
TOR Mini IR - Laser pointer Steiner - Free user manual and instructions
Find the device manual for free TOR Mini IR Steiner in PDF.


| Product Type | Infrared Laser Pointer |
| Brand | Steiner |
| Model | TOR Mini IR |
| Laser Class | Class 3R or 3B (IR) |
| Wavelength | Approximately 850 nm or 940 nm (IR) |
| Power Output | Below 5 mW (typical for IR pointers) |
| Dimensions (approx.) | Length: 100 mm, Diameter: 15 mm |
| Weight | Approximately 30 g (excluding batteries) |
| Power Source | 2x AAA batteries or 1x CR123A lithium battery |
| Battery Life | Up to 20 hours continuous use (with fresh alkaline batteries) |
| Activation | Momentary push button switch (on while pressed) |
| Body Material | Aluminum alloy with matte anodized finish |
| Housing Material | Hardened aluminum, rubber grip |
| Water Resistance | IPX4 (splash resistant) |
| Operating Temperature | -10°C to 50°C |
| Storage Temperature | -20°C to 60°C |
| Beam Visibility | Invisible to naked eye; requires IR night vision equipment |
| Application | Military, tactical, or outdoor use with night vision devices |
| Mounting | Picatinny / Weaver rail mount compatible |
| Maintenance | Clean lens with soft cloth; replace batteries as needed |
| Spare Parts | Battery cover, lens cap (if available) |
| Repairability | Non-serviceable; replace device if defective |
| Safety Warnings | Keep away from eyes; avoid prolonged exposure; not a toy |
| Warranty | Limited manufacturer warranty (see manual) |
Frequently Asked Questions - TOR Mini IR Steiner
User questions about TOR Mini IR Steiner
0 question about this device. Answer the ones you know or ask your own.
Ask a new question about this device
Download the instructions for your Laser pointer in PDF format for free! Find your manual TOR Mini IR - Steiner and take your electronic device back in hand. On this page are published all the documents necessary for the use of your device. TOR Mini IR by Steiner.
USER MANUAL TOR Mini IR Steiner
natural_image
Black STEINER device with mesh grille and button, no visible text or symbols on bodyTOR Mini IR
Welcome to the TOR Mini IR weapon-mounted infrared laser pointer! Use with a night vision device to get spot-on accuracy at night or in no-light conditions.
Features
• Rugged military-grade aluminum housing
- Left/right pressure pads
• Auto-on function when drawn
- Adjustable laser power
- Water resistant
This powerful weapon-mounted laser ensures Nothing Escapes You!
TOR Mini IR At-A-Glance
| Feature Description | |
| Activation Options M | multiple modes of laser output power |
| Housing Durable, Hard | Anodized Machined Aluminum Housing and Rail Mount |
| Color Black | |
| Adjustable Windage | and Elevation Laser Brightness |
| Mounting Rail Mount | |
| Battery Type 1/3N | |
| Environmental Conditions | Water resistant Dust Proof |
| Part Numbers 7009 |
Included with your purchase of a TOR Mini IR:
- One 1/3N battery
- 5/64 Allen wrench
- Caution and aperture labels
- User guide
Important Warnings
Failure to read and follow these operating instructions and warnings may result in serious injury, damage to property, or death.
Firearm Safety
Prior to installing the TOR Mini IR, ensure the firearm is unloaded and the magazine is removed.
Always follow these safety rules when handling a firearm:
• Always treat a firearm as if it were loaded.
- Store your firearm so that children cannot gain access to it.
- Always point the gun in a safe direction, away from anything you do not want to destroy.
- Keep your finger off the trigger until you are ready to fire.
- Be aware of your surroundings, target and what is beyond.
Laser Safety Precautions
The TOR Mini IR has a Class 3R infrared laser. Avoid exposure to the invisible laser beam.
CAUTION: The TOR Mini IR contains an Class 3R laser capable of causing permanent eye injury.
• DO NOT stare into the laser beam.
- DO NOT look into the laser beam through binoculars or telescopes.
• DO NOT point the laser beam at mirror-like surfaces.
• DO NOT shine the laser beam into other individual's eyes.
Caution Label

Aperture Label

Battery Warning
WARNING: FIRE, EXPLOSION, BURN HAZARD
The TOR Mini IR is powered by one 1/3N battery.
The following safety precautions apply when handling lithium batteries:
- DO NOT short circuit, puncture, or disassemble a battery.
- DO NOT attempt to recharge a battery.
- NEVER dispose of batteries in a fire, or in any way expose batteries to excessive heat.
- Batteries may explode if disassembled, crushed, recharged, or exposed to high temperatures.
- Prior to use, inspect all batteries for cracks, leakage, or bulging.
- NEVER install a defective battery in the TOR Mini IR.
- Store batteries at room temperature.
• Refer to applicable federal, state, and local laws and regulations for proper disposal of the batteries.
Getting Started
| TOR Mini IR Laser Specifications | |
| Center Wavelength 830 nm +/-10 | |
| Beam Dot Size 0.50 inches at 50 feet | |
| Maximum Power Output Laser: <0.7 mW | |
| Weight (with battery) 2.12 oz. (60.0 g) | |
| Size | 2.1 x 1.3 x 1.2 in.(5.3 x 3.3 x 3.0 cm) |
Battery Installation
Follow all firearm safety precautions before installing the battery.
- Unscrew the battery cap.
- Place a new battery into the unit with the negative terminal (-) in first.
- Using a coin or your fingers, firmly tighten down the battery cap.

Low Battery Indication
When the battery gets low, the TOR Mini IR's laser will step down in power and slowly flash before turning off completely. Replace the battery when this occurs.
Rail Mounting
IMPORTANT: Unload the firearm and remove the magazine before mounting the TOR Mini.
The rail mount on the TOR Mini will fit pistols that have a Picatinny or Weaver style rail forward of the trigger guard.
Follow these steps to mount the TOR Mini to the rail:
- Using a flathead screwdriver, fully loosen the captive screws.
- Pull back the clamp bar.
- Position the rail bar to fit the weapon's rail.
- Once the best rail position is found, ensure the rail bar pins are inserted in the clamp bar in your preferred position. There are 6 rail positions to choose from.
- Tighten down the screws until snug.
Operating the TOR Mini IR
Always operate the TOR Mini IR with the mount facing up. A night vision device is required to see the infrared laser.
Turn On
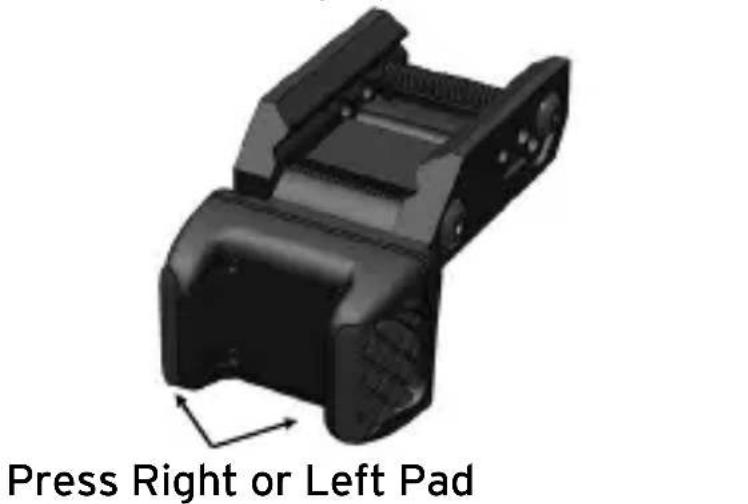
- Press right or left pressure pad to turn the laser on.
Turn Off
- Press and release right or left pressure pad to turn the laser off.
Note: If the TOR Mini IR laser is left on, it will shut off automatically after 5 minutes to conserve battery power.
Adjust brightness
- Press and hold right or left pressure pad. The TOR Mini IR cycles through low, medium, and high brightness.
- Release the pressure pad when the brightness level you want is reached.
The TOR Mini IR will remember the setting even if the batteries are removed and replaced.

natural_image
3D rendered mechanical component with directional arrows indicating movement or force (no text or symbols)Press Right or Left Pad to Adjust Brightness
Windage and Elevation Adjustment
The TOR Mini IR is pre-sighted at the factory. It may not be necessary for you to adjust the factory settings.
However, differences in the alignment of your handgun's rail to its bore can result in the laser aim point being off target. Verify the boresight and adjust, if necessary, every time the TOR Mini IR is mounted to a weapon.
The TOR Mini IR has one screw for windage adjustment and one screw for elevation adjustment. Use the 5/64 Allen wrench provided in the box to make adjustments.
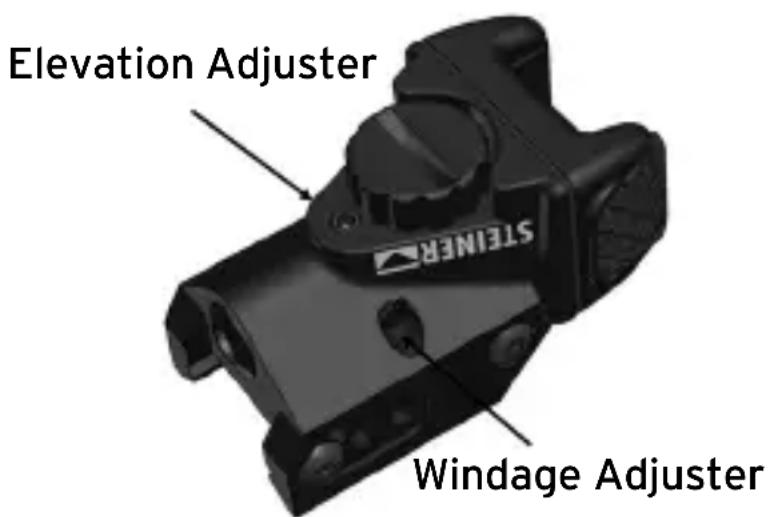
Adjust the laser beam using windage and elevation screws
- To move the beam spot down, turn the elevation screw clockwise.
- To move the beam spot up, turn the elevation screw counterclockwise.
- To move the beam spot to the right, turn the windage screw clockwise.
- To move the beam spot to the left, turn the windage screw counterclockwise.
DO NOT over-torque the screws. It can damage the internal laser module.
When the laser spot cannot move further, stop turning the adjustment screw.
Turn on Auto On
The TOR Mini IR can be set to turn on automatically when you raise or draw your weapon. This mode is ideal for training.
With the TOR Mini IR mount facing UP, do the following:
-
Turn the TOR Mini IR on using the right or left pressure pad.
-
Within 5 seconds, fully press and release the activation pads in this pattern:
Left - Right - Left - Right
- If you take more than 5 seconds to press the pressure pads in this order, the Auto On feature will not work. - After the sequence is completed, the TOR Mini IR flashes to indicate that the Auto On feature is activated.
-
Turn the unit off using the right or left pressure pad.
-
Point the TOR Mini IR at the ground (if weapon-mounted, point the muzzle straight at the ground). Keep the TOR Mini IR in this position for more than 1 second. This is the INACTIVE ZONE.
-
Raise the TOR Mini IR or your weapon to a shooting position. The laser displays. This is the ACTIVE ZONE.
If the TOR Mini IR goes untouched for more than 10 minutes, the Auto On feature is disabled to conserve battery life.
To turn off the Auto-On feature, with the TOR Mini IR ON and mount facing UP, do the following:
-
Turn the TOR Mini IR on using the right or left pressure pad.
-
Within 5 seconds, fully press and release the activation pads in this pattern:
Left - Right - Left - Right
- After the pads are pressed, the TOR Mini IR flashes to indicate that the Auto On feature is deactivated.
Mount Facing Up or Rail Mounted
Maintenance
- Never use strong cleaning fluid or solvents.
- Do not use liquid cleaners inside the battery compartment.
- Keep the lens of the laser clean. Clean with alcohol and a cotton swab. A dirty lens will affect beam quality.
- ALWAYS remove the TOR Mini IR before cleaning your weapon.
Warranty and Repair
Steiner Optics, Inc. warrants its products against defects in workmanship and materials for a period of two years from the date of purchase. Warranty is void if the product has been abused, misused, neglected, or disassembled prior to the return to the manufacturer.
This warranty does not cover loss, theft, deliberate damage, or cosmetic damage that does not hinder the performance of the product.
If you are experiencing any problems with your Steiner TOR product, please first review the manual for tips and information.
To return the TOR Mini for repair, please contact Steiner Optics at www.steiner-optics.com.
STEINER

Nothing Escapes You
Steiner Optics
881 East 8th St.
Greeley, CO 80631
Tel: (888) 550-6255
www.steiner-optics.com

- TOR Mini IR
- Features
- TOR Mini IR At-A-Glance
- Important Warnings
- Firearm Safety
- Laser Safety Precautions
- CAUTION: The TOR Mini IR contains an Class 3R laser capable of causing permanent eye injury.
- Caution Label
- Aperture Label
- Battery Warning
- Getting Started
- Battery Installation
- Low Battery Indication
- Rail Mounting
- Operating the TOR Mini IR
- Turn On
- Turn Off
- Adjust brightness
- Windage and Elevation Adjustment
- Adjust the laser beam using windage and elevation screws
- Turn on Auto On
- With the TOR Mini IR mount facing UP, do the following:
- Left - Right - Left - Right
- To turn off the Auto-On feature, with the TOR Mini IR ON and mount facing UP, do the following:
- Maintenance
- Warranty and Repair
- STEINER
Brand : Steiner
Model : TOR Mini IR
Category : Laser pointer