R80 - Telescope iOptron - Free user manual and instructions
Find the device manual for free R80 iOptron in PDF.


| Type of Product | Refractor Telescope |
| Model | iOptron R80 (SmartStar Cube-G 8802) |
| Optical Design | Achromatic Refractor |
| Clear Aperture | 80 mm |
| Focal Length | 400 mm |
| Focal Ratio | f/5 |
| Mount Type | Alt-Azimuth (GoToNova) |
| Motor Drive | Dual-Axis DC Servo with encoders |
| Slew Speeds | 5 speeds: 2x, 8x, 64x, 256x, MAX (4°/sec) |
| Object Database | Over 50,000 celestial objects |
| GPS | 32-channel GPS module for automatic time/location sync |
| Hand Controller | GoToNova 8402G with 8-line LCD, USB port, red LED light |
| Power Source | 8 AA batteries (not included) or AC adapter (included) |
| Power Requirement | DC 12V ±2V, >1.2A |
| Operating Temperature | 0°C to 40°C |
| Optical Tube Weight | 2.2 lbs (1 kg) |
| Mount with Tripod Weight | 5.5 lbs (2.5 kg) without OTA |
| Payload Capacity | 7 lbs (3.2 kg) |
| Included Eyepieces | 10 mm and 25 mm |
| Included Accessories | 3x Barlow lens, 45° diagonal, tripod, tray, USB cable |
| Cleaning Instructions | Use distilled water/isopropyl alcohol solution for optics; avoid solvents |
| Safety Warning | Never look at the Sun through telescope; instant eye damage |
| Warranty | One year limited warranty (USA/Canada only) |
Frequently Asked Questions - R80 iOptron
User questions about R80 iOptron
0 question about this device. Answer the ones you know or ask your own.
Ask a new question about this device
Download the instructions for your Telescope in PDF format for free! Find your manual R80 - iOptron and take your electronic device back in hand. On this page are published all the documents necessary for the use of your device. R80 by iOptron.
USER MANUAL R80 iOptron
natural_image
Blue iXtron telescope mounted on a tripod, showing its blue body and optical components (no text or symbols visible)
SmartStar ^® Cube ^TM -G Series
Mount and Telescopes
(For 8800, 8802, 8803 and 8804)
Instruction Manual
Table of Content
Table of Content....2
- SmarStar ^® Cube ^TM -G Series Overview 4
1.1. SmartStar ^® Cube ^TM -G Series Features.... 4
1.2. Assembly Terms....6
-
Telescope Assembly 7
-
GoToNova ^® 8402G Hand Controller 10
3.1.Key Description....10
3.2. The LCD Screen 11
- Getting Started 12
4.1.Level and Align the Mount 12
4.1.1. Level the Mount.... 12
4.1.2. Initial Positions 12
4.2. Setting Up the Mount 12
4.2.1. Set Up Time and Site 13
4.2.2. Using your telescope.... 14
4.2.3. Go to the Moon 15
4.2.4. Initial Star Alignment 15
4.3. Turn Off the Mount.... 16
- Use SmartStar ^® Cube ^TM -G Telescopes.... 17
5.1. Manual Operation of a Telescope.... 17
5.2. Slew to an Object....17
5.2.1. Planets, Sun, Moon 17
5.2.2. Deep Sky Objects 17
5.2.3. Comets....17
5.2.4. Asteroids 18
5.2.5. Stars.... 18
5.2.6.User Objects 18
5.2.7. Enter Position.... 18
5.2.8. Watch List 18
5.2.9. Watch List Auto 18
5.3. Land Objects....18
5.4. Sync to Target 20
5.5. Electric Focuser 21
5.6. Set Up Controller 21
5.6.1. Set Up Time and Site 21
5.6.2. Set Display Info 21
5.6.3. Set Key Beep 21
5.6.4. Reset All....21
5.6.5. Update Firmware....22
5.7. Align....22
5.7.1. Easy One Star Align....22
5.7.2. One Star Align....22
5.7.3. Two Star Alignment....22
5.8.User Object List 22
5.8.1. R.A. and DEC....23
5.8.2. Comets.... 25
5.8.3. Asteroids 26
5.9. Watch List....26
5.10. Set Telescope Coord....27
5.11. Park Scope 27
- Maintenance and Servicing 28
6.1. Maintenance 28
6.2. Storage and Transport 28
6.3. Troubleshooting 29
6.4.iOptron Customer Service 30
Appendix A. Technical Specifications.... 31
Appendix B. GoToNova® 8402G HC MENU STRUCTURE 32
Appendix C. GoToNova ^® Star List.... 34
Appendix D. Set Up USB-PC Connection 40
Appendix E. Firmware Upgrade 44
Appendix F. Use a PC to Control an iOptron Mount......47
IOPTRON ONE YEAR LIMITED WARRANTY 48

WARNING!
NEVER USE A TELESCOPE TO LOOK AT THE SUN!
Looking at or near the Sun will cause instant and irreversible damage to your eye.
Children should always have adult supervision while observing.
1. SmarStar ^® Cube ^TM -G Series Overview
1.1. SmartStar ^® Cube ^TM -G Series Features
Alt-Azimuth Mount— The Cube ^TM
The SmartStar ^® Cube ^TM -G series come with our patented Alt-Azimuth (AltAzi) mount, a.k.a. The Cube ^TM . This compact mount design is probably the most functional and flexible unit on the market. It was named “Hot Product 2008” by Sky and Telescope. Both axis motors are built into a small single unit with optical encoders which provides accurate GOTO and tracking. The mount is universally compatible with all telescopes using a dove-tail connection. In addition, there are no “dead spots” – so you can point your telescope to ANYWHERE above the horizon, whereas, other mounts block the telescope tube at certain points of rotation. This mount also comes standard with AC connection. An optional DC adaptor is available so you can plug your telescope mount into your car if you’re camping or at any remote location.
32-Channel GPS Module
All G-series telescopes come standard with a 32-channel GPS module for fully automated operation. Simply turn on the GoToNova® Hand Controller and the GPS module will automatically synchronize your telescope location and time with the GoToNova® computerized control system. View celestial objects without having to manually punch in the date, time, latitude or longitude.
GoToNova® Computerized Control System
The revolutionary GoToNova® computerized control system is by far the most technologically advanced automated tracking system available on the market today. With a database over 50,000 celestial objects, including all of the most famous galaxies, nebulae, star clusters, not to mention the planets, you'll be able to enjoy star gazing with the simple push of a button.
The easy to understand controller on the market
The GoToNova ^® hand controller is much easier to use than other similar products. The hand controller is more intuitive with menu categories better organized. It also has a larger LCD screen with more lines of content compared with the competition. Using the easy-to-use hand controller and its large LCD screen, you can easily set up your telescope and select where you want to go.
More precise speed control for viewing objects
The control system also allows you to slew the telescope at 5 different drive speeds, keeping the object within the telescope's viewfinder for as long as you wish.
Compatible with many OTAs
Most light weight (<7 lbs) Optical Tube Assemblies (OTAs) with dovetail connection should be compatible with the SmartStar® Cube™-G GOTO AltAzi mount. If you do not have a dovetail connection -- attach your OTA using mounting rings and dovetail available at your local telescope store or the OTA manufacturer. Contact iOptron for expert's advice on compatibility issues.
USB Port
The 8402 hand controller comes with a USB port that tremendously expands the functionalities of the already powerful system. With the USB2COM driver installed, the USB port works as an RS232 serial port. It supports firmware upgrades and computer control. With ASCOM protocol, you can control your telescope with most ASCOM compatible software. This enables you to utilize the CPU, large screen, and disk space of your PC/laptop. With a wide selection of software, your star gazing experience will never be the same again.
Package Contents ^1
(1) SmartStar ^® Cube ^TM -G Mount with built-in GPS receiver (Models 8800, 8802, 8803 and 8804)
(1) GoToNova ^® Hand Controller (Part No. 8402G)
(1) Controller Cable
(1) USB Cable
(1) Tripod
(1) Tripod bolt and Tray Lock
(1) Tripod Tray
(1) AC adapter with cord
For Model 8802 (SmartStar ^® Cube ^TM -G R80)
(1) 80mm Refractor Telescope
(2) Eyepieces (10mm & 25mm)
(1) 3X Barlow Lens
(1) 45^ Diagonal
For Model 8803 (SmartStar ^® Cube ^TM -G N114)
(1) 114mm Newtonian Reflector Telescope
(2) Eyepieces (10mm & 25mm)
(1) Red Dot Finderscope
For Model 8804 (SmartStar® Cube™-G MC90)
(1) 90mm Maksutov-Cassegrain Reflector Telescope
(2) Eyepieces (10mm & 25mm)
(1) Red Dot Finderscope
(1) 45^ Diagonal
1.2. Assembly Terms
- Telescope tube
- Dovetail lock
- Hand controller
- Altitude lock
- Mount
- Tripod
- Tripod bolt
- Tray
- Tray lock
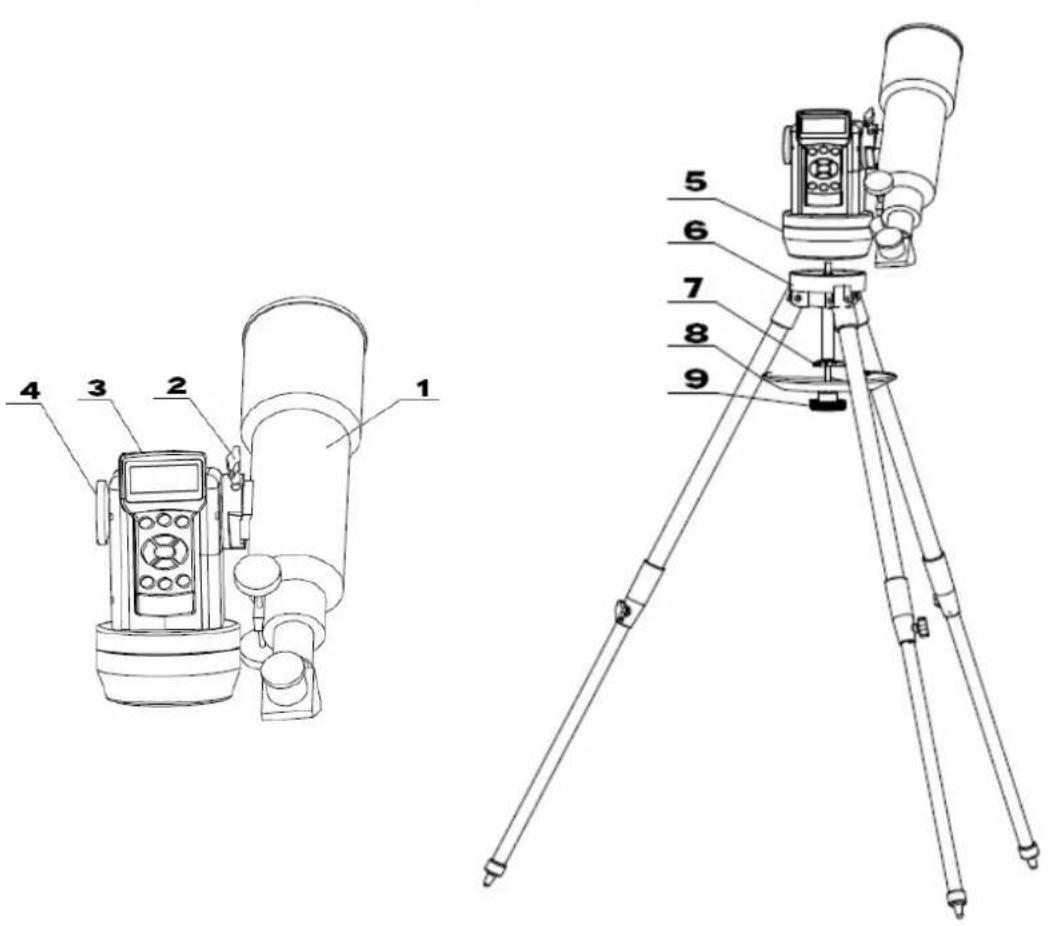
2. Telescope Assembly
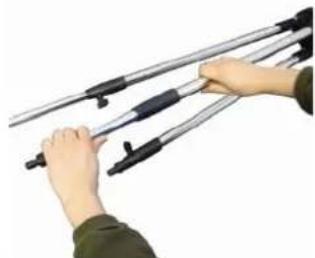 | Step 1. Preparing the Tripod Extend tripod legs to full extension. |
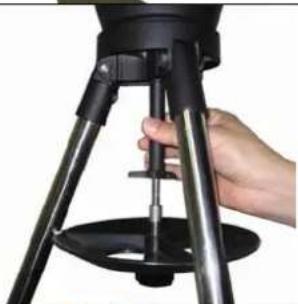 | Step 2. Attaching the Mount Attach mount to tripod using the long bolt (#7). Slide tray on bottom of shaft. Then screw on round black knob (#9). |
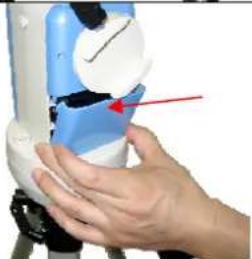 | Step 3a. Installing Batteries (not included) Note: you may use 8 AA batteries (Step 3) or the AC adaptor (Step 5) to operate the mount.Pull the batteries compartment cover (shown) open.Gently pull the batteries holder (shown next) out of the compartment to avoid breaking the attached wires. |
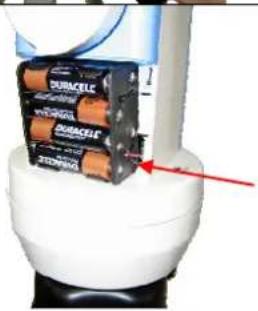 | Step 3b. Insert 8 AA batteries (not included) according to the diagrams on the holder. Refer to the diagram on the holder to orient the batteries properly. Replace the holder back into the batteries compartment and replace the cover.For reference: the battery pack fits in with wires on the bottom right (See arrow in photo). Use only fresh batteries. Using/mixing old or low batteries may cause error messages.Optional AC Adapter and Car Charger accessories are available atwww.ioptron.com |
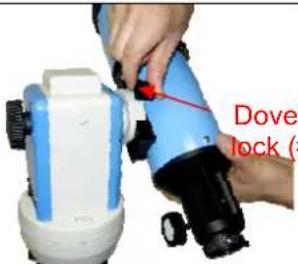 | Step 4. Attaching Telescope Attach telescope to mount using the dovetail lock knob (#2). tail (Picture shows 80mm refractor. However all scopes will attach in the same manner.) |
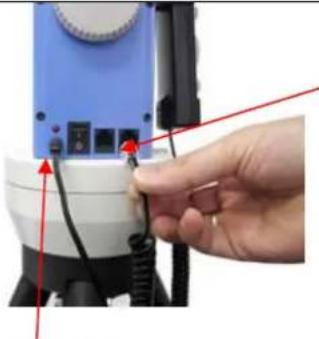 Plug in AC adaptor here Plug in AC adaptor here | Step 5. Plug in hand controller and AC adaptor. Plug hand controller into either one of the two HBX ports on the mount. Next plug in AC adaptor. (Or use batteries—see step 3). Turn on power (the red light should go on). At this point you can begin observing manually. Use the 4 Arrow keys (▲▼◀▶) to rotate the scope Up, Down, Left, and Right. Use the SPEED key to change the slew rate from the slowest (2X) to the fastest (MAX). The other HBX is reserved for accessories, such as external GPS module, electronic focuser or laser pointer. DO NOT plug non-iOptron accessories into the unit to avoid damaging the mount or accessories. |
| For 80mm Refractor (#8802) | |
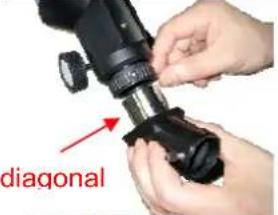 45° 45° 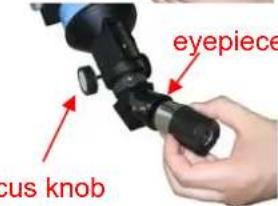 Fo Fo | Insert 45° diagonal: Insert the diagonal into the eyepiece side of the telescope. Tighten the thumbscrews to a firm feel only. Insert the eyepiece: Slide the eyepiece into the open end of the diagonal. Tighten the thumbscrews to a firm feel only. Remove the dust cover from the other end of optical tube assembly. Use the focus knob to bring objects into focus. You may need to turn the focus knob quite a few turns to focus your telescope for the first time. Always start observing using a low power eyepiece (such as a 25mm eyepiece) to get a nice wide field of view. Later you can change to high power if so desired. Higher powered eyepieces have a much narrower field of view. So it's more difficult to initially locate objects using higher powered eyepieces. |
| For 114mm Newtonian (#8803) | |
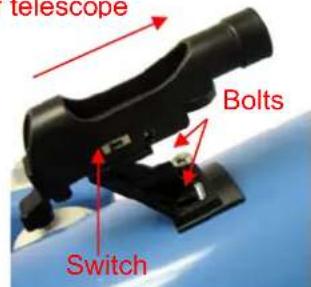 | Attach the red dot finder scope to the telescope tube (#1): First remove the two washers on the tube. Then place the finder scope onto the two bolts and re-attach the washers securely. The finder scope should face towards the open end of the tube (see arrow in diagram). Turn on the beam using the switch on the side. (note: you may need to remove the plastic insulation placed next to the battery underneath) |
| For 90mm Maksutov-Cassegrain (#8804) | |
D 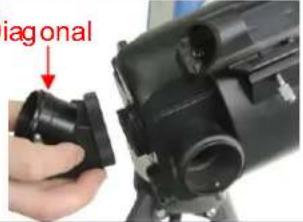 | Install Diagonal by screwing it onto the back end of the scope. You can adjust the position of the diagonal by loosening the free-spinning threader on the diagonal. |
For 80mm Refractor (#8802)
For 90mm Maksutov-Cassegrain (#8804)
| Flip switch | 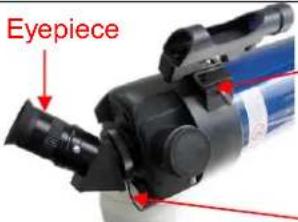 | Install the Finderscope by sliding the dovetail plate onto the sleeve (see arrow) and tightening the side screw.The eyepiece can be placed on the end of the scope or on the side (see next step). Secure the eyepiece using the side screw.Use the focus knob to adjust the focus. |
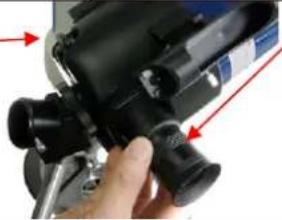 | This picture shows the eyepiece on the side. Remove the protective cap to insert the eyepiece. The diagonal is not used for side viewing.Use the flip switch to flip the internal mirror to view from the side or the end of the scope. |
3. GoToNova® 8402G Hand Controller
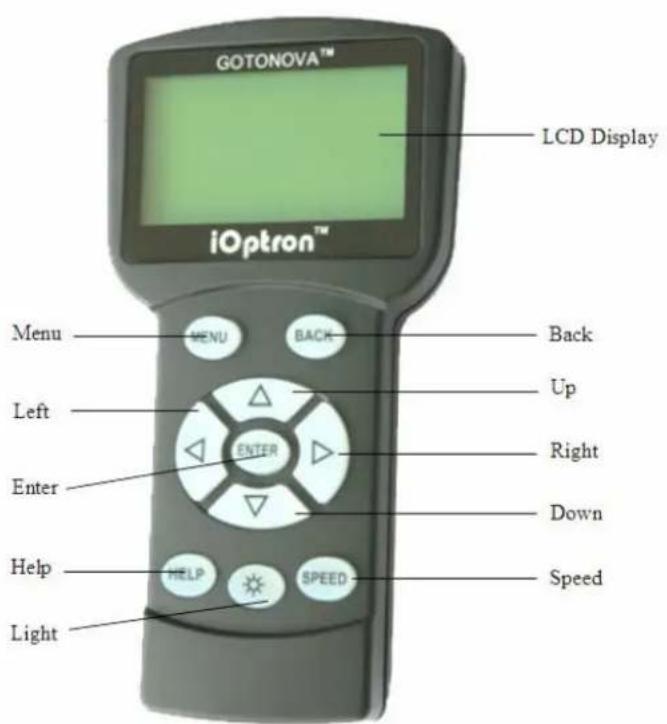
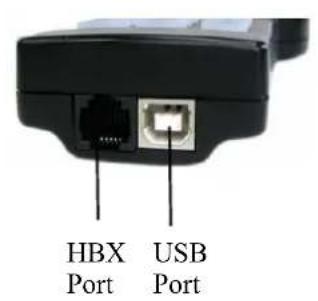
Figure 1. GoToNova 8402 Hand Controller
GoToNova® 8402G hand controller (HC) is the standard controller for a SmartStar® Cube-G series mount and telescope, as shown in Figure 1.
3.1. Key Description
- MENU: Press "MENU" to enter the Main Menu.
- BACK: Move back to the previous screen, or end/cancel current operation, such as slewing.
- ENTER: Confirm an input, go to the next menu, select a choice, slew the telescope to a selected object, or stop/start tracking.
- Arrow (▲▼▶◀): Press ▲▼ buttons to move a telescope along the altitude direction, ▶◀ to move a telescope along the azimuth direction. Brows the menu or move the cursor in operating menu.
- SPEED Key: To select slew speed (2X, 8X, 64X, 256X, and MAX)
• Light Key(☀): Turns on/off the red LED reading light on the back of the controller. - HELP Key: Display the definition of some terms.
- HBX (handbox) port: connect the HC to SmartStar mount using a 6-wire RJ11 cable.
- USB port: connect the HC to a Computer via a USB cable.
3.2. The LCD Screen
The 8402G HC consists of a large 8-line LCD screen, which displays all the information as shown in Figure 2. The user interface is simple and easy to learn.
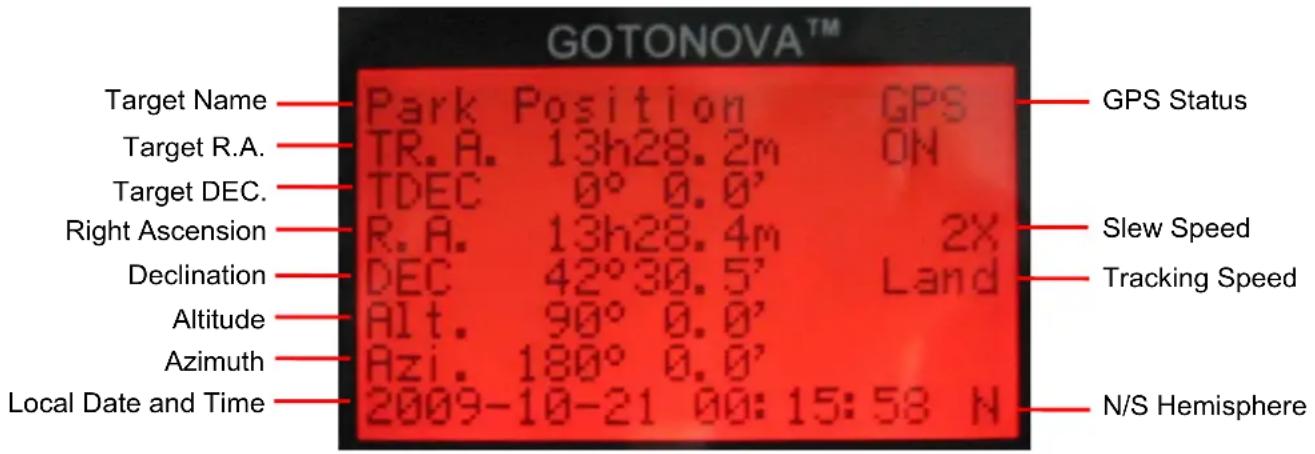
Figure 2. 8402G HC LCD Information Screen
-
Target Name: display the name of the target that telescope is currently point to.
-
Park Position: A default position when the mount is turned on, i.e., the telescope is point to zenith (altitude is 90°) and the mount is facing south (azimuth is 180°);
-
An object name, such as "Mercury" or "Andromeda Galaxy": Name of the celestial object or land target that is currently slewing, gotoing, observing or tracking;
-
GPS Status: when the power is turned on, it shows "GPS ON", which means a GPS receiver is connected. When the GPS receiver finds the satellite and receives GPS signal, it shows "GPS OK". The "GPS OK" may turn off after few minutes.
- Slew speed: It has 5 speeds: 2X, 8X, 64X, 256X(1°/sec), MAX(4°/sec). Press SPEED key to change it.
- Tracking speed: display current operation mode of the mount
- Land: the mount is operating at a land mode.
- Cel., Sol. or Lun.: the mount is tracking an celestial object at Sidereal, Solar or Lunar speed.
- Altitude of the telescope (zenith is 90°).
- Azimuth of the telescope (north is 0^ , east 90^ , south 180^ , and west 270^ ).
- Local Date and Time: display local time in a format of YYYY-MM-DD HH:MM:SS.
- N/S Hemisphere: display the observation hemisphere.
4. Getting Started
In order to experience the full GOTO capability of GoToNova technology, it is very important to set up the mount correctly before observation.
4.1. Level and Align the Mount
Leveling is critical for a good GOTO and tracking accuracy.
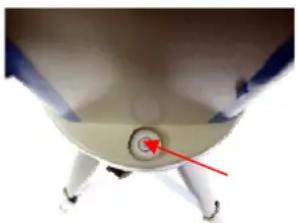
Level the mount by observing the bubble (shown) on the base of the mount by adjusting tripod legs. The bubble should be in the center of the circle. It is also recommended to use additional levelers (such as a torpedo leveler) to assure precise leveling. Turn the mount around by pressing ▶ or ◀ button to make sure it is always leveled.
natural_image
Close-up of a white spherical object with a red arrow pointing to a circular feature, possibly a button or knob (no text or symbols visible)4.1.2. Initial Positions
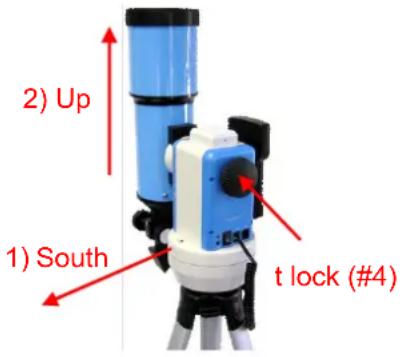
Each time the mount is turned on, the default position is Park Position, i.e., its altitude is 90^0.0' and azimuth is 180^0.0' , which means the “SOUTH” mark is pointing to south and the telescope is pointing straight up at the zenith. To set the Park Position, you can:
- Align the mount to south by turning the mount so that the South mark facing south. An additional compass is needed. Unlock the altitude lock (#4) and rotate the telescope to point straight up at the Zenith. A torpedo level may help. Make sure the mount is leveled. Then turn the mount power on.
or
- Turn the mount power on. Press the SPEED button to select a slew speed (MAX for fast slew and 2X for fine tuning). Turn the SOUTH mark pointing to south using ▶ or ◀ button. An additional compass may be needed. Rotate the telescope point to the zenith using ▲ or ▼ button. A torpedo level may help. Then turn the mount power off and turn it on. Or you can press MENU, scroll down to "Set Telescope Coord.", press ENTER. The default number is "Alt: 90°00.0' and Azi: 180°00.0"'. Press ENTER to complete the initialization.
4.2. Setting Up the Mount
A SmartStar Cube-G is equipped with a GPS receiver, which will receive the local time, longitude and latitude information from a satellite after the link is established. However, manual input is still needed for time zone and Daylight Saving setting.
A clear sky outside is needed for GPS to communicate well with the satellites.
4.2.1. Set Up Time and Site
Press MENU button, from the main menu, scroll down and select "Set up controller"
Select and slew
Land Objects
Sync. to target
Electronic focuser
Set up controller
Align
User Object List
Watch List
Press ENTER. Select "Set Up Time and Site"
Set Up Time and Site
Set Display Info
Set Key Beep
Reset All
Upgrade Firmware
Press ENTER. The "Set Local Time" screen will show:
Set Local Time:
2009-06-01 11:55:09
300 Min. behind UT
Daylight Time Saving √
The local time will be updated when the GPS picks up satellite signals. If for any reason your GPS can't pick up a signal you can manually enter the time. Press ◀ or ▶ key to move the cursor and using ▲ or ▼ key to change the number.
Press ◀ or ▶ key, move the cursor to the line below time info to set the time zone information (add or subtract 60 minutes per time zone). Enter minutes “ahead of” or “behind” UT (universal time).
- New York City is 300 minutes "behind" UT
- Los Angeles is 480 minutes "behind" UT
- Rome is 60 minutes "ahead of" UT
- Beijing is 480 minutes "ahead of" UT
- Sydney is 600 minutes "ahead of" UT
All the time zones in North America are behind UT (universal time), as shown in the following table. So make sure it shows “behind” instead of “ahead of” UT.
| Time Zone | Hawaii | Alaska | Pacific | Mountain | Central | Eastern |
| Hour behind UT -10 | -9 -8 -7 | -6 | -5 | |||
| Enter Minutes 600 | 540 480 | 420 | 360 | 300 |
To adjust minutes, move the cursor to each digit and use the n▲ or ▼ key to change the number. To change the “behind” or “ahead of” UT, move the cursor to “ahead of” and using ▲ or ▼ key to toggle between “behind” and “ahead of”. For other parts of the world, you can find out your “time zone” information from internet, such as http://www.timeanddate.com/worldclock/. DO NOT COUNT DAYLIGHT SAVING TIME.
To set daylight saving time, use the ◀ or ▶ key to move the cursor to the bottom of the screen, use ▲ or ▼ button to toggle the Daylight Time Saving between X, which means "No" and √, which means (Yes).
When the number is correct, press ENTER and go to "Setup Site Info" screen:
Set up site info:
Longitude:
W071d27m47s
Latitude:
N42d15m40s
The longitude and latitude coordinates will be updated when the GPS picks up satellite signals. "W/E" means west/east hemisphere; "N/S" means north/south hemisphere; "d" means degree; "m" means minute; and "s" means second.
If for any reason your GPS can't pick up a signal you can manually enter the GPS coordinates. Press ◀ or ▶ key to move the cursor and using ▲ or ▼ key to toggle between "W" and "E", "N" and "S", or to change the numbers. It is always a good idea to do your home work to get the GPS coordinates before traveling to a new observation site.
The site coordinates information can be found from internet, such as GPSVisualizer (http://www.gpsvisualizer.com/geocode), by entering the city name or address. In case you only find the site information in decimal format you can convert them into d:m:s format by multiplying the decimal numbers by 60. For example, N47.53 can be changed to N47°31'48": 47.53° = 47° +0.53°, 0.53°=0.53x60'=31.8', 0.8'=0.8x60"=48". Therefore, 47.53°=47°31'48" or 47d31m48s. Same as N47°31.8': 31.8'=31'+0.8', 0.8'=0.8x60"=48".
4.2.2. Using your telescope
Selecting an Eyepiece:
- Always begin viewing with the lowest power eyepiece. (Note: a 25 mm focal length eyepiece has a lower power than a 10 mm one.) A formula can be used to determine the power of each eyepiece: Telescope focal length divided by eyepiece focal length equals magnification. Ex. 400mm ÷ 25mm = 16X (magnification). The rule of thumb is that the magnification should not be too much larger than the OTA aperture, otherwise view and color distortion may occur.
- A 45° Erecting Diagonal Prism is included in the R80 or MC90 telescope. The Erecting Diagonal Prism is used to erect the image you will see. Astronomical telescopes are designed in such a way that the image you see may be UPSIDE DOWN and REVERSED. This is perfect for viewing celestial bodies. However, it will feel strange when observing a land object or a bird.
Focusing Telescope:
- After selecting the desired eyepiece aim the telescope tube at a land-based target at least 200 yards away (e.g. A telephone pole or building). Fully extend focusing tube by turning the focus knob.
- While looking through selected eyepiece, slowly retract focusing tube by turning focusing knob until object comes into focus.
Aligning Finderscope:
- Look through main telescope tube and establish a well-defined target (see focusing telescope section). Tighten all lock knobs (Declination, Latitude, Right Ascension, Horizontal Axis) so that telescope's aim is not disturbed.
- Turn on the red dot finder and look through the finder window. Adjust the red dot alignment screws to center the red dot on the object.
- Now, objects located with the finderscope first will be centered in field of view of the main telescope.
4.2.3. Go to the Moon
After performing these setups, the mount is ready to GOTO and track objects. The most common object will be the Moon.
Press MENU button, select "Select and Slew" by press ENTER button. Select "Planets, Sun, Moon", and using ▲ or ▼ button to select Moon. Press ENTER. The telescope will automatically slew to the Moon and lock on. It will automatically begin to track once it locks on to it. Use the arrow keys to center the Moon in your eyepiece, if it is not centered. Press BACK key to stop GOTO during the slew. Press ENTER key to stop the tracking.
4.2.4. Initial Star Alignment
A simple alignment/synchronization can be performed to improve the GOTO and tracking accuracy. To do so, press MENU button, scroll down to "Align", select "Easy One Star Align" and press ENTER. A list of three bright objects, such as Moon, Venus, and other stars, will be displayed for you to select from. Select an object using ▲ or ▼ key. Then press ENTER. Use ◀▶▲ or ▼ key to center the object in your eyepiece. Press SPEED button to change the slew speed if needed. Then press ENTER to complete the alignment. Or press the BACK key to cancel the process.
An alternate way is performing "Sync to Target". To do so, press MENU button, select "Select and Slew" and press ENTER. Then select a known sky object, such as Moon from "Planets, Sun, Moon" menu and press ENTER. The mount will slew to the Moon. When the mount stopped slewing, the Moon could be just inside your eyepiece or way off. Press MENU button and scroll down the menu to "Sync to Target" and press ENTER. Follow the instruction, use ◀▶▲ and ▼ keys to move the Moon in the center of your eyepiece and press ENTER.
4.3. Turn Off the Mount
When finishing observing, always move the mount to Park Position. If the mount is not moved, no initial set up is needed when powered on the next time. To do so, press the MENU button, scroll down to "Park Telescope" and press ENTER. Turn the power off.
5. Use SmartStar ^® Cube ^TM -G Telescopes
5.1. Manual Operation of a Telescope
You may observe land and astronomical objects using GoToNova's arrow keys.
After the telescope was assembled (referring to Section 2. Telescope Assembly), flip the I/O switch on the telescope mount to turn on the mount. Use ▶,◀,▼ or ▲ buttons to point the telescope to desired object. You may need using SPEED key to change the slewing speed.
5.2. Slew to an Object
Press MENU button, from the main menu, select "Select and Slew." Select an object you would like to observe and press ENTER key.
The GoToNova ^® 8402G hand controller has a database consists of over 50,000 objects. Use ▶ or ◀ button to move the cursor and ▼ or ▲ button to change the number. A check mark “√” indicates the object is above the horizon, and cross mark “X” means it is below the horizon. Only those objects above the horizon can be observed. In some catalogs, those stars below the horizon may not display.
5.2.1. Planets, Sun, Moon
There are 9 objects in Solar system.
5.2.2. Deep Sky Objects
This menu includes objects outside our Solar system such as galaxies, star clusters, quasars, nebulae.
- Named Deepsky Objects: It consists of 60 deep sky objects with their common names. More information will be available by pressing HELP key. A list of named deep sky objects is also attached in Appendix C.
- Messier Catalog: It consists of all 110 objects in Messier catalog. More information will be available by pressing HELP key.
- NGC IC Catalog: consists of 7840 objects in NGC catalog and 5386 objects in IC catalog. To select an object from NGC or IC catalog, move the cursor to NGC, using ▲ or ▼ button to toggle between NGC and IC. Then move the cursor to numerical position and use the number button to select the object.
• UGC Catalog: consists of 12939 objects.
5.2.3. Comets
It contains up to 64 comets, with 16 pre-loaded comets. This database is customer upgradeable.
5.2.4. Asteroids
It contains up to 64 asteroids, with 16 pre-loaded asteroids. This database is customer upgradeable.
5.2.5. Stars
- Named Stars: It consists of 191 stars with their common names. They are listed alphabetically. A list is attached in Appendix C.
- Constellations: It consists of 88 modern constellations with their names. They are listed alphabetically. A list is attached in Appendix C.
- Double Stars: It consists of 40 double stars. A list is attached in Appendix C.
• SAO Bright Stars: It consists of 21460 SAO catalog objects.
5.2.6. User Objects
It can consist up to 128 user predefined objects. These objects need to be entered before they can be selected for slewing (Refer to 5.8.1 R.A. and DEC).
5.2.7. Enter Position
Go to a target by entering its R.A. and DEC numbers.
5.2.8. Watch List
A watch list is a list of your favorite celestial objects in the database. It can be selected for slewing. User can add, delete and browse the watch list. (Refer to 5.9 Watch List).
5.2.9. Watch List Auto
This function will set the mount automatically slew to all the objects listed in Watch List at a preset time interval. The time interval can be set to from 10 seconds to 1200 seconds by using ▼ or ▲ button.
5.3. Land Objects
Up to 64 your favorite land objects can be stored in the hand controller. Press MENU, select "Land Objects" and press ENTER, the Land Objects screen will show.
Goto Landmark
Record New Landmark
Add a New landmark
Edit One Data
Delete One Data
Delete All
Goto Landmark:
Use ▼ or ▲ button to move the cursor to "Goto Landmark" line, press ENTER. The first saved landmark will display:
No: 01
Name: Z0
Alt. 23d33.1m
Azi. 225d58.8m
Use ▶ or ◀ button to move the cursor and ▼ or ▲ button to change the number, then press ENTER. The mount will automatically slew to the target.
This function only works if a land object has been stored in database.
Record New Landmark
Use ▼ or ▲ button to move the cursor to "Record New Landmark" line, and press ENTER. A landmark screen will show:
Alt. 13^ 0.0'
Azi. 25°58.8'
Use arrow keys to
Move. Press "ENTER"
To modify. 64X
Use ◀▶ ▲ and ▼ keys to slew the telescope to the target you want to observe. Press SPEED button to change the slew speed if needed. Then press ENTER to save the target. Enter the Name using ▼ or ▲ to select form A-Z, 0-9 and “-, space”. (such as Z0). The object No. will be assigned by the system in order. Press ENTER to record your landmark.
Add a new Landmark
Use ▼ or ▲ button to move the cursor to "Add a new Landmark" line, and press ENTER Enter the Name using ▼ or ▲ to select form A-Z, 0-9 and "- , space". (such as Z0). A coordinate setting screen will show:
Enter Alt. Azi.
Alt: 13d 0.0m
Azi: 25d58.8m
Use ▶ or ◀ button to move the cursor, and ▼ or ▲ button to change the number. Then press ENTER. Press ENTER to add the landmark information.
Edit One Data
Use ▼ or ▲ button to move the cursor to "Edit One Data" line, and press ENTER. The first saved landmark will display:
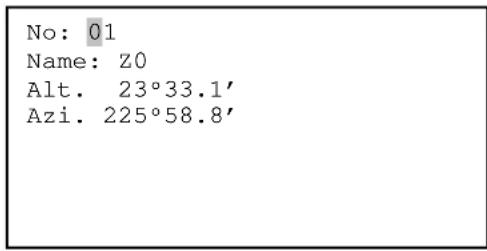
Use ▶ or ◀ button to move the cursor and ▼ or ▲ button to change the number, then press ENTER. You can change the name and Alt/Azi coordinates accordingly.
Delete One Data
Use ▼ or ▲ button to move the cursor to "Delete One Data" line, and press ENTER. The first saved landmark will display:
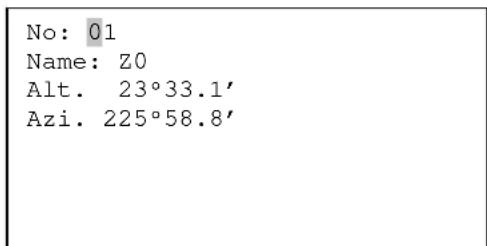
Use ▶ or ◀ button to move the cursor and ▼ or ▲ button to change the number, then press ENTER. Press ENTER to confirm the deletion.
Delete All Data
Use ▼ or ▲ button to move the cursor to "Delete All Data" line, and press ENTER. Press ENTER to confirm the deletion.
Press BACK to back to main menu.
5.4. Sync to Target
This operation will match the telescope's current coordinates to Target Right Ascension and Declination. After slew to an object, move the cursor to "Sync to Target" and press ENTER. Follow the screen to do the sync. Using this function can improve the GOTO accuracy in nearby sky. Multiple syncs can be performed if needed.
"Sync to Target" will only work after "Select and slew" was performed. You may need using SPEED key to change the slewing speed to make the centering procedure easier. A default slew speed is 2X.
5.5. Electric Focuser
N/A
5.6. Set Up Controller
5.6.1. Set Up Time and Site
- Please refer to section 4.2.
5.6.2. Set Display Info
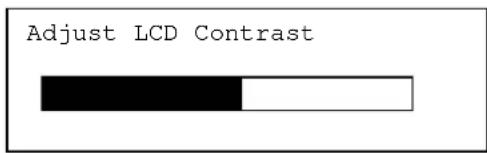
- Adjust LCD Contrast
Use arrow keys to adjust LCD display contrast. Press ENTER.
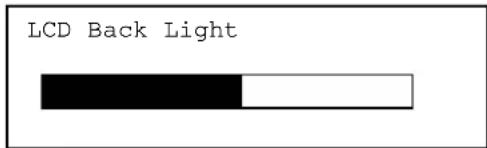
- LCD Back Light.
Use arrow keys to adjust LCD screen back light intensity. Press ENTER.
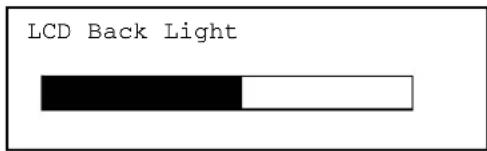
- Keypad Backlight.
Use arrow keys to adjust keypad backlight. Press ENTER.
5.6.3. Set Key Beep
Turn the key beep on/off.
5.6.4. Reset All
Reset all settings to factory default data.
5.6.5. Update Firmware
Firmware updating using iOptron Downloader through USB port on hand controller. (Refer to Appendix E.)
5.7. Align
This function is used for align the telescope. Before star alignment, please make sure the mount is well leveled. The system also provides “Easy One Star Align”, “One Star Align” and “Two Star Align”. Any one can be selected for telescope alignment.
5.7.1. Easy One Star Align
From the main menu, select "Align". Select "Easy One Star Align" and press ENTER. Three most popular objects, such as Moon, a planet or a bright star that are above the horizon will be provided for selection. Use ▲ or ▼ button to select an alignment star and press ENTER. Then manually slew the telescope to the object and center the object in your eyepiece using ◀ ▶ or ▼ key. Press SPEED button to adjust the slew speed. Then press ENTER to complete the alignment. Or press the BACK key to cancel the process.
5.7.2. One Star Align
From the main menu, select "Align". Select "One Star Align" and press ENTER. A list of align stars that are above the horizon is computed based on your local time and location. Use ▲ or ▼ button to select an alignment star and press ENTER. Center the object in your eyepiece using ◀▶▲ or ▼ key. Press SPEED button to adjust the slew speed. Then press ENTER to complete the alignment. Or press the BACK key to cancel the process.
If you have a very good initial setup, one star alignment should be sufficient for good GOTO accuracy. To increase the accuracy you may choose to do two star alignment.
5.7.3. Two Star Alignment
Two star alignment will increase the GOTO accuracy of the mount. It is suggested to do two star alignment after one star alignment. Select "Two Star Align" in the Align menu. Use ▲ or ▼ button to select a star and press ENTER. The mount will slew to it automatically. Use ◀ ▶ or ▼ key to center the object in your eyepiece. Press SPEED button to adjust the slew speed if needed. Then press ENTER to complete the alignment. After you finish the first star, the system will prompt you to choose the second star. Repeat the process to finish the second star alignment. An "Align OK!" screen will show briefly. To obtain a better alignment effect, it is suggested to choose two align stars far apart.
“Two Star Align” result will be overridden if “One Star Align” or “Sync. to Target” is performed after “Two Star Align.”
5.8. User Object List
Besides various star lists available in the hand controller, users can add, edit or delete their own defined objects. The comets and asteroids list also can be edited. Up to 128 user
objects can be added or modified. For comets or asteroids, the maximum number is 64, which includes the preloaded objects.
To edit a user object, press MENU, use ▲ or ▼ button move the cursor to "User Object List" and press ENTER. A following screen will show:
R.A. and DEC.
Comets
Asteroids
Use ▲ or ▼ button to select R.A. and DEC., comets or asteroids.
5.8.1. R.A. and DEC.
Select "R.A. and DEC." and press ENTER, a menu like following will show:
Add a new object
Edit one data
Delete one data
Delete all
Add a new object:
Use ▼ or ▲ button to move the cursor to "Add a new object" line, and press ENTER. Enter the name of your object by using ▲ or ▼ key to change the display from 1 to 9, space, - and A to Z, and ◀ or ▶ key to move the cursor. Press ENTER when you are done. A screen will display to ask you to enter R.A. and DEC. numbers:
Enter R.A. DEC
RA: 00h00.0m
DEC: +00d00.0m
Use◀ or ▶ key to move the cursor and ▲ or ▼ key to change the numbers of your object. RA ranges from 0 hour to 24 hour and DEC from -90 degree to +90 degree. Press ENTER when it is done. A confirmation screen will show:
Save to No. 003 ?
Press "ENTER" to
Confirm
Press, "BACK" to
Cancel
Press ENTER to confirm. The user object will be stored in the hand controller in sequence. Up to 256 objects can be added.
Edit one data
Use ▼ or ▲ button to move the cursor to "Edit one data" line, and press ENTER. A user object screen will show:
No: 003
Name: SAO2940
R.A. 17h30.7m
DEC 86°58.1'
The first line shows the number of the user object. The second line shows the name of the user object, here is "SAO2940". The next two lines shows target's current RA and DEC coordinates. Use ◀ or ▶ move the cursor position and ▲ or ▼ key change the number and press ENTER to select the object you want to edit.
Follow the same procedure as "Add a new object" to edit it.
Delete one data
Use ▼ or ▲ button to move the cursor to "Delete one data" line, and press ENTER. A user object screen will show:
No: 003
Name: SAO2940
R.A. 17h30.7m
DEC 86°58.1'
Use ▶ or ◀ button to move the cursor, and ▼ or ▲ button to change the number. Press ENTER to delete selected object.
Delete all
Use ▼ or ▲ button to move the cursor to "Delete all" line, and press ENTER to delete all user R.A. and DEC. data.
5.8.2. Comets
Select "Comets" and press ENTER, a menu like following will show:
Add a new comet
Edit one data
Delete one data
Reset comet data
Add a new comet:
The hand controller has 16 preloaded comets. Up to 64 comets can be stored in the hand controller.
Select "Add a new comet" and press ENTER. Enter the name of your object by using ▲ or ▼ key to change the display from 1 to 9, space, - and A to Z, and ◀ or ▶ key to move the cursor. It will then ask the following information: Year, Month, Day, e, q, w, Omega and i. After entering all these parameters, a confirmation screen will show:
Save to No. 17 ?
Press "ENTER" to
Confirm
Press, "BACK" to
Cancel
Press ENTER to confirm. The user object will be stored in next available or previous deleted comet position. It can be selected and slewed from Comets menu.
Edit one data
Use ▼ or ▲ button to move the cursor to "Edit one data" line, and press ENTER. A user object screen will show:
No: 17 X
Name: 2P
R.A. 23h 3.5m
DEC 0°34.8'
Alt. -44°44.5'
Azi. 21°56.9'
The first line shows the number of this comet and if it is above the horizon. The second line shows the name of the comet, here is "2P". The third line shows comet's current RA and DEC coordinates. The bottom line shows its altitude and azimuth position. Use ◀ or ▶ move the cursor position and ▲ or ▼ key change the number and press ENTER to select the object you want to edit.
Follow the same procedure as "Add a new comet" to edit it.
Delete one data
Use ▼ or ▲ button to move the cursor to "Delete one data" line, and press ENTER. A screen consists comet information will show:
No: 17 X
Name: 2P
R.A. 23h 3.5m
DEC 0°34.8′
Alt. -44°44.5′
Azi. 21°56.9′
Use ▶ or ◀ button to move the cursor, and ▼ or ▲ button to change the number. Press ENTER to delete selected object.
Reset comet data
Use ▼ or ▲ button to move the cursor to "Reset comet data" line, and press ENTER to restore all deleted or modified comets data to factory default setting.
5.8.3. Asteroids
Select "Asteroids" and press ENTER, a menu like following will show:
Add a new Asteroid
Edit one data
Delete one data
Reset Asteroids data
Refer to 5.8.2 Comets to set the Asteroids.
5.9. Watch List
A watch list is a list of your favorite celestial objects in the database. User can add, delete and browse the watch list. All celestial objects, include User objects, can be compiled into the list. Up to 20 objects can be added to the watch list.
To setup/modify a Watch List, press MENU, use ▲ or ▼ button move the cursor to "Watch List" and press ENTER. A following screen will show:
Add a watch object
Delete one data
Delete all
Browse the list
Select "Add a watch object" and press ENTER. Browse the celestial object list and select the one you want to watch by press ENTER. Follow the screen prompt to confirm the selection. After you are done, press BACK to back to Watch List menu.
You also can delete one or all objects in your watching list. After the watch list is set, it can be observed through “Select and Slew” operation, either watching them manually or automatically using Watch List Auto.
5.10. Set Telescope Coord.
Set the current Altitude and Azimuth of your telescope.
5.11. Park Scope
Park your telescope. Return the telescope to its initial position, i.e.,its altitude is 90^0.0' and azimuth is 180^0.0' .
6. Maintenance and Servicing
6.1. Maintenance
The SmartStar ^® Cube-G mount or telescope is a precision instrument designed to yield a lifetime of rewarding applications. Given the care and respect due any precision instrument, your telescope will rarely require factory servicing or maintenance. Maintenance guidelines include:
- Using wet cloth to clean the mount and hand controller. Do not use the solvent.
- Leave the dust cap on while not operating the telescope. Avoid cleaning the telescope's optics. A little dust on the front surface of the telescope's correcting lens causes virtually no degradation of image quality and should not be considered a reason to clean the lens.
- When absolutely necessary, dust on the front lens should be removed with gentle strokes of a camel hair brush, a soft glass clean cloth or blown off with an ear syringe (available at any pharmacy). Do not use a commercial photographic lens cleaner.
- Organic materials (e.g., fingerprints) on the front lens may be removed with a solution of 3 parts distilled water to 1 part isopropyl alcohol. Use soft, white facial tissues or cotton balls and make short, gentle strokes. Change tissues often. Do not use scented, colored, or lotioned tissues as damage could result to the optics.
- If your telescope is used outdoors on a humid night, telescope surfaces may accumulate water condensation. While such condensation does not normally cause any damage to the telescope, it is recommended that wait the entire telescope be dried before being packed away. Do not wipe any of the optical surfaces. In addition, the dust cap should not be placed back on to the optical tube until the telescope is thoroughly dry.
- If your telescope is not to be used for an extended period, perhaps for one month or more, it is advisable to remove the batteries from battery holder, if they are installed. Batteries left installed for prolonged periods may leak, causing damage to the telescope's electronic circuitry.
- Do not leave your telescope outdoors on a warm day or inside a sealed car for an extended period of time. Excessive ambient temperatures can damage the telescope's internal lubrication and electronic circuitry.
6.2. Storage and Transport
When not in use, store the telescope in a cool, dry place. Do not expose the instrument to excessive heat or moisture. It is best to store the telescope in its original box with the altitude lock knob unlocked. If shipping the telescope, use the original box and packing material to protect the telescope during shipment.
When transporting the telescope, take care not to bump or drop the instrument; this type of abuse can damage the optics or affect the GOTO tracking accuracy.
6.3. Troubleshooting
The following suggestions may be helpful with operation of the SmartStar ^® E mount or telescope.
The power indicator light on the mount does not come on or there is no response when pressing hand controller's arrow keys:
(1) Verify that the power switch on the mount is in the ON position.
(2) Verify that the hand controller cord is firmly connected to the HBX port on the mount, or switch the cord to the other HBX port.
(3) Check the power source, which include:
- Using the battery? Are the batteries installed correctly? Are the batteries fresh? How long have they been used? (frequent slew and GOTO will deplete battery power very quickly)
- Using AC or DC adapter? Check the plugs to the mount and to the power outlet.
- Using extension cord? Make sure the cord is in good condition. Power drop along the extension cord was known to cause the problem. Also check all the plugs and connections.
(4) If the telescope does not respond to commands, set the power switch to OFF and then back to ON.
(5) If the telescope does not slew after power is applied or if the motor quits or stalls, verify that there are no physical obstructions that would impede telescope movement.
Cannot seem to focus (No image appears in the eyepiece):
(1) Confirm that the dust cap has been removed from the telescope.
(2) Keep turning the focus knob. Your telescope has a fine focusing mechanism which allows you to focus an image very precisely. However, this means that you may have to rotate the focus knob 20 to 40 complete turns to achieve focus, particularly the first time you use your telescope. After that, fewer turns will be needed.
Images through the eyepiece appear unfocused or distorted:
(1) The magnification used may be too high for the seeing conditions. Back off to a lower power eyepiece.
(2) If inside a warm house or building, move outside. Interior air conditions may distort terrestrial (land) or celestial images, making it difficult, if not impossible, to obtain a sharp focus. For optimal viewing, use the telescope outside in the open air instead of observing through an open or closed window or screen.
(3) If viewing a land object on a warm day, heat waves distort the image.
(4) The optics within the telescope need time to adjust to the outside ambient temperature to provide the sharpest image. To "cool down" the optics, set the telescope outside for 10 to 15 minutes before observing begins.
Error Message "Warning! Motor driver overloaded."
(1) Check the hand controller cord. Unplug it and re-plug into, or plug it into another HBX port.
(2) Check the power source.
The telescope does not GOTO the right object, or the alignment is always wrong:
(1) Leveling (very important).
(2) Site information (minutes ahead or behind UT, DST).
(3) Check the power source.
6.4. iOptron Customer Service
If you have a question concerning your telescope, contact the iOptron Customer Service Department. Customer Service hours are 9:00 AM to 5:00 PM, Easter Time, Monday through Friday. In the unlikely event that the telescope requires factory servicing or repairs, write or call the iOptron Customer Service Department first, before returning the telescope to the factory, giving full particulars as to the nature of the problem, as well as your name, address, and daytime telephone number. The great majority of servicing issues can be resolved by telephone, avoiding return of the telescope to the factory.
It is also strongly suggested that to send your technical questions to support@ioptron.com.
Appendix A. Technical Specifications
SmartStar® GOTO Mount
| Mount AltAzimuth Mount |
| Body Materials Die-cast Aluminum |
| Motor Dual-Axis DC Servo motor with encoders |
| Gear Acetal worm wheel/Nylon 6 worm gear |
| Bearing 4 steel ball bearings |
Speed
Dual-Axis, 5-Gear, Electronic
(2×,8×,64×,256×,MAX)
GOTO System GoToNova
® 8402G
Processor 32bit ARM
Object in Database 50,000+
GOTO accuracy 1 Arc Min. (Typical)
Tracking Automatic
Payload 7 lbs
Battery
AA x 8 (Not Included)
Power Requirement DC 12V±2V, >1.2A
Operating Temperature 0 \~ 40°C
Weight with tripod 5.5 lbs (without OTA)
Refractor Telescope
| Optical Design Achromatic Refractor | |
| Clear Aperture | 80 mm |
| Focal Length 400 mm | |
| Focal Ratio | f/5 |
| Resolving Power | 1.4 arc secs |
| Weight | 2.2 lbs |
Newtonian Reflector Telescope
| Optical Design | Reflector |
| Clear Aperture 114 mm | |
| Focal Length | 1000 mm |
| Focal Ratio | f/8.8 |
| Resolving Power | 1 arc secs |
| Finderscope | Red dot |
| Weight 4 lbs | |
Maksutov-Cassegrain Telescope
| Optical Design | Maksutov-Cassegrain |
| Clear Aperture | 90 mm |
| Focal Length | 1200 mm |
| Focal Ratio | f/13.3 |
| Resolving Power | 1.3 arc secs |
| Finderscope | Red dot |
| Weight 4 lbs | |
Appendix B. GoToNova® 8402G HC MENU STRUCTURE
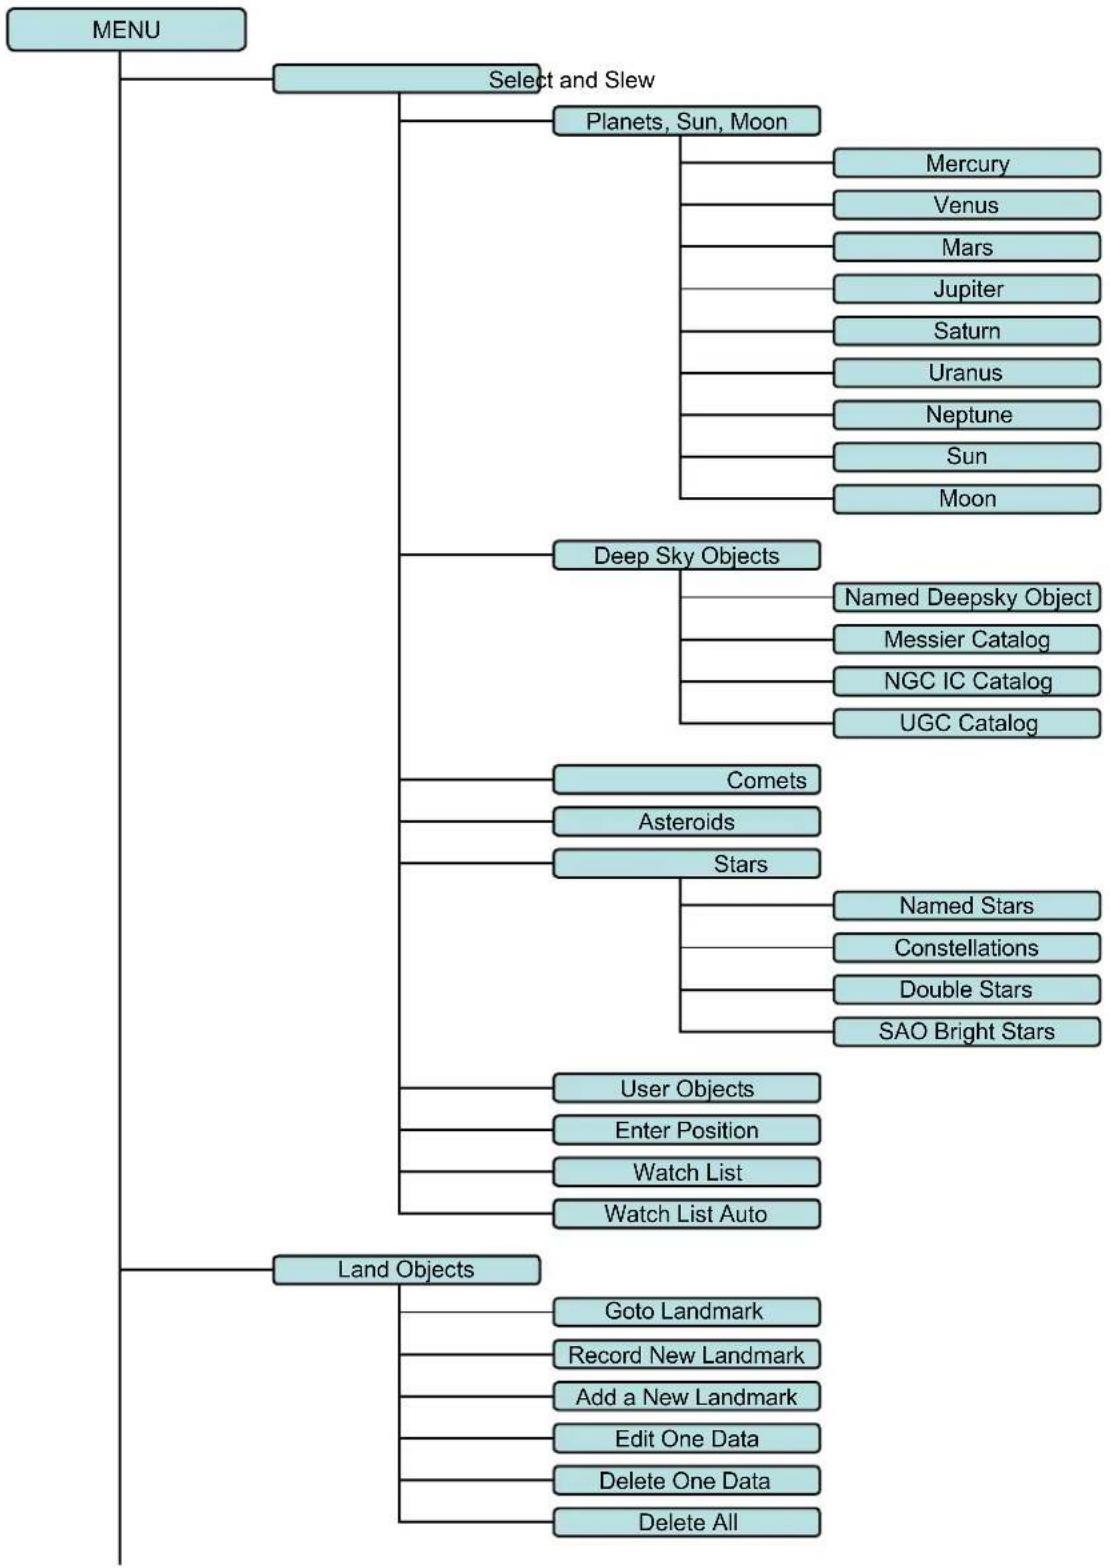
flowchart
graph TD
    A["MENU"] --> B["Select and Slew"]
    B --> C["Planets, Sun, Moon"]
    C --> D["Mercury"]
    C --> E["Venus"]
    C --> F["Mars"]
    C --> G["Jupiter"]
    C --> H["Saturn"]
    C --> I["Uranus"]
    C --> J["Neptune"]
    C --> K["Sun"]
    C --> L["Moon"]
    B --> M["Deep Sky Objects"]
    M --> N["Named Deepsky Object"]
    M --> O["Messier Catalog"]
    M --> P["NGC IC Catalog"]
    M --> Q["UGC Catalog"]
    B --> R["Comets"]
    B --> S["Asteroids"]
    B --> T["Stars"]
    T --> U["Named Stars"]
    T --> V["Constellations"]
    T --> W["Double Stars"]
    T --> X["SAO Bright Stars"]
    B --> Y["User Objects"]
    B --> Z["Enter Position"]
    B --> AA["Watch List"]
    B --> AB["Watch List Auto"]
    A --> AC["Land Objects"]
    AC --> AD["Goto Landmark"]
    AC --> AE["Record New Landmark"]
    AC --> AF["Add a New Landmark"]
    AC --> AG["Edit One Data"]
    AC --> AH["Delete One Data"]
    AC --> AI["Delete All"]
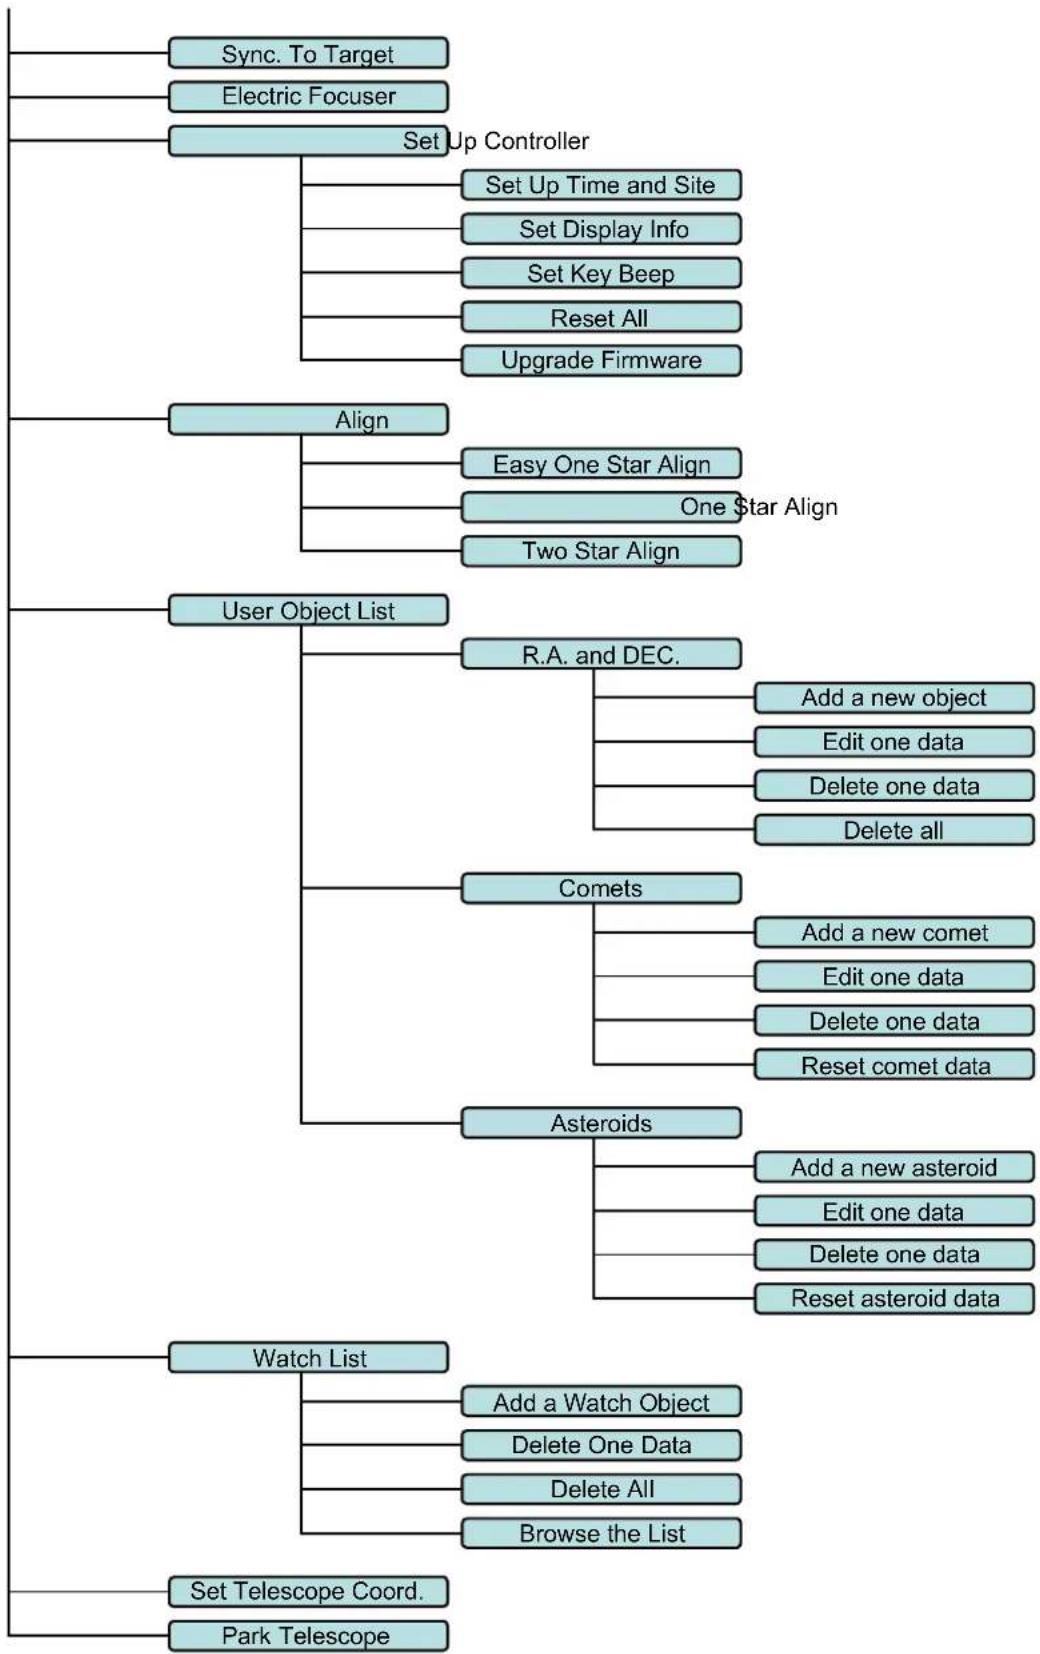
flowchart
graph TD
    A["Sync. To Target"] --> B["Electric Focuser"]
    B --> C["Set Up Controller"]
    C --> D["Set Up Time and Site"]
    C --> E["Set Display Info"]
    C --> F["Set Key Beep"]
    C --> G["Reset All"]
    C --> H["Upgrade Firmware"]

    I["Align"] --> J["Easy One Star Align"]
    I --> K["One Star Align"]
    I --> L["Two Star Align"]

    M["User Object List"] --> N["R.A. and DEC."]
    N --> O["Add a new object"]
    N --> P["Edit one data"]
    N --> Q["Delete one data"]
    N --> R["Delete all"]

    S["Comets"] --> T["Add a new comet"]
    S --> U["Edit one data"]
    S --> V["Delete one data"]
    S --> W["Reset comet data"]

    X["Asteroids"] --> Y["Add a new asteroid"]
    X --> Z["Edit one data"]
    X --> AA["Delete one data"]
    X --> AB["Reset asteroid data"]

    AC["Watch List"] --> AD["Add a Watch Object"]
    AC --> AE["Delete One Data"]
    AC --> AF["Delete All"]
    AC --> AG["Browse the List"]

    AH["Set Telescope Coord."] --> AI["Park Telescope"]
Appendix C. GoToNova ^® Star List
GoToNova Deep Sky Object List
for 8402G
| ID No. | OBJECT NGC # Messier # IC# | A(Abell) | U(UGC) | |||
| 1 | Andromeda Galaxy 224 31 | |||||
| 2 | Barnards Galaxy | 6822 | ||||
| 3 | Beehive Cluster | 2632 | 44 | |||
| 4 | Blackeye Galaxy | 4926 | 64 | |||
| 5 | Blinking Planetary Nebula | 6826 | ||||
| 6 | Blue Flash Nebula | 6905 | ||||
| 7 | Blue Planetary | 3918 | ||||
| 8 | Blue Snowball Nebula | 7662 | ||||
| 9 | Box Nebula | 6309 | ||||
| 10 | Bubble Nebula | 7635 | ||||
| 11 | Bipolar Nebula | 6302 | ||||
| 12 | Butterfly Cluster | 6405 | 6 | |||
| 13 | California Nebula | 1499 | ||||
| 14 | Cat's Eye Nebula | 6543 | ||||
| 15 | Cocoon Nebula | 5146 | ||||
| 16 | Cone Nebula | 2264 | ||||
| 17 | Cork Nebula | 650-51 | 76 | |||
| 18 | Crab Nebula | 1952 | 1 | |||
| 19 | Crescent Nebula | 6888 | ||||
| 20 | Draco Dwarf | 10822 | ||||
| 21 | Duck Nebula | 2359 | ||||
| 22 | Dumbbell Nebula | 6853 | 27 | |||
| 23 | Eagle Nebula | 16 | ||||
| 24 | Eight-Burst Nebula | 3132 | ||||
| 25 | Eskimo Nebula | 2392 | ||||
| 26 | Flaming Star Nebula | 405 | ||||
| 27 | Ghost of Jupiter | 3242 | ||||
| 28 | Great Cluster | 6205 | 13 | |||
| 29 | Helix Nebula | 7293 | ||||
| 30 | Hercules Galaxy Cluster | 2151 | ||||
| 31 | Hind's Variable Nebula | 1555 | ||||
| 32 | Hubble's Variable Nebula | 2261 | ||||
| 33 | Integral Sign Galaxy | 3697 | ||||
| 34 | Jewel Box Cluster | 4755 | ||||
| 35 | Keyhole Nebula | 3372 | ||||
| 36 | Lagoon Nebula 6523 8 | |||||
| 37 | Little Gem 6445 | |||||
| 38 | Little Gem Nebula 6818 | |||||
| 39 | Little Ghost Nebula 6369 | |||||
| 40 | North American Nebula 7000 | |||||
| 41 | Omega Nebula | 6618 | 17 | |||
| 42 | Orion Nebula | 1976 | 42 | |||
| 43 | Owl Nebula | 3587 | 97 | |||
| 44 | Pelican Nebula | 5070 | ||||
| 45 | Phantom Streak Nebula | 6741 | ||||
| 46 | Pinwheel Galaxy | 598 33 | ||||
| 47 | Pleiades | 45 | ||||
| 48 | Ring Nebula | 6720 | 57 | |||
| 49 | Ring Tail Galaxy | 4038 | ||||
| 50 | Rosette Nebula | 2237 | ||||
| 51 | Saturn Nebula | 7009 | ||||
| 52 | Sextans B Dwarf | 5373 | ||||
| 53 | Small Magellanic Cloud | 292 | ||||
| 54 | Sombrero Galaxy | 4594 | 104 | |||
| 55 | Spindle Galaxy | 3115 | ||||
| 56 | Tank Track Nebula | 2024 | ||||
| 57 | Trifid Nebula | 6514 | 20 | |||
| 58 | Ursa Minor Dwarf | 9749 | ||||
| 59 | Whirlpool Galaxy | 5194 | 51 | |||
| 60 | Wild Duck Cluster | 6705 | 11 | |||
Messier
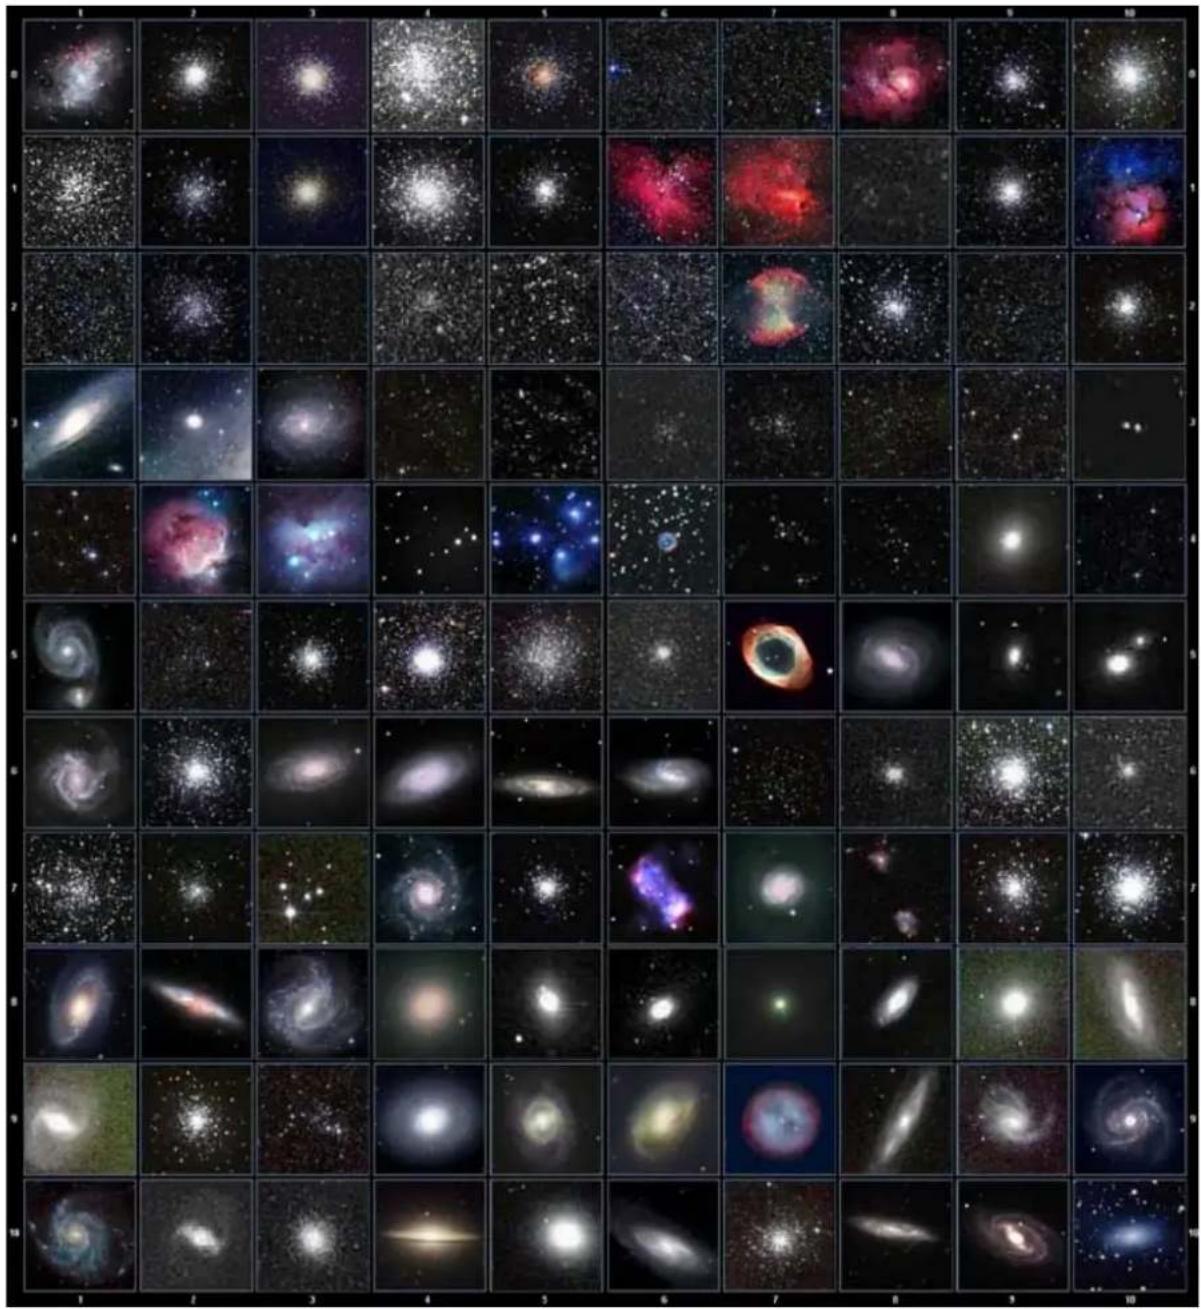
natural_image
Grid of 30 astronomical images showing various types of galaxies and star clusters in deep space (no text or symbols)This table is licensed under the GNU Free Documentation License. It uses material from the Wikipedia article List of Messier objects
Modern Constellations
| No. | Constellation Abbreviation | |
| 1 | Andromeda And | |
| 2 | Antlia | Ant |
| 3 | Apus | Aps |
| 4 | Aquarius | Aqr |
| 5 | Aquila | Aql |
| 6 | Ara | Ara |
| 7 | Aries | Ari |
| 8 | Auriga | Aur |
| 9 | Boötes Boo | |
| 10 | Caelum Cae | |
| 11 | Camelopardalis Cam | |
| 12 | Cancer | Cnc |
| 13 | Canes Venatici | CVn |
| 14 | Canis Major | CMa |
| 15 | Canis Minor | CMi |
| 16 | Capricornus | Cap |
| 17 | Carina Car | |
| 18 | Cassiopeia | Cas |
| 19 | Centaurus | Cen |
| 20 | Cepheus | Cep |
| 21 | Cetus | Cet |
| 22 | Chamaeleon | Cha |
| 23 | Circinus | Cir |
| 24 | Columba | Col |
| 25 | Coma Berenices | Com |
| 26 | Corona Australis | CrA |
| 27 | Corona Borealis | CrB |
| 28 | Corvus | Crv |
| 29 | Crater | Crt |
| 30 | Crux Cru | |
| 31 | Cygnus Cyg | |
| 32 | Delphinus | Del |
| 33 | Dorado | Dor |
| 34 | Draco | Dra |
| 35 | Equuleus | Equ |
| 36 | Eridanus | Eri |
| 37 | Fornax | For |
| 38 | Gemini Gem | |
| 39 | Grus | Gru |
| 40 | Hercules | Her |
| 41 | Horologium | Hor |
| 42 | Hydra | Hya |
| 43 | Hydrus Hyi | |
| 44 | Indus | Ind |
| No. | Constellation Abbreviation | |
| 45 | Lacerta Lac | |
| 46 | Leo Leo | |
| 47 | Leo Minor LMi | |
| 48 | Lepus Lep | |
| 49 | Libra Lib | |
| 50 | Lupus Lup | |
| 51 | Lynx Lyn | |
| 52 | Lyra Ly | r |
| 53 | Mensa Men | |
| 54 | Microscopium Mic | |
| 55 | Monoceros Mon | |
| 56 | Musca | Mus |
| 57 | Norma Nor | |
| 58 | Octans | Oct |
| 59 | Ophiuchus | Oph |
| 60 | Orion | Ori |
| 61 | Pavo | Pav |
| 62 | Pegasus | Peg |
| 63 | Perseus | Per |
| 64 | Phoenix | Phe |
| 65 | Pictor | Pic |
| 66 | Pisces Psc | |
| 67 | Piscis Austrinus Ps | A |
| 68 | Puppis | Pup |
| 69 | Pyxis | Pyx |
| 70 | Reticulum Ret | |
| 71 | Sagitta | Sge |
| 72 | Sagittarius | Sgr |
| 73 | Scorpius | Sco |
| 74 | Sculptor | Scl |
| 75 | Scutum | Sct |
| 76 | Serpens | Ser |
| 77 | Sextans | Sex |
| 78 | Taurus | Tau |
| 79 | Telescopium | Tel |
| 80 | Triangulum | Tri |
| 81 | Triangulum Australe | TrA |
| 82 | Tucana Tuc | |
| 83 | Ursa Major | UMa |
| 84 | Ursa Minor UMi | |
| 85 | Vela | Vel |
| 86 | Virgo Vi | r |
| 87 | Volans | Vol |
| 88 | Vulpecula | Vul |
GoToNova Named Star List
for 8402G
| 001 Acamar 049 Ascella | 097 Kaus Australis 145 Ra | ssalas | |
| 002 Achernar 050 Asellus | Australis 098 Kaus Borealis 146 Rasagethi | ||
| 003 Acrux 051 Asellus Bo | realis 099 Kaus Media 147 | Rasalhague | |
| 004 Acubens 052 Aspidis | ke 100 Keid 148 Rastaba | ||
| 005 Adhafera 053 Atik 101 | Kitalpha 149 Regulus | ||
| 006 Adhara 054 Atlas 102 | Kochab 150 | Rigel | |
| 007 Al Na’ir | 055 Atria | 103 Kornephoros | 151 Rigel Kentaurus |
| 008 Albali | 056 Avoir | 104 Kurhah 152 Ruchbah | |
| 009 Alberio | 057 Azha | 105 Lesath | 153 Rukbat |
| 010 Alchibar 058 Baten Ka | aitos 106 Maia | 154 Sabik | |
| 011 Alcor | 059 Beid 107 Marfik | 155 Sadachbia | |
| 012 Alcyone | 060 Bellatrix | 108 Markab | 156 Sadalbari |
| 013 Aldebaran | 061 Betelgeuse | 109 Matar 157 Sadalmelik | |
| 014 Alderamin | 062 Biham | 110 Mebsuta | 158 Sadalsuud |
| 015 Alfirk 063 Canopus | 111 Megrez | 159 Sadr | |
| 016 Algedi | 064 Capella | 112 Meissa | 160 Saiph |
| 017 Algenib | 065 Caph | 113 Mekbuda | 161 Scheat |
| 018 Algiebra | 066 Castor | 114 Menkalinan | 162 Schedar |
| 019 Algol | 067 Celabrai | 115 Menkar | 163 Seginus |
| 020 Algorab | 068 Celaeno | 116 Menkent | 164 Shaula |
| 021 Alhena | 069 Chara | 117 Menkib 165 Sheiak | |
| 022 Alioth | 070 Chertan | 118 Merak | 166 Sheratan |
| 023 Alkaid | 071 Cor Caroli | 119 Merope | 167 Sirius |
| 024 Alkalurops | 072 Cursa | 120 Mesartim | 168 Skat |
| 025 Alkes | 073 Dabih | 121 Miaplacidus 169 Spica | |
| 026 Almach | 074 Deneb | 122 Mintaka | 170 Sterope |
| 027 Alnasl | 075 Deneb Algedi | 123 Mira | 171 Sulafat |
| 028 Alnilam | 076 Deneb Kaitos | 124 Mirach | 172 Syrma |
| 029 Alnitak | 077 Denebola 125 Mirfak | 173 Talitha | |
| 030 Alphard 078 Dubhe | 126 Mirzam | 174 Tania Australis | |
| 031 Alphecca | 079 Edasich | 127 Mizar | 175 Tania Borealis |
| 032 Alpheratz | 080 Electra | 128 Muphrid 176 Tarazed | |
| 033 Alrakis | 081 Elnath | 129 Muscida | 177 Taygeta |
| 034 Alrescha 082 Eltanin | 130 Nashira | 178 Thuban | |
| 035 Alshain | 083 Enif | 131 Nekkar | 179 Unukalhai |
| 036 Altair | 084 Errai | 132 Nihal | 180 Vega |
| 037 Altais | 085 Fomalhaut | 133 Nunki 181 Vindemiatrix | |
| 038 Alterf | 086 Furud | 134 Nusakan | 182 Wasat |
| 039 Aludra | 087 Gacrux 135 Peacock | 183 Wazn | |
| 040 Alula Australis | 088 Giausar | 136 Phact 184 Yed Posterior | |
| 041 Alula Borealis | 089 Gienah 137 Pheeda | 185 Yed Prior | |
| 042 Alya | 090 Gomeisa | 138 Pherkad | 186 Zaniah |
| 043 Ancha | 091 Graffias | 139 Pleione | 187 Zaurak |
| 044 Ankaa | 092 Groombridge 1830 | 140 Polaris | 188 Zavijava |
| 045 Antares 093 Grumium | 141 Pollux | 189 Zosma | |
| 046 Arcturus | 094 Hamal | 142 Porrima | 190 Zubenelgenubi |
| 047 Arkab | 095 Homan 143 Procyon | 191 Zubeneschamali | |
| 048 Arneb | 096 Izar 144 Propus |
GoToNova Double Star List
for 8402G
| No. | Object Const | SAO Name | |
| 1 | Eta Cas 21732 | ||
| 2 | Alpha Psc 110291 | ||
| 3 | Theta | Per 38288 | |
| 4 | Alpha For 168373 | ||
| 5 | Alpha Aur 40186 | ||
| 6 | Sigma Ori 132406 | ||
| 7 | Mu | Ori 113389 | |
| 8 | Alpha CMa | 151881 Sirius | |
| 9 | Delta Gem | 79294 | |
| 10 | Alpha Gem 60198 | ||
| 11 | Alpha CMi | 115756 | |
| 12 | Epsilon Hya | 117112 | |
| 13 | HR 3579 | 42642 | |
| 14 | Kapa UMa | 42661 | |
| 15 | Psi | Vel 221234 | |
| 16 | Gamma | Leo 81298 | |
| 17 | HR 4167 | 222199 | |
| 18 | Mu | Vel 222321 | |
| 19 | Alpha UMa | 15384 Dubhe | |
| 20 | Zeta UMa 28737 | ||
| 21 | Iota | Leo 99587 | |
| 22 | Gamma | Cen | 223603 |
| 23 | Gamma | Vir 138917 | |
| 24 | Beta | Mus | 252019 |
| 25 | HR 5089 | 204545 | |
| 26 | Alpha Cen | 252838 | |
| 27 | Zeta Boc | 101145 | |
| 28 | Gamma | Lup 225938 | |
| 29 | Gamma | CrA | 83958 |
| 30 | Xi | Sco | 159665 |
| 31 | Alpha Sco | 184415 Antares | |
| 32 | Lambda Oph | 121658 | |
| 33 | Zeta Her | 65485 | |
| 34 | Eta | Oph | 160332 Sapik |
| 35 | 70 | Oph | 123107 |
| 36 | Zeta Sgr | 187600 Ascella | |
| 37 | Delta Cyg 48796 | ||
| 38 | Beta | Del 106316 Rotanev | |
| 39 | Tau | Cyg 71121 | |
| 40 | Epsilon | Lyr | 67310 double double |
Appendix D. Set Up USB-PC Connection
Before a computer being used to control the mount or update the firmware, a connection between PC and 8402G Hand Controller has to be established. (If you have a 8402 HC, refer to www.iOptron.com for more information).
For an 8402G Hand Controller, the initial LCD screen shows following when it is turned on:
GoToNova®
8402G V071022W
www.iOptron.com
1. Install PL-2303 (usb2com) driver
Download USB to COM driver for 8402G hand controller from iOptron website and double click on the compressed file:
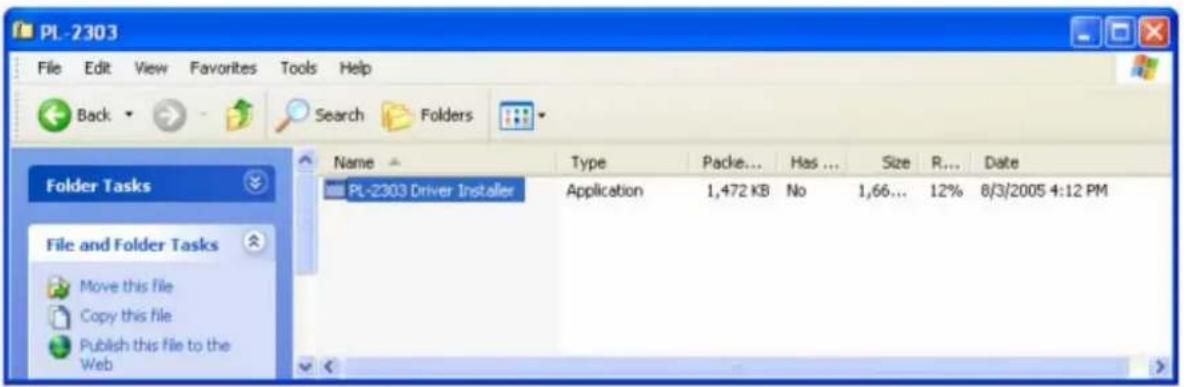
Double click on it, and you will see:
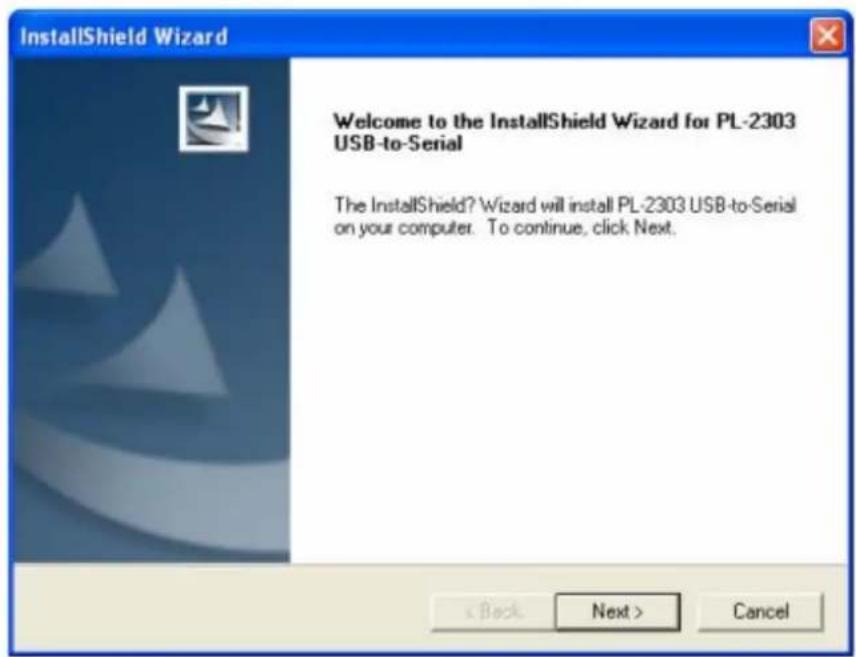
Click "Next".
![InstallShield Wizard InstallShield Wizard Complete InstallShield already successfully to installed PL-2303 USB-to-Serial driver. Please press [Finish] button to close and out of InstallShield. If you have been plugged cable on PC before run this setup, please unplug and then plug cable again for system detect this device!](/content/2026/05/957797/images/846d37006f1bb5eb489f66bc2e4613cd529d42e1f1c43f5240cd698f8fee4421.jpg)
When finished installation, click "Finish"
- Plug the USB cable into a USB port on your PC, plug the other end of the USB cable to hand controller. Turn the mount power on.
3. Install the Hardware
The computer will find a new hardware and install the driver automatically.
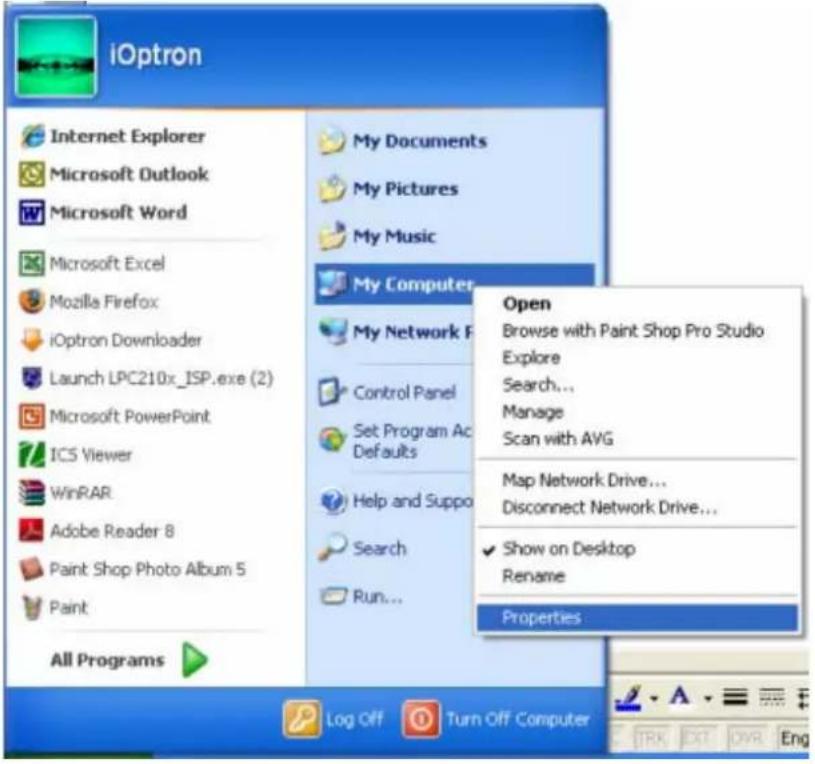
Now you computer should be ready for Firmware Upgrading, computer communication with the mount via ASCOM platform and planetarium software applications. However, you need to find assigned COM port number for the USB connection. To do so, right click "My Computer", and click "Properties"
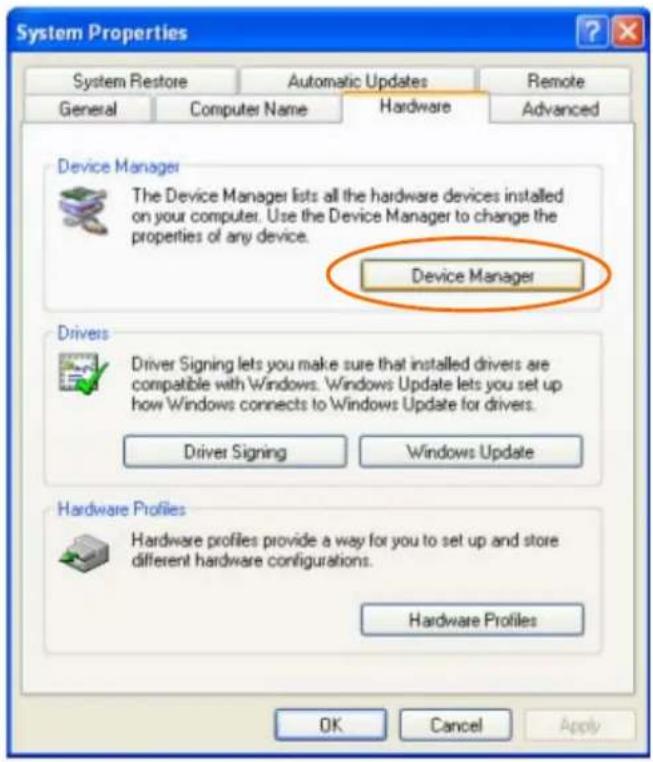
Click "Hardware", click "Device Manager"
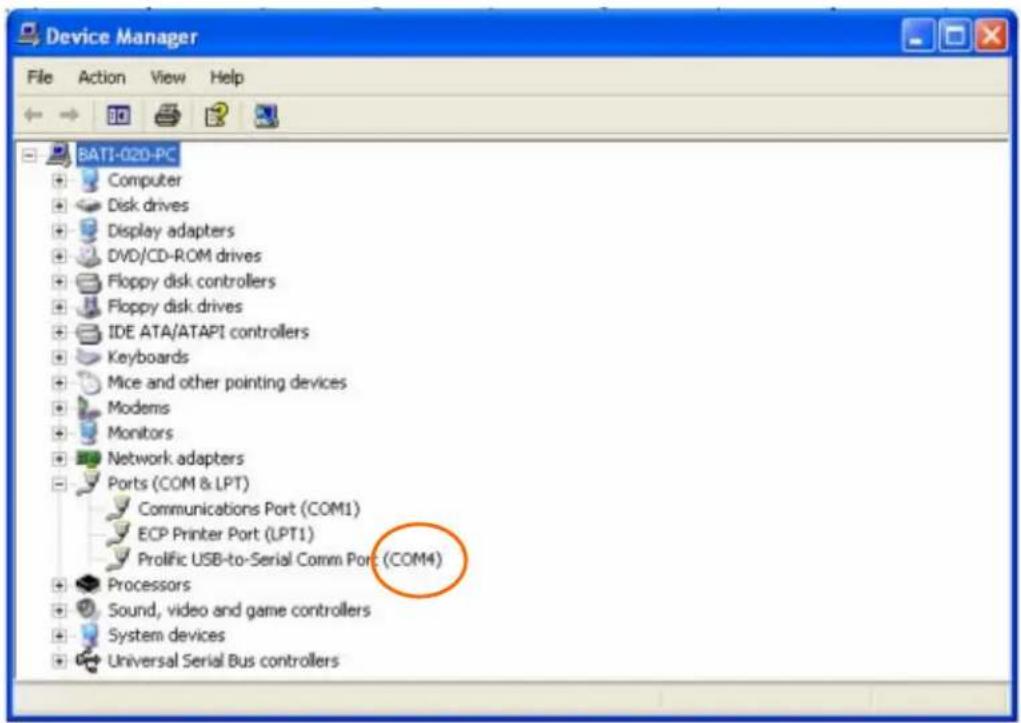
Double click on "Ports (COM & LPT)", find out the COM number and write it down (in the following figure, it is COM4)
Appendix E. Firmware Upgrade
- Download and install Firmware Downloader from iOptron Website
- Double click and open "iOptron Downloader"
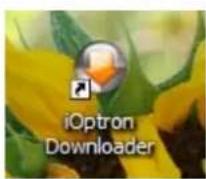
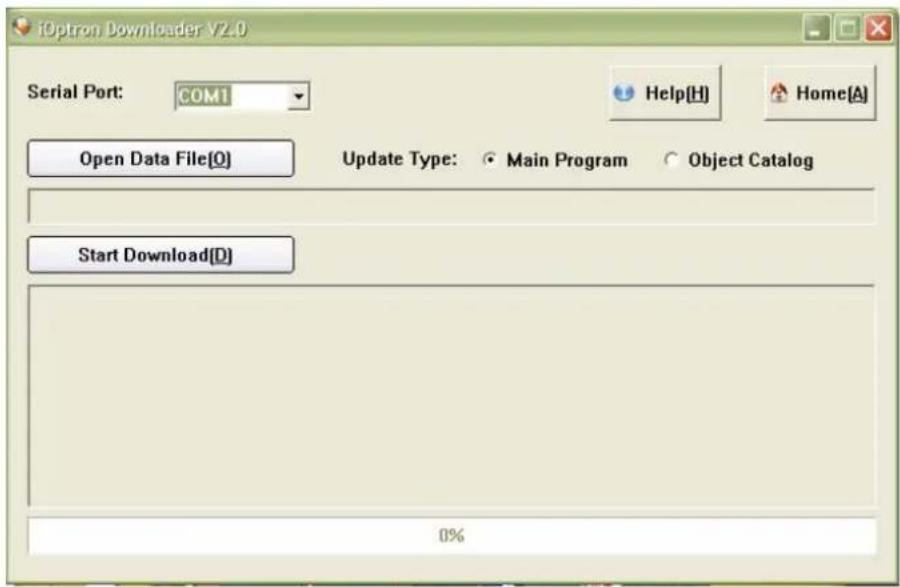
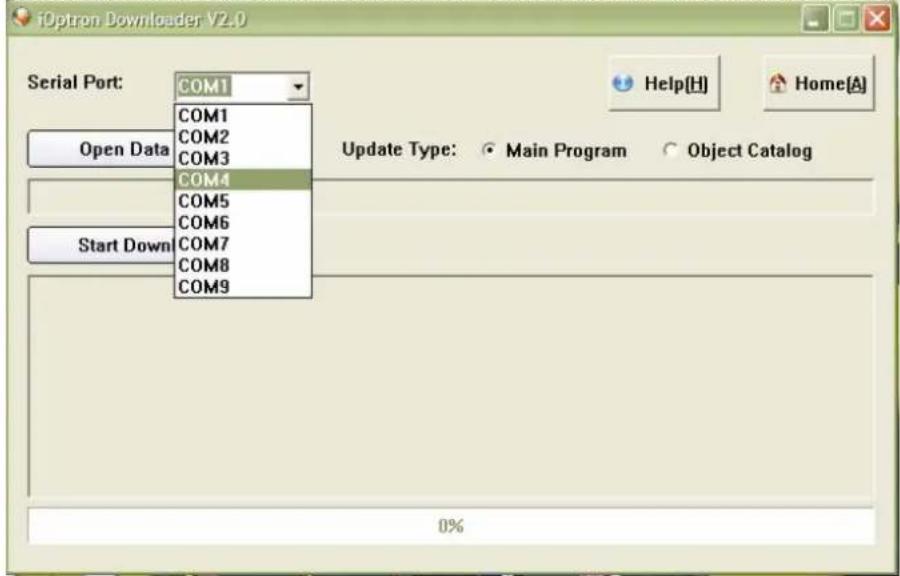
On the interface, select appropriate port using pull-down menu (in this case, COM4):
Click "Open Data File", and select appropriate ".bin" file that matches your hand controller.
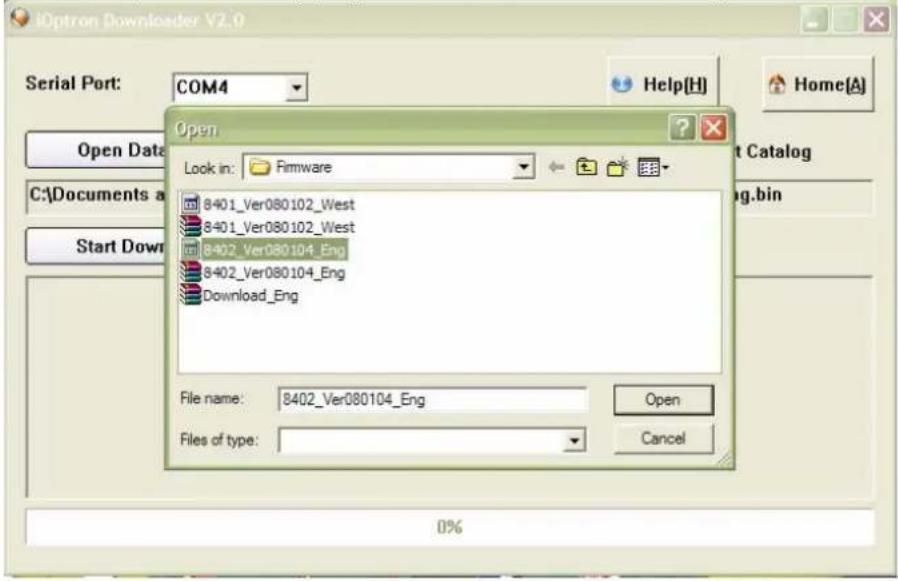
and click "Open". Select "Main Program" ONLY in Update Type.
![i0ptron Downloader V2.0 Serial Port: COM4 Open Data File[0] Update Type: Main Program Object Catalog C:\Documents and Settings\Chris\Desktop\Software\Firmware\8402_Ver080104_Eng.bin Stop Download[D] Please reset the GOTONOVA\GOTOSTAR\Waiting for connection ... 0%](/content/2026/05/957797/images/5073e1787802d34f05a9d837dd8078988f18a8cc5c426d24cb54f7931d85525a.jpg)
Click "Start Download"
It shows "Please reset GoToNova[GOTOSTAR], waiting for connection..."
On the hand controller, press "MENU", and using ▼▲ scroll to select "Set up controller", press "ENTER", then select "Upgrade firmware", press "ENTER" and the upgrade starts.
![iOptron Downloader V2.0 Serial Port: COM4 Open Data File[0] Update Type: Main Program Object Catalog C:\Documents and Settings\Chris\Desktop\Software\Firmware\8402_Ver080104_Eng.bin Stop Download[D] Please reset the GOTONOVA\GOTOSTAR\,Waiting for connection ... Connected. Processing ... Please wait ... 17%](/content/2026/05/957797/images/160f4dee90f7ef3e397f358112941ead2a9a4c730a22a1ea0c5d82f76fa9897e.jpg)
![iOption Downloader V2.0 Serial Port: COM4 Open Data File[O] Update Type: Main Program Object Catalog C:\Documents and Settings\Chris\Desktop\Software\Firmware\8402_Ver080104_Eng.bin Start Download[D] Please reset the GOTONOVA[GOTOSTAR].Waiting for connection ... Connected. Processing ... Please wait ... Download successfully finished! 100%](/content/2026/05/957797/images/2d59852653b893e8e8a00d874c4dd535f4f9708ca3c8a6a801cb3e7f9dac8cbe.jpg)
Now the upgrade is finished.
Typical Errors:
- Invalid Port Number: in Device Manager, make sure you have the correct COM port number for "Prolific USB-to-Serial Com Port."
- Wrong ".bin" file: make sure you have the correct ".bin" file for firmware upgrade.
- Wrong downloader, you should use iOptron Downloader instead of the Flash Downloader.
- Use PL-2303 driver provided by iOptron. The newest version from Prolific may not work properly for iOptron's hand controller.
Appendix F. Use a PC to Control an iOptron Mount
In general you need the followings to use a PC to control a SmartStar Cube-G mount,
- Download USB2COM driver (PL-2303, zip file for 8402G)
- Install USB2COM and establish the connection between the mount and the PC (see instruction);
- ASCOM platform (download from http://ascom-standards.org/);
- iOptron ASCOM drive (download it from iOptron website; and
- Planetarium software.
Some company has integrated iOptron's products into their planetarium software, such as Voyage and The Sky X Pro. Therefore, an ASCOM plug-in will not be needed. Most planetarium software can be used to control iOptron's product via ASCOM.
Some other ASCOM drivers, such as LX200 Generic ASCOM driver and AstroPhysics GTO driver, are also compatible to SmartStar ^® mount.
IOPTRON ONE YEAR LIMITED WARRANTY
A. iOptron warrants your telescope, mount, or controller to be free from defects in materials and workmanship for one year. iOptron will repair or replace such product or part which, upon inspection by iOptron, is found to be defective in materials or workmanship. As a condition to the obligation of iOptron to repair or replace such product, the product must be returned to iOptron together with proof-of-purchase satisfactory to iOptron.
B. The Proper Return Authorization Number must be obtained from iOptron in advance of return. Call iOptron at 1.866.399.4587 to receive the number to be displayed on the outside of your shipping container.
All returns must be accompanied by a written statement stating the name, address, and daytime telephone number of the owner, together with a brief description of any claimed defects. Parts or product for which replacement is made shall become the property of iOptron.
The customer shall be responsible for all costs of transportation and insurance, both to and from the factory of iOptron, and shall be required to prepay such costs.
iOptron shall use reasonable efforts to repair or replace any telescope, mount, or controller covered by this warranty within thirty days of receipt. In the event repair or replacement shall require more than thirty days, iOptron shall notify the customer accordingly. iOptron reserves the right to replace any product which has been discontinued from its product line with a new product of comparable value and function.
This warranty shall be void and of no force of effect in the event a covered product has been modified in design or function, or subjected to abuse, misuse, mishandling or unauthorized repair. Further, product malfunction or deterioration due to normal wear is not covered by this warranty.
IOPTRON DISCLAIMS ANY WARRANTIES, EXPRESS OR IMPLIED, WHETHER OF MERCHANTABILITY OF FITNESS FOR A PARTICULAR USE, EXCEPT AS EXPRESSLY SET FORTH HERE. THE SOLE OBLIGATION OF IOPTRON UNDER THIS LIMITED WARRANTY SHALL BE TO REPAIR OR REPLACE THE COVERED PRODUCT, IN ACCORDANCE WITH THE TERMS SET FORTH HERE. IOPTRON EXPRESSLY DISCLAIMS ANY LOST PROFITS, GENERAL, SPECIAL, INDIRECT OR CONSEQUENTIAL DAMAGES WHICH MAY RESULT FROM BREACH OF ANY WARRANTY, OR ARISING OUT OF THE USE OR INABILITY TO USE ANY IOPTRON PRODUCT. ANY WARRANTIES WHICH ARE IMPLIED AND WHICH CANNOT BE DISCLAIMED SHALL BE LIMITED IN DURATION TO A TERM OF TWO YEARS FROM THE DATE OF ORIGINAL RETAIL PURCHASE.
Some states do not allow the exclusion or limitation of incidental or consequential damages or limitation on how long an implied warranty lasts, so the above limitations and exclusions may not apply to you.
This warranty gives you specific legal rights, and you may also have other rights which vary from state to state.
iOptron reserves the right to modify or discontinue, without prior notice to you, any model or style telescope.
If warranty problems arise, or if you need assistance in using your telescope, mount, or controller contact:
iOptron Corporation
Customer Service Department
6X Gill Street
Woburn, MA 01801
www.ioptron.com
Tel. (866)399-4597
Fax. (781)935-2860
Monday-Friday 9AM-5PM EST
NOTE: This warranty is valid to U.S.A. and Canadian customers who have purchased this product from an authorized iOptron dealer in the U.S.A. or Canada or directly from iOptron. Warranty outside the U.S.A. and Canada is valid only to customers who purchased from an iOptron Distributor or Authorized iOptron Dealer in the specific country. Please contact them for any warranty.
- SmartStar ® Cube TM -G Series
- Mount and Telescopes
- Table of Content
- Table of Content....2
- WARNING!
- SmarStar ® Cube TM -G Series Overview
- SmartStar ® Cube TM -G Series Features
- Alt-Azimuth Mount— The Cube TM
- 32-Channel GPS Module
- GoToNova® Computerized Control System
- The easy to understand controller on the market
- More precise speed control for viewing objects
- Compatible with many OTAs
- USB Port
- Package Contents 1
- For Model 8802 (SmartStar ® Cube TM -G R80)
- For Model 8803 (SmartStar ® Cube TM -G N114)
- For Model 8804 (SmartStar® Cube™-G MC90)
- Assembly Terms
- Telescope Assembly
- GoToNova® 8402G Hand Controller
- Key Description
- The LCD Screen
- Getting Started
- Level and Align the Mount
- Initial Positions
- Setting Up the Mount
- Set Up Time and Site
- Using your telescope
- Selecting an Eyepiece:
- Focusing Telescope:
- Aligning Finderscope:
- Go to the Moon
- Initial Star Alignment
- Turn Off the Mount
- Use SmartStar ® Cube TM -G Telescopes
- Manual Operation of a Telescope
- Slew to an Object
- Planets, Sun, Moon
- Deep Sky Objects
- Comets
- Asteroids
- Stars
- User Objects
- Enter Position
- Watch List
- Watch List Auto
- Land Objects
- Goto Landmark:
- Record New Landmark
- Add a new Landmark
- Edit One Data
- Delete One Data
- Delete All Data
- Sync to Target
- Electric Focuser
- Set Up Controller
- Set Up Time and Site
- Set Display Info
- Set Key Beep
- Reset All
- Update Firmware
- Align
- Easy One Star Align
- One Star Align
- Two Star Alignment
- User Object List
- R.A. and DEC.
- Add a new object:
- Delete all
- Comets
- Add a new comet:
- Reset comet data
- Asteroids
- Watch List
- Set Telescope Coord.
- Park Scope
- Maintenance and Servicing
- Maintenance
- Storage and Transport
- Troubleshooting
- The power indicator light on the mount does not come on or there is no response when pressing hand controller's arrow keys:
- Cannot seem to focus (No image appears in the eyepiece):
- Images through the eyepiece appear unfocused or distorted:
- Error Message "Warning! Motor driver overloaded."
- The telescope does not GOTO the right object, or the alignment is always wrong:
- iOptron Customer Service
- Appendix A. Technical Specifications
- Appendix C. GoToNova ® Star List
- Messier
- Appendix D. Set Up USB-PC Connection
- Install PL-2303 (usb2com) driver
- Install the Hardware
- Appendix E. Firmware Upgrade
- Typical Errors:
- Appendix F. Use a PC to Control an iOptron Mount
- IOPTRON ONE YEAR LIMITED WARRANTY
Brand : iOptron
Model : R80
Category : Telescope