
MNCD42 - Dash cam MINOLTA - Free user manual and instructions
Find the device manual for free MNCD42 MINOLTA in PDF.


| Product Type | Dash Cam (Car Camcorder) |
| Brand | Minolta |
| Model | MNCD42 |
| Display | 4.0 inch LCD (800x480 pixels) |
| Video Resolution | 1920x1080 @ 30fps, 1280x720 @ 30fps, 848x480 @ 30fps |
| Photo Resolution | 12 MP, 10 MP, 8 MP, 5 MP |
| Field of View | 120 degrees super wide angle |
| Loop Recording | Yes (Off, 1 min, 3 min, 5 min) |
| Collision Auto Recording | Yes (sensitivity: Off, Low, Medium, High) |
| Motion Detection | Yes (On/Off, auto recording on movement) |
| Parking Guard (Park Mode) | Yes (on collision detection while parked) |
| G-Sensor | Built-in (collision sensitivity adjustment) |
| High Dynamic Range (HDR) | Yes (On/Off) |
| Audio Recording | Built-in microphone (On/Off) |
| Date & Time Stamp | Yes (imprinted on video and photo) |
| Storage | MicroSD / MicroSDHC / MicroSDXC (up to 64GB, Class 10 recommended) |
| File Format | Video: AVI, Photo: JPEG |
| Battery | Built-in 3.7V 200mAh (backup power only) |
| Power Input | DC 5V via USB (car charger included) |
| Mount | Windshield suction cup mount |
| Connectivity | USB 2.0 (data transfer and charging) |
| Languages | English, Spanish, Chinese, Korean, French, Hebrew, Russian |
| Safety & Care | Do not disassemble; avoid moisture/extreme temperatures; clean with damp soft cloth |
| Spare Parts / Repairability | Contact Minolta support; reset button for unresponsive device |
Frequently Asked Questions - MNCD42 MINOLTA
User questions about MNCD42 MINOLTA
0 question about this device. Answer the ones you know or ask your own.
Ask a new question about this device
Download the instructions for your Dash cam in PDF format for free! Find your manual MNCD42 - MINOLTA and take your electronic device back in hand. On this page are published all the documents necessary for the use of your device. MNCD42 by MINOLTA.
USER MANUAL MNCD42 MINOLTA
Congratulations on purchasing your Minolta Camcorder! The contents of this manual are subject to change without notice. Note that the example screens and product illustrations shown in this User's Guide may differ somewhat from the screens and configuration of the actual camera. Please visit our website at www.minoltadigital.com for the latest updates.
This manual contains proprietary information protected by copyright. All rights are reserved. No part of this manual may be reproduced by any mechanical, electronic or other means, in any form, without prior written permission of Elite Brands Inc. © 2020.
The Minolta MNCD42 Car Camcorder integrates multi-functions of 1080p HD video capture, high resolution photo capture and a compact form factor. It adopts video decoding technology of high performance and compression ratios to deliver excellent video quality. This camcorder is intended for in-vehicle shooting, which effectively enables the collection of evidence for driving accidents, daily life, traveling and outdoor activities. The Minolta MNCD42 allows you to record video when mounted to your car's windshield in a wide, large angle.
This quick guide explains how to use your camcorder and provides additional information, including precautions and technical specifications. Please read through it carefully and understand this quick guide before use. Keep it properly stored away for reference.
Safety and Handling Precautions
- Do not take apart or attempt to service the camcorder yourself.
- Do not expose the camcorder to moisture, or extreme temperatures.
- Allow the camera to warm up when moving from cold to warm temperatures.
- Do not touch and put pressure on the camera lens.
- Do not expose the lens to direct sunlight for extended periods.
- Do not use abrasive chemicals, cleaning solvents or strong detergents to clean the product. Wipe the product with a slightly damp soft cloth.
- When the camera is used for an extended period of time, it is normal for the camera body to feel warm.
- Do not subject the LCD monitor to impact.
- To prevent the risk of fire or electric shock, do not expose this appliance to rain or moisture.
1. GETTING STARTED
1.1 Overview
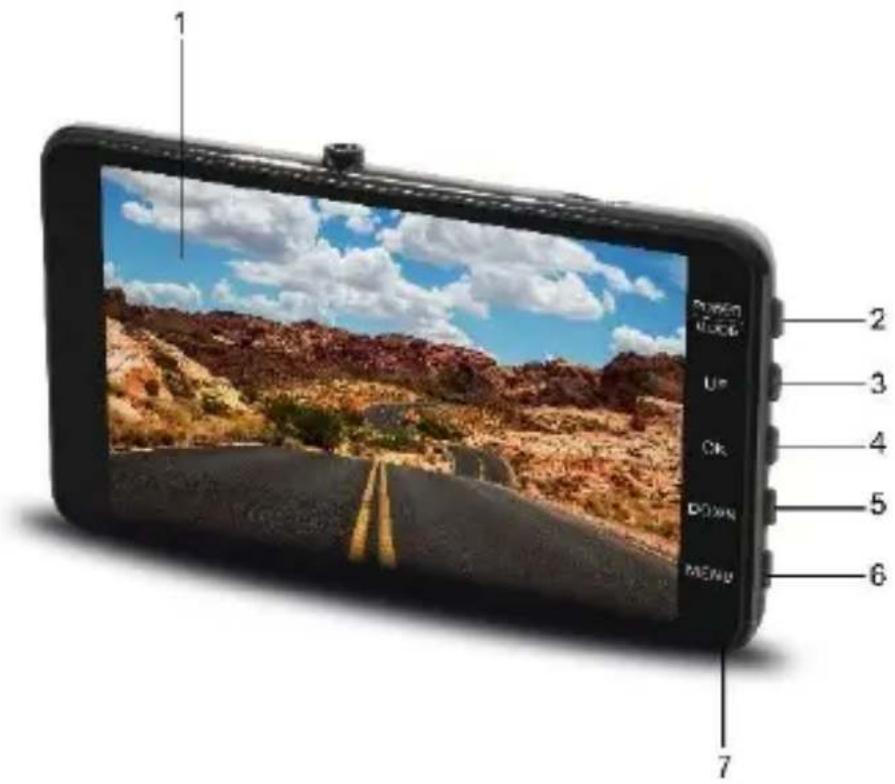
| 1 | Display |
| 2 | Power | Mode |
| 3 | Up |
| 4 | OK | Record |
| 5 | Down |
| 6 | Menu |
| 7 | Microphone |
| 8 | USB Port |
| 9 | LED Flash Light |
| 10 | Mount Port |
| 11 | Memory Card Slot |
| 12 | Speaker |
| 13 | Lens |
| 14 | Reset Button |
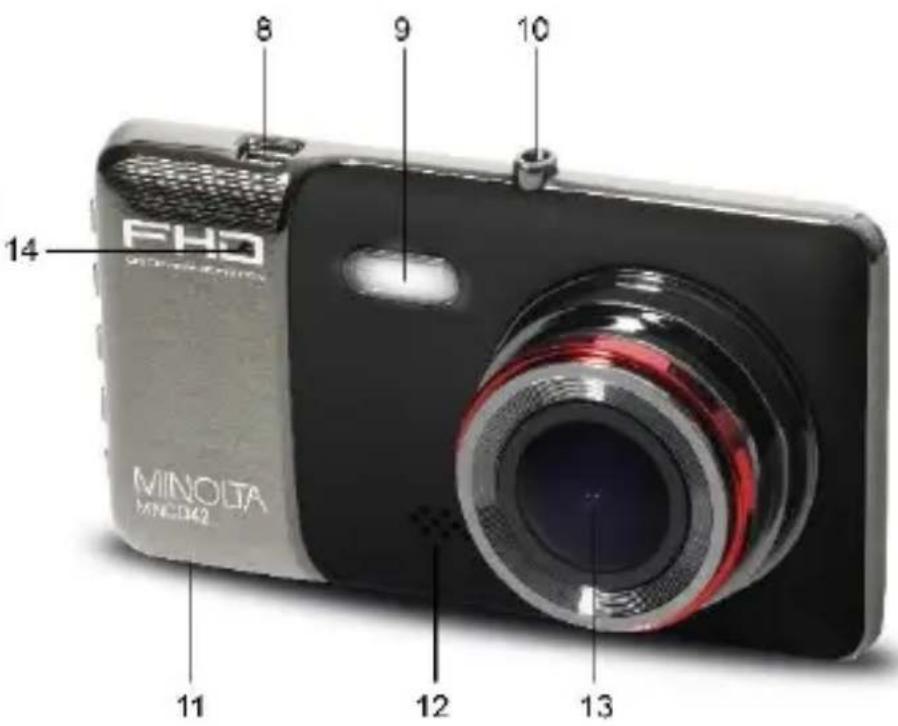
1.2 Button and Functions Explanation
| Button | Function | Description |
| 1 | Display | Shows the current view and menu, options and different statuses of each mode. |
| 2 | Power | Mode | Press for 3 seconds to power on or off. Tap once to cycle between Video, Photo and Playback modes. |
| 3 | Up | Button used during menu navigation and playback use. |
| 4 | OK | Record | OK button in menus. Record button in shooting modes. |
| 5 | Down | Button used during menu navigation and playback use. |
| 6 | Menu | Button used for accessing and exiting all menus and submenus. |
| 7 | Microphone | Built-in microphone for audio capture during video recording. |
| 8 | USB Port | Power port and data transfer port for transferring media to your computer. |
| 9 | LED Flash Light | LED to aid with additional lighting. |
| 10 | Mount Port | Mount port for attaching the windshield suction cup mount. |
| 11 | Memory Card Slot | Storage slot for inserting your MicroSD memory card. |
| 12 | Speaker | Built-in speaker output for playback of video files when audio recording is enabled. |
| 13 | Lens | Front capture device for all video and photo. |
| 14 | Reset Button | Button for power cycling your camcorder if it freezes or becomes unresponsive |
1.3 Memory Card Insertion and Removal
- Ensure the camcorder is powered off.
- Insert a MicroSD memory card into the MicroSD card slot with the gold pins facing the display screen. Do not force it through the MicroSD card into the slot as it can only be inserted in one direction. Once successfully inserted, it will click in.
- To remove the MicroSD card, simply push the MicroSD card in and it will bounce back out of the slot.
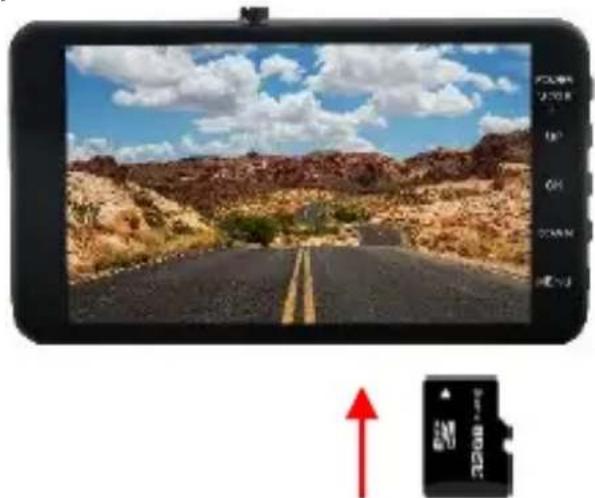
Do not remove or insert the memory card when recording. Doing so may cause the card to become damaged or cause data loss.
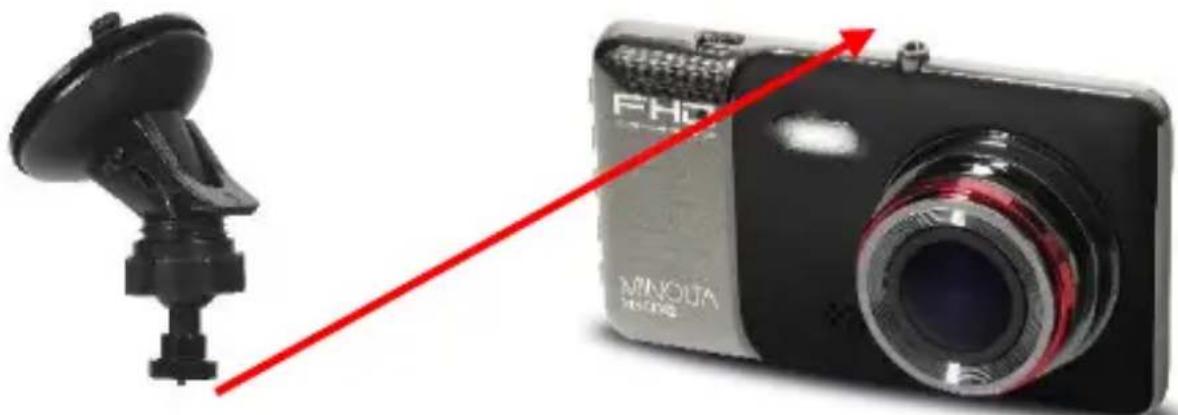
1.4 Windshield Suction Cup Mount
The included windshield mount is included for mounting your camcorder to your windshield. Simply screw in the mount's adaptor clockwise to fasten it to your dashcam, or counterclockwise to loosen it from the dashcam. Apply the suction cup side to the top of your windshield. Before applying to your windshield, make sure that your windshield is clean and free of any dirt or debris.
NOTE: If the suction cup loses its grip over time, thoroughly clean the clear suction are with soap and water. After cleaning, allow it to dry for 2 hours and reapply it to your windshield.
natural_image
Two digital cameras, one black with a camera mount and the other black with a red arrow pointing to its side (no visible text or symbols on the devices themselves)1.5 Startup
1.5.1 In-Car Use
Connect the included auxiliary DC power adaptor to your car's power port. Plug the USB plug into the camcorder's USB port. Charging will begin immediately. Please note that the camcorder's internal battery has a very limited capacity and is only intended for use in emergency use situations.
1.5.2 USB Cord / Computer Use
Connect the included USB cable to a free USB port on your computer, and connect the other end of the cable into the camcorder's USB port. The battery may be charged while the camcorder is powered on or off.
While charging, the LCD monitor will display the battery's status as follows:

Dashcam is connected to auxiliary power and battery is fully charged.

Dashcam is connected to auxiliary power and is charging.

Dashcam is disconnected from auxiliary power and running on battery.
Quick Use Instructions
Simply insert the memory card into the card slot, and insert the auxiliary power adaptor into the camcorder's USB port and your car's power port. The camcorder will automatically power on and begin recording a video file.
To start or stop recording at any time, press the OK button. You may also remove the auxiliary DC power adaptor at any time to automatically save a recording and power the camcorder off. Just mount it to your windshield, plug in the power and drive!
Once you have inserted the MicroSD memory card and plugged your camcorder into a power source, your camcorder will automatically power on. You may also manually power your camcorder on or off by pressing the POWER button for 2 seconds.
There are 3 operation modes available for use. To cycle through the different modes, simply short press the POWER / MODE button. Your camcorder's screen will show the current mode in the display's upper left corner. Modes cannot change while a video is being recorded. The recording must stop first before changing to another mode.
3.1 Video Capture Mode

Once your camcorder powers on, it will default to Video Mode and will begin recording automatically. To start or stop recording at any time, press the OK button. To manually capture video when changing from another capture mode, enter VIDEO Mode and press the OK button to begin recording video again.
3.2 Photo Capture Mode

To capture a photo, enter PHOTO Mode by short pressing the POWER / MODE button until a camera icon is show in the upper left hand corner of the screen. Press the OK button to instantly capture a photo. You may also capture a photo during a video recording by pressing the UP button.
3.3 Playback Mode

To review your video and photo files, enter PLAYBACK Mode. Short press the POWER / MODE button until a previously captured file is shown on the screen. The most recent file captured will be displayed first.
- Press the UP and DOWN buttons to cycle through available playback files of photos and videos.
- To delete a file or to protect a file from deletion, press the MENU button.
- Press the POWER / MODE button again to exit PLAYBACK mode.
Playing Back Video Clips
- Press the OK button to play or pause a video clip in PLAYBACK mode.
- To delete a file or to protect a file from deletion, press the MENU button.
3.4 Main Screen and Icons Explanation
VIDEO MODE
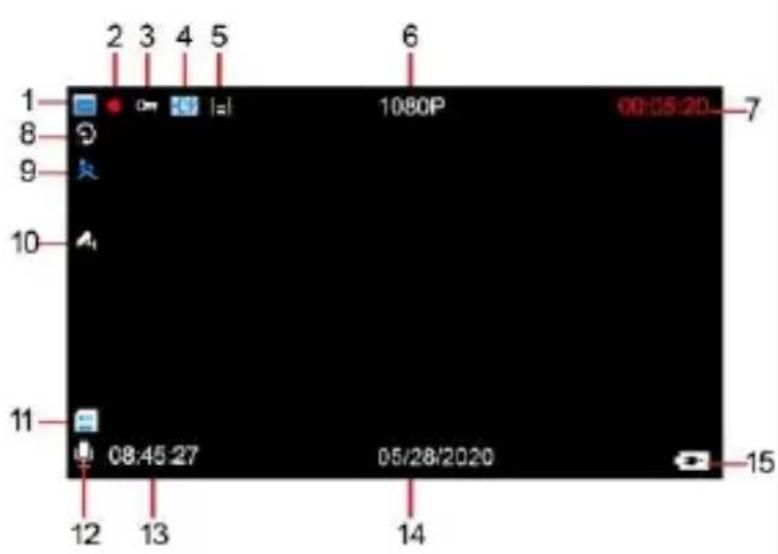
- VIDEO Mode
- Recording Active
- Gravity Sensor Enabled
- High Dynamic Range (HDR)
- Collision Sensitivity
- Video Size (Resolution)
- Recording Time Elapsed
- Loop Recording Enabled
- Motion Detection Enabled
- Parking Guard
- Memory Card Inserted
- Microphone Enabled
- Current Time
- Current Date
- Power Status
PHOTO MODE
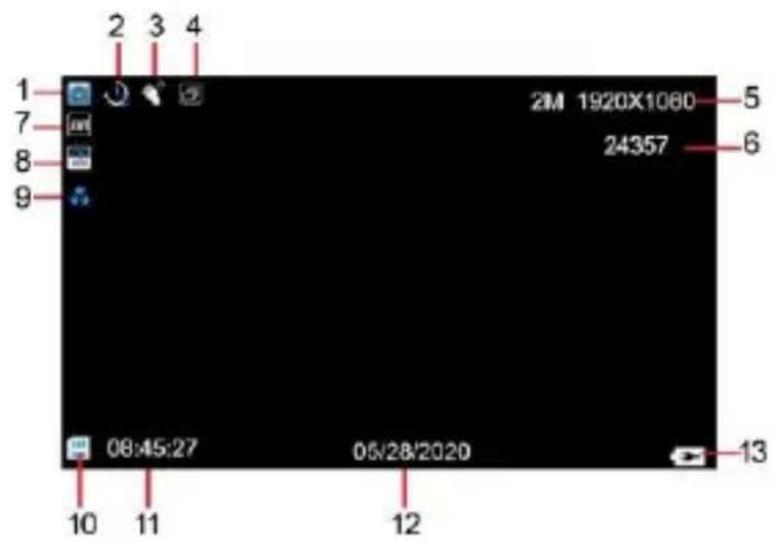
- PHOTO Mode
- Self-Timer Delay
- Image Stabilization Status
- Photo Burst
- Picture Size (Resolution)
- Number of Pictures Remaining
- Automatic White Balance
- Automatic ISO Enabled
- Current Image Quality
- Memory Card Inserted
- Current Time
- Current Date
- Power Status
4. MENU & SETTINGS INTERFACE
4.1 Video Mode Settings

Overview
Your camcorder comes preset with some user-adjustable settings to fine tune and customize how you would like your videos to be captured. The settings are already optimized and preset for the easiest experience.
Before you begin, ensure you are in VIDEO mode ☐. From the main screen, short press the POWER / MODE button once. The current mode will be displayed in the upper left corner of the display. To cycle through the different modes, simply short press the POWER / MODE button again.
NOTE: The settings menu cannot be accessed while the camcorder is recording a video file. If the camcorder is recording a file, you must stop recording before the settings menu can be accessed. To stop recording at any time, press the OK button.
4.1.1 Video Resolution
Your camcorder has a number of preset resolution and frames per second rates. A higher resolution will produce a higher quality and lager video file.
- In VIDEO mode, press the MENU button. Select 'Video Resolution' by using the UP or DOWN buttons. Press the OK button to enter the 'Video Resolution' submenu.
- Press the UP or DOWN buttons again to navigate the submenu and select a setting. You can select from 1080p (highest quality), 720p (medium quality), and 480p (low quality).
- Press the OK button to confirm your selected setting.
To exit the settings menu, press the MENU button twice and your camcorder will return to the main status screen of the current mode.
4.1.2 Cyclic Record (Loop Recording)
This setting allows you to set a maximum duration for each video clip recorded. Once you select an option, your camcorder will record video clips in this time interval only. Once your selected duration recording time is reached, the camcorder will end the recording and begin recording a new video file seamlessly.
- In VIDEO mode, press the MENU button. Select 'Loop Recording' by using the UP or DOWN buttons. Press the OK button to enter the 'Loop Recording' submenu.
- Press the UP or DOWN buttons again to navigate the submenu and select a setting. You can select from Off, 1 Minute Loop, 3 Minute Loop and 5 Minute Loop.
- Press the OK button to confirm your selected setting.
To exit the settings menu, press the MENU button twice and your camcorder will return to the main status screen of the current mode.
4.1.3 High Dynamic Range
This setting allows you to turn High Dynamic Range on and off. HDR improves the range of color and contrast in a digital image and video.
- In VIDEO mode, press the MENU button. Select 'High Dynamic Range' by using the UP or DOWN buttons. Press the OK button to enter the 'High Dynamic Range' submenu.
- Press the UP or DOWN buttons again to navigate the submenu and select a setting. You can select from Off and On.
- Press the OK button to confirm your selected setting.
To exit the settings menu, press the MENU button twice and your camcorder will return to the main status screen of the current mode.
4.1.4 Motion Detection
This setting automatically begins recording if movement is detected in front of the camcorder lens. Once recording, the camcorder will stop recording if not further movement is detected within a 10-second period of the last movement registered. You may also manually stop recording anytime by pressing the OK button during a recording.
- In VIDEO mode, press the MENU button. Select 'Motion Detection' by using the UP or DOWN buttons. Press the OK button to enter the 'Motion Detection' submenu.
- Press the UP or DOWN buttons again to navigate the submenu and select a setting. You can select from Off and On.
- Press the OK button to confirm your selected setting.
- To exit the settings menu, press the MENU button twice and your camcorder will return to the main status screen of the current mode.
Note: When selecting OFF, your camcorder will still automatically record upon startup if you power it off.
4.1.5 Audio Recording
This setting allows you to set the built-in microphone ON or OFF during a video recording. Once you select an option, your camcorder will either record audio within the video file, or record a video file without audio captured.
- In VIDEO mode, press the MENU button. Select 'Audio Recording' by using the UP or DOWN buttons. Press the OK button to enter the 'Audio Recording' submenu.
- Press the UP or DOWN buttons again to navigate the submenu and select a setting. You can select from Off and On.
- Press the OK button to confirm your selected setting.
To exit the settings menu, press the MENU button twice and your camcorder will return to the main status screen of the current mode.
4.1.6 Date & Time Stamp
This setting allows you to imprint a date & time onto your recorded video files. Once a video file is recorded with the imprint, the imprint cannot be removed.
- In VIDEO mode, press the MENU button. Select 'Date & Time Stamp' by using the UP or DOWN buttons. Press the OK button to enter the 'Date & Time Stamp' submenu.
- Press the UP or DOWN buttons again to navigate the submenu and select a setting. You can select from Off and On.
- Press the OK button to confirm your selected setting.
To exit the settings menu, press the MENU button twice and your camcorder will return to the main status screen of the current mode.
4.1.7 Collision Sensitivity
This setting allows you to set the sensitivity level for automatic recording upon collision.
When triggered or when the camcorder things a collision occurred, it will automatically begin recording and the recording will be stored with the icon. The video file will be locked and protected from deletion.
- In VIDEO mode, press the MENU button. Select 'Collision Sensitivity' by using the UP or DOWN buttons. Press the OK button to enter the 'Collision Sensitivity' submenu.
- Press the UP or DOWN buttons again to navigate the submenu and select a setting. You can select from Off, Low, Medium and High.
- Press the OK button to confirm your selected setting.
To exit the settings menu, press the MENU button twice and your camcorder will return to the main status screen of the current mode.
4.1.8 Parking Guard (Park Mode)
This setting allows the camcorder to automatically power on and record a video clip if the camcorder detects a collision while parked and is powered off. You can set the sensitivity level setting in this menu. This setting will only activate if there is sufficient battery power remaining in the camcorder's built-in battery. When triggered or when the camcorder thinks a collision occurred, it will automatically begin recording and the recording will be stored with the icon. The video file will be locked and protected from deletion.
- In VIDEO mode, press the MENU button. Select 'Parking Guard' by using the UP or DOWN buttons. Press the OK button to enter the 'Parking Guard' submenu.
- Press the UP or DOWN buttons again to navigate the submenu and select a setting. You can select from Off and On.
- Press the OK button to confirm your selected setting.
To exit the settings menu, press the MENU button twice and your camcorder will return to the main status screen of the current mode.
Note: When selecting Off, your camcorder will still automatically record upon startup if you power it off.
4.1.9 Headlight Monitor
This setting will alert you to turn on your car's headlights if the road appears too dark.
- In VIDEO mode, press the MENU button. Select 'Headlight Monitor' by using the UP or DOWN buttons. Press the OK button to enter the 'Headlight Monitor' submenu.
- Press the UP or DOWN buttons again to navigate the submenu and select a setting. You can select from Off and On.
- Press the OK button to confirm your selected setting.
To exit the settings menu, press the MENU button twice and your camcorder will return to the main status screen of the current mode.
4.2 Photo Mode Settings

Overview
Your camcorder comes preset with some user-adjustable settings to fine tune and customize how you would like your photos to be captured. The settings are already optimized and preset for the easiest experience.
Before you begin, ensure you are in PHOTO mode ☐ From the main screen, short press the POWER button once. The current mode will be displayed in the upper right corner of the display. To cycle through the different modes, simply short press the POWER button again.
NOTE: The settings menu cannot be accessed while the camcorder is recording a video file. If the camcorder is recording a file, you must stop recording before the settings menu can be accessed. To stop recording at any time, press the OK button.
4.2.1 Photo Resolution
Your camcorder has a number of preset photo resolution sizes. A higher resolution will produce a higher quality and larger file size photo.
- In PHOTO mode, press the MENU button. Select 'Resolution' by using the UP or DOWN buttons. Press the OK button to enter the 'Resolution' submenu.
- Press the UP or DOWN buttons again to navigate the submenu and select a setting. You can select from 12 Mega Pixels (highest quality), 10 Mega Pixels, 8 Mega Pixels, and 5 Mega Pixels (lowest quality).
- Press the OK button to confirm your selected setting.
To exit the settings menu, press the MENU button twice and your camcorder will return to the main status screen of the current mode.
4.2.2 Photo Burst
This setting allows the camcorder to take 3 consecutive pictures at once.
- In PHOTO mode, press the MENU button. Select 'Photo Burst' by using the UP or DOWN buttons. Press the OK button to enter the 'Photo Burst' submenu.
- Press the UP or DOWN buttons again to navigate the submenu and select a setting. You can select from Off and 3 Photos.
- Press the OK button to confirm your selected setting.
To exit the settings menu, press the MENU button twice and your camcorder will return to the main status screen of the current mode.
4.2.3 Photo Quality
This setting determines the level of compression the camera uses when saving photos to your memory card. A high level of compression will produce a lower quality photo, and will also use less space when saving your photos.
- In PHOTO mode, press the MENU button. Select 'Photo Quality' by using the UP or DOWN buttons. Press the OK button to enter the 'Photo Quality' submenu.
- Press the UP or DOWN buttons again to navigate the submenu and select a setting. You can select from Fine (highest quality), Normal, and Economy (lowest quality).
- Press the OK button to confirm your selected setting.
To exit the settings menu, press the MENU button twice and your camcorder will return to the main status screen of the current mode.
4.2.4 Photo Sharpness
This setting determines the visible detail of the photos being captured.
- In PHOTO mode, press the MENU button. Select 'Photo Sharpness' by using the UP or DOWN buttons. Press the OK button to enter the 'Photo Sharpness' submenu.
- Press the UP or DOWN buttons again to navigate the submenu and select a setting. You can select from Strong (sharp, saturated photo), Normal (medium sharpness), and Soft (soft, duller photo).
- Press the OK button to confirm your selected setting.
To exit the settings menu, press the MENU button twice and your camcorder will return to the main status screen of the current mode.
4.2.5 White Balance
This setting determines the color of light present in your photos. It can make scenes seem warmer or cooler in lighting depending on how the scene you're shooting in affects the frame.
- In PHOTO mode, press the MENU button. Select 'White Balance' by using the UP or DOWN buttons. Press the OK button to enter the 'White Balance' submenu.
- Press the UP or DOWN buttons again to navigate the submenu and select a setting. You can select from Auto, Daylight, Cloudy, Tungsten, and Fluorescent.
- Press the OK button to confirm your selected setting.
To exit the settings menu, press the MENU button twice and your camcorder will return to the main status screen of the current mode.
4.2.6 Photo Color Filter
This setting determines the filter color effect of the photo.
- In PHOTO mode, press the MENU button. Select 'Photo Color Filter' by using the UP or DOWN buttons. Press the OK button to enter the 'Photo Color Filter' submenu.
- Press the UP or DOWN buttons again to navigate the submenu and select a setting. You can select from Normal, Black and White, and Sepia.
- Press the OK button to confirm your selected setting.
To exit the settings menu, press the MENU button twice and your camcorder will return to the main status screen of the current mode.
4.2.7 ISO
This setting determines the light sensitivity in the photos being captured.
- In PHOTO mode, press the MENU button. Select 'ISO' by using the UP or DOWN buttons. Press the OK button to enter the 'ISO' submenu.
- Press the UP or DOWN buttons again to navigate the submenu and select a setting. You can select from Auto, 100, 200 and 400.
- Press the OK button to confirm your selected setting.
To exit the settings menu, press the MENU button twice and your camcorder will return to the main status screen of the current mode.
4.2.8 Image Stabilization
This setting enables image capture in shaky or low-light settings by electronically eliminating motion blur and canceling shake.
- In PHOTO mode, press the MENU button. Select 'Image Stabilization' by using the UP or DOWN buttons. Press the OK button to enter the 'Image Stabilization' submenu.
- Press the UP or DOWN buttons again to navigate the submenu and select a setting. You can select from Off and On.
- Press the OK button to confirm your selected setting.
To exit the settings menu, press the MENU button twice and your camcorder will return to the main status screen of the current mode.
4.2.9 Quick Review
This setting allows you to review the photo after it's taken before returning back to Photo Mode.
- In PHOTO mode, press the MENU button. Select 'Quick Review' by using the UP or DOWN buttons. Press the OK button to enter the 'Quick Review' submenu.
- Press the UP or DOWN buttons again to navigate the submenu and select a setting. You can select from Off, 2 Seconds and 5 Seconds.
- Press the OK button to confirm your selected setting.
To exit the settings menu, press the MENU button twice and your camcorder will return to the main status screen of the current mode.
4.2.10 Self-Timer
This setting enables the camcorder to capture a photo using a preset count down.
- In PHOTO mode, press the MENU button. Select 'Self-Timer' by using the UP or DOWN buttons. Press the OK button to enter the 'Self-Timer' submenu.
- Press the UP or DOWN buttons again to navigate the submenu and select a setting. You can select from Off, 2s Delay, 5s Delay, and 10s Delay.
- Press the OK button to confirm your selected setting.
To exit the settings menu, press the MENU button twice and your camcorder will return to the main status screen of the current mode.
4.2.11 Date & Time Stamp
This setting allows you to imprint a date & time onto your captured photos. Once a photo is captured with the imprint, the imprint cannot be removed.
- In PHOTO mode, press the MENU button. Select 'Date & Time Stamp' by using the UP or DOWN buttons. Press the OK button to enter the 'Date & Time Stamp' submenu.
- Press the UP or DOWN buttons again to navigate the submenu and select a setting. You can select from Off and On.
- Press the OK button to confirm your selected setting.
To exit the settings menu, press the MENU button twice and your camcorder will return to the main status screen of the current mode.
4.3 Playback Mode Settings

Overview
Before you begin, ensure you are in PLAYBACK mode ▶. From the main screen, press the POWER / MODE button three times. The current mode will be displayed in the upper right corner of the display. To cycle through the different modes, simply press the MODE button again.
4.3.1 Delete
Your camcorder gives you the option of deleting your recording video and photo files right from your camcorder.
- In PLAYBACK mode, press the MENU button. Select 'Delete' by using the UP or DOWN buttons. Press the OK button to enter the 'Delete' submenu.
- Press the UP or DOWN buttons again to navigate the submenu and select a setting. You can select from Delete Current? and Delete All?
- Press the OK button to confirm your selected setting.
- Press the MENU button to exit the menu without deleting any images.
To exit the settings menu, press the MENU button twice and your camcorder will return to the main status screen of the current mode.
NOTE: There is no way to recover deleted media. Once you delete a single file or all files, they cannot be recovered. Only files that are locked are protected from deletion in PLAYBACK mode.
4.3.2 File Lock
Your camcorder gives you the option of protecting your recording video and photo files right from your camcorder. This will lock your files and prevent them from being deleted in PLAYBACK mode.
- In PLAYBACK mode, press the MENU button. Select 'File Lock' by using the UP or DOWN buttons. Press the OK button to enter the 'File Lock' submenu.
- Press the UP or DOWN buttons again to navigate the submenu and select a setting. You can select from Lock Current, Unlock Current, Lock All and Unlock All.
- Press the OK button to confirm your selected setting.
- Press the MENU button to exit the menu without making a selection.
To exit the settings menu, press the MENU button twice and your camcorder will return to the main status screen of the current mode.
4.4 Setup Settings Menu

Overview
The Setup Settings Menu can be accessed while in any mode. From the main screen, press the MENU button twice. The menu will move right and switch tabs from the current mode's icon to the ✗ Setup Settings menu.
NOTE: The settings menu cannot be accessed while the camcorder is recording a video file. If the camcorder is recording a file, you must stop recording before the settings menu can be accessed. To stop recording at any time, press the OK button.
4.4.1 LED Flash
This setting controls the LED photo light for your dashcam.
- In any mode, press the MENU button twice. Select 'LED Flash' by using the UP or DOWN buttons. Press the OK button to enter the 'LED Flash' submenu.
- Press the UP or DOWN buttons again to navigate the submenu and select a setting. You can select from Off, On and Auto.
- Press the OK button to confirm your selected setting.
To exit the settings menu, press the MENU button twice and your camcorder will return to the main status screen of the current mode.
4.4.2 Screen Auto Shut Off
This settings allows you to set the length of time before the LCD Screen turns off automatically.
- In any mode, press the MENU button twice. Select 'Screen Auto Shut Off' by using the UP or DOWN buttons. Press the OK button to enter the 'Screen Auto Shut Off' submenu.
- Press the UP or DOWN buttons again to navigate the submenu and select a setting. You can select from Off, 1 Minute, 3 Minutes and 5 Minutes.
- Press the OK button to confirm your selected setting.
- After the selected amount of time the screen will power off. To wake the screen back on, press any button.
To exit the settings menu, press the MENU button twice and your camcorder will return to the main status screen of the current mode.
4.4.3 Frequency
This setting allows you to set the power frequency of your camcorder. This setting is dependent on the region that the camcorder is being used in.
- In any mode, press the MENU button twice. Select 'Frequency' by using the UP or DOWN buttons. Press the OK button to enter the "Frequency" submenu.
- Press the UP or DOWN buttons again to navigate the submenu and select a setting. You can select from 50Hz and 60Hz. The setting for North America is 60Hz.
- Press the OK button to confirm your selected setting.
To exit the settings menu, press the MENU button twice and your camcorder will return to the main status screen of the current mode
4.4.4 Beep Sound
This setting allows you to enable or disable the sound when pressing a button.
- In any mode, press the MENU button twice. Select 'Beep Sound' by using the UP or DOWN buttons. Press the OK button to enter the 'Beep Sound' submenu.
- Press the UP or DOWN buttons again to navigate the submenu and select a setting. You can select from Off and On.
- Press the OK button to confirm your selected setting.
To exit the settings menu, press the MENU button twice and your camcorder will return to the main status screen of the current mode.
4.4.5 Language
This setting allows you to set the language for your camcorder's menus.
- In any mode, press the MENU button twice. Select 'Language' by using the UP or DOWN buttons. Press the OK button to enter the 'Language' submenu.
- Press the UP or DOWN buttons again to navigate the submenu and select a setting. You can select from several different languages.
- Press the OK button to confirm your selected setting.
To exit the settings menu, press the MENU button twice and your camcorder will return to the main status screen of the current mode.
4.4.6 Date & Time Setup
This setting allows you to set a date and time for display on videos and photos.
- In any mode, press the MENU button twice. Select 'Date & Time Setup' by using the UP or DOWN buttons. Press the OK button to enter the 'Date & Time Setup' submenu.
- The menu is presented as follows:
Date: MM / DD / YYYY (the date can only be displayed in this format)
Time: HH:MM:SS (the time can only be displayed in a 24-hour format)
- Press the UP or DOWN buttons to change the any of the values of the date and time. When you are satisfied with the highlighted value, press the OK button to confirm that value and proceed to the next value.
Once you are completed, press the MENU button twice to save your setting and exit. Your camcorder will return to the main status screen of the current mode.
4.4.7 Format Memory Card
This setting allows you to erase all video and photo files stored on your memory card.
- In any mode, press the MENU button twice. Select 'Format Memory Card' by using the UP or DOWN buttons. Press the OK button to enter the 'Format Memory Card' submenu.
- Press the UP or DOWN buttons again to navigate the submenu and select a setting. You can select from No and Yes.
- Press the OK button to confirm your selected setting.
- To exit the settings menu, press the MENU button twice and your camcorder will return to the main status screen of the current mode.
NOTE: Use extreme caution when accessing this setting. There is no way to recover formatted media. Once you format your memory card, the previously stored files cannot be recovered.
4.4.8 Reset To Default Settings
This setting allows you to reset all menu settings to the factory default settings. This function will not delete any media stored on your memory card.
- In any mode, press the MENU button twice. Select 'Reset To Default Settings' by using the UP or DOWN buttons. Press the OK button to enter the 'Reset To Default Settings' submenu.
- Press the UP or DOWN buttons again to navigate the submenu and select a setting. You can select from No and Yes.
- Press the OK button to confirm your selected setting.
To exit the settings menu, press the MENU button twice and your camcorder will return to the main status screen of the current mode.
4.4.9 Firmware Version
This setting displays the current firmware version of your camcorder.
- In any mode, press the MENU button twice. Select 'Firmware Version' by using the UP or DOWN buttons. Press the OK button to enter the 'Firmware Version' submenu.
- The menu will display the current firmware version.
To exit the settings menu, press the MENU button twice and your camcorder will return to the main status screen of the current mode.
5. MEDIA TRANSFER & RESET
Connecting to a Computer
Connect your camcorder to a computer with the included USB cable. When the camcorder automatically powers on, it will automatically begin downloading any necessary compatibility drivers required for your camera to sync with your PC.
Your camcorder acts like a memory card reader when connected and your videos and photos stored on your dashcam memory can easily be accessed this way
To access the files on your PC, go to Start (or File Explorer) → This PC → and find Removable Disk. Your media will be stored in a folder on this drive.
Reset
If your camcorder freezes or becomes unresponsive, press the RESET button to reset and power cycle the camcorder. Insert a pointy object into the reset hole on the front body of the camcorder to fully reset it. Refer to the Section 1 of the user manual's illustration.
- TECHNICAL SPECIFICATIONS
| Model Number | MNCD42 |
| LCD Display Screen | 4.0 Inch LCD Screen (800x480 pixels resolution) |
| Anti-Shake Technology | Electronic Image Stabilization (Photo Mode only) |
| Field of View | Super wide angle; 120 Degrees |
| Video Resolution | 1920x1080@30fps, 1280x720@30fps, 848x480@30fps |
| Photo Resolutions | 12 Mega Pixels; 10 Mega Pixels; 8 Mega Pixels; 5 Mega Pixels; |
| File Format | Picture: JPEG Video: AVI |
| Loop Recording | Support |
| Collision Auto Recording | Support |
| Motion Detection Recording | Support |
| Time & Date Stamp | Support |
| External Storage | MicroSD, MicroSDHC, MicroSDXC Card (64GB max.) – Class 10 Recommended |
| Languages | English, Spanish, Chinese (simplified), Korean, French, Hebrew, Russian |
| USB Function | USB 2.0 Built-in |
| Microphone and Speaker | Built-in |
| Built-in Battery | 3.7v 200mAh - for use as a backup power source during power outage |

MINOLTA®
Minolta is a registered trademark of JMM Lee Properties, LLC and is used in the United States by Elite Brands Inc. under license. 40 Wall Street, 61st Floor, New York, NY 10005 USA • Tel: 800-441-1100 www.minoltadigital.com • www.elitebrands.com Copyright © 2020 Elite Brands Inc.
If you're having difficulties with your camera, or would like further assistance, please call our toll-free technical support hotline at 800-441-1100. Please be sure to have your camera handy when calling.
- Safety and Handling Precautions
- GETTING STARTED
- Overview
- Button and Functions Explanation
- Memory Card Insertion and Removal
- Windshield Suction Cup Mount
- Startup
- In-Car Use
- USB Cord / Computer Use
- Quick Use Instructions
- Video Capture Mode
- Photo Capture Mode
- Playback Mode
- Playing Back Video Clips
- Main Screen and Icons Explanation
- MENU & SETTINGS INTERFACE
- Video Mode Settings
- Overview
- Video Resolution
- Cyclic Record (Loop Recording)
- High Dynamic Range
- Motion Detection
- Audio Recording
- Date & Time Stamp
- Collision Sensitivity
- Parking Guard (Park Mode)
- Headlight Monitor
- Photo Mode Settings
- Photo Resolution
- Photo Burst
- Photo Quality
- Photo Sharpness
- White Balance
- Photo Color Filter
- ISO
- Image Stabilization
- Quick Review
- Self-Timer
- Date & Time Stamp
- Playback Mode Settings
- Delete
- File Lock
- Setup Settings Menu
- LED Flash
- Screen Auto Shut Off
- Frequency
- Beep Sound
- Language
- Date & Time Setup
- Format Memory Card
- Reset To Default Settings
- Firmware Version
- MEDIA TRANSFER & RESET
- Connecting to a Computer
- Reset
- MINOLTA®
Brand : MINOLTA
Model : MNCD42
Category : Dash cam