
SP36091US - Treadmills COSTWAY - Free user manual and instructions
Find the device manual for free SP36091US COSTWAY in PDF.


| Product Type | Motorized Treadmill |
| Model | SP36091US |
| Brand | Costway |
| Assembled Dimensions (L x W x H) | 1515 x 690 x 1297 mm |
| Folded Dimensions (L x W x H) | 783 x 690 x 1354 mm |
| Running Surface | 430 x 1200 mm |
| Net Weight | 99 lbs |
| Maximum User Weight | 220.5 lbs (100 kg) |
| Speed Range | 0.5 - 7.5 mph |
| Power | As per rating label (110-240V, grounded) |
| Display | 1 LCD window: Speed, Time, Distance, Calories, Pulse |
| Programs | 12 preset programs (P1-P12) plus manual and fat test mode |
| Countdown Modes | Time, Distance, Calories |
| Heart Rate Monitor | Hand pulse sensors (reference only) |
| Body Fat Test | BMI calculation via hand pulse (needs manual input of sex, age, height, weight) |
| Safety Key | Emergency stop (pull pin) |
| Foldable | Yes, with gas shock for easy folding |
| Transport Wheels | 2 moving wheels |
| Accessories Included | Bottle cage, oil bottle, safety key, MP3 wire (optional), tools |
| Lubrication | Pre-lubricated deck; lubricate annually for light use, every 6 months for medium, every 3 months for heavy |
| Cleaning | Unplug before cleaning; vacuum under motor cover yearly |
| Intended Use | Home use only |
| Safety Area Behind | 1000 x 2000 mm |
Frequently Asked Questions - SP36091US COSTWAY
User questions about SP36091US COSTWAY
0 question about this device. Answer the ones you know or ask your own.
Ask a new question about this device
Download the instructions for your Treadmills in PDF format for free! Find your manual SP36091US - COSTWAY and take your electronic device back in hand. On this page are published all the documents necessary for the use of your device. SP36091US by COSTWAY.
USER MANUAL SP36091US COSTWAY
natural_image
Line drawing of a standard treadmill with adjustable arms and legs (no text or symbols)USER'S MANUAL
MOTORIZED TREADMILL
SP36091US
Safety precautions
Warning: Now here we suggest that you should consult with your physician or health professional before starting your workout, especially for the age up to 35 old or once-health problem people. We take no responsible for any troubles or hurts if you don't following our specification. Treadmill will be carefully assembled and covered the motor shield, then connect to the power.
Attention :
- Ensuring the safety clamps were attached to the clothing or belts before using the treadmill.
- Please do not insert any items to any part of the equipments, which would damage the equipment.
- Position the treadmill on a clear, level surface. Do not place the treadmill on thick carpet as it may interfere with proper ventilation. Do not place the treadmill near water or outdoors.
- Never start the treadmill while you are standing on the walking belt. After turning the power on and adjusting the speed control, there may be a pause before the walking belt begins to move, always stand on the foot rails on the sides of the frame until the belt is moving.
- Wear appropriate clothing when exercising on the treadmill. Do not wear long, loose fitting clothing that may be caught in the treadmill. Always wear running or aerobic shoes with rubber soles.
- Keep the children and pets away from the treadmill while starting workout.
- Don't exercise in 40-Mints after dinner.
- The equipment is suitable for adults, Juveniles need be accompanied with adults while workout.
- You must hold on to the handrails until you become comfortable and familiar with the treadmill at your first start the workout.
- Treadmill is indoor-using equipment, not outdoor-using for avoiding damage. Keep the store-place clean and flat, drying. Prohibiting the other purpose using, only for workout.
- Please purchase the power-line to the distributor or contact with our company directly, for the power-line only equip to the treadmill.
- If the treadmill should suddenly increase in speed due to an electronics failure or the speed being inadvertently increased, the treadmill will come to a sudden stop when the pull pin is disengaged from the console.
- Do not connect line to the middle of cable; do not lengthen cable or change the cable plug; do not any heavy thing on cable or put the cable near the heat source; forbid using socket with several holes, these may cause fire or people may be hurt by the power.
- Cut off the power when the equipment is not used. When the power is cut off, do not pull the power line to keep thee wire unbroken. Insert the plug to the socket with the safety ground circuit, for the power-line is professional equipment. You must contact with the professional people directly while the line is damaged.
- This Treadmill only for home-using. Max user weight: 100KGS
- Safety area behind the treadmill: 1000*2000MM
Assembly Instructions
When you open the carton, and you will find the below parts in the carton
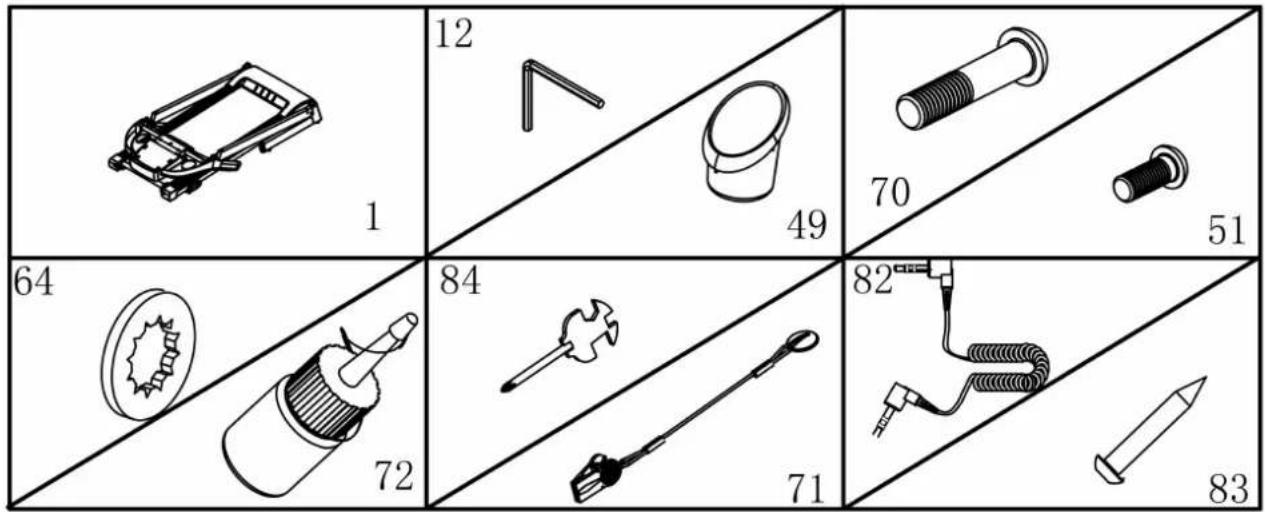
PART LIST:
| NO | DES. Specification Nos. NO | DES Specification | Nos | |||||
| 1 | Main Frame | 1 | 71 | Safety key | 1 | |||
| 12 | 5# Allen Wrench | 1 | 84 | Wrench with screw driver | S=13、14、15 | 1 | ||
| 49 | Bottle Cage | 2 | 72 | Oil bottle | 1 | |||
| 70 | Bolt | M8*40 | 2 | 82 | MP3 wire | OPTION | 1 | |
| 51 | Bolt | M8*16 | 4 | 83 | Bolt | 4.2*12 | 2 | |
| 64 | Lock washer | 8 | 6 |
FIXING TOOLS:
5# Allen Wrench 5mm 1pc,
Wrench with screw driver S=13、14、15 1pc
Notice: Do not get through power before complete assembly
WARNING:
1) Warning: a folded treadmill should not be operated;
2) Warning: To allow the running surface to come to a complete stop before folding.
3) WARNING! Heart rate monitoring systems may be inaccurate. Over exercising may result in serious injury or death. If you feel faint stop exercising immediately.
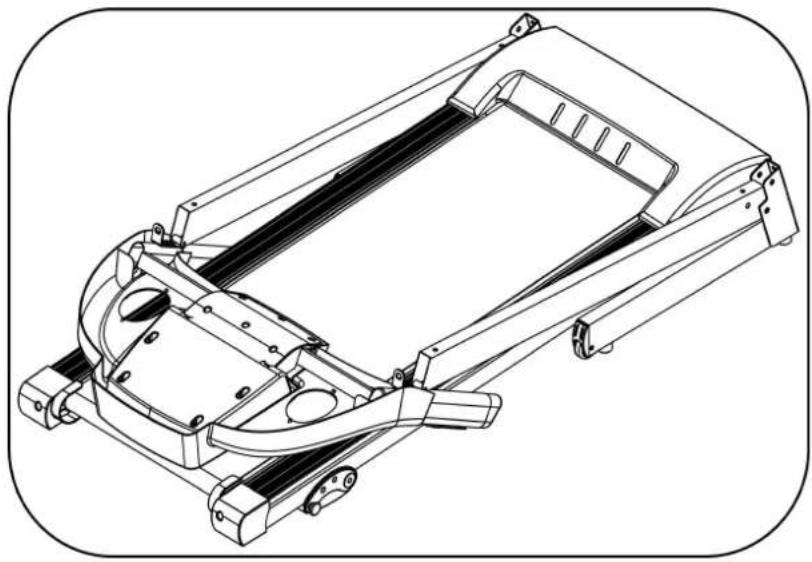
STEP 1:
natural_image
Technical line drawing of a mechanical assembly with no visible text or symbols- Open the carton, take out the above spare parts, put the Main Frame on the level ground.
STEP 2 :
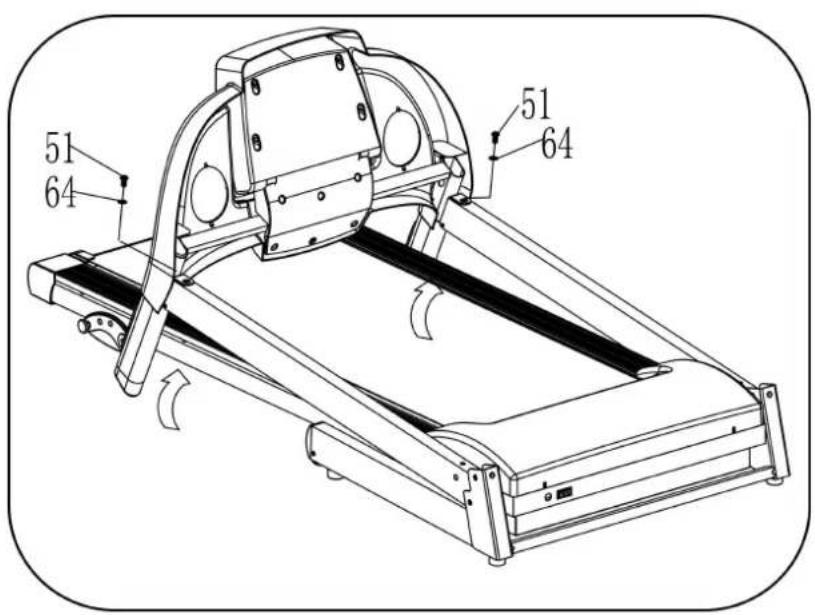
- Hold on the Computer frame and use the 5# Allen wrench(12), M8*20 bolt(51) and lock washer (64), fix the computer frame onto the right and left upright. Left picture for reference.
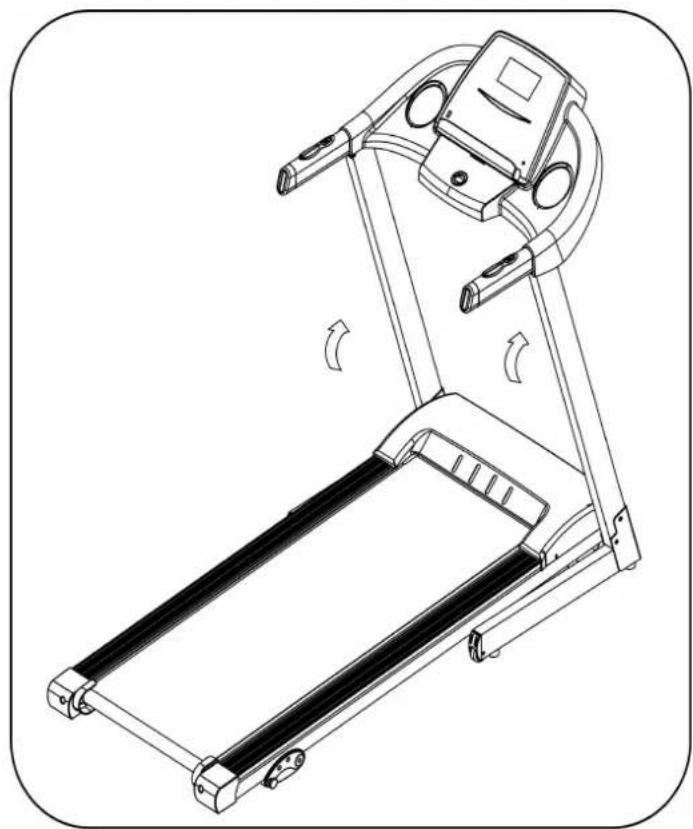
STEP 3
natural_image
Line drawing of a treadmill with motion arrows indicating changes (no text or symbols)- Push up the Computer and L&R uprights.
STEP 4:
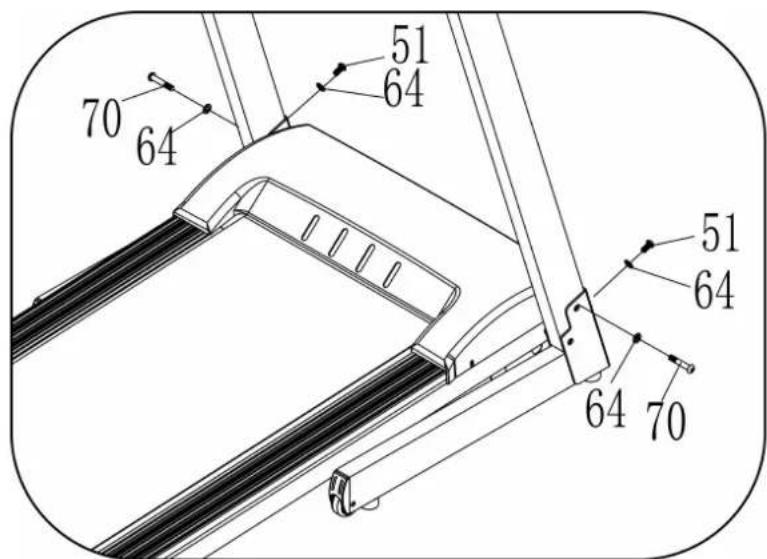
1、Use 5# Allen wrenchfirstly lock upright onto base frame by bolt M8*40 (70) and lock washer (64), then lock upright onto base frame by bolt M8*20 (51) and lock washer (64).
Notice: Support the upright with hand to avoid falling down to have any hurt.
STEP 5:
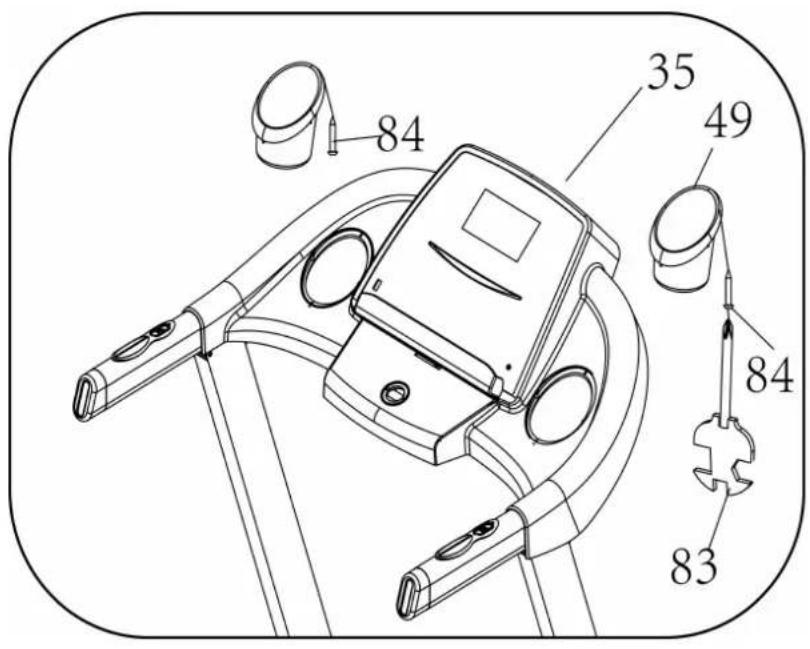
- Put the Bottle cage (49) into the hole of the computer. Then use wrench with screw driver (83) and Bolt(84) to lock the bottle cage on computer(35). Left is same as right side.
STEP 6:
natural_image
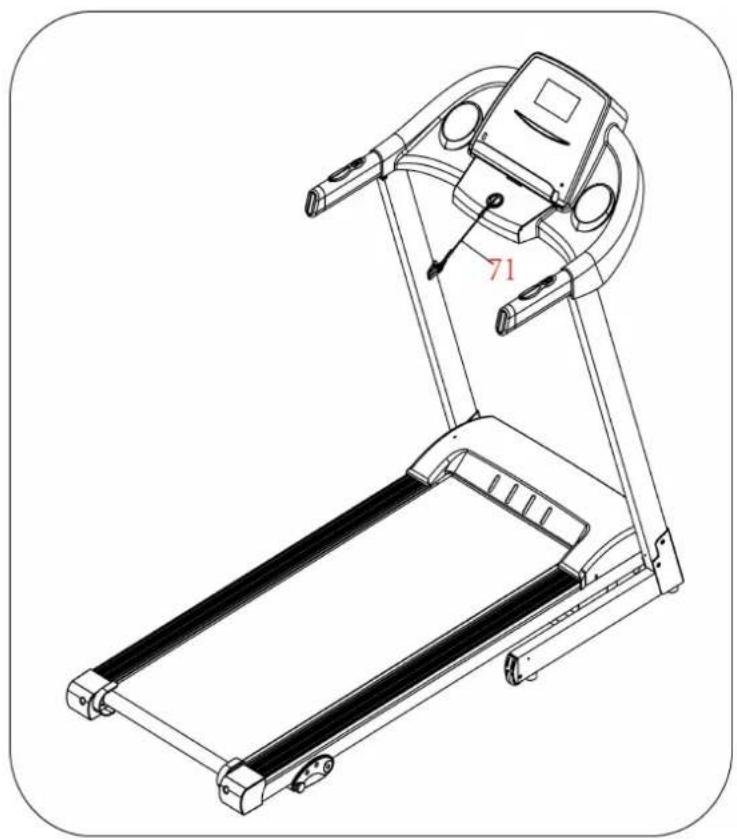
Line drawing of a treadmill with labeled parts, no text or symbols presentPut the safety key (71) on the computer.
Folding Instruction
Pulling up:
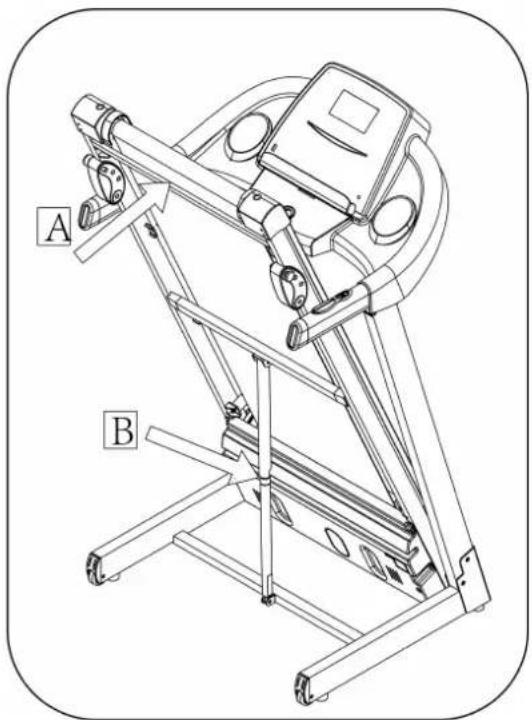
Pull up the base frame at position (A) till hearing the sound that the air pressure bar (B) is locked into the round tube.
Pulling down:
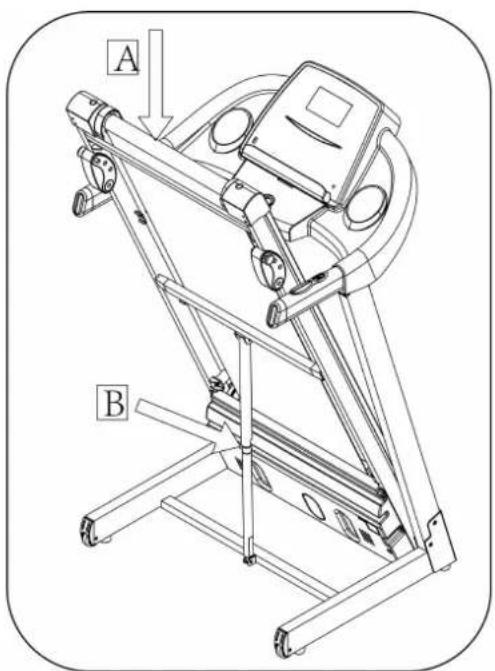
Support place A with hand, kick the place of air pressure bar, then the base frame will fall down automatically (Please keep anybody and any pet away the machine when falling down).
ATTENTION: Please confirm complete assembly as the require above and lock all the bolt. Do the following operation after checking everything is OK. Before you use the treadmill, please read the instruction carefully.
Technical Parameter
| BUILT UP SIZE(mm) | 1515*690*1297mm | POWER | As the rating label showing |
| FOLDABLE SIZE(mm) | 783*690*1354mm | Maximum output power | As the rating label showing |
| RUNNING SURFACE SIZE(mm) | 430*1200 | SPEED RANGE | 0.5-7.5MPH |
| NET WEIGHT | 99 lbs | MAX USER WEIGHT | 220.5 lbs |
| 1 LCD WINDOW | Speed, Time, Distance, Calories, Pulse | ||
Grounding Methods
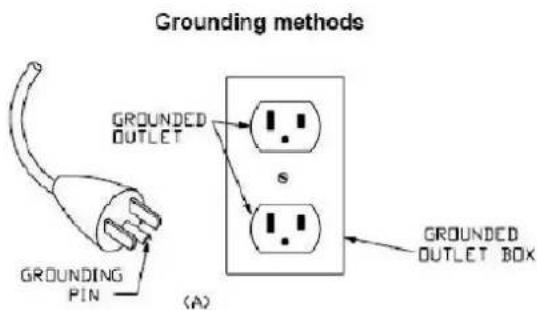
This product must be grounded. If it should malfunction or breakdown, grounding provides a path of least resistance for electric current to reduce the risk of electric shock. This product is equipped with a cord having an equipment-grounding conductor and a grounding plug. The plug must be plugged into an appropriate outlet that is properly installed and grounded in accordance with all local codes and ordinances.
DANGER -Improper connection of the equipment-grounding conductor can result in a risk of electric shock. Check with a qualified electrician or serviceman if you are in doubt as to whether the product is properly grounded. Do not modify the plug provided with the product – if it will not fit the outlet, have a proper outlet installed by a qualified electrician. This product is for use on a nominal 220-240/100-120 volt(please choose the correct voltage) circuit and has a grounding plug that looks like the plug illustrated in sketch A in following figure Make that the product is connected to an outlet having the same configuration as the plug. No adapter should be used with this product.( The below picture is just for reference, the actual plug and jack is depends on import country)
1. DISPLAY WINDOW
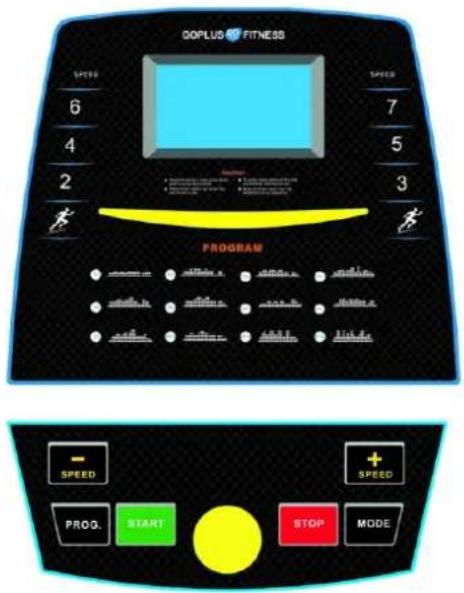
2. LCD WINDOW DISPLAY DETAILS:
SPEED: Show speed.
CALO.: Show calories.
PULSE: Show heart beat data,.
TIME: Show running time.
DIST: Show distance.
3. BUTTON FUNCTION
"START" button: Press this button to start the machine, the machine will run at the lowest speed or at the speed of default program after 3 seconds time count down;
"STOP" button: Press this button to stop the machine, the machine will slow the speed still stop.
"PROG" button: Press this button to choose program from manual mode—P1----P12---FAT;
"MODE" button: When machine in standby state, press this button to choose the mode: manual mode-time count down mode-distance count down mode-calories count down;
SPEED▲、▼: Adjust the speed. Press the button to adjust the speed when running, and adjust the data when stop;
SPEED (2/4/6 & 3/5/7): Adjust the speed quickly.
4. MAIN FUNCTION
Open the power switch, the window will light, the machine will enter into ready state.
4.1. START-UP QUICKLY (MANUAL):
Put safety key, press 'START' button, the treadmill will run at the lowest speed in 3 seconds, press SPEED▲、▼ to adjust the speed. Press the 'STOP' button or take out the safety key directly to stop the treadmill.
4.2. COUNT DOWN MODE:
Press the ‘ MODE’ button, it can choose time countdown mode, distance count down mode, calories countdown mode, and the window will show the default data and glitter. At the same time, press SPEED ▲/▼ to set the data. Press ‘ START ’ button, the machine will run at the lowest speed, you can press SPEED ▲/▼ to change the speed. When it counts down to 0, the machine will stop smoothly. Certainly, you can press ‘ STOP’ button or take out the safety key from the computer to stop the machine.
4.3. INNER INSTALL PROGRAM:
Press 'PROG' button to choose the inner install program from P1----P12. When set the program, the time window will show default data and glitter, press SPEED button to set the running time. Each program has been divided into 20 section, Each exercise time=the setting time/20. Press 'START', the machine will run at the first section speed. When the section is over, it will enter into next section automatically, the speed will change as next section data. When finish one program, the machine will stop smoothly.
During the runnig, you can change the speed by the SPEED ▲/▼ whenever, When the program enter next sect will come back to the current speed. And you can press 'STOP' or take out the safety key to stop the machine whenever.
5. HEART BEAT TEST
When holding the hand pulse by two hands, the pulse window will show your heart beat after 5 seconds. In order to get the heart beat more correct, please test when the machine stop, and holding the hand pulse more than 30 seconds. The heart beat data is just for reference, can not be as the medical data.
6. BODY FAT TEST
Press ‘PROGRAM’ button under ready condition, till ‘FAT’ show in the speed window. ‘FAT’ is body fat test mode. Press ‘MODE’ to choose parameter ‘SEX / AGE / HEIGHT / WEIGHT’, and TIME/DIST window will show “F1”“F2”、“F3”“F4”. When set each parameter, press SPEED ▲/▼ to adjust the data, and CAL/PULSE window will show the data and press ‘MODE’ button to finish, and the window will show“F5” and“---” enter into ready condition. Hold the handle pulse with two hands, it will show your BMI data after 5 seconds.
6.1 Data display and set range
| default range mark | |||
| SEX (F1) | 1 (MALE) | 1—2 | I= MALE 2= FEMALE |
| AGE (F2) 25 | 10—99 | ||
| HEIGHT (F3) | 68 in | 40—48 in | |
| WEIGHT (F4) | 154lbs | 44—330lbs | |
6.2 BMI reference
| (BMI) | |
| FAT ≤19 | Under weight |
| 19< FAT ≤25 | Normal weight |
| 25< FAT ≤29 | Over weigh |
| FAT≥30 | Obesity |
7. SLEEP FUNCTION
Stopped for more than 10 minutes without any operation, the system completed all showed off into the body of sleep state. Press any key to wake up.
8. SAFETY KEY FUNCTION
Pull out the safety key, the treadmill will stop quickly, all data turn to zero, All the windows display“——All normal operation must be in the state of safety key locked.
9. RUNNING DATA DISPLAY AND SETTING RANGE
| DEFAULT PROGRAM | DEFAULT MODE | SET RANGE | SHOW RANGE | |
| PROGRAM TIME | 0:00 | 30:00 | 5:00-99:00 | 0:00~99:59 |
| SPEED(KM/H) | 0.0 | N/A | N/A | 0.5 mph --7.5 mph |
| DISTANCE | 0.0 | 1.0 | 0.5-99.9 | 0.0-99.9 |
| CALORIES | 0 | 50 | 10-999 | 0-999 |
| MODE TIME | 0:00 | 15:00 | 5:00-99:00 | 0:00~99:59 |
DATE TABLE:
| PROGRAM\TIME | Setting time/20= interval running time | ||||||||||||||||||||||||||||
| 1 | 2 | 3 | 4 | 5 | 6 | 7 | 8 | 9 | 10 | 11 | 12 | 13 | 14 | 15 | 16 | 17 | 18 | 19 | 20 | ||||||||||
| P01 | SPEED | 1.2 | 1.8 | 1.8 | 2.5 | 3.1 | 1.8 | 2.5 | 3.1 | 3.1 | 1.8 | 2.5 | 3.1 | 2.5 | 2.5 | 2.5 | 1.2 | 1.8 | 1.8 | 3.1 | 1.8 | ||||||||
| P02 | SPEED | 1.2 | 2.5 | 2.5 | 3.1 | 3.7 | 2.5 | 3.7 | 3.7 | 3.7 | 2.5 | 3.1 | 3.7 | 2.5 | 2.5 | 2.5 | 1.2 | 1.2 | 3.1 | 2.5 | 1.2 | ||||||||
| P03 | SPEED | 1.2 | 2.5 | 2.5 | 3.7 | 3.7 | 2.5 | 4.3 | 4.3 | 4.3 | 2.5 | 4.3 | 4.3 | 2.5 | 2.5 | 2.5 | 1.2 | 2.5 | 3.1 | 1.8 | 1.2 | ||||||||
| P04 | SPEED | 1.8 | 3.1 | 3.1 | 3.7 | 4.3 | 4.3 | 3.1 | 4.3 | 4.3 | 5 | 5 | 3.1 | 5.6 | 3 | 1 | 3.1 | 3.7 | 3.7 | 2.5 | 2.5 | 1.8 | |||||||
| P05 | SPEED | 1.2 | 2.5 | 2.5 | 3.1 | 3.7 | 4.3 | 4.3 | 3.1 | 3.7 | 4.3 | 5 | 5 | 3.1 | 2 | 5 | 1.8 | 1.8 | 3.7 | 3.1 | 2.5 | 1.2 | |||||||
| P06 | SPEED | 1.2 | 2.5 | 2.5 | 2.5 | 3.1 | 3.7 | 5 | 5 | 3.7 | 4.3 | 5 | 5 | 3.7 | 2.5 | 2.5 | 1.2 | 3.1 | 2.5 | 1.8 | 1.2 | ||||||||
| P07 | SPEED | 1.2 | 1.8 | 1.8 | 1.8 | 2.5 | 3.1 | 1.8 | 2.5 | 3.1 | 1.8 | 2.5 | 3.1 | 1.8 | 1.8 | 1.8 | 3.7 | 3.7 | 3.1 | 1.8 | 1.8 | ||||||||
| P08 | SPEED | 1.2 | 1.8 | 1.8 | 3.7 | 4.3 | 4.3 | 2.5 | 3.7 | 4.3 | 2.5 | 3.7 | 4.3 | 2.5 | 2.5 | 2.5 | 1.2 | 1.8 | 2.5 | 2.5 | 1.2 | ||||||||
| P09 | SPEED | 1.2 | 2.5 | 2.5 | 4.3 | 4.3 | 2.5 | 4.3 | 5 | 2.5 | 5 | 5.6 | 5.6 | 2.5 | 2 | 5 | 2.5 | 3.1 | 3.7 | 1.8 | 1.8 | 1.2 | |||||||
| P10 | SPEED | 1.2 | 2.5 | 3.1 | 3.7 | 4.3 | 3.1 | 2.5 | 3.7 | 5 | 5 | 3.7 | 3.7 | 3.1 | 2 | 5 | 2.5 | 1.2 | 2.5 | 2.5 | 1.8 | 1.8 | |||||||
| P11 | SPEED | 1.2 | 3.1 | 5 | 6.2 | 4 | 3 | 4.3 | 6.2 | 6 | 2 | 4.3 | 4.3 | 6.2 | 6.2 | 3.1 | 3.1 | 5 | 6 | 5.6 | 3.1 | 3.1 | 2.5 | 1.8 | |||||
| P12 | SPEED | 1.8 | 2.5 | 5.6 | 5.6 | 3.1 | 5 | 6 | 3.1 | 5 | 3.1 | 5.6 | 4.3 | 3.1 | 3.1 | 4.3 | 5 | 6 | 5.6 | 3.1 | 4.3 | 3.7 | 1.8 | ||||||
Learning Guide
PREPARATION
If you are over 35 years old or not very healthy, also it's your first time do exercise, please consult with your doctor or professional person.
Before you use the motorized treadmill, please learn how to control the machine first, know well how to start, stop, adjust the speed and so on. After that, stand on anti-slip pad both sides and hold the handle bar with your both hands. Keep the machine at the low speed about 1.0\~2 .0 mph, Stand straight and test the running machine by one foot, after get used to the speed, you can begin to run and can increase speed to 1.9\~3.1 mph. Keep the speed about 10 minutes, then stop the machine.
EXERCISE :
Learn how to adjust the speed and incline before using. Walk about 0.6 mile at stable velocity, it will take you about 15-25 minutes. If walk at 3.0 mph, it will take you about 12 minutes in 0.6 mile. If you feel comfortable at the stable velocity, you can add the speed and incline, after 30 minutes, you can have good exercise. At this stage, you can not add the speed or incline too much at one time, it is good for your health.
EXERCISE INTENSITY:
Warm up at the speed 3.0 mph in 2 minutes, then add the speed to 3.3 mph and keep walking in 2 minutes, then add to 3.6 mph and walk in 2 minutes. After that, add up 0.2 mph in each 2 minutes, unt rapid breath but not feel comfortable. Finally, you should slow down the speed step by step for 4Mints. If you feel it is difficult to increase the speed to strengthening exercise, please increase the incline slowly. Increasing the incline slowly will improve the exercise intensity greatly.
Calorie burning---the best effective way
Warm-up for 5mints by the velocity:2.5-3.0 mph, then slowly increase the speed by 0.2 mph /2Mints ,until up to the stable speed which you feel is comfortable for 45Mints.For improving the intensity of movement, you can maintain the speed during 1H of TV program, then increase the speed by 0.2 mph each Advertisement interval time, after that return to the original speed . You can acquaint the best efficiency of workout for calorie burning during the advertisement time and subsequent heart frequency increasing time. Finally, you should slow down the speed step by step for 4Mints.
The cycle time: 3-5times/Week, 15-60mints/Times. Make up the schedule of workout scientific, not only for your hobby.
You can control the running intensity through adjusting the velocity and incline of treadmill. We suggest that you don't set the incline at first; improve the incline is the effective way to strengthen the exercise's intensity.
Consult with your physician or health professional before starting your workout. The professional people can help you make up the suitable exercise time-chart according to your age and health condition, determine the velocity of movement, the intensity of exercise. Please stop at once, If you feel chest
tightness, chest pain, irregular heartbeat, breath difficulty, dizziness or other discomfort during exercise.
You should consult with your physician or health professional as keep going.
You can choose the normal walking speed or the jogging speed, if you always take workout with treadmill.
If you don't have enough experiences or confirm the testing velocity, you can follow the instruction:
Speed 0.6-1.9 mph not well physical
Speed 1.9-2.8 mph less movement and workout
Speed 2.8-3.8 mph normal walking
Speed 3.8-4.7 mph Fast walking
Speed 4.7-5.6 mph Jogging
Speed 5.6-7.5 mph intermediate speed running
Speed 7.5-9.1 mph experienced runner
Speed 9.1-10 mph excellent runner
Attention: The velocity of movement ≤3.8MP/H , the normal walking; The velocity of movement ≥5.0 mph the runner.
Warm-up Instruction
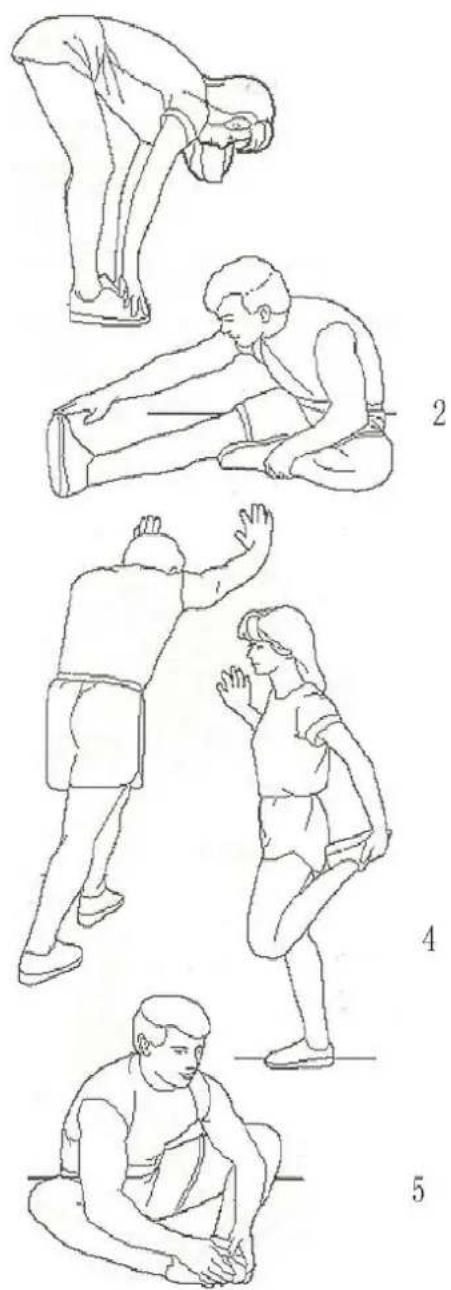
Before exercise, it is better to do stretching exercises .Warm muscles stretch more easily, so the first of 5 \~ 10minutes to warm up. Then in accordance with the followingmethods to stop and do stretching exercises - do five times,each leg every time 10 seconds or more time to do it againafter the end of the exercise.
- Down the stretch: knees slightly curved, the body bent forward slowly, so that the back and shoulders relaxed, hands try to touch your toes. Maintain 10 to 15 seconds, then relax. Repeat three times to do (see Figure I).
-
Hamstring stretch: sitting on the clean seat, put one leg straight. Inward close to the other leg to make it close to the inside leg straight. hand try to touch the toes. Maintain 10 to 15 seconds, then relax. Repeat for each leg do three times (see Figure 2).
-
Legs and feet tendon stretch: two on the Rotary wall or tree stand, one foot in the post. Keep legs straight and heel to tilt the direction of the wall or tree. Maintain 10 to 15 seconds, then relax. Repeat for each leg do three times (see Figure 3).
4 .quadriceps stretch: the left hand wall or table to make balance, and then stretched his right hand back to seize the right foot to the buttocks with slowly pull until you feel the front thigh muscles tense. Maintain 10 to 15 seconds, then
relax. Repeat for each leg to do three times (see Figure 4).
- Sartorius muscle (inner thigh muscles) stretch: Foot In contrast, the knee outward to sit down. The hands grasp the feet to the groin pull. Maintain 10 to 15 seconds, then relax. Repeat three times(see Figure 5).
Warning: ALWAYS UNPLUG THE TREADMILL FROM THE ELECTRICAL OUTLET BEFORE CLEANING OR SERVICING THE UNIT.
Clean: General cleaning or the unit will greatly prolong the treadmill.
Keep treadmill clean by dusting regularly. Be sure to clean the exposed part of the deck on either side of the walking belt and also the side rails. This reduces the build up of foreign material underneath the walking belt by wearing the clean running shoes.
Warning: Always unplug the treadmill from the electrical outlet before removing the motor cover. At least once a year remove the motor cover and vacuum under the motor cover.
RUNNING BELT AND DECK LUBRICATION
This treadmill is equipped with a pre-lubricated, low maintenance deck system. The belt/ deck friction may play a major role in the function and life of your treadmill, thus requiring periodic lubrication. We recommend a periodic inspection of the deck. You need contact with our service center if you find the damage of the deck.
We recommend lubrication of the deck according to the following timetable:
➢ Light user (less than 3 hours/week) annually
➢ Medium user (3-5 hours/ week) every six months
➢ Heavy user (more than 5 hours/week) every three months
We recommend that you buy the lubrication from our distributor or directly to our company.
Attention: Any repair need the professional technician.
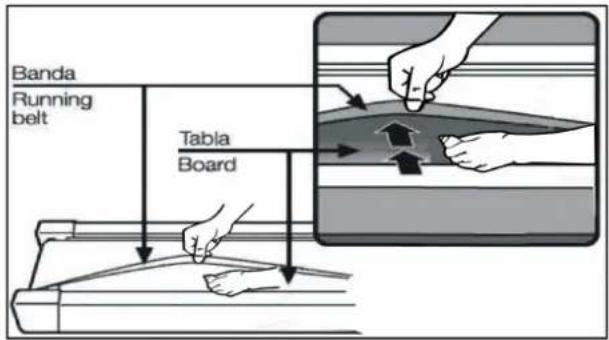
- We suggest that you should cut off the power for 10Mints after keep running 2HS, so that it's good for maintain the treadmill.
2, For avoiding the slipping during running, the belt not too loose; for avoiding the more abrasion between the roller and belt and maintain the machine's good running, the belt not too tight. You can adjust the distance between plates and belt, the belt be away from the plates about 50-75mm on both sides, if the best not too tight and loose.
Center The Running Be
- Place treadmill on a level surface. Run
Treadmill at approximately 2.4-3.1mph,
checking the running condition.
If the belt has drifted to the right, pull out of the save clock and switch, turn the right adjusting bolt 1/4 turn clockwise, then start running until centering the belt. PIC A
If the belt has drifted to the left ,pull out of the safety clock and switch, turn the left adjusting bolt 1/4 turn clockwise ,then start running until centering the belt .PIC B
Timely adjust the tightness of the belt ,for the looseness after a period of time running. Pull out of the safety clock and switch , turn the left and right adjusting bolt 1/4 turn clockwise ,then re-start running, confirm the belt-tightness until the belt be right tightness. PIC C
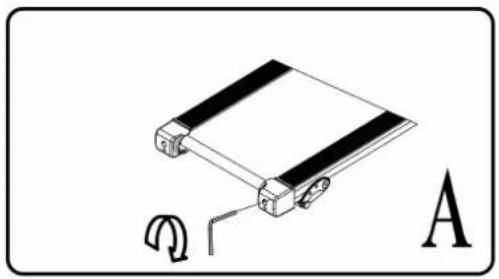
natural_image
Diagram of a mechanical device with a spring and labeled section A (no text or symbols on the device itself)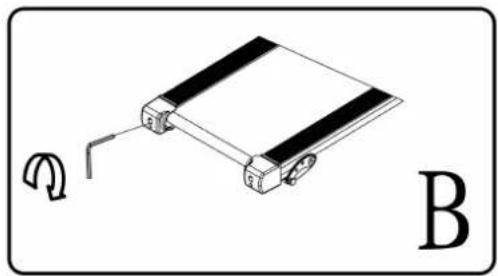
natural_image
Simple line drawing of a rectangular electronic component with a curved arrow and label B (no text or symbols on the diagram itself)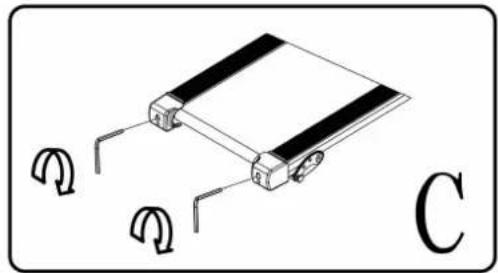
natural_image
Pure electrical circuit lines without any symbolsExploded Parts Diagram
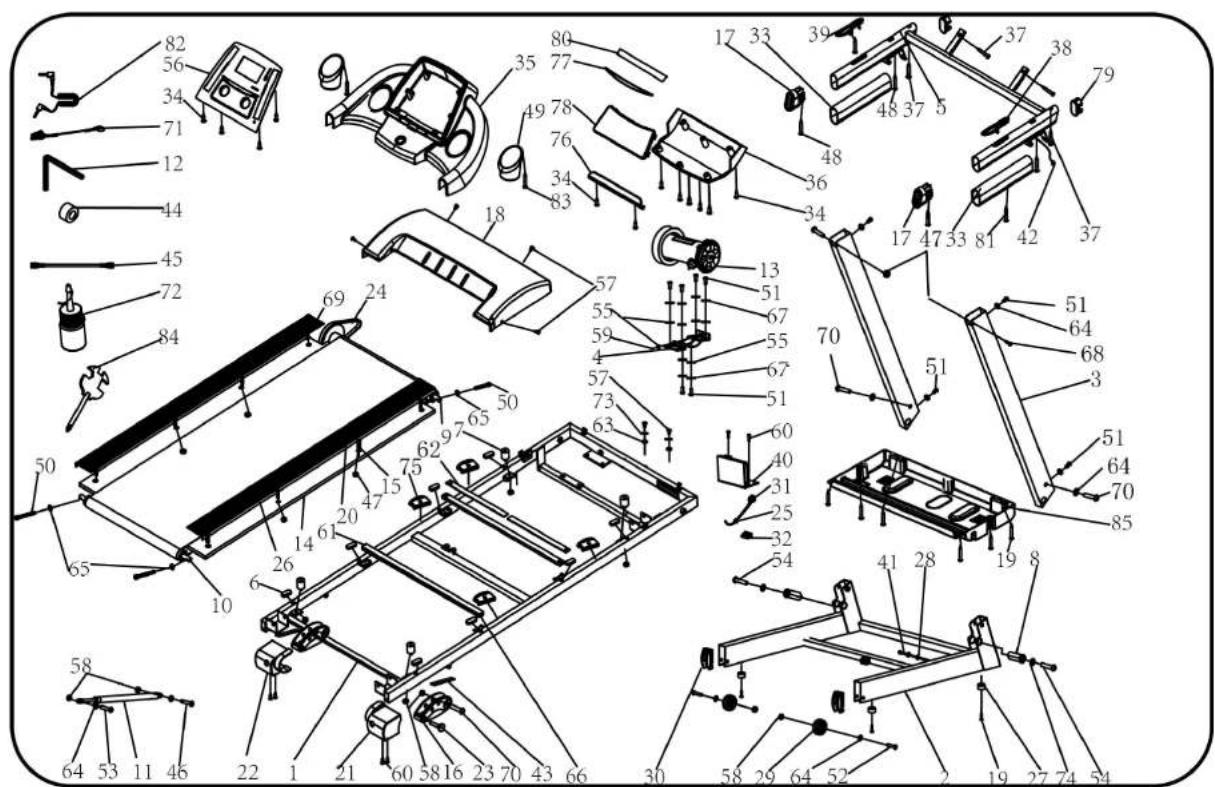
PARTS LIST
| NO. | DESCRIPTION | SPECS. QTY | NO. | DESCRIPTION | SPECS. | QTY | ||
| 1 | Main Frame | 1 | 44 | Magnetic ring | 1 | |||
| 2 | Base Frame | 1 | 45 | Brown Single Line | 1 | |||
| 3 | Upright Frame | 2 | 46 Bolt | M8*25 1 | ||||
| 4 | Motor Bracket | 1 | 47 | Lock nut | M6 | 6 | ||
| 5 | Computer Bracket | 1 | 48 Screw | ST4.2* | 45 2 | |||
| 6 | Rubber pad | 8 | 49 | Bottle Cage | 2 | |||
| 7 | Cushion | 4 | 50 Bolt | M6*65 3 | ||||
| 8 | Turning tube | 2 | 51 Bolt | M8*20 10 | ||||
| 9 | Front Roller | 1 | 52 Bolt | M8*40 2 | ||||
| 10 | Rear Roller | 1 | 53 Bolt | M8*42 1 | ||||
| 11 | Cylinder | 1 | 54 Bolt | M10*55 | 2 | |||
| 12 | 5#Allen wrench | 5mm 1 | 55 | Flat Washer C | 8 | 7 | ||
| 13 | DC Motor | 1 | 56 | Panel | 1 | |||
| 14 | Running Board | 1 | 57 Bolt | M5*8 | 5 | |||
| 15 | Bolt | M6*40 | 4 | 58 | Lock Nut | M8 | 10 | |
| 16 | Adjustable foot pad | 2 | 59 | Bolt | M8*25 1 | |||
| 17 | Inclined tube plug | 2 | 60 Screw | ST4.2* | 19 6 | |||
| 18 | Motor up cover | 1 | 61 | Running Board | 2 | |||
| 19 | Screw | ST4.2*19 | 11 | 62 | Strengthen tube | 275*20*3 | 4 | |
| 20 | Side rails | 2 | 63 | Lock washer | 5 | 1 | ||
| 21 | Right back end cover | 1 | 64 | Lock washer | 8 | 12 | ||
| 22 | Left back end cover | 1 | 65 | Lock washer | 6 | 3 | ||
| 23 | Fix Pin | 2 | 66 | Nylon isolation mat | 23* | 4 | ||
| 24 | Motor belt | 1 | 67 | Lock washer | 8 | 6 | ||
| 25 | Power wire buckle | 1 | 68 Bolt | M6*37 2 | ||||
| 26 | Running belt | 1 | 69 Bolt | M8*25 4 | ||||
| 27 | Foot pad | 4 | 70 Bolt | M8*40 4 | ||||
| 28 | Ring wire protector B | 2 | 71 | Safety key | 1 | |||
| 29 | Moving Wheel | 2 | 72 | Oil Bottle | 1 | |||
| 30 | Moving wheel cover | 2 | 73 | Lock washer | 5 | 1 | ||
| 31 | Standard power wire | 1 | 74 | Lock washer | 10 | 2 | ||
| 32 | Switch | 1 | 75 | Elastic cushion | 4 | |||
| 33 | Foam | 2 | 76 | Ipad rack | 1 | |||
| 34 | Screw | ST4.2*20 | 12 | 77 | PU Pad | 1 | ||
| 35 | Computer cover | 1 | 78 | Speaker box grill | 1 | |||
| 36 | Computer seal cover | 1 | 79 | Oval tube inner | 2 | |||
| 37 | Screw | ST4.2*20 | 6 | 80 | EVA | 1 | ||
| 38 | Hand pulse with Speed+/- | 1 | 81 Screw | ST4.2* | 55 2 | |||
| 39 | Hand pulse with Start Stop Key | 1 | 82 | Mp3 wire | option | 1 | ||
| 40 | Control Circuit Board | 1 | 83 Bolt | 4.2*12 | 2 | |||
| 41 | Computer bottom wire | 1 | 84 | Wrench with screw | 1 | |||
| 42 | Computer up wire | 1 | 85 | Motor bottom cover | 1 | |||
| 43 | Rubber pad 2 | 2 |
TROUBLE SHOOTING
1、Probable reason for computer not workable after power start: The wire from computer to bottom control board did not connected well or the transformer was burnt out. Check the each wire from computer to control board make sure they are connected well. If the wire is destroyed, change it. If the above can not settle the problem to change a good transformer.
2、E01: Message failure. Probable reason: The wires from computer and bottom control board didn't connect well, please check each wire. If the wire was destroyed, change a good one.
3、E02: Burst clash. Check the power is right, if not, use correct power to test; Check if the bottom control was burnt out, change a good one; reconnect the motor wire.
4、E03: Speed sensor fault: check the bottom control, change a good one.
5、E05: Current overload protecting. Over rated loaded or the motor is stuck, cause excessive current, machine will start self-protecting system. Adjust the machine and restart; Check if the motor has noise from motor or if motor / bottom control board were burnt out, if burnt out, change good motor and bottom control; Use right voltage.
6、E06:If the motor can not work after pressing START button, the probable reason: the motor wire is broken; the safety pipe is broken or fell; motor wire is not connected well; IGBT on bottom control board is burnt out. Te above reasons and change the relevant part.
TIPS:
Your suggestions and comments for Costway are really important to us!
We sincerely solicit you to go back to our shop and leave a good rating in just a simple click. It would be quite encouraging if you could kindly do so like below:
★★★★★ Great products so far
February 24, 2018
Great product so far. Fast delivery, easy setup, and working without any issues.
With your inspiring rating, Costway will be more consistent to offer you EASY SHOPPING EXPERIENCE, GOOD PRODUCTS and EFFICIENT SERVICE!
US office:Fontana
UK office:Ipswich
- Safety precautions
- Attention :
- Assembly Instructions
- FIXING TOOLS:
- Notice: Do not get through power before complete assembly
- Folding Instruction
- Pulling up:
- Pulling down:
- Technical Parameter
- Grounding Methods
- DISPLAY WINDOW
- LCD WINDOW DISPLAY DETAILS:
- BUTTON FUNCTION
- MAIN FUNCTION
- START-UP QUICKLY (MANUAL):
- COUNT DOWN MODE:
- INNER INSTALL PROGRAM:
- HEART BEAT TEST
- BODY FAT TEST
- Data display and set range
- BMI reference
- SLEEP FUNCTION
- SAFETY KEY FUNCTION
- RUNNING DATA DISPLAY AND SETTING RANGE
- Learning Guide
- PREPARATION
- EXERCISE :
- EXERCISE INTENSITY:
- Warm-up Instruction
- RUNNING BELT AND DECK LUBRICATION
- Center The Running Be
- Exploded Parts Diagram
- TROUBLE SHOOTING
- TIPS:
Brand : COSTWAY
Model : SP36091US
Category : Treadmills