
FMF2K5BK00 - Household Fan NewAir - Free user manual and instructions
Find the device manual for free FMF2K5BK00 NewAir in PDF.


| Product Type | Domestic Fan with Misting Function |
| Brand | NewAir |
| Model | FMF2K5BK00 |
| Rated Voltage | 120V |
| Rated Frequency | 60 Hz |
| Rated Power | 55W |
| Current | 0.45A |
| Fan Speeds | 3 |
| Spray Nozzles | 3 |
| Airflow | 2400 CFM |
| Coverage Area | 500 sq. ft. |
| Misting Feature | Yes (requires garden hose) |
| Oscillation | Yes (push/pull clutch knob) |
| Height Adjustment | Yes (adjustable internal pole) |
| Construction Material | Plastic and Metal |
| Power Cord | Grounded with GFCI protection |
| Safety Features | GFCI, overload protection (5A/125V fuse), grounded plug |
| Warranty | 1 year limited manufacturer's warranty |
| Customer Support | Email: support@newair.com | Phone: 855-963-9247 |
| Assembly Required | Yes (approx. 15 minutes, screwdriver needed) |
| Intended Use | Indoor/Outdoor (with waterproof cover) |
| Cleaning Instructions | Wipe with soft cloth and mild detergent; do not allow water into motor |
| Replacement Fuse | 5 Amp / 125 Volt |
Frequently Asked Questions - FMF2K5BK00 NewAir
User questions about FMF2K5BK00 NewAir
0 question about this device. Answer the ones you know or ask your own.
Ask a new question about this device
Download the instructions for your Household Fan in PDF format for free! Find your manual FMF2K5BK00 - NewAir and take your electronic device back in hand. On this page are published all the documents necessary for the use of your device. FMF2K5BK00 by NewAir.
USER MANUAL FMF2K5BK00 NewAir
FMF2K5BK00 Owner's Manual
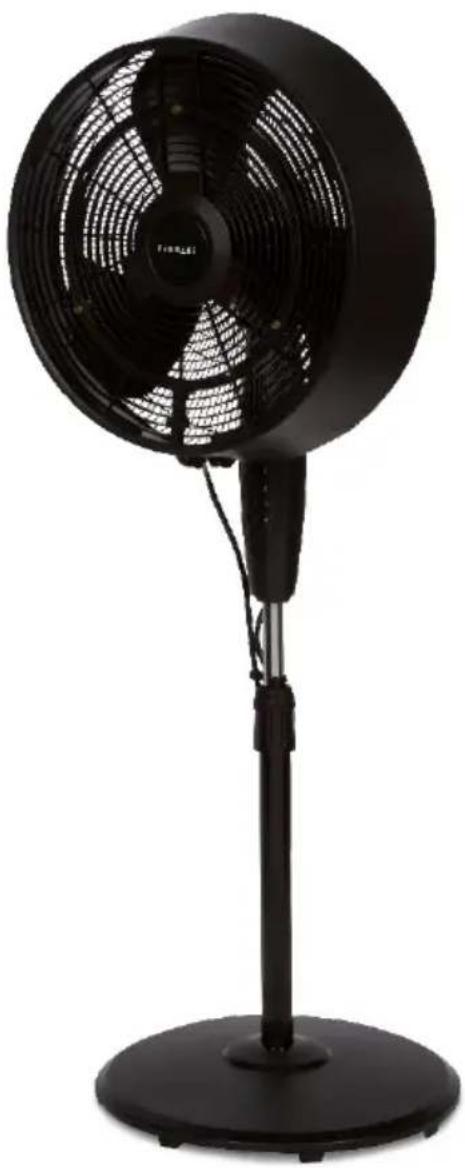
natural_image
Black outdoor fan with circular blades and a stand, no visible text or symbolsREAD AND SAVE THESE
INSTRUCTIONS.
TABLE OF CONTENTS
Register Your Product Online....3
Important Safety Instructions/Warnings 4
Parts Lists 6
Assembly Instructions....7
Operating Instructions....9
Cleaning and Maintenance....10
Troubleshooting 12
Limited Manufacturer's Warranty 13
SPECIFICATIONS
| MODEL NO | FMF2K5BK00 |
| RATED VOLTAGE | 120V |
| RATED FREQUENCY | 60 Hz |
| RATED POWER | 55W |
| CURRENT | 0.45A |
| FAN SPEEDS | 3 |
| SPRAY NOZZLES | 3 |
| AIRFLOW | 2400 CFM |
| COVERAGE | 500 square feet |
Frigidaire is a registered trademark of Electrolux Home Products, Inc. All rights reserved.
Manufactured under license by:
NewAir, LLC
6600 Katella Ave, Cypress, CA 90630
Comments/questions:
support@newair.com | 855-963-9247
REGISTER YOUR PRODUCT ONLINE
Register Your Frigidaire Product Online Today!
Take advantage of all the benefits product registration has to offer:

Service and Support
Diagnose troubleshooting and service issues faster and more accurately

Recall Notifications
Stay up-to-date on safety notices, system updates, and recall notifications

Special Promotions
Opt-in for NewAir promotions and offers
Registering your product information online is safe & secure and takes less than 2 minutes to complete:
newair.com/register
Alternatively, we recommend you attach a copy of your sales receipt below and record the following information, which can be found on the manufacturer's nameplate on the back of the unit. You will need this information if it becomes necessary to contact the manufacturer for service inquiries.
Date of Purchase: ____
Serial Number: ____
Model Number: ____
IMPORTANT SAFETY INSTRUCTIONS/WARNINGS
CAUTION: Read rules for safe operation and instructions carefully.
When using any electrical appliance, basic safety precautions must be followed in order to reduce the risk of fire, electrical shock and/or injury to persons or property. Be sure to read all instructions before using this appliance and observe the following safety tips:
- To reduce the risk of fire or electrical shock, do not use this fan with any solid state speed control device (e.g. a dimmer switch).
- This product must be grounded properly when plugged in. If the unit should malfunction or break down, a grounded power cord will keep you safe. This product is equipped with a grounded power cord. Plug into an appropriate outlet that is properly installed and grounded in accordance with all local codes and ordinances.
- This fan is provided with a ground fault circuit interrupter (GFCI) built into the power supply cord. This device provides additional protection from the risk of electric shock. Should replacement of the plug or cord become necessary, use only identical replacement parts that include GFCI protection.
- Do not leave the fan running unattended.
- Do not use the fan where it may get wet from rain, sprinklers, etc. Water could leak inside of the unit and damage the internal components.
- Do not insert anything through the fan cover, especially while the fan is running.
- Before using the unit, check if the voltage indicated corresponds with the intended outlet (120V).
- Connect power after the fan is fully assembled.
- Unplug from the outlet when not in use, when moving the fan from one location to another, before putting on or taking off parts, and before cleaning.
- Be sure the fan is on a stable surface when operating to avoid it falling over, and ensure the power cord is not a trip hazard.
- Do not use any appliance with a damaged cord or plug. Discard fan or return to an authorized service facility for examination and/or repair if the power cord or plug are damaged.
-
Children should be supervised to ensure they do not play with or around the appliance.
-
This product employs overload protection (fuse). A blown fuse indicates an overload or short-circuit. If the fuse blows, unplug the product from the outlet. Replace the fuse as per the user servicing instructions and check the product. If the replacement fuse blows, a short-circuit may be present and the product should be discarded or customer service should be contacted immediately.
- Press the TEST button (then RESET button) on the power cable GFCI box once every month to ensure proper operation.
- Risk of Fire: Do not replace or modify any part of the power cord, GFCI or wall plug. Do not remove the fuse unless you are replacing it. If any of these parts are damaged, contact customer service immediately.
- Place the fan on a level surface. Plug the grounding type attachment plug into a standard 120V AC 3-Pring wall outlet.
SAVE THESE INSTRUCTIONS
PARTS LIST

A. Front grille
B. Blade cap
C. Fan blade
D. Plastic nut
E. Rear grille
F. Motor shaft
G. Clutch knob
H. Motor housing
I. Control panel
J. Thumb screw
K. Power cord
L. Waterproof cover
M. Misting line clip
N. Internal pole
O. Height adjustment knob
P. External pole
Q. Misting line
R. Filter washer
S. Water valve
T. Fan base
U. Screw for base
ASSEMBLY INSTRUCTIONS
Before beginning assembly of this product, make sure all parts are included in the box (see chart on previous page). If any part is missing or damaged, do not attempt to assemble the product. Contact customer service for replacement parts. You should only need a philips head screwdriver for assembly, and about 15 minutes of time.


natural_image
Technical line drawing of a mechanical fan or impeller assembly (no text or symbols)
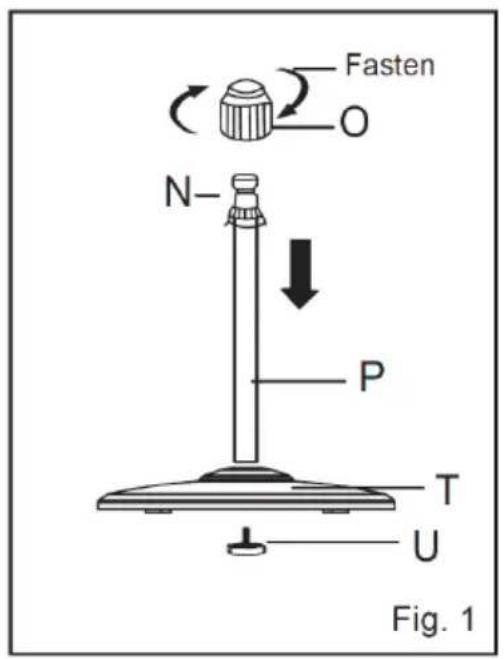
FAN BASE ASSEMBLY - FIG. 1
- Unscrew the screw (U) from the external pole (P) and attach the external pole (P) to the base (T) by tightening the screw (U).
- Remove the height adjustment knob (O) by unscrewing it counterclockwise.
- Use your finger to pull out the internal pole (N), slide height adjustment knob (O) over internal pole (N). Fasten it to external pole (P) by turning the knob while holding the pole. Make sure the knob (O) is tightly fastened before final assembly.
FAN HEAD ASSEMBLY - FIG. 2 & 3
- Remove the blade cap (B) by turning clockwise. Remove the plastic nut (D) by turning counter clockwise.
- Position the rear grille (E) over the motor shaft (F), making certain that the handle is at the top, and that the one notch on the back of of rear grille (E) fits over the three prong attachment on the motor housing (H on parts list).
- Secure rear grille (E) by turning the plastic nut (D) clockwise and tightening firmly.
- Slide the fan blade (C), with the hollow interior of the blade facing toward rear grille (E), onto motor shaft (F).
- Secure fan blade (C) onto motor shaft (F) by turning the blade cap (B) counterclockwise until firmly in place.
- Loosen the bolt on the bottom of front grille (A) and mount the front grille (A) with the logo right side up to rear grille (E) by snapping both together firmly. Ensure all snaps around front grille (A) are secured onto rear grille (E).
- Tighten the bolt on the bottom of front grille (A).
FINAL ASSEMBLY - FIG. 4
- Loosen the thumb screw (J) by turning it counterclockwise.
- Always keep the waterproof cover (L) match with the height adjustable knob (O) when adjusting the internal pole (N).
- Insert internal pole (N) into the neck joint and tighten by turning thumb screw (J) clockwise. Make sure it is tight enough to support the fan head.
- Attach the Misting Line holder (M) onto the Internal pole (N).
- Secure the Misting Line (Q) to the clip under front grille (A) and the misting line clip (M).
OPERATING INSTRUCTIONS
FAN-ONLY MODE
- Plug in the unit, press the reset button on the GFCI, and select a fan speed on the control panel. The fan will start running as soon as you select a fan speed.
- To start/stop fan oscillation, push down/pull up the clutch knob (G).
- To adjust the airflow upward or downward, simply tilt the fan head by hand and move to the desired angle.
- The height of the fan can be adjusted by loosening the height adjustment knob (O) and carefully raising or lowering the fan and retightening the knob.

MISTING MODE
- Connect a standard 34 " garden hose to the misting hose valve (S). Water pressure should not exceed 550 kPa (5.6 kfg/cm2). Only use a hose in good condition.
- With the garden hose turned on at the spigot, turn the lever on the misting hose valve to the right to turn on water to the fan.
- Turn the lever back (to the left) to temporarily disable the misting feature. To disable the misting feature for a longer period of time, close the water valve lever and turn the spigot off as well.
CLEANING AND MAINTENANCE
- Disconnect from the electrical socket during cleaning or initial assembly.
- To ensure adequate air circulation to the motor, keep the vents at the rear of the motor housing clear of dust, dirt, etc. Unplug the fan before using a vacuum cleaner or compressed air to clean the grilles. It should not be necessary to disassemble the fan to clean it.
- Wipe the exterior housing of the fan with a soft cloth soaked in a mild detergent. Do not use any abrasive detergents or solvents to avoid damaging the surface. Do not use gasoline, thinner, or bending to clean the fan.
- Do not allow water or any other liquid into the motor housing or interior parts.
- When dismantling the fan (we recommend following the assembly instructions in reverse), be sure to clean each of the components before storage. Allow all parts to dry completely before storing.
- To test the GFCI feature, press the "TEST" button. The fan should immediately shut off as if the GFCI has been tripped. Press the "RESET" button and the fan should be able to be turned on again, and the light on the GFCI box should light up orange. If it does, then the unit (as well as the GFCI feature) are functioning normally.
- If the fuse in the power cord plug needs to be replaced, follow these instructions:
a) Pull the power plug from the outlet, being careful not to pull from the cord.
b) Slide open the fuse access cover.
c) Remove the fuse slowly and carefully by inserting a small tool into the fuse slot and prying it out. When one side of the fuse has been lifted out, you will be able to remove it entirely.
d) Only replace the fuse with 5 Amp / 125 Volt fuses. Using an incompatible fuse may cause a fire.
e) Close the fuse cover.
f) Caution: Do not attempt to replace the plug or the power cord itself. Only replace a broken fuse with a compatible fuse. If any part of the plug or cord are damaged, contact customer service for assistance.
USER SERVICING INSTRUCTIONS
- Grasp plug and remove from the receptacle or other outlet device. Do not unplug by pulling on cord.
- Open fuse cover. Slide open fuse access cover on top of attachment plug towards blades.
- Remove fuse carefully. Insert the tip of your tool into fuse slot (close with the terminal), then prize the fuse gradually and slowly, but not overexert. If you feel tight, you can try it at several times and prize the fuse little by little. When one side of the fuse has been prized, then you can get the fuse out entirely.
- Risk of fire. Replace fuse only with 5 Amp, 125 Volt fuse.
- Close fuse cover. Slide closed the fuse access cover on top of attachment plug.
- Risk of fire. Do not replace attachment plug. Contains a safety device (fuse) that should not be removed. Discard product if the attachment plug is damaged.
MISTING NOZZLE MAINTENANCE
If the misting nozzles become clogged, unscrew them from the fan grille and soak in vinegar or a lime scale remover until they are clear of buildup. Use a non-metallic brush to scrub them if necessary. If the nozzles remain obstructed, contact customer service for replacement.
Warning: never try to clear the nozzles with pins or other sharp objects as this can cause damage to the nozzles, affecting their efficiency.
If the misting hose valve becomes clogged, unscrew the head of the valve and flush it with running water to clear debris. Make sure the screen inside the misting hose is clean as well.
TROUBLESHOOTING
| Problem | Possible Causes | Solution |
| The fan has no power. | The unit may be plugged in using a different voltage. | Check if using the wrong voltage. |
| The circuit breaker may be tripped or there is a blown fuse. | Reset the circuit breaker or check for a broken fuse. | |
| The fan is not rotating. | There is an obstruction. | Check for obstructions in the fan. If you find something, turn the fan off. Unplug the fan and carefully remove the obstruction. Plug the fan in and turn it on again by referring to the operating instructions. |
| No mist is produced. | There is no water coming from the hose. | Make sure the garden hose is correctly connected to the spigot and the misting hose valve, that the spigot is turned on, and that the valve is open. |
| Nozzles are leaking or dripping. | The nozzles are clogged. | Clean the clogged nozzles on the front of the fan as described under “Cleaning & Maintenance.” |
LIMITED MANUFACTURER'S WARRANTY
This appliance is covered by a limited manufacturer's warranty. For one year from the original date of purchase, the manufacturer will repair or replace any parts of this appliance that prove to be defective in materials and workmanship, provided the appliance has been used under normal operating conditions as intended by the manufacturer.
Warranty Terms:
During the first year, any components of this appliance found to be defective due to materials or workmanship will be repaired or replaced, at the manufacturer's discretion, at no charge to the original purchaser. The purchaser will be responsible for any removal or transportation costs.
Warranty Exclusions:
The warranty will not apply if damage is caused by any of the following:
- Power failure
- Damage in transit or when moving the appliance
- Improper power supply such as low voltage, defective household wiring or inadequate fuses
- Accident, alteration, misuse or abuse of the appliance such as using non-approved accessories, inadequate air circulation in the room or abnormal operating conditions (extreme temperatures)
• Use in commercial or industrial applications - Fire, water damage, theft, war, riot, hostility or acts of God such as hurricanes, floods, etc.
• Use of force or damage caused by external influences
• Removal of stickers and/or screws
• Partially or completely dismantled appliances
Obtaining Service:
When making a warranty claim, please have the original bill of purchase with purchase date available. The purchaser will be responsible for any removal or transportation costs.
Replacement parts and/or units will be new, remanufactured or refurbished and are subject to the manufacturer's discretion.
For technical support and warranty service, please email support@newair.com
Frigidaire is a registered trademark of Electrolux Home Products, Inc.
All rights reserved.
Manufactured under license by:
NewAir, LLC
6600 Katella Ave, Cypress, CA 90630

- FMF2K5BK00 Owner's Manual
- READ AND SAVE THESE
- INSTRUCTIONS.
- TABLE OF CONTENTS
- REGISTER YOUR PRODUCT ONLINE
- Register Your Frigidaire Product Online Today!
- Service and Support
- Recall Notifications
- Special Promotions
- IMPORTANT SAFETY INSTRUCTIONS/WARNINGS
- CAUTION: Read rules for safe operation and instructions carefully.
- SAVE THESE INSTRUCTIONS
- PARTS LIST
- ASSEMBLY INSTRUCTIONS
- FAN BASE ASSEMBLY - FIG. 1
- FAN HEAD ASSEMBLY - FIG. 2 & 3
- FINAL ASSEMBLY - FIG. 4
- OPERATING INSTRUCTIONS
- FAN-ONLY MODE
- MISTING MODE
- CLEANING AND MAINTENANCE
- USER SERVICING INSTRUCTIONS
- MISTING NOZZLE MAINTENANCE
- TROUBLESHOOTING
- LIMITED MANUFACTURER'S WARRANTY
- Warranty Terms:
- Warranty Exclusions:
- Obtaining Service:
Brand : NewAir
Model : FMF2K5BK00
Category : Household Fan