
MXALINK2 - Bluetooth Receiver Memphis Audio - Free user manual and instructions
Find the device manual for free MXALINK2 Memphis Audio in PDF.


| Product Type | Wireless Audio Transmitter and Receiver (2-Unit Kit) |
| Brand | Memphis Audio |
| Model | MXALINK2 |
| Technology | SKAA (2.4GHz, not Bluetooth) |
| Waterproof Rating | IPX6 |
| Wireless Range | Up to 230 feet (70 meters) |
| Latency | 36 ms |
| Number of Units | 2 (each can be transmitter or receiver) |
| Max Receivers per Transmitter | 4 |
| Audio Input/Output | 3.5mm AUX stereo (input and output) |
| Battery | Built-in lithium-ion, rechargeable via USB |
| Charging | USB (standard USB port) |
| Automatic Reconnection | Yes, after initial bonding |
| Compatibility | SKAA ecosystem devices |
| Green List Capacity | Up to 10 favorite transmitters |
| Dimensions (approx.) | 2.5 x 2.5 x 0.8 in (63.5 x 63.5 x 20 mm) |
| Weight (approx.) | 2 oz (57 g) |
| Power Source | Internal battery, USB charging |
| Construction | Engineered to resist water and elements; suitable for powersports and marine |
| Maintenance | Clean with a soft, dry cloth; avoid immersion beyond IPX6 rating |
| Safety | Follow standard electronic device precautions; do not expose to extreme heat |
| Spare Parts & Repairability | Not user-serviceable; contact Memphis Audio support for repairs |
Frequently Asked Questions - MXALINK2 Memphis Audio
User questions about MXALINK2 Memphis Audio
0 question about this device. Answer the ones you know or ask your own.
Ask a new question about this device
Download the instructions for your Bluetooth Receiver in PDF format for free! Find your manual MXALINK2 - Memphis Audio and take your electronic device back in hand. On this page are published all the documents necessary for the use of your device. MXALINK2 by Memphis Audio.
USER MANUAL MXALINK2 Memphis Audio
122 GAYOSO AVE, MEMPHIS, TN. 38101
TECH SUPPORT: 800 489 2300
WWW.MEMPHISCARAUDIO.COM
@MEMPHISCARAUDIOUSA
@MEMPHISCARAUDIO
MEMPHISAUDIO



MXALINK2
2 UNIT WIRELESS AUDIO
TRANSMITTER AND RECEIVER

compatible

MEMPHIS


ENGINEERED TO RESIST
[Unreadable]
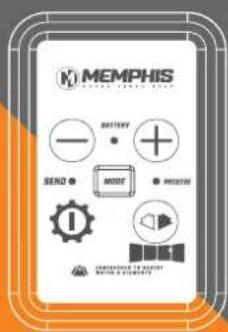

MXA
MEMPHIS XTREME AUDIO
Memphis Xtreme Audio products were designed to withstand water and the elements making them a perfect solution for powersports and marine applications.
FEATURES
- Wirelessly connects multiple audio systems to a single streaming source
- Includes 2 units, each unit is capable of transmitting or receiving signal
- 230 foot approximate wireless range
- SKAA does not require Bluetooth or WIFI
- Up to 4 units can be bonded to 1 transmitter
SPECIFICATIONS
- IPX6 Waterproof Rating
- RF Frequency 2.4GHz
- Auxiliary stereo input/output
- Music sharing range up to 230Ft
• One sender works with four receivers - Super low latency time 36ms
• Built-in lithium battery - Automatically reconnects after initial bonding
INSTRUCTIONS

MXA
QUESTIONS AND ANSWERS
SKAA CERTIFICATION
The SKAA Compatible Badge found on the product certifies that this product has been tested and is fully compliant with all the requirements of th SKAA standard and has been granted SKAA Certification. This product will work
seamlessly with other products in the SKAA ecosystem of audio transmitting and receiving devices. For more information on the SKAA Standard, please visit www.SKAA.com. The SKAA* name as well as its associated marks, logos and icons
are trademarks or registered trade marks of the Elven Engineering Incorporated.


MXA
WIRING AND BONDING INSTRUCTIONS
SEND MODE WIRING
![SEND MODE WIXING AUX Output for Amplifier [Black] USB Cable For Charging AUX INPUT for Source Unit [Red]](/content/2026/05/957359/images/e4706113f0c6be334c499615be8d2528c02884ded89cde4b39c92b933f193d31.jpg)
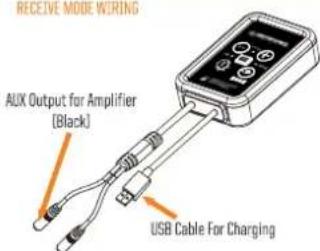
RECEIVE MODE WIRING
CHARGING
- Insert the USB charging cable into any standard USB powered port
- The Red LED light stays solid while charging, once fully charged the light will turn OFF.
SEND MODE OPERATION
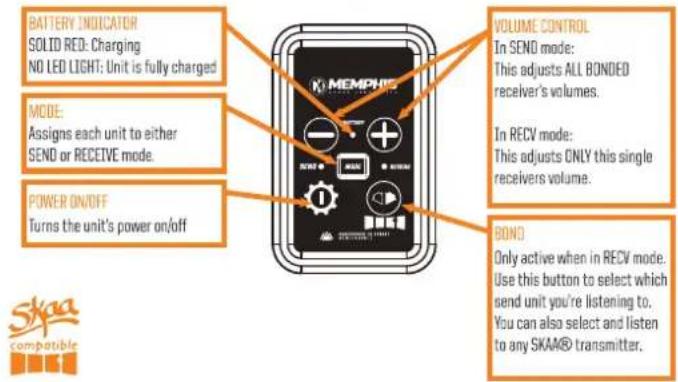
- Hold the POWER button until either the SEND or RECV LED lights illuminate
- Press the MODE button to select SEND mode. Confirm the SEND LED light is illuminated
- Plug a 3.5mm cable into the AUX input jack. The other end of the 3.5mm cable should be plugged into the audio output of a full range audio source.
- Hold the POWER button until either the SEND or RECV LED lights illuminate
- Press the MODE button to select RECV and confirm the RECV LED light is illuminated
- Plug one end of a 3.5mm cable into the AUX output jack. The other end of the 3.5mm cable should be plugged into the audio input of an amplifier, powered speaker or any type of audio playback device.
- In RECV mode, it might be necessary to press the BOND Control to cycle through the available send units until a bond is established.


MXA
SKAA USERS GUIDE
Each SKAA receiver has a GREEN LIST which remembers your favorite transmitters. A GREEN indicator on you reviver means you are listening to a favorite, or searching for one. Your receiver can also explore to find new transmitters. An AMBER indicator means you are exploring for transmitters which are not on your green list. A cluster is a product with two or more pieces which behave as one, such as a left and right speaker pair. The BOND Button lets you select which transmitter you're listening to. The BOND Button has the logo
ESSENTIALS
| Bond Button | Command | Indicator Meaning |
| Hold a few seconds | Add / Delete Manually add / delete the current transmitter to / from your Green List | to = Added(flash) = Deleted |
| - | Auto Add SKAA will automatically add the current Amber transmitter to your Green List if you listen to it for 30 minutes | to = Added |
| 1 Click | Green Mode Rotate through your list of favorite transmitters (Green List) — when a favorite transmitter is found, the search stops and audio plays from that transmitter | (dim) = Hunting(flash) = Next one(bright) = Bonded |
| 2 Clicks | Amber Mode Explore for new, unknown transmitters (ones which are not already on your Green List) | (dim) = Hunting(bright) = Bonded |
OTHER FUNCTIONS
| Bond Button | Command | Indicator Meaning |
| 3 Clicks | Mute do again to Unmute; any Click command will first Unmute and then do its function | ○, ○ or ● = Muted(slow flash) |
| 4 Clicks | Red Mode If you have 2 or more transmitters on your Green List, power on Just the one you want to hear and it plays automatically. | ● (dim) = Hunting● (bright) = Bonded |
| 6 Clicks | Factory Reset Clear Green List. Start Over! | ● (flash) = Reset Done |
| Hold during power on | Make a Cluster of Receivers:1. Power off all transmitters and receivers2. Power on the Master receiver while holding down its Bond Button—hold the button down until the Indicator begins to flash Red3. With the remaining receivers within 3 meters of the Master receiver, power on the first one, wait for its Indicator to flash Red and then power on the second one; ccontinue until all of them are powered on4. Once all of the Indicators stop flashing (turn solid Red), power off all of the receivers | ● (flash) = Rreceiver has entered 'Cluster Up' mode● (bright) = The Cluster has been successfully made |

MXA
QUESTIONS AND ANSWERS
| Question | Answer |
| How does the Green List work? | You can store up to 10 favorite transmitters on your Green List. Every time you add a transmitter, it is assigned the first open spot on the Green List—so if you already have two favorite transmitters, the next one you add will go into Green List spot #3. When you click the Bond Button, the receiver hunts through the Green List much like a car radio hunts for radio stations when you press "seek". If the Indicator is dim Green and flashes every few seconds, you know the receiver is hunting through your Green List. Say you have 5 transmitters on your Green List; your receiver will hunt through the list one by one: 1, 2, 3, 4, 5 and then back around to 1 and so on (always starting with the last-bonded favorite transmitter). The dim Green Indicator flashes every time the receiver moves to the next spot. The receiver hunts through your Green List for up to 1 minute. If it doesn't find any of your favorite transmitters in 1 minute, it stops hunting through the Green List and just waits for the last-bonded favorite transmitter. When your receiver finds one of your favorite transmitters, it bonds with that transmitter and starts playing its audio. The Indicator turns bright Green when the receiver has successfully bonded with one of your favorite transmitters. A dim Green Indicator that is NOT flashing means the receiver is just sitting on one spot, waiting for that specific favorite transmitter to show up. |
| How do I bond with a specific Green transmitter? | Play audio from your source device and ensure it has a SKAS transmitter connected and turned on. Click the Bond Button. The receiver hunts through the Green List, flashing the Indicator as it goes. Once your receiver finds one of your favorite transmitters, it bonds to it and plays audio from that transmitter. If that isn't the transmitter you want, click the Bond Button once more. Repeat until your receiver bonds with the transmitter you want. |
| How do I select transmitters if I can't reach my Bond Button? | Say you want to put your receiver on a high shelf where you can't reach the Bond Button easily. First, set up your Green List — add all of the transmitters you'll want to use. Use the Bond Button to enter Red Mode (4 Clicks). Put the receiver up on the high shelf. Power on just one of your transmitters. The receiver automatically bonds to that transmitter. |
| How do I delete a transmitter from my Green List? | Factory Reset (6 Clicks) clears the Green List and lets you start over from scratch. If however, you'd like to delete just one transmitter from your Green List, first bond your receiver to that transmitter. See the section above: How do I bond with a specific Green transmitter? Once you are bonded to it, hold down the Bond Button for a few seconds until you see the Indicator flash Red — this Red flash means the transmitter has been deleted. |
| What is the Master receiver? | In any Cluster, there is a single Master receiver, and all of the other receivers in the Cluster follow its behavior. You can control the entire Cluster by operating the Bond Button of the Master (a receiver must have a physical Bond Button in order to become the Master). |
| How do I "undluster" several receivers? | Do the Make a Cluster of Receivers procedure once for each receiver (omit Step 3). This gives each of the receivers a functioning Bond Button, and each of them will thereafter operate independently. |
| What are some tips for making Clusters? | Each step in the Make a Cluster of Receivers procedure has a 10-second time limit. For example, when you see the Master's Indicator start to flash Red, you have 10 seconds to power on the next receiver. When that receiver's Indicator starts to flash Red, you have 10 more seconds to power on the next one, and so on. |
| Why does only one of my Bond Buttons work? | When you make a Cluster from several receivers, the first one powered on in the Make a Cluster of Receivers procedure becomes the Master of the Cluster. Only the Master's Bond Button works because a Cluster uses just one Green List (the Master's Green List). The Bond Button of the other receivers will work only for the Mute / Unmute function (3 Clicks). |
| Can any group of receivers be made into a Cluster? | No. The receivers must be members of the same product family. If they are not, the Make a Cluster of Receivers procedure won't work. This is because only receivers that were designed to work together (as a single product) can be made into a Cluster. |
Brand : Memphis Audio
Model : MXALINK2
Category : Bluetooth Receiver