PIXMA TS302a - Printer CANON - Free user manual and instructions
Find the device manual for free PIXMA TS302a CANON in PDF.

| Product Type | Inkjet Multifunction Printer |
| Functions | Print, Scan, Copy |
| Print Technology | Canon FINE (Full-photolithography Inkjet Nozzle Engineering) |
| Max Print Resolution | 4800 x 1200 dpi |
| Print Speed (Black) | Up to 8.0 ipm |
| Print Speed (Color) | Up to 4.0 ipm |
| Paper Sizes Supported | A4, A5, B5, Letter, Envelopes (DL, COM10), 4x6 inch Photo |
| Scan Type | Flatbed CIS (Contact Image Sensor) |
| Scan Resolution | Up to 600 x 1200 dpi (optical) |
| Copy Resolution | Up to 600 x 1200 dpi |
| Connectivity | USB 2.0 High-Speed |
| Operating Systems | Windows 10, 8.1, 8, 7; Mac OS X v10.12.6 or later |
| Dimensions (W x D x H) | Approx. 435 x 327 x 145 mm |
| Weight | Approx. 3.9 kg |
| Power Requirements | AC 100-240V, 50/60Hz |
| Ink Cartridge Type | PG-47S (Pigment Black), CL-57S (Dye Color) |
| Paper Capacity (Input) | Up to 60 sheets plain paper, 20 sheets photo paper |
| Borderless Printing | Yes (4x6 inch photo) |
| Maintenance | Replace ink cartridges, clean print head via printer utility |
| Safety Features | Auto power off, low ink indicator |
| Spare Parts & Repairability | Ink cartridges, power cord; user-replaceable print head available |
| General Information | Compact home printer ideal for everyday documents and photos |
Frequently Asked Questions - PIXMA TS302a CANON
User questions about PIXMA TS302a CANON
0 question about this device. Answer the ones you know or ask your own.
Ask a new question about this device
Download the instructions for your Printer in PDF format for free! Find your manual PIXMA TS302a - CANON and take your electronic device back in hand. On this page are published all the documents necessary for the use of your device. PIXMA TS302a by CANON.
USER MANUAL PIXMA TS302a CANON
Read Safety and Important Information (addendum) first.
natural_image
Red background with white icons of a laptop and smartphone, no text or symbols presentConnecting with Computer and Smartphone/Tablet......page 4
natural_image
Hand holding a circular play button icon on a computer monitor (no text or symbols visible)
flowchart
graph LR
    A["Laptop"] -->|http://ij.start.canon| B["Laptop"]
    B --> C["Book Icon"]
    C --> D["OK"]
    D --> E["Video Camera"]
text_image
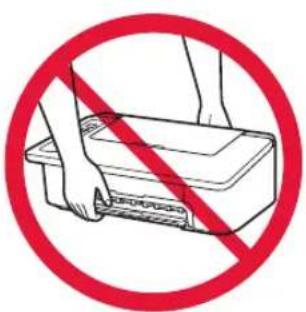
Prohibition sign showing hands using a printer to stop or remove a printer, with red prohibition symbol
text_image
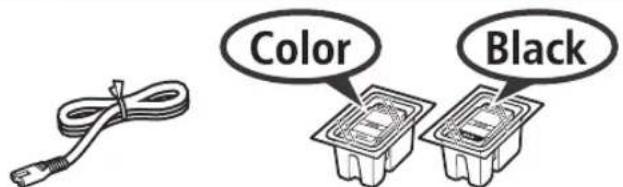
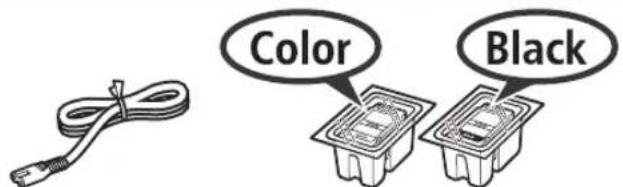
3.XXXXXXXXXXX1. Unpack Box
text_image
Color Black□ Power cord □ FINE cartridge
□ Safety and Important Information
□ Getting Started (this manual)
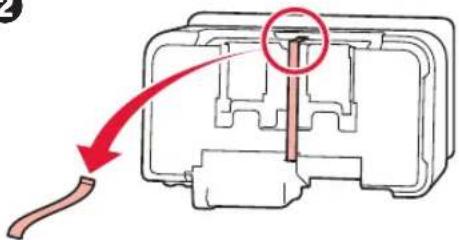
2.RemoveTape and Turn on

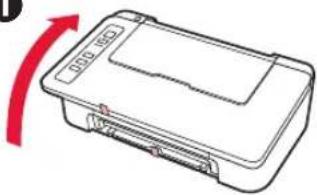
1 Stand the printer on its back and remove the orange tape stuck to the bottom of it. Return the printer to its original position.
1
natural_image
Simple line drawing of a rectangular device with a red arrow indicating rotation (no text or symbols)2
text_image
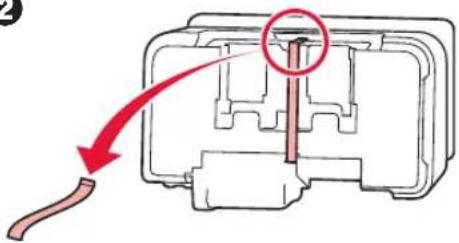
Diagram showing a mechanical component with a red arrow indicating direction, highlighting a specific feature within the internal structure.3
natural_image
Diagram of a rectangular device with a red arrow indicating rotation or change, no text or symbols present.2 Remove the packing materials (such as orange tape) from outside the printer.
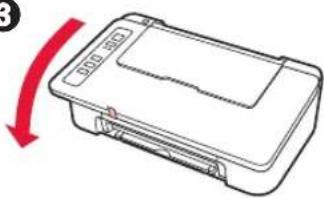
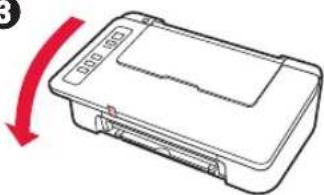
3 Open the cover.
text_image
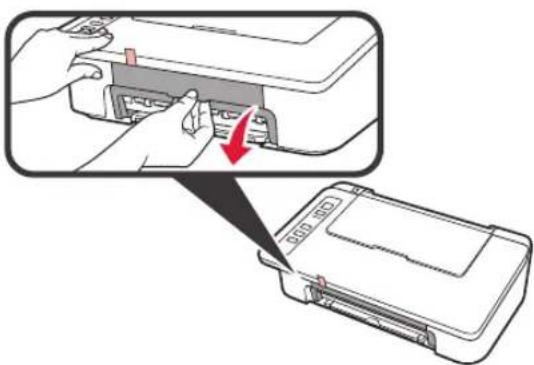
Diagram showing printer operation with a hand inserting a printer into a device, labeled with '600 M3' and a red arrow indicating the process.4 Remove the orange tape and the protective material and discard them both.
text_image
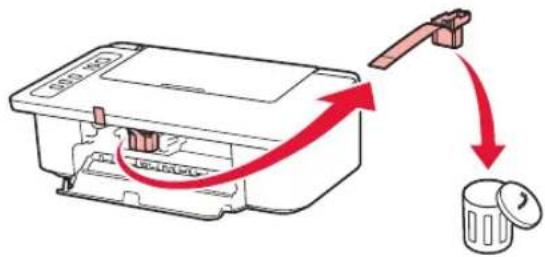
Diagram showing a printer's internal structure with red arrows indicating flow and a separate circular component, likely illustrating a printing or packaging process.5 Close the cover.

natural_image
Illustration of a hand inserting a card into a plastic container (no text or symbols visible)6 Connect the power cord.
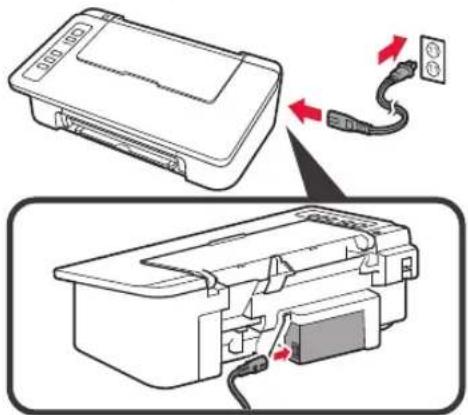
text_image
Diagram showing a printer's internal structure with cable and power outlet, annotated with red arrows indicating connection or movement.Do not connect any cables except the power cord yet.
7 Press the ON/Stop button. The ON lamp lights.
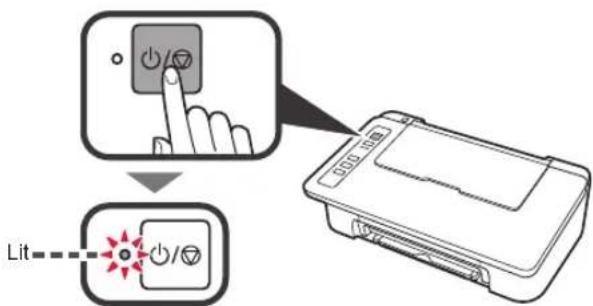
text_image
Lit- If the Alarm lamp (A) flashes 9 times at a time, press the ON/Stop button to turn off the power, and then try again from step 3 of chapter 2 "Remove Tape and Turn on".
- If the Alarm lamp (A) flashes 4 times at a time, proceed to the next step as it is.
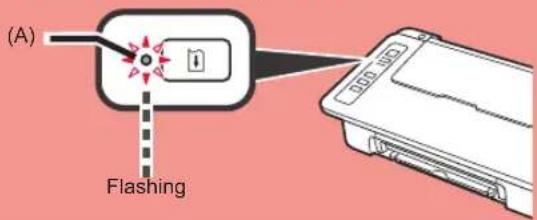
text_image
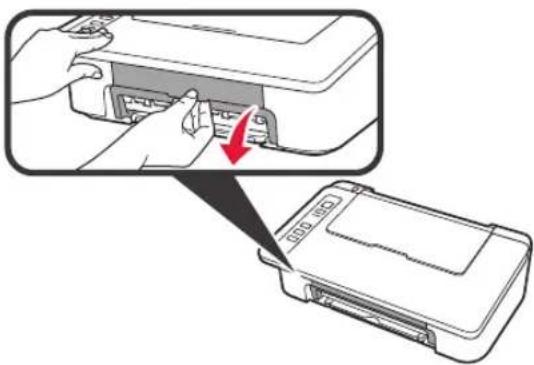
(A) Flashing3. Install Inks

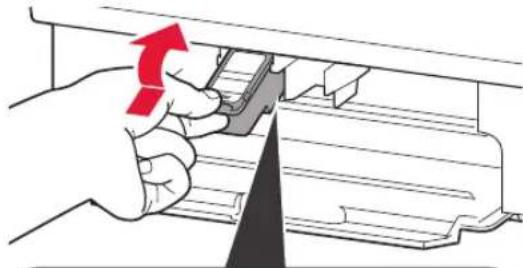
1 Open the cover.
natural_image
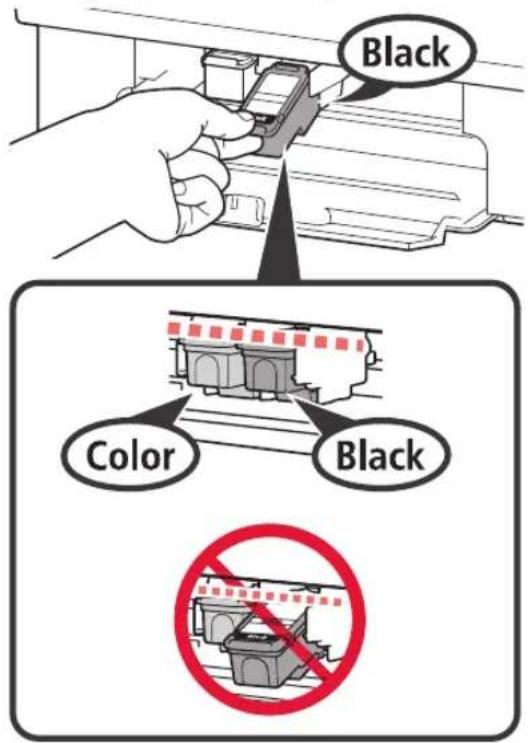
Illustration of a printer being inserted into a device, showing the printer's internal structure and the printer's base (no text or symbols present)2 ① Take out the Color FINE cartridge from the package.
② Remove the protective tape.
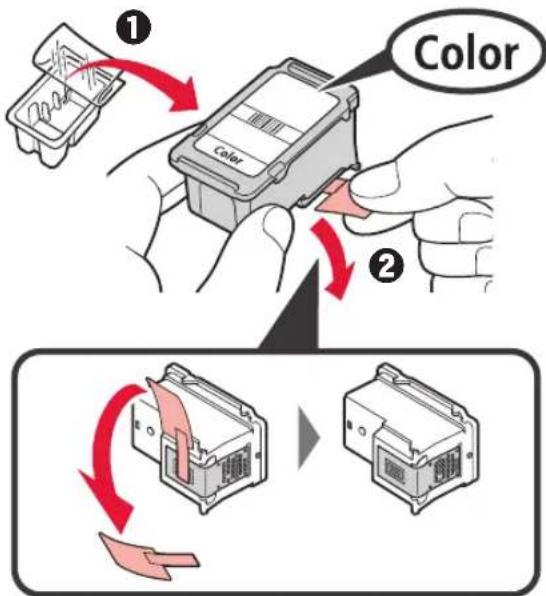
text_image
① Color ②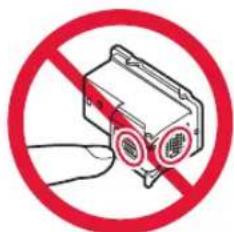
text_image
Prohibition sign showing a device with red circular elements and 'No' symbol, indicating no use or absence of usage.Do not touch.
Be careful of ink on the protective tape.
3 ① Insert the Color FINE cartridge into the FINE cartridge holder on the left at a slight upward angle. ② Push the FINE cartridge in and up firmly until it snaps into place.
Make sure that the FINE cartridge is installed horizontally.
natural_image
Illustration of a hand using a tool to adjust or install a mechanical component, with no visible text or symbols.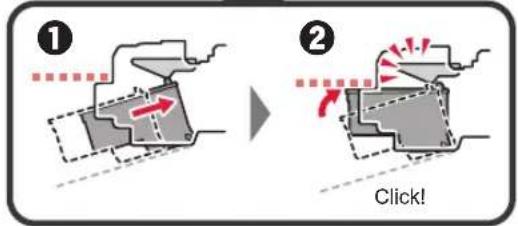
text_image
Diagram illustrating two mechanical states (① and ②) with directional arrows and a 'Click!' button, likely illustrating a process or motion sequence.
text_image
Prohibition sign showing a broken structure with a lightning bolt symbol, commonly used in safety or hazard prevention.Do not bump it against the surrounding parts.
natural_image
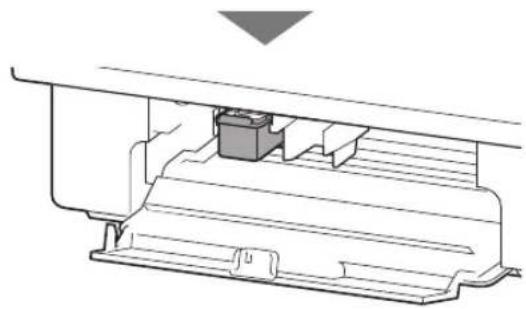
Technical line drawing of a mechanical assembly with no visible text or symbols4 Repeat steps 2 to 4 and install the Black FINE cartridge as well, on the right.
text_image
Black Color Black5 Close the cover.
natural_image
Line drawing of a printer with a paper clip inserted, showing no text or symbolsIf the Alarm lamp flashes 4 times at a time, go back to step 3 of chapter 3 "Install Inks" and check whether the FINE cartridges for Color and Black are installed correctly.
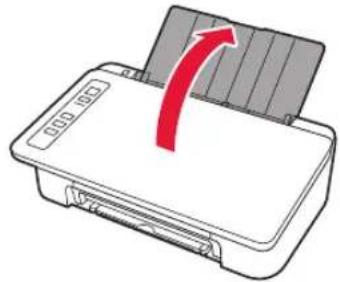
4. Load Paper

1 Open the paper support.
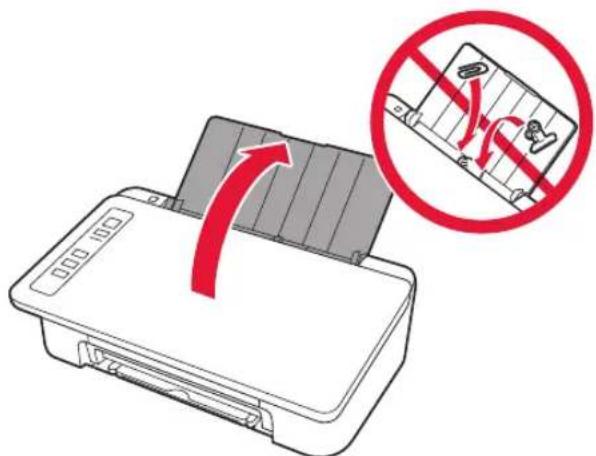
text_image
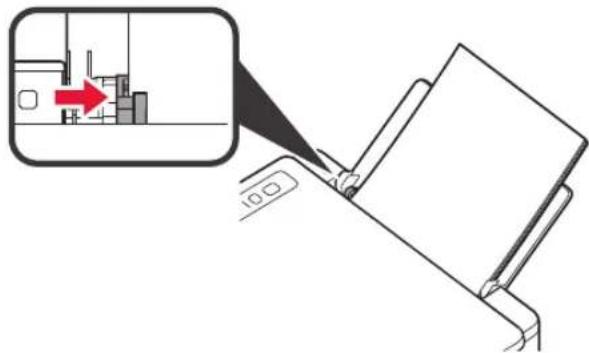
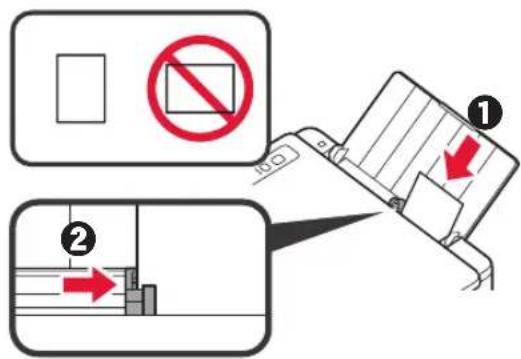
Diagram showing a printer with a red arrow indicating compression and a prohibition symbol in the background.2 Slide the paper guide to the left.
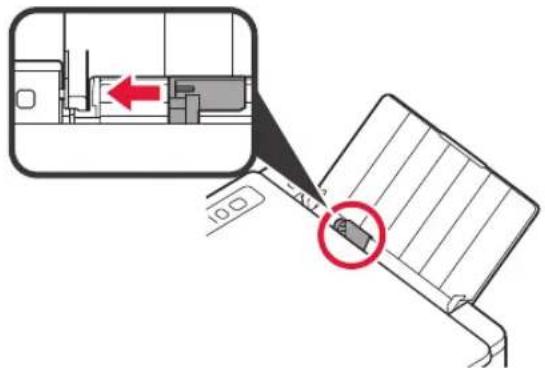
text_image
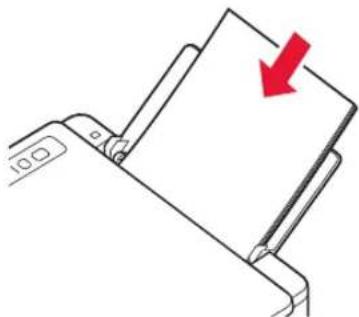
Diagram showing a device with a red arrow pointing to a component and a magnified view of the device's internal structure.3 Load plain LTR or A4 size paper against the right edge with the print side facing up.
natural_image
Diagram of a device being inserted into a paper holder, showing a red arrow indicating the fold (no text or symbols present)4 Slide the paper guide to align it with the side of the paper stack.
text_image
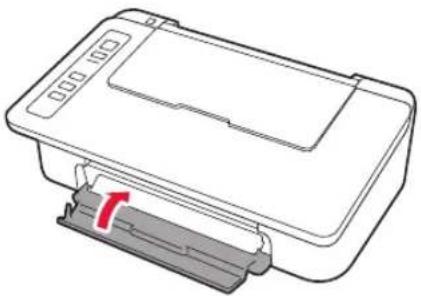
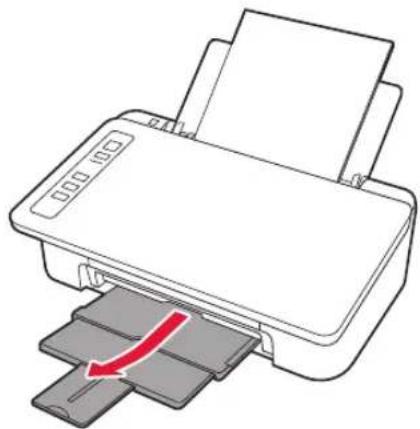
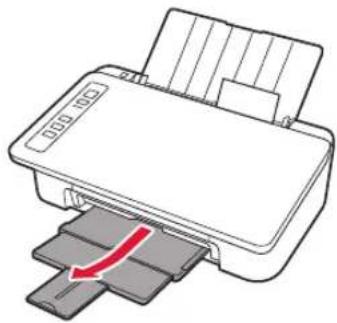
Diagram showing a device with a red arrow pointing to a small building, likely illustrating a process or operation.5 Pull out the paper output tray and output tray extension.
natural_image
Illustration of a printer with a red arrow indicating compression or shift (no text or symbols present)5. Preparing for Connection
From here on, the procedure differs depending on the device used to connect to the printer.
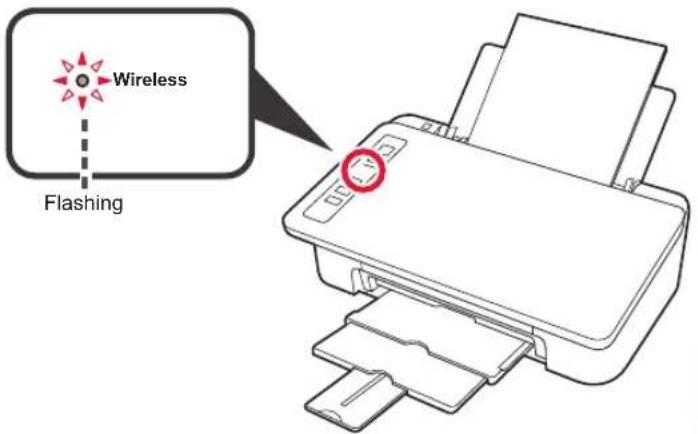
First, after checking that the Wireless lamp is flashing 2 times at a time, proceed to the following operations. In the following description, smartphones and tablet devices are collectively described as smartphone.
text_image
Wireless FlashingWhen the Wireless lamp does not flash, try again from chapter 2 "Remove Tape and Turn on".
• To use the printer by connecting only to a computer or both to a computer and smartphone

"6-A. Connecting to Computer"
• To use the printer by connecting only to a smartphone

"6-B. Connecting to Smartphone" on page 6
6-A. Connecting to Computer

text_image
Windows macOSYou need a connection setup for each computer. Proceed with the setup from step 1 for each computer.
1 Start the setup file.
① Open a web browser on your computer.
② Input the following URL and access the Canon website.

text_image
http://ij.start.canon③ Select Set Up.

④ Input the model name of your printer and click OK.

You can select a model name from the list.
⑤ Click Setup.

The procedures for Windows and macOS are shown below. If you are using a computer with an OS other than Windows or macOS, such as a Chrome OS, do the setup according to the on-screen instructions.
⑥ Click Download and download the setup file.

text_image
Setup - Microsoft - ■ Click Download on the computer to which you want to connect the printer Download⑦ Execute the downloaded file.
Proceed to step 2 on the next page to continue.
2 Click Start Setup.
If the following screen appears, click Exit.

flowchart
graph LR
    A["Start Setup"] --> B["Used Software"]
    B --> C["Online Manual"]
    C --> D["Installation completed successfully"]
    D --> E["End"]
The connection with your computer is now complete. You can print from your computer.
6-B. Connecting to Smartphone

text_image
iOS AndroidYou need a connection setup for each smartphone. Proceed with the setup from step 1 for each smartphone.
Preparation
- Turn on Wi-Fi on your smartphone.
- If you have a wireless router, connect your smartphone to the wireless router you want to connect to the printer.
* For operations, refer to manuals of your smartphone and the wireless router or contact those manufacturers.
1 Install the application software Canon PRINT Inkjet/SELPHY in your smartphone.
iOS : Search "Canon PRINT" in App Store. Android : Search "Canon PRINT" in Google Play. Or access the Canon website by scanning the QR code.

* You may not connect your smartphone to the Internet wirelessly during connecting the printer to the smartphone directly. In that case, you may be charged depending on the contract with your service provider.
* Up to 5 devices can be connected to the printer via wireless LAN connection directly.
2 Check the Wireless lamp, and then proceed to A. B
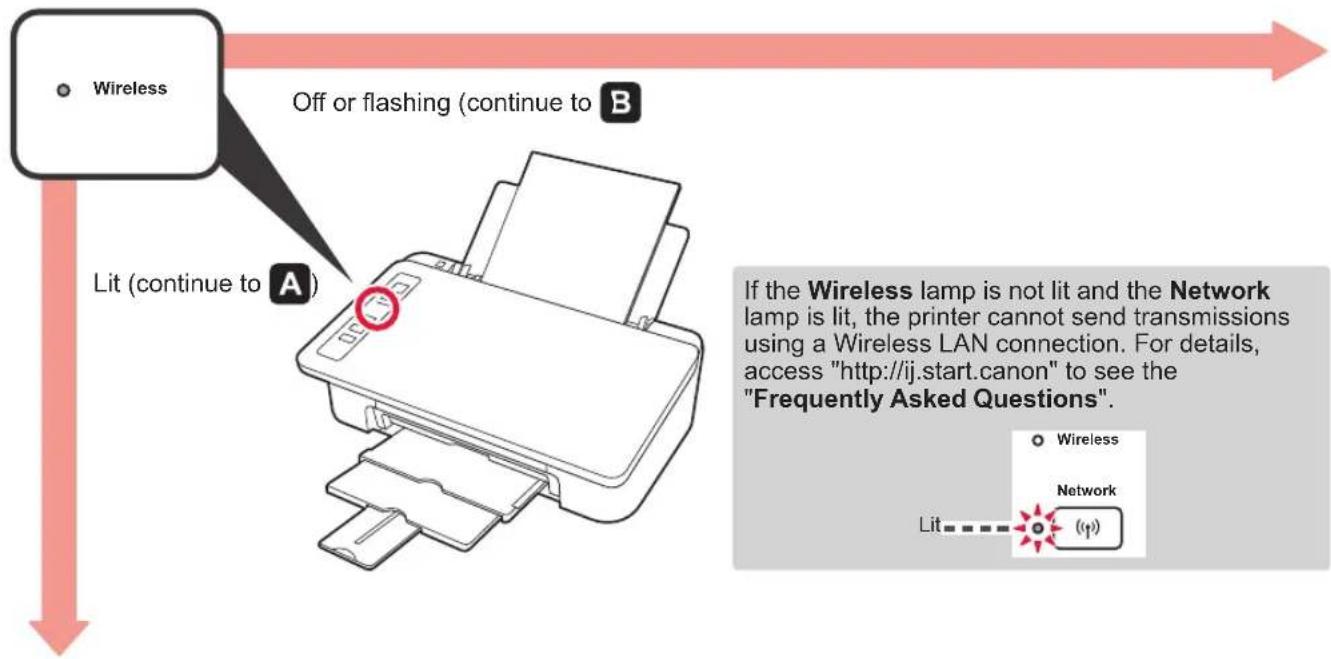
text_image
Wireless Off or flashing (continue to B) Lit (continue to A) If the Wireless lamp is not lit and the Network lamp is lit, the printer cannot send transmissions using a Wireless LAN connection. For details, access "http://ij.start.canon" to see the "Frequently Asked Questions". Wireless Network LitIf the Wireless lamp is not lit and the Network lamp is lit, the printer cannot send transmissions using a Wireless LAN connection. For details, access "http://ij.start.canon" to see the "Frequently Asked Questions".

A iOS Android
① Tap the installed application software.

② Follow the on-screen instructions to register the printer.
③ Make sure that the following screen appears.
The connection with your smartphone is now complete. You can print from your smartphone.
To print photos, load photo paper. Proceed to "Loading Photo Paper" on page 8.

Procedures below vary depending on iOS or Android. Select your operating system and proceed to its procedure.
iOS
① Tap Settings on your smartphone's home screen, and tap Canon_ij_XXXX in the Wi-Fi settings.

text_image
Settings Settings Wi-Fi Wi-Fi Canon_ijIf Canon_ij_XXXX does not appear on the list, see "Troubleshooting" below to operate the printer, and then repeat step ①.
② Tap the installed application software.
③ Follow the on-screen instructions to register the printer.
Follow the on-screen instructions to proceed with the setup.
If you select Auto Select Conn. Method (recommended) on the connection method selecting screen, the appropriate connection method is selected automatically depending on your environment.
④ Make sure that the following screen appears.
Android
① Tap the installed application software.
② Follow the on-screen instructions to register the printer.
If a message saying "Printer is not registered. Perform printer setup?" does not appear, see "Troubleshooting" below to operate the printer, and then wait for a while until the message appears.
Follow the on-screen instructions to proceed with the setup.
The appropriate connection method is selected depending on your environment.
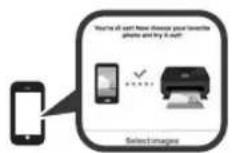
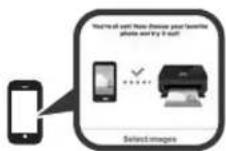
③ Make sure that the following screen appears.
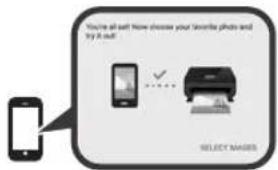
text_image
You're all soft. How choose your Sniffer photo and try it off SELECT MAGERSThe connection with your smartphone is now complete. You can print from your smartphone.
To print photos, load photo paper. Proceed to "Loading Photo Paper" on page 8.

Troubleshooting
Printer is not found from your smartphone.
① Press and hold the Direct button on the printer for about 2 seconds until the Direct lamp starts to flash.
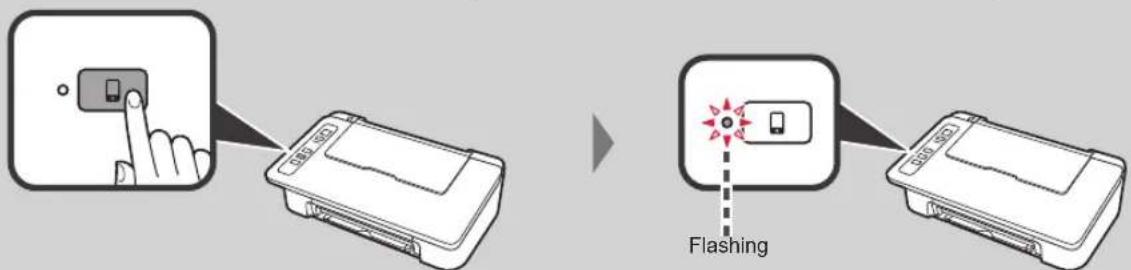
text_image
Flashing② Return to the operation of your smartphone.
Loading Photo Paper
1 Open the paper support.
natural_image
Illustration of a printer with a red arrow indicating rotation or compression (no text or symbols)2 Slide the paper guide to the left.

text_image
Diagram showing a mechanical assembly with a red arrow indicating direction and a magnified inset highlighting a component with a red circle.3 ① Load photo paper against the right edge with the print side facing up.
② Slide the paper guide to align it with the side of the paper stack.
text_image
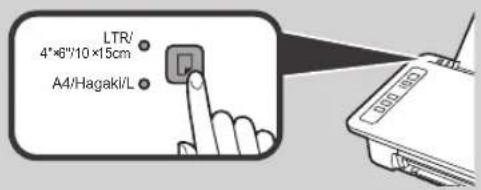
Diagram illustrating a device's disassembly process with Chinese annotations and directional arrows indicating removal or disassembly steps.4 Confirm that the Paper lamp that is lit matches the paper size that is loaded.
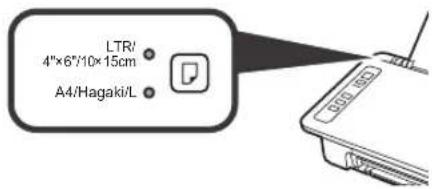
text_image
LTR/ 4"×6"/10×15cm A4/Hagaki/LIf the Paper lamp that lights does not match the paper size, press the Paper Select button.
text_image
LTR/ 4"×6"/10×15cm A4/Hagaki/L5 Pull out the paper output tray and output tray extension.
natural_image
Illustration of a printer with a red arrow indicating compression or disassembly (no text or symbols present)Smartphone Copy
You can copy documents by using the Canon PRINT Inkjet/SELPHY application software for smartphones. To install the application, refer to step 1 on page 6. For the operation procedure, refer to the Online Manual.

1 Load the document on the printer.
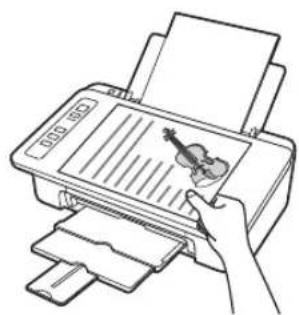
natural_image
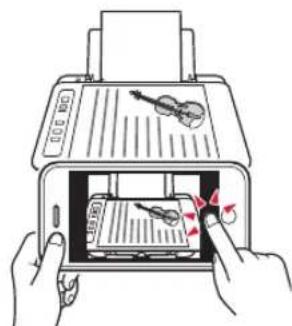
Line drawing of a hand using a handheld printer to press a violin (no text or symbols visible)2 Take a photo of the document by using Canon PRINT Inkjet/SELPHY.
text_image
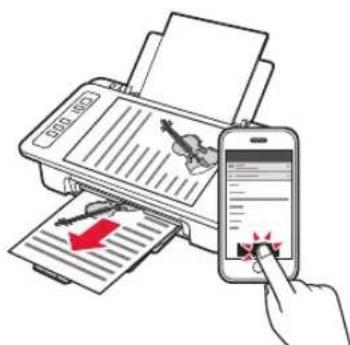
Illustration of a printer with a violin and pen, showing a hand inserting a pencil into the print area.3 Send the image data to the printer and print it.
text_image
Illustration showing a hand using a smartphone to scan documents with a red arrow indicating a downward motion, while the printer displays text and graphics.1. Desempaquetar la caja
text_image
Color Blacknatural_image
Line drawing of a rectangular electronic device with a red arrow indicating rotation (no text or symbols)2
text_image
Diagram showing a mechanical component with a red arrow indicating direction, highlighting a specific feature within the internal structure.3
natural_image
Diagram of a printer with a red arrow indicating rotation (no text or symbols)natural_image
Illustration of a printer being inserted into a device, showing the process with a red arrow indicating the insertion (no text or symbols present)text_image
Diagram showing a printer's internal structure with red arrows indicating rotation and waste disposal, including a labeled waste bin.natural_image
Illustration of a hand inserting a card into a device (no text or symbols visible)text_image
Diagram showing a printer case with cable and plug connections, illustrating the process from casing to printer.natural_image
Illustration of a printer being inserted into a device, showing the printer's internal structure and the printer's base (no text or symbols present)natural_image
Illustration of a hand using a tool to adjust or install a mechanical component, with no visible text or symbols.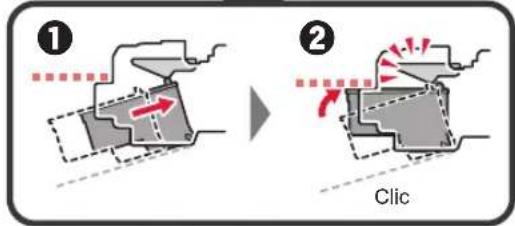
text_image
Diagram illustrating two mechanical process steps with directional arrows and labeled 'Clic' (Click) in English.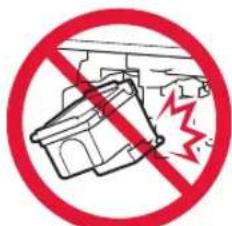
text_image
Prohibition sign showing a broken structure with a red diagonal line and a lightning bolt symbolnatural_image
Technical line drawing of a mechanical component or housing assembly (no text or symbols visible)natural_image
Diagram of a printer with a paper clip inserted, showing internal structure without any text or symbols.text_image
Diagram showing a printer with a red arrow indicating compression, and a prohibition symbol with 'No' text.text_image
Diagram showing a device with a red arrow pointing to a component, and a magnified view of the device's internal structure.natural_image
Diagram of a device being inserted into a paper holder, with a red arrow indicating the fold (no text or symbols present)text_image
Diagram showing a device with a red arrow pointing to a small object, possibly indicating a process or operation.natural_image
Illustration of a printer with a red arrow indicating compression or shift (no text or symbols present)text_image
Setup - Windows - • Click Download on the computer to which you want to connect the printer Downloadtext_image
You're off soft. How choose your favorite photo and try it out SELECT MAGERSnatural_image
Illustration of a printer with a red arrow indicating compression or shift (no text or symbols present)text_image
Diagram showing a device with a red arrow pointing to a component, and a magnified view highlighting a component with a red circle.text_image
Diagram illustrating two steps of installing a door panel, with red arrows indicating removal or disassembly.natural_image
Illustration of a printer with a red arrow indicating compression or disassembly (no text or symbols present)natural_image
Line drawing of a hand using a handheld printer to press a violin (no text or symbols visible)text_image
Illustration showing hands inserting a card into a printer with a musical note and scroll, indicating a card copy or print operation.text_image
Illustration showing a hand inserting a QR code into a printer with a smartphone displaying a document and a red arrow indicating the print direction.flowchart
graph LR
    A["Laptop"] --> B["Open Book Icon"]

From Web site
Desde el sitio web
http://ij.start.canon

flowchart
graph LR
    A["Smartphone"] --> B["QR Code"]
    B --> C["Open Book Icon"]