
AVS1324 - Consumer Electronics DAEWOO - Free user manual and instructions
Find the device manual for free AVS1324 DAEWOO in PDF.


| Product Type | Digital Video Recorder (DVR) / Set-Top Box |
| Brand | Daewoo |
| Model | AVS1324 |
| Dimensions (W x D x H) | 28.5 x 20.0 x 5.5 cm |
| Weight | 0.8 kg |
| Power Supply | AC 100-240 V, 50/60 Hz |
| Power Consumption | 12 W (standby < 1 W) |
| Video Output | HDMI, Composite, Component |
| Audio Output | HDMI, Optical, Stereo RCA |
| Recording Media | Internal HDD (500 GB), USB external storage |
| Recording Modes | Manual, Timer, Series Link |
| Playback Formats | MPEG-2, MPEG-4, AVI, MKV, MP3, JPEG |
| Electronic Program Guide (EPG) | Yes, 7-day |
| Time Shift | Pause and rewind live TV |
| Connectivity | Ethernet, Wi-Fi (802.11 b/g/n), USB 2.0 x2 |
| Remote Control | Infrared, incl. batteries |
| Maintenance | Clean with dry, soft cloth; do not use liquids |
| Safety | Ensure adequate ventilation; do not block slots; use grounded outlet |
| Spare Parts Available | Remote control, power adapter, HDMI cable |
Frequently Asked Questions - AVS1324 DAEWOO
User questions about AVS1324 DAEWOO
0 question about this device. Answer the ones you know or ask your own.
Ask a new question about this device
Download the instructions for your Consumer Electronics in PDF format for free! Find your manual AVS1324 - DAEWOO and take your electronic device back in hand. On this page are published all the documents necessary for the use of your device. AVS1324 by DAEWOO.
USER MANUAL AVS1324 DAEWOO
natural_image
Abstract black fan-like shape on light blue background (no text or symbols)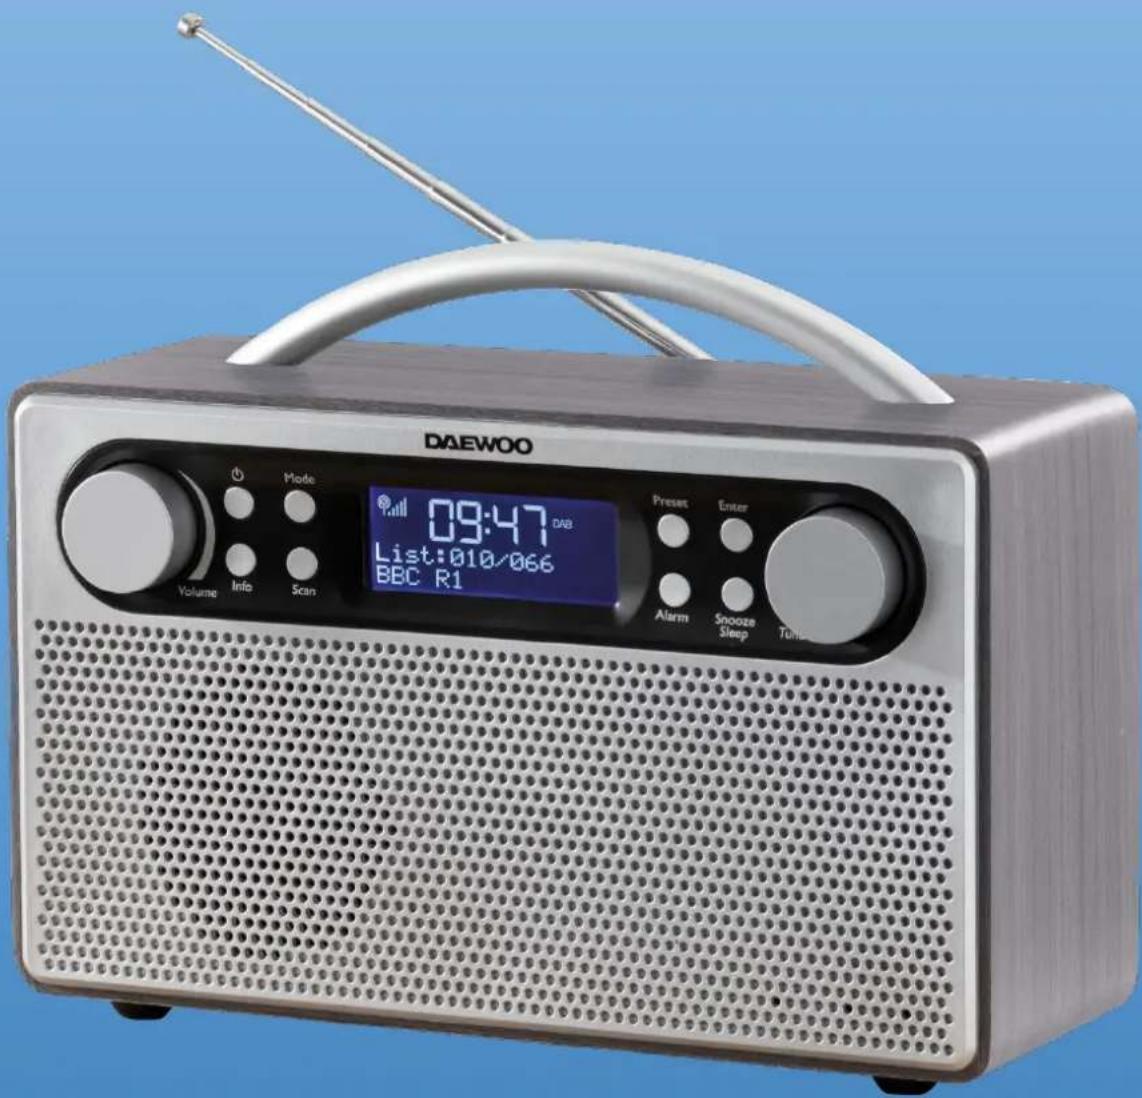
Portable DAB Radio
AVS1324G
User Manual
IMPORTANT – RETAIN THESE INSTRUCTIONS FOR FUTURE REFERENCE *Please refer to the warranty section for terms of your extended guarantee.

IMPORTANT SAFEGUARDS
When using electrical appliances, basic safety precautions should always be followed. These instructions should be saved for future reference:
- Read and familiarise yourself with all operating instructions before using this DAB Radio.
- Before plugging your unit into the mains, visually check that the unit is intact and has not suffered any transit damage.
- Check that the voltage indicated on the data plate corresponds with that of the local network before connecting the appliance to the mains power supply.
• Always use this appliance on a solid, level, non-flammable surface. - Ensure that there is clearance of at least 100mm (4 Inches) minimum around the Radio for sufficient ventilation.
- Ensure that the ventilation openings are not covered with items, such as newspapers, table-cloths, curtains, etc.
- No naked flame sources, such as lighted candles, should be placed on the Radio.
- Do not position the Radio close to sources of heat such as radiators, heaters, other electronic equipment, etc.
- The Radio shall not be exposed to dripping or splashing and that no objects filled with liquids, such as vases, shall be placed on the apparatus.
- Do not immerse this appliance or its supply in water or any other liquids.
- Do not leave the appliance unattended during use.
- Do not leave the appliance unattended whilst connected to the mains supply.
- Always remove the mains supply from the mains socket when the Radio is not in use, the mains supply must be accessible at all times.
- Close supervision is required when using this appliance near children.
- Never leave this appliance within reach of children.
- This appliance can be used by children aged from 8 years and above and persons with reduced physical, sensory or mental capabilities or lack of experience and knowledge if they have been given supervision or instruction concerning use of the appliance in a safe way and understand the hazards involved. Children shall not play with the appliance. Cleaning and user maintenance shall not be made by
children without supervision.
- Children of less than 3 years should be kept away unless continuously supervised.
- Do not use this appliance outdoors.
- It is imperative to unplug the power supply after the appliance has been used, before it is cleaned and whilst being repaired.
- Unplug after each use. Grasp the supply, not the cord.
- Repairs to electrical appliances should only be performed by qualified personnel. Improper repairs may place the user at serious risk.
- Do not operate this appliance with a damaged plug or cord, after a malfunction or after being dropped or damaged in any way.
- Regular, periodic checks should be carried out on the mains supply to ensure no damage is evident. Should there be any signs of damage the product should not be used.
- If the power cable is damaged, it should only be replaced by the manufacturer or a suitable qualified after-sales-service in order to avoid a hazard
- Do not allow the power cable to hang over sharp edges or come in contact with hot surfaces.
- Do not run the power cable under carpets, rugs, etc.
- This product is intended for household use only and should not be used for industrial purposes.
- Do not use any accessories or attachments with this appliance other than those supplied or recommended by supplier.
- Do not use this product for anything other than its intended use.
- Do not push objects into any openings as damage to the product and/or electric shock may occur.
Description of Parts – Front Panel
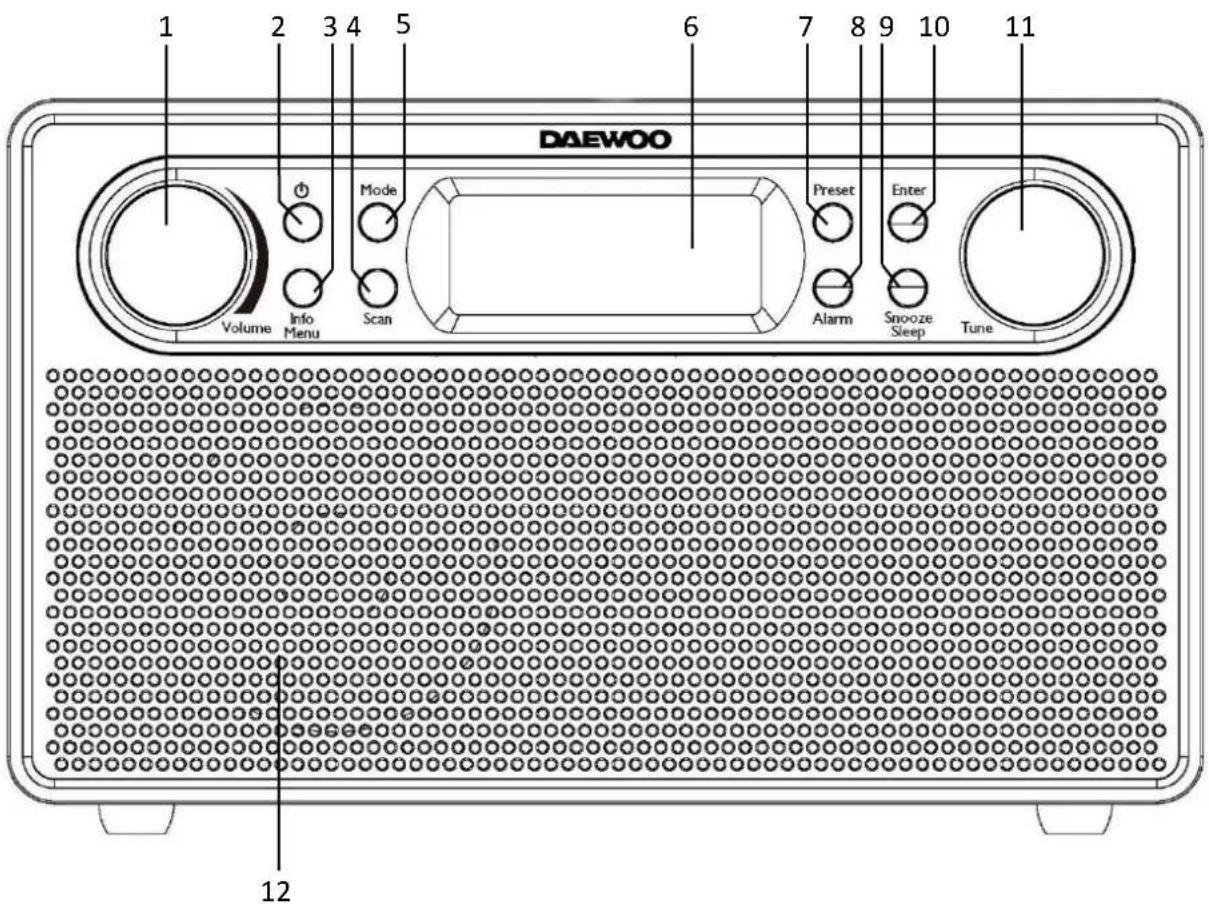
- Volume Control – Rotate Clockwise to Increase Volume, Anticlockwise to Decrease Volume.
- POWER – Press Once for Power On, Press Once for Power Off.
- INFO/MENU – Press to Display Radio Station Information; Press and hold to enter system settings
- SCAN – Press Once to Scan the Radio Band and Store Pre-set Stations.
- MODE – Press to select
- LCD Display
- PRESET – Press to Select Radio Presets.
- ALARM – Press to Select the Alarm Function.
- SNOOZE/SLEEP – Press to Select a delay after the Alarm.
- ENTER – Press to Confirm Selection.
- TUNE – Rotate to Tune Radio Stations, Select Presets, Set the Time and Date, etc.
- LOUDSPEAKER
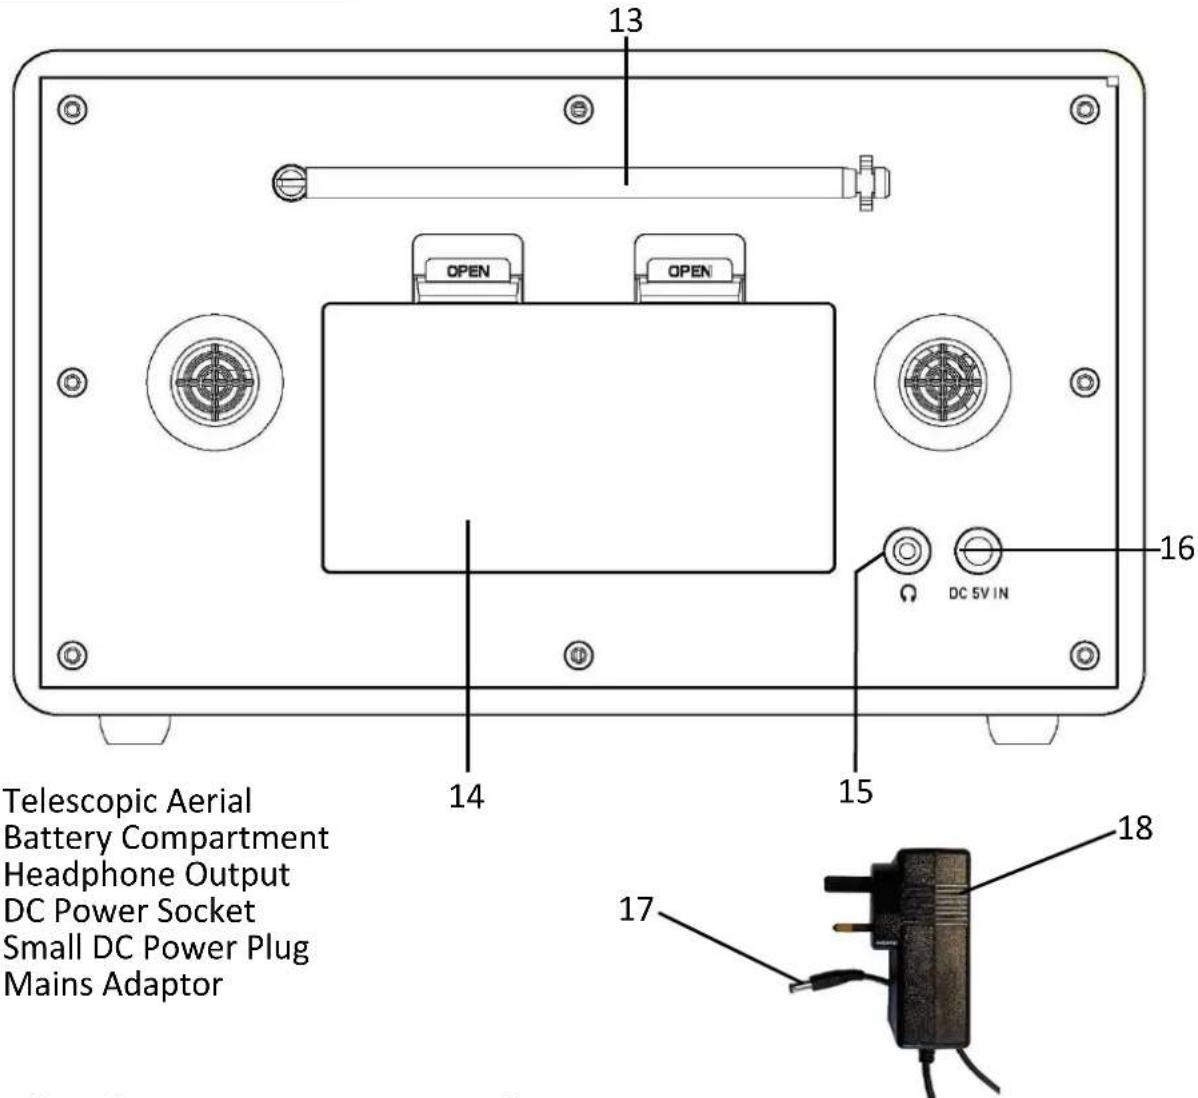
Description of Parts – Rear Panel
Before the first time you use your DAB Radio
Please read these operating instructions thoroughly and keep them in a safe place for future reference.
Remove all packing materials and discard responsibly.
Inserting Batteries (not supplied)
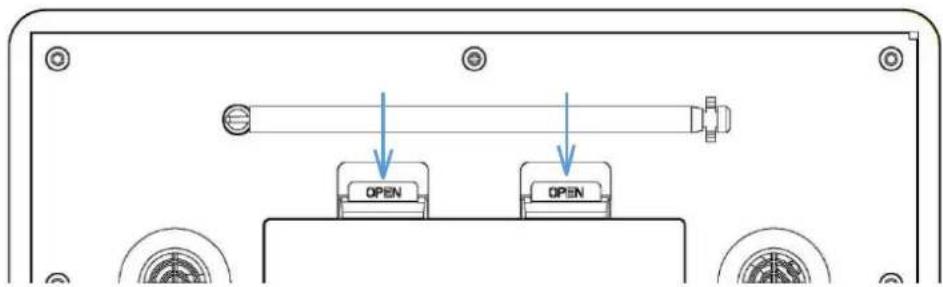
- To open the Battery Compartment (14), pull the tabs down (arrowed below) on the cover and remove.
- Insert four C-Type Batteries (not supplied) into the battery compartment being careful to observe the polarity markings inside:
- Do not mix old and new batteries together.
- It is recommended that batteries are removed from the radio if it is not to be used for a long period of time.
- CAUTION: There is a danger of explosion if the batteries are incorrectly fitted.
- Replace only with the same or equivalent battery type.
- Do not expose the radio to sunshine, fire, heat or similar.
WARNING
- Keep new and used batteries away from children.
- If the battery compartment does not latch securely, stop using the product and keep it away from children.
Operating Instructions
- Insert the Small DC Power Plug (17) of the Mains Adaptor (18) into DC Power Socket (16) on the rear panel of the Radio.
- Insert the Mains Adaptor (18) into the nearest mains socket.
NB if the mains adaptor is being used, it is recommended that the batteries are removed.
Operating Instructions – Using the DAB Radio
Listening to the DAB Radio
- Ensure the Radio Telescopic Aerial (13) is fully extended.
- Ensure the radio has batteries inserted or has the Mains Adaptor (18) connected as described above.
- Press POWER button (2) on the front panel to power up the radio. NB The radio will automatically scan the airwaves for DAB stations if it is being used for the first time.
- Press the MODE button (5) until 'DAB' is displayed on the right hand side of the LCD display (6).
- Adjust the volume using the VOLUME control (1).
Tuning in and Selecting DAB stations
Rotate the TUNE control (11) to select the desired station. Once the station has been found press the ENTER button (10) to select the station.
Saving up to 10 DAB radio stations using the preset function
- Tune the radio into the desired station as above.
- Press and hold the PRESET button (7) to enter Preset mode.
- Rotate the TUNE control (11) to select the desired preset number and press the ENTER button (10), the radio will store the station you have tuned into the preset number selected.
NB If the preset has no radio station stored in it the LCD Display (6) will show "Preset Store
- Repeat the above three steps to save more stations in the presets.
Recalling a preset DAB radio station
- To recall a preset Radio Station, briefly press the PRESET button (7) to enter the preset recall mode.
- Rotate the TUNE control (11) to cycle through the DAB radio stations saved in the presets.
- Once the LCD Display (6) shows the desired preset press the ENTER button (10) to select the radio station preset.
NB If the preset has no radio station stored in it the LCD Display (6) will show "Preset Recall
Selecting DAB Radio Information on the LCD Display
Press the INFO/MENU (3) button to select the various DAB radio station related information such as:
- Dynamic Label Segment (DLS) - Displays scrolling text information supplied by the broadcaster.
- Signal Strength - Displays a signal bar with the current station strength.
- Bit Error Rate (BER) - Provides details of signal error rate.
- Channel and Frequency - Displays the station's transmission channel number and frequency.
- PTY (program type) - Shows the type and description of the program provided by the radio station.
- Time and Date - Displays the time and date information provided by the broadcaster.
- Bit rate - The data rate of which the signal is being transmitted.
Updating the DAB stations using the scan button.
It may be necessary to retune your DAB radio in order to receive new stations being broadcast in your area or if a broadcaster has made any changes to an existing station and you can no longer receive it.
To update your DAB stations, press the SCAN button (4) on the front panel and the DAB radio band will be updated. Any stations saved in the presets may need to be re-programmed after the scan has finished.
NB Re-scanning may be required if the radio is moved to a new location i.e. after moving house.
Operating Instructions – Using the FM Radio
Listening to the FM Radio
- Ensure the Radio Telescopic Aerial (13) is fully extended.
- Ensure the radio has batteries inserted or has the Mains Adaptor (18) connected as described above.
- Press the POWER button (2) on the front panel to power up the radio.
- Press the MODE button (5) until 'FM' is displayed at the right-hand side of the LCD display (6).
- Tune the radio into the desired station using the TUNE control (11). NB the radio tunes in 0.05MHz steps.
- Adjust the volume using the VOLUME control (1).
Saving up to 10 FM radio stations using the preset function
- Tune the radio into the desired station using the TUNE control (11) as above.
- Press and hold the PRESET button (7) to enter preset store mode.
- Rotate the TUNE control (11) to select the desired preset number and press the ENTER button (10), the radio will now store the station you have tuned to in the preset number chosen.
NB If the preset has no radio station stored in it the LCD Display (6) will show "Preset Store
Recalling an FM preset radio station
- To recall preset Radio Stations, briefly press the PRESET button (7) to recall previously stored radio stations. "Preset Recall" will be shown on the LCD Display (6).
- Rotate the TUNE control (11) to cycle through the FM radio station presets.
- Once the LCD Display (6) shows the desired preset station press the ENTER button (10) to select the desired radio station.
NB If the preset has no radio station stored in it the LCD Display (6) will show "Preset Recall
Saving up to 10 FM preset stations automatically
- Press the SCAN button (4) once, the radio will automatically search the frequency range-starting at 87.5MHz upwards, when a station of sufficient strength has been found the radio will stop scanning.
- To scan down the frequency band, press and hold the SCAN button (4).
Selecting FM Radio Information on the LCD Display
NB the bottom line of the LCD display (6) will show the radio station name or frequency, radio station information is shown on the lower line on the LCD Display (6) Press the INFO/MENU (3) button to select the various FM radio station related information as below:
- Radio Text – Displays scrolling text information supplied by the broadcaster.
- Program Type – Displays description of the program provided by the radio station.
- Signal Strength – Displays a signal bar with current station strength.
- Time and Date – Displays the time and date provided by the broadcaster.
- Frequency – Displays the stations transmission frequency.
- Audio Type – Displays the audio type of the current station (Stereo or Mono).
Operating Instructions – Using the Alarm Function
- Press the ALARM button (8) until the Alarm 1 appears on the left-hand side of the LCD Display (6) and press the ENTER button (10), the Alarm: OFF will flash, rotate the TUNE control (11) to select ON and press the ENTER button (10) to confirm. The hour digit will now flash.
- Rotate the TUNE control (11) to select the alarm hour and press the ENTER button (10) to set the hour.
- Rotate the TUNE control (11) to select the alarm minute and press the ENTER button (10) to set the minute.
- Again, use TUNE control (11) to select alarm volume.
- Rotate the TUNE control (11) to select wake up to DAB, FM or Alarm and press ENTER button (10) to select the desired source.
- To set Alarm 2, press the ALARM button (8) twice and follow the above procedure.
- Follow step 1 above and rotate the TUNE control (11) to select OFF and press the ENTER button (10) to turn off the Alarm.
Silencing the alarm
Press the POWER button (2) to cancel the alarm.
Snooze
After the alarm sounds, the SNOOZE/SLEEP button (9) can be pressed to snooze the alarm. The alarm will be silent for a further 9 minutes before sounding again. Press the POWER button (2) to cancel the snooze mode.
Sleep Timer
The sleep timer allows you to listen to music for a set time before the radio turns itself off automatically.
a. Switch the radio on to the desired station.
b. Press the SNOOZE/SLEEP button (9) to enter sleep mode.
c. Rotate the TUNE control (11) to select between OFF-120-90-60-45-30-15 and 5 minutes.
d. Press the ENTER button (10) to confirm the time you have selected.
e. The radio will play for the selected time and then go into Standby (off).
f. To cancel the sleep timer, repeat steps b, c and d and select OFF.
System Settings
Press and hold the INFO/MENU button (3) to enter the system menu. Rotate the TUNE control (11) to select one of the menu options:
Time and Date
- Press the ENTER button (10) the hour digits will flash
- Rotate the TUNE control (11) to select the hour.
- Press the ENTER button (10) to confirm the hour setting.
Repeat the above three steps to set the minutes and the date.
System Version
- Select to check the current software version
Factory Reset
WARNING Factory Reset will delete all personal settings, stored DAB and FM stations and any tuned stations.
- Press and hold the INFO/MENU button (3) to enter the system menu.
- Rotate the TUNE control (11) until 'Factory Reset' is shown on the DISPLAY (6), press ENTER button (10) to confirm.
- Rotate the TUNE control (11) to show 'Yes' on the DISPLAY (6).
- Press the ENTER button (10) to confirm reset.
FM scan setting (FM mode)
- Select the FM automatic scanning to stop and select strong stations 'Only' or 'All' stations.
Prune (DAB mode)
- Select 'Prune' mode to delete DAB stations that do not have service any more.
Operating Instructions – Using the Headphone Output
Insert the Headphones 3.5mm jack plug into the Headphone input (15) on the rear panel. Adjust the volume level as desired using the VOLUME control (1).
Care and Use of your DAB Radio
• Always disconnect the DAB Radio from the mains power supply before cleaning.
- Clean outside of the DAB Radio with a clean damp cloth. Never clean with harsh or abrasive cleaners.
- Do not submerge the DAB Radio or its Power Supply in water or any other liquids.
Technical Specification
| Model Number | AVS1324G |
| Power Supply | 4xC Type Batteries or DC 5V @1A |
| Mains Adaptor | Input: AC 100-240V ~ 50/60Hz 0.15A.Output: DC 5V @1A |
| Audio Output Power | 2W |
| No of Speaker Units | 1 |
| Unpacked Weight | Approx. 1.08 Kgs |
| Dimensions (Approx.) | Approx. 255 (w) x 100 (d) x 154 (h) mm |
| Operating Temperature Range | 0°C to +40°C |
| FM Frequency Range | 87.5 - 108MHz |
| DAB Frequency Range | 174.928 - 239.2MHZ |
| Wavebands | DAB, DAB+ & FM |
Customer Support
Should you require any product information, replacement parts or accessories, please contact our customer care team at help@daewooelectricals.com or call 0161 831 7879.
● Replacement parts and accessories are guaranteed for 1 year from the date of purchase.
- It is important to note that your warranty becomes invalid should non Daewoo parts or accessories be used with this appliance
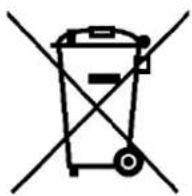
Waste electrical products should not be disposed of with household waste.
Please recycle where facilities exist. Check with your Local Authority or retailer for recycling advice.
CE
DAEWOO
ELECTRICALS

natural_image
Abstract black-and-white geometric pattern resembling a stylized fan or leaf shape (no text or symbols)WARRANTY
Thank you for purchasing your Daewoo Audio product.
As part of our commitment to quality, we are offering you an extra 2 years warranty in addition to your 1 year guarantee
Your Daewoo audio product is guaranteed for 1 year from the date of original purchase, with proof of purchase or receipt. If any defect should occur due to faulty workmanship or material, your faulty product should be returned to the place of purchase, replacement or refund is at the discretion of the retailer.
The guarantee is subject to the following provisions:
- The product must be correctly installed and operated in accordance with the requirements contained in the instruction manual.
- The product must be used solely for domestic purposes.
- It does not cover general wear and tear, damage, misuse or any consumable parts.
- The guarantee will be rendered invalid if the product is re-sold or has been damaged through inexpert repair.
- The guarantee is only valid within the UK and Eire.
Your standard 1 year guarantee will only be extended to the maximum available for your individual product upon registration. (Note: products must be registered individually and covers the main body and housing). If you do not register your product within 28 days of the original purchase date, your product will only be guaranteed for 1 year.
To validate your extended 2 year warranty*please register your purchase online within 28 days of the original purchase date by registering at
www.daewoowarrantyregistration.com/warranty-registration
*Your extended warranty is only valid with proof of purchase receipt and subject to the conditions outlined above.
Daewoo Electricals is a registered trademark. Produced and imported under licence by ESG Ltd Manchester M3 1JS www.esgld.com
- Portable DAB Radio
- IMPORTANT SAFEGUARDS
- When using electrical appliances, basic safety precautions should always be followed. These instructions should be saved for future reference:
- Description of Parts – Front Panel
- Description of Parts – Rear Panel
- Before the first time you use your DAB Radio
- Inserting Batteries (not supplied)
- WARNING
- Operating Instructions
- Operating Instructions – Using the DAB Radio
- Listening to the DAB Radio
- Tuning in and Selecting DAB stations
- Saving up to 10 DAB radio stations using the preset function
- Recalling a preset DAB radio station
- Selecting DAB Radio Information on the LCD Display
- Updating the DAB stations using the scan button.
- Operating Instructions – Using the FM Radio
- Listening to the FM Radio
- Saving up to 10 FM radio stations using the preset function
- Recalling an FM preset radio station
- Saving up to 10 FM preset stations automatically
- Selecting FM Radio Information on the LCD Display
- Operating Instructions – Using the Alarm Function
- Silencing the alarm
- Snooze
- Sleep Timer
- System Settings
- Time and Date
- System Version
- Factory Reset
- FM scan setting (FM mode)
- Prune (DAB mode)
- Operating Instructions – Using the Headphone Output
- Care and Use of your DAB Radio
- Customer Support
- DAEWOO
- ELECTRICALS
- WARRANTY
Brand : DAEWOO
Model : AVS1324
Category : Consumer Electronics