
BSDF364G - Cooker BlueStar - Free user manual and instructions
Find the device manual for free BSDF364G BlueStar in PDF.


| Brand | BlueStar |
| Model | BSDF364G |
| Product type | Gas range |
| Dimensions (W x D x H) | 91.4 x 71.1 x 91.4 cm (estimate) |
| Weight | Approximately 90 kg (estimate) |
| Power supply | Natural gas or propane (depending on conversion) and 120 V / 60 Hz for ignition and lighting |
| Total power | Varies by burner (consult the rating plate) |
| Number of burners | 4 (estimate based on model) |
| Oven type | Gas oven with static heat |
| Oven capacity | Approximately 120 L (estimate) |
| Cooking surface material | Cast iron grates |
| Controls | Rotary knobs for burners and oven |
| Oven light | Standard bulb, replaceable |
| Child safety | Not specified (refer to the manual) |
| Safety shutdown | Safety device on burners (flame) |
| Cleaning | Manual cleaning of enameled surfaces, do not use steam cleaner |
| Spare parts | Available from the manufacturer or authorized dealer |
| Repairability | Contact a qualified technician for any repairs |
| Warranty | Refer to the conditions provided with the appliance |
| Manual | User and installation manual included |
Frequently Asked Questions - BSDF364G BlueStar
User questions about BSDF364G BlueStar
0 question about this device. Answer the ones you know or ask your own.
Ask a new question about this device
Download the instructions for your Cooker in PDF format for free! Find your manual BSDF364G - BlueStar and take your electronic device back in hand. On this page are published all the documents necessary for the use of your device. BSDF364G by BlueStar.
USER MANUAL BSDF364G BlueStar
Use and Care Information
Part # 200009 – revision 1
Thank You and Welcome
Thank you for your purchase and welcome to the BlueStar family!
BlueStar appliances are designed for discerning home chefs who demand restaurant-quality results in their own kitchens. As the owner of a new BlueStar appliance, you can look forward to years of precise and even cooking in your home kitchen.
Here are a few tips to get started:
- Review this User Manual, which includes instructions and tips for getting the most out of your new appliance.
- Register your appliance online at www.bluestarcooking.com/support/product-registration to stay in touch and allow us to send you valuable product news and updates.
- Review our products and help us spread the word at https://www.bluestarcooking.com/inspiration/reviews.
Thank you again for choosing BlueStar.
Contents
Safety Information 5
Site Preparation 10
Installation Instructions 19
Before Your First Use 23
Touch Screen Control 24
Touch Screen Control-Modes 26
Touch Screen Control—Settings 28
Operation 30
Cooking Guide and Tips....33
Common Baking Problems and Solutions 41
Care and Cleaning 42
Troubleshooting 44
Warranty 46
Product Information
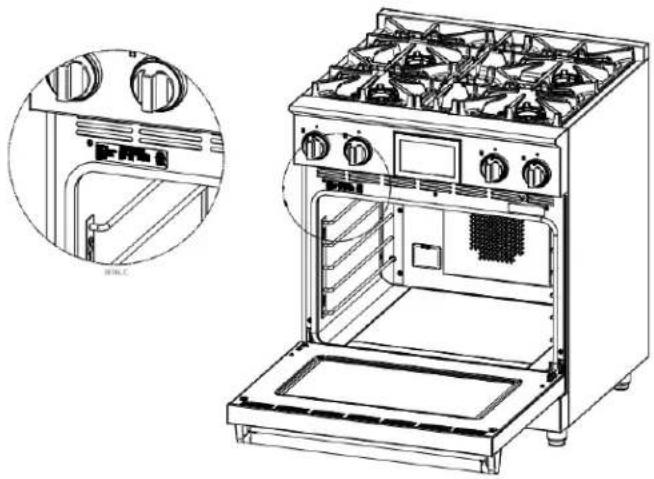
Important product information, including the model and serial numbers, can be found on the serial plate, which is located on the upper left corner behind the oven door.
natural_image
Line drawing of a kitchen oven with heat exchanger and control panel (no text or symbols)Please complete the information below for warranty purposes and future reference:
Model Number ____
Serial Number ____
Installation Date ____
Dealer's Name ____
Dealer's Phone Number ____
If service is required under warranty, it must be performed by an authorized BlueStar service company. To locate an authorized BlueStar service company in your area, go to www.bluestarcooking.com/support/find-a-service-center.
Please read and comply with the following safety messages to ensure your cooking product is installed and operated as safely as possible.
DANGER states a hazard that will cause serious injury or death if precautions are not followed.
WARNING states a hazard that can cause serious injury or death if precautions are not followed.
CAUTION states a hazard that can cause minor injury or product damage if instructions are not followed.
This appliance is designed for easy installation and operation, however we recommend that you read all sections of this manual before installation and first use.
Electrical Requirements and Grounding Instructions
Installation and service must be performed by a qualified installer, service agency, or utility company.
Important: Installation must conform with local codes or, in the absence of local codes, to the National Fuel Gas Code, ANSI Z223.1/NFPS54, and National Electrical Code NFPA70.
The installation of appliances designed for manufactured (mobile) home installation must conform to the Manufactured Home Construction and Safety Standard, Title 24 CFR, Part 3280, or, when this standard is not applicable, refer to: ANSI/NCSBCS A225.1 or with local codes as applicable.
The installation of appliances designed for Recreation Park Trailers must conform with state and local codes, or, in the absence of such codes, to the standard for Recreational Park Trailers ANSI A119.5.
WARNING
To reduce the risk of fire, electric shock, serious injury, or death when using your appliance, follow basic safety precautions, including the following:
- Read the provided user manual before operating this appliance.
- This product is to be used only for cooking tasks expected of a home appliance. This product is not intended for commercial use.
- If your product is found to be damaged upon receipt, contact your dealer or builder immediately. Do not install or use a damaged appliance or if the conduit is damaged.
- Do not install, repair, or replace any part of the appliance yourself unless specifically recommended in the literature accompanying it. All other service must be performed by a qualified service technician.
- Electric power to the appliance must be turned off at the circuit breaker or fuse box prior to performing any type of service or installation.
- This appliance must be properly installed and grounded by a qualified installer according to these installation instructions prior to use. The installer must show the customer the location of the circuit breaker panel or fuse box so that they know where and how to turn off electric power to the appliance. BlueStar is not responsible for service required to correct a faulty installation. The owner is responsible to make sure this appliance is properly installed.
- To avoid electric shock hazard, do not install this appliance outside or near water. Do not install or use this appliance if it has been exposed to water.
- Do not obstruct any venting areas or slots. The appliance must be installed in a manner which will keep the area below the door unobstructed to allow free air flow.
- Do not tamper with the controls. Do not adjust or alter any part of the appliance unless specifically instructed to do so by this manual.
- Secure the appliance to the cabinet following the direction in the installation instructions to prevent injury due to the unit tipping forward.
WARNING
To reduce the risk of fire, electric shock, serious injury, or death when using your appliance, follow basic safety precautions, including the following:
- To prevent damage, do not use the oven handles as lift points or for moving the appliance
- Do not climb or sit on any part of the appliance.
- Do not use the oven door for stepping, leaning, or sitting on at any time, Damage to the appliance and/or personal injury can occur.
- Keep packaging materials away from children. Plastic sheets and bags can cause suffocation.
- Do not leave children or pets alone or unattended in the area around the appliance. Do not allow children to play with the controls, pull on the handle, or touch other parts of the appliance
- Caution: Do not store items of interest to children above the appliance. Children can be burned or injured while climbing on the appliance.
• Install a smoke detector near the kitchen. - Do not use water on grease fires. Smother any flames with a lid, cookie sheet, or flat tray. Use baking soda or a foam fire extinguisher to extinguish flaming grease. If a fire occurs, keep the oven door closed.
- Keep flammable items, such as paper, cardboard, plastic, and cloth away from hot surfaces. Do not put such items in the oven. Do not allow potholders to touch hot surfaces.
- Only use dry potholders to prevent steam burns when moving items in or out of the appliance. Do not use a towel or other bulky cloth in place of potholders.
- When using the oven, do not touch the heating elements or interior surfaces of the oven or the exterior area immediately surrounding the door. Heating elements may be hot even though they are dark in color. Interior oven surfaces can become hot enough to cause burns.
-
Wear proper attire. Do not wear loose or hanging apparel while using the appliance. Do not allow clothing to come into contact with or within close proximity of any element or the interior of the oven and the surrounding areas during and immediately after use. Some synthetic materials are highly flammable and should not be worn while cooking.
-
Do not use the oven for storage.
- Do not store combustible, flammable, or explosive materials in the oven or in adjacent cabinets.
- Never use the appliance for warming or heating the room.
- Do not line the oven with aluminum foil or other materials while cooking or cleaning.
- Do not leave metal objects, such as aluminum foil, the meat probe, cookie sheets, etc. on the bottom of the oven. Objects left on the bottom of the oven could damage the oven and the object.
- Use caution when opening the oven door. Let hot air or steam escape before removing or replacing food in the oven.
- Use caution when adding liquids to food or containers in a hot oven. Steam can cause serious burns or scalding.
- Do not heat unopened food containers. Build up of pressure may cause the container to burst and result in injury.
- Grease is flammable. Let hot grease cool before attempting to handle it. Avoid letting grease deposits collect. Clean after each use.
- Light lenses must always be in place when the oven is in use to protect the light bulbs from breakage.
- Oven racks are to be positioned when the oven is cool to prevent burns. If a rack must be moved while the oven is hot, do not let the potholder contact hot heating elements in the oven.
- Be sure all appliance controls are turned off and the appliance is cool before using any type of aerosol cleaner on or around the appliance. The chemical that produces the spraying action could, in the presence of heat, ignite or cause metal parts to corrode.
- Clean parts only as listed in the user manual.
- Do not clean the oven door gaskets. The door gaskets are essential for a good seal of the oven. Care is to be taken during cleaning to prevent rubbing, damaging, or moving the gasket from its installed position.
Electrical Requirements
This appliance requires a grounded dedicated circuit with the following requirements:
- BSDF30 – 240/208 VAC, 60Hz, 40 amp
- BSDF36 – 240/208 VAC, 60Hz, 40 amp
- BSDF48 – 240/208 VAC, 60Hz, 50 amp
- BSDF60 – 240/208 VAC, 60Hz, 50 amp
Performance may be compromised if the electrical supply is less than 240 volts.
For US models, the power cord is not included with the range. If a power cord kit is used, it shall be rated 240V, 50 amps. It must include three or four conductors with closed loop terminals and be marked for use with ranges with nominal 1 3/8" (35mm) diameter connection openings. A 4-conductor cord is required for installations where grounding through the neutral is prohibited such as:
- New branch-circuit installations (1996 NEC)
- Mobile homes
- Recreational vehicles
- In an area where local codes prohibit grounding through the neutral
For Canadian models, the power cord is included.
Clearances
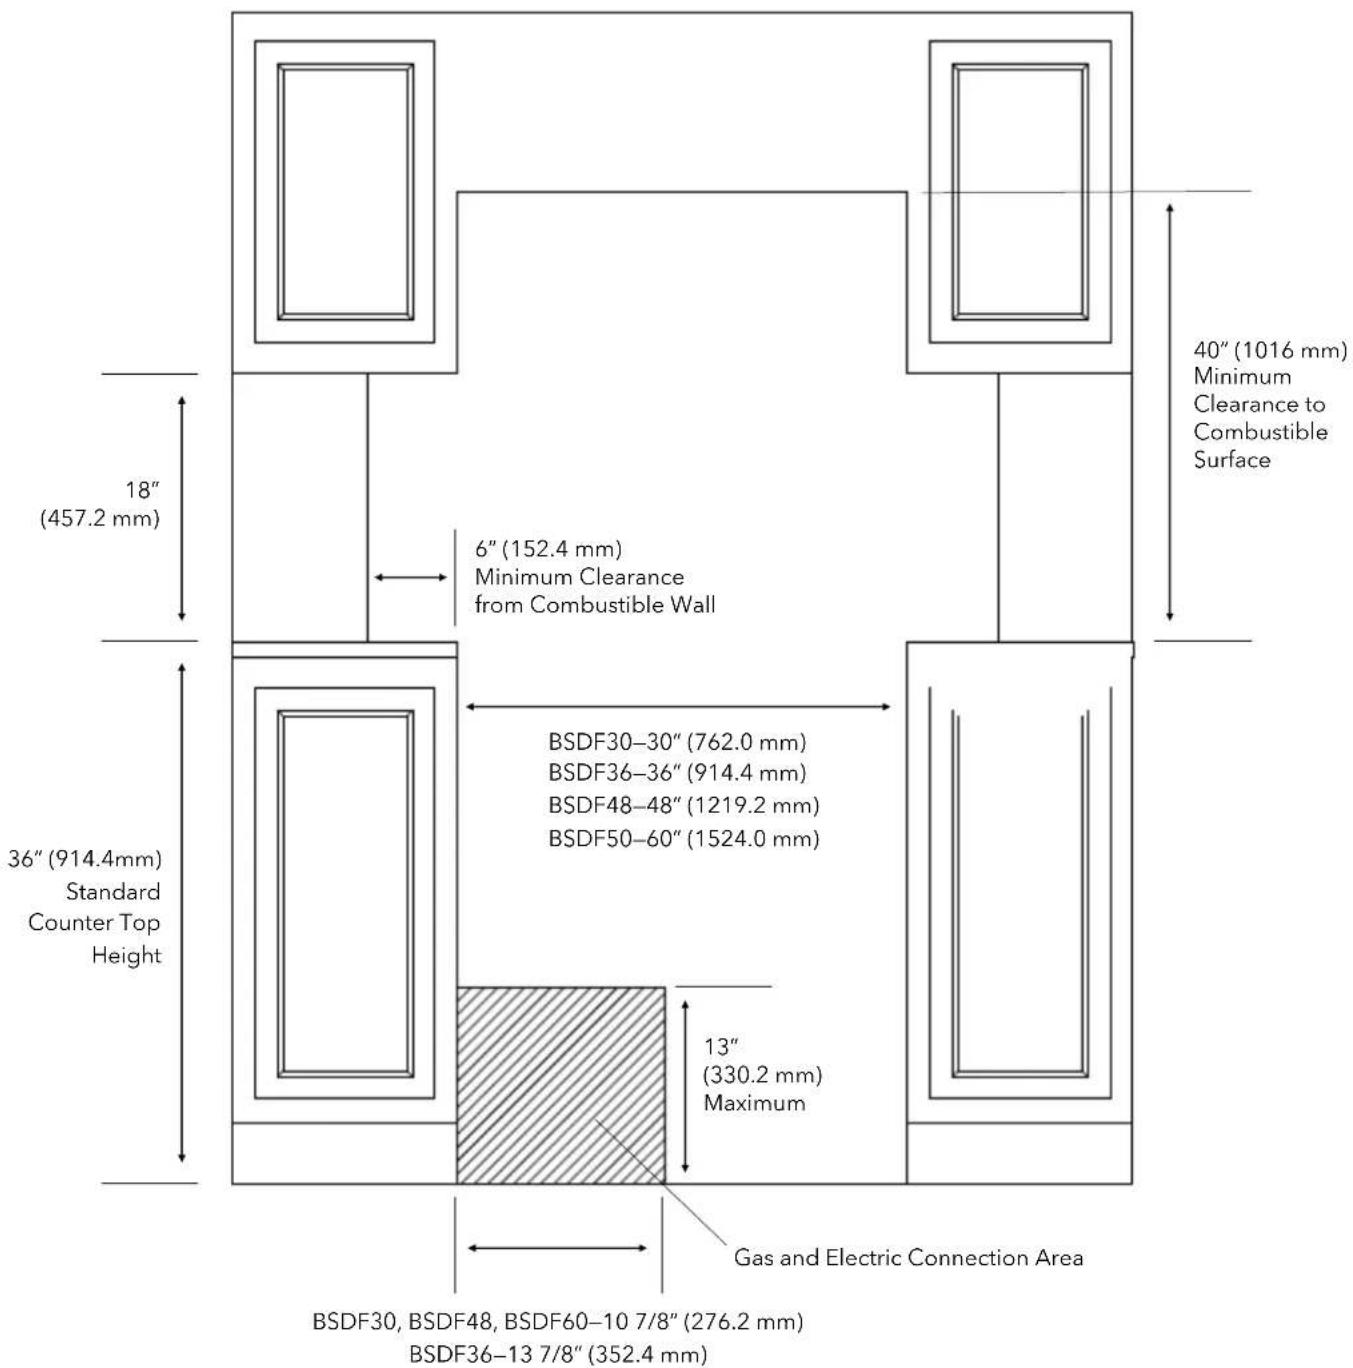
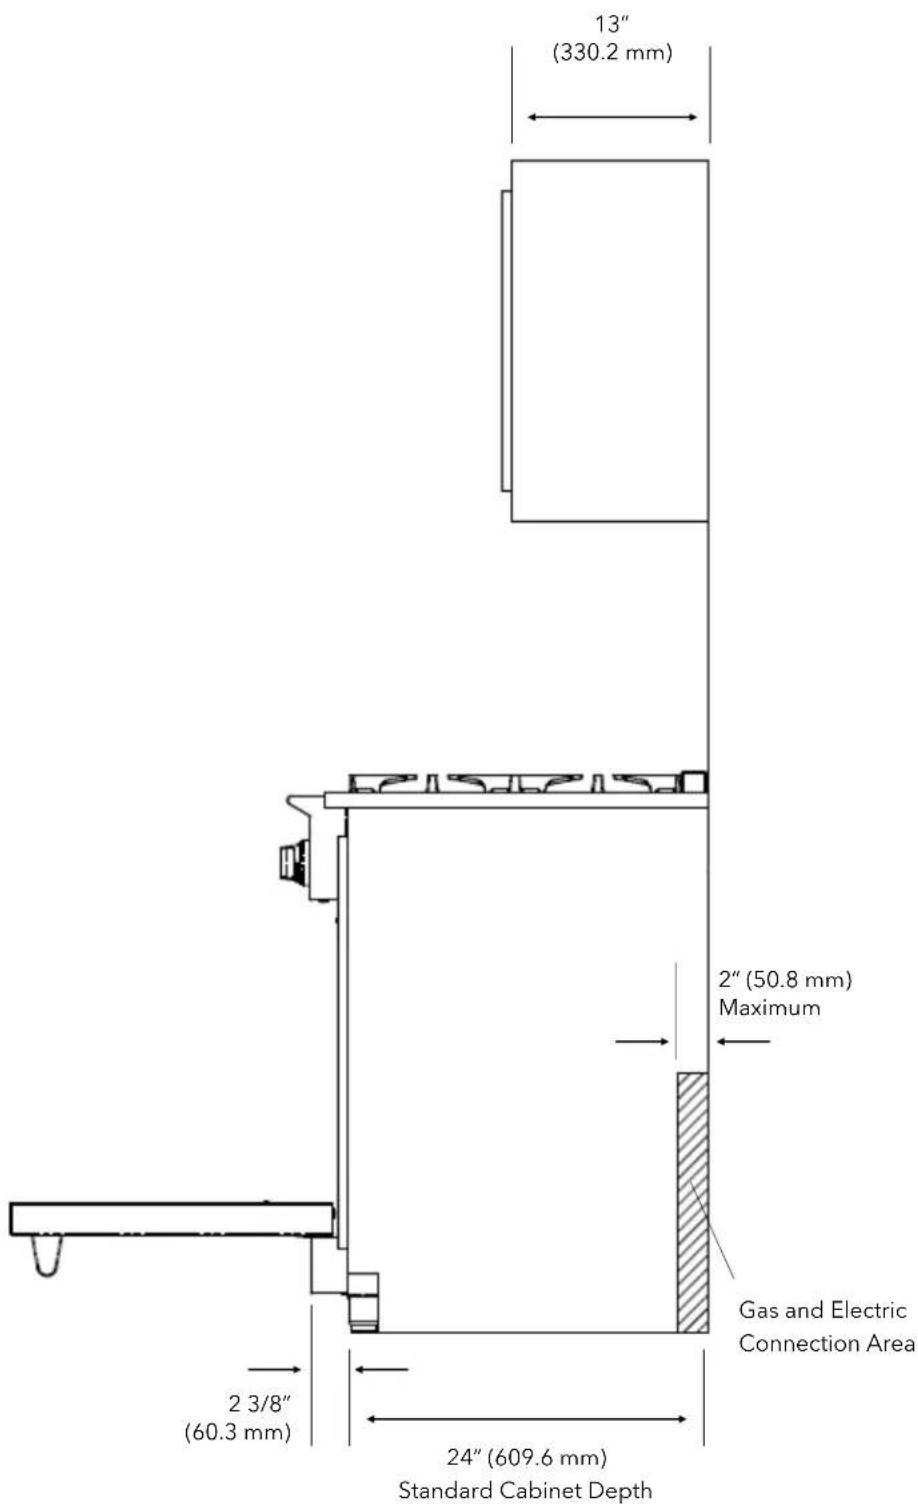
When the appliance is installed in an island, the island trim itself should be kept at least 6" (152.4 mm) in a vertical plane below the top horizontal plane of the appliance and 6" (152.4 mm) above the top horizontal plane of the appliance from combustible materials at the rear.
When the appliance is installed in a zero clearance condition or is installed with any other backguard in a zero clearance condition. Use non-combustible/heat resistant materials in a vertical plane for at least 6" (152.4 mm) below the top horizontal plane of the appliance and 6" (152.4 mm) above the top horizontal plane of the appliance where the appliance meets the back wall.
The non-combustible material need not extend horizontally past the initial barrier thickness. The initial barrier should consist of materials such as ceramic tile, cement backer board, .032" (0.8 mm) thick stainless steel or other non-combustible material. Non-combustible materials are defined as in the form in which the material is used and under the conditions anticipated, the material will not aid combustion or add appreciable heat to an ambient fire or materials that are in compliance with ASTM E 136. Refer to the local building code for additional information.
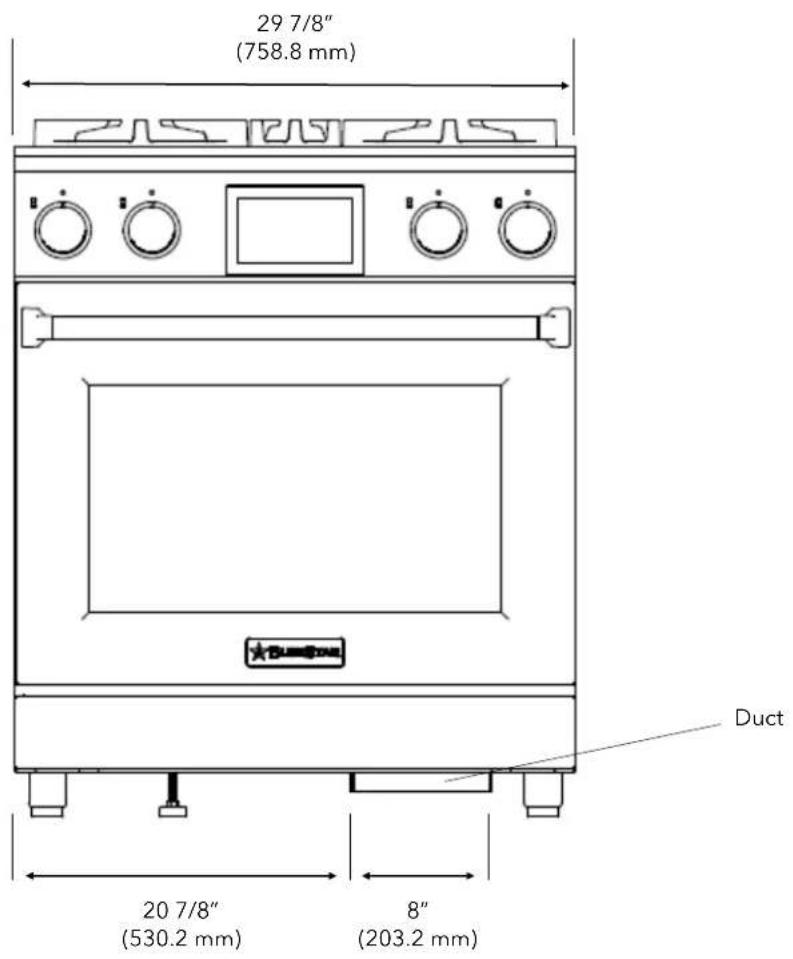
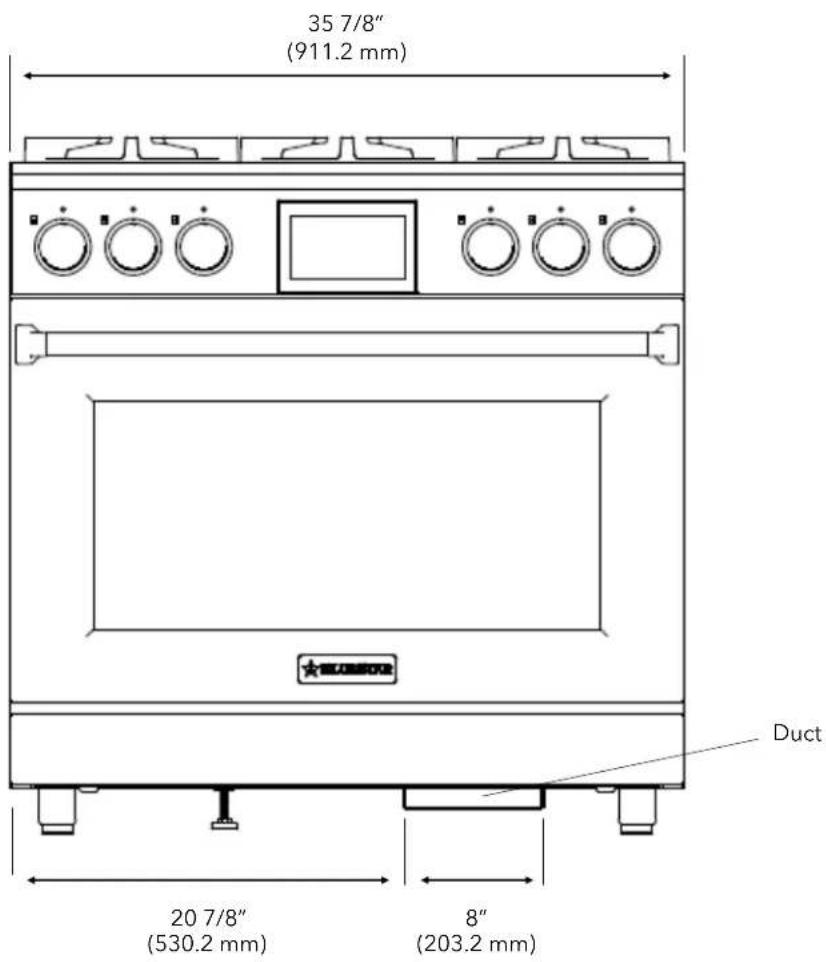
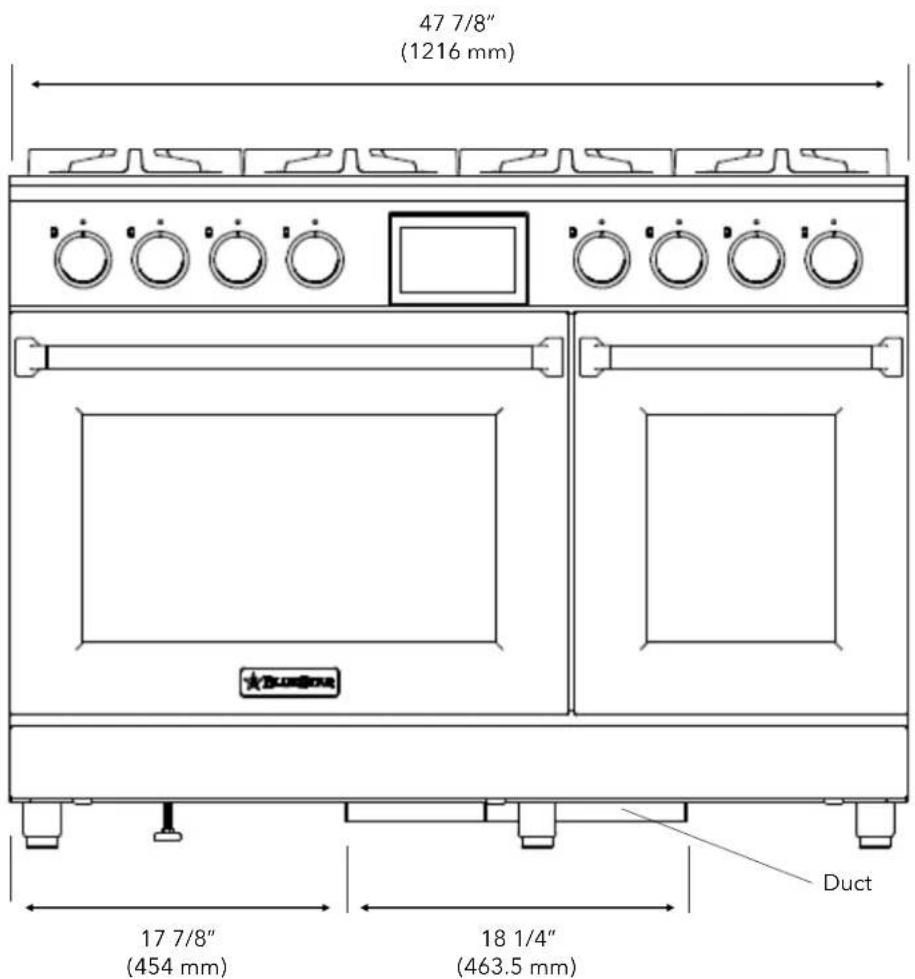
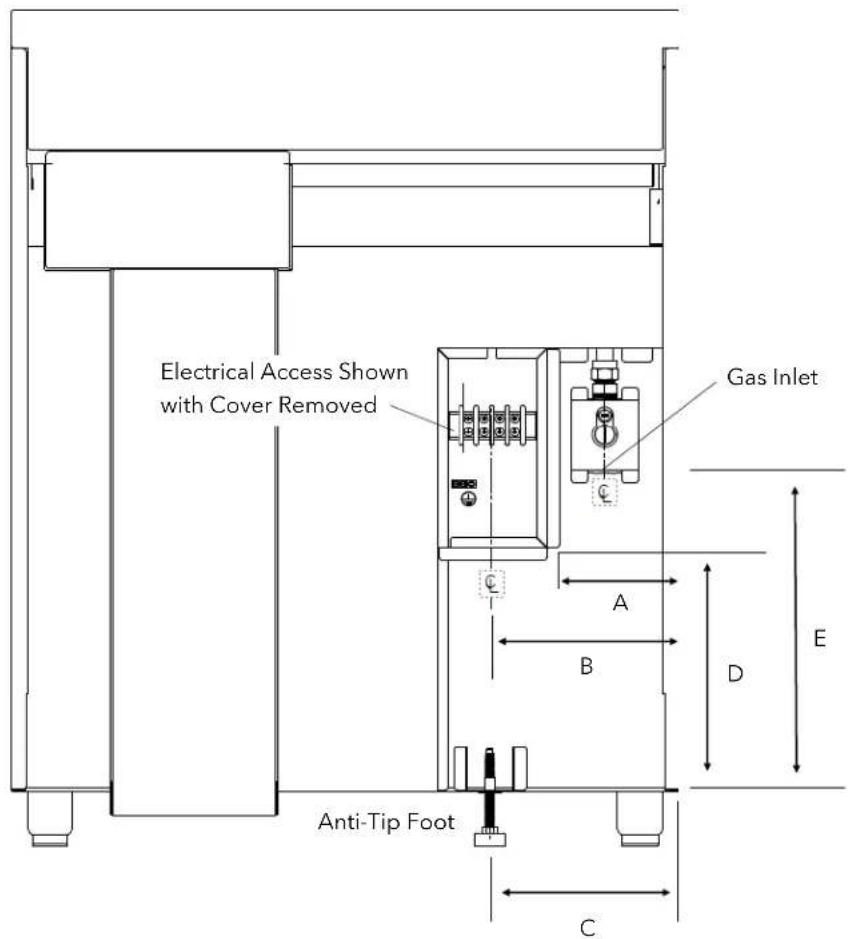
| Model | A | B | C | D | E |
| BSDF30 | 3 5/16"(84.1 mm) | 8 3/8"(212.7 mm) | 8 7/16"(214.3 mm) | ||
| BSDF36 | 6 1/4"(158.8 mm) | 11 5/16"(287.3 mm) | 11 7/16"(290.5 mm) | 13 5/8"(346.1 mm) | 17 1/8"(435.0 mm) |
| BSDF48 | 3 5/16"(84.1 mm) | 8 3/8"(212.7 mm) | 8 7/16"(214.3 mm) | ||
| BSDF60 | 3 5/16"(84.1 mm) | 8 3/8"(212.7 mm) | 8 7/16"(214.3 mm) |
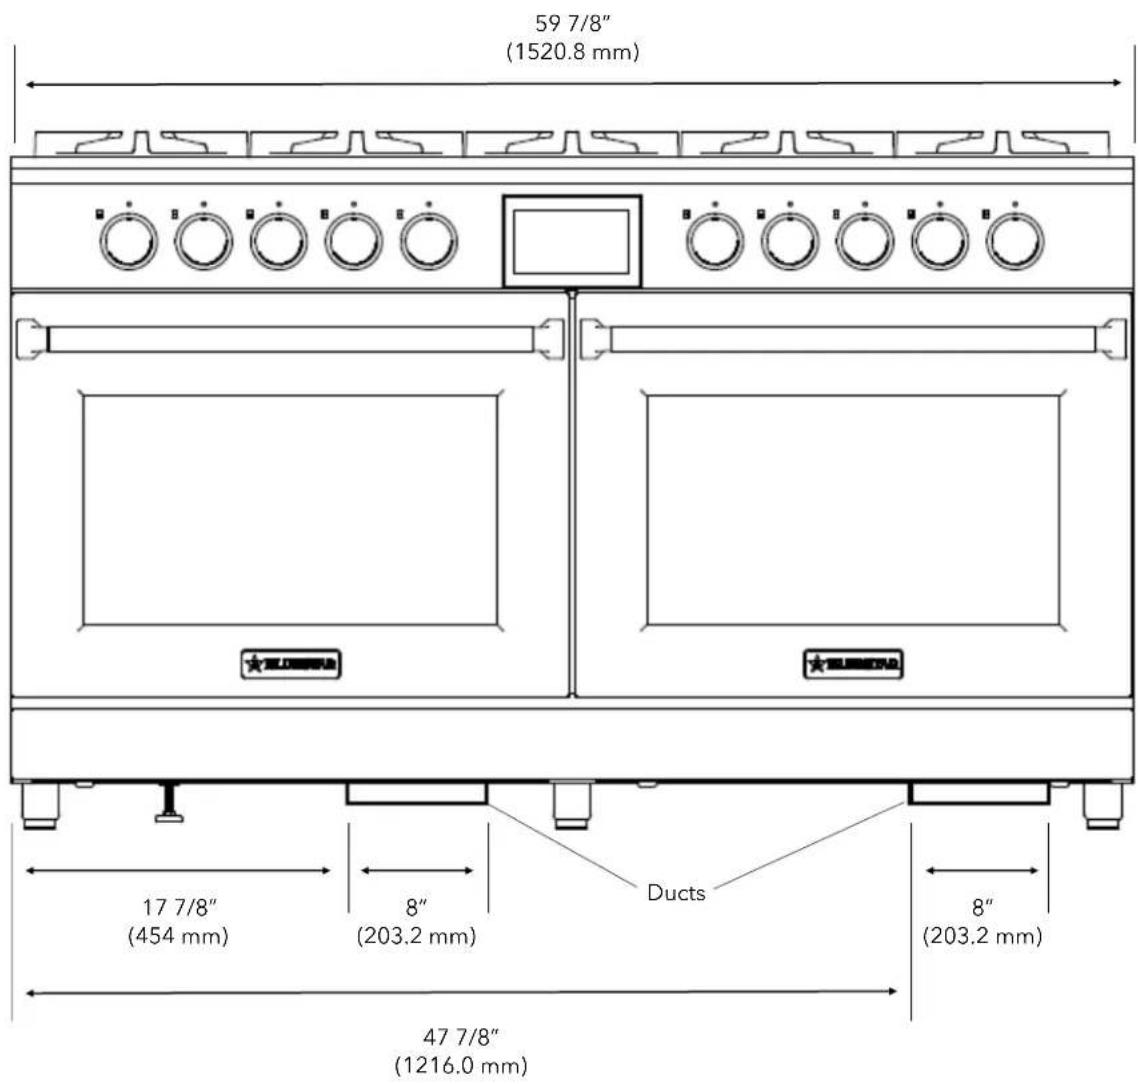
Front View
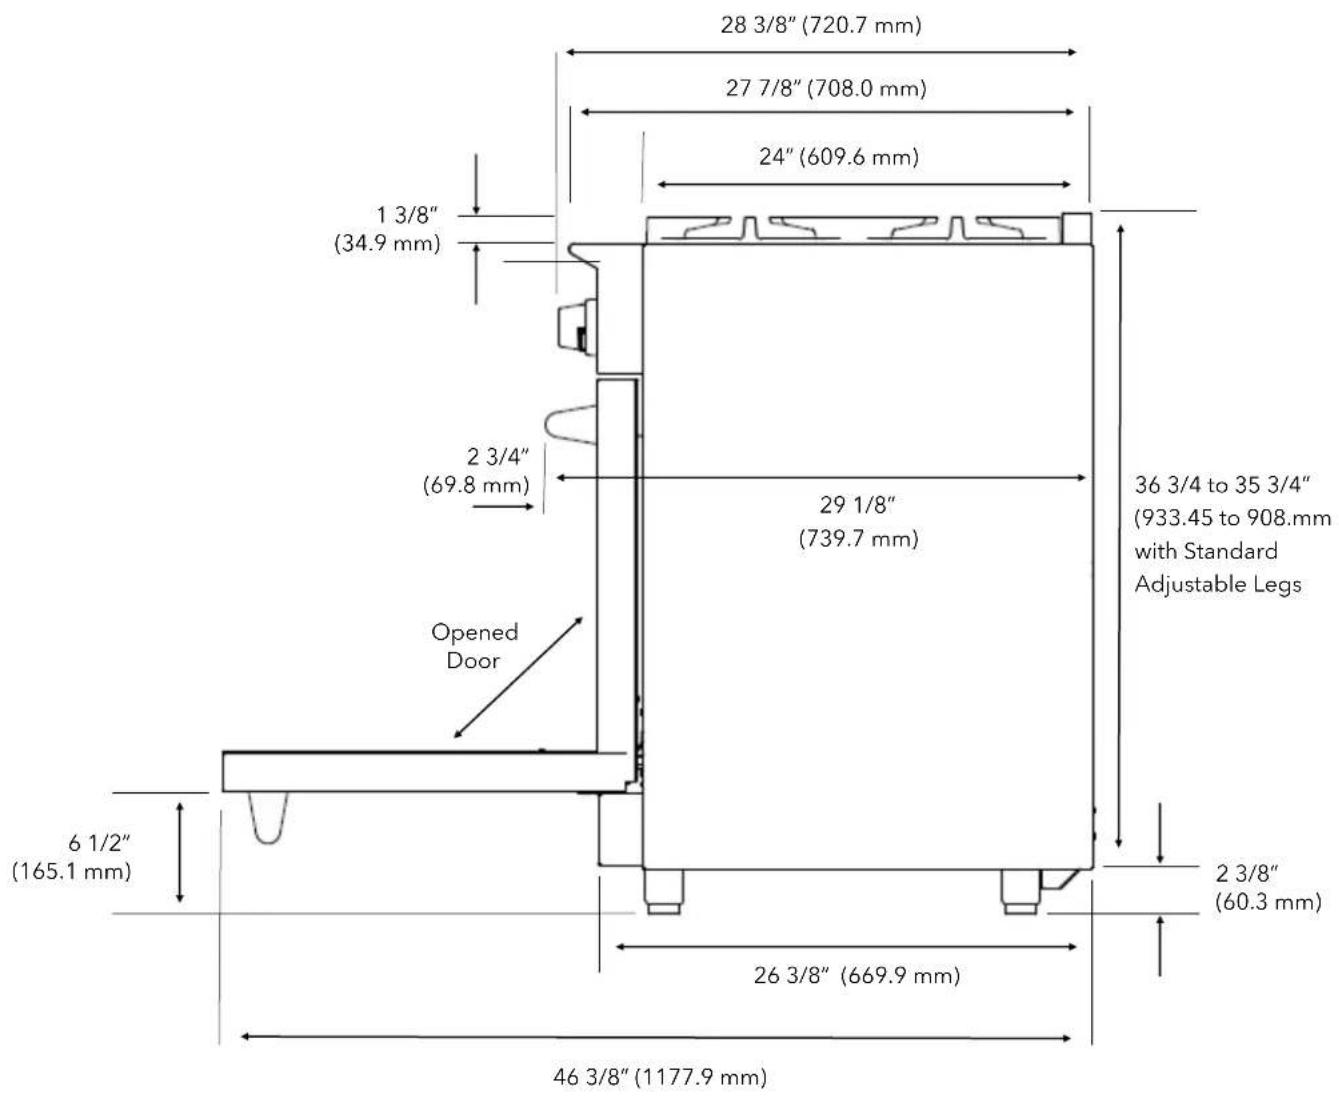
Ventilation recommended for all installations at 30"-36" (762.0-914.4 mm) above cooktop surface
Side View
Tools and Materials
• Phillips screwdriver
- Level
- Gloves and safety glasses

WARNING
This appliance is heavy and tips easily when not completely installed. Use two or more people to move and install the range. Failure to follow these instructions can result in death or serious injury.

AVERTISSEMENT
Step 1 – Uncrate and Inspect the Range
Uncrate and inspect the range. Remove the packing materials but do not discard the anti-tip bracket, temperature probe, user manual, etc.
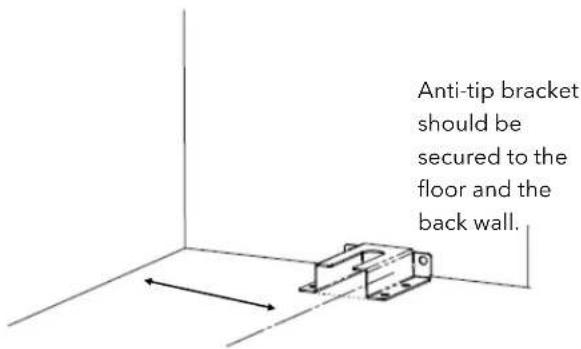
Step 2 – Install the Anti-Tip Bracket
Important: An anti-tip bracket is required for all ranges. You must install the anti-tip bracket before installing the range to reduce the risk of tipping.
Attach the anti-tip bracket using the measurements below.
From the left side of the edge of the range BSDF30, BSDF48, BSDF60-8 1/2" (215.9 mm) BSDF36-11 1/2" (292.1 mm)
Step 3 – Detach the Door
- Open the door all the way.
- Holding onto the door, push the latch at the top of each hinge downwards to lock the hinge.
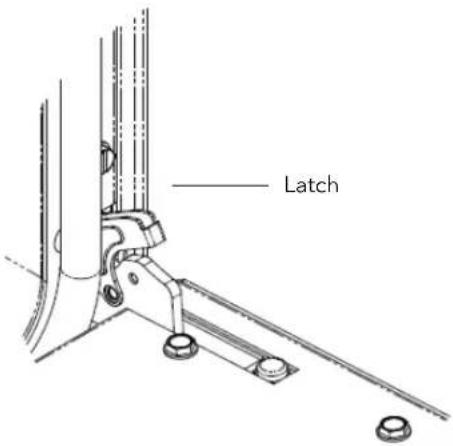
- After the hinges are locked, lift the door slightly, then pull the hinge arms out of the hinge receptacles to remove the door.

CAUTION
Keep fingers away from the door hinges after removing the door. The hinges have strong springs that can snap closed if impacted, which can cause injury.

MISE EN GARDE
- Lean the door against a wall or cabinet with the handle towards the floor and facing the wall to prevent the hinge latches from coming unlatched. Use padding beneath the door to prevent scratching or damage
Step 4 – Remove the Oven Racks
See page 31 for instructions.
Step 5 – Move the Range into Position
Remove the hold down screws and brackets from the wooden base with a Phillips screwdriver. Move the range onto an appliance cart and use the appliance cart to move the range near the front of the enclosure. Do not slide it into the cabinet until after connecting the gas and electrical connections.
Step 6 – Connect Gas Supply
- The installation of this appliance must conform with all applicable local codes. In the absence of local codes, the installation must conform to the latest level of the National Fuel Gas Code, ANSI Z223.1/NFPA 54.
- In Canada, the installation must be in accordance with the current CAN/CGA B149.1 and B149.2.
- Maximum gas must not exceed 14" water column (WC) or 1/2 psi.
- You can use either natural gas or liquid propane with this appliance. Verify whether the appliance and the incoming gas supply are compatible. Check the serial plate.
- The gas supply line must be the same size or larger than the gas inlet on the appliance. The appliance has either a 1/2" NPT or 3/4" NPT gas inlet connection. Make sure the supply line is 1/4" NPT larger than the appliance gas inlet.
- The sealant used on the pipe joints must be resistant to LP gas.
- You must have a manual shut-off valve installed in the gas supply line ahead of the appliance. This must be easily accessible in case of emergency.
-
All gas cooking equipment must have a pressure regulator on the incoming service line for safe and efficient operation. This appliance is equipped with such a gas pressure regulator. Check the incoming gas pressure using a manometer. The correct manifold pressure for natural gas is 5.0" WC and for LP is 10" WC.
-
Incoming line pressure upstream of the appliance should be 1.0" WC greater than the operating manifold pressure. Service pressure may fluctuate for a variety of reasons. Under no circumstances should the factory-installed regulator be removed or bypassed.
- The factory-installed pressure regulator will withstand an input pressure of 1/2 PSI (14" WC). If the incoming pressure exceeds the maximum rating, a step-down regulator is required.
- The appliance and its individual shut-off valve must be disconnected from the gas supply line during any pressure testing in excess of 1/2 PSI (3.5 kPa).
- The appliance must be disconnected from the gas supply by closing its individual shut-off during any pressure testing less than 1/2 PSI (3.5 kPa).
- Check to see that all installer-supplied pipes and fittings are clear of direct, threading chips or other foreign particles before connecting the appliance to the supply line. Such particles will clog orifices and/or valves when pressure is applied.
- The incoming gas supply is brought from the inlet pipe. This is the only connection required via the installer-supplied shut-off valve.
- If installing the appliance with flexible couplings and/or a "quick disconnect," use a commercially-approved AGA Design certified flexible connector at least 1/2" NPT that complies with ANSI Z21.41. In Canada, the connector must comply with CAN 16.10-88 and the "quick disconnect" device must comply with CAN 16.19M-79 and installed with a strain relief device.
- Before putting the appliance into service, test all gas connections for leaks. When pressure testing systems, do not exceed 1/2 PSI or damage will occur to the regulator. Use a soapy solution. Do not use an open flame to check for leaks. Such a procedure is dangerous and it may not detect all the small leaks that a soapy solution will.
Step 7 – Connect Electrical Supply
Observe all local and other codes regarding electrical connections.

WARNING
This appliance must be grounded. Do not cut, remove, or disregard the grounding wire in this appliance. If the appliance is not grounded, severe shock hazards can exist.

AVERTISSEMENT
Important: Save these instructions for the local electrical inspector's use.
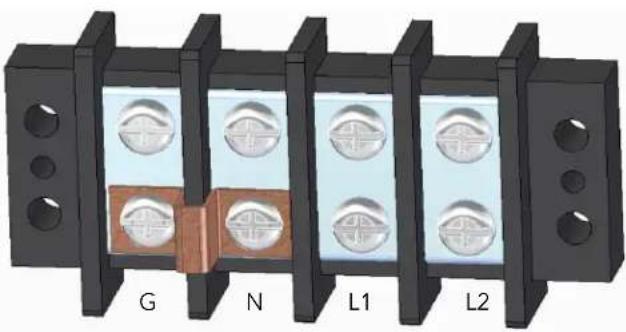
- Remove the electrical box cover to expose the terminal block. Route the wires through the strain relief (not supplied) through the bottom of the electrical enclosure. The terminal block allows for a 4-wire installation.
Four Wire Installation
- If a four wire connection is used, remove and discard the metal ground strap.
- Connect green/ground to G.
- Connect white/neutral to N.
- Connect black to L1.
- Connect red to L2.
Important: All electrical wiring should be free and clear. Wires or cables should not be pinched or otherwise obstructed.
- Tighten the screws on the strain relief and attach the electrical cover.
- If the power cord (supplied with Canadian models) is used, locate the electrical outlet and plug the range into the outlet.
Three Wire Installation
- Move the metal ground strap to positions N and G as shown below.
- Connect the white/neutral to G.
- Connect black to L1.
- Connect red to L2.
natural_image
Diagram of four mechanical components labeled G, N, L1, L2 with circular features on each side (no text or symbols beyond labels)Important: All electrical wiring should be free and clear. Wires or cables should not be pinched or otherwise obstructed.
- Tighten the screws on the strain relief and attach the electrical cover.
- If the power cord (supplied with Canadian models) is used, locate the electrical outlet and plug the range
Step 8 – Slide the Range into Position
- Slide the range into place so the anti-tip foot slides into the bracket.
- Level the range, placing the level on the surface three ways: side to side, front to back, and diagonally.
Important: If you move the range, remove the anti-tip bracket before the move, then reinstall it in the new location. Do not operate the range without the anti-tip bracket engaged.
Step 9 – Replace the Oven Racks
See page 31 for instructions.
Step 10 – Reattach the Door
- Hold the door with the handle side facing the ground.
- Align and insert the door hinges with the openings on the range.
- Push up the latch at the top of each hinge to secure each hinge.
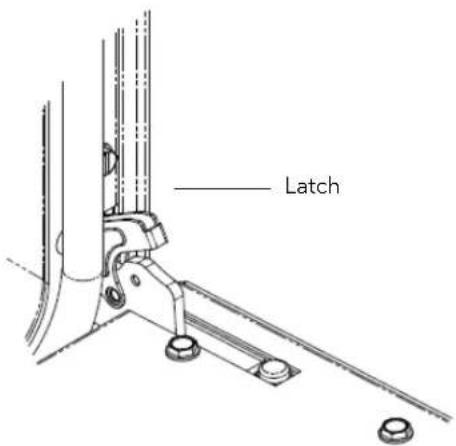
- The door should close easily.
Oven Burn-Off Procedure
Important: Before you use the range, it is essential that you complete the oven burn-off procedure. This procedure will take 90 minutes to complete and will remove all factory oils and residue from its internal parts. During this process, you may notice a strong odor, some smoke, and/or condensation on the front of the oven (including the oven doors, control panel, and side panels) as any oils and solvents on internal parts are burned off. This is normal and is the primary reason for this burn-off. Failure to complete this procedure before first using the oven may result in undesirable odors, flavors, and excessive smoke,
Note: For documentation purposes, touch screen control illustrations are for the BSDF48/BSDF60 range. Instructions apply to all ranges unless otherwise noted.
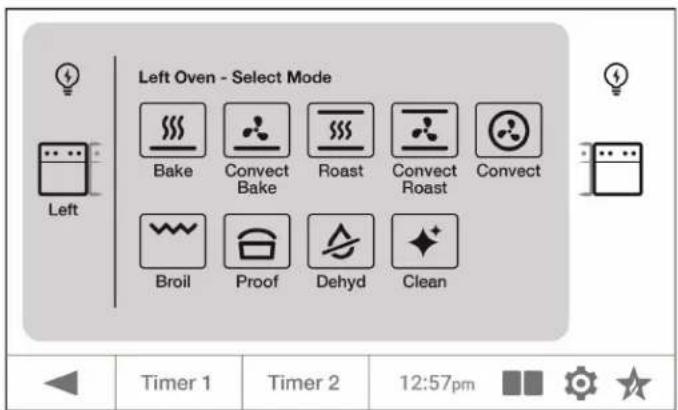
- Take out the oven racks and temperature probe (if necessary).
- Tap Clean on the Select Mode screen.
- Tap Start on the Select Clean screen to start the cleaning cycle, which will take 90 minutes.
- The Cleaning in Progress timer will start counting down from "1:30". You can tap OFF at any time to stop the process.
- When the time is up, you will hear a tone to indicate the Clean cycle is complete. The oven will still be hot at this point.
- Wait for the oven to cool completely before you put back the oven racks.
Griddle Season Procedure (select models)
Important: You must season your griddle before your first use. The seasoning process prevents food from sticking and the surface from rusting. This procedure will take about an hour and a half and you will need to stay and monitor the griddle during this time as the griddle will get very hot!
- Wipe off any factory oils and residue with a soft cloth.
- Use a dry cotton towel to apply a light coat of high smoke point oil to the griddle's cooking surface. The smoke point of the oil must be over 450°F (232°C).
- Use a different dry cotton towel to wipe away excess oil.
- Push in and turn the griddle burner control knob left to 300^ F ( 149^ C) setting and wait 30 minutes.
- After 30 minutes, use a dry cotton towel to remove the excess oil from the griddle's surface.
- Use another clean, dry cotton towel to apply another coat of oil to the griddle's surface.
- Turn the griddle knob to 325^ F ( 163^ C), then wait 15 minutes.
- Turn the griddle knob to 350^ F ( 177^ C), then wait 15 minutes.
- Turn the griddle knob to 375^ F ( 191^ C), then wait 15 minutes.
- Turn the griddle burner knob back to OFF and using extreme care, use a clean, dry cotton towel to remove any excess oil while the griddle is hot.
Your griddle is now ready for use. After seasoning, with time and use, your griddle will darken and develop a normal, rich blue/black patina color.
Note: For documentation purposes, touch screen control illustrations are for the BSDF48/BSDF60 range. Instructions apply to all ranges unless otherwise noted.
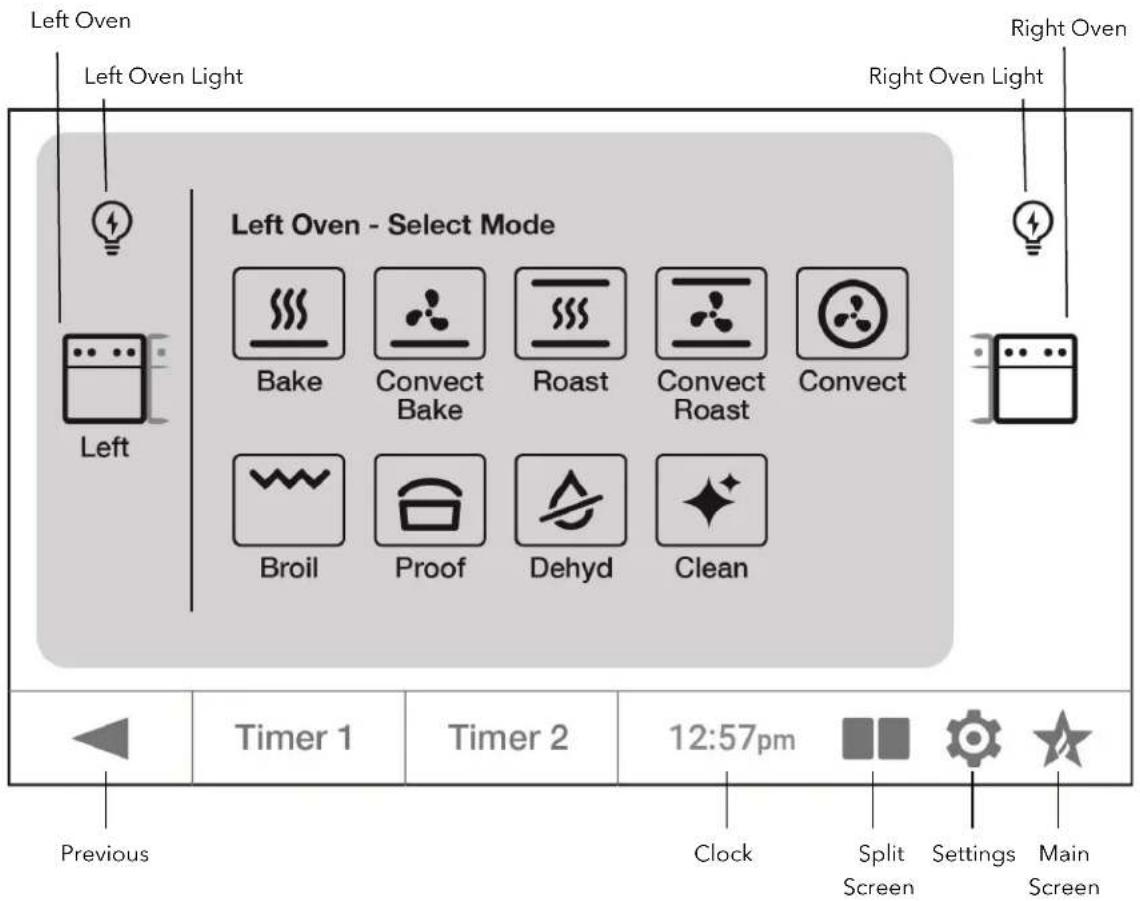
Main Screen
When you are not using the ovens, the main screen shows the time.
Tap the screen to start any oven operation. Tap the BlueStar logo in the bottom right corner to return to the main screen.
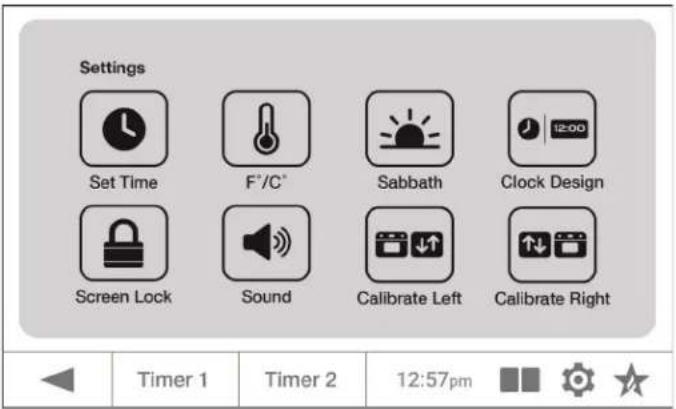
Settings
Tap the Settings icon to do any of the following:
- Set the time
- Change the temperature scale (Fahrenheit/Celsius)
- Enable Sabbath mode
- Lock the touch control screen
- Adjust the volume
- Change the clock design
Split Screen
Note: The following information applies to the BSDF48/BSDF60 range only.
By default, the system starts with the left oven. Tap the right oven icon on the right to use the right oven instead.
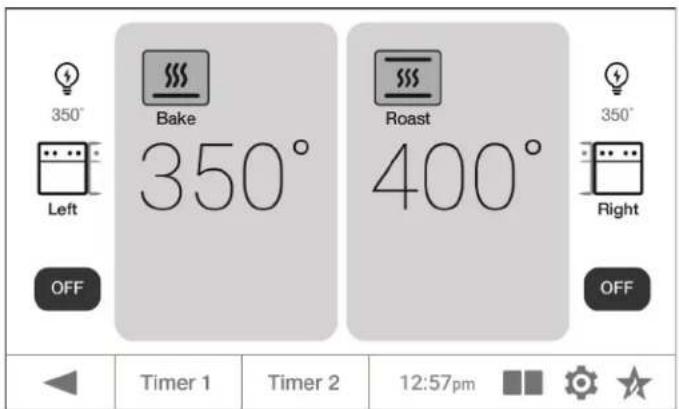
After tapping Start on any operation, you can tap the oven icon on the opposite side (in the black) to set up the second oven for additional cooking.
To see both ovens on the touch screen control, tap the split screen icon in the bottom row.
Kitchen Timers
- Tap either Timer 1 or Timer 2 in the bottom row.
- On the Set Kitchen Timer screen, use the keypad to enter the hours, minutes, and seconds, then tap Start. The timer countdown will appear in the bottom row in the Timer box.
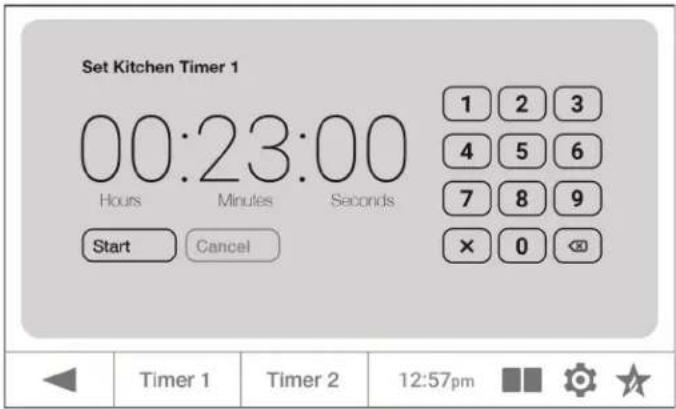
- When time is expired, you will hear a tone for two minutes or until you respond. Tap the Timer box.
Previous Screen
Tap the previous icon to go to a previous screen.
Oven Light
Tap the light bulb icon to turn on the oven light. Tap the same icon again to turn it off.
Your oven has the following operating modes:
BSDF30 and BSDF36
- Bake
- Convection
- Convection Bake
- Broil
- Roast - Proof
- Convection Roast
- Dehydrate
BSDF48
Left Oven
- Bake
- Convection
- Convection Bake
- Broil
- Roast - Proof
- Convection Roast
- Dehydrate
Right Oven
- Bake • Proof
- Convection Bake
- Dehydrate
- Convection
- Clean
BSDF60
Both Ovens
- Bake
- Convection
- Convection Bake
- Broil
- Roast - Proof
- Convection Roast
- Dehydrate
Note: For documentation purposes, touch screen control illustrations are for the BSDF48/BSDF60 range. Instructions apply to all ranges unless otherwise noted.
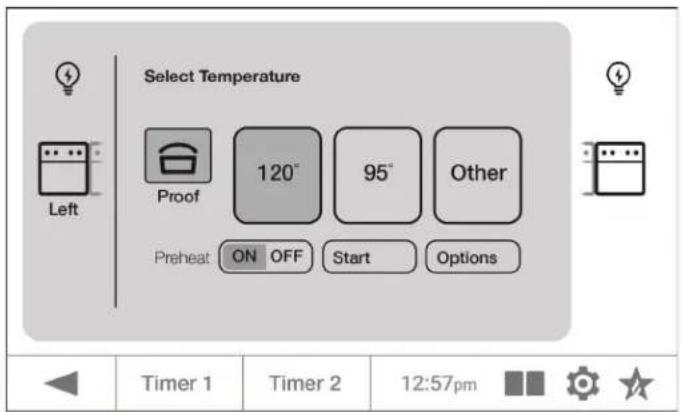
- Tap the mode on the Select Mode screen.
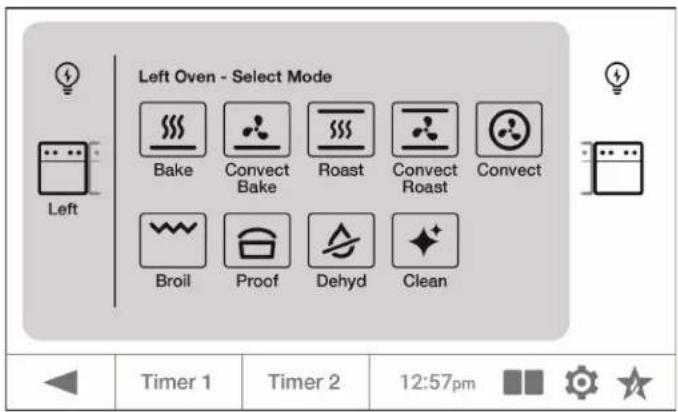
- Use the default setting or use the keypad to enter the temperature on the Select Temperature screen. Tap Start to preheat the oven. You also have the option to turn preheat on or off.
Note: If you want to select an option, do so before you tap Start.
-
Tap Options to select any of the following. Once you have made your selections, tap Start to confirm the setting and begin cooking:
-
Select Timed to set the cooking time.
- If you want to postpone the bake start time, select Delay.
- If you are using the temperature probe and need to set its temperature, select Probe.
Timed
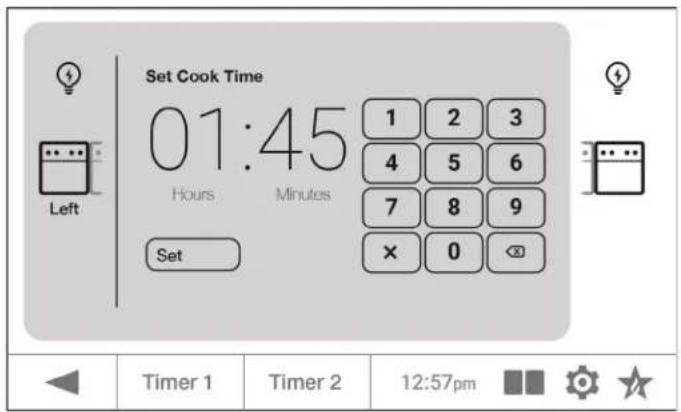
Use the keypad on the Set Cook Time screen to set the cooking time in hours and minutes, then tap Set.
Delay
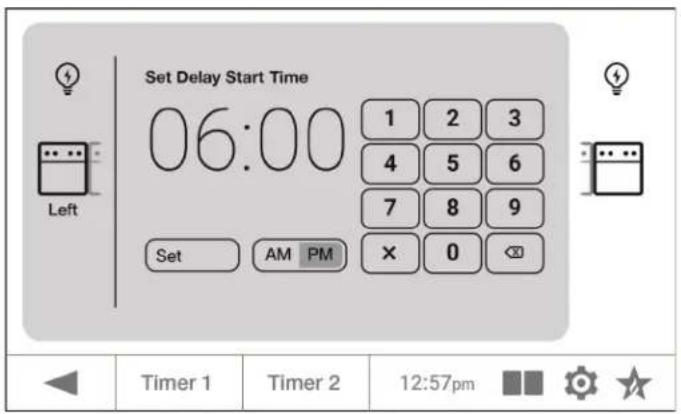
Note: Using Delay Time will turn off the preheat feature to prevent burning food.
Use the keypad on the Set Delay Start Time screen to set the hours/minutes, then tap Set.
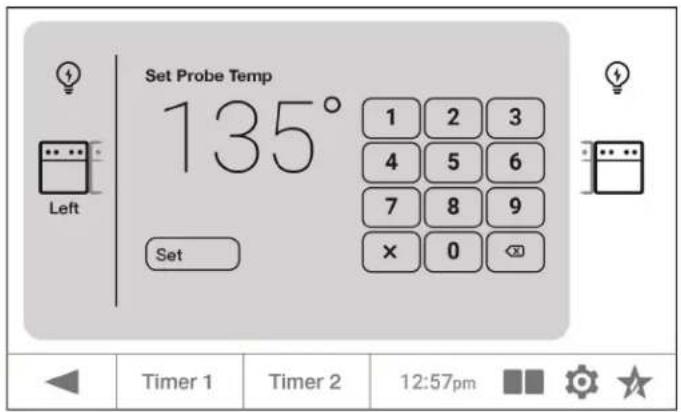
Probe
Note: The probe is not available with the Broil, Proof, or Dehydrate modes.
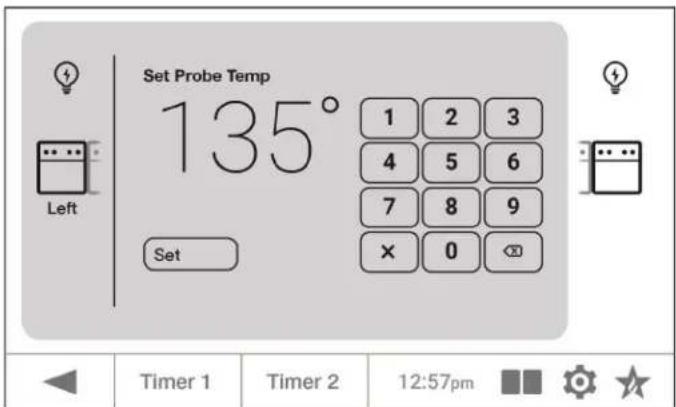
Use the keypad on the Set Probe Temp screen to set the temperature or use the options on the Select Meat screen and the corresponding Type or Preferences on the subsequent screens. Tap Set.
Clean
- Tap Clean on the Select Mode screen
- Tap Start on the Select Clean screen to start the cleaning cycle, which will take 90 minutes.
- The Cleaning in Progress timer will start counting down from "1:30". You can tap OFF at any time to stop the process.
- When the time is up, listen for a tone to indicate the Clean cycle is complete. The oven will still be hot at this point.
Demo Mode (for dealer use only)
- Tap Calibrate Left (or Calibration) on the Settings screen.
- On the Calibrate screen, press and hold the blank space in the center at the top of the screen to go to the Set Demo Mode screen and follow the steps on the screen.
- DEMO will appear in the center of each screen.
- To cancel Demo mode, press and hold DEMO for five seconds to access the Set Demo Mode screen and follow the steps on the screen.
Tap the Settings icon.
Set Time
-
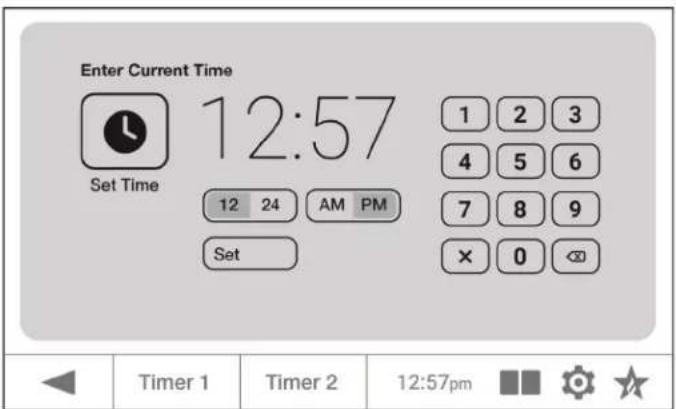
Tap Set Time.
-
On the Enter Current Time screen, use the keypad to enter the hours and minutes, tap 12 or 24 for either a 12-hour or 24-hour clock. If you select "24", the AM/PM option will be disabled. Tap AM or PM, then tap Set to confirm your selections.
- Tap the Main Screen icon to see the change made.
F^/C^ (Temperature Scale)
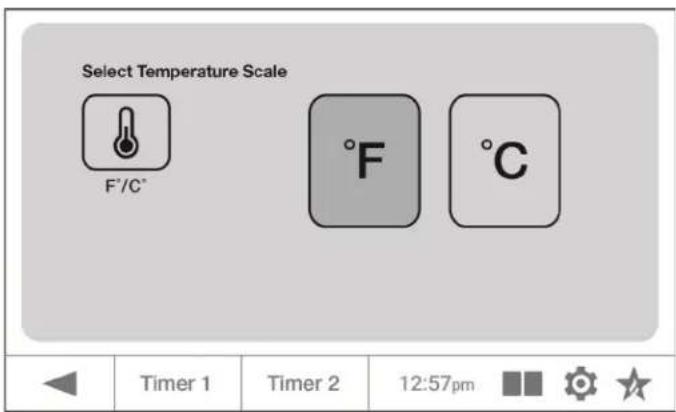
- Tap °F/°C.
- Tap °F (Fahrenheit) or °C (Celsius).
Sabbath
In Sabbath mode, the oven maintains a set cooking temperature in Bake, Convection Bake, Roast, Convection Roast, or Dehydrate mode until you cancel Sabbath mode. Oven lights and alarms (except error codes) are disabled until Sabbath mode is canceled.
When in Sabbath mode, you can tap either arrow to increase or decrease the temperature in 10-degree increments. You will have to wait at least a minute before you can change the temperature again. When you adjust the temperature, there will be no indication the oven temperature did change.
- Tap Sabbath and follow the steps on the screen.
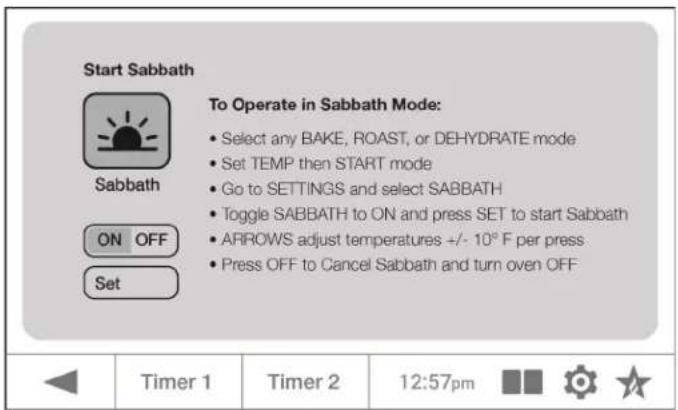
- Tap OFF to cancel the Sabbath mode.
Clock Design
- Tap Clock Design. If you do not want a clock design to show on the main screen, tap OFF and the screen will remain black.
- Tap Analog or Digital to select the type of clock you want.
- Tap any of the options available.
- Tap any of the colors available.
- Tap the Clock Design icon to see the change made.
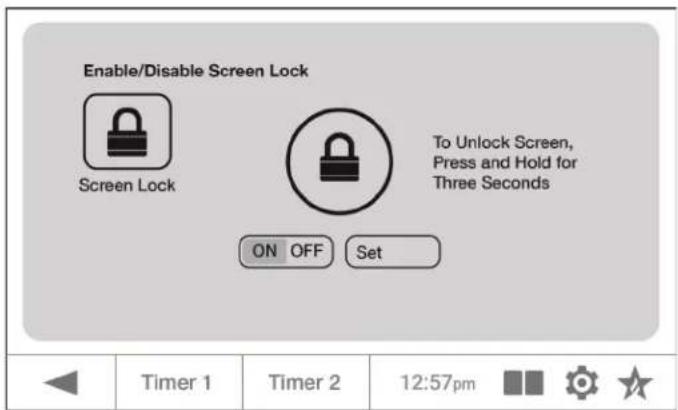
Screen Lock
- Tap Screen Lock.
- Tap ON to lock the touch screen control. When the screen is unlocked, you can use the oven normally until the control returns to the main screen, where the screen will lock again. This will happen each time the control returns to the main screen until you turn off the screen lock.
- Press and hold the Screen Lock for three seconds to unlock the screen.
Sound
- Tap Sound.
- Tap any of the volume options to listen its the sound level.
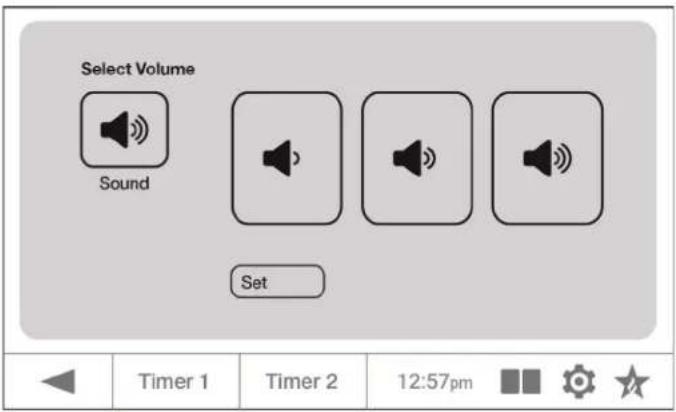
- Tap Set after selecting the volume you want.
Calibrate
The oven is factory calibrated and if changes are necessary should be calibrated by an authorized BlueStar service company. To locate an authorized BlueStar service company in your area, go to www.bluestarcooking.com/support/find-a-service-center.
Surface Burners
- Push in and turn the burner knob counterclockwise past HIGH towards LOW to start the ignition process. The ignitor will spark and make a clicking sound, which will stop after the burner ignites. After ignition, it may take a few seconds for the gas to reach all the ports. For best results, light the burner with a pot or pan on top of it.
- Once the burner is lit, turn the knob to your desired setting.
- Turn the knob to OFF to extinguish the burner. The flame may linger for several seconds until all the gas in the tube is burned off.
- Burners have a reignite feature in case the flame is extinguished. However, it may take several seconds for the burner to reignite.
Important: Never operate the burner with knob set between the HIGH and OFF positions. The flame will not reignite in this position and a gas leak could occur.
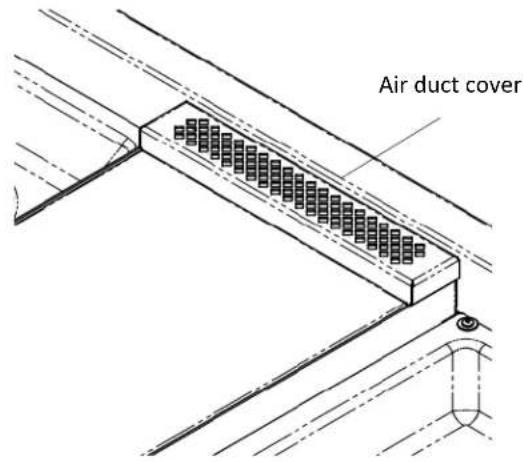
Griddle Air Duct Cover (select models)
The griddle air duct cover may become discolored from normal use or cooking oils, etc. It can be removed for cleaning. Wait for it to cool to room temperature and lift it up to remove it.
Griddle Grease Tray (select models)
The griddle grease tray can be removed to dispose of the grease and for cleaning. Wait for it to cool to room temperature, lift it up and tilt it back to remove it. Check the grease tray after each use to prevent overflowing.
Standard Racks
Remove
- Grasp both sides of the front of the rack.
- Slightly lift the rack up, then pull the rack until the ball tabs on the bottom of the rack clear the rack guide.
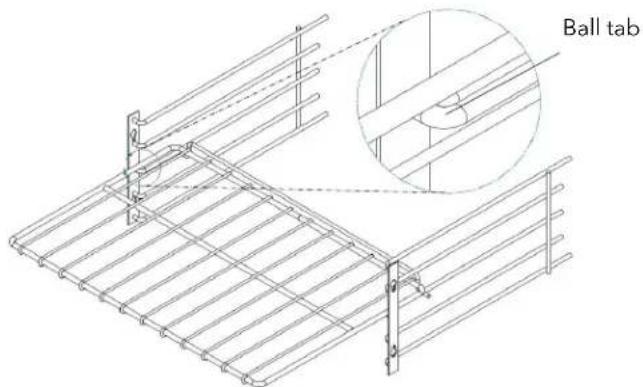
- Continue to pull the rack all the way out of the oven.
Replace
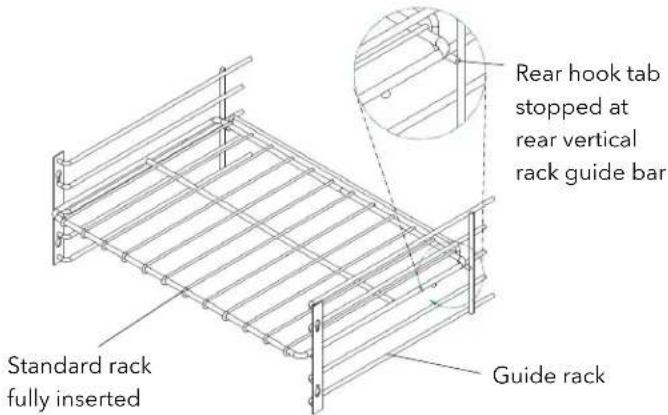
- Hold both sides of the rack and align the rack onto the rack guide position you want to use.
- Push in the rack up to the ball tabs, then slightly lift the rack until the ball tabs are past the front of the rack guide.
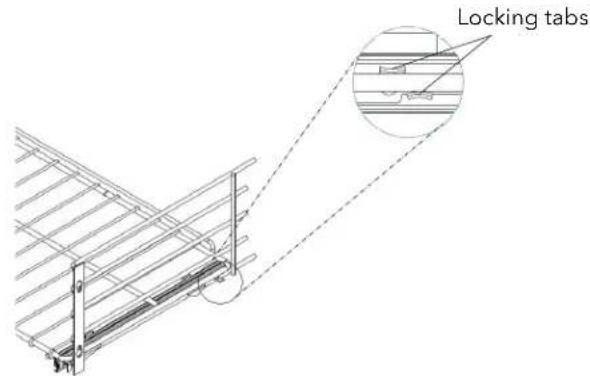
- Set the rack onto the rack guide, then push the rack into the oven the rest of the way until the rear hook tab stops at the rear vertical rack guide bar.
Extension Racks
Remove
- Push the extension rack all the way into the oven.
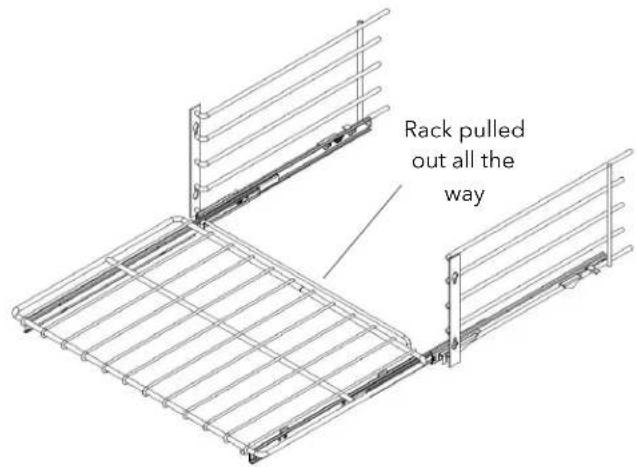
- Firmly grasp all of the slides on both sides of the extension rack. You will need to pull everything out at the same time.
- As you pull, be sure to slightly lift each time you need to clear the tabs on the rack from the rack guide.
Important: The extension rack is heavy and could drop unexpectedly after you pull it completely from the oven.
- Carefully pull the extension rack all the way out of the oven.
Replace
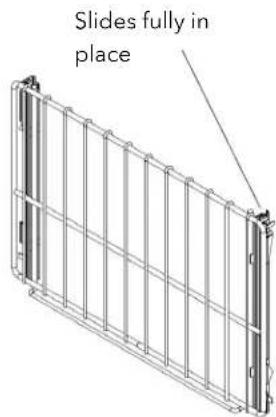
- To make sure the extension rack is fully closed, firmly hold the front ends of the rack at your waist, then touch the back of the extension rack to the floor. Slide the front end of the rack downward until the slides are in place.
- Firmly grasp the slides on each side of the extension rack, slightly elevate the rack above the rack guide you want to use, then gently nudge the rack onto the rack guide.
- Continue to slightly lift the extension rack over the rack guide as each tab reaches the rack guide.
- When the extension rack is pushed in all the way, make sure it is securely locked in position or it will slide out when the door is opened.
Temperature Probe
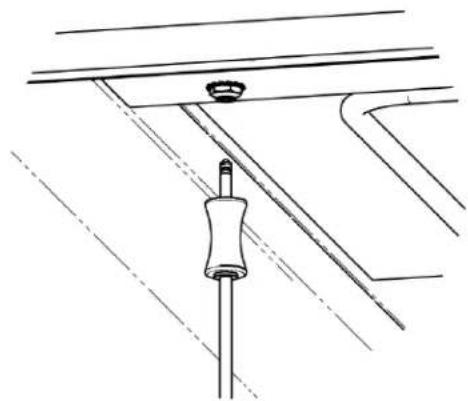
The internal temperature probe monitors the core temperature of meat and poultry. In a BSDF48 range, the probe is only available in the large oven. In a BSDF60, it is available in both ovens.
Important: Remove the temperature probe from the oven when not using it to avoid damage.
- Insert the short end of the temperature probe into the temperature probe socket located on the left front top interior of oven.
natural_image
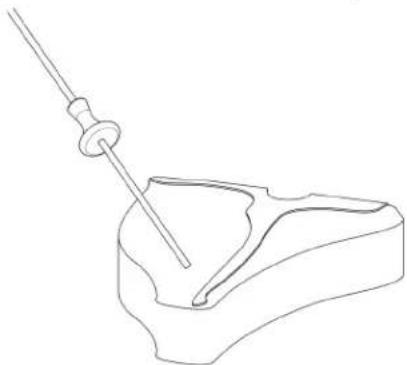
Technical line drawing of a mechanical assembly with a central rod and mounting bracket (no text or symbols)- Insert the long pointed end of the temperature probe into the thickest portion of the meat. Failure to do so could result in an incorrect temperature reading or indicate the meat is fully cooked before it actually reaches the correct temperature. Avoid touching bones or inserting it all the way through the meat.
- Select cooking mode. Note: The probe is not available with the Broil, Proof, or Dehydrate modes.
natural_image
Line drawing of a mechanical component with a rod inserted into a base (no text or symbols)- Select options.
- Select Probe.
- Use the keypad on the Set Probe Temp screen to set the temperature or use the options on the Select Meat screen and the corresponding Type or Preferences on the subsequent screens. Tap Set.
General
- Always use the timer on the oven display so you don't lose track of time and overcook your food.
- When following recipes, always use the recommended pan size and type. Shiny or reflective pans are best for cakes, quick breads, muffins, cookies and for pies with light golden crusts. Medium gauge aluminum sheets with low sides should be used when making cookies.
- Avoid using old or darkened pans. Warped and dented stainless steel and tin coated pans heat unevenly and fail to produce uniform baking results.
- Use cookware that has a combination of both stainless steel and an aluminum core for performance, durability and that has oven compatibility of up to 550°F (287.8°C).
- Only certain types of glass, heat proof ceramic, ceramic earthenware, or other glazed utensils are suitable cooking at higher temperatures in the oven. If not suitable for high heat, the utensils or cookware may break with sudden temperature changes, so depending on the cookware, use only on low or medium heat settings according to the manufacturer's directions.
Surface Burners
- Never leave the range unattended during use. Boil-overs may occur, causing spills which may ignite.
- To avoid oil spillover and fire, use a minimum amount of oil when shallow pan-frying and avoid cooking frozen foods with excessive amounts of ice.
- If you are flaming liquor or other spirits, turn off the fan on the hood. The draft could cause the flames to spread.
- Do not use cookie sheets or aluminum foil to cover the grates or line any part of the rangetop. Doing so may result in carbon monoxide build-up and poisoning, over heating the rangetop surfaces, or a potential fire hazard.
- Use a deep fry thermometer whenever possible to monitor oil temperature and operate with safe limits.
Griddle (select models)
Push in and turn the griddle burner knob left to the temperature you want. For optimal performance, allow the griddle to preheat for approximately 20 minutes before cooking.
Important: Turn off the griddle when you are not using it. Do not bang the griddle with metal utensils as this will damage it.
Oven
- Important: Wait for pre-heat cycle to be completed before placing food in the oven. All of the elements are on during pre-heat and food may burn.
- If preheat is not required, a bypass option is available. After selecting the cooking mode, the display screen will indicate preheat on or off. Press OFF to bypass the preheat. Not using preheat will result in longer cooking times.
- Center items on oven racks evenly for even baking.
- When loading the oven, work as quickly as possible to prevent loss of heat.
- When practical, cook the item that requires the lowest temperature first then gradually raise the temperature for each additional item.
- Roast meat with the fat side facing up to self-baste and shrink less.
- Keep the oven free from grease buildup to avoid fire.
- Avoid using aluminum foil in the oven and do not place it on the bottom of the oven as it could cause damage.
• After using the oven, do not touch the appliance until it is completely cooled.
Oven Rack Positions
Selecting the proper rack position is important and depending on where you place your food, it could make or break your recipe. For example, baking a pizza on the top rack will not provide an extra crispy bottom crust or baking a single rack of cookies on the bottom rack could mean darker cookies than you prefer. Ideal rack positions will help deliver optimal results for all your meals, whether baking, roasting or broiling.
Below is a general guideline for rack positions:
Top – For rich and even browning, stick with the top rack especially when broiling foods like salmon and steak. In broil mode, all the heat is generated from the broil element that is positioned on top of the oven. In bake mode, the element is located on the bottom of the oven, but heat still rises, making the top rack warmer than the others. So, when baking dishes that you want to brown or crisp, like casseroles and gratins, the top rack will provide the best results.
Middle – If unsure of which rack position to use, it is best to stick with the middle rack as it is positioned in the center of all the heating elements. For most baking and roasting, the middle rack will cook food more evenly. Keep in mind that this rule applies for single rack cooking only when you are making one dish at a time.
Bottom – If you want to brown the underside of your roasted vegetables, bread or crusty pizza, move the rack to the lowest position closest to the heat source. It is especially beneficial to start fruit pies on a preheated baking sheet in the bottom rack because it helps the bottom crust get nicely browned.
Source: Epicurious.com, Recipes, Menu Ideas, Videos & Cooking Tips
You may find that your new oven cooks differently than the old one. Take a few weeks to get comfortable and familiar with your new oven. Do not use thermostats such as those found in grocery stores to check your oven temperatures. These thermostats may vary by 40^ F (4°C) or more.
Temperature Operating Ranges
Important: Entering a temperature outside the range given for an applicable cooking mode will result in an error message.
| Mode Default Temperature | Temperature Set Range | Best Used For | |
| Bake | 350°F (177°C) | 100°F – 500°F (38°C – 260°C) | Single rack cooking, baked goods, and casseroles |
| Convect Bake | 350°F (177°C) | 100°F – 500°F (38°C – 260°C) | Pies and pastries |
| Roast | 375°F (191°C) | 100°F – 500°F (38°C – 260°C) | Pork shoulder, chuck roast, beef tips and flank steak |
| Convect Roast | 375°F (191°C) | 100°F – 500°F (38°C – 260°C) | Beef, pork, poultry and lamb |
| Convect | 325°F (163°C) | 100°F – 500°F (38°C – 260°C) | Multi-rack cooking (cookies and baked goods) |
| Broil | HIGH (550°F, 288°C) | 350°F – 550°F (178°C – 288°C) | Meats, fish and poultry |
| Proof 95°F (35°C) and 120°F (49°C) | 95°F – 135°F (35°C – 57°C) | Bread dough and pizza dough | |
| Dehyd | 105°F (41°C) and 155°F (68°C) | 95°F – 160°F (35°C – 71°C) | Vegetables, fruits, herbs, aromatics and meats for drying/jerky |
| Probe | None | 100°F – 200°F (38°C – 93°C) | Beef, pork, poultry, lamb, chops, tenderloins, seafood and casseroles |
Convection
True convection cooking uses a fan inside the oven, along with a heating element around the fan, to increase air circulation throughout the oven cavity. This results in even heat distribution and a more consistent temperature, which cooks food more efficiently.
In addition to Convect mode, this oven offers Bake and Convect Bake modes. Bake mode is similar to a conventional baking method where most of the heat is generated from the bottom bake element. In Convect Bake mode, the heat from the bottom element is circulated throughout the oven with the aid of the convection fan that is mounted on the back wall of the oven.
Any time a convection mode is selected, food will cook faster than a standard mode because the fan will be utilized, so as a general rule when cooking with standard recipes, do one of the following:
- Reduce the temperature by 25^ (-4°C)
- Reduce the duration of the cooking time by approximately 25%
What's best in each mode? Use the chart below as a guide. As a general rule, Convect mode is best for multiple rack cooking (except when baking cakes, quick breads, custards or souffles) and can also be used to cook multiple dishes at one time on multiple racks. Convect Bake mode is best for browning, roasting and quick baking and Bake mode is best for cakes, brownies, quick breads, custards and souffles as well as covered dishes, which do not benefit from convection cooking. When in doubt, use Convect mode as it is generally a good "go to" mode that will work for almost any recipe.
| Food Item Pan Size/Type # of | Pans | Mode | Temp | Cook Time | Rack Position* | |
| Muffins Muffin Tin(12-Cup) | 3 | Convection | 325°F (163°C) | 13-15 minutes | 1, 3, 5 | |
| Whole Yeast Bread | Loaf Pan (9 x 5") | 4 | Convection Bake | 325°F (163°C) | 20-25 minutes | 3, 5 |
| White Yeast Rolls | Cookie Sheet | 2 | Convection | 325°F (163°C) | 10 minutes | 2, 4 |
| 3 | Convection | 325°F (163°C) | 10 minutes | 1, 3, 5 | ||
| Cupcakes | Muffin Tin(12-Cup) | 2 | Convection | 325°F (163°C) | 15-17 minutes | 2, 4 |
| 3 | 1, 3, 5 | |||||
| Layer Cakes | Round Pan (9") | 4 | Convection | 325°F (163°C) | 25-30 minutes | 2, 4 |
| Drop Cookies | Cookie Sheet | 2 | Convection | 325°F (163°C) | 8-10 minutes | 3, 5 |
| 3 | 1, 3, 5 | |||||
| Rolled Cookies | Cookie Sheet | 2 | Convection | 325°F (163°C) | 8-10 minutes | 3, 5 |
| 3 | 1, 3, 5 | |||||
| Frozen Pizza(12" Round) | Cookie Sheet | 2 | Convection Bake | 350°F (177°C) | 12-14 minutes | 2, 4 |
*Rack positions start with one as the bottom rack and five as the top rack.
Roast and Convection Roast
Roast and convection roast are best used for caramelization of vegetables, crispy skin on poultry, or a crust on a tenderloin or roast. When using the Roast and Convect Roast modes, the broil element on the top, the convection fan and heating element on the bottom will be engaged. They are also the perfect modes to use with the temperature probe.
- Always roast meats fat-side up, on a roasting rack, in a shallow pan. Use a pan that fits the size of the food being prepared. No basting is required when the fat side is up. The fat renders in the oven and self-bastes the protein. It is not necessary to add water or liquid as that creates steam and prevents the browning necessary when roasting.
- Place poultry breast side up in a shallow pan, on a rack, that fits the size of the food being prepared. Brush poultry with melted butter or oil before roasting.
- Tall side pans are not recommended when using Convect Roast mode as they interfere with the heated air circulation over the food.
- Do not cover food when using the Convect Roast mode.
- When using the temperature probe, insert the probe halfway into the center or thickest part of the food being prepared. For poultry, insert the probe (between the body and leg) into the thickest part of the inner thigh. Avoid touching bone, fat or the bottom of the pan.
- It is okay to remove the food being prepared from the oven 5-10 degrees before it hits the programmed temperature. The meat continues to cook when removed from the oven. This is called carry-over cooking and can be utilized for 10-15 minutes. It's always important to let the meat rest after cooking.
Broil
Broiling is a method of cooking that exposes food to direct radiant heat. Unlike baking and roasting, which use indirect hot air to thoroughly cook food throughout, broiling uses high heat from a direct heat source to quickly cook food. Broiling is ideal for achieving the perfect char on meats or vegetables.
Important: The broiler is an extremely hot burner. For safety purposes, the broiler turns off when the door is open. It is important to keep a close eye on the oven to prevent overcooking food as food cooks very quickly and can burn at that high temperature.
- Determine your rack position before you start cooking. It's recommended to start on a lower rack and move it up as necessary. Do not place food closer than 2" (50.8mm) from the broiler element to prevent burning.
- Preheat your broiling pan. Bring your broiling pan up to temperature by placing it inside the oven during the preheat cycle. This will help sear your food evenly and seal in flavors.
- Use oil or nonstick spray. Avoid or use extreme caution with parchment paper, which tends to burn at the high temperatures needed for broiling.
- Do not use aluminum foil to line greasy foods cooking with the broil mode as fats and grease can melt off and quickly catch fire.
- Spread your food out so that the surface of every piece is exposed to the heating element to ensure even cooking and browning. It is also best to cook foods of even thickness.
- Start or finish larger foods using the broil mode. It is best to avoid broiling for longer than 10 minutes, as this could lead to burnt food. For foods with longer cooking times, it's best to use the Broil mode to create a crispy crust, either at the beginning or end of the cooking process. For the rest of your cooking, move food to the center of the oven and set to Bake or Roast mode at a temperature of 300-450°F (149-232°C).
- Go light on marinades and heavy on spices. Avoid heavy marinades, especially oil-based ones, as those drippings cause intense heat and can burn or possibly catch fire.
Broil Guide
| Food Item | Doneness Qty and/or Thickness | Rack Position | First Side Time (minutes) | Second Side Time (minutes) | Tips/Tricks | |
| Ground Beef | Well Done 1 | lb. (4 patties) 1/2-3/4 thick | 5 | 4-5 | 3-4 | Space evenly. Up to eight patties can be done at a time. |
| Beef Steaks | Rare | 1/2 lb., 1" thick | 4 | 4 | 2-3 | Steaks less than 1" thick cook through before browning. Pan frying is recommended first. Score fat. |
| Medium | 1/2 lb., 1" thick | 4 | 4 | 3-4 | ||
| Well Done | 1/2 lb., 1" thick | 4 | 4 | 4-4 | ||
| Rare 2-2 1/2 | Ibs. 1 1/2" thick | 3 | 10 | 4-6 | ||
| Medium | 2-2 1/2 lbs. 1 1/2" thick | 3 | 12 | 6-8 | ||
| Well Done 2-2 1/2 Ibs. 1 1/2" thick | 3 | 14 | 8-10 | |||
| Chicken | 1 whole cut-up 2-2 1/2 Ibs. Split lengthwise | 2 | 20 | 6-8 | Broil skin-side down first | |
| 2 Breasts | 4 | 8-9 | 5-6 | |||
| Lobster Tails | 2-4 10-12 oz each | 2 | 12-14 | Do not turn over. | Cut through back of shell. Spread open. Brush with melted butter before broiling and again halfway through broiling. | |
| Pork Chops | Well Done | 2, 1/2" thick | 4 | 7 | 4-6 | Score fat. |
| Well Done | 2, 1" thick | 3 | 9-10 | 6-8 | ||
| Lamb Chops | Medium | 2, 1" Thick 10-12 oz. | 4 | 6 | 4-6 | Score fat. |
| Medium | 2-1 1⁄2" Thick | 4 | 8 | 6-8 | ||
| Salmon Steaks | 2-1" Thick | 4 | 7-8 | 4-6 | Grease pan. Brush steaks with melted butter. | |
| 4-1" Thick | 3 | 9 | 4-6 | |||
| Fish Fillets | 1⁄4 - 1⁄2" thick | 4 | 5 | 2-4 | Handle and turn very carefully. Brush with lemon butter before and during cooking, if desired. | |
*Rack positions start with one as the bottom rack and five as the top rack.
Proof
It is often difficult to maintain a consistent temperature in your home to proof doughs for baking breads, especially when the outside temperatures can be either too warm or too cold. The Proof mode solves that by providing a very low heat to maintain a gentle climate for yeast to grow. The convection fans do not run while proofing to keep dough from drying out before it fully rises.
Any baked good that contains yeast should be proofed to produce the air bubbles that make leavened foods taste light and fluffy, including:
- Breads such as sourdough, whole-grain, rye country-style, and even gluten-free
- Enriched breads including breads enriched with sugar, fat, and sometimes eggs, such as brioche and challah.
• Italian focaccia and pizza - Raised donuts
- Cinnamon rolls
- Morning buns
- Viennoiserie, which are baked good such as brioche, croissants and Danish pastries
Dehydrate
Dehydrating is an excellent way to preserve food and make healthy snacks with fruits, vegetables and herbs right from your garden. You can also make delicious jerky as well. The Dehyd mode delivers a low consistent heat that provides the perfect environment to reduce the moisture content from food. The oven has preset temperatures to customize the temperature as needed.
Times will vary depending on the thickness of the product as well as the moisture content. Some fruits are better for dehydrating than others. Bananas, for example, have a satisfying crispy texture, along with a sweet flavor when dried. Apples, mangos, papaya, pineapple, cherries, strawberries, plums and apricots are also great choices. Savory fruits like tomatoes are best for sun drying. You can also dehydrate vegetables like zucchini or green beans for a tasty and healthy snack.
Suggested temperature for dehydrating various foods are as follows:
| Item Temperature | |
| Herbs, Flowers and Dough 105°F (41°C) | |
| Soft Vegetables 113°F (45°C) | |
| Hard Vegetables 122°F (50°C) | |
| Citrus Peels 131°F (55°C) | |
| Fruit 155°F (68°C) | |
| Jerky 158°F (70°C) | |
Food Safety Tips
Safe steps in food handling, cooking, and storage are essential in preventing food-borne illness. You can't see, smell, or taste harmful bacteria that may cause illness. In every step of food preparation, follow these four guidelines to keep food safe:
- Clean – Wash hands and surfaces often.
- Separate – Keep raw meat apart from other foods.
• Cook – Cook to the right temperature. - Chill – Refrigerate food promptly.
Cook all food to these minimum internal temperatures as measured with the temperature probe before removing food from the oven. You may choose to cook food to higher temperatures. A holding temperature of 140^ F ( 60^ C) or higher is recommended for food safety.
| Category | Food | Temperature | Rest Time |
| Ground Meat, Stuffing, and Meat Loaf | Beef, Pork, Veal, Lamb 160°F (71°C) None | ||
| Turkey, Chicken 165°F (74°C) None | |||
| Fresh Beef, Veal, Lamb | Steaks, Roasts, Chops | 145°F (63°C) | 3 minutes |
| Poultry Chicken and Turkey | (breasts, whole bird, legs, thighs, wings, ground poultry, giblets, and stuffing) | 165°F (74°C) | Whole: 10-15 minutesBreasts: 5 minutes |
| Pork and Ham | Fresh Pork | 145°F (63°C) | 3 minutes |
| Fresh Ham (raw) | 146°F (63°C) | 3 minutes | |
| Precooked Ham (to reheat)Note: Reheat cooked hams packaged at USDA-inspected plants. | 140°F (60°C)165°F (74°C) if not from USDA-inspected plants | None | |
| Eggs and Egg Dishes | Eggs | Cook until yolk and white are firm. | None |
| Egg Dishes (such as frittata, quiche) | 160°F (74°C) | None | |
| Leftovers and Casseroles | Leftovers and Casseroles | 165°F (74°C) | None |
| Seafood | Fish with fins | 145°F (63°C) or cook until flesh is opaque and separates easily with a fork. | None |
| Shrimp, Lobster, Crabs, Scallops | Cook until flesh is pearly or white and opaque. | None | |
| Clams, Oysters, Mussels | Cook until shells open during cooking. | None |
Source: FoodSafety.gov, United States Food Safety and Inspection Service, as of April 2019.
High Altitudes
For helpful information on cooking in high altitudes, visit: https://www.fsis.usda.gov/food-safety/safe-food-handling-and-preparation/food-safety-basics/high-altitude-cooking.
Common Baking Problems and Solutions
| Problem Causes Corrections | ||
| Cookies and biscuits burn on the bottom | ·Cookies and biscuits are put into oven before the preheating time is completed.·Dark pan absorbs heat too fast·Oven door opened too often·Incorrect rack position being used, and pan is too close to the heat source | ·Allow oven to preheat to the selected temperature before placing food in the oven·Set timer to shortest recommended time. Use a medium weight aluminum baking sheet·Check on cookies through oven window instead of opening oven·Use recommended rack position |
| Cookies and Biscuits too dark on the top | ·Rack position being used is too high·Oven not preheated·The pan's sides are too high·Aluminum foil was used and distributed the heat unevenly | ·Use recommended rack position·Allow oven to preheat fully·Use recommended pan size based on recipe·Remove foil |
| Cakes too dark on top or bottom | ·Cakes put into oven before preheated time is completed·Rack position is too high or low·Oven is too hot | ·Allow oven to fully preheat·Use recommended rack position·Set oven temperature 25°F (-4°C) lower than recommended |
| Cakes not done in center | ·Oven is too hot·Incorrect pan size·Pan not centered in the oven | ·Set oven temperature 25°F (-4°C) lower than recommended·Use recommended pan size based on recipe·Use proper rack position and place pan so there is 2"-4" of space on all sides of pan |
| Cakes are not level | ·Batter was unevenly spread·Oven or racks are not level·Warped pan·Pan too close to oven wall or rack overcrowded | ·Spread batter evenly and tap to release air bubbles·Place a marked glass measuring cup filled with water on the center of the oven rack. If the water level is uneven, refer to instructions for leveling the range·Be sure to allow 2"-4" of clearance on all sides of each pan in the oven |
| Cakes crack on top | ·Wrong pan size used·Batter was too thick·Oven temperature was too high | ·Use recommended pan size for recipe·Follow recipe and double check liquid·Set oven temperature 25°F (-4°C) lower than recommended |
| Pies are burnt around edges and not done in center | ·Oven was too hot·Too many pans were used·Dark, heat absorbing pan was used | ·Set oven temperature 25°F (-4°C) lower than recommended·Reduce number of pans being used·Use shiny reflective pans |
| Pies are too light on top | ·Oven is not hot enough·Overcrowded oven or rack | ·Set oven temperature 25°F (-4°C) higher than recommended·Reduce number of pans |
Important: Make sure the appliance is cool before you clean.
| Material Cleaning Need to Know | ||
| Cast Iron | Wash in hot, soapy water, rinse well and dry thoroughly. For heavy soiling, use a commercially available oven cleaner. Be sure to follow the cleaner manufacturer's instructions.Use a push pin or safety pin to clear clogged burner ports. | Do not allow a commercial oven cleaner to touch painted or stainless steel surfaces.Do not use a wooden or plastic toothpick or any other material that can break to clean burner ports. |
| Griddle | Wait for it to cool to room temperature and scrape off any excess food with a spatula and wipe off any used cooking oil.For heavy soiling, use a nylon pad coated with a thin layer of cooking oil.For stubborn stains, use a commercially-available, food-safe griddle cleaner. Be sure to follow the cleaner manufacturer's instructions.After every use, apply a light coat of high smoke point oil (like corn oil) to the griddle, then use a clean, dry cotton towel to wipe off the excess. | Do not use soap directly on the griddle surface, residue may remain on the surface of the griddle which can affect the flavor of your food.Never flood a hot griddle plate with cold water.Do not allow your griddle to stand without a fresh coat of oil. |
| Porcelain-Coated Burner Bowl | Wash with hot, soapy water, rinse well and dry thoroughly. | Do not use steel wool or metal pads as they may damage or scratch the enamel coating.Do not permit citrus or tomato juices to sit and dry on these surfaces as citric acid will discolor the surface. Wipe such spills immediately. |
| Stainless Steel | Clean with stainless steel cleaner and follow the cleaner manufacturer's instructions. | Do not use steel wool, metal pads, or abrasive cleaners.Do not use a metal knife, spatula, or any metal tool to scrape these surfaces.Do not permit citrus or tomato juices to sit and dry on these surfaces as citric acid will discolor the surface. Wipe such spills immediately.Do not polish across the grain or in circles.Discoloration may occur with heavy use. |
| Painted Metal | Use a soft cloth and a quality glass cleaner or warm soapy water. | Do not use steel wool, metal pads, or abrasive cleaners.Do not use a metal knife, spatula, or any metal tool to scrape these surfaces.Do not permit citrus or tomato juices to sit and dry on these surfaces as citric acid will discolor the surface. Wipe such spills immediately.Do not use paper towels or other coarse cloths. |
| Plated Finishes (Brass, Copper, Chrome, Oil-Rubbed Bronze, Pewter) | The parts were treated with a protective clear coat to prevent aging or discoloration. This clear coat will last the life of the appliance unless the coating is removed.Clean with a microfiber cloth using Endust, Pledge, or something similar. | Do not use a metal knife, spatula, or something similar or any metal tool to scrape these surfaces.Do not permit citrus or tomato juices to sit and dry on these surfaces as citric acid will discolor the surface. Wipe such spills immediately.Do not use harsh cleaners (such as Brite Boy) as these will remove the coating and cause the metals to discolor. |
| Oven Window | When the oven is cool, use a cloth and warm soapy water to clean the interior oven door window. Rinse with clear water and dry thoroughly. | Do not clean the oven door gaskets. Damage to the material or the door seal may occur. |
| Porcelain-Coated Oven Interior | For spot cleaning, use a commercial oven cleaner. Be sure to follow the cleaner manufacturer's instructions before you start.Make sure the area is well-ventilated when using a commercially available oven cleaner.To loosen tough baked-on stains, lay a cloth soaked in hot water on the area for several minutes. | Do not use the commercial oven cleaner on the door gasket, igniter, or ceramic broiler.Do not use steel wool or metal pads as they may damage or scratch the enamel coating.Make sure cleaning chemicals do not come in contact with any stainless steel or painted surfaces. |
| Oven Racks | Make sure the oven is cool before you take out the oven racks.Wash the racks in hot, soapy water, rinse in clear water, then dry thoroughly. | N/A |
| Broiler | N/A | Do not clean the broiler surface or permanent damage may occur. |
| Temperature Probe | When the temperature probe is cool, wipe the probe clean with mild soapy water, rinse, then dry thoroughly. | Do not immerse the temperature probe in water or put it in the dishwasher. |
Check these helpful tips for any problems with your oven. If additional help or service is needed, please call customer service at (800) 449-8691. You will need to have the model and serial numbers for your appliance ready before you contact them. See Product Information on page 4 for information on finding these numbers.
| Problem Possible Cause Solution | ||
| Burner will not ignite and there is no "clicking" sound | No electrical power to the appliance. | Plug into a properly grounded three-prong electrical outlet.Check and reset the circuit breaker for the appliance. |
| Burner will not ignite and there is a "clicking" sound, but no spark | Gas is not turned on.Clogged burner ports. | Turn on the gas supply.Use a push pin or safety pin to clear the ports. |
| Burner will not ignite and there is a "clicking" sound and a spark | Gas is not turned on. | Turn on the gas supply. |
| Burner ignites but the "clicking" sound does not stop | Burners are wet.Electric plug is not in grounded outlet. | Let burners dry and try again.Check the outlet polarity.Plug the appliance into a grounded three-prong electrical outlet. |
| Burner does not fully ignite | Partial gas supply.Clogged burner ports. | Make sure the gas supply is fully on.Use a push pin or safety pin to clear the ports. |
| Burner flame floats | For LP users-the propane supply is low. | Fill the propane tank. |
| Oven is on, but is not heating | No electrical power to the appliance. | Check and reset the circuit breaker for the appliance. |
| Oven light is not on | No electrical power to the appliance.Oven light bulb is burned out. | Check and reset the circuit breaker for the wall outlet used for the appliance. |
| Convection fan is making noise | Mounting screws on the fan cover are loose. | Tighten screws. |
| Convection fan does not turn | No electrical power to the appliance. | Confirm oven door is shut. Fan will not operate when the oven door is open.Check and reset the circuit breaker for the appliance. |
| Fan behind the control panel is running when the oven is turned off | Oven has not cooled to 200° F (93° C) or lower. | Let the oven cool down. |
| Touchscreen is not lit | No electrical power to the appliance.Sabbath mode is on.Clock is turned off. | Check and reset the breaker/fuse.Cancel Sabbath mode.Check whether the clock is turned off. |
Troubleshooting (continued)
| Problem Possible Cause Solution | ||
| Touchscreen displays the following: | ||
| Control Error F20 | Control board or wiring issue | Call 800-449-8691 for service |
| Control Error F40 | Oven temperature sensor issue | Call 800-449-8691 for service |
| Probe Error F50 | Meat probe issue | Call 800-449-8691 for service |
| Fan Error F60 | Cooling fan issue | Call 800-449-8691 for service |
| Temp Error F80 | High temperature issue | Call 800-449-8691 for service |
| Probe Not Detected | Meat probe is not detected | Insert meat probe |
| Set Temp Between 90°F and 200°F | Meat probe temperature setting is outside of the acceptable range. | Change probe temperature setting |
| Set Between 100°F and 500°F | Temperature setting is outside of the acceptable range. | Change temperature setting |
| Remove Probe | Meat probe has been detected in Broil or Clean modes. | Remove meat probe. |
Prizer-Painter Stove Works, Inc. ("Prizer-Painter") warrants your BlueStar appliance ("product") purchased in the U.S. and Canada and installed in residential properties for normal residential use.
What Is Covered
Subject to the specific conditions and limitations below, this warranty covers parts and/or labor necessary to repair or replace any part of the product that contains defects in materials and workmanship.
Two Year Warranty. For two (2) years from the date of installation, this warranty covers all parts and labor necessary to repair or replace any part on the product except for the Cosmetic Component Warranty below.
Cosmetic Component Warranty. For thirty (30) days from the date of installation, this warranty covers scratches and dents, paint and porcelain blemishes, visible chips, etc.
Limitations of Coverage
- Floor Models. For one (1) year from the date of installation, this warranty covers all parts and labor necessary to repair or replace any part on the product except for cosmetic parts for which there is no warranty.
- The replacement of a part under this warranty does not extend the warranty period.
- Warranty service outside normal business hours and in areas beyond 50 miles one way from an authorized BlueStar retailer or service provider. The owner will be responsible for any and all costs associated with additional mileage, non-standard service or overtime, and special equipment required to remove the product so service may be performed.
This warranty is void:
- If the product is removed from where it was originally installed.
- If the original factory installed serial number is altered or removed from the product.
- If gas cooking products are converted by someone other than a BlueStar authorized service company.
What Is Not Covered
This warranty does not cover, and specifically excludes:
- Product installed or used in any commercial or other non-residential property such as, but not limited to, day care facilities, fire stations, hotels, nursing homes, etc.
- Installation related issues including or installation inconsistent with the product specifications/installation instructions.
- Damage or repairs caused by alterations or modifications, abuse, misuse, neglect, or improper installation, mounting, handling, operation, maintenance, or storage.
- Normal adjustments after installation and setup.
- Normal wear, care, and maintenance of the product as described in this manual.
- Service calls to educate the customer on the proper use and care of the product.
- Consumable parts.
- Damage or repairs caused by unauthorized service or repairs, including unauthorized adjustments or calibrations performed on the product.
• Accidental or intentional damage. - Damage or repairs as a result of natural disasters, fires, floods, earthquakes, winds, lightning, corrosive atmosphere, loss of electrical power to the product for any reason, or other conditions beyond Prizer-Painter's control.
- Damage or repairs caused by alteration for outdoor use.
- Damage or repairs caused by the use of harsh chemicals or cleaning products improperly applied.
- Damage to surrounding property including cabinetry, floors, ceilings, etc.
- Consequential or incidental damage, including but not limited to food or medicine loss, time away from work, restaurant meals, etc.
The terms of this warranty provide for repair of the product only. If the product cannot be repaired, Prizer-Painter, at its sole discretion, will determine whether to exchange the product.
Please see the Arbitration Clause and Related Provisions, which affect your legal rights. The Arbitration Clause is available at www.bluestarcooking.com.
- Thank You and Welcome
- Contents
- Product Information
- Electrical Requirements and Grounding Instructions
- WARNING
- Electrical Requirements
- Clearances
- Front View
- Tools and Materials
- AVERTISSEMENT
- Step 1 – Uncrate and Inspect the Range
- Step 2 – Install the Anti-Tip Bracket
- Step 3 – Detach the Door
- CAUTION
- MISE EN GARDE
- Step 4 – Remove the Oven Racks
- Step 5 – Move the Range into Position
- Step 6 – Connect Gas Supply
- Step 7 – Connect Electrical Supply
- Four Wire Installation
- Three Wire Installation
- Step 8 – Slide the Range into Position
- Step 9 – Replace the Oven Racks
- Step 10 – Reattach the Door
- Oven Burn-Off Procedure
- Griddle Season Procedure (select models)
- Main Screen
- Settings
- Split Screen
- Kitchen Timers
- Previous Screen
- Oven Light
- BSDF30 and BSDF36
- BSDF48
- Left Oven
- Right Oven
- BSDF60
- Both Ovens
- Timed
- Delay
- Probe
- Clean
- Demo Mode (for dealer use only)
- Set Time
- F°/C^° (Temperature Scale)
- Sabbath
- Clock Design
- Screen Lock
- Sound
- Calibrate
- Surface Burners
- Griddle Air Duct Cover (select models)
- Griddle Grease Tray (select models)
- Standard Racks
- Remove
- Replace
- Extension Racks
- Temperature Probe
- General
- Griddle (select models)
- Oven
- Oven Rack Positions
- Temperature Operating Ranges
- Convection
- Roast and Convection Roast
- Broil
- Proof
- Dehydrate
- Food Safety Tips
- High Altitudes
- Troubleshooting (continued)
- What Is Covered
- Limitations of Coverage
- This warranty is void:
- What Is Not Covered
Brand : BlueStar
Model : BSDF364G
Category : Cooker