
INSERT-24 - Range hood Porter & Charles - Free user manual and instructions
Find the device manual for free INSERT-24 Porter & Charles in PDF.


| Product Type | Insert Range Hood |
| Model | INSERT-24 |
| Brand | Porter & Charles |
| Power Supply | 115V, 60Hz |
| Rated Input Power | 97W |
| Motor Power | 95W |
| Lighting Power | 1 x 2W LED |
| Airflow | 300 CFM |
| Duct Outlet Diameter | 150mm |
| Installation Height (Electric/Induction) | 600mm |
| Installation Height (Gas) | 762mm |
| Speed Settings | 3 (Low, Mid, High) |
| Control Type | Electronic Push Buttons |
| Grease Filters | Washable |
| Charcoal Filters | Replaceable every 6 months |
| Duct Material Requirement | Metal only |
| Dimensions (Approx. W x D x H) | 610mm x 290mm x 310mm |
| Warranty | 2 years (parts and labor) |
Frequently Asked Questions - INSERT-24 Porter & Charles
User questions about INSERT-24 Porter & Charles
0 question about this device. Answer the ones you know or ask your own.
Ask a new question about this device
Download the instructions for your Range hood in PDF format for free! Find your manual INSERT-24 - Porter & Charles and take your electronic device back in hand. On this page are published all the documents necessary for the use of your device. INSERT-24 by Porter & Charles.
USER MANUAL INSERT-24 Porter & Charles
Thank you for the purchase of this product. Please read the manual carefully before operang the appliance.
Contents
Important Safety Instrucons 2
Introducon 3
Features 3
Installaon 4-5
How to Use 6
Grounding Instrucon 7
Safety Informaon 8
Trouble Shoong 9
Electrical Diagram 10
Specicaons 11
Cleaning & Maintenance 12
Installaon Diagram 13
Warranty 14
Important Safety Instrucons
- Read and save these instrucons
○ Warning - To reduce the risk of re or electric shock, do not use this fan with any solid-state speed control device. -
CAUTION: For general venlang use only. Do not use to exhaust hazardous or explosive materials and vapors.
○ Warning - To reduce the risk of a range top grease re: -
Never leave surface units unaended at high sengs.
Boil overs cause smoking and greasy spillovers that may ignite. Heat oils slowly on low or medium sengs. - Always turn hood ON when cooking at high heat or when ambéing food (i.e. Crepes Suzee, Cherries Jubilee, Peppercorn Beef Flambé)
- Clean venlang fans frequently. Grease should not be allowed to accumulate on fan or iter.
- Use proper pan size. Always use cookware appropriate for the size of the surface element.
○ Warning - To reduce the risk of injury to persons in the event of a range top grease re, observe the following:
- Smother ames with a close-ng lid, baking sheet, or metal tray, and then turn o the burner. Be careful to prevent burns. If the ames do not go out immediately, evacuate and call the re department.
- Never pick up a aming pan - you may be burned.
- Do not use water, including wet dishcloths or towels a violent steam explosion may result.
- Use an exnguisher ONLY if: A) You know you have a class ABC exnguisher, and you already know how to operate it. B) The re is small and contained in the area where it started. C) The re department is being called. D) You can ght the re with your back to an exit.
Introducon
- This appliance has been manufactured with materials and processes that respect the environment. We hope that you will connue this important consideraon in the operaon of this appliance and the disposal of the packaging materials – thank you.
- The installaon work must be undertaken by a qualified technician experienced in range hood installaon. Please connect the correct power rang (see page 10)
- The manufacturer disclaims all liability for any damage or injury caused as a result of not following instrucons for installaon contained in the following text
- The appliance is not intended for use by young children or inrm persons without supervision
○ Young children should be supervised to ensure that they do not play with the appliance - The maximum number of burners covered by a range hood should not exceed 5
- Any modicaons to the appliance, electric wire and plug is dangerous and voids the warranty
Features
○ This appliance is manufactured from top quality materials, and oers superb streamlined eects
- With high sucon power and low noise, it is designed to remove cooking fumes from your kitchen quietly and eecvely
Installaon (duct is not supplied)
-
The range hood should be mounted at a distance of 600mm from an electric or inducon cooktop, and 762mm above a gas cooktop for safety and opmum performance. If the instrucons for installaon of the gas cooktop specify a greater distance, this has to be taken into account. (see pic 1) The exhaust air must not be discharged into a chimney which is used for exhausng fumes from other appliances burning gas or other fuels
-
To install, drill 2 holes of ∅8mm on a sturdy wall and in line with the hood
-
Insert expanding screws into the holes
-
Fix drilling template on the wall (see pic 2)
-
The appliance should be embedded into the wall unit or another support. This process should be carried out by 4 screws suitable for the kind of unit following the instrucons for the drilling of the holes as shown (see pic 3)
-
Aach the duct to the one way valve, and connect it to the kitchen outlet vent (see pic 4)
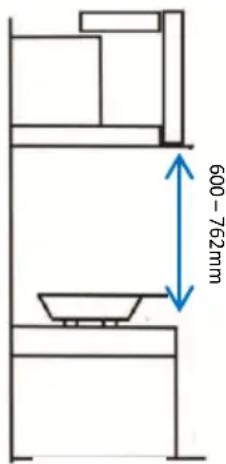
Pic 1

- Ensure that the wall the hood is to be installed on is sufficiently sturdy to carry the weight of the hood. It should be mounted level for best performance
- Do not connect to a common vent with any other appliances such as a gas heater, water heater, washer/dryer, etc.
- The duct should not be bent more than 120° from the one way valve outlet in the kitchen vent
- Make sure that the electrical cord is not in contact with sharp edges of the appliance
- Be sure that the plug is accessible aer installaon
How to Use
3 speed adjustment (see pic 6)
○ Push the Low buon, and the motor will run at the lowest speed
- Push the Mid buon, and the motor will run at medium speed
○ Push the High buon, and the motor will run at the highest speed
- Push the Light buon, and the two lighng lamps will illuminate. Push it again and the lights will turn o
- Push the Stop buon, and the motor will turn o
Electronic Switch
Stop

Low

Mid

High

Light

Pic 6
Grounding Instrucons
- This appliance must be grounded. In the event of an electrical short circuit, grounding reduces the risk of electric shock by providing an escape wire for the electric current. This appliance is equipped with a cord having a grounding wire with a grounding plug. The plug must be plugged into an outlet that is properly installed and grounded.
- Warning - Improper grounding can result in a risk of electric shock.
- Consult a qualified electrician if the grounding instrucons are not completely understood, or if doubt exists as to whether the appliance is properly grounded.
- Do not use an extension cord. If the power supply cord is too short, having a qualified electrician install an outlet near the appliance.
WARNING: TO REDUCE THE RISK OF FIRE, USE ONLY METAL DUCTWORK.
Safety Informaon
- There must be permanent and adequate venlaon of the room when operang the range hood with appliances burning gas or other fuels
- Do not check the status of the Iters when the range hood is operang – wait at least 30 minutes aer switching o to avoid scalding
- Do not touch the LED light within 30 minutes aer appliance use
- Avoid operang a gas cooktop when there is no pan on the stove. It is a re hazard and may cause damage to the hood iters
○ Disconnect the electrical plug prior to any maintenance - This appliance is not intended for use by young children unless they have been adequately supervised by a reasonable person to ensure that they can use the appliance safely
- The range hood is for home use only and is not suitable for outdoor, barbeque, and other commercial applicaons
- The range hood and its Iter should be cleaned regularly for best performance
Before cleaning, please conrm that the power is switched o
○ Building regulaons concerning the discharge of exhaust air have to be fulfilled - Don't cook with an open ame under the range hood
- For any technical issues ensure that a suitably qualified person handles any repairs or inspecons
Trouble Shoong
If any problem occurs, please detach the plug from the socket and contact Euro-Parts or a similarly qualified person in order to avoid a hazard.
| Problem | Cause | Soluon |
| Light on, but motor does not work | The outlet valve is blocked | Detach ue and duct then turn on the hood to check if the valves open |
| The capacitor has failed | Call for technical service | |
| The control switch has broken | Call for technical service | |
| Light does not work, motor does not work | No power supply | Plug another appliance into the socket to conrm there is power supply |
| Fuse has blown | Open up the plug and replace he 13A fuse | |
| Vibraon | The propeller is damaged or unbalanced | Call for technical service |
| The hood is not installed correctly | Review the installaon instrucons and check the installaon again for loose screws, brackets or connecons | |
| Insucient sucon eect | The distance between the hood and cooktop is too great | Check that the distance is between 600mm and 762mm |
| The Iters are saturated | Clean the Iters from grease residue and replace aer cleaning |
Electrical Diagrams
Insert-24, Insert-30

Insert-36
![graph TD A["135° 4uf 450V"] --> B["MOTOR"] B --> C["POWER BOARD"] C --> D["CONTROL BOARD"] D --> E["L2"] E --> F["115V, 60Hz"] G["2W"] --> H["LIGHT"] H --> I["12V"] I --> J["POWER BOARD"] K["HIGH MID LOW"] --> C L["L"] --> E M["F"] --> E](/content/2026/05/957135/images/7631672cb5c2c488c0365afa7ad2ce28734f09e2989b166459b2eec9372117da.jpg)
Specicaons
Insert-24
| Power Supply | 115V, 60Hz |
| Rated Input Power | 97W |
| Lighng Power | 1 x 2W |
| Motor Power | 95W |
| Airow | 300 CFM |
| Outlet Diameter | 150mm |
Insert-30
| Power Supply | 115V, 60Hz |
| Rated Input Power | 97W |
| Lighng Power | 1 x 2W |
| Motor Power | 95W |
| Airow | 300 CFM |
| Outlet Diameter | 150mm |
Insert-36
| Power Supply | 115V, 60Hz |
| Rated Input Power | 99W |
| Lighng Power | 2 x 2W |
| Motor Power | 95W |
| Airow | 300 CFM |
| Outlet Diameter | 150mm |
Cleaning & Maintenance
- Clean the surface of the hood every week with mild soap or detergent. Avoid solvents, acid, alkali, scouring pads or powder that could irreparably damage the stainless steel surface
- The grease Iters may be washed using mild soap, detergent or degreasing agents
- The charcoal Iters cannot be cleaned and must be replaced generally aer 6 months of use
Installaon Diagram

Warranty
Porter & Charles Appliances are imported and distributed in North America by Euro-Line Appliances Inc.
For more informaon visit www.euro-line-appliances.com or contact:
EURO-LINE APPLIANCES INC.
2278 Speers Road
Oakville, ON L6L 2X8
Canada
1-800-421-6332 - Euro-Line Appliances Inc.
1-800-ELA-WEST – Euro-Line Appliances West
markeng@euro-line-appliances.com
All Porter & Charles Appliances are backed by a comprehensive 2-year part and labour warranty.
Informaon on service and parts available from Euro-Parts at 1-800-678-8352
Porter&Charles
Brand : Porter & Charles
Model : INSERT-24
Category : Range hood