
EM044K10 - Microwave Porter & Charles - Free user manual and instructions
Find the device manual for free EM044K10 Porter & Charles in PDF.


| Product Type | Over-the-Range Microwave Oven |
| Brand | Porter & Charles |
| Model | EM044K10 |
| Capacity | 1.6 cu. ft. |
| Output Power | 1000 W (IEC) |
| Power Supply | 120 V, 60 Hz, AC only, 1550 W, 14.0 A |
| Frequency | 2450 MHz |
| Outside Dimensions (W x H x D) | 29.88 in x 15.75 in x 15.04 in |
| Cavity Dimensions (W x H x D) | 20.24 in x 9.25 in x 14.41 in |
| Net Weight | 55.1 lb |
| Turntable | Glass tray with ring assembly, reversible rotation |
| Cooking Uniformity | Turntable system |
| Control Panel | Digital display with touch keypad |
| Power Levels | 10 levels (10% to 100%) |
| Auto Cook Programs | Popcorn, Potato, Beverage, Reheat (3 sizes each) |
| Defrost | By weight (0.1-6.0 lb) or by time |
| Clock/Timer | 12-hour clock, countdown timer up to 99 min 99 sec |
| Multi-Stage Cooking | Up to 2 stages with different power levels |
| Child Lock | Yes, control panel lock |
| Exhaust Fan | 2-speed (High/Low) with automatic cooling function |
| Surface Light | 2 x 30 W incandescent bulbs |
| Oven Light | 1 x 30 W incandescent bulb |
| Filters | Grease filters (washable); charcoal filter (replace every 6-12 months) |
| Installation Type | Built-in or over-the-range |
| Warranty | 2 years full (parts and labor) |
Frequently Asked Questions - EM044K10 Porter & Charles
User questions about EM044K10 Porter & Charles
0 question about this device. Answer the ones you know or ask your own.
Ask a new question about this device
Download the instructions for your Microwave in PDF format for free! Find your manual EM044K10 - Porter & Charles and take your electronic device back in hand. On this page are published all the documents necessary for the use of your device. EM044K10 by Porter & Charles.
USER MANUAL EM044K10 Porter & Charles
of your Microwave Oven

TABLE OF CONTENTS
WELCOME 2
IMPORTANT SAFETY INSTRUCTIONS ......2
PART NAMES 8
MANUAL COOKING....11
AUTO COOKING 17
COOKINGCHARTS....19
CLEANING AND CARE 21
SPECIFICATIONS....24
WELCOME
Congratulations on your purchase of a new microwave oven!
we are very proud of our product and are completely committed to providing you with the best service possible. Your satisfaction is our number one priority.
We know you'll enjoy your new microwave oven and Thank You for choosing our product. We hope you consider us for future purchases.
PLEASE CAREFULLY READ AND SAVE THESE INSTRUCTIONS
This Use & Care Manual provides specific operating instructions for your model. Use your microwave oven only as instructed in this manual. These instructions are not meant to cover every possible condition and situation that may occur. Common sense and caution must be practiced when installing, operating and maintaining any appliance.
Please record your model and serial numbers below for future reference.
Model Number: ____
Serial Number:
Purchase Date: ____
Before you call for service, there are a few things you can do to help us serve you better.
Read this manual.
It contains instructions to help you use and maintain your microwave oven properly.
If you received a damaged Microwave Oven... immediately contact the dealer (or builder) that sold you the Microwave Oven.
IMPORTANT SAFETY INSTRUCTIONS
For your safety the information in this manual must be followed to minimize the risk of fire or explosion or to prevent property damage, personal injury or loss of life.
PRECAUTIONS TO AVOID POSSIBLE EXPOSURE TO EXCESSIVE MICROWAVE ENERGY
(a) Do not attempt to operate this oven with the door open since open-door operation can result in harmful exposure to microwave energy. It is important not to defeat or tamper with the safety interlocks.
(b) Do not place any object between the oven front face and the door or allow soil or cleaner residue to accumulate on sealing surfaces.
(c) Do not operate the oven if it is damaged. It is particularly important that the oven door close properly and that there is no damage to the: (1) door (bent), (2) hinges and latches (broken or loosened), (3) door seals and sealing surfaces.
(d) The oven should not be adjusted or repaired by anyone except properly qualified service personnel.
IMPORTANT SAFETY INSTRUCTIONS
Definitions
This is the safety alert symbol. It is used to alert you to potential personal injury hazards. Obey all safety messages that follow this symbol to avoid possible injury or death.

WARNING
WARNING indicates a potentially hazardous situation which, if not avoided, could result in death or serious injury.

CAUTION
CAUTION indicates a potentially hazardous situation which, if not avoided, may result in minor or moderate injury.
READ ALL INFORMATION BEFORE USING

WARNING
To reduce the risk of fire, burns, electric shock, injury to persons, or exposure to excessive microwave energy when using your appliance, follow basic precautions, including the following sections.
- Read all instructions before using the appliance.
- Read and follow the specific “PRECAUTIONS TO AVOID POSSIBLE EXPOSURE TO EXCESSIVE MICROWAVE ENERGY” on page 2.
- This appliance must be grounded. Connect only to properly grounded outlet. See “GROUNDING INSTRUCTIONS” on page 4.
- Install or locate this appliance only in accordance with the provided installation instructions.
- Some products such as whole eggs and sealed containers —for example, closed glass jars—are able to explode and should not be heated in this microwave oven.
- Use this appliance only for its intended use as described in this manual. Do not use corrosive chemicals or vapors in this appliance. This type of microwave oven is specifically designed to heat, cook or dry food. It is not designed for industrial or laboratory use.
- As with any appliance, close supervision is necessary when used by children.
- Do not operate this appliance if it has a damaged cord or plug, if it is not working properly or if it has been damaged or dropped.
- This appliance should be serviced only by qualified service personnel.
- Do not cover or block any openings on the appliance.
- Do not store or use this appliance outdoors. Do not use this product near water—for example, near a kitchen sink, in a wet basement or near a swimming pool, or similar locations.
- Do not immerse cord or plug in water.
- Keep cord away from heated surfaces.
-
Do not let cord hang over edge of table or counter.
• See door surface cleaning instructions on page 23. -
To reduce the risk of fire in the microwave oven cavity:
- Do not overcook food. Carefully attend appliance when paper, plastic or other combustible materials are placed inside the microwave oven to facilitate cooking.
- Remove wire twist-ties from paper or plastic bags before placing bag in microwave oven.
- If materials inside the microwave oven ignite, keep microwave oven door closed, turn microwave oven off and disconnect the power cord or shut off power at the fuse or circuit breaker panel.
- Do not use the cavity for storage purposes. Do not leave paper products, cooking utensils or food in the cavity when not in use.
- Liquids, such as water, coffee or tea are able to be overheated beyond the boiling point without appearing to be boiling. Visible bubbling or boiling when the container is removed from the microwave oven is not always present. THIS COULD RESULT IN VERY HOT LIQUIDS SUDDENLY BOILING OVER WHEN A SPOON OR OTHER UTENSIL IS INSERTED INTO THE LIQUID.
To reduce the risk of injury to persons:
- Do not overheat the liquid.
- Stir the liquid both before and halfway through heating it.
- Do not use straight-sided containers with narrow necks. Use a wide-mouthed container.
- After heating, allow the container to stand in the microwave oven at least for 20 seconds before removing the container.
- Use extreme care when inserting a spoon or other utensil into the container.
- Clean ventilation openings and grease fi Iters frequently. Grease should not be allowed to accumulate on ventilation openings, louver or grease fi Iters.
- Use care when cleaning the louver and the grease filters. Corrosive cleaning agents, such as lye-based oven cleaners, may damage the louver and the grease filters.
- When flaming food under the hood, turn the fan on.
- This appliance is suitable for use above both gas and electric cooking equipment 36" wide or less.
SAVE THESE INSTRUCTIONS.
IMPORTANT SAFETY INSTRUCTIONS
UNPACKING AND EXAMINING YOUR MICROWAVE OVEN
Open the bottom of the carton, bend the carton fl aps back and tilt the microwave oven over to rest on plastic foam pad. Lift carton off microwave oven and remove all packing materials, Installation Instructions, Wall Template, Top Template, Charcoal Filter, Turntable and Turntable Support. SAVE THE CARTON AS IT MAY MAKE INSTALLATION EASIER.
- Remove the feature sticker from the outside of the door, if there is one.
• DO NOT REMOVE THE WAVEGUIDE COVER.
Check to see that there are Installation Instructions, Wall Template, Top Template and Charcoal Filter, which is used when recirculating is chosen. Read enclosures and SAVE the Use and Care Manual.
Check the microwave oven for any damage, such as misaligned or bent door, damaged door seals and sealing surfaces, broken or loose door hinges and latches and dents inside the cavity or on the door. If there is any damage, do not operate the microwave oven and contact your dealer. See Installation Instructions for more details.

GROUNDING INSTRUCTIONS
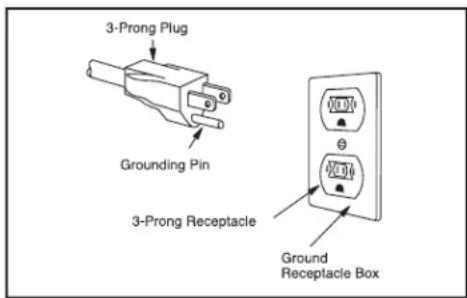
This appliance must be grounded. This microwave oven is equipped with a cord having a grounding wire with a grounding plug. It must be plugged into a wall receptacle that is properly installed and grounded in accordance with the National Electrical Code and local codes and ordinances. In the event of an electrical short circuit, grounding reduces risk of electric shock by providing an escape wire for the electric current.

WARNING
Improper use of the grounding plug can result in a risk of electric shock.
Electrical Requirements
Check Installation Instructions for proper location for the power supply.
The electrical requirements are a 120 volt 60 Hz, AC only, 15 amp. or more protected electrical supply. It is recommended that a separate circuit serving only the microwave oven be provided.
The microwave oven is equipped with a 3-prong grounding plug. It must be plugged into a wall receptacle that is properly installed and grounded. DO NOT UNDER ANY CIRCUMSTANCES CUT OR REMOVE THE GROUNDING PIN FROM THE PLUG. DO NOT USE AN EXTENSION CORD.
If the power supply cord is too short, have a qualified electrician or serviceman install an outlet near the appliance.
The Power Supply Cord and plug must be connected to a separate 120 Volt AC, 60 Hz, 15 Amp, or more branch circuit, single grounded receptacle. The receptacle should be located inside the cabinet directly above the Microwave Oven mounting location as shown in Figure 1.

NOTES
- If you have any questions about the grounding or electrical instructions, consult a qualified electrician or service person.
- The dealer can accept any liability for damage to the microwave oven or personal injury resulting from failure to observe the correct electrical connection procedures.

IMPORTANT SAFETY INSTRUCTIONS
Federal Communications Commission Radio Frequency Interference Statement (U.S.A. Only)
This equipment generates and uses ISM frequency energy and if not installed and used properly, that is in strict accordance with the manufacturer's instructions, may cause interference to radio and television reception. It has been type tested and found to comply with limits for ISM Equipment pursuant to part 18 of FCC Rules, which are designed to provide reasonable protection against such interference in a residential installation.
However, there is no guarantee that interference will not occur in a particular installation. If this equipment does cause interference to radio or television reception, which can be determined by turning the equipment off and on, the user is encouraged to try to correct the interference by one or more of the following:
- Reorient the receiving antenna of the radio or television.
- Relocate the microwave oven with respect to the receiver.
- Move the microwave oven away from the receiver.
- Plug the microwave oven into a different outlet so that the microwave oven and the receiver are on different branch circuits.
The manufacturer is not responsible for any radio or television interference caused by unauthorized modification to this microwave oven. It is the responsibility of the user to correct such interference.
IMPORTANT SAFETY INSTRUCTIONS
This Use and Care Manual is valuable: read it carefully and always save it for reference.
A good microwave cookbook is a valuable asset. Check it for microwave cooking principles, techniques, hints and recipes.
NEVER use the microwave oven without the turntable and support nor turn the turntable over so that a large dish could be placed in the microwave oven. The turntable will turn both clockwise and counterclockwise. See page 23 for complete instructions.
ALWAYS have food in the microwave oven when it is on to absorb the microwave energy.
When using the microwave oven at power levels below 100%, you may hear the magnetron cycling on and off. It is normal for the exterior of the microwave oven to be warm to the touch when cooking or reheating.
Condensation is a normal part of microwave cooking. Room humidity and the moisture in food will influence the amount of moisture that condenses in the microwave oven. Generally, covered foods will not cause as much condensation as uncovered ones. Ventilation openings must not be blocked.
The microwave oven is for food preparation only. It should not be used to dry clothes or newspapers.
Your microwave oven is rated 1000 watts by using the IEC Test Procedure. In using recipes or package directions, check food a minute or two before the minimum time and add time accordingly.
ABOUT MICROWAVE COOKING
- Arrange food carefully. Place thickest areas towards outside of dish.
- Watch cooking time. Cook for the shortest amount of time indicated and add more as needed. Food severely overcooked can smoke or ignite.
- Cover foods while cooking. Check recipe or cookbook for suggestions: paper towels, wax paper, microwave plastic wrap or a lid. Covers prevent spattering and help foods to cook evenly.
- Shield with small flat pieces of aluminum foil any thin areas of meat or poultry to prevent overcooking before dense, thick areas are cooked thoroughly.
- Stir foods from outside to center of dish once or twice during cooking, if possible.
- Turn foods over once during microwaving to speed cooking of such foods as chicken and hamburgers. Large items like roasts must be turned over at least once.
- Rearrange foods such as meatballs halfway through cooking both from top to bottom and from the center of the dish to the outside.
- Add standing time. Remove food from microwave oven and stir, if possible. Cover for standing time which allows the food to fi nish cooking without overcooking.
- Check for doneness. Look for signs indicating that cooking temperatures have been reached.
Doneness signs include:
- Food steams throughout, not just at edge.
- Center bottom of dish is very hot to the touch.
- Poultry thigh joints move easily.
- Meat and poultry show no pinkness.
- Fish is opaque and flakes easily with a fork.
ABOUT FOOD
| FOOD | DO | DON'T |
| Eggs, sausages, nuts, seeds, fruits & vegetables | · Puncture egg yolks before cooking to prevent “explosion”. · Pierce skins of potatoes, apples, squash, hot dogs and sausages so that steam escapes. | · Cook eggs in shells. · Reheat whole eggs. · Dry nuts or seeds in shells. |
| Popcorn | · Use specially bagged popcorn for microwave cooking. · Listen while popping corn for the popping to slow to 1 or 2 seconds or use special popcorn pad. | · Pop popcorn in regular brown bags or glass bowls. · Exceed maximum time on popcorn package. |
| Baby food | · Transfer baby food to small dish and heat carefully, stirring often. Check temperature before serving. · Put nipples on bottles after heating and shake thoroughly. “Wrist” test before feeding. | · Heat disposable bottles. · Heat bottles with nipples on. · Heat baby food in original jars. |
| General | · Cut baked goods with filling after heating to release steam and avoid burns. · Stir liquids briskly before and after heating to avoid “eruption”. · Use deep bowl, when cooking liquids or cereals, to prevent boilovers. | · Heat or cook in closed glass jars or air tight containers. · Can in the microwave as harmful bacteria may not be destroyed. · Deep fat fry. · Dry wood, gourds, herbs or wet papers. |
IMPORTANT SAFETY INSTRUCTIONS
ABOUT UTENSILS AND COVERINGS
It is not necessary to buy all new cookware. Many pieces already in your kitchen can be used successfully in your new microwave oven. Make sure the utensil does not touch the interior walls during cooking.
Use these utensils for safe microwave cooking and reheating:
- glass ceramic (Pyroceram®), such as Corningware®.
- heat-resistant glass (Pyrex®)
- microwave-safe plastics
- paper plates
- microwave-safe pottery, stoneware and porcelain
- browning dish (Do not exceed recommended preheating time. Follow manufacturer's directions.)
These items can be used for short time reheating of foods that have little fat or sugar in them:
- wood, straw, wicker
DO NOT USE
• metal pans and bakeware
• dishes with metallic trim
• non-heat-resistant glass
• non-microwave-safe plastics (margarine tubs)
• recycled paper products
- brown paper bags
- food storage bags
- metal twist-ties
Should you wish to check if a dish is safe for microwaving, place the empty dish in the microwave oven and microwave on HIGH for 30 seconds. A dish which becomes very hot should not be used.
The following coverings are ideal:
- Paper towels are good for covering foods for reheating and absorbing fat while cooking bacon.
- Wax paper can be used for cooking and reheating.
- Plastic wrap that is specially marked for microwave use can be used for cooking and reheating. DO NOT allow plastic wrap to touch food. Vent so steam can escape.
- Lids that are microwave-safe are a good choice because heat is kept near the food to hasten cooking.
- Microwave oven cooking bags are good for large meats or foods that need tenderizing. DO NOT use metal twist ties. Remember to slit bag so steam can escape.
How to use aluminum foil in your microwave oven:
- Small flat pieces of aluminum foil placed smoothly on the food can be used to shield areas that are either defrosting or cooking too quickly.
- Foil should not come closer than one inch to any surface of the microwave oven.
Should you have questions about utensils or coverings, check a good microwave cookbook or follow recipe suggestions.
ACCESSORIES There are many microwave accessories available for purchase. Evaluate carefully before you purchase so that they meet your needs. A microwave-safe thermometer will assist you in determining correct doneness and assure you that foods have been cooked to safe temperatures.
ABOUT CHILDREN AND THE MICROWAVE
Children below the age of 7 should use the microwave oven with a supervising person very near to them. Between the ages of 7 and 12, the supervising person should be in the same room.
As with any appliance, close supervision by an adult is necessary when used by children.
At no time should anyone be allowed to lean or swing on the microwave oven door.
Children should be taught all safety precautions: use potholders, remove coverings carefully, pay special attention to packages that crisp food because they may be extra hot.
Don't assume that because a child has mastered one cooking skill he/she can cook everything.
Children need to learn that the microwave oven is not a toy. See page 20 for Child Lock feature.
ABOUT SAFETY
- Check foods to see that they are cooked to the United States Department of Agriculture's recommended temperatures.
TEMP FOOD
| 145°F(63°C) | - For beef, lamb or veal cut into steaks, chops or roasts, fi sh |
| 160°F(71°C) | - For fresh pork, ground meat, seafood, egg dishes, frozen prepared food and beef, lamb or veal cut into steaks, chops or roasts |
| 165°F(74°C) | - For leftover, ready-to-reheat refrigerated, deli and carry out “fresh” food, whole chicken or turkey, chicken or turkey breasts and ground poultry used in chicken or turkey burgers |

NOTE
Do not cook whole, stuffed poultry. Cook stuffing separately to 165°F.
To test for doneness, insert a meat thermometer in a thick or dense area away from fat or bone. NEVER leave the thermometer in the food during cooking, unless it is approved for microwave oven use.
- ALWAYS use potholders to prevent burns when handling utensils that are in contact with hot food. Enough heat from the food can transfer through utensils to cause skin burns.
- Avoid steam burns by directing steam away from the face and hands. Slowly lift the farthest edge of a dish's covering and carefully open popcorn and oven cooking bags away from the face.
- Stay near the microwave oven while it's in use and check cooking progress frequently so that there is no chance of overcooking food.
- NEVER use the cavity for storing cookbooks or other items.
- Select, store and handle food carefully to preserve its high quality and minimize the spread of foodborne bacteria.
- Keep waveguide cover clean. Food residue can cause arcing and/or fi res.
- Use care when removing items from the microwave oven so that the utensil, your clothes or accessories do not touch the safety door latches.
- Keep aluminum foil used for shielding at least 1 inch away from walls, ceiling and door.
PART NAMES
Microwave features
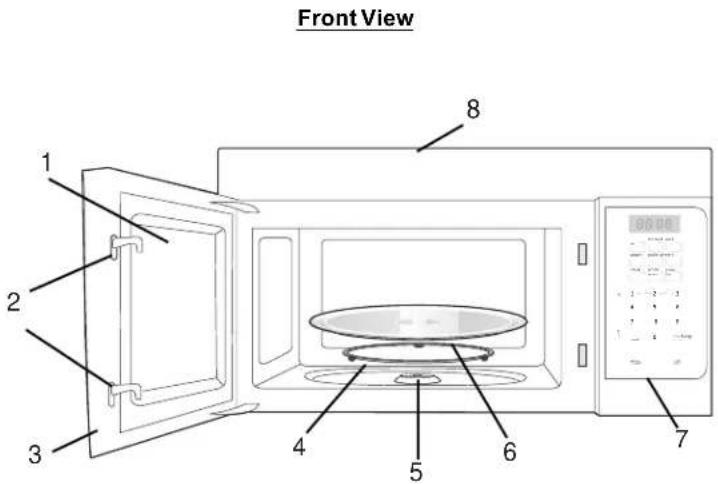
1 Window
2 Interlock system
3 Door assembly
4 Turntable ring assembly
5 Turntable Shaft
6 Turntable glass tray
7 Control panel
8 Ventilation openings (on top)
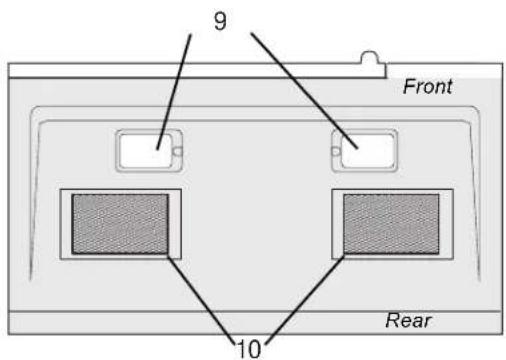
9 Surface lights
10 Ventilation filters
Bottom View
CONTROL PANEL

(1) Popcorn (P17) (11)
(2) Beverage (P17) (12)
(3) Potato (1-3 potatoes) (P17) (13)
(4) Reheat (3 different settings) (P15) (14)
(5) Defrost (by time or weight) (P13)
(6) EasySet (3 instant key settings) (P11) (15)
(7) Numeric pads (0 thru 9)
(8) Clock (P10)
(9) Timer (P11)
(10) Cook Time (P12)
Power Level (10 power levels available) (P12)
START/+30 sec (P13)
Stop/Cancel (P13)
Exhaust (High/Low/Off) \~ Use to turn the exhaust fan on, off, or to adjust fan speed. (P11)
Surface Light \~ Press this pad to turn the surface lights on or off. (P11)
Note: For detailed information, please go to relative page list above.
BEFORE OPERATING
Learn more about your microwave oven

CAUTION
- To avoid risk of personal injury or property damage, do not operate the microwave oven empty.
- To avoid risk of personal injury or property damage, do not use stoneware, aluminum foil, metal utensils, or metal trimmed utensils in the microwave oven.
Setting the clock
Example: setting clock display for 9:00:
- Touch Clock pad once for AM, touch twice for PM.
- Enter time using number pads.
- Touch Clock pad again.
Microwave utensil guide
| Use | Do not use |
| Oven proof glass (specifically treated for high intensity heat):Utility dishes, loaf dishes, pie plates, cake plates, liquid measuring cups, casseroles and bowls without metallic trim.China:Bowls, cups, serving plates and platters without metallic trim.Plastic:Plastic wrap (as a cover) - lay the plastic wrap loosely over the dish and press it to the sides. Vent plastic wrap by turning back one edge slightly to allow excess steam to escape. The dish should be deep enough so that the plastic wrap will not touch the food. Use plastic dishes, cups, semi-rigid freezer containers and plastic bags for short cooking times. Use these with care because the plastic may soften from the heat of the food.Paper:Paper towels, waxed paper, paper napkins and paper plates with no metallic trim or design. Look for the manufacturer's label for any special instructions for use in the microwave oven. | Metal utensils:Metal shields the food from microwave energy and produces uneven cooking. Also, avoid metal skewers, thermometers or foil trays. Metal utensils can cause arcing, which can damage your microwave oven.Metal decoration:Bowls, cups, serving plates and platters without metallic trim.Aluminum foil:Avoid large sheets of aluminum foil because they hinder cooking and may cause harmful arcing. Use small pieces of foil to shield poultry legs and wings. Keep ALL aluminum foil at least 1 inch from the side walls of the oven cavity and door of the microwave.Wood:Wooden bowls and boards will dry out and may split or crack when you use them in the microwave oven. Baskets made of wood will react in the same way.Tightly covered utensils:Be sure to leave openings for steam to escape from covered cookware. Pierce plastic pouches of vegetables or other food items before cooking. Tightly closed pouches may explode.Brown paper:Avoid using brown paper bags. They absorb heat and can burn.Flawed or chipped cooking utensils:Any utensil that is cracked, flawed or chipped may break in the oven.Metal twist ties:Remove metal twist ties from plastic or paper bags. They become hot and could cause a fire. |
MANUAL COOKING
Setting the timer
Example: setting timer for 5 minutes:
- Touch Timer pad once.
- Enter desired time using number pads.
- Touch Timer pad.
When the timer has reached the end of set time, you will hear beep alerts indicating the timer has run out.
Exhaust High / Low / Off
The exhaust ventilation moves steam and other cooking vapors from the cooking surface of the range below the microwave oven.
To operate the exhaust vent, Touch the Exhaust High/Low/Off pad once for the highest speed setting. Touch the pad again to choose the Low speed setting and a 3rd time to turn the exhaust ventilation off.
Note: If the temperature gets too hot around the microwave oven, the fan in the exhaust vent hood will automatically turn on at the LOW setting to cool the oven. The fan will automatically turn off when the internal parts are cool. When this occurs, the vent cannot be turned off.
Surface Light / On / Off
Touch the Surface Light/On/Off pad once for a cooking surface light. Press the pad again to turn the light off.
Control Lock
You may lock the control panel to prevent the microwave from being accidentally started or used by children.
The control lock feature is very useful when cleaning the control panel. The lock will prevent accidental programming when wiping the control panel clean.
Example: to set the control lock ON:
Touch and hold the Stop/Cancel pad for more than 3 seconds. The Lock icon will appear in the display window along with 2 beeps.
Example: to change the control lock from ON to OFF:
Touch and hold the Stop/Cancel pad for more than 3 seconds. The Lock icon will disappear in the display window.
Using Ready Set
Microwave heating or cooking may be quickly set at 100% power level for 1, 2 or 3 minutes. Use the number keys 1, 2 or 3 to choose the desired minutes of cook time (this option will only work using the 1, 2 or 3 numeric pads):
Example: to quickly heat for 2 minutes at 100% power:
Touch number pads 1, 2 or 3 for desired minutes of cook time.
MANUAL COOKING
Heating with high power level
Example: to heat for 5 minutes at 100% power:
- Press Cook Time pad.
- Use the number pads to enter desired heating time (cook time may be set up to 99 minutes and 99 seconds).
- Touch START pad.
When heating has finished you will hear beeps and "Good" will display.
Heating with lower power levels
Using the highest power level to heat foods with does not always give the best results when some types of food need slower cooking, such as roasts, baked goods or custards. Your oven has nine other power levels you may choose.
Example: to heat for 4 minutes at 70% power:
- Press Cook Time.
- Use the number pads to enter desired heating time (cook time may be set up to 99 minutes and 99 seconds).
- Press Power Level pad once for power level 10 (100% power).
- Use the number key to change the power level to 7. PL7 appears in the display (70 % power).
- Press START pad.
When heating has finished you will hear beeps and "Good" will display.
Heating with multiple cooking stages
For best results, some microwave recipes call for different power levels or different lengths of time for cooking. Your microwave may be set to change from one stage to another automatically (2 stages maximum).
Example: to cook food for 3 minutes at 80% power and then 50% power for 6 minutes 30 seconds:
- Press Cook Time.
- Use the number pads to enter heating time for the 1st stage (cook time may be set up to 99 minutes and 99 seconds).
- Press Power Level pad once.
- Use the number keys to enter power level for the 1st stage. PL8 appears in the display (80 % power).
- Press Cook Time pad for 2nd stage.
- Use the number pads to enter heating time for the 2nd stage (cook time may be set up to 99 minutes and 99 seconds).
- Press Power Level pad for 2nd stage.
- Use the number key to enter power level for the 2nd stage. PL5 appears in the display (50 % power).
- Press START pad.
When heating has finished you will hear beeps and "Good" will display.
Note:
Power level must always be programmed for first stage - 100% = 10.
MANUAL COOKING
Using the Stop/Cancel key
This feature will let you quickly stop or cancel the cooking process.
Touch the stop/cancel pad to :
- Erase if you have entered wrong information.
- Canel timer.
- Press pad once to pause the oven temporally during cooking. (Touch START/+30 sec pad again to resume cooking.)
- Return the time of day (clock) to the display after cooking cycle is completed.
- Cancel a program during cooking, touch twice.
Using the Stayt/+ 30 sec.
This feature will let you quickly start or add 30 seconds
Touch the START/+30sec. pad to :
- Start programmed cooking.
- Start cooking for 30 seconds at 100% power level.
- Extend cooking time in multiples of 30 seconds each time this pad is touched during microwave cooking.
Example: to add 1 minute of cook time during 80% microwave cooking :
Press STARTe30 sec
Setting Defrost (by Weight)
Example: to defrost 1lb. of food with the default power level and cook time determined automatically:
- Press Defrost pad once. 0.0 will appear in the display.
- Use the numeric pads to input weight of food to defrost in pounds (10 = 1lb.) You may enter any weight from 0.1 to 6.0lbs.
- Press START/+30sec. pad.
When defrosting has finished you will hear beeps and "Good" will display.
Note: The weight amount must be a valid entry for this feature to start. A valid weight entry is 0.1 to 6.0 pounds.
Setting Defrost (by Time)
Example: to defrost food with the default 30% power level for 5 minutes:
- Press Defrost pad twice. 0:00 will appear in the display.
- Use the number pads to enter desired defrost time (defrost time may be set up to 99 minutes and 99 seconds).
- Press START/+30sec. pad.
When heating has finished you will hear beeps and "Good" will display.
Note: Power levels cannot be changed for both defrost (by weight) or defrost (by time) because the defrost performance will be adversely affected.
Special notes for defrosting by time
- After pressing START key, the display will count down remaining defrost time. The oven will beep twice during the defrost cycle. At this time open the door and turn the food if needed and remove any portions that have already thawed. Touch the START key to resume the defrost cycle.
- When heating has finished you will hear beeps.
MANUAL COOKING
Defrosting tips
- When using the defrost weight feature, the weight entered should always be pounds (valid entries are from 0.1 to 6.0 pounds).
- Use both defrost weight and defrost time features for raw food items only. Defrosting gives best results when food to be thawed is a minimum of 0° F (taken directly from a true freezer). If the food has been stored in a refrigerator-freezer that does not maintain a temperature of 5° F or below, always program a lower food weight or lower cook time to prevent cooking the food.
-
If the frozen food is stored outside the freezer for up to 20 minutes, enter a reduced cook time or weight.
-
The shape of the package will alter the defrosting time. Shallow rectangular food packets defrost more quickly than a deep frozen block of food.
- Separate pieces as they begin to defrost. Separated frozen pieces of food defrost better.
- Shield warm areas of food with small pieces of foil if they start to become warm.
- You may use small pieces of aluminum foil to shield food items like chicken wings, leg tips and fish tails, but do not allow the foil to touch the oven cavity walls when defrosting.
Defrosting suggestions for meats
For best results, please read these suggestions when defrosting meats.
| Meat | Normal amount | Suggestions |
| Roast beef or pork | 2.5 to 6 lbs.(40 to 96 oz.) | Start with the food placed fat side down. After each stage, turn the food over and shield any warm portions with narrow strips of aluminum foil. Let stand, covered for 15-30 minutes. |
| Steaks, chops or fish | 0.5 to 3 lbs.(8 to 48 oz.) | After each stage, rearrange the food. If there are any warm or thawed portions of food, shield them with narrow flat pieces of aluminum foil. Remove any pieces of food that are nearly defrosted. Let stand, covered for about 5 to 10 minutes. |
| Ground meat | 0.5 to 3 lbs.(8 to 48 oz.) | After each stage, remove any pieces of food that are nearly defrosted. Let stand, covered with foil for 5 to 10 minutes. |
| Whole chicken | 2.5 to 6 lbs.(40 to 96 oz.) | Remove giblets before freezing poultry. Start defrsoting with the breast side down. After the 1st stage, turn the chicken over and shield any warm portions with narrow strips of aluminum foil. After the 2nd stage, again shield any warm portions with narrow strips of aluminum foil. Let stand, covered, for 30 to 60 minutes in the refrigerator. |
| Chicken pieces | 0.5 to 3 lbs.(8 to 48 oz.) | After each stage, rearrange or remove any pieces of food that are nearly defrosted. Let stand for 10-20 minutes. |
MANUAL COOKING
Reheat
The reheat feature provides 3 quick preset settings based on serving size to reheat food for your cooking convenience.
Example: to reheat 24 ounces of food.
- Press Reheat pad 3 times to reheat 24oz. of food. 24oz will appear in the display (see reheat category table).
| Reheat Category | Press | Display |
| 8 ounces of food | once | 8 oz |
| 16 ounces of food | twice | 16 oz |
| 24 ounces of food | 3 times | 24 oz |
- Press START pad.
Reheat cooking suggestions
| Reheat | Directions | Amount |
| Dinner plate | Use only pre-cooked, refrigerated foods. Cover plate with vented plastic wrap or waxed paper, tucked under plate. If food is not as hot as you prefer after heating with Reheat, continue heating using manual time and power level settings.Contents: • 3-4 oz. meat, poultry or fish (up to 6 oz. with bone)• 1/2 cup starch (potatoes, pasta, rice, etc.)• 1/2 cup of vegetables (about 3-4 oz.) | 1 serving(1 plate) |
| Casserole | Cover plate with lid or vented plastic wrap. If food is not as hot as you prefer after heating with Reheat, continue heating using manual time and power level settings. | 1 to 4 servings |
| Pasta | Stir foods once before serving.Contents: • Casserole-refrigerated foods (for example beef stew or lasagna)• Pasta-Canned spaghetti and ravioli, refrigerated foods. |
MANUAL COOKING
Suggested power levels for cooking
The 10 power levels available with this microwave will help you to adjust to the power output best suited for the food type you are preparing. As with any food preparation in the microwave, it is best to follow the microwave instructions that are printed on food packaging.
The table below provides suggested power levels for various types of food that you can be prepare in the microwave.
| Power level | Microwave output | Use to prepare when: |
| 10 High | 100 % | ·Boiling water.·Cooking ground beef.·Making candy.·Cooking fresh fruits & vegetables·Cooking fish & poultry.·Preheating browning dish.·Reheating beverages.·Cooking bacon slices. |
| 9 | 90 % | ·Reheating meat slices quickly.·Saute onions, celery & green peppers. |
| 8 | 80 % | ·All reheating.·Cooking scrambled eggs. |
| 7 | 70 % | ·Cooking breads & cereal products.·Cooking cheese dishes & veal.·Cakes, muffins, brownies & cupcakes. |
| 6 | 60 % | ·Cooking pasta. |
| 5 | 50 % | ·Cooking meats & whole poultry.·Cooking custard.·Cooking spare ribs, rib roast & sirloin roast. |
| 4 | 40 % | ·Cooking less tender cuts of meat.·Reheating frozen packaged foods. |
| 3 | 30 % | ·Thawing meat, poultry & seafood.·Cooking small quantities of food.·Finish cooking casseroles, stew & some sauces. |
| 2 | 20 % | ·Softening butter & cream cheese.·Heating small amounts of food. |
| 1 | 10 % | ·Softening ice cream.·Raise yeast dough. |
Suggestions for getting the best results
To help you achieve the best possible results from your microwave oven, read the following suggestions below;
- Storage temperature
Foods taken from the freezer or refrigerator take longer to cook than the same foods would at room temperature.
- Size
Small pieces of food cook faster than large ones. Pieces similar in size and shape will cook more evenly when cooked together. For more even results, reduce the power levels when cooking large pieces of food.
- Natural moisture
Very moist foods cook more evenly because microwave energy heats water molecules very efficiently.
- Stirring
Stir foods such as casseroles and vegetable from the outside to the center to distribute the heat more evenly. This will allow the food to cook faster. Constant stirring is not necessary.
- Turn over items
Turn over foods such as pork chops, roasts or whole cauliflower halfway through the cook time. This will help to expose all sides equally to microwave energy.
- Food placement
Place delicate areas of food items, such as asparagus tips, toward the center of the turntable tray.
- Food arrangement
Arrange unevenly shaped foods, such as chicken pieces or salmon, with the thicker or meatier parts toward the outside of the turntable tray.
- Let the food stand
After removing the food from the microwave, cover the food with foil or a casserole lid and let it stand to finish cooking. This will help the food finish in the center and avoids overcooking the out edges, The length of stand time depends on the density and surface area of the food items.
- Wrapping in paper towels or waxed paper
Sandwiches and many other food types containing pre-baked bread should be wrapped prior to placing in the microwave to help prevent the food items fro drying out while heating.
AUTO COOKING
Popcorn

CAUTION
- DO NOT leave microwave oven unattended while popping corn.
The popcorn feature lets you pop 3 different commercially packaged microwave popcorn sized bags. Use the table below to determine the setting to use.
| Amount | Press popcorn pad |
| 1.75 oz. (default setting) | once |
| 3.0 oz. | 2 times |
| 3.5 oz. | 3 times |
Example: to pop a 3.0 oz. bag of popcorn automatically.
-
Press Popcorn pad (1, 2 or 3 times - refer to table above to change for bag size).
-
Press START pad.
The microwave will beep when finished.
Potato
The potato feature cooks 1, 2 or 3 (cooking times based on 8 to 24 oz.) potatoes automatically. Use the table below to determine the setting to use.
| Amount | Press potato pad |
| 1 potato (default setting) | once |
| 2 potatoes | 2 times |
| 3 potatoes | 3 times |
Example: to cook 1 potato automatically.
-
Press Potato pad (1, 2 or 3 times - refer to table above to change quantity).
-
Press START pad.
The microwave will beep when finished.
Notes:
- Before cooking, pierce potatoes with fork several times.
• After cookings, let potatoes stand for 5 minutes.
Beverage
The beverage feature heats 1, 2 or 3 cups of beverage. Use the table below to determine the setting to use.
| Amount | Press beverage pad |
| 1 cup (about 8 oz.) | once (default setting) |
| 2 cups (about 16 oz.) | 2 times |
| 3 cups (about 24 oz.) | 3 times |
Example: to heat 1 cup of a beverage.
-
Press Beverage pad (1, 2 or 3 times - refer to table above to change number of servings).
-
Press START pad.
The microwave will beep when finished.
AUTO COOKING
Convenience cooking suggestions
| Convenience category | Amount | Suggestions |
| Popcorn | 1.75,3.0, 3.5 oz. 1 pkg. | Cook a single “microwave-only” bag of popcorn at a time. Use caution when removing and opening the hot popcorn bag from the oven. Let microwave oven cool down at least 5 minutes before using again. |
| Potato | 1,2,3 potatoes 8,16,24 oz. | Pierce each potato several times using a fork. Place on turntable in spoke-like fashion. After cooking, let stand for 3-5 minutes. Let oven cool for at least 5 minutes before using again. Use the start/+30sec pad to increase cook time for larger potatoes. |
| Beverage | 1,2,3 cups (8 oz,16 oz, 24 oz.) | Use a microwave-safe measuring cup or mug; do not cover. Place the beverage in the microwave. After heating, stir well. Let oven cool for at least 5 minutes before using again. Beverages heated with the beverage category may be very hot. Remove the container with care. |
COOKING CHARTS
Cooking meat in your microwave
Be sure to place prepared meats on a microwave-safe roasting rack in a microwave-safe dish. Start cooking the meat fat side down and if necessary, use narrow strips of aluminum foil to shield any bone tips or thin meat areas. After cooking, check the temperature in several places before letting the meat stand the recommended time. Please note that the temperatures in the following charts are temperatures at removal time; the temperature will rise during the standing period.
| Meat | Power level | DirectionsCook time | |
| • Roast beef boneless (up to 4 lbs.) | High (10) for first 5 minutes, then medium (5) | 12-17 min./lb. for 160°F (Medium) | Place roast beef fat-side down on roasting rack. Cover with wax paper. Turn over half way through cooking. Let stand* 10-15 minutes. |
| 14-19 min./lb. for 170°F (Well Done) | |||
| • Roast pork boneless or bone-in (up to 4 lbs.) | High (10) for first 5 minutes, then medium (5) | 15-20 min./lb. for 170°F (Well Done) | Place roast pork fat-side down on roasting rack. Cover with wax paper. Turn over half way through cooking. Let stand* 10-15 minutes. |
* Expect a 10° F rise in the temperature during the standing period.
| Meat | Doneness | Remove from oven | After standing (10-15 min.) |
| • Beef | MediumWell Done | 150°F160°F | 150°F160°F |
| • Pork | MediumWell Done | 150°F160°F | 150°F160°F |
| • Poultry | Dark meatLight meat | 170°F160°F | 170°F160°F |
Cooking poultry in your microwave
Be sure to place poultry on a microwave-safe roasting rack in a microwave-safe dish. Cover poultry with wax paper to prevent splattering. Use narrow strips of aluminum foil to shield any bone tips or thin meat areas, or areas that start to overcook. After cooking, check the temperature in several places before letting the meat stand the recommended time.
| Poultry | Cook time/power level | Directions |
| Whole chicken (up to 4 lbs.) | Cook time: 7-10 min. /lb.180° F dark meat170° F dark meatPower level: medium high (7) | Place chicken breast-side down on roasting rack. Cover with wax paper. Turn over half way through cooking. Cook until juices run clear and meat near bone is no longer pink. Let stand for 5-10 min. |
| Chicken pieces (up to 4 lbs.) | Cook time: 7-10 min. /lb.180° F dark meat170° F dark meatPower level: medium high (7) | Place chicken bone-side down on dish, with thickest portions toward the inside of dish. Cover with wax paper. Turn over half way through cooking. Cook until juices run clear and meat near bone is no longer pink. Let stand for 5-10 min. |
Cooking eggs in your microwave
- Never cook eggs in the shell and never warm hard-cooked eggs in the shell; they can explode.
- Always pierce whole eggs to keep them from bursting.
- Cook eggs just until set; they will become tough if overcooked.
COOKING CHARTS
Cooking vegetables in your microwave
- Vegetables should be washed just before cooking. Rarely is extra water needed. If dense vegetables such as potatoes, carrots and greens are being cooked, add about 1/4 cup of water.
- Small vegetables (sliced carrots, peas, lima beans, etc.) will cook faster than larger vegetables.
-
Whole vegetables, such as potatoes, acorn squash or corn on the cob, should be arranged in a circle on the turntable before cooking. The will cook more evenly if turned over halfway through cooking.
• Always place vegetables like asparagus and broccoli with the stem ends pointing towards the edge of the dish and the tips toward the center. -
When cooking cut vegetables, always cover the dish with a lid or vented microwavable plastic wrap.
- Whole, unpeeled vegetables such as potatoes, squash, eggplant, etc., should have their skin pricked in several locations before cooking to prevent them from bursting.
- For more even cooking, stir or rearrange whole vegetables halfway through the cook time.
- Most of the time, the denser the food the longer the required standing time. For example, a baked potato should stand for 5 minutes before serving, while a dish of peas may be served immediately.
Cooking seafood in your microwave
Place fish on a microwave-safe roasting rack in a microwave-safe dish. Be sure to always cook fish until it flakes easily with a fork. Use a tight cover to steam fish; a lighter cover of wax paper or paper towel provides less steaming. And be sure not to overcook fish; check it for doneness at a minimum cooking time before cooking longer.
| Seafood | Cook time/power level | Directions |
| Fish steaksUp to 1 1/2 lbs. | Cook time: 7-11 min./lb.Power level: med-high (7) | Arrange fish on roasting rack with meaty portions towards the outside of rack. Cover with wax paper. Turn over and rearrange halfway through cook time. Cook until fish flakes easily with fork. Let stand 3-5 mins. |
| Fish filletsUp to 1 1/2 lbs. | Cook time: 4-8 min./lb.Power level: med-high (7) | Arrange fillets in a baking dish, thuring any thin pieces under. Cover with wax paper. If over 1/2 inch thick, turn over and rearrange halfway through cook time. Cook until fish flakes easily with fork. Let stand 2-3 mins. |
| ShrimpUp to 1 1/2 lbs. | Cook time: 4-6 1/2 min./lb.Power level: med-high (7) | Arrange shrimp in a baking dish without overlapping or layering. Cover with wax paper. Cook until firm and opaue, stirring 2 or 3 times. Let stand 5 mins. |
CLEANING AND CARE
Disconnect the power cord before cleaning or leave the door open to deactivate the oven during cleaning.
Cleaning the exhaust filters
The oven ventilation exhaust filters should be removed and cleaned often; generally at least once every month.

CAUTION
To avoid risk of personal injury or property damage, do not operate oven hood without filters properly in place.


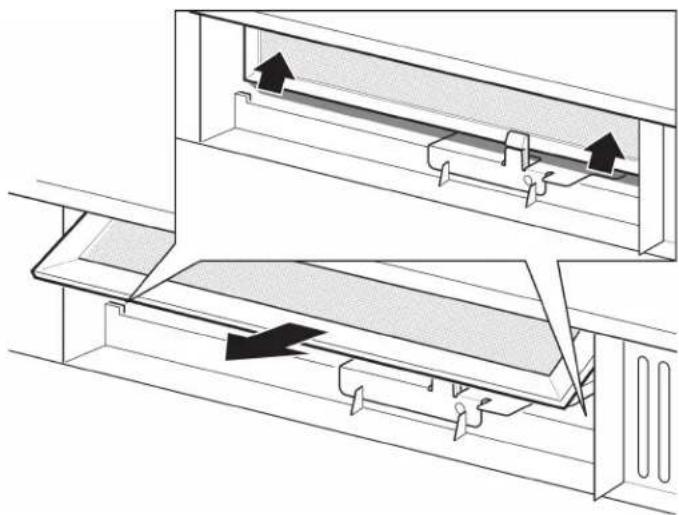
- To remove the exhaust ventilation filters, slide the filter to the rear. Then pull filter downward and push to the other side. The filter will drop out. Repeat for the 2nd filter.

- Soak the ventilation filters in hot water using a mild detergent. Rinse well and shake to dry or wash in a dishwasher. Do not use ammonia. The aluminum on the filter will corrode and darken.

- To reinstall the exhaust ventilation filter, slide it into the side slot, then push up and toward oven to lock. Reinstall the 2nd filter using the same procedure.
Surface light replacement

CAUTION
To avoid risk of personal injury or property damage, wear gloves when replacing the light bulbs.
- Unplug the microwave oven or turn off power at the main circuit breaker.
- Remove the bulb cover mounting screws at both light positions under the microwave.

-
Replace bulb with 30 watt appliance bulb.
-
Re-install bulb cover and mounting screw.
-
Plug the microwave back into the power supply or turn the power back on at the main circuit breaker.
CLEANING AND CARE
Disconnect the power cord before cleaning or leave the door open to deactivate the oven during cleaning.
Charcoal filter replacement
Charcoal Filter installed in your microwave oven, is used for nonvented, recirculated installation. The filter should be changed every 6 to 12 months depending on use.
- Disconnect power to the microwave oven at the circuit breaker panel or by unplugging.
- Remove the vent grill mounting screws.
- Pull the vent grill away from the unit.

- Remove the charcoal filter by pushing it inwards, then turn and pull it away from the unit.
Oven light replacement
Remove the vent instructions 1-4 above and charcoal filter, if used.
- Open light cover located behind filter mounting by carefully pulling up on the front edge.

- Remove old light bulb and replace only with equivalent 30 watt bulb available from parts distributor. Bulbs are also available at most hardware stores or lighting centers.

Note: DO NOT USE BULB LARGER THAN 30 WATTS.
- Replace the microwave oven light cover by carefully pushing into place. Replace the charcoal filter. Push the vent grill back into place (engaging both the bottom and top tabs) and replace the vent grill mouting screws.
CLEANING AND CARE
Disconnect the power cord before cleaning or leave the door open to deactivate the oven during cleaning.
Cleaning suggestions
For best performance and for safety reasons, keep the oven clean inside and outside. Take special care to keep the inner door panel and oven fron frame free of food and grease build-up.
Never use rough scouring powder or pads on the microwave. Wipe the microwave oven inside and out with a soft cloth and and warm (not hot) mild detergent solution. Then rinse and wipe completely dry.
Wipe spatters immediately with a wet paper towel, especially after cooking greasy foods like chicken or bacon.
Clean your microwave oven weekly or more often, if needed.
Follow these instructions to clean and care for your microwave oven:
- Keep the inside (cavity) of the oven clean. Food particles and spilled liquids can stick to the oven walls, causing the oven to work less efficiently.
- Wipe up spills immediately. Use a damp, clean cloth and mild soap. DO NOT use harsh detergents or abrasive cleaners.
- To help loosen baked-on food particles or liquids, heat 2 cups of water (add the juice of 1 lemon if you desire to keep the oven fresh smelling) in a 4 cup measuring glass at High power for 5 minutes or until boiling. Let stand in oven cavity for 1 or 2 minutes.
- Remove the glass turntable tray from the oven when cleaning the oven cavity or tray. To prevent the glass turntable from breaking, handle with care and do not put it in water immediately after cooking. Wash the turntable tray in warm sudsy water or in the dishwasher.
-
Clean the outside surface of the microwave with soap and a clean damp cloth. Dry with a clean soft cloth. To prevent damage to the operating parts of the oven, do not let water seep into any vents or openings.
-
Wash the oven door window with very mild soap and water. Be sure to use a soft clean cloth to avoid scratching.
- If steam accumulates inside or outside the oven door, wipe with a soft cloth. Steam can accumulate when operating the oven in high humidity and in no way indicates microwave leakage.
- Never operate the oven without food in the oven cavity; this can damage the magnetron tube or glass tray. You may wish to leave a cup of water standing inside the oven when it is not in use to prevent damage if the oven is accidentally turned on.
SPECI FI CATIONS
| AC Line Voltage: Single phase 120V, 60Hz, AC only | |
| AC Power Required: | 1550W 14.0 amps. |
| Output Power*: 1000 W | |
| Frequency: 2450 MHz (Class B/Group2)** | |
| Outside Dimensions (including handle): "(D) | 29 .88 "(W) x 15.75 "(H) x 15.04 |
| Cavity Dimensions: | 20.24 "(W) x 9.25 "(H) x 14.41 "(D) |
| Microwave oven Capacity***: | 1.6 Cu.Ft. |
| Cooking Uniformity: Turntable | |
| Weight: | Approx. (net) 55.1 lb, (gross) 62.8 lb |
| Work/Night Light: | 2 bulbs 30w each (incandescent light bulbs) |
| Oven Light: | 1 bulb 30w (incandescent light bulbs) |
GUARANTEE/CUSTOMER SERVICE CENTRES Porter&Charles
LENGTH OF WARRANTY: PORTER&CHARLES WILL PAY FOR:
TWO YEAR FULL WARRANTEE Replacement parts and/or labour to repair de- from original date of purchase, including fects in materials or workmanship. Service must parts and labour, to the first purchaser of this be provided by an authorized Porter&Charles appliance. company (unless advised
otherwise)
THIS GUARANTEE DOES NOT COVER COMMERCIAL USE.
The name Porter&Charles, for service matters, incorporates work performed by authorized service agents or service companies.
EXCEPTIONS:
PORTER&CHARLES WILL NOT PAY FOR THE FOLLOWING SERVICE CALLS:
- To install or correct the installation of an appliance.
- To instruct the use of an appliances.
- To replace house fuses, re-set circuit breakers, or correct house wiring.
- To correct house plumbing.
- To clean drains, filters, or garbage disposers.
- To repair an appliance if it fails due to misuse or abuse.
PORTER&CHARLES WILL NOT PAY WHEN THE FOLLOWING OCCURS:
- Damage resulting from fires, acts of God, alteration, improper installation, or installation not in accordance with building codes.
- Pickup or delivery of major appliances requiring service. The appliances are designed to be repaired in the home. However, Porter&Charles will not be responsible for travelling and labour costs if the customer lives in excess of 50km/30 miles, or if the travel time is in 30 minutes from the nearest service centre. Any excess to this will not be covered by the warranty.
In no event will Porter&Charles be responsible for incidental or consequential damages. For warranty service and parts, contact EURO-PARTS. Service will be provided during normal business hours. Should you have a service problem that is not resolved locally, please contact:
Service and Parts
EURO-PARTS, USA EURO-PARTS, CANADA
Porter&Charles
Tel: 1-800-561-4614 Tel: 1-800-678-8352 Tel: 1-866-699-4973
Fax: 1-519-528-5001 Fax: 1-519-528-5001 Tel. Direct: 1-905829-3989
Fax: 1-905-829-8409
User Instructions and Installation Manual
Service and Repair
To save you time and money, please have the following information ready in case you have to call for service:
- Name of the dealer from whom you purchased the appliance.
- Model number (shown on rating plate).
- Serial number (shown on rating plate).
- Date of purchase.
You should also retain the original purchase receipt to support any claim made under the warranty. (We suggest you staple the receipt to this page)
DISTRIBUTED BY: PORTER&CHARLES
2278 SPEERS ROAD, OAKVILLE, ONTARIO, CANADA, L6L 2X8
Toll Free: 1-866-699-4973
Tel: 905-829-8389
Fax: 905-829-8409
www.porter&charles.ca
INFORMATION SUR LA GARANTIE Porter&Charles
VALIDITE DO LA GARANTIE: PORTER&CHARLES PREND EN CHARGE:
GARANTIE COMPLETE DE DEUX ANS
- OF YOUR MICROWAVE OVEN
- TABLE OF CONTENTS
- WELCOME
- PLEASE CAREFULLY READ AND SAVE THESE INSTRUCTIONS
- IMPORTANT SAFETY INSTRUCTIONS
- PRECAUTIONS TO AVOID POSSIBLE EXPOSURE TO EXCESSIVE MICROWAVE ENERGY
- DEFINITIONS
- WARNING
- CAUTION
- READ ALL INFORMATION BEFORE USING
- SAVE THESE INSTRUCTIONS
- UNPACKING AND EXAMINING YOUR MICROWAVE OVEN
- GROUNDING INSTRUCTIONS
- ELECTRICAL REQUIREMENTS
- NOTES
- FEDERAL COMMUNICATIONS COMMISSION RADIO FREQUENCY INTERFERENCE STATEMENT (U.S.A. ONLY)
- ABOUT MICROWAVE COOKING
- DONENESS SIGNS INCLUDE
- ABOUT UTENSILS AND COVERINGS
- USE THESE UTENSILS FOR SAFE MICROWAVE COOKING AND REHEATING
- THESE ITEMS CAN BE USED FOR SHORT TIME REHEATING OF FOODS THAT HAVE LITTLE FAT OR SUGAR IN THEM
- DO NOT USE
- THE FOLLOWING COVERINGS ARE IDEAL
- HOW TO USE ALUMINUM FOIL IN YOUR MICROWAVE OVEN
- ABOUT CHILDREN AND THE MICROWAVE
- ABOUT SAFETY
- NOTE
- PART NAMES
- MICROWAVE FEATURES
- CONTROL PANEL
- BEFORE OPERATING
- LEARN MORE ABOUT YOUR MICROWAVE OVEN
- SETTING THE CLOCK
- MANUAL COOKING
- SETTING THE TIMER
- EXHAUST HIGH / LOW / OFF
- SURFACE LIGHT / ON / OFF
- CONTROL LOCK
- USING READY SET
- HEATING WITH HIGH POWER LEVEL
- HEATING WITH LOWER POWER LEVELS
- HEATING WITH MULTIPLE COOKING STAGES
- USING THE STOP/CANCEL KEY
- USING THE STAYT/+ 30 SEC
- SETTING DEFROST (BY WEIGHT)
- SETTING DEFROST (BY TIME)
- SPECIAL NOTES FOR DEFROSTING BY TIME
- DEFROSTING TIPS
- DEFROSTING SUGGESTIONS FOR MEATS
- REHEAT
- SUGGESTED POWER LEVELS FOR COOKING
- SUGGESTIONS FOR GETTING THE BEST RESULTS
- STORAGE TEMPERATURE
- SIZE
- NATURAL MOISTURE
- STIRRING
- TURN OVER ITEMS
- FOOD PLACEMENT
- FOOD ARRANGEMENT
- LET THE FOOD STAND
- WRAPPING IN PAPER TOWELS OR WAXED PAPER
- AUTO COOKING
- POPCORN
- POTATO
- BEVERAGE
- COOKING CHARTS
- COOKING MEAT IN YOUR MICROWAVE
- COOKING POULTRY IN YOUR MICROWAVE
- COOKING EGGS IN YOUR MICROWAVE
- COOKING VEGETABLES IN YOUR MICROWAVE
- COOKING SEAFOOD IN YOUR MICROWAVE
- CLEANING AND CARE
- CLEANING THE EXHAUST FILTERS
- SURFACE LIGHT REPLACEMENT
- CHARCOAL FILTER REPLACEMENT
- OVEN LIGHT REPLACEMENT
- NOTE: DO NOT USE BULB LARGER THAN 30 WATTS
- CLEANING SUGGESTIONS
- FOLLOW THESE INSTRUCTIONS TO CLEAN AND CARE FOR YOUR MICROWAVE OVEN
- GUARANTEE/CUSTOMER SERVICE CENTRES PORTER&CHARLES
- INFORMATION SUR LA GARANTIE PORTER&CHARLES
Brand : Porter & Charles
Model : EM044K10
Category : Microwave