
FMXGN4200021 - Generator STANLEY - Free user manual and instructions
Find the device manual for free FMXGN4200021 STANLEY in PDF.


| Product Type | Inverter Generator |
| Model | FMXGN4200021 |
| Brand | Stanley |
| Engine Type | Single cylinder, 4-stroke 79.8cc |
| Rated Engine Speed | 4800 r/min |
| Rated Output | 1800W |
| Maximum Output | 2000W |
| Rated Voltage | 240V AC, 50Hz |
| Rated Current | 7.5A |
| Power Factor | 1.0 |
| DC Output | 12V, 8.3A |
| USB Output | 5V, Max 2.1A |
| Fuel Type | Unleaded 91 petrol (no ethanol) |
| Fuel Tank Capacity | 4 L |
| Oil Type | 4-stroke fully synthetic SAE 15W-40 (API SN) |
| Oil Capacity | 400 ml |
| Running Time at Rated Output | 3.5 hours |
| Net Weight (without fuel) | 18 kg |
| Noise Level at 7m | 58-68 dB(A) depending on load |
| Spark Plug | E5RTC (gap 0.70-0.80mm) |
| Waveform | Pure sine wave (inverter) |
| Safety Features | Low oil shutoff, overload protection, earth stake included |
| Warranty | 1 year (extendable to 3 years with online registration) |
Frequently Asked Questions - FMXGN4200021 STANLEY
User questions about FMXGN4200021 STANLEY
0 question about this device. Answer the ones you know or ask your own.
Ask a new question about this device
Download the instructions for your Generator in PDF format for free! Find your manual FMXGN4200021 - STANLEY and take your electronic device back in hand. On this page are published all the documents necessary for the use of your device. FMXGN4200021 by STANLEY.
USER MANUAL FMXGN4200021 STANLEY
For service, spare parts or product information, please contact Smart Marketing Group Pty. Ltd.

AUST. 1300 660 457 N.Z. 0800 474 876
www.stanleyproducts.com.au
CONTENTS
Section Page
| Specification 2 | |
| Suggested Applications 2 | |
| Introduction 3 | |
| Warranty Statement 4 | |
| General Safety Instructions 5 - 6 | |
| Specific Safety Instructions 7 | |
| Electrical Information 8 | |
| Fuel and Oil Information 8 | |
| Components and Controls 9 | |
| Operating Instructions 10-15 | |
| Maintenance Chart 17 | |
| Maintenance 18-19 | |
| Fault Chart 20-21 | |
| Service Log | 22 |
SUGGESTED APPLICATIONS
These are some suggestions of appliances which could be powered by this generator. These suggestions cannot all be run at the same time, please read page 14 for full details:
• Televisions up to 150W
• AC/DC Camping fridges up to 150W
• DVD/Video players up to 400W
• Laptop computers up to 700W
• TV and DVD/Video player combination up to 800W
• Mobile phone/hand held games charging up to 900W
• Power tools up to 1300W
• Lighting up to 1650W
Never exceed 1650W in total when using multiple appliances.
TECHNICAL INFORMATION
| Specifications | |
| Inverter Generator | FMXGN4200021 |
| Engine type | Single cylinder, 4 stroke 79.8cc |
| Rated engine speed | 4800r/min |
| Oil tank capacity | 400ml |
| Oil type | 4 Stroke fully synthetic motor oil, SAE 15W-40 (API SN Category) |
| Fuel tank capacity | 4L |
| Fuel type | Unleaded 91 Petrol - no ethanol |
| Spark plug | E5RTC |
| Rated voltage | 240V AC-50Hz |
| Rated output | 1800W |
| Maximum output | 2000W |
| Rated current | 7.5A |
| Power factor | 1.0 |
| 12V DC output | 8.3A |
| USB output | 5V, Max. 2.1A |
| Running Time | 3.5hrs at rated output |
| Inverter | Yes - Pure sine wave |
| Spark arrestor | Yes |
| Noise | 0W Load - 58db(A) @ 7m900W Load - 64db(A) @ 7m1350W Load - 67db(A) @ 7m1800W Load - 68db(A) @ 7m |
| Net weight | 18kg, not including fuel |

ALTERNATE POWER SOURCE

ASPHYXIATION
HAZARD
USE OUTDOORS
Thank you for purchasing this generator which has passed through our extensive quality assurance processes. Every care has been taken to ensure that it reaches you in perfect condition. However, in the unlikely event that you should experience a problem, or if you require any assistance please do not hesitate to contact us;

If you have a problem, call customer service do not return this generator to the place of purchase.
Note: For convenience we suggest taking a photocopy of your purchase receipt as the original may fade.
Due to continual product development, the actual product may differ slightly from the product pictured.
CUSTOMER SERVICE
Australia: 1300 660 457
New Zealand: 0800 474 876
Operating times: Monday – Friday
8.00am - 5.00 pm
Australian Eastern Standard Time (AEST)
EXPRESS WARRANTY STATEMENT GENERATORS
You are not required to do anything to register your generator purchase. Please attach the purchase receipt to this manual and ensure both are kept safe. We hope you enjoy your new generator, and if you have any problems call customer service on the above phone numbers. Do not return to place of purchase.
Smart Marketing Group Pty Ltd (SMG) warrants that this generator will be free from manufacturing faults or defects for 12 months from the date of purchase, providing original purchase receipt is kept and shown when needed and is subject to the terms and conditions below.
If a warranty fault appears within the warranty period, SMG reserves the right to replace or repair the product. In the event that SMG chooses to replace the product, this original warranty will expire at the original date. If the product includes various accessories or components, only the defective accessory or component will be replaced or repaired.
SMG reserves the right to replace defective parts of the product with parts and components of similar quality, grade and composition where an identical part or component is not available.
Products presented for repair may be replaced by refurbished products of the same type rather than being repaired. Refurbished parts may be used to repair the products.
WHAT IS COVERED
• Manufacturing fault or defect.
HOW TO CLAIM UNDER THIS WARRANTY
- Call customer service, phone number to the left.
- Ensure you have the following: Original purchase receipt, Model of generator, Serial number of generator.
- Discuss the issue.
- Customer service will advise which authorised service agent to take the generator to provide the issue is a warranty one.
• Take generator to authorised service agent for repair.
WHAT IS NOT COVERED
• Commercial use of generator.
• Use of Generator for hire.
- Use of generator in a commercial premises.
• Damage caused by incorrect oil.
- Damage caused by incorrect fuel or use of E10 ethanol fuel.
• Damage or deterioration due to transport.
- Damage caused by negligence, misuse, abuse or accident or incorrect voltage and wattage.
• Any corrosion or rusting.
- Damage caused by incorrect set up and start up.
- Replacement parts due to general wear and tear.
- Generators with serial number defacement, modification or removal.
- Generators which have been serviced by anyone other than an authorised SMG service agent.
- Generators with no original purchase receipt.
- Generators which have been on sold, not original purchaser.
- Damage due non-servicing of generator as is required by this manual.
- Blockages / damage caused by dust, dirt, spiders webs or insects.
- Damage caused by the incorrect fitting of accessories.
- Damage caused by overloading, overworking the generator.
- Damage to attached equipment or third party accessories.
- Damage caused by attached equipment or third party accessories.
CONTACT DETAILS
Smart Marketing Group Pty Ltd
33-35 Lionel Road, Mt. Waverley
Victoria 3149, Australia.
Tel (+613) 9543 7266
Fax (+613) 9543 9839
service.group@smga.com.au
COMPLETE WARRANTY STATEMENT – GENERATORS
As soon as you have purchased the generator, we recommend that you check to make sure it is intact and that you read the operating instructions carefully before using it. The purchase receipt for this product is to be retained and must be presented if making a claim under the terms of the Smart Marketing Group (SMG) warranty. Bank account statements are not acceptable for proof of purchase.
This warranty does not cover generators intended for hire or use in commercial applications or in commercial premises. The warranty will under no circumstances extend to reimbursement or payment of damages, whether direct, indirect or consequential. The warranty is void if there is evidence the generators has been modified or tampered with in any way or used with unauthorised accessories without our consent.
SMG declines any responsibility or liability whatsoever arising from misuse or abuse, negligent handling of the generators or if the product has not been installed or failure to comply with the relevant safety, operating, setting and maintenance instructions (see further in this manual).
The warranty does not extend to installation or disconnection costs.
Any item sent freight forward/collect for repair will be refused. Warranty repairs are free of charge, provided the appliance is delivered to our service department or authorised service agent. The generator will need to be returned, adequately protected in a box. SMG will not be responsible for any in-transit loss or damage. Assistance under the warranty will only be made available if the request is made to our customer service team on the contact numbers listed below and proof of purchase is provided.
This is a repair only warranty you will need to take the generator to the authorised service agent after contacting our customer service centre.
If the product includes various accessories or components, only the defective accessory or component will be replaced or repaired.
SMG reserves the right to replace defective parts of the product with parts and components of similar quality, grade and composition where an identical part or component is not available.
Products presented for repair may be replaced by refurbished products of the same type rather than being repaired. Refurbished parts may be used to repair the products.
Damage caused by third party accessories is not covered under this warranty. Damage caused to attached equipment or third party accessories will not be covered under this warranty.
Rust and corrosion are not covered under this warranty.
If a warranty fault is found the freight cost will be credited to the
owner. If no fault is found the product will be returned and any costs associated with the service will be charged to the owner.
Blockages caused by spider webs, insects, dirt, or accumulated dust and incorrect oil are not covered by warranty. SMG reserves the right to replace or repair the appliance within the warranty period. Parts found to be defective due to a manufacturing fault will be replaced free of charge.
In the event of SMG choosing to replace the appliance, the warranty will expire at the original date of purchase. If no warranty fault is found the owner will be advised and the product will be returned and any costs associated with the service will be charged to the owner.
Our goods come with guarantees that cannot be excluded under the Australian Consumer Law. You are entitled to a replacement or refund for a major failure and for compensation for any other reasonably foreseeable loss or damage. You are also entitled to have the goods repaired or replaced if the goods fail to be of acceptable quality and the failure does not amount to a major failure. The benefits of this warranty are in addition to any rights and remedies imposed by Australian State and Federal legislation that cannot be excluded.
In New Zealand, this SMG warranty is in addition to the conditions and guarantees which are mandatory as implied by the New Zealand Consumer Guarantee Act 1993. For service, spare parts or product information please contact customer service:
Australia: 1300 660 457
New Zealand: 0800 474 876
CONTACT DETAILS
Smart Marketing Group Pty Ltd
33-35 Lionel Road, Mt. Waverley
Victoria 3149, Australia.
Tel (+613) 9543 7266
Fax (+613) 9543 9839
service.group@smga.com.au
This STANLEY Fatmax product is eligible for a 3 Year Limited Trade Warranty*
*Register online for your extended warranty (terms and conditions apply see online for details) at www.stanleyproducts.com.au/warranty-registration
LUBRICATION OF ENGINE
Your engine comes with NO oil in the sump. You will need to add engine oil, refer to pages 8 and 10 for complete details and images. Failure to do this may result in damage to the engine, generator and/or injury to the user.
GENERAL SAFETY INSTRUCTIONS
Before attempting to operate this generator the following basic safety precautions should be taken to reduce the risk of fire, electric shock and personal injury. It is important to read the instruction manual and to understand applications, limitations and potential hazards associated with this generator. It is important that you read, understand and follow these instructions very carefully. They are designed for the safety of yourself and others ensuring a long and trouble free service life from your generator. This generator is not intended for use by persons (including children) with reduced physical, sensory or mental capabilities, or lack of experience and knowledge, unless they have been given supervision or instruction concerning the use of the appliance by a person responsible for their safety.
OPERATING ENVIRONMENT
NEVER use your generator indoors. Your generator produces deadly carbon monoxide and this is harmful and can cause death. Only use your generator in well ventilated areas like the outdoors. Do not expose your generator to rain or use in damp or wet locations. Do not expose your generator to direct sunlight. Keep the work area well lit. Do not use your generator in areas where there is a risk of explosion or fire from combustible materials, flammable liquids, paint, varnish, petrol, etc flammable gases and dust of an explosive nature. As a precaution it is recommended that you consult an expert on selecting and using a suitable fire extinguisher and have it available for use in an emergency when operating the generator.
Never touch the generator with wet or damp hands as electric shock may occur. Always ensure your generator is connected to ground, i.e. Earthed with the supplied earth stake, see page 11.
BEWARE OF CHILDREN & PETS
Children and pets should be kept out of the operating area. Children should not be allowed to touch or operate generators or touch extension cords. All generators should be kept out of reach of children. When NOT in use keep the generator preferably stored or locked in a secure well ventilated cabinet or room with the fuel tank empty.
SELECT A GENERATOR WITH A SUFFICIENT RATING
Select the right generator for the job. Do not use a generator to do a job for which it was not designed. Do not force a small generator to do the job of a heavy duty generator. Any damage caused by overloading will void the warranty. Do not use generators for purposes not intended.
PROTECT POWER LEADS FROM DAMAGE
Always disconnect power cords from a power supply socket by pulling the plug. Never pull on the cord. Keep the power lead away from heat, oil, solvents and sharp edges. If a power lead becomes damaged have it replaced by an authorised service facility.
FUEL - UNLEADED 91 PETROL - NO ETHANOL
Fuel used in this generator is poisonous. Always wear approved breathing protection when decanting fuel. If you get any fuel on your skin or clothes wash the affected area immediately with soap and water and change your clothes. If you get fuel in your eyes wash immediately with clean water and seek medical attention. If any fuel is swallowed DO NOT induce vomiting, seek immediate medical attention.
HOT COMPONENTS
Beware many of the components will get hot during use. Never touch any of the metal pipes, pump or motor as these may burn.
MAINTAIN YOUR GENERATOR WITH CARE
When not using your generator ensure the fuel cock is 'OFF'. Never leave the fuel cock 'ON' as this can damage the carburettor. Follow the instructions for lubricating and changing accessories. Keep handles clean, dry and free from oil and grease. Ensure that ventilation slots are kept clean and free from dust at all times. Blocked ventilation slots can cause overheating and damage to the motor. Ensure that the air and fuel filters are kept clean at all times.
REMOVE ADJUSTING KEYS AND WRENCHES
Form the habit of always checking to see that any adjusting keys or wrenches have been removed from the generator before operating.
FIRE PRECAUTIONS
Always contact your fire authority before using the generator on fire restricted days. It is not recommended to use your generator when a total fire ban is in force. Never refuel your generator while it is still running. Never connect your generator to a commercial or domestic power outlet. As a precaution it is recommended that an expert is consulted on obtaining and using a suitable fire extinguisher.
CLEANING YOUR GENERATOR
Always stop your generator before you commence cleaning. Always ensure that your generator has cooled, about one (1) hour, before cleaning and storing. When cleaning your generator use only a damp soft cloth. NEVER use liquid or solvents of any type. All areas can be wiped down.
EXTENSION CORDS & REELS
Inspect extension cords periodically and replace if damaged. Never use damaged extension cord as these may cause injury. Always unwind any extension cords fully before plugging into mains power supply. Protect your extension cord or reel from sharp objects, excessive heat, damp conditions or wet locations. Always use a '3' core extension cord or reel with this generator. Only heavy duty extension cords intended for and marked 'outdoor' use, which are no longer than 20m.
GENERATOR 'EARTHING'
Always ensure that this generator is "Earthed" correctly before using. "Earthing" stake and wire has been supplied with this generator ensure it is used to ensure your safety, see page 11.
CHECK DAMAGED PARTS
Before using the generator it should be carefully checked to determine that it will operate properly and perform its intended function.
Check for broken or missing parts and have them replaced or repaired at an authorised service facility. Check any other condition that may affect the operation of the generator. A guard or any other part of the generator that is damaged should be properly repaired or replaced by an authorised service facility unless otherwise indicated in this instruction manual.
Any switch that does not operate correctly must be replaced by an authorised service facility.
DO NOT use the generator if the 'ON / OFF' motor switch does not turn the generator 'ON' and 'OFF'.
PERSONAL SAFETY
CLOTHING
DO NOT wear loose clothing, jewellery or anything that could get caught in moving machinery. Gloves may be worn when filling generator with fuel.
HAIR
Long hair should be tied back or contained in a protective covering.
EYE PROTECTION
The use of safety goggles is highly recommended (normal glasses are not sufficient for eye protection) when using or refuelling generators. Prescription glasses do not have safety lenses.
FOOTWEAR
Where there is the risk of heavy objects or if there is a risk of slipping on wet or slippery floors, suitable non-slip, covered, safety footwear should be worn. Protect your feet from dropping accidents.
EAR PROTECTION
The use of ear protection is highly recommended when using generators. The continual noise may damage your ears.
RESPIRATORY PROTECTION
Always wear approved breathing protection when decanting fuel. ALWAYS use this generator in well ventilated area. Never use indoors.

WARNING! Do not breathe in exhaust fumes. Exhaust fumes are poisonous and may cause drowsiness, unconsciousness and even death.
DO NOT OVER REACH
DO NOT over reach. Keep a proper footing and maintain your balance at all times. Avoid using abnormal stances and awkward body positions.
STAY ALERT
Watch what you are doing, use common sense, and never operate a generator when you are tired, drinking alcohol, taking drugs or if taking medication that causes drowsiness.

WARNING
Do not attempt to modify the generator in any way; this will VOID your warranty.
The use of any attachment or accessory other than those recommended in this instruction manual could result in damage to the generator and could cause injuries to the operator.
This petrol generator complies with Australian / New Zealand and International standards and safety requirements. Repairs should only be carried out by qualified persons using original spare parts. Failure to do so may result in considerable danger to the operator.
SPECIFIC SAFETY INSTRUCTIONS

WARNING! Do not use the generator in areas where there is a risk of explosion or fire from combustible materials. The sparks possibly caused when using this generator may ignite combustible materials as well as flammable liquids, paint, varnish, petrol, flammable gases and dust of an explosive nature. As a precaution it is recommended that you consult an expert on a suitable fire extinguisher and its use. Ensure that the work area is kept clear of combustible materials.

WARNING! Do not use the generator indoors or in confined spaces where exhaust gases, smoke or fumes could reach dangerous concentrations.
- Never connect this generator to a second generator.
- Never connect this generator to Commercial or Domestic power supply.
• Always use the generator in an open well ventilated area. - Unit will become hot during use. Please keep generator at least one metre (1m) away from buildings, other equipment, pedestrian areas or flammable materials.
- Never pull the re-coil starter once the generator engine has started. Any damage caused will not be covered by warranty.
- Never start or stop the generator with any appliances attached.
- Ensure the generator has stopped before servicing, or lubricating etc.
- Do not attempt to modify the generator, guards or the supplied accessories in any way.
- Do not touch the exhaust. This can become very hot during operation and can cause serious burns.
• Always check the generator for damaged parts or fuel leaks, ensure these are fixed before using it. - Never refuel while smoking or in the vicinity of an open flame.
• Always wear safety eye wear, ear and breathing protection when operating or refuelling the generator. - To avoid a fire if you spill fuel while refuelling, clean up before starting the generator.
-
Never operate or store the generator on its side, ALWAYS operate or store in an upright manner on firm, solid ground.
-
Your generator is factory set, NEVER attempt to speed it up as this could endanger the user and damage the generator and/or attached appliances.
- Never operate the generator in damp, wet or flooded conditions.
- Before plugging appliances into the generator allow it to run up to full speed.
- If the generator makes an unfamiliar sound or vibrates excessively, switch the generator 'OFF' immediately. Investigate the possible cause or consult your authorised service agent.
- Do not use ANY type of coolant on the generator as a fatal electric shock could occur.
- Never use coolant in the generator as damage may occur.
- Do not touch the generator with wet hands as this may cause electrocution.
- Never use your generator on highly conductive surfaces. e.g. Steel walk ways, metal roof or metal bench, as this could cause an electric shock.
• Always operate your generator at least two (2) metres away from conductive surfaces. - Locate this generator in a convenient place, avoid using long extension leads.
- If an extension lead is used, avoid leaving it where it may be damaged by pedestrian or vehicular traffic or cause a trip and fall hazard.
• Always observe normal safety precautions with ALL appliances used with this generator. - Never transport the generator with fuel in the tank. ALWAYS empty the fuel tank.
- All loads must be kept within the ratings stated on the name plate. Overloading the generator will damage the unit or shorten its life. This will not be covered under warranty.
- Do not tamper or alter any parts as this may cause personal injury or damage the generator.
• Always disconnect any loads before starting or stopping the generator. - When storing the generator always store in a secure well ventilated area.
• Always store in an upright position. NEVER store or lay this generator on its side.

IMPORTANT ELECTRICAL DATA
This generator is fitted with a sealed electrical connection socket that is compatible with the generator. If the electrical connection socket becomes damaged it must be replaced with a complete assembly that is identical to the original, and this must be replaced by an authorised service agent. Never connect to an external power supply. If in doubt always consult a qualified electrician.

FUEL ONLY USE UNLEADED 91 PETROL (ULP-91RON) - NO ETHANOL
Fuel tank capacity - 4 litres (4 L)
Use of incorrect fuel and/or oil may damage the generator and will not be covered under warranty.
Do not use E10 or any type of ethanol fuel as this will damage the generator and will not be covered under warranty.
Do not use high octane fuels (greater than 91%) as this will damage the generator and will not be covered under warranty.
- Ensure you use clean fresh unleaded 91 petrol (ULP) - no ethanol
- Use a clean approved container to store your unleaded petrol (ULP) in before decanting into the fuel tank.
- If contaminated (dirty) or old (stale) fuel is used any damage caused will not be covered under warranty.

OIL CHECK DAILY - ONLY USE 4 STROKE FULLY SYNTHETIC MOTOR OIL
To operate, this generator requires oil in the sump, not supplied. If the generator does not have the correct level of oil in the sump, it will not run, see note below.
Oil capacity – approximately four hundred millilitres (0.4 L or 400 ml)
Oil type – 4 stroke fully synthetic motor oil, SAE 15W-40 (API SN Category). Non-detergent or 2-stroke engine oils will damage the engine and should not be used.
• Always check oil level before using.
• Always use fresh clean oil.
- Change oil every 12 hours or every 3 months.
- If contaminated (dirty) or old (stale) oil is used any damage caused will not be covered under warranty.
NOTE: This generator is fitted with an oil cut out switch and red warning light. If the oil level is empty or low then the generator WILL NOT start or run and the low oil light will glow when the recoil is pulled.
Always check the oil level before starting the generator.
Never check or add oil while the generator is running.

COMPONENTS & CONTROLS (PIC.1)
- Low oil level indicator (yellow): this light is off when the engine is off or when in normal operation with adequate oil.
A. If the engine is low on oil when you shut it down, the engine will fail to start up. The yellow light will turn on when you attempt to pull-start the engine (usually visible at the moment of start up).
B. If the engine runs low on oil during operation, the engine will automatically stop running.
- Output indicator (green): This light is on when power supply is normal.
In any situation, when the red light turns on the power supply will be disconnected automatically. To restore power, turn the appliance off and disconnect from the generator. Press the AC Reset button to restore power supply.
-
Overload indicator (red): This indicator light is on when the generator is overloaded, check attached products power, refer to page 14.
-
Earth bolt point for earth lead
- Single 5V DC USB socket
- Single 240V AC socket
- Air filter and oil sump access panel (Opposite Side)
- Recoil starter grip
- 12V DC cigarette lighter socket
- Fuel cap and vent lever
- Start switch (Fuel tap valve, engine on /off and choke combination)
- AC reset button
- DC circuit breaker
- Economy switch
- Digital display (Voltage/Frequency/Time)
- Fuel gauge
OPERATING INSTRUCTIONS
UNPACKING
Carefully unpack your generator. This generator is heavy (21kg) and may require two (2) people to lift. Dispose of all packing material in an environmentally responsible manner.
Open carton, gently lift the generator clear of the carton and packaging, this may require 2 people. Remove from plastic bag.
NOTE: Plastic bags can be a danger to young children, dispose of immediately. Always dispose of packaging in a responsible manner.
ASSEMBLY
This generator requires no assembly, however the motor requires oil, 4 stroke fully synthetic motor oil, SAE 15W-40 (API SN Category), to be added to the sump before you can use, refer to page 8 for specific details.
ACCESS PANEL
This access panel (side) needs to be removed in order to add/change oil as well as clean/replace air filter.
To Remove
- Loosen and remove the 2 screws top and bottom
- Hold generator and gently pull side away from the back using the tab, Pic. 2.
- Un-clip at the front
To Fit
- Clip in at the front
- Close panel
- Secure with the 2 screws top and bottom
ADDING LUBRICATING OIL
Always use clean fresh oil as specified on page 8. Incorrect or old oil can cause the generator to run rough and damage the motor; this will not be covered by warranty.
- Ensure that engine is OFF when filling oil.
- Remove access panel as per above.
- Use oil as detailed on page 8, 4 stroke fully synthetic motor oil, SAE 15W-40 (API SN Category).
- Ensure generator is level when filling with oil. DO NOT TIP - USE A FUNNEL (NOT SUPPLIED)
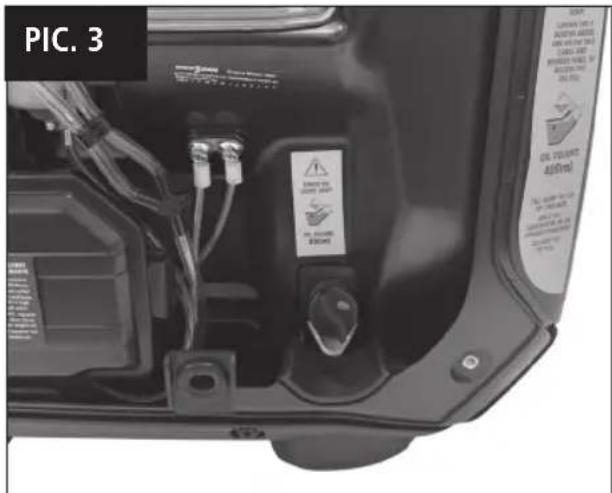
- Remove oil filler cap, Pic. 3.
- Only fill oil to the top of the thread, Pic. 4.
- Ensure that the oil filler cap is screwed on tightly.
- Fit access panel as per above, before attempting to start generator.

WARNING! Over filling the oil can damage the generator, this damage will not be covered under warranty.
NOTE: Check oil daily and especially before use.


FILLING THE FUEL TANK UNLEADED 91 PETROL - NO ETHANOL
Always use clean fresh fuel as specified on page 8. Stale fuel can cause the generator to run rough and damage the motor; this will not be covered by warranty.
- Ensure the engine is OFF.
- Ensure the start switch is OFF.
- Use fresh fuel as detailed on page 8, unleaded petrol.
- Do not fill fuel tank above the centre line of the fuel filter, Pic. 5.
- Ensure that the fuel tank cap is screwed on tightly.
GENERATOR 'EARTHING'
Always ensure that this generator is "Earthed" BEFORE starting and using.
- Ensure that engine is OFF when fitting the "Earth" stake and wire.
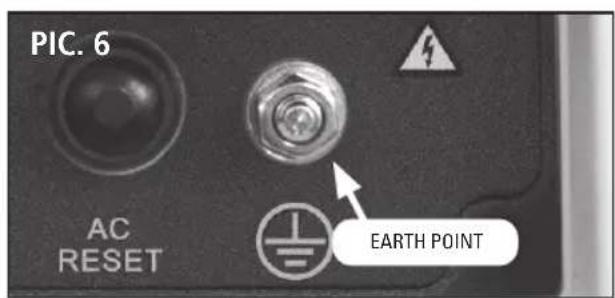
- Attach the wire to the "Earth" point on the generator, see Pic. 6.
- Push the attached stake into the ground. Ensure that this is not a trip hazard when near the generator.
- Ensure the generator is OFF and cool before removing the "Earth" stake and wire.
FUEL CAP BREATHER
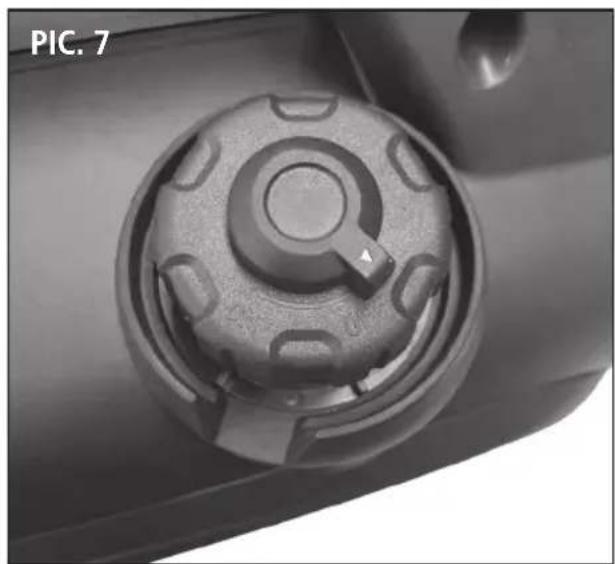
This generator is fitted with a sealing fuel cap, Pic. 7.
Seal the fuel cap for storage or transport - rotate the lever anti-clockwise to OFF.
When using the generator the fuel cap needs to breathe -rotate the lever clockwise to ON.
ECONOMY SWITCH (PIC. 8)
When this switch is turned on your generator will use less fuel, however only switch on when load of less than 900W are attached. If a load is higher than 900W switch to OFF.

natural_image
Close-up of a mechanical component with a circular knob and central knob, labeled 'PIC. 7' in the top-left corner (no other text or symbols visible)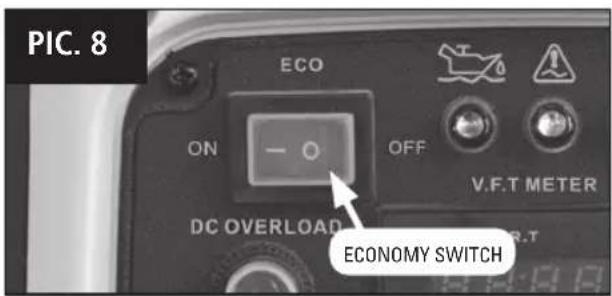
STARTING YOUR GENERATOR

WARNING! Never start your generator without "earth" stake attached or with electrical appliances or power leads attached.
- Ensure the "Earth" stake and wire are attached, Pic. 6.
- Turn the fuel cap breather lever clockwise to ON. NOTE: If fuel cap breather is not on generator will not operate correctly.
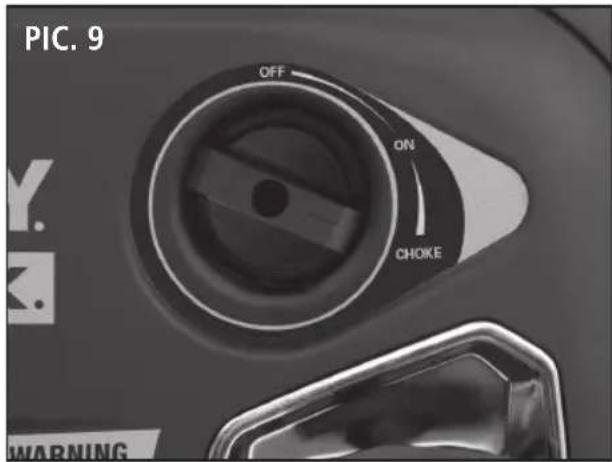
- Turn the START switch clockwise to CHOKE, Pic. 9.
- Hold down the generator firmly with one hand on the frame, then pull the recoil starter slowly until engaged, then pull briskly, Pic. 10. This step may need to be repeated until generator engine starts, this can take up to about 12 pulls.

WARNING! Never pull the recoil once the engine has started. Any damage caused will not be covered under warranty.
- Allow engine to run up to speed, this usually takes up to about 5-10 seconds.
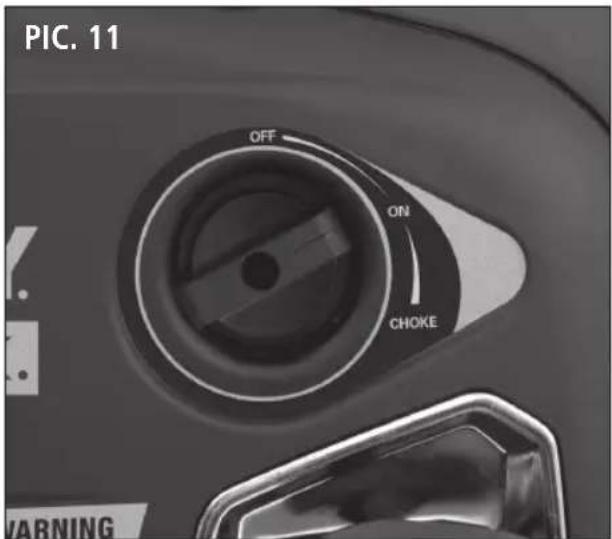
- Rotate START switch anti-clockwise to ON, Pic. 11.
- Check that the only illuminated light is the green output power light. The generator will be running and ready for use.

WARNING! Before connecting any electrical load to the generator ensure that the load does not exceed the maximum load as stated on the rating plate and also check page 14 for extra details.
Ensure that the mains supply lead is long enough to reach the generator without any strain.

STOPPING YOUR GENERATOR

WARNING! Never stop your generator with electrical appliances or power leads attached. Always remove power leads and appliances before stopping your generator.

WARNING! In case of emergency, the easiest way to stop the generator is to directly rotate START switch to OFF position.
Avoid doing so in non-emergency circumstances as it carries the risk of damaging the generator.
- Ensure all power leads and appliances have been switched off and disconnected from the generator power socket.
- Allow generator to run for 1-2 minutes, this allows the generator to cool down.
- Push economy switch to OFF, Pic. 8.
- Rotate START switch anti-clockwise to OFF, Pic. 12.
DIGITAL DISPLAY
This generator is fitted with a digital display, Pic, 13. When the generator is running it will continuously rotate through the following;
• Voltage
- Frequency
• Time
OUTPUT INDICATOR LIGHT
Output indicator light (Green - RUN), Pic. 13, will remain ON during operation. However if it goes out and the red light comes then you have overloaded the generator, see page 14.
LOW OIL LIGHT
If while the generator operating, the oil level in the motor sump drops to a dangerously low level then the yellow oil light, Pic. 13, will flicker and the generator will automatically stop.
If the oil level in the motor sump is dangerously low, then the generator will not start or be able to re-start, however the yellow low oil light will flicker only when the recoil starter is pulled.
If your generator will not start always check the oil level first.
To add oil or check the oil level, refer page 10.


USING YOUR GENERATOR
AC OUTLET
Your generator is equipped with a 240V AC power socket. This will run a range of devices providing they are within the limits of the generators output.
NOTE: The peak (surge) power requirements of some devices e.g. Fridges, Televisions, etc; can be up to seven (7) times greater than their rated (continuous) power. Do not over load your generator. The devices wattage can be found on the data label. See Pic.14. A basic guide is listed below for some common products.
You can use any combination of appliances provided that you do not exceed the limits of your generator. For this generator never exceed 1650W in total when combining multiple different appliances.
NOTE: When using multiple devices only start one device at a time.
YOUR GENERATOR AC LIMITS
Rated (continuous) power - 1800W Peak (surge) power - 2000W
Note: Long extension leads may reduce the effectiveness of your generators supply power.
TO USE THE 240V AC OUTLET
- Check that the only illuminated light is the green output power. If not turn to page 15, 20 or 21 and fix the problem before using the generator.
- Lift the flap and plug your appliance into the outlet socket on the face plate.
- Turn the appliance on and use as per the manufacturers manual.
- When finished turn your appliance off.
- Disconnect appliance from the generator and the flap should close automatically.
NEVER leave any appliances plugged into your generator, always disconnect when appliance is not in use.
Suggested Device Maximum Wattage Suggested Wattage
| Bayonet/Screw in globes (home use) Up to 1750W Maximum of 35 x 50W globes | |
| Florescent tubes Up to 1200W Maximum of 60 x 20W globes | |
| Halogen lights Up to 1300W | |
| Power tools Up to 1300W | |
| Laptop computer Up to 700W | |
| DVD/Video players Up to 450W | |
| Portable television Up to 150W | |
| Portable television & DVD/Video player combination Up to 800W | |
| AC/DC Camping fridge Up to 150W | |
| Cooling fans | Up to 500W |
| Heating | Up to 1000W |
| Radio/CD player | Up to 1200W |
| ipod/MP3 player | Up to 1400W |
| Mobile phone charging | Up to 900W |
| Hand held games charging | Up to 900W |
You can use any combination of appliances provided that you do not exceed the limits of your generator. For this generator never exceed 1650W in total when combining multiple different appliances.
PIC. 14

natural_image
Front view of a computer tower rack with ventilation grilles and ventilation ducts (no visible text or labels)Data Label
natural_image
Close-up of a black-framed floor fan with visible blades and mounting base (no text or symbols)Data Label
SAFETY DEVICES
AC OUTLET
Your generator is equipped with a green output indicator (RUN) light, Pic. 15. When this light goes out and the red light glows, then the generator will produce NO POWER.
To restart the power supply;
- Remove the appliance. Check wattage, page 14.
- Press the AC Reset button, Pic. 16, the red light should go out and the green light should be illuminated.
-
Re - attach the appliance.
-
If the green output indicator light goes out and the red light glows again, then the attached appliance is either faulty or the appliances' required power is greater than the generators' rated output, check the appliance wattage requirements, refer page 14 or have the appliance check by a service technician.
12V DC and USB OUTLETS
Your generator is equipped with a DC output circuit breaker, which covers both the 12V DC socket and the USB twin sockets. This circuit breaker will "pop" out if the attached appliance is either faulty or the appliances' required power need is greater than the generators' DC power output.
To reset the circuit breaker and restart the power supply;
- Remove the appliance.
- Push the circuit breaker, Pic. 17, back in, it should stay in. If not the circuit breaker is still over heated, allow to cool down for another 2 minutes before trying again to push it in.
- Once it stays in, re - attach the appliance.
- If the circuit breaker "pop's" out again and the power stops then the attached appliance is either faulty or the appliances' required power is greater than the generators DC rated output, check the appliances power (Amperage) requirements, refer page 2 or have the appliance checked by a service technician.


STORAGE
If the generator is not to be used or is to be stored for more than one month the following storage procedure should be carried out. Drain all the fuel from the fuel tank (refer to page 19) and the carburettor (see below), ensure that all the fuel has been drained.
Remove the spark plug and pour approximately one tablespoon full of clean engine oil into the spark plug hole.
With the start turned OFF gently pull on the recoil starter cord several times. Re-fit the spark plug and gently pull the recoil starter cord until the piston is on the compression stroke (when resistance is felt) then stop pulling.
Store the generator in a dry well ventilated place under a cover to prevent any dust or debris from accumulating on the generator.
DRAINING THE CARBURETTOR
- Remove the access side panel.
- Place a fuel safe container under the fuel drain tube.
- Loosen the carburettor drain screw and allow fuel to drain out, Pic. 18.
- Once fuel has drained, secure screw.
- Discard the old fuel responsibly.
- Secure the access side panel.
When preparing the generator for storage, follow the guidelines below.

natural_image
Close-up of mechanical components with coiled wires and connectors (no visible text or symbols)Storage Time Prior to Storing
Less than 1 month No special preparation is required
1 to 2 months Drain fuel from carburettor
2 months to 1 year Empty fuel from fuel tank
Drain fuel from carburettor
1 year or more Empty fuel from fuel tank
Drain fuel from carburettor
Remove spark plug
Put a tablespoon of engine oil into the cylinder through the spark plug hole. Turn the engine slowly with the recoil to distribute the oil
Reinstall spark plug
Change engine oil
*Use unleaded fuel stabilisers formulated to extend storage life. For recommendations, contact your nearest authorised service centre.
MAINTENANCE CHART
| Item Remark P | Pre-operation | check (daily) | Initial 1 month or 6 hours | Every 3 month or 12 hours | Every 6 month or 24 hours | Every 12 month or 48 hours |
| Spark plug | Check conditionAdjust gap and cleanReplace if required | ● | ● | ● | ||
| Engine oil | Check oil level | ● | ||||
| Replace | ● | ● | ● | ● | ||
| Air filter | CleanReplace if required | ● | ● | ● | ||
| Fuel tank filter | Clean fuel tank filterReplace if required | ● | ● | |||
| Valve clearance(SERVICE CENTRE ONLY) | Check and adjust when engine is cold | ● | ||||
| Fuel line | Check fuel hose for cracks or damageReplace if required | ● | ||||
| Exhaust system | Check for leakageTighten or replace gasket if required | ● | ||||
| Check exhaust screenClean and replace if required | ● | |||||
| Carburettor Check choke operation | ● | |||||
| Fittings/ Fastenings | Check all fittings and fixtures and tighten if required | ● | ||||
SERVICE
Now that you have purchased your generator, should a need ever exist of repair or service, simply contact your nearest Authorised Service Centre or other qualified service organisation. Be sure to provide all pertinent facts when you call.
Smart Marketing Group for your closest centre
Aust. 1300 660 457 N.Z. 0800 474 876.
MAINTENANCE
CHECKING/CLEANING THE AIR FILTER
For proper performance and long life, keep air filters clean.
- Remove access panel, refer page 10.
- Un-clip the air filter cover, Pic. 19.
- Remove the foam air filter (Pic. 20).
- If the filter element is dirty, clean with warm, soapy water. Rinse and let dry.
- Apply a light coat of engine oil to the filter element, then squeeze it out.
- Replace the filter element into the air filter box.
- Replace air filter cover and ensure it is clipped firmly in place.
- Re-fit access panel, refer page 10.
NOTE: Do not run the generator without the air filter. Rapid engine wear will result.
SPARK PLUG MAINTENANCE
The spark plug must be properly gapped and free of deposits in order to ensure proper engine operation.
To check:
- Rotate the thumb screw anti-clockwise to ON, and lift cover off and let dangle from the fitted cord.
- Remove the spark plug cap (Pic. 21).
- Clean any dirt from around base of spark plug.
- Remove spark plug using socket provided.
- Inspect spark plug for damage, and clean with a wire brush before reinstalling. If insulator is cracked or chipped, spark plug should be replaced. Make sure electrode gap is 0.70mm-0.80mm.
NOTE: If replacing, use the following recommended spark plug: E5RTC.
- Screw spark plug back by hand, avoid damaging threads of the cylinder.
- Put the spark plug back in position and use the spark plug socket to tighten it. If spark plug is new, use 1/2 turn to compress washer appropriate amount. If reusing old spark plug, use 1/8 to 1/4 turn for proper washer compression.
- Replace spark plug cap.
- Re-fit the cover, rotate the thumb screw clockwise to OFF. The cover should be secure.


natural_image
Interior view of a car showing internal components and a plastic housing (no text or symbols visible)
CLEANING THE EXHAUST PORT & MUFFLER
Depending on the type of fuel used, the type and amount of oil used, and/or your operating conditions, the exhaust port and muffler may become blocked with carbon deposits. If you notice a power loss with your petrol-powered tool, you may need to remove these deposits to restore performance. We highly recommend that only qualified service technicians perform this service.
CLEANING THE FUEL TANK FILTER
- Remove fuel cap.
- Lift out the fuel tank filter.
- Clean the filter, replace if broken.
- Dry the filter.
- Place back into the fuel tank.
- Replace the fuel cap.
DRAINING FUEL TANK

WARNING! Generator is heavy and may require 2 people to lift.
- Remove fuel tank cap.
- Remove the fuel tank filter.
- Position a fuel safe container next to the generator.
- Lift and rotate the generator to drain the fuel tank.
- Once tank is empty place generator on its feet, wipe up any spills.
- Replace fuel tank cap.
- Dispose of fuel in an environmentally responsible manner, check your local council for disposal locations.
DRAINING ENGINE OIL

WARNING! Generator is heavy and may require 2 people to lift.
- Start generator.
- Run generator, without load for about 2-3 minutes.
- Stop generator and turn the fuel cap breather to off.
- Remove access panel, refer page 10.
- Remove oil filler cap.
- Position oil safe container next to the generator.
- Lift and tip generator to drain the oil out of the "oil fill".
- Once oil sump is empty place generator on its feet, wipe up any spills.
- Replace oil filler cap. If changing oil refer to page 10 for oil filling details.
- Dispose of oil in an environmentally responsible manner, check your local council for disposal locations.
Call Smart Marketing Group for your closest centre
Aust. 1300 660 457
N.Z. 0800 474 876.
FAULT CHART
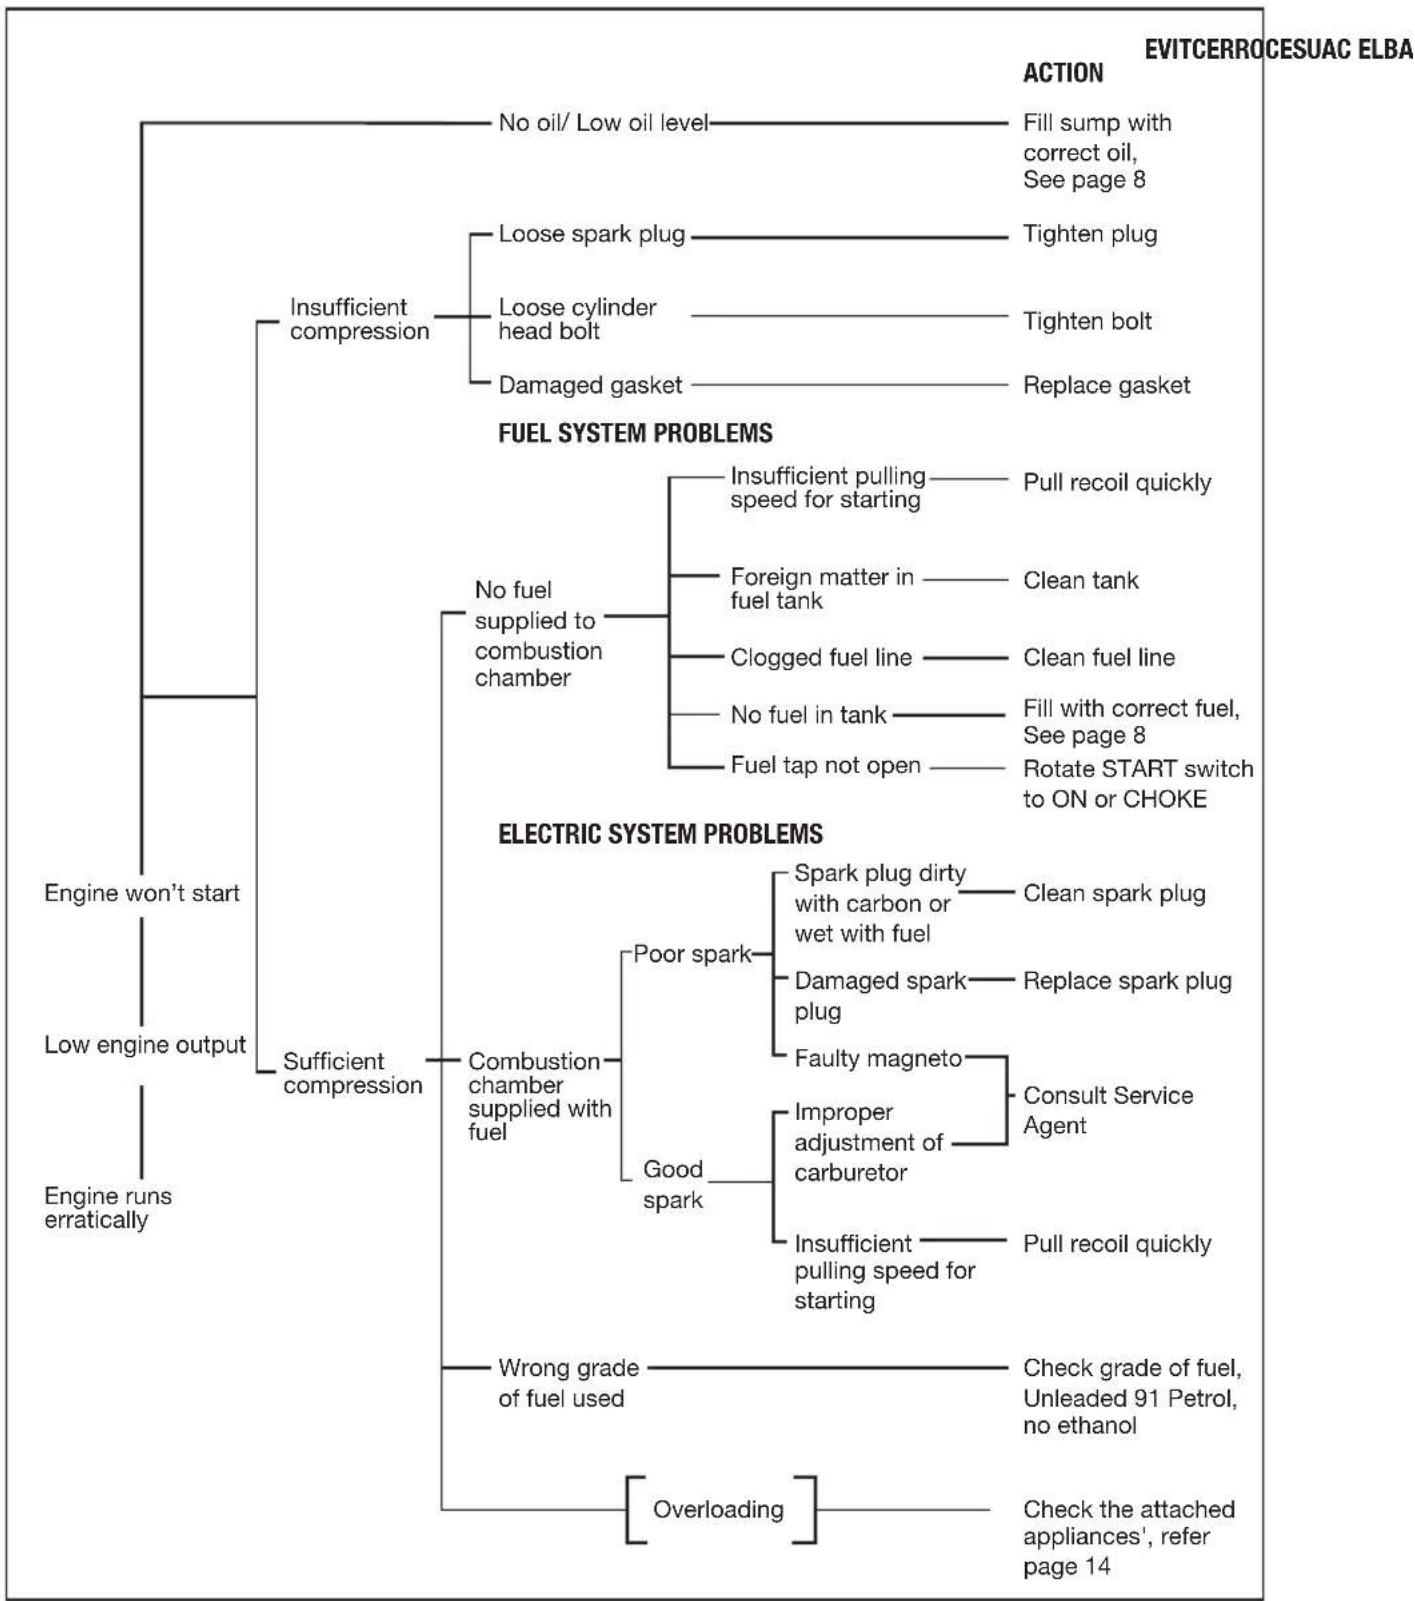
flowchart
graph TD
    A["Engine runs erratically"] --> B["Low engine output"]
    B --> C["Engine won't start"]
    B --> D["Sufficient compression"]
    D --> E["Insufficient compression"]
    D --> F["Combustion chamber supplied with fuel"]
    F --> G["Wrong grade of fuel used"]
    F --> H["Overloading"]

    I["No oil/ Low oil level"] --> J["Fill sump with correct oil, See page 8"]
    K["Loose spark plug"] --> L["Tighten plug"]
    M["Loose cylinder head bolt"] --> N["Tighten bolt"]
    O["Damaged gasket"] --> P["Replace gasket"]

    Q["No fuel supplied to combustion chamber"] --> R["Insufficient pulling speed for starting"]
    S["Fuel tap not open"] --> T["Pull recoil quickly"]
    U["Foreign matter in fuel tank"] --> V["Clean tank"]
    W["Clogged fuel line"] --> X["Clean fuel line"]
    Y["No fuel in tank"] --> Z["Fill with correct fuel, See page 8"]
    AA["Fuel tap not open"] --> AB["Rotate START switch to ON or CHoke"]

    AC["Good spark"] --> AD["Improper adjustment of carburetor"]
    AE["Faulty magneto"] --> AF["Consult Service Agent"]
    AG["Spark plug dirty with carbon or wet with fuel"] --> AH["Clean spark plug"]
    AI["Damaged spark plug"] --> AJ["Replace spark plug"]

    AK["Insufficient pulling speed for starting"] --> AL["Pull recoil quickly"]

    AM["Check grade of fuel, Unleaded 91 Petrol, no ethanol"] --> AN["Check the attached appliances', refer page 14"]
FAULT CHART CONTINUED
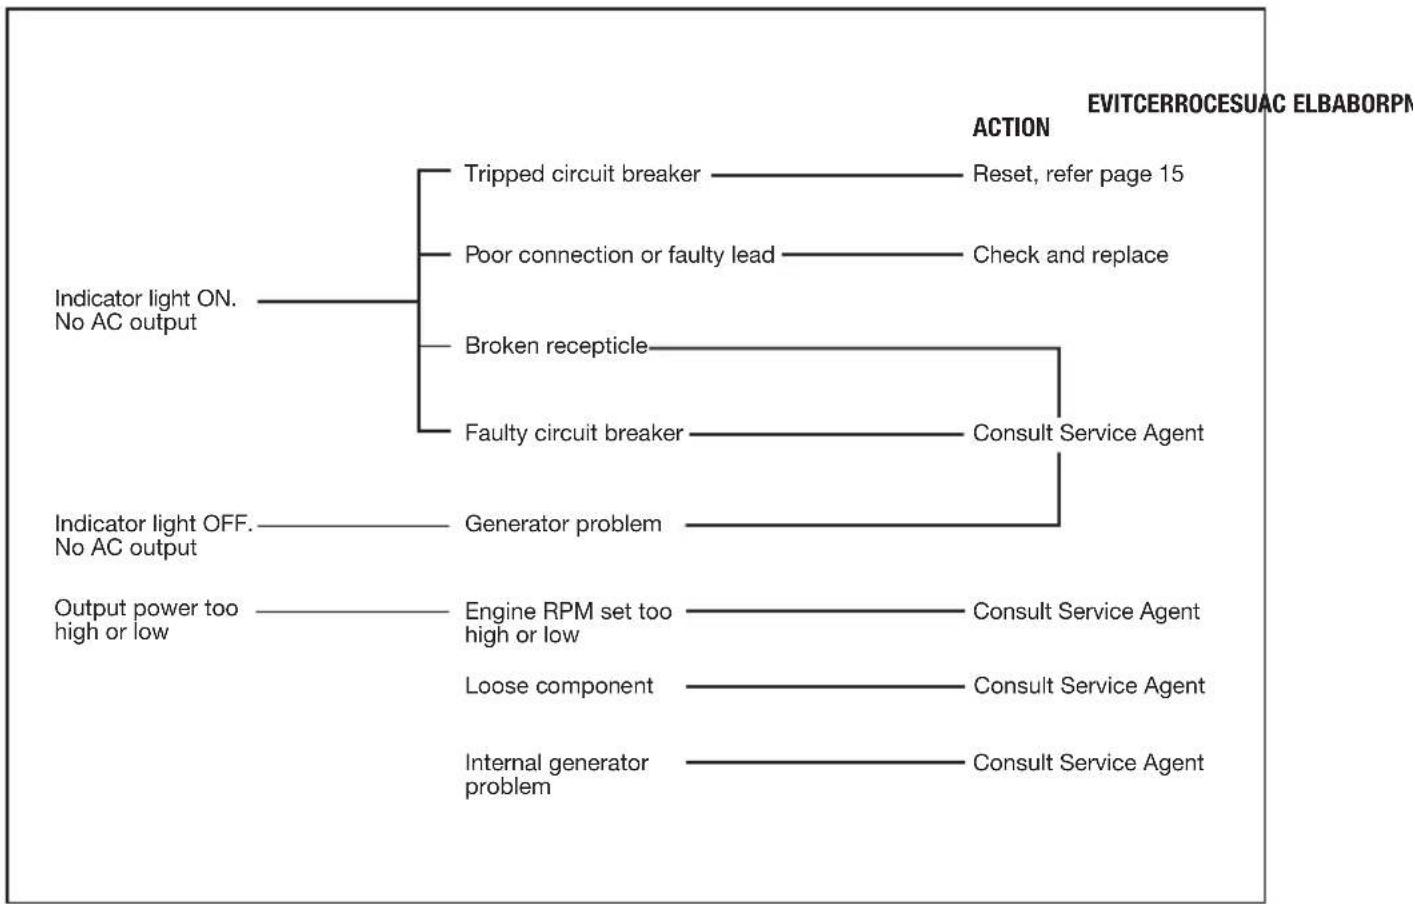
flowchart
graph TD
    A["Indicator light ON.<br>No AC output"] --> B["Tripped circuit breaker"]
    A --> C["Poor connection or faulty lead"]
    A --> D["Broken recepticle"]
    A --> E["Faulty circuit breaker"]
    A --> F["Generator problem"]
    G["Indicator light OFF.<br>No AC output"] --> H["Generator problem"]
    I["Output power too high or low"] --> J["Engine RPM set too high or low"]
    I --> K["Loose component"]
    I --> L["Internal generator problem"]
    M["Reset, refer page 15"] --> N["Response to EVITCERROCESUAC ELBABORPM"]
    O["Check and replace"] --> P["Response to EVITCERROCESUAC ELBABORPM"]
    Q["Consult Service Agent"] --> R["Response to EVITCERROCESUAC ELBABORPM"]
    S["Consult Service Agent"] --> T["Response to EVITCERROCESUAC ELBABORPM"]
REPAIRS
Repairs to your generator should only be carried out by an authorised service agent.
Call Smart Marketing Group for your closest centre
Aust. 1300 660 457 N.Z. 0800 474 876.
Please take note of serial number and write here for ease of reference:
Serial Number:
Date of Purchase:
Place of Purchase:
Receipt Number:
SERVICE LOG
Purchase Date Place of Purchase
This Service is to be complete within 5 hours or 1 months of purchase as well as again within 12 hours or 3 months, which ever comes first.
Replace Check, Clean, Adjust
Spark plug
Engine oil Air Filter
Authorised Service Agent
(Name or Company Stamp)
Technician
Date
This Service is to be complete within 36 hours or 9 months of purchase, which ever comes first.
Replace Check, Clean, Adjust
Spark plug
Engine oil Air Filter
Authorised Service Agent
(Name or Company Stamp)
Technician
Date
This Service is to be complete within 24 hours or 6 months of purchase, which ever comes first.
Replace Check, Clean, Adjust
Fuel tank filter
Air Filter Spark Plug
Engine oil
Authorised Service Agent
(Name or Company Stamp)
Technician
Date
This Service is to be complete within 48 hours or 12 months of purchase, which ever comes first.
Replace Check, Clean, Adjust
Fuel tank filter
Air Filter Spark Plug
Engine oil Valve clearance
Exhaust system
Authorised Service Agent
(Name or Company Stamp)
Technician
Date
ACCESSORIES SUPPLIED
- Screw driver & handle
- Spark plug socket
- Earth stake and lead
- Storage bag

natural_image
Product catalog image showing various medical or laboratory tools including a screwdriver, slide, and pen-like device (no text or labels visible)NOTES
STANLEY®
FATMAX®
For any queries or assistance call

Customer Service
AUST. 1300 660 457
NZ 0800 474 876
www.stanleyproducts.com.au
Hours of operation:
Monday to Friday 8.00am - 5.00pm AEST
Do not return to place of purchase.
Keep your purchase receipt, this will be required to make any claims under the 1 year warranty.
Register online for your extended warranty
(terms and conditions apply see online for details)
at www.stanleyproducts.com.au/warranty-registration
- CONTENTS
- SUGGESTED APPLICATIONS
- TECHNICAL INFORMATION
- CUSTOMER SERVICE
- EXPRESS WARRANTY STATEMENT GENERATORS
- WHAT IS COVERED
- HOW TO CLAIM UNDER THIS WARRANTY
- WHAT IS NOT COVERED
- CONTACT DETAILS
- COMPLETE WARRANTY STATEMENT – GENERATORS
- LUBRICATION OF ENGINE
- GENERAL SAFETY INSTRUCTIONS
- OPERATING ENVIRONMENT
- BEWARE OF CHILDREN & PETS
- SELECT A GENERATOR WITH A SUFFICIENT RATING
- PROTECT POWER LEADS FROM DAMAGE
- FUEL - UNLEADED 91 PETROL - NO ETHANOL
- HOT COMPONENTS
- MAINTAIN YOUR GENERATOR WITH CARE
- REMOVE ADJUSTING KEYS AND WRENCHES
- FIRE PRECAUTIONS
- CLEANING YOUR GENERATOR
- EXTENSION CORDS & REELS
- GENERATOR 'EARTHING'
- CHECK DAMAGED PARTS
- PERSONAL SAFETY
- CLOTHING
- HAIR
- EYE PROTECTION
- FOOTWEAR
- EAR PROTECTION
- RESPIRATORY PROTECTION
- DO NOT OVER REACH
- STAY ALERT
- WARNING
- SPECIFIC SAFETY INSTRUCTIONS
- IMPORTANT ELECTRICAL DATA
- FUEL ONLY USE UNLEADED 91 PETROL (ULP-91RON) - NO ETHANOL
- OIL CHECK DAILY - ONLY USE 4 STROKE FULLY SYNTHETIC MOTOR OIL
- COMPONENTS & CONTROLS (PIC.1)
- OPERATING INSTRUCTIONS
- UNPACKING
- ASSEMBLY
- ACCESS PANEL
- ADDING LUBRICATING OIL
- FILLING THE FUEL TANK UNLEADED 91 PETROL - NO ETHANOL
- FUEL CAP BREATHER
- ECONOMY SWITCH (PIC. 8)
- STARTING YOUR GENERATOR
- STOPPING YOUR GENERATOR
- DIGITAL DISPLAY
- OUTPUT INDICATOR LIGHT
- LOW OIL LIGHT
- USING YOUR GENERATOR
- AC OUTLET
- YOUR GENERATOR AC LIMITS
- TO USE THE 240V AC OUTLET
- SAFETY DEVICES
- 12V DC and USB OUTLETS
- STORAGE
- DRAINING THE CARBURETTOR
- Storage Time Prior to Storing
- SERVICE
- MAINTENANCE
- CHECKING/CLEANING THE AIR FILTER
- SPARK PLUG MAINTENANCE
- CLEANING THE EXHAUST PORT & MUFFLER
- CLEANING THE FUEL TANK FILTER
- DRAINING FUEL TANK
- DRAINING ENGINE OIL
- REPAIRS
- SERVICE LOG
- ACCESSORIES SUPPLIED
- NOTES
- STANLEY®
- FATMAX®
Brand : STANLEY
Model : FMXGN4200021
Category : Generator