R4 - Dash cam Rexing - Free user manual and instructions
Find the device manual for free R4 Rexing in PDF.


| Product Type | Dash Cam |
| Brand | Rexing |
| Model | R4 |
| Color | Black |
| Night Vision | Yes, 1.8 IR LEDs |
| GPS | Built-in GPS logger |
| Wi-Fi | Yes, 2.4 GHz (SSID and password displayed on screen) |
| Memory Card Support | Micro SD, up to 256GB, Class 10/UHS-3 |
| Rear Camera | Included, with 22ft extension cable |
| Power Supply | Car power connector (12V DC), 12ft cable |
| Battery | Built-in rechargeable battery (capacity not specified) |
| Audio Recording | Yes, with built-in microphone (can be toggled off) |
| G-Sensor | Yes, gravity sensing for event recording |
| Parking Monitor | Yes, with optional Type-C Smart Hardwire Kit (vibration or motion detection) |
| Warranty | 12 months (extendable to 18 months with registration) |
| Package Contents | Dash cam, rear camera, adhesive mount, suction cup mount, car charger, cable management tool, quick start guide, safety guide |
| Maintenance | Clean with soft, dry cloth; avoid solvents |
| Safety Compliance | FCC Part 15 |
| Country of Origin | Made in China |
| Customer Support | Email: care@rexingusa.com, Phone: (877) 740-8004 |
Frequently Asked Questions - R4 Rexing
User questions about R4 Rexing
0 question about this device. Answer the ones you know or ask your own.
Ask a new question about this device
Download the instructions for your Dash cam in PDF format for free! Find your manual R4 - Rexing and take your electronic device back in hand. On this page are published all the documents necessary for the use of your device. R4 by Rexing.
USER MANUAL R4 Rexing
The information in this manual is subject to change without notice.
www.rexingusa.com
Overview
Thank you for choosing REXING!
We hope you love your new products as much as we do. If you need assistance, or have any suggestions to improve it, please contact us.

care@rexingusa.com

(877) 740-8004
Our support team will respond to you as soon as possible.
Always a surprise with Rexing
Check us out here.
- https://www.facebook.com/rexingusa/
- https://www.instagram.com/rexingdashcam/
- https://www.rexingusa.com/support/registration/



Site

Product Support
What's in the box?
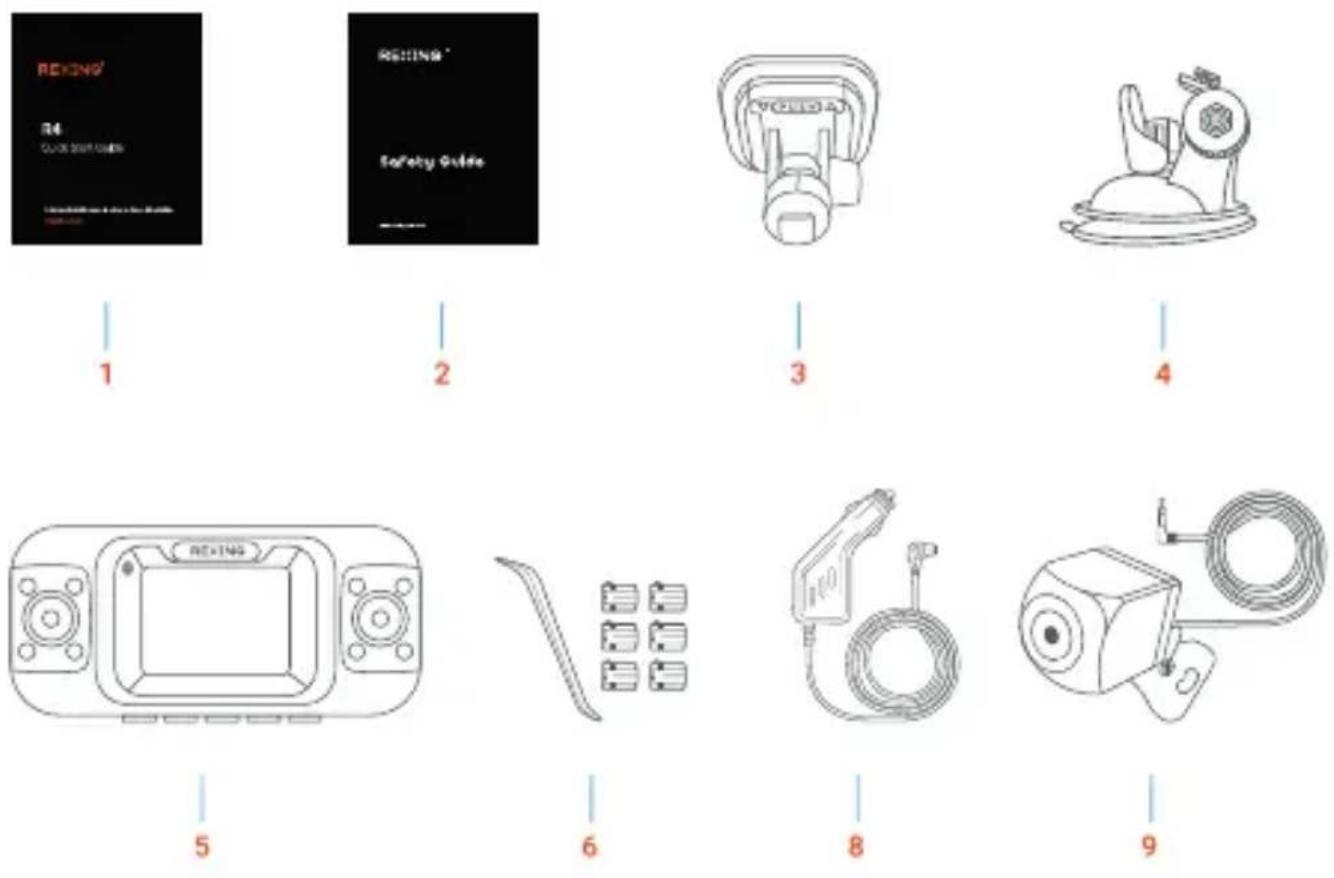
- R4 Quick Start Guide
- Safety Guide
- 3M Adhesive Mount
- Suction Cup Mount
-
Rexing R4 Dash Cam
-
Cable Management Tool
- Car Power Connector (12ft)
- R4 Rear Camera with Extension Cable (22ft)
- Rear Camera
Camera Overview
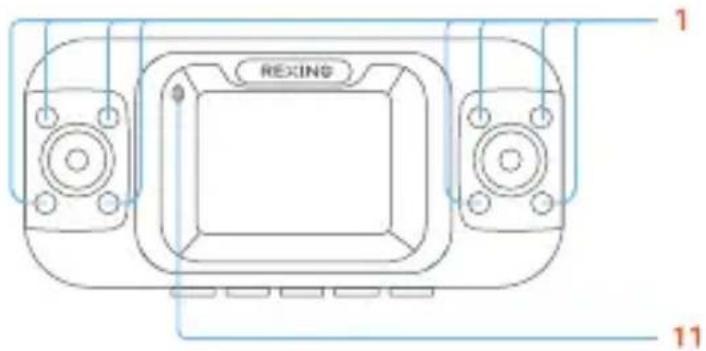
The camera is recording when the LED is flashing red. The device is charging or powered on when the LED is solid red.
1.8 IR Lights
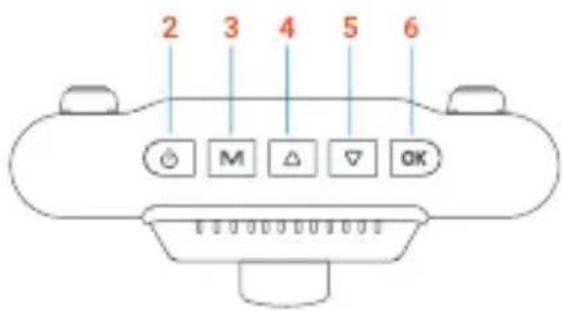
2. Power Button / Screen Toggle Button
3. Menu Button / Playback Button
4. Up Button / Mode Button / Wi-Fi Button
5. Down Button / Mic Button
6. OK (Confirm) Button / Video Lock Button / Record Button
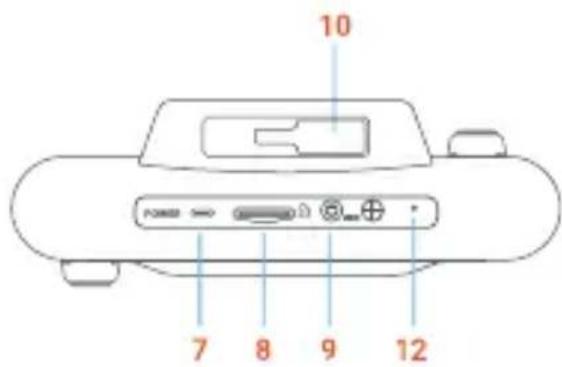
- Charger/ Type C Port
- Micro SD Card Slot
- Rear Camera Port
- Mounting Area
- LED indicator
- Microphone
Screen Icons
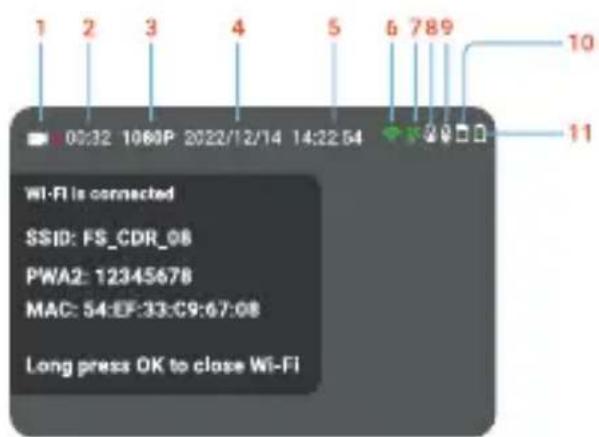
- Recording (on)
- Recording Time (current clip)
- Video Resolution
- Current Date (MM/DD/YYYY)
- Time (24h)
- Wi-Fi (connected)
- GPS Signal (connected)
- Current video file locked
- Audio Recording (on)
- Memory Card (Inserted)
- Battery Charging
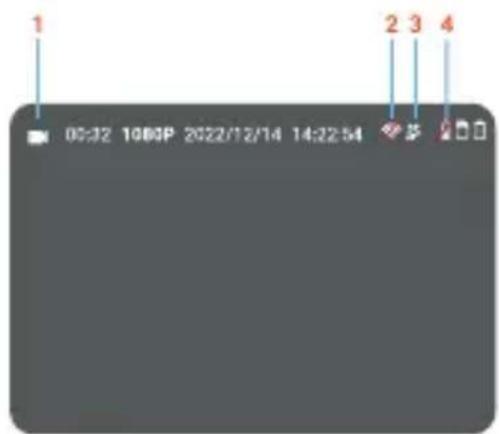
- Recording (off)
- Wi-Fi (not connected)
- GPS Signal (Searching)
- Audio Recording (off)
Installation
Step 1: Install the Dash Camera
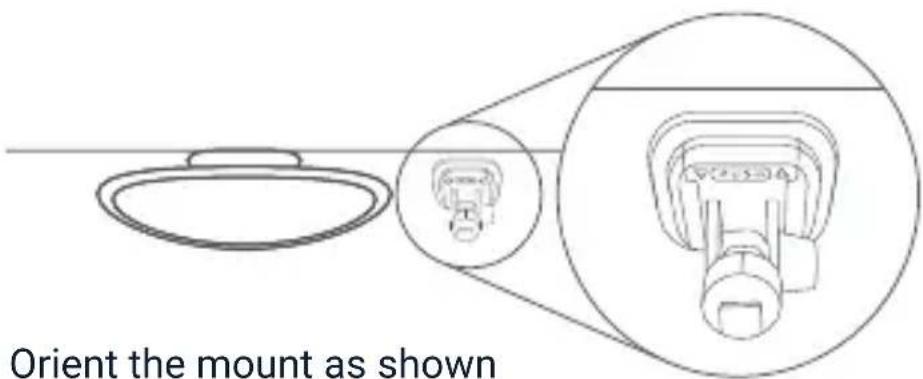
Adhesive Mount: Place the 3M tape on the mount and properly orient the mount square to the roof and hood line of the vehicle. Firmly press the mount onto the windshield. Wait at least 20 minutes before mounting the camera. Orient the mount as shown on the illustration below.
Suction Cup Mount: Remove the protective plastic from the suction cup, clean the mounting area of the windshield with rubbing alcohol, and wipe dry with a lint free cloth. Now, clean the back of the suction cup with rubbing alcohol and wipe dry with a lint free cloth. Next, apply moisture to the suction cup to create a better seal and mount the suction cup to the windshield as shown below and wait approximately 30 minutes for it to dry. Once dry, attach the device by fitting the tab on the top of the mount into the slot on the top of the device.
Step 2: Insert the memory card
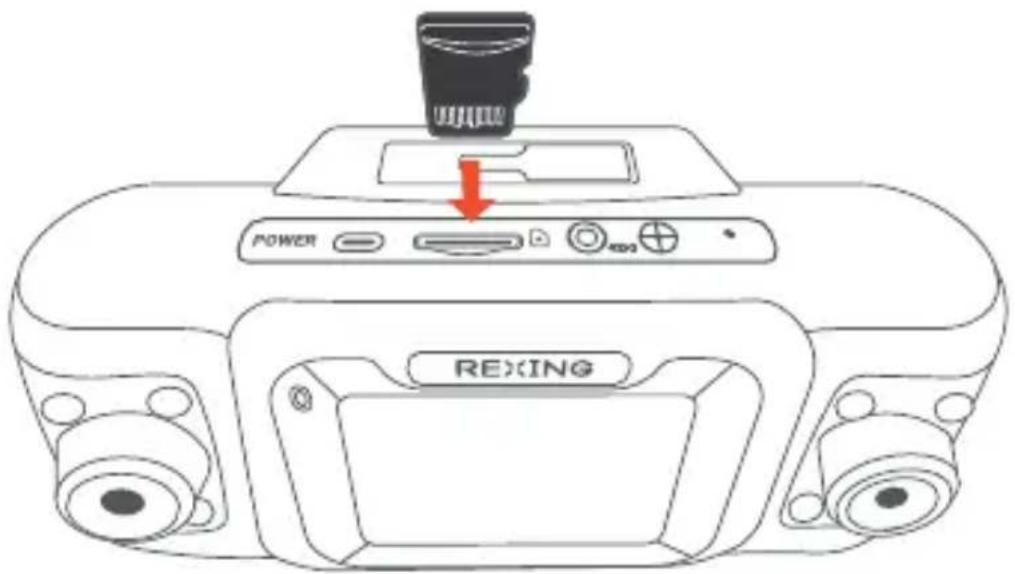
The Rexing R4 Plus accepts Class 10/UHS-3 or higher Micro SD memory cards up to 256GB. You will need to insert a memory card before begin recording. Before inserting or removing a memory card, first ensure you've powered down the device. Gently push the memory card in until you hear a click, and allow the spring release to push the card out.
Step 3: Power on the Camera and Format the Memory Card
Power the camera by connecting the charger to the car cigarette lighter and camera. Before you start using a new memory card, you MUST format the card within the camera using the format function. Always backup important data stored on the memory card before formatting.
To format the memory card, make sure you have inserted your memory card, then turn on the device by connecting to a power source. Press OK to stop recording. Then press the MENU button twice to enter the Menu.
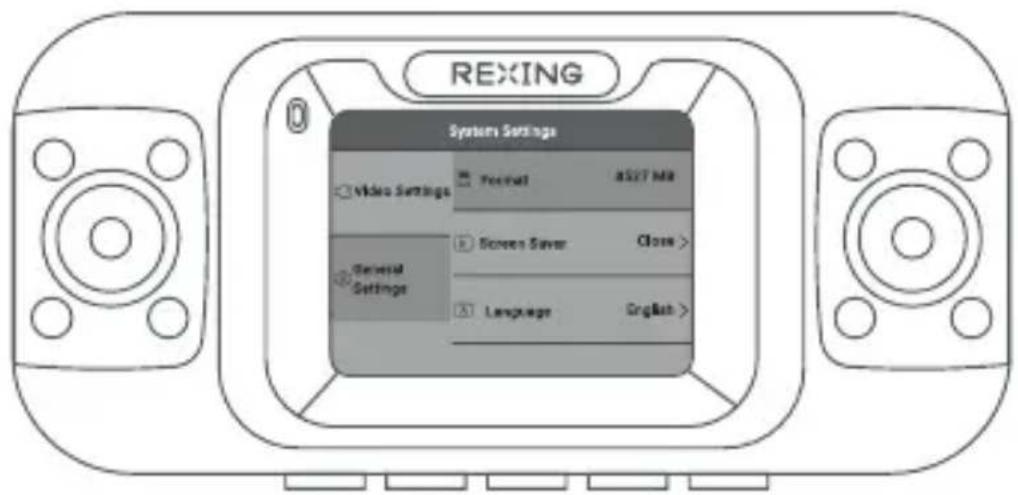
Press the Menu button twice and toggle down to Format

Press the OK button to confirm formatting the card
Use the UP and DOWN navigation buttons and go to the Format setting. Press the OK button to confirm the selection. You may now disconnect from power. The camera will shut down after 3 seconds. The camera should begin recording automatically the next time it is powered on.
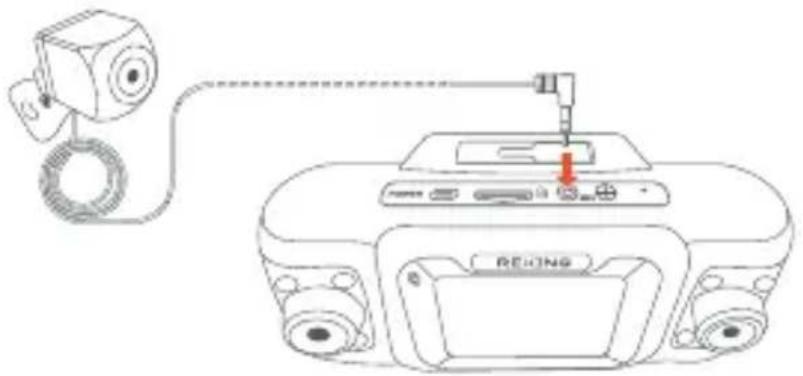
Step 4: Mount the Rear Camera
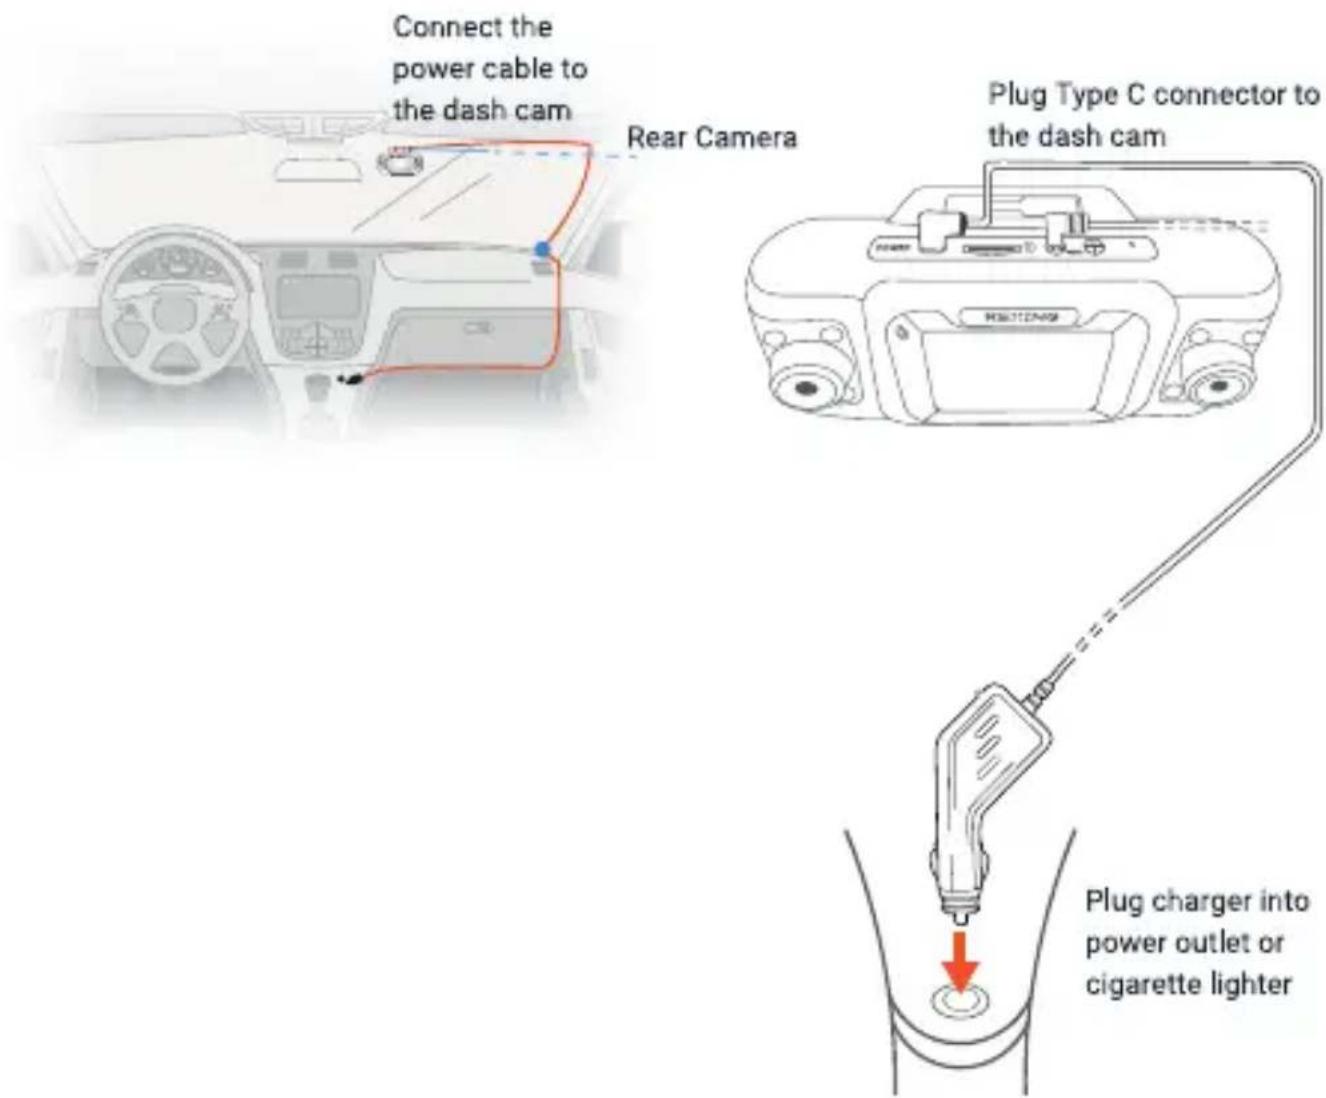
Mount the rear camera as shown below. Use rear camera cable to connect the rear camera to the R4 camera.
natural_image
Line drawing of a camera connected to a device with a red arrow indicating the cable or connector (no text or symbols present)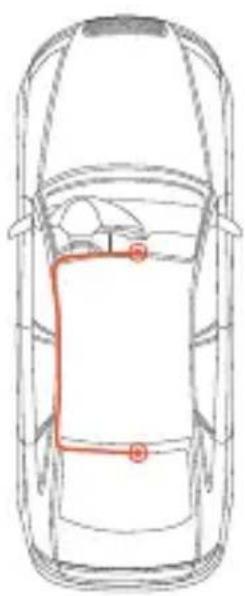
natural_image
Top-down line drawing of a car with a red rectangular outline and two marked points (no text or symbols)
Step 5: Installing the Camera onto the Windshield
Place the camera on the mount and carefully route the power cable around the windscreen and tuck in under the trim.
Plug the Car Charger Cable into a 12V DC power outlet or the car cigarette lighter. Connect car charger to the camera. The camera will auto-start recording once powered on.
Basic Operation
Device Power
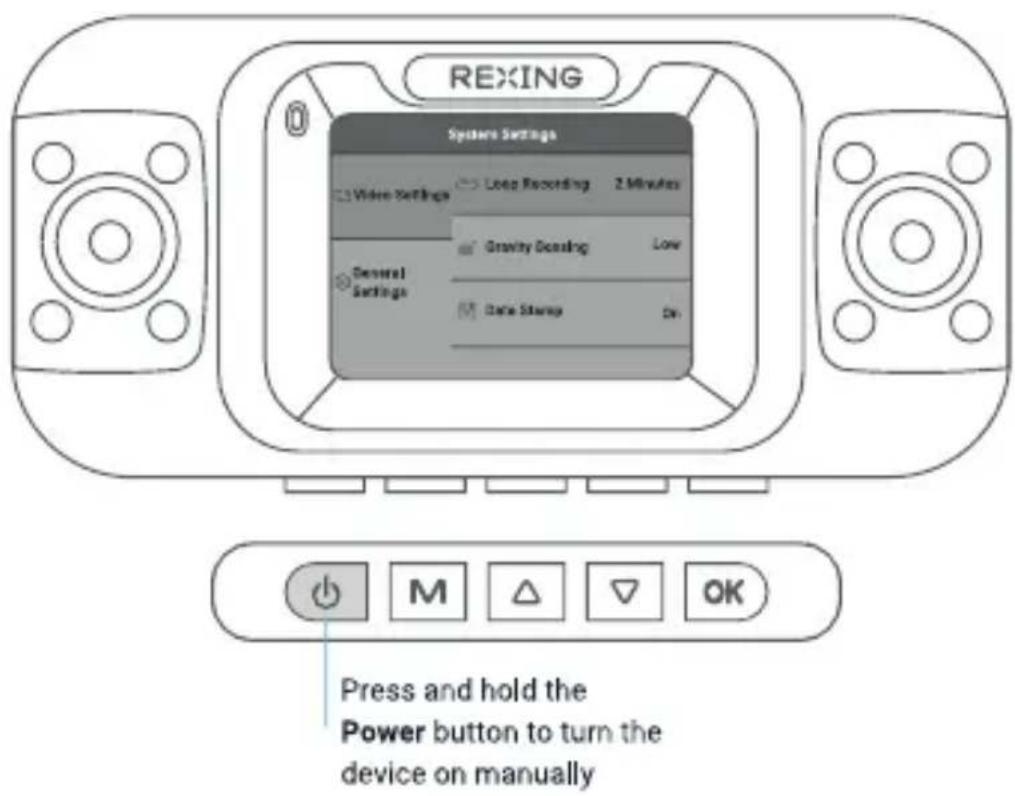
The device will be automatically powered on when plugged into a 12V accessory socket or cigarette lighter when receives a charge (i.e. the vehicle is started).
To turn the device on manually, press and hold the Power button until the welcome screen appears.
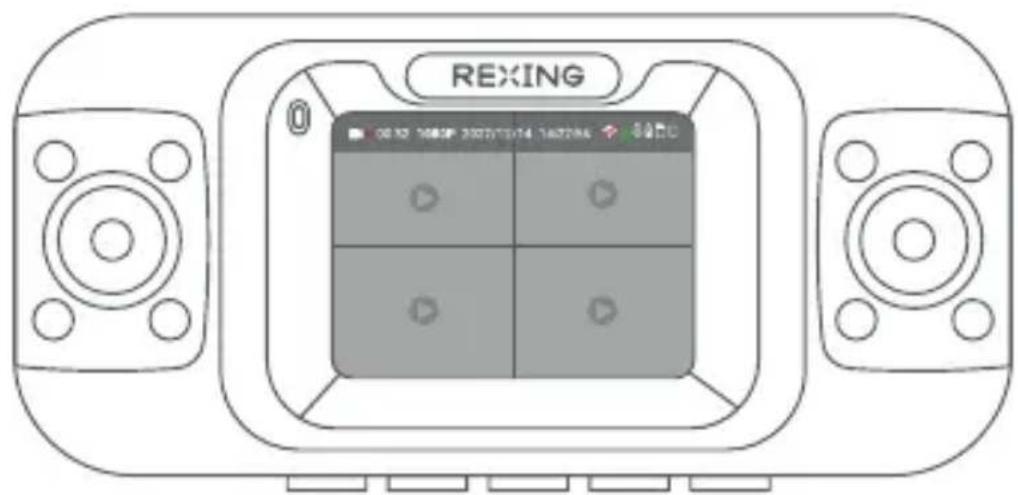
The camera will automatically start recording when it's powered on.
Menu Settings
Power on the camera. If the camera is recording, press the OK button to stop recording.
Hold the MENU button and toggle to the desired mode.
Press the MENU button once to enter the Video Settings.
Press the MENU button twice to enter the Setup Settings.
Video Recording
The camera will automatically start recording when the device receives a charge. The LED lights and red dot will blink red device when recording. Press the OK button to stop recording.
Video Playback
Playback of videos can be done on the device or a computer. To playback a video on the device, hold MENU button and toggle to the Playback mode. Use the UP and DOWN navigation buttons to toggle to the desired video. Press the OK button to play.
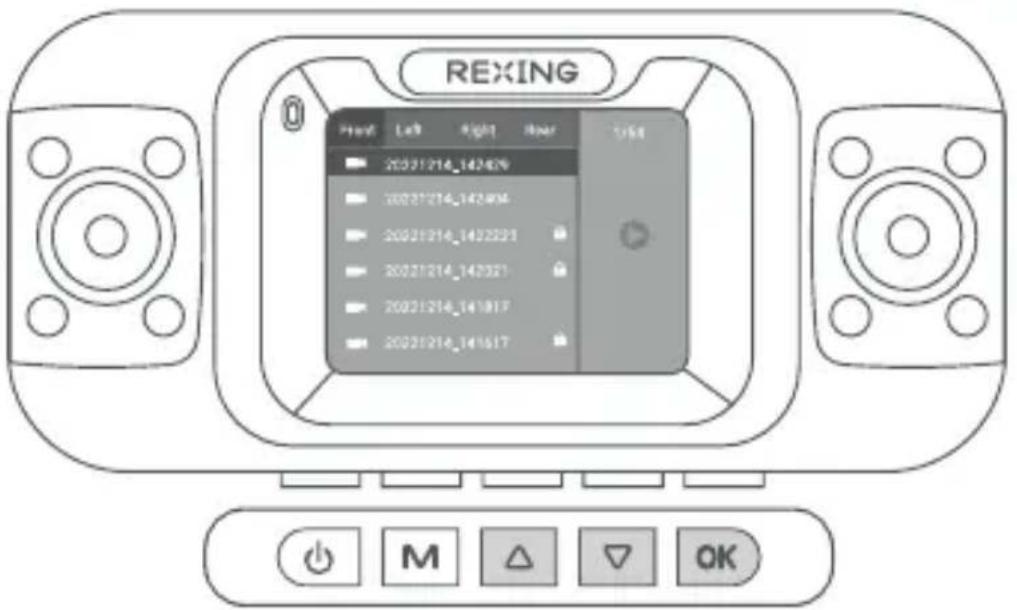
During playback, use the OK (pause), UP (rewind) and DOWN (fast forward) buttons to control the video playback.
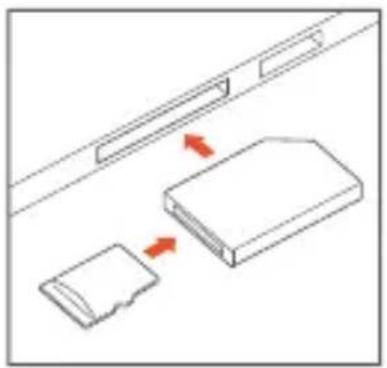
To playback a video using an SD card adapter, remove the memory card and insert it into an SD card adapter. Place the adapter in the computer. Then place the adapter into the computer. On the computer, navigate to device drive. Then select the video to playback.
natural_image
Diagram showing two devices with red arrows indicating movement or interaction (no text or symbols present)Wi-Fi Connect
Step 1:
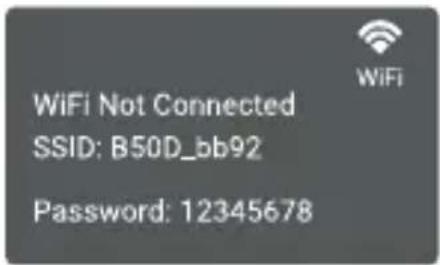
on, hold the UP navigation button to enable the Wi-Fi function. The Wi-Fi name (aka the SSID and password for the dash cam should be displayed on-screen.
Step 2:
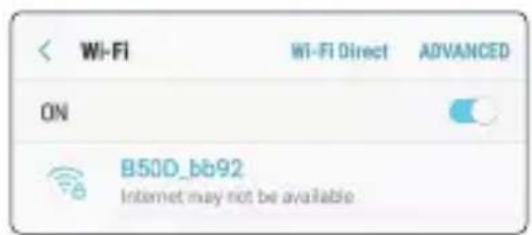
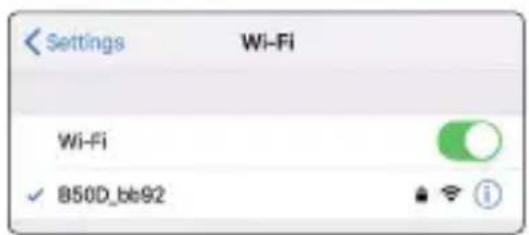
On your mobile device, navigate to your Wi-Fi settings. Connect to your dash cam's Wi-Fi by tapping its name when it appears. Enter your dash cam's Wi-Fi password if you are prompted to do so.
Note: On same mobile devices, you may have to try to connect more than once. To ensure you've successfully connected, your mobile device's screen should resemble the examples shown.
Samsung / Android Example
iPhone / iOS Example
Step 3:
Once you're connected to the dash cam, open the Rexing Connect app on your mobile device.
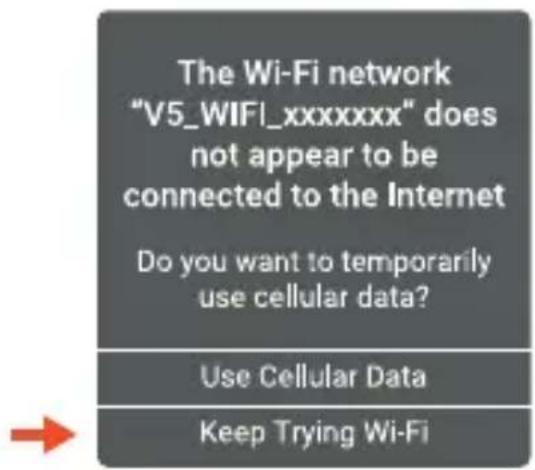
Please select "Keep Trying Wi-Fi" if you see the notification on the right.
Step 4:
In the app, hit the "Connect" button to connect to your dash cam, allowing you to access live view and view/download your recordings.
Note:
Hold to the UP button for 2 seconds to disconnect the Wi-Fi.
Rexing Connect App
Easily download the app by scanning the QR code below or search via the App Store or Google Play

Wi-Fi Connect Troubleshooting
If you bring up the Rexing Connect app and cannot connect your phone to the dash cam please go to https://www.rexingusa.com/wifi-connect/ OR scan the QR code below.
Internal GPS
The built in GPS logger will record the speed and location of your vehicle as you drive.
You can then access these information while playing back your recordings using the GPS Video player. For windows and Mac, available at
https://www.rexingusa.com/support/rexing-apps/
The dash cam will automatically search for the GPS signal once it's connected to the power source. Press the MENU button once and go to Video Settings. Toggle the GPS setting, and select your favorite speed unit.
After a GPS signal is found, the screen icon will turn from not connected to active - as per the below icons.

GPS Signal Searching

GPS Signal Active
GPS Date-Time Troubleshooting
If your dash cam GPS date and time are incorrect please go to https://www.rexingusa.com/gps-date-time/ OR scan the QR code below.

Parking Monitor (Parking Surveillance Mode)
Parking monitor provides surveillance on your parked vehicle. When the engine is off, the hardwire kit is used to provide continuous power and protect your car battery from being discharged.
Option 1: Vibration Detection
To enable the Parking Monitor, you'll need to connect it with a Rexing Type-C Smart Hardware Kit (sold separately).
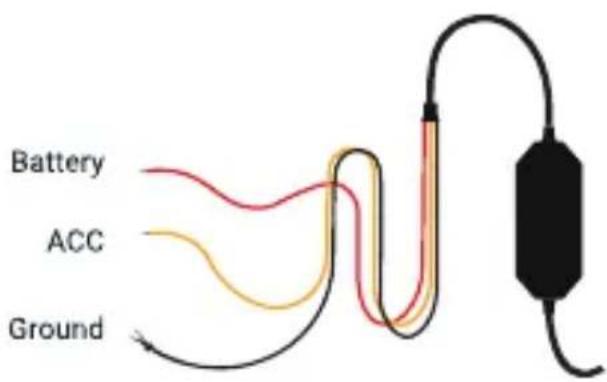
This feature will allow the dash cam to switch to parking mode automatically if the vehicle's engine turns off and switch back to the normal recording after the vehicle's engine turns on.
Gravity Sensing Record:
The Gravity Sensing detects significant or sudden movement (such as an impact or collision), it will trigger an event recording. We suggest setting the "Gravity Sensing" to High sensitivity for Parking Mode Recording.
Note:
If you do not use the parking mode function, please change the Gravity Sensing sensitivity to low. Otherwise, the video will easily be locked and the video cannot be deleted by the loop recording function. This will cause the memory card to be full of locked videos and cause the recorder to fail to work normally.
Please DO NOT ENABLE the Parking Monitor function in the settings of the dash cam WITHOUT connecting a smart hardwire kit. They may cause a malfunction.
Option 2: Motion Detection
To use this feature, you need to connect it with a Rexing Type-C Intelligent Hardwire Kit (sold separately). Make sure that the Parking Mode is turned off on your dash cam.
Make sure that the Parking Mode is turned off on your dash cam, otherwise it may cause a malfunction.
Once the sensor has detected MOTIONS. The intelligent hardwire kit will power up the dash cam automatically and start recording until the MOTION is cleared.
Please go to https://www.rexingusa.com/hwk-install/ to watch a video tutorial about the installation or scan the QR code below.
Warranty & Support
Warranty
The Rexing R4 Dash Cam comes with a full 12-month warranty. If you register your product on our official site (https://www.rexingusa.com/support/registration), you can extend the warranty to 18 months.
Support
If you have any questions regarding your product, please do not hesitate to contact us at care@rexingusa.com, or call us at (877) 740-8004. Queries are typically answered within 12-24 hours.
Your opinion matters
Rexing is firmly committed to always improving our products, services, and user experience. If you have any thoughts on how we can do even better, we welcome your constructive feedback and suggestions.
Connect with us today at care@rexingusa.com
Thank you for choosing Rexing!
FCCID:
This device complies with part 15 of the FCC Rules. Operation is subject to the following two conditions: (1) This device may not cause harmful interference, and (2) this device must accept any interference received, including interference that may cause undesired operation.
Changes or modifications not expressly approved by the party responsible for compliance could void the user's authority to operate this equipment.
REXING®




MADE IN CHINA
- Overview
- Thank you for choosing REXING!
- Check us out here.
- What's in the box?
- Camera Overview
- Screen Icons
- Installation
- Step 1: Install the Dash Camera
- Step 2: Insert the memory card
- Step 3: Power on the Camera and Format the Memory Card
- Step 4: Mount the Rear Camera
- Step 5: Installing the Camera onto the Windshield
- Basic Operation
- Device Power
- Menu Settings
- Video Recording
- Video Playback
- Wi-Fi Connect
- Step 1:
- Step 2:
- Step 3:
- Step 4:
- Note:
- Rexing Connect App
- Wi-Fi Connect Troubleshooting
- Internal GPS
- GPS Date-Time Troubleshooting
- Parking Monitor (Parking Surveillance Mode)
- Option 1: Vibration Detection
- Gravity Sensing Record:
- Option 2: Motion Detection
- Warranty & Support
- Warranty
- Support
- Your opinion matters
- FCCID:
Brand : Rexing
Model : R4
Category : Dash cam