S1 Pro - Dash cam Rexing - Free user manual and instructions
Find the device manual for free S1 Pro Rexing in PDF.


| Product Type | Dash Camera |
| Brand | Rexing |
| Model | S1 Pro |
| Display | 3.0-inch TFT color screen |
| Video Resolution | 1080P + 1080P + 1080P (front, cabin, rear) |
| Loop Recording | 1, 2, or 3 minutes |
| Parking Monitor | Super Night Scene, Time-Lapse video monitoring |
| G-Sensor | Off, High, Moderate, Low (impact detection and auto-lock) |
| Input Power | DC 5V, 1500mA |
| Operating Temperature | -4°F to 150°F (-20°C to 65°C) |
| Memory Card | MicroSD (not included; format required before use) |
| Wi-Fi | Built-in Wi-Fi for app control (Rexing Connect) |
| GPS | Included GPS Logger (optional for tracking) |
| Dimensions | Approximately 3.5 x 2.4 x 1.4 inches |
| Weight | Approximately 100 g |
| Included Accessories | Rear camera (20ft cable), Smart Hardwire Kit, GPS Logger, 3M adhesive mount, USB cable, cable management tool |
| Maintenance | Regularly format memory card; clean lens with soft cloth; do not expose to extreme heat |
| Safety Warnings | Do not install near airbags; avoid blocking driver's view; use only OEM charger; do not expose battery to heat or flame |
| Spare Parts & Repairability | No user-serviceable parts; contact support for repairs or replacement |
| Warranty | 12 months (extendable to 18 months with registration) |
Frequently Asked Questions - S1 Pro Rexing
User questions about S1 Pro Rexing
0 question about this device. Answer the ones you know or ask your own.
Ask a new question about this device
Download the instructions for your Dash cam in PDF format for free! Find your manual S1 Pro - Rexing and take your electronic device back in hand. On this page are published all the documents necessary for the use of your device. S1 Pro by Rexing.
USER MANUAL S1 Pro Rexing
The information in this manual is subject to change without notice.
www.rexingusa.com
Notice
- Menu Setup Operation: The menu is to be set up in non-video mode. If the device is in video mode, proceed after stopping the video recording.
- Memory card: A new card must be formatted to the device before use. Continuous image recording for long periods of time may produce protected files that are not subject to long-term protection (these files may not be overwritten during loop recording) and storage fragments, which need to be cleared regularly in order to save stable storage space.
- Standard Voltage for On-board Charger: Standard input voltage is configured at 12V. If a charge voltage greater than 12V is found, contact your dealer or our service center to replace it with an applicable charger. An OEM charger must be used.
- Parking Monitor: Do not enable this function during driving. When it is enabled, repeated start/stop recording may affect the integrity of your video.
- Do not install the device within the range that could be impacted by airbag or in a location that interferes with the driver's view or other safe operation of the vehicle. Make sure it is securely mounted.
- The features described in the operation manual are available for all products of the same type. Your model may have come with optional or additional functions. Menu operations may vary. Please refer to the instructions that apply to your actual product.

Warning
The battery (module or pack) must not be expose to an overheat environment such as direct sunlight or flame.
Never remove, strike, or squeeze the battery or put it in fire. Stop using the battery if it is ballooned, warped, leaking, or shows any other visible signs of damage.
Overview
Thank you for choosing REXING!
Thank you for choosing REXING! We hope you love your new products as much as we do.
If you need assistance, or have any suggestions to improve it, please contact us. You can reach us via

care@rexingusa.com

(877) 740-8004
Our support team will respond you as soon as possible.
Check us out here.
- https://www.facebook.com/rexingusa/
- https://www.instagram.com/rexingdashcam/
- https://www.rexingusa.com/support/registration/

Facebook Instagram Site Product Support



What's in the box?
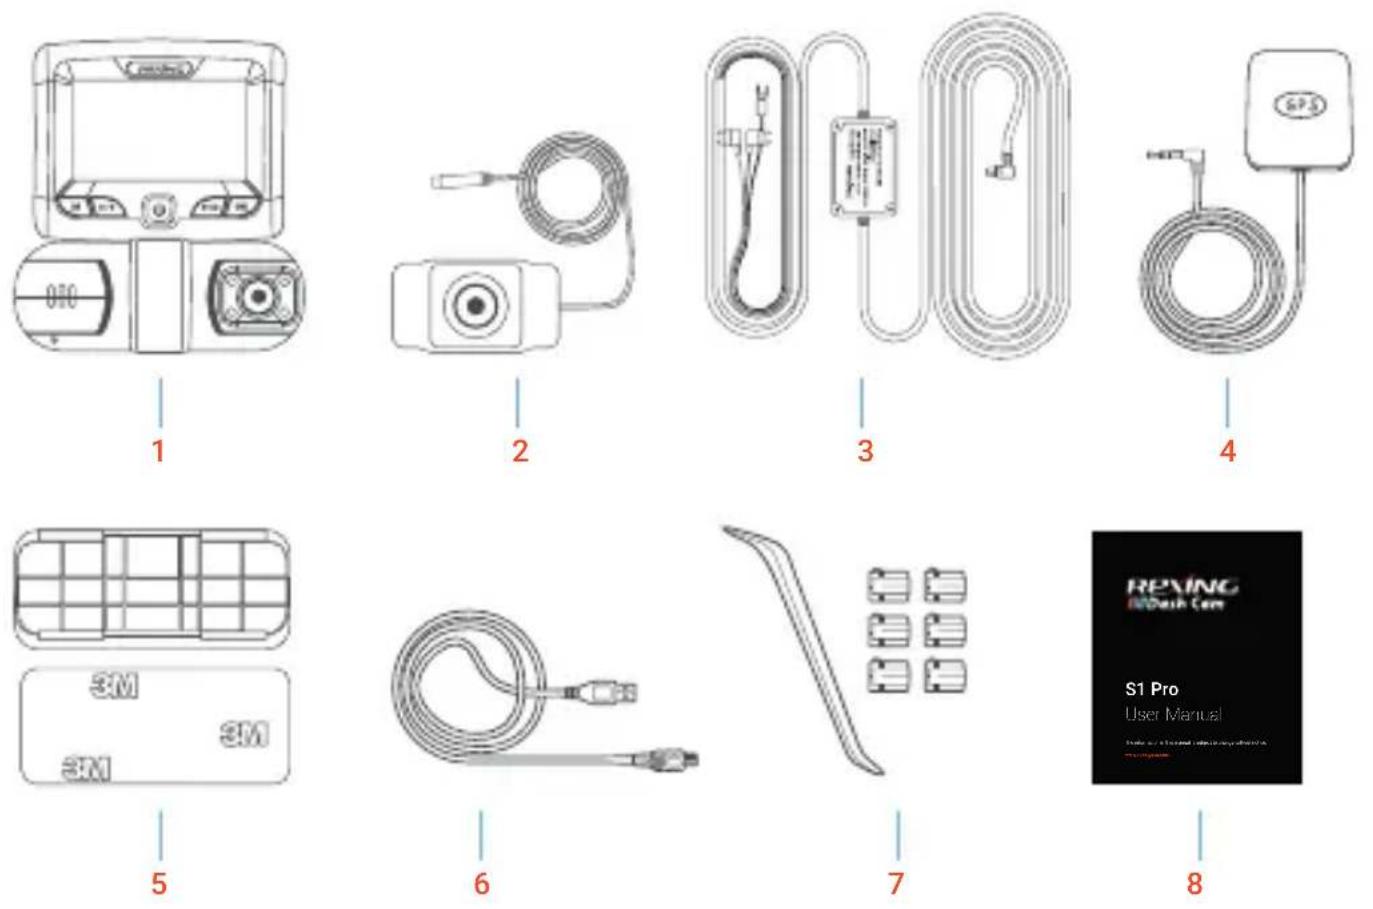
- Rexing S1 Pro Dash Camera
- Rear Camera with Extension Cable (20ft)
- Free Smart Hardware Kit
-
GPS Logger
-
3M Adhesive Mount
- USB Computer Cable
- Cable Management Tool
- Quick Start Guide
Table of Contents
Camera Overview
Installation
Basic Operations
Mobile Connection
GPS Player
Product Specifications
General Troubleshooting
Warranty and Support
6
9
12
20
27
30
31
32
Camera Overview
I. Visual Features
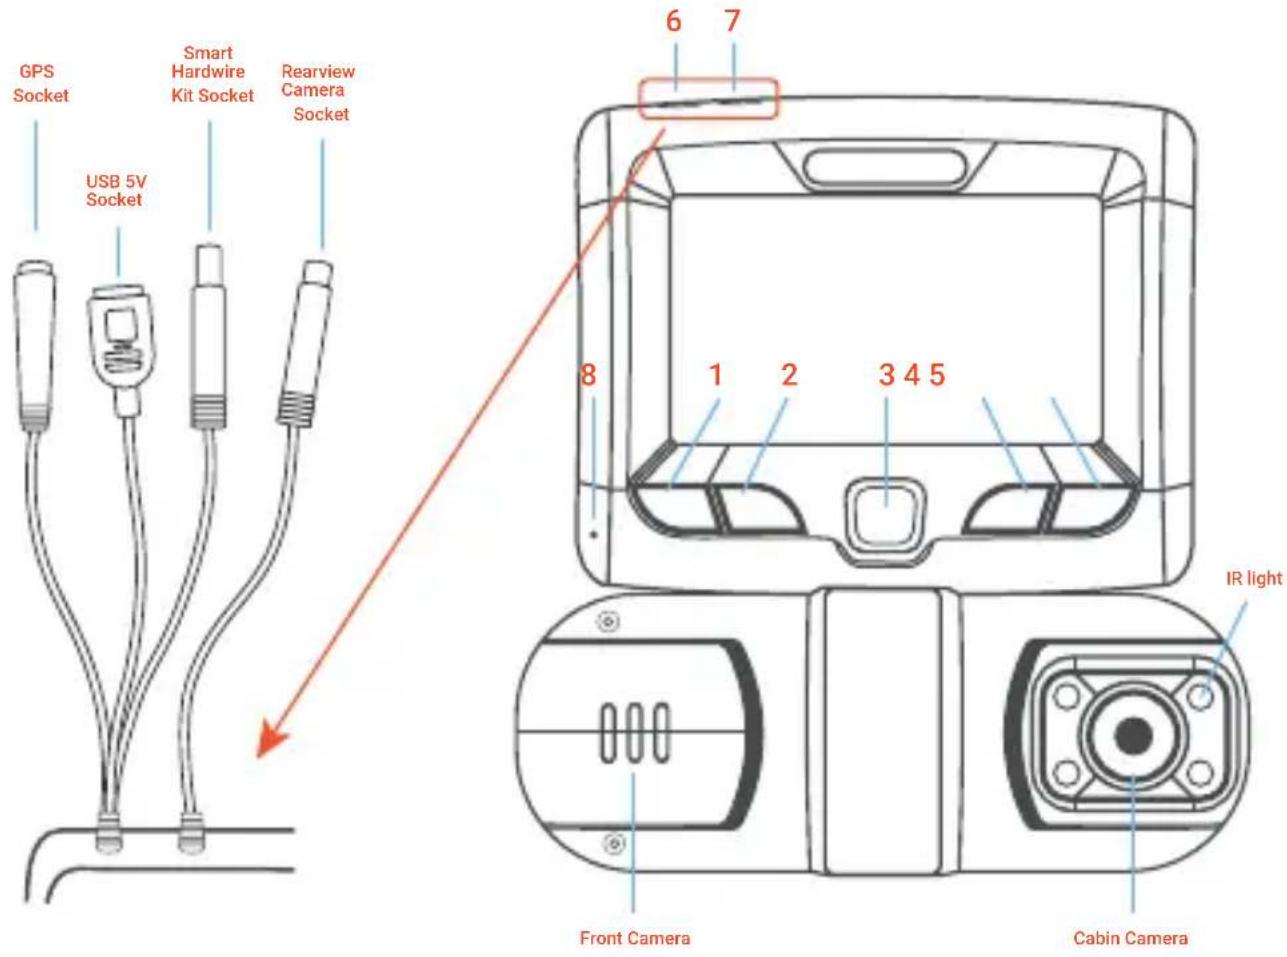
- Menu/Mode Button
- Record/Up Button
- Power Button
-
Down/Toggle Button
-
OK Button
- Power Cord Connection Port
- Rearview Camera Connection Port
- Reset Pinhole
Note:
GPS is an optional feature, needs to connect to the included GPS Logger. The S1 Pro does not support memory expansion.
Buttons and Description
| Buttons | Description |
| M Button (Menu/Mode Switch) | 1. In standby mode, press this button to start/stop the related menu options such as recording mode, photography mode, playback mode.2. In recording mode, press and hold the button for 3 second to enter picture-taking and playback interface. Depress it again to exit. |
| Record/Up/MIC Button | 1. In standby mode, press this button to start/pause video recording.2. Video Mode: Depress this button to start/stop audio recording.3. The button is defined for page up in menu setup and playback mode.4. During playback, press the button shortly to play fast rewind. |
| Power Button | 1. Press this button to start the device. Depress it for 3 seconds to power off the device.2. In power-on state, press the button shortly to turn off/on screen backlight. |
| Down/Toggle Button | 1. This button is defined for page down in menu setup and playback mode.2. Press this button to switch between front/rear camera view and PIP display.3. During playback, press the button shortly to play fast forward.4. In video mode, depress the button to switch the IR light to OFF/ON/AUTO. |
| OK Button | This button functions as a confirmation in each of the setups.In video recording, press this button to start emergency recording.Depress this button to switch Wi-Fi on/off.In photography mode or playback mode, press the button to take a picture or play back a file. |
| Power charging port/USB data cable portUSB Port | |
| Power Port | Power cable connection port |
| Connection Port | Rearview Camera Connection PortRearview Camera |
| If the system crashes, use a pin to reset the system.Reset Pinhole |
Installation
- Turn off the car's engine.
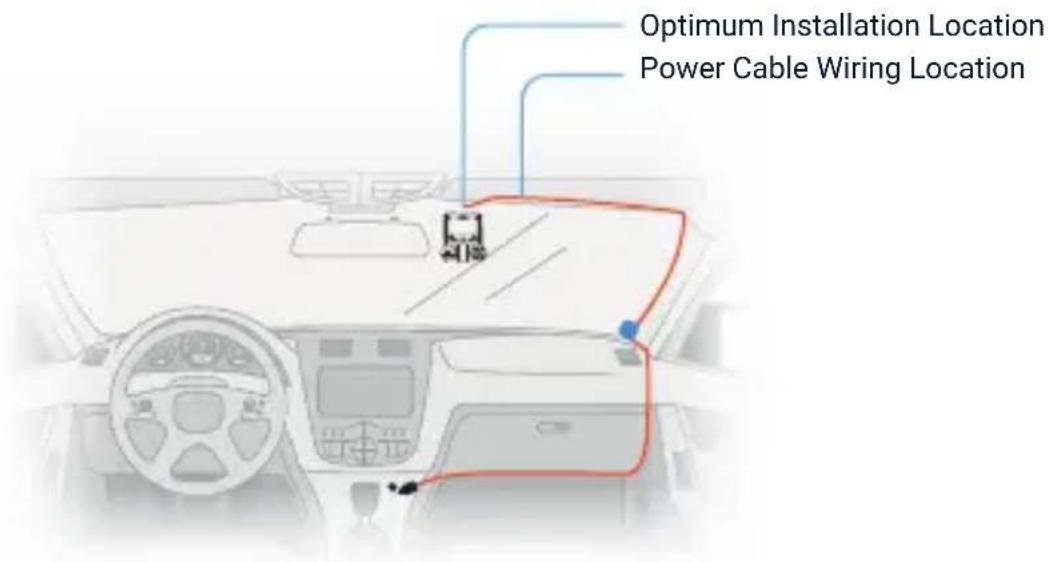
- Secure the dashcam to a place close to the original rearview mirror.
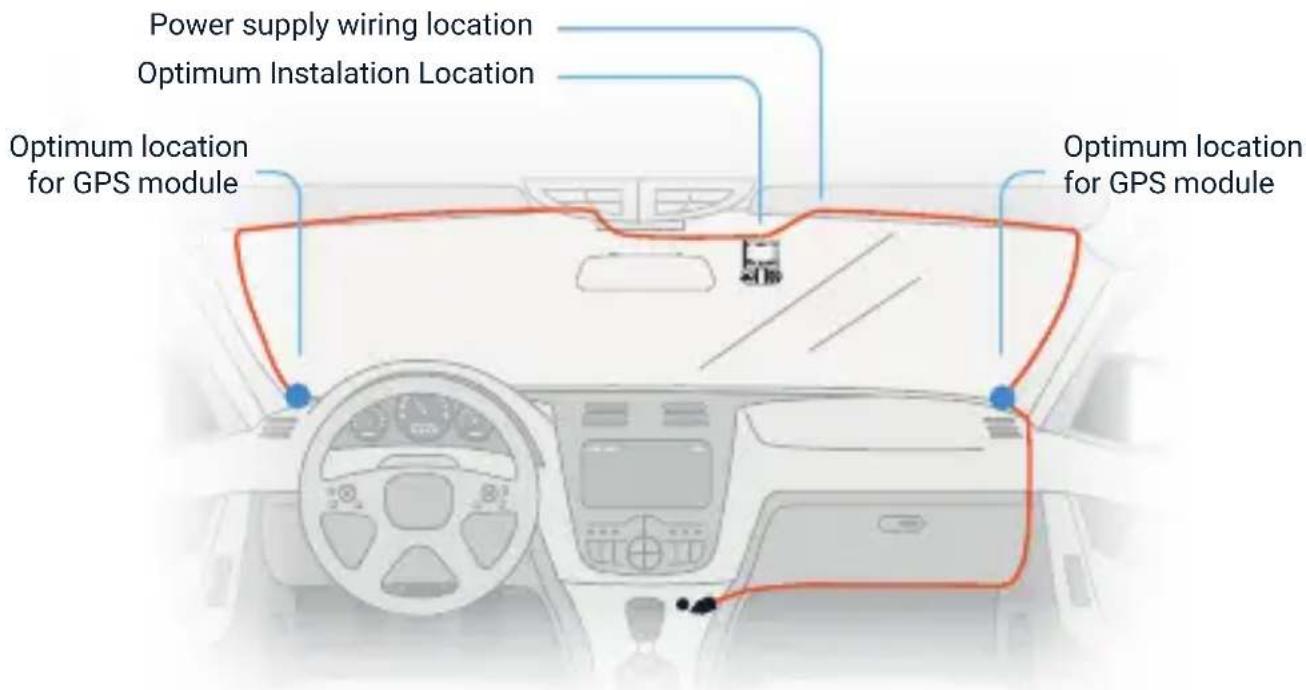
- Plug the GPS module into the GPS port and secure the module to a position close to A-pillar of the car. The antenna receiver side (the side without 3M adhesive) faces the outside and the side with 3M adhesive faces down. It should be properly secured.
- Plug the charger into the car's cigarette lighter. Connect the device to the cigarette lighter through the car charger.
Note:
The charger extension cable can be wired along the edge of the windshield during installation. The optional rearview camera should be mounted on the rear windshield of the car. Pay attention to its orientation during installation. It can be wired against or above the interior's headliner. Plug the rearview camera connector into its rear camera port of the device once the camera is securely mounted. Adjust the position of the lens to make sure that it remains horizontal with the ground. Start the engine to check the video operation of your device.
Installation Instructions
- Rearview Camera Wire Routing Illustration (as shown below)
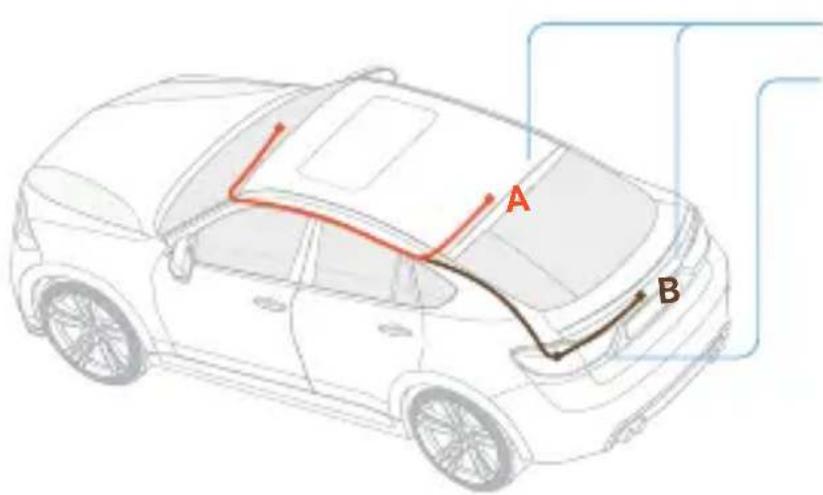
Connected to rearview camera Connected to reversing light
For the rearview camera, there are two wiring options as shown in the above figure. The first part of both options is characterized with concealed wire routing against the edges of the door(s).
a. The rearview camera can be mounted directly above the rear window inside the car.
b. The rearview camera can be mounted directly above the car's license plate.
We recommend that you install all components beforehand according to the above drawing and test the system by using the on-board charger power supply. Make sure the device is good condition prior to installation. Please, contact our service center in case of any questions.
III. Turn on the Dash Cam
Connect the dash cam to the car charger after installation. Starting the car engine will start the device.
Note:
Due to unstable voltages caused by starting the car engine, a voltage fluctuation in some vehicles may be especially obvious. If a flashing screen or some other unforeseeable operating problem occurs when you start the engine, it is recommended to unplug the device from the charger before starting the engine, and then reconnect it after the engine is running.
Basic Operations
Main Interface
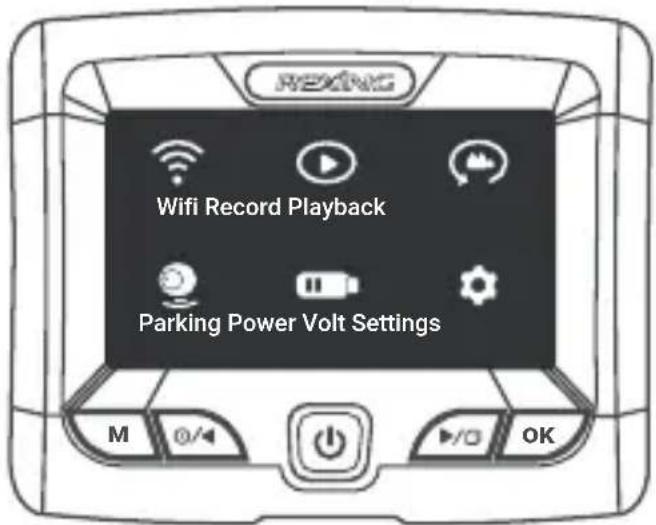
System Setup
I. Open the Setup Menu
Press the Menu Button to open system menu setup. Select Settings. Press the Up/Down Button to change the option and press the OK Button to confirm.
II. Video Mode - Setup
Select Record on the main menu. Press the OK Button to start/pause video recording of the device or press the Record Button to pause/start video recording.
Note:
Please perform selective setups to the primary options, such as setting the device's system time. Video Resolution: FHDP30+FHDP30, FHDP30+HDP30
1. Loop Recording:
1, 2, or 3 minutes
2. WDR:
ON/OFF.
3. G-SENSOR:
Off/High/Moderate/Low
After the device is started, it may sense shock/impact caused by a certain level of force (the higher the sensitivity setting, the smaller the force required). This function will lock the video at the time of detection and save it as a protected video. Meanwhile an icon indicating that the device is locked will be shown on top of the display.
4. Time-lapse Monitoring Duration:
12h, 24h, 48h
5. Exposure Compensation:
$$ + 5 / 3, + 4 / 3, + 1. 0, + 2 / 3, + 1 / 3, + 0. 0, - 1 / 3, - 2 / 3, - 1. 0, - 4 / 3, - 5 / 3 $$
6. DVR Audio:
Off/On
7. Date Stamp:
Off/On
III. System Menu Setup
Select Record on the main menu. Press the OK Button to start/pause video recording of the device or press the Record Button to pause/start video recording.
1. Date/Time:
Year, Month, Day, Hour, Minute, Second (RTC system time setup). Press the OK Button to access [Date/Time] of system setup. Press the Menu Button to shift to the next setting. Press the Up/Down Button to set the parameters. Press the OK Button to save and exit.
Note:
To obtain a valid date and time record to be used as evidence for a car accident, please set the correct time and date before using the device.
2. Screen Backlight:
Off, 1, 3, and 5 minutes. When Off is selected, the screen remains on. Select 1/3/5 minutes. Without any operation, the screen backlight turns off automatically after a predetermined length of time, but the device will keep recording as normal.
3. Key Tone:
Off/On
4. Language Setup:
English, French, German, Spanish, Italian, Portuguese, Simplified Chinese, Japanese, Traditional Chinese, and Russian.
5. Frequency:
50HZ, 60HZ
6. IR Light Mode:
Auto, On, Off
7. Default Setup:
Cancel/Confirm. When Confirm is selected, customer settings will be changed and the system will be restored to its default values.
8. Version:
Determine the current software version.
Taking Pictures
I. Taking a Picture
Depress the Menu Button to switch to the picture taking mode. Press the OK Button once to take a picture.
II. Picture Mode Setup
When the picture taking function is in standby, press the Menu Button to access the picture taking setup menu. Use the Record/UP button and Record/DOWN button to select parameters. Press the OK Button to save your setup selections and return to the previous menu. Press the Menu Button to exit setup when complete.
1. Picture Taking Method:
Single Shot, 2s Timer, 5s Timer, 10s Timer
2. Resolution:
12M 4032 x 3024, 10M 3648 x 2736, 8M 3264 x 2448, 5M 2592 x 1944, 3M 2048 x 1536, VGA 640 x 480
3. Continuous Capture:
Off/On When continuous capture is enabled, 3 pictures are taken consecutively.
4. Picture Quality:
Optimum, Standard
5. Sharpness:
Strong, Standard, Moderate
6. White Balance:
Auto, Daylight, Cloudy, Tungsten, Fluorescent
7. Color:
Color, Black & White, Sepia
8. ISO:
Auto, 100, 200, 400
9. Exposure Compensation:
$$ + 5 / 3, + 4 / 3, + 1. 0, + 2 / 3, + 1 / 3, + 0. 0, - 1 / 3, - 2 / 3, - 1. 0, - 4 / 3, - 5 / 3 $$
10. Anti-Shock:
Off/On
11. Quick Preview:
Off, 2s, 5s After taking a picture, time setting will be discontinued on the image, so as to allow you to determine if the picture is desirable
12. Date Stamp:
Off, Date, Date/Time.
Playback and Delete a File
I. Browsing Files
Select the playback folder on the main menu or depress the Menu Button to switch to playback mode. Press the Up/Down Button to browse your video files and pictures
II. Playback
When browsing files, video files are presented with an 📋 icon on screen. Press the OK Button to play the video and quickly press it again to stop playback.
III. Deletion and Protection
When browsing files in playback mode, quickly press the Menu Button to enable the pop-up menu options. The following operations are available:
Delete: Delete a single file or all files.
Note: Locked files cannot be simply deleted. Unlock the file before you need to delete it.
Protection
Lock and save unprotected files. A locked file cannot be overwritten. Lock:
Unlock: Remove the protective feature of a protected file. Simply delete the file once it is unlocked.
IV. Slide View
Recorded files are played automatically at a set time interval.
V. Back to homepage
Return directly to the homepage.
Playback on Computer
When using the USB cable to connect with a computer, the [UP] and [DOWN] buttons can be used to select options in the pop-up menu. Use the [OK] button to confirm your selection.
1. Mass Storage:
Can be used to play a file in the device or copy any file to your computer.
2. Video:
Video can be used as a power source for video recording.
Parking Monitor
Note:
A Smart Hardwire Kit (included in the package) is required to activate the parking monitor feature. A USB cable cannot provide this function.
I. Power Voltage Protection
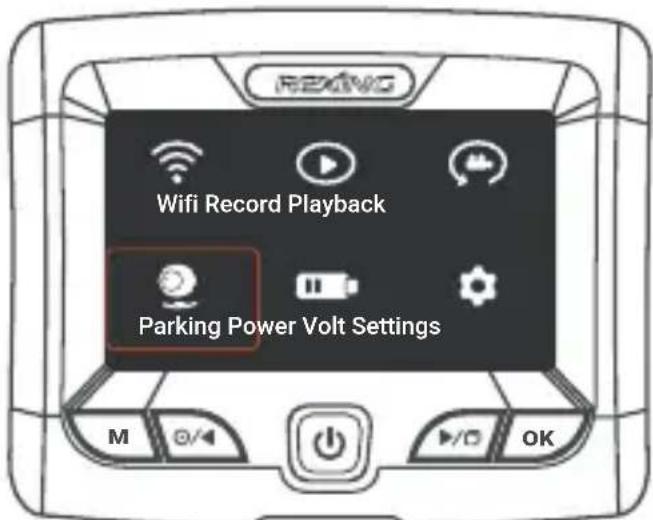
From the Power Voltage menu setup on the main menu, select a voltage (11.8-12.5V) for switching off the device when the car engine is turned off for parking. For example, 11.8V means that the device automatically switches off when the detected vehicle battery voltage drops to less than 11.8V.
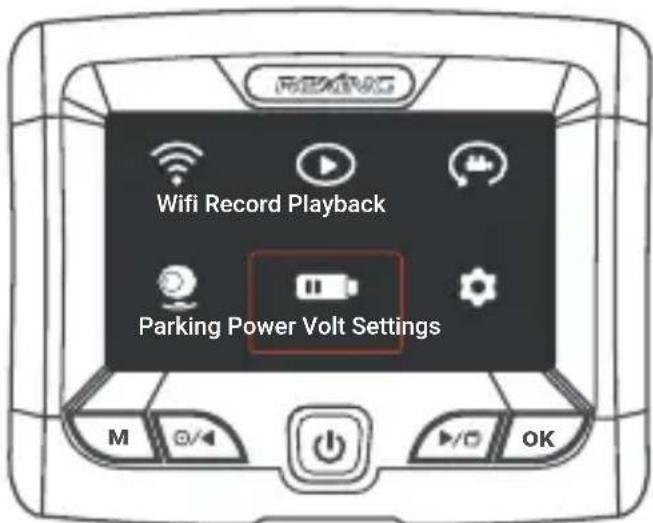
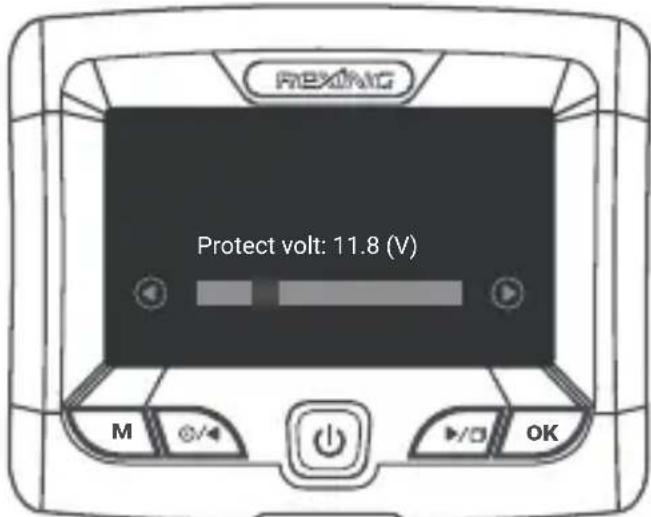
II. Monitoring Mode
In the monitoring mode menu setup on the main page, when a smart hardwire connection is detected, turning on the parking monitor will enable modes: Super Night Scene and Time-Lapse video monitoring.
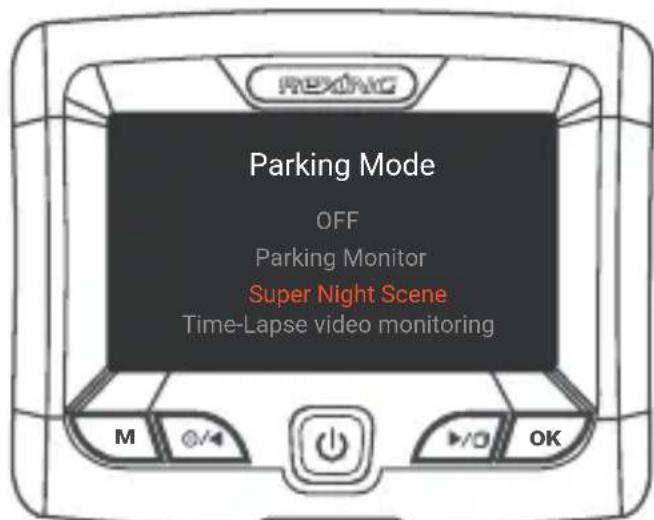
1. Time-Lapse Video Monitoring:
A video recorded in parking mode has only an approximate size of about one sixth to one tenth that of a normal video. This enables the user to save as much video as possible.
2. Super Night Vision:
Time lapse photography in parking monitoring mode is recorded at sixty frames per minute. This function allows for clearer video during low-light or night conditions.
3. Parking Monitor:
In parking mode, when a shock/impact is detected, recording will start and last for 1 minute.
Note:
Monitoring duration options include 12h, 24h, 48h
Mobile Connection
When the device is paired to a mobile phone via Wi-Fi, it can be controlled through the Mobile App.
Basic Operations:
I. Download the Rexing Connect App
- Please go to RexingUSA website and download the app for Android or Apple iOS systems.

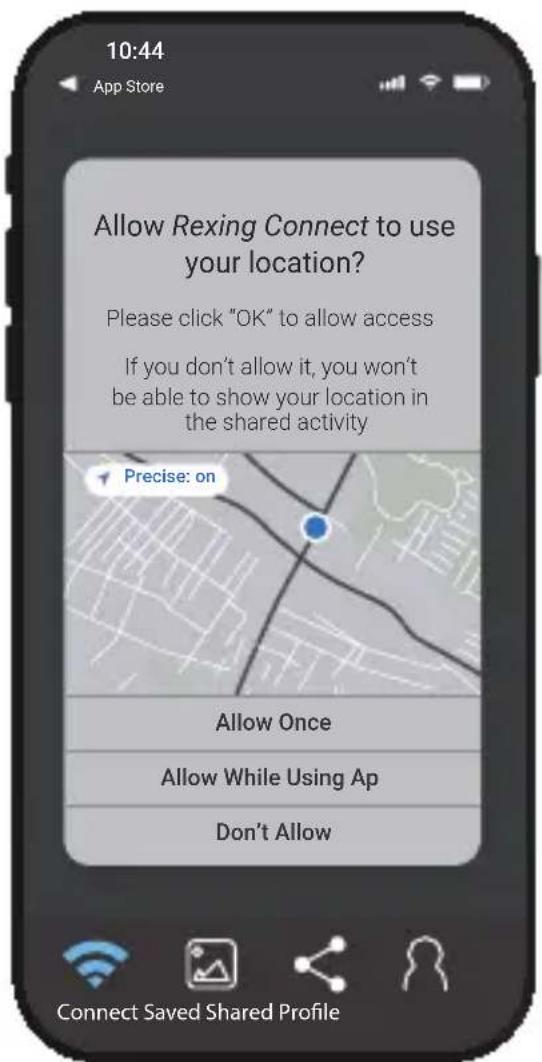
- Open the app after installation. There will be a pop-up message asking if you will allow Rexing Connect to access the your location. Click as shown in the picture:
III. Wi-Fi Connection
For an initial connection, it is necessary to access Wi-Fi setup. Find network and input the password. Later connections require no password input.
- Select Wi-Fi ON/OFF on the main menu or press the OK Button to turn on the Wi-Fi of the device. Press it again to turn the Wi-Fi off. As shown below:
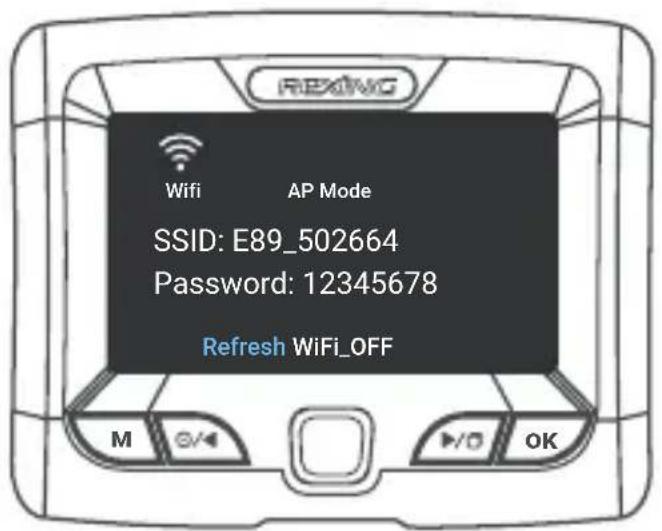
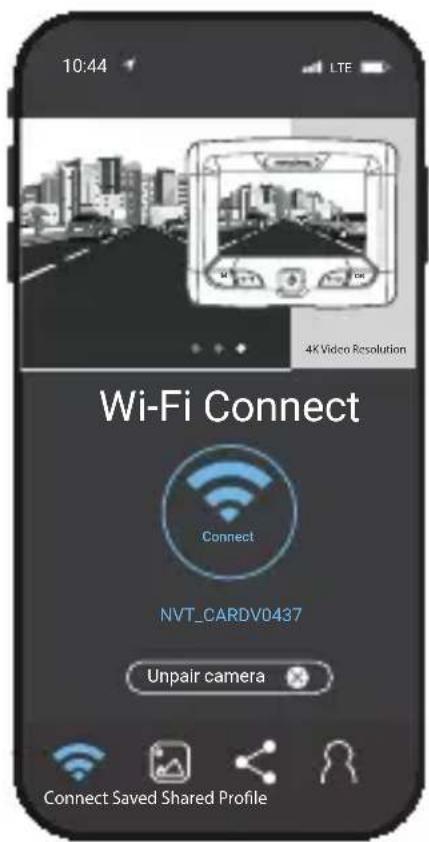
- Search for Wi-Fi on your phone and find SSID: E89_***. Input the password for your connection. The default password for the device is 12345678.
-
Click Connect to complete your connection. When successful a connection is established between the mobile phone and camera, the Wi-Fi icon on the device's screen will turn from white to green. To view the camera record images, simply return to the app.
-
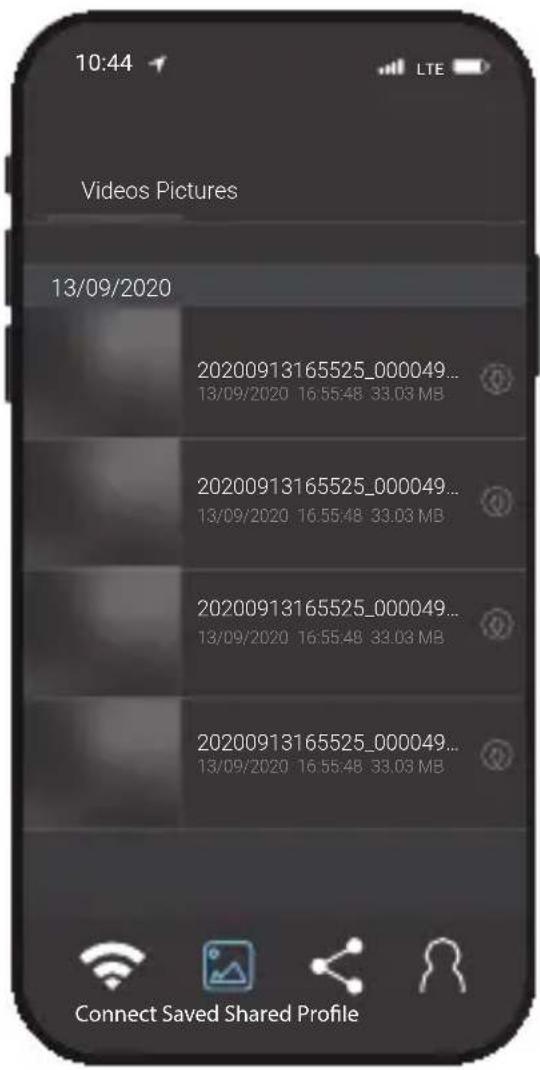
Click the Saved button on the bottom to check the video files and pictures. You may simply click the file to play it online or download it to your mobile phone as shown in the picture:
IV. App Overview:
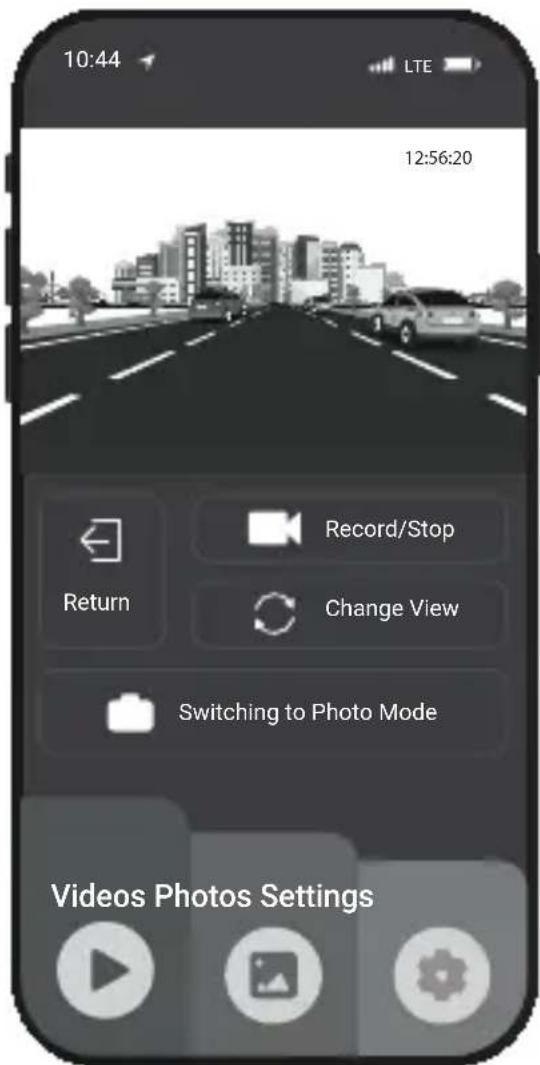
- Press the Record/Stop button to pause/start recording.
Note:
To begin a new setup, use the Settings menu shown below, press this button to pause the recording before beginning a new setup.
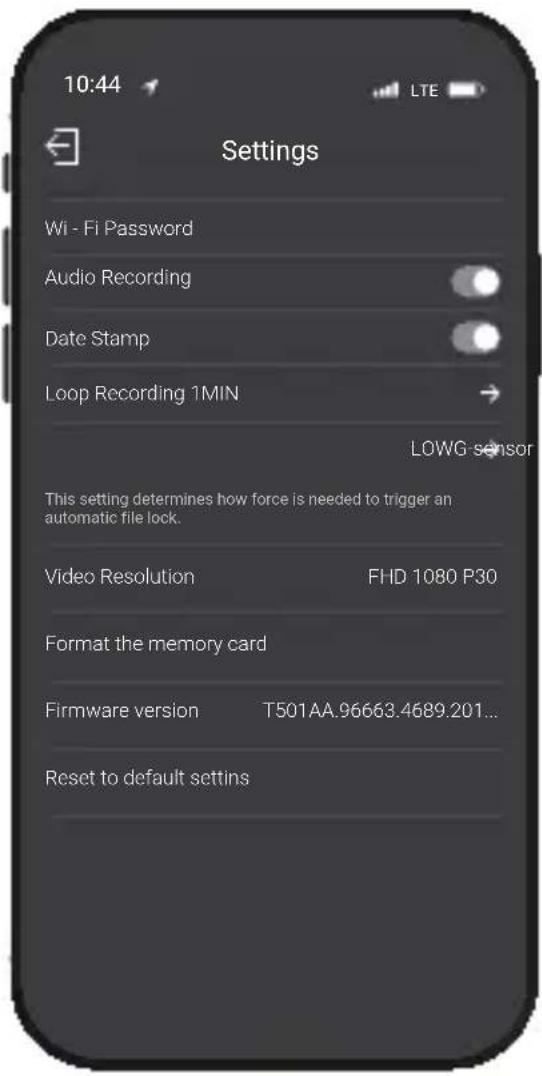
- Press the Settings button on the bottom and set up the parameters of the system menu as shown in the picture:
- Click the Photo button on the bottom to review photos.
- Click the Change View button on the top to toggle between camera views from the front camera, cabin camera, and rearview camera.
- Click the button Switch to Photo Mode in the middle to take a picture in real time.
- Click the button Record/Stop on the top to quickly stop/start the video and audio recordings.
Note:
The information provided is based on the current version of the app. The pictures shown are for reference only. The app is subject to change without prior notice. Please refer to your product.
GPS Player
I. Install a GPS Module
Typical installation locations for the GPS module are on the center console or sun visor with the GPS module facing outward or upward and the back side of GPS module (applied with double-sided, adhesive tape) facing inward or downward so as to ensure an effective satellite signal reception as shown in the picture:
Installation Instructions
II. Installation and Operation of GPS Player
-
Unzip file LUCKY PLAYER and then double click setup.en to install.
-
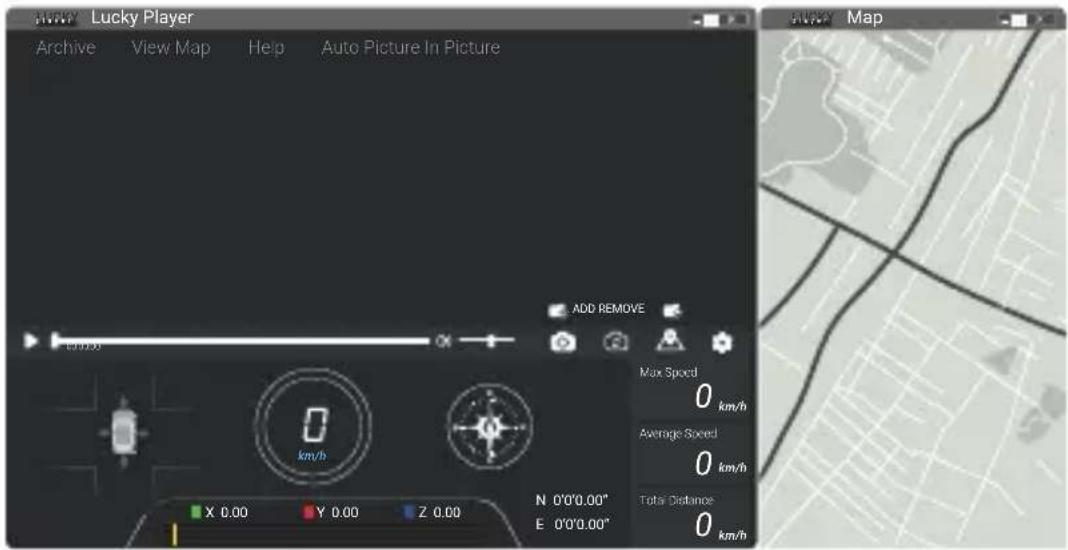
After installation you will see the icon 📄 on your desktop. Double-click to use it, as shown below:
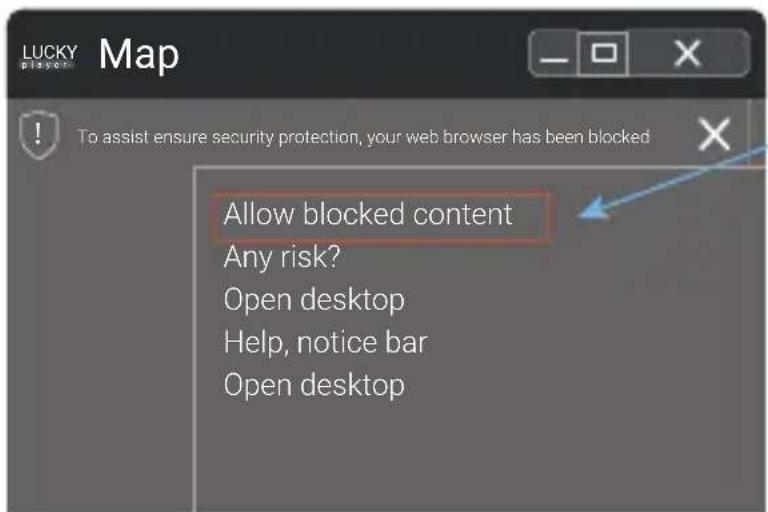
- When LUCKY PLAYER is used and a pop-up message appears in the upper right corner, place the cursor in the range of text and right click the mouse to view the options. Select allow blocked content as shown below:
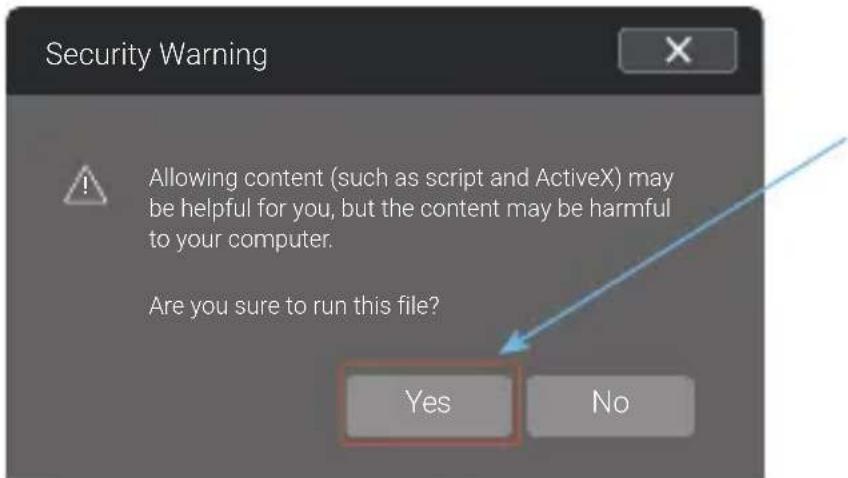
- Click allow blocked content to confirm. Click Yes to display a map with GPS tracking as shown below:
- Click on the GPS player ADD to load the video file with GPS tracking information or directly drag the video file to the player window. The computer is connected to the Internet while the video is being played. The player shows a map with GPS tracking information while driving, as shown below:
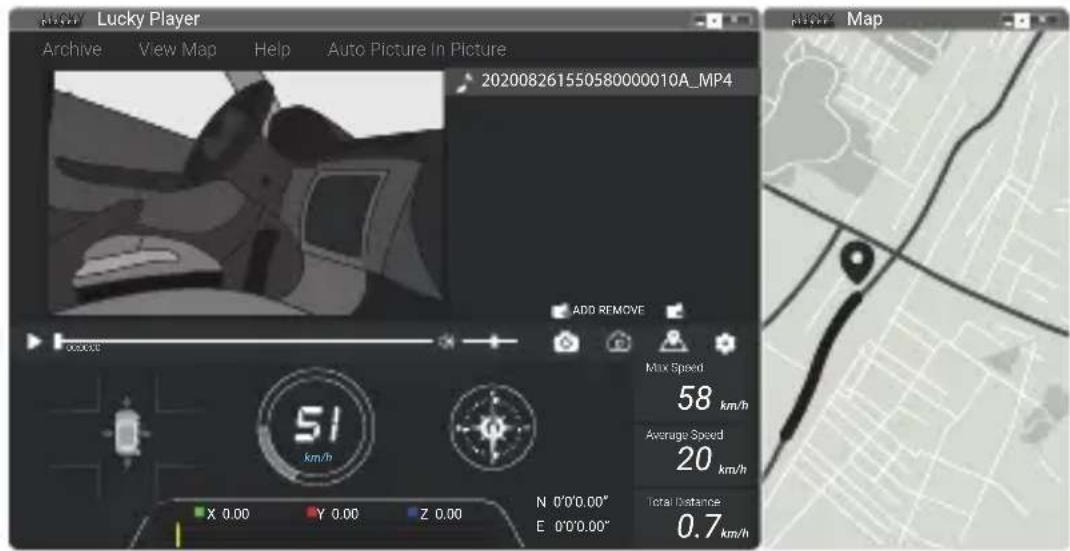
Note:
The GPS player is edited on the basis of the current version. The pictures given are for reference only. The version is subject to change without prior notice. Please refer to the actual one.
Product Specifications
| SDRAM | Built-in |
| Speaker | Built-in |
| MIC | Built-in |
| Display | 3.0" TFT |
| Video Resolution | 1080P + 1080P + 1080P |
| Loop Recording | Support 1, 2, and 3 minutes |
| Parking Monitor | Yes |
| G-Sensor | Yes |
| Video format | H.264 |
| Picture format | JPG |
| Operating Temperature | -4°F ~ 150°F |
| DC 5V 1500mAInput Current |
Note:
Product specifications are subject to change along with software updating. Please refer to your product.
General Troubleshooting
| Trouble | Possible Causes | Solution |
| Failure to power on | Dead battery | Plug in the charger to charge the battery. |
| Automatic shutdown during operation | The automatic shutdown function is enabledDead battery. | In standby mode, automatic shutdown is activated when no time is set.Set time/date.Plug in the charger to charge the battery. |
| Pictures taken are not saved | Power was cut before pictures could be saved. | Charge device |
| Failure to record video or take pictures | MicroSD card is not inserted or recognized by the device.MicroSD card is full.MicroSD card contains images taken by another vehicle's dashcam. | Plug in the card. If the card is not recognized, unplug and plug it in again or clean any debris/substances from the card contacts, or back up data and format the card.Delete unnecessary files or format the card after backup. |
| All buttons fail to function | Program error or incorrect operation | Press the reset key to restart the device. |
Warranty & Support
Warranty
The Rexing S1 Pro Dash Cam comes with a full 12-month warranty. If you register your product on our official site (https://www.rexingusa.com/support/registration), you can extend the warranty to 18 months.
Support
If you have any questions regarding your product, please do not hesitate to contact us at care@rexingusa.com, or call us at (877) 740-8004. Queries are typically answered within 12-24 hours.
Your opinion matters
Rexing is firmly committed to always improving our products, services, and user experience. If you have any thoughts on how we can do even better, we welcome your constructive feedback and suggestions.
Connect with us today at care@rexingusa.com
Thank you for choosing Rexing!
FCCID: 2AW5W-S1PRO
This device complies with part 15 of the FCC Rules. Operation is subject to the following two conditions: (1) This device may not cause harmful interference, and (2) this device must accept any interference received, including interference that may cause undesired operation.
Changes or modifications not expressly approved by the party responsible for compliance could void the user's authority to operate this equipment.
REXING®




MADE IN CHINA
- Notice
- Warning
- Overview
- Thank you for choosing REXING!
- Check us out here.
- What's in the box?
- Table of Contents
- Camera Overview
- Visual Features
- Note:
- Installation
- Installation Instructions
- Turn on the Dash Cam
- Basic Operations
- Main Interface
- System Setup
- Open the Setup Menu
- Video Mode - Setup
- Loop Recording:
- WDR:
- G-SENSOR:
- Time-lapse Monitoring Duration:
- Exposure Compensation:
- DVR Audio:
- Date Stamp:
- System Menu Setup
- Date/Time:
- Screen Backlight:
- Key Tone:
- Language Setup:
- Frequency:
- IR Light Mode:
- Default Setup:
- Version:
- Taking Pictures
- Taking a Picture
- Picture Mode Setup
- Picture Taking Method:
- Resolution:
- Continuous Capture:
- Picture Quality:
- Sharpness:
- White Balance:
- Color:
- ISO:
- Exposure Compensation:
- Anti-Shock:
- Quick Preview:
- Date Stamp:
- Playback and Delete a File
- Browsing Files
- Playback
- Deletion and Protection
- Protection
- Slide View
- Back to homepage
- Playback on Computer
- Mass Storage:
- Video:
- Parking Monitor
- Power Voltage Protection
- Monitoring Mode
- Time-Lapse Video Monitoring:
- Super Night Vision:
- Parking Monitor:
- Mobile Connection
- Basic Operations:
- Download the Rexing Connect App
- Wi-Fi Connection
- App Overview:
- GPS Player
- Install a GPS Module
- Installation and Operation of GPS Player
- Warranty & Support
- Warranty
- Support
- Your opinion matters
- FCCID: 2AW5W-S1PRO
Brand : Rexing
Model : S1 Pro
Category : Dash cam