KSTAP10MFC - Air conditioner Keystone - Free user manual and instructions
Find the device manual for free KSTAP10MFC Keystone in PDF.


| Product Type | Mobile Room Air Conditioner |
| Model | KSTAP10MFC |
| Brand | Keystone |
| Cooling Capacity | 10,000 BTU/h (estimated) |
| Heating Capacity | 9,000 BTU/h (estimated) |
| Dehumidification | Yes (Dry mode) |
| Refrigerant | R410A |
| Global Warming Potential (GWP) | 2088 |
| Compressor Oil | ESTER OIL Vg68 or equivalent |
| Power Supply | 115V/60Hz (typical) |
| Control Panel | Button/Touch with LED indicators |
| Remote Control | Yes (magnetic holder) |
| WiFi Connectivity | Yes (via Connect button) |
| Child Lock | Yes |
| Weekly Timer | Yes (via App) |
| Sleep Mode | Yes (8-hour auto exit) |
| Timer (On/Off) | Yes |
| Filter Cleaning Reminder | Yes (every 250 hours) |
| Auto-Restart | Yes |
| Air Filter | Washable (upper and lower) |
| Drain Method | Manual bottom drain + pump drain option |
| Exhaust Duct Length | 27 cm min, 150 cm max |
| Window Kit Length | 67.5 cm to 120 cm |
| Safety Features | Grounded plug, no extension cord, RCD recommended |
Frequently Asked Questions - KSTAP10MFC Keystone
User questions about KSTAP10MFC Keystone
0 question about this device. Answer the ones you know or ask your own.
Ask a new question about this device
Download the instructions for your Air conditioner in PDF format for free! Find your manual KSTAP10MFC - Keystone and take your electronic device back in hand. On this page are published all the documents necessary for the use of your device. KSTAP10MFC by Keystone.
USER MANUAL KSTAP10MFC Keystone
INSTALLATION & OPERATIONS MANUAL
MOBILE ROOM AIR CONDITIONER
natural_image
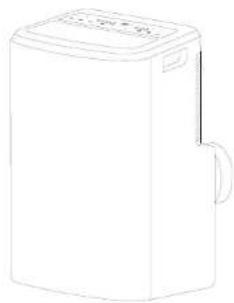
Line drawing of a rectangular electronic device with a lid and handle (no text or symbols)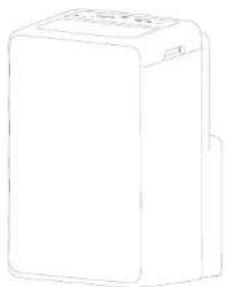
natural_image
Simple line drawing of a rectangular box with a label on top (no text or symbols on the box itself)FOR FUTURE REFERENCE
CONTENTS
Troubleshooting
Safety Precaution .... 1
Parts Description 5
Control Panel....6
Operation....9
Accessories.... 10
Installation 11
Maintenance 16
Troubleshooting 17
Note: All the illustrations in this manual are for explanation purpose only. Your air conditioner may be slightly different. The actual shape shall prevail. They are subject to change without notice for future improuement.
To save the cost of a service call, please try the suggestions below to see if you can solve your problem without outside help.
| Air Condition Will Not Operate | |
| Causes | Solutions |
| The power switch is released.Power supply failure.The fuse is burnt.It doesn't reach the setting time for starting up. | Switch on the power.Wait for the recovery of power supply.Replace the fuse by professional.Wait or reset the original setting. |
| Unit Doesn't Start When Pressing ON/OFF Button | |
| Causes | Solutions |
| It is not four minutes after switch off.Room temperature is lower than the setting temperature under cooling mode or higher than setting temperature under heating mode. | Wait four minutes.Reset the setting temperature. |
| The Wind Blowing Out, But The Cooling Effect Is Bad | |
| Causes | Solutions |
| ● Mistakes in temperature setting.● The air filter is blocked by dust.● The air inlet or outlet of machine is blocked.● Turn the air conditioner on in very hot room.● Cooling capacity is insufficient.● The doors or windows are open. | ■ Set a proper temperature, setting temperature should be lower than ambient temperature.■ Clean the air filter.■ Remove the obstruction.■ Allow additional time to remove stored heat from walls ,ceiling, floor and furniture.■ Reconfirm the required cooling capacity with your dealer.■ Close the doors and windows. |
| Noise or vibration | |
| Causes | Solutions |
| ●The ground is not level or not flat enough. | ■ Place the unit on a flat, level ground if possible. |
Maintenance
Safety Precautions
WARNING
※Before the cleaning of the air conditioner, it must be shut down and the electricity must be cut off for more than 5 minutes, otherwise there might be the risk of electric shocks.
※Do not use gasoline, benzene, thinner or any other chemicals, or any liquid insecticide on the air conditioner, as these substances may cause flaking off of the paint, cracking or deformation of plastic parts.
※Never attempt to clean the unit by pouring water directly over any of the surface areas, as this will cause deterioration of electrical components and wiring insulation.
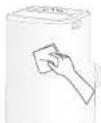
Clean the unit
When the unit is contaminated, clean it gently with a wrung towel using tepid water below 40°C (104°F).
Clean the Air Filter
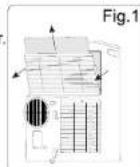
- Remove the air filter
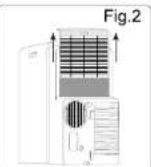
Take out the upper air filter and the lower air filter.
Note: There are two types about the low air intake grille, please refer to Fig. 1 or Fig. 2. If the low air intake with a srew, please remove the srew at first.
- Clean the air filter
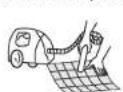
Use a vacuum cleaner or water to rinse filter, and if the filter is very dirty (for example, with greasy dirt), clean it with warm water (below 40°C(104°F)) with mild detergent dissolved in, and then put the filter in the shade to dry in the air.

- Reinstall the dried filter in reverse order of removal. Put the filter cover back to its place.
Note:
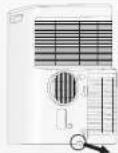
if you don't use the unit for a long time, please pull out the rubber plug to drain the inside water out referring to right figure.
Incorrect installation or operation by not following these instructions may cause harm or damage to people, properties, etc.
The seriousness is classified by the following indications:
WARNING
This symbol indicates the possibility of death or serious injury.
CAUTION
This symbol indicates the possibility of injury or damage to properties.
⚠ WARNING
- This appliance can be used by children aged from 8 years and above and persons with reduced physical, sensory or mental capabilities or lack of experience and knowledge if they have been given supervision or instruction concerning use of the appliance in a safe way and understand the hazards involved. Children shall not play with the appliance. Cleaning and user maintenance shall not be made by children without supervision. (Only for the AC with CE-MARKING)
- This appliance is not intended for use by persons (including children) with reduced physical, sensory or mental capabilities, or lack of experience and knowledge, unless they have been given supervision or instruction concerning use of the appliance by a person responsible for their safety. Children should be supervised to ensure that they do not play with the appliance. (Except for the AC with CE-MARKING and UL )
● This unit is designed for indoor use only.
● The air conditioner must be grounded. Incomplete grounding may result in electric shocks.
- The unit must be placed on the horizontal ground to prevent tilting and sliding.
Safety Precautions
Installation
- An earth leakage breaker with rated capacity must be installed to avoid possible electric shocks.
- Don't install air conditioner in a place where there is flammable gas or liquid.
- If the power supply cord is damaged, it must be replaced by the manufacture or its service agent or a similar qualified person.
● The specification of the fuse are printed on the circuit board, such as: AC 250V/5A, etc. - Don't put hands or any objects into the air inlets or outlets.
- Don't touch the swinging wind vanes.
- Don't attempt to repair the air conditioner by yourself.
●In lighting storm weather, please cut off the primary power supply switch in order to prevent the machine from damage. - Don't use liquid or corrosive detergent to clean the appliance and don't splash water or other liquid onto it, otherwise, it may damage the plastic components, even cause electric shock.
- Don't operate the unit in a wet room such as the bath room or laundry rooms.
- Don't touch the unit with wet or damp hands or when barefoot.
- If your air conditioner is not fitted with a supply cord and a plug, an all-pole switch must be installed in the fixed wiring and the distance between contacts should be no less than 3.0 mm.( Except UL)
- Don't pull the unit by the cord.
- Don't remove any part of the unit unless instructed by an authorized technician.
- Don't move the unit, unless the power has been cut off and the power cord is tied to the bending and winding column.
- Don't operate the unit with a damaged plug or a loose socket.
● After installment, earth leakage examination must be carried on through electrifying.
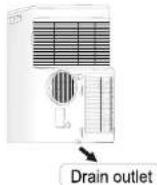
* If the unit you bought has the pump drain outlet, as shown below, please drain in this way: Remove the pump drain plug from the back of the unit, attach the drain hose to the hole. Place the other end of the hose in the drainage way or other drain areas.
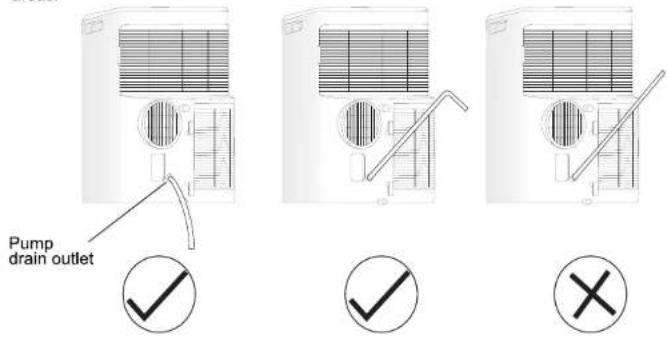
Note: Make sure the hose is secure and there are no leaks. Direct the hose toward the drain, making sure that there are no kinks that will stop the water flowing. Place the end of the hose into the drain and make sure the end of the hose is down to let the water flow smoothly. Do never let it up.
* When the water level of the bottom tray reaches predetermined level, the digital display area shows "P1" and the WATER FULL indicator light illuminates.
Carefully move the unit to a drain location, remove the bottom drain plug and let the water drain away. Reinstall the bottom drain plug and restart the machine until the P1 symbol disappears. If the error repeats, call for service.
NOTE: Be sure to reinstall the bottom drain plug before using the unit.
Installation
Safety Precautions
Install the exhaust duct into the wall
- Prepare a hole in the wall. Install the wall exhaust adaptor onto the wall by using 4 expansion screw sleeve and type C screws, be sure to fix thoroughly.
- Connect the exhaust duct to wall exhaust adaptor.(Fig.G)
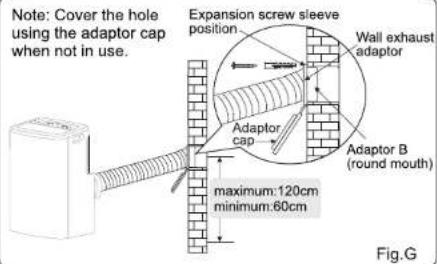
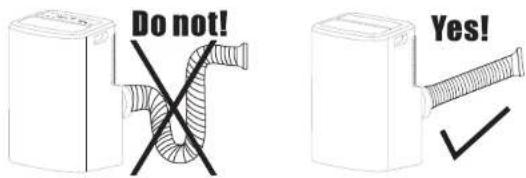
Note: 1. The duct can be compressed to 270mm minimum and extended to 1500mm maximum. It is better to keep the duct length to a minimum length.
2. Stretching or bending the duct excessively will affect the cooling efficiency. (As the following fig. Shows)
Water drainage
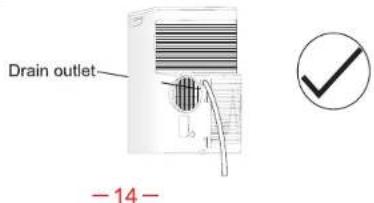
* During dehumidifying mode, remove the upper drain plug from the back of the unit. Attach the drain hose to the hole. Place the other end of the hose in the drainage way or other drain areas.
⚠ WARNING
Failure to follow the below precaution could result in electrical shock, fire or personal injury.
- The plug must be plugged into an outlet that is properly installed and grounded.
- Do not use an extension cord or plug adaptor with this unit.
∅ CAUTION
- Don't apply the cold air to the body for a long time. It will deteriorate your physical conditions and cause health problems.
- Don't block air inlet or air outlet, otherwise, the cooling capacity will be weakened, even cause system stop operating.
- Close the windows and doors, otherwise, the cooling capacity will be weakened.
- If the air filter is very dirty, the cooling capacity will be weakened. Please clean the air filter regularly.
Notices for R410A models
Refrigerant leakage contributes to climate change. Refrigerant with lower global warming potential (GWP) would contribute less to global warming than a refrigerant with higher GWP, if leaked to the atmosphere. This appliance contains a refrigerant fluid with a GWP equal to [2088]. This means that if 1 kg of this refrigerant fluid would be leaked to the atmosphere, the impact on global warming would be [2088] times higher than 1 kg of CO₂, over a period of 100 years. Never try to interfere with the refrigerant circuit yourself or disassemble the product yourself and always ask a professiona.
Safety Precautions
Installation
WEEE Warning
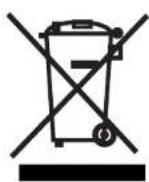
Meaning of crossed out wheeled dustbin: Do not dispose of electrical appliances as unsorted municipal waste, use separate collection facilities.
Contact you local government for information regarding the collection systems available. If electrical appliances are disposed of in landfills or dumps, hazardous substances can leak into the groundwater and get into the food chain, damaging your health and well-being. When replacing old appliances with new ones, the retailer is legally obligated to take back your old appliance for disposals at least free of charge.
The oil of compressor used as below table:
| Compressor Manufacturer or Trade mark | Refrigerant | The name of oil |
| Highly | R410A | 68HES-H or equivalent |
| R22 | DIAMOND MS-56 or NM56EP or equivalent | |
| Meizhi | R410A | ESTER OIL Vg68 |
| R22 | SUNISO 4GSD or NM56EP or equivalent | |
| Rechi | R410A | NMOC Ze-Gles RB68EP or equivalent |
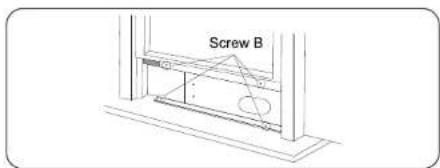
- Carefully lower the window. Secure the vent panel in place with 4 type B screws, plus one screw for each extension.
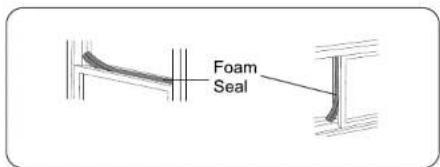
- Cut the foam seal B(non-adhesive) to the window width. Stuff the foam seal B between the glass and the window to prevent air and insects from getting into room.
natural_image
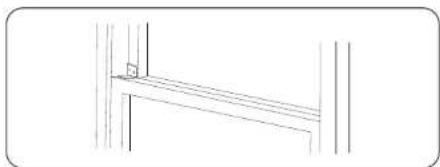
Simple line drawing of a window frame with a small square object on the left side (no text or symbols)- Install the security bracket with a type B screw, as shown.
Install the exhaust duct into the window
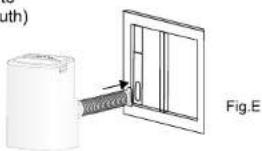
Remove the unit with the packed exhaust duct next to the window, and then connect the adaptorB (flat mouth) of the exhaust duct with the window.(Fig.E)
Installation
Parts Description
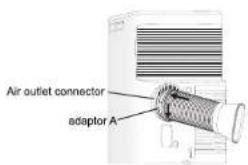
- Connect the exhaust duct to the Air outlet connector on back of the unit. Slide-in the adaptor A downwards until it is locked in place. (Fig.C)
or
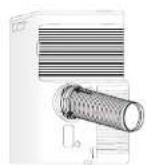
Fig.C
Install the Window Slider Kit
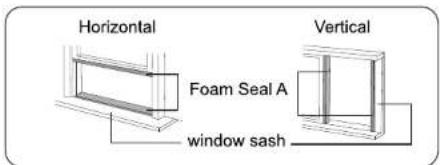
- Cut the foam seal(adhesive type) to the proper length and attach it to the window sash.
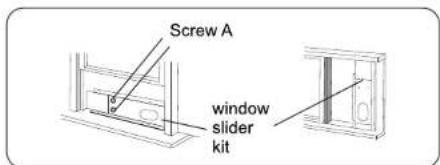
- Attach the window slider kit to the window sash. Adjust the length of the Window Slider Kit: Loose the screw A to adjust the length of the Window Slider Kit, then tight the screw when the length is suitable.
Note: the length of the Window Slider Kit is 67.5cm to 120cm.
FRONT VIEW
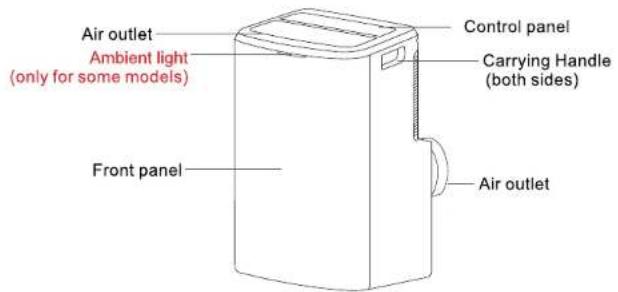
REAR VIEW
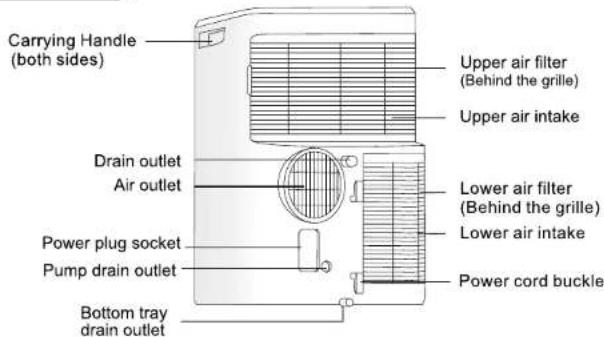
NOTE:
* The descriptions in this user manual are text and figures may have slightly difference to the promotion information and actual appliance. Please refer to the real appliance purchased, Thank you.
* The woking temperature range of the air conditioner is 16\~35°C (60\~95°F) under cooling mode; 5\~27°C(41\~80°F) under heating mode.
* Function of magnetic remote control: If there is a "Magnetic Holder" indicator label near the control panel, the original remote controller can magnetically match the label area.
Control Panel
Installation
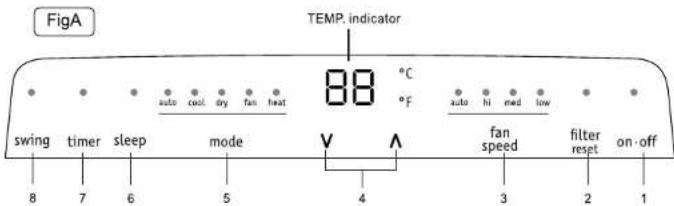
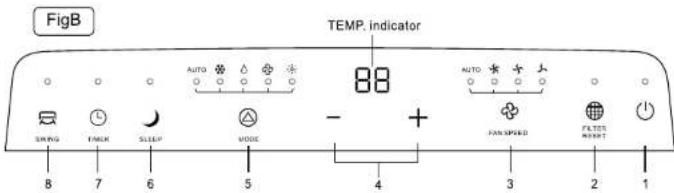
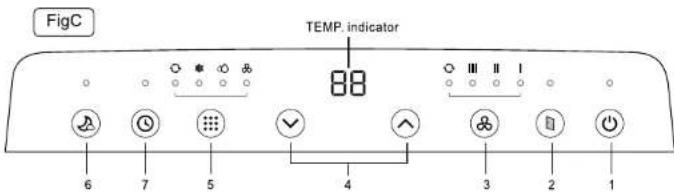
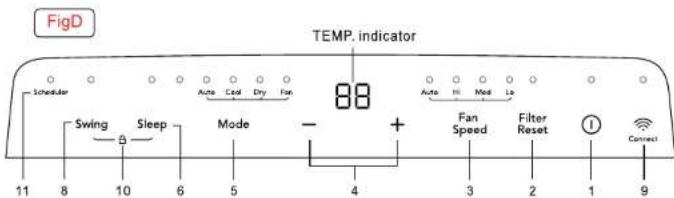
There are four kinds of control panel, Fig A, Fig B, Fig C and Fig D, the actual shape shall prevail.
Guide of customer
● The customer should have a qualified power supply coincident with that printed on the tag of the air conditioner.
● Must use dedicated circuit and efficient grounding outlet matching with the plug of the air conditioner.
●The appliance should be installed in accordance with national wiring regulation.
●The plug should be easily accessible after installation.
Select a best location
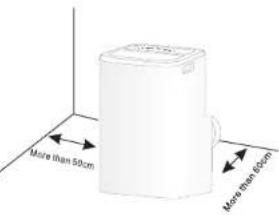
- Install the mobile air conditioner in a flat and spacious location where the air outlets will not be obstructed.
2.A minimum clearance from walls or other obstacles should be kept, as fig. - The gradient can't be more than 10 degrees with the horizontal plane, while placing and using the unit.
Note: 1. The air conditioner shall not be used in the laundry.
- The plug shall be accessible after the unit is positioned.
Duct mount instruction
- In cooling, heating and drying mode, the exhaust duct needs to be installed while in fan mode, the exhaust duct is not needed.
- According to the actual needs, the exhaust duct can be moderately compressed and tensed, but cannot be arbitrarily stretched and bent.
-
The exhaust duct can be connected with Windows or installed into the wall. With the actual needs, you can make the installation with accessories of the unit.
-
Install the adaptor A and adaptor B (flat mouth or round mouth) onto the exhaust duct as shown in Fig.A or Fig.B.
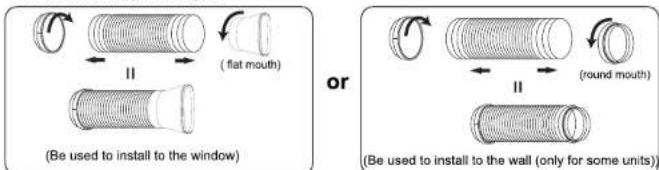
Fig.A
Fig.B
Accessories
Control Panel
| Parts | Parts name | Quantity |
| Adaptor A, Exhaust duct, Adaptor B(flat mouth), Window Slider Kit | 1set | |
| Type A Screws(#) | 2pc | |
| Type B Screws(#) | 1/2" screws 4pc3/4" screws 2pc | |
| Security bracket(#) | 1pc | |
| Type A foam seal(adhesive)(#) | 2pc | |
| Type B foam seal(non-adhesive)(#) | 1pc | |
| Adaptor B(round mouth)(#), Wall exhaust Adaptor(#) | 1set | |
| Drain hose | 1pc | |
| Remote controller and Battery | 1pc | |
| Expansion screw sleeve(#), Type C Screws(#) | 4pc4pc | |
| NOTE: Optional parts (#), some models without. | ||
NOTE:
All the illustrations in this manual are for explanation purpose only. Your air conditioner may be slightly different. The actual shape shall prevail. They are subject to change without notice for future improuement.
mobile air-conditioner air louver notes:
- With automatic wind sweep function models, the air louver opening angle can not be less than automatically wind smallest outlet angle when use it.
- No automatic sweep function models, air louver minimum opening angle: from air louver closed state breaking up 5 grid, air louver opening angle can not be less than the minimum open angle when use it.
TEMP. indicator
* In cooling or heating mode, when V(-/_) or A(+/_) button is pressed, the setting temperature is displayed and be adjusted.
* 1.In auto, cool and heat mode, TEMP.indicator display is setting temperature.
2.In dry and fan mode, TEMP.indicator display is room temperature.
Function buttons
- on-off/ ⏻/ ⏻/ ⏱ button — Press this button to turn the unit on or off.
- filter / Ⓗ / ⏱ button
a. The running time of the unit has reached 250 hours, the filter reset indicator light will illuminates, and it means the air filter should be cleaned.
After cleaning, you can press the "filter reset" button, the filter reset indicator light will turns off and the running time will be cleared.
b. If you do not press the "filter reset" button when the filter reset indicator light illuminates, the indicator light will always illuminates except the unit is power off.
- fan / ☑/ Ⓤ button — Press this button, you can select the fan speed as follows:
$$ \rightarrow \text { auto } \longrightarrow \text { hi } \longrightarrow \text { med } \longrightarrow \text { low } $$
The fan speed indicator light illuminates under the different fan speed.
Note: In fan mode, do not have auto fan speed;
- V (-/ Venezuela) or Λ (+/ Venezuela) button
a. Each time the (+ / ) or V(-/√) button is pressed, the setting temperature will increase or decrease by 1^ (1°F). The setting temperature ranges from 16^ (60°F)\~ 32^ (90°F).
b. By pressing both the V(-/∨) and A(+/∧) button at the same time(≥3s), the display will toggle between Celsius and Fahrenheit.
- mode/△/☑ button — Press this button, you can select the running mode as follows:
$$ \text { Heat - pump type: } \boxed {\rightarrow \text { auto } \longrightarrow \text { cool } \longrightarrow \text { dry } \longrightarrow \text { fan } \longrightarrow \text { heat }} $$
$$ \text { Cool only units: } \quad \rightarrow \text { auto } \longrightarrow \text { cool } \longrightarrow \text { dry } \longrightarrow \text { fan } $$
The mode indicator light illuminates under the different mode.
- sleep/ J / 📁 button
Press this button to enter sleep mode, which the unit will exit after 8 hours of continuous operation and restore to the previous status. Note: The SLEEP function can not be activated in fan and dry mode.
Control Panel
Operation
- timer/ Ⓛ / ⓞ button
a. Press the "timer" button, the timer indicator light illuminates.
b. Press V (-/√) or Λ (+/∧) button to select the desired time.
c. After setting time 5 seconds without other operation, the timing function will be initiated automatically. If you press the timer button, there are no operation within 5 seconds or setting time is 0, the timing function will be cancelled automatically.
d. When the timing function is initiated, the unit displays the remaining time by press the "timer" button once and cancel the timing function by press it again.
Note: With the unit on, press this button to set off timer.
With the unit off, press this button to set on timer.
-
swing / ≈ button — Press this button, the swing indicator light will illuminate.
-
Connect button
Press and hold the "Connect" button for 5 seconds, the WI-FI turn on for matching and the ambient light blinks white, it stops when the time is over 10 minutes.
After the WI-FI is successfully connected, the ambient light is fixed white for 10 seconds, and then it restores previous display status.
- ☐ Child-lock (only Fig D)
Press the "Swing" and "Sleep" buttons at the same time and hold for at least 3 seconds to activate or deactivate the child-lock function.
- Scheduler Weekly timing function (only Fig D)
When the weekly timer function is turned on through the APP, the scheduler light will illuminate.
Display function of the ambient light (only applicable to models with ambient light): In non-sleep mode, the ambient light can be turned on or turned off through APP or pressing and holding the “+” and “=Fan Speed” buttons on the panel for 3 seconds.
WARNING
Failure to follow the below precaution could result in electrical shock, fire or personal injury.
-
The plug must be plugged into an outlet that is properly installed and grounded.
-
Do not use an extension cord or plug adaptor with this unit.
Before starting the unit
-
Select a suitable location, make sure the unit is near to an electrical outlet.
-
Install the flexible exhaust hose and the adjustable window slider kit.
-
Plug the unit into a right outlet.
Heating operation mode (Cold wind type has no heating function)
-
Press the MODE button in a sequence until the heat indicator is lighted.
-
Press the "+" and "-" button to setting your desired setting temperature.
-
Press FAN button to select the fan speed.
Cooling operation mode
-
Press the MODE button in a sequence until the cool indicator is lighted.
-
Press the "+" and "-" button to set your desired setting temperature.
-
Press FAN button to select the fan speed.
Drying operation mode
-
Press the MODE button in a sequence until the dry indicator is lighted.
-
The fan will run at a fixed speed at this operation mode.
-
Close windows and doors for the best dehumidifying effect.
Note: The setting temperature and fan speed can not be adjusted. The setting temperature is 25^ C ( 77^ F) and the fan speed is low.
Fan operation mode
-
Press MODE button in a sequence until the fan indicator is lighted.
-
Press the FAN button to select the fan speed.
Note: The setting temperature can not be adjusted.
Auto-restart function:
If power to the unit is interrupted, the unit will restart itself in its last used mode / settings once power is restored. The compressor will restart after 4 minutes.
- Set: Press the sleep button 10 times within 5 seconds, buzzer sounds 4 times.
2.Cancel: Press the sleep button 10 times within 5 seconds, buzzer sounds 2 times.
- MOBILE ROOM AIR CONDITIONER
- CONTENTS
- Troubleshooting
- Maintenance
- Safety Precautions
- WARNING
- Clean the unit
- Clean the Air Filter
- CAUTION
- ⚠ WARNING
- Installation
- Install the exhaust duct into the wall
- Water drainage
- ∅ CAUTION
- Notices for R410A models
- WEEE Warning
- Install the exhaust duct into the window
- Parts Description
- Install the Window Slider Kit
- NOTE:
- Control Panel
- Guide of customer
- Select a best location
- Duct mount instruction
- Accessories
- mobile air-conditioner air louver notes:
- TEMP. indicator
- Function buttons
- Operation
- Before starting the unit
- Heating operation mode (Cold wind type has no heating function)
- Cooling operation mode
- Drying operation mode
- Fan operation mode
- Auto-restart function:
Brand : Keystone
Model : KSTAP10MFC
Category : Air conditioner