
ID-1172 - Small Appliances Salton - Free user manual and instructions
Find the device manual for free ID-1172 Salton in PDF.


| Product Type | Induction Cooktop |
| Brand | Salton |
| Model | ID-1172 |
| Power Consumption | 1500W maximum |
| Voltage | 120V AC |
| Power Levels | 6 settings (Keep Warm to High) |
| Timer Range | 1 to 99 minutes |
| Auto Shut-off | After 2 hours of continuous use |
| Display Type | LED display |
| Control Type | Rotary knob (On/Off and power adjustment) and timer buttons (+/-) |
| Compatible Cookware Materials | Cast iron, enameled, stainless steel |
| Pan Diameter Range | 12 cm (5 inches) to 18 cm (7 inches) |
| Safety Features | Polarized plug, short supply cord, dry pot protection, overheat protection, voltage monitoring |
| Protection Features | Automatic shut-off on dry pot (E3), voltage error detection (E7/E8), fan cooling after shut-off |
| Care Instructions | Wipe with damp cloth; do not immerse in water; avoid abrasive cleansers |
| Warranty | 1 year limited warranty |
| Included Accessories | Instruction booklet with recipes |
Frequently Asked Questions - ID-1172 Salton
- E3: Dry pot or overheating. Check if the pot has boiled dry and ensure ventilation is clear.
- E7: Voltage below 90V.
- E8: Voltage above 140V.
- E1, E2, E4, E5, Eb, EC: Internal faults; contact service center.
User questions about ID-1172 Salton
0 question about this device. Answer the ones you know or ask your own.
Ask a new question about this device
Download the instructions for your Small Appliances in PDF format for free! Find your manual ID-1172 - Salton and take your electronic device back in hand. On this page are published all the documents necessary for the use of your device. ID-1172 by Salton.
USER MANUAL ID-1172 Salton
natural_image
Black and white photo of a stainless steel pot on a black electrical stove with a digital display showing temperature reading (no text or symbols on the pot itself)Instruction Booklet
Model: ID-1172
IMPORTANT SAFEGUARDS
When using electrical appliances, basic safety precautions should always be followed including the following:
- Read all instructions.
- Do not touch hot surfaces. Use handles or knobs.
- To protect against electrical hazards, do not immerse cord, plugs, or the appliance in water or other liquid.
- Close supervision is necessary when any appliance is used by or near children.
- Unplug from outlet when not in use and before cleaning. Allow to cool before putting on or taking off parts, and before cleaning the appliance.
- Do not operate any appliance with a damaged cord or plug or after the appliance malfunctions, or has been damaged in any manner. Return appliance to Salton for examination, repair or adjustment. See Warranty.
- If the appliance is not working as described in this instruction booklet discontinue use and contact Salton Canada. See Warranty.
- The use of accessories or attachments not recommended by Salton may cause hazards.
- Do not use outdoors.
- Do not let cord hang over edge of table or counter, or touch hot surfaces.
- A fire may occur if surface is covered or touching flammable material such as curtains, draperies, walls and the like when in operation.
- Always disconnect appliance from outlet when not in use. To disconnect, turn any control to 'OFF', then remove plug from wall outlet.
- Do not use appliance for other than intended use.
- Do not place on or near a hot gas or electric burner, or in a heated oven.
- Extreme caution must be used when moving an appliance containing hot liquids. Do not overfill Cookware used on the appliance to avoid spilling when contents are boiling.
SAVE THESE INSTRUCTIONS
HOUSEHOLD USE ONLY
POLARIZED PLUG
This appliance has a polarized plug (one blade is wider than the other). To reduce the risk of electric shock, this plug will fit in a polarized outlet only one way. If the plug does not fit fully in the outlet, reverse the plug. If it still does not fit, contact a qualified electrician. Do not modify the plug in any way.
DESCRIPTION OF PARTS
- Induction Cooktop
- Timer Buttons
- LED Display
- On/Off Button with Cooking Level Adjustment (Power)
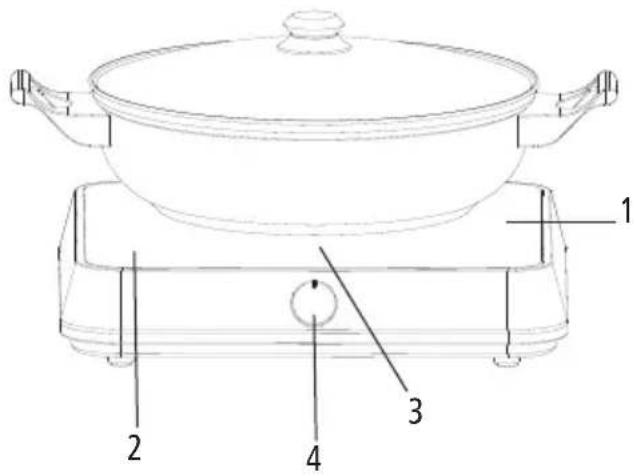
HOW TO USE
- Place the cookware within the white circle on the Induction Cooktop.
NOTE: Ensure that the bottom of the cookware is clean as dirt may cause the bottom to stick to the Induction Cooktop. - Plug into a 120 volt wall outlet. The Induction Cooker will beep once and display '-'.
- Turn the On/Off Button clockwise to turn the unit on. To set the temperature, turn the Cooking Level Adjustment Button clockwise. There are 6 cooking levels between 'Keep Warm' and 'High' to choose from. Refer to the table below.
| Power Setting Temperature Wattage | ||
| - Off - | ||
| 0 Standby - | ||
| 1 Keep Warm 120 | ||
| 2 Low 500 | ||
| 3 Low-High 800 | ||
| 4 | Medium 1000 | |
| 5 | Medium-High | 1300 |
| 6 | High | 1500 |
-
If you wish to use the timer, press the '+' or '-' Timer Button. The default time starts at 30 minutes, however you may increase or decrease that time by pressing the '+' or '-' buttons. Press either of these buttons once to increase/decrease the time in 1 minute increments or hold down the button to increase/decrease in increments of 10 minutes. The timer can be set anywhere between 1 and 99 minutes. The unit will automatically turn off when the Timer has counted down to 0.
-
Turn the On/Off Button counterclockwise to turn the unit off.
NOTE: When the unit is turned off, the fan will continue running for approximately one minute. The display window may also display 'H' until the temperature of the Induction Cooktop is below 122°F (50°C).
IMPORTANT:
The Induction Cooker has a default running time of 2 hours. After 2 hours of continuous use, the unit will automatically shut off. If you would like to use the Induction Cooker longer than 2 hours, simply Restart the Induction Cooker after it has shut off.
IMPORTANT NOTES:
- This Induction Cooktop will only operate with compatible Cookware. The most common types are cast iron, enameled and stainless steel. The Induction Cooktop will not operate when using aluminum, ceramic, copper, glass or pyrex or cookware that has a concave bottom or a diameter less than 12cm (5") or more than 18cm (7").
- If the Induction Cooker has been turned on without a compatible pot in place the unit will beep 5 times then shut off.
- Make sure to turn the unit off before you remove the Cookware from the Cooktop. If the Cookware is removed from the Induction Cooktop without first turning the knob to the 'Off' position, the unit will beep 5 times then shut off.
- The unit will show an error code of E8 if the voltage rises over 140 volts or an error code of E7 if the voltage drops to less than 90 volts. Restart the Induction Cooker in the desired mode.
- This unit is equipped with a 'Dry Pot' protection feature. The Error code E3 will be shown in the Display Window and the unit will not heat.
CARE AND CLEANING
1) Unplug from the wall outlet.
2) Clean the Induction Cooktop and the Control Panel with a damp cloth.
NOTE:
- Do not use a brush or abrasive cleansers. This may damage the Cooktop.
- Do not immerse the unit in water or any other liquid.
3) Dry with a soft cloth.
4) Clean the unit after each use.
TROUBLESHOOTTING:
| Error Codes | Reason Solution | |
| E3, E6 | Overheating or dry | ·Ensure that the air inlet or the exhaust outlet are not blocked.·Ensure that the fan is running·Check to see if the pot has boiled dry. If so, turn off the cooker and let it cool down. |
| E7, E8 | Voltage not suitable | ·The voltage has either increased over 140V or decreased below 90V |
| E1, E2, E4, E5, Eb, EC | Internal parts are either overheating, have an open or short circuit | ·Contact the service centre. See last page of the instruction booklet for contact information. |
RECIPES
Vegetable Medley
1 small onion, diced
1/3 cup (85 ml) canola oil
1 cup (250 ml) chicken broth
1 clove garlic, minced
1/2 cup (125 ml) parsley, chopped
2 large tomatoes, cut in chunks and seeds removed
8 new potatoes, peeled and cut in 1/2" (13mm) cubes
2 carrots, large, cut in 1/2" (13 mm) slices
1 green pepper, seeds removed, cut in 1/4" (6mm) slices
8 oz. ( 225 g) frozen peas
salt and pepper to taste
- Add canola oil to pan and sauté onions on power 6 until onions are softened.
- Add garlic and parsley. Stir.
- Add broth, vegetables, salt and pepper. Cover pan with lid. Cook until contents boil. Reduce power to 4 and cook until vegetables are tender, stirring occasionally.
- Drain excess liquid and serve.
Stuffed Tomatoes
4 to 6 medium tomatoes
3/4 cup (180 ml) white rice, cooked
1/2 cup (125 ml) parsley, chopped
1/2 yellow onion, small dice
1 lb. (450 g)
ground beef
2 cups (500 ml)
pasta sauce
salt and pepper to taste
- Cut tops off tomatoes and carefully scoop out the seeds and the inner flesh. Set aside.
- Place ground beef in skillet and brown in power 6. Add onion in the last minute of cooking. Drain fat from pan.
- Add rice, parsley, salt and pepper to the ground beef and onion. Stir. Set aside to cool when cooked.
- Fill the tomatoes with the mixture.
- Place stuffed tomatoes in the pan and pour sauce over the tomatoes. Cover. Cook on power 6 until the contents boil. Lower power to 4 and cook for 5 – 8 minutes.
- Remove to a serving platter.
Vegetable Rice Pilaf
2 tbsp. (30 ml) vegetable oil
1 cup (250 ml) carrots, chopped
1/2 onion, chopped
1 clove garlic, minced
1/2 tsp (2 ml) ground cumin
1/4 tsp. (1 ml) pepper, white or black
1 cup (250 ml) rice, long grain
2 cups (500 ml) chicken broth
1 cup (250 ml) frozen corn
1 cup (250 ml) broccoli florets, thinly sliced
1/4 cup (50 ml) fresh parsley, chopped
- Place oil in pan. Follow the directions above in the 'How To' section and heat oil on power level 2.
- Increase power level to 5 and add carrots, onion, garlic, cumin and pepper. Cook until onion is softened. Add rice and stir for 1 minute. Stir in chicken broth until it comes to a boil.
- Reduce power level to 2. Cover and simmer until rice is tender and liquid is absorbed.
- Increase power to 4. Add corn, broccoli and parsley. Stir until heated through.
- Turn off induction cooker, cover and let stand for 5 minutes.
Mushroom-Sauced Tournedos
6 - 6 oz. ( 170 g) beef tenderloin steaks
1/2 lb. (225 g) sliced mushrooms
2 tbsp. (30 ml) butter
1/3 cup (ml) red wine
1/2 cup (125 ml) whipping cream
- Trim any excess fat from steaks.
- Add butter to pan and melt on power level 2.
- Add mushrooms to butter. Fry on power level 5 until soft then remove and keep aside.
- Fry steaks in the same skillet. Cook to desired doneness, turning once. Season with a little salt and pepper and transfer to a serving platter. Keep warm.
- Add wine to skillet and stir to loosen crust bits from the bottom of pan. Decrease temperature to 2 and add cream. Stir. Cook until sauce is slightly thickened. Stir mushrooms into sauce. Pour over steaks and serve.
Chicken with Peppers
2 lbs. (1 kg) boneless chicken thighs
1 onion
2 cloves garlic, minced
4 green peppers, cut in 1" (2.5 cm) strips
1 can (28oz/796 ml) diced tomatoes
1/4 cup (50 ml) fresh parsley, chopped
1-1/2 tsp. (7 ml) each salt and pepper
1 tbsp. (15 ml) olive oil
- Sprinkle chicken with 1/2 tsp. (2 ml) salt and pepper.
- Place 1 tbsp (15 ml) olive oil in pan on power level 2. When oil is hot, brown chicken in batches. Transfer to a plate.
- Drain fat from pan. Add onion, garlic and green pepper, stirring occasionally, until softened.
- Drain tomatoes reserving 1/4 cup (50 ml) of the juice. Add juice to pan; cook, scraping up the brown bits from the bottom of the pan. Cook until almost all liquid is evaporated.
- Add tomatoes and 1 tsp (5 ml) salt and pepper to pan. Return chicken and any accumulated juices to the pan, spooning sauce over top.
- Change the power level to 6 until mixture comes to a boil. Reduce power level to 2. Cover and simmer, stirring occasionally, until juices run clean when chicken is pierced.
- Transfer chicken and peppers to a serving plate and keep warm.
- Increase power to 5 and cook until sauce is thickened. Pour over chicken.
Beef Stew
1 lb. (500 g) stewing beef, cut into 1" (2.5 cm) cubes
2 tbsp. (30 ml) olive oil
2 carrots, peeled and sliced 1/2" (13mm)
2 stalks celery, sliced 1/2" (13mm)
1 cup (250 ml) onion, large dice
1 tbsp. (15 ml) brown sugar
2 tsp. (10 ml) all purpose flour
1 cup (250 ml) beef broth
salt and pepper to taste
- Sprinkle beef with salt and pepper.
- Heat oil in skillet on power level 2. When oil is hot, add beef and fry until browned. Transfer beef to bowl.
- Reduce power to 5 and add carrots, celery and onions to skillet. Toss.
- Add flour. Stir.
- Add broth and brown sugar. Stir.
- Add beef and any accumulated juices back to the skillet. Cover and simmer on power level 2 until beef and vegetables are tender. Stir occasionally. Season with salt and pepper.
A short supply cord is provided to reduce the hazards of becoming entangled in or tripping over a long cord. Extension cords may be used if care is exercised in their use. If an extension cord is used, the marked electrical rating of the detachable power-supply cord or extension cord should be at least as great as the electrical rating of the appliance. If the appliance is of the grounded type, the extension cord should be a grounded 3-wire cord. The extension cord should be arranged so that it will not drape over the counter top or table top, where it can be pulled on by children or tripped over.
LIMITED WARRANTY
Salton Canada warrants that this appliance shall be free from defects in material and workmanship for a period of one year from the date of purchase. During this 'in-warranty' period, defective products will be repaired or replaced at the discretion of the retailer and/or Salton Canada. This warranty covers normal domestic usage and does not cover damage which occurs in shipment or failure which results from alteration, accident, misuse, abuse, glass breakage, neglect, commercial use or improper maintenance.
A defective product should be returned to the original place of purchase within the retailer's stipulated return/exchange period*. If you are unable to have a defective product replaced under warranty by the retailer, please check our website at "www.salton.com" for the service centre nearest you. You may also contact us for assistance by mail, e-mail, fax or telephone as listed below.
To ensure prompt ‘in-warranty’ service securely package and return the product to us prepaid. Be sure to include the original proof of purchase and a description of the defect along with your address and postal code.
For repairs not covered by the warranty, please contact us for assistance.
SALTON CANADA
Customer Service Department
81A Brunswick,
Dollard-des-Ormeaux,
Quebec, Canada H9B 2J5
website: www.salton.com
E-mail: service@salton.com
Fax: 514-685-8300
Tel: 514-685-3660
Brand : Salton
Model : ID-1172
Category : Small Appliances