
TO2091BK - Small Appliances Salton - Free user manual and instructions
Find the device manual for free TO2091BK Salton in PDF.


| Product Type | Countertop Toaster Oven |
| Brand | Salton |
| Model | TO2091BK |
| Functions | Toast, Roast, Broil/Grill, Bake |
| Temperature Range | 150°F – 450°F (65°C – 230°C) |
| Timer | 60-minute mechanical timer with audible bell |
| Power | 1200W (estimated) |
| Voltage | 120V AC |
| Plug Type | Polarized plug |
| Accessories Included | Baking/Broiling pan, Wire rack, Crumb tray |
| Rack Positions | 2 rack guides inside oven |
| Door Type | Tempered safety glass with handle |
| Indicator Light | Yes, illuminates when timer is active |
| Dimensions (approx.) | 18 x 12 x 10 in (45.7 x 30.5 x 25.4 cm) |
| Weight (approx.) | 8 lbs (3.6 kg) |
| Clearance Requirements | At least 4 in (10 cm) on each side |
| Safety Features | Tempered glass door, polarized plug, overheat protection (inherent design) |
| Material | Stainless steel exterior, metal interior |
| Care and Cleaning | Wipe with damp cloth; do not immerse in water; use nylon scrubber for accessories |
| Warranty | 5-year limited warranty |
Frequently Asked Questions - TO2091BK Salton
User questions about TO2091BK Salton
0 question about this device. Answer the ones you know or ask your own.
Ask a new question about this device
Download the instructions for your Small Appliances in PDF format for free! Find your manual TO2091BK - Salton and take your electronic device back in hand. On this page are published all the documents necessary for the use of your device. TO2091BK by Salton.
USER MANUAL TO2091BK Salton
natural_image
Exterior view of a stainless steel salton toaster oven with open grilles and control knobs (no visible text or symbols on the device itself)Instruction Booklet
Model: TO2091BK
IMPORTANT SAFEGUARDS
When using electrical appliances, basic safety precautions should always be followed, including the following:
- Read all instructions.
- To protect against electrical hazards, do not immerse cord, plugs, or the appliance in water or other liquid.
- Close supervision is necessary when any appliance is used by or near children. Children should be supervised to ensure that they do not play with the appliance.
- This appliance is not intended for use by persons (including children) with reduced physical, sensory or mental capabilities or lack of experience and knowledge, unless they have been given supervision or instruction concerning the use of the appliance by a person responsible for their safety.
- DO NOT operate any appliance with a damaged cord or plug or after the appliance malfunctions, or is dropped or damaged in any manner. Return appliance to the manufacturer for examination, repair or electrical or mechanical adjustment. All servicing, other than cleaning, should be performed by an authorized service representative. See Warranty section
- The use of accessories or attachments not recommended by Salton may cause fire, electric shock or injury.
- DO NOT use outdoors.
- DO NOT let cord hang over edge of table or counter, or touch hot surfaces.
- DO NOT place on or near a hot gas or electric burner, or in a heated oven.
- To allow adequate air circulation position the Oven so that it is at least 4 inches (10 cm) from any surrounding object on the left and right hand side.
- Extreme caution must be used when moving an appliance containing hot oil or other hot liquids or when removing trays and disposing of hot grease or other hot liquids.
- Always attach plug to appliance first, then plug cord into the wall outlet. To disconnect, turn any control to 'OFF', then remove plug from wall outlet. Always hold the plug, never pull on the cord.
-
DO NOT use appliance for other than intended use.
-
DO NOT leave unit unattended while in use, especially when broiling or toasting.
- Oversize foods or metal utensils must not be inserted in the oven as they may create a fire or risk of electric shock.
- Extreme caution should be used when using containers other than metal or glass.
- DO NOT cover the Crumb Tray or any part of the oven with metal foil. This will cause overheating. Foil can be used to cover approved cooking containers. Do not place any of the following materials in the oven: cardboard, plastic, paper or anything like items.
- DO NOT clean with metal scouring pads. Pieces can break off the pad and touch electrical parts, creating a risk of electrical shock.
- DO NOT store any materials other than manufacturer recommended accessories in the Oven when not in use.
- A fire may occur if this Oven is covered by or touches flammable material, including curtains, draperies, walls, etc. when in operation.
- DO NOT store any item on top of the appliance when in operation or before the oven cools down.
- Unplug from outlet when not in use and before cleaning. Allow to cool before putting on or taking off parts and before cleaning.
- This appliance is for Household Use Only.
- The exterior of the oven will become very hot during use. Do not touch hot surfaces. Use handles or knobs.
- Always turn the appliance off and unplug from the outlet when left unattended or finished using.
- Check to be sure that the switch is in the OFF position after each use.
- Handles and knobs may become hot when appliance is in use. Use oven mitts when touching handles and knobs.
-
This appliance has a tempered safety glass door. This glass is stronger than ordinary glass and more resistant to breakage. Tempered glass can break but the pieces will not have sharp edges. Avoid scratching the door surface or nicking the edge of the glass. If the door has a scratch or nick contact our service department (see warranty section) before using the oven. Do not place eyes or face in close proximity of the tempered safety glass door
-
Always use oven mitts when putting in or removing items from a hot oven.
- All servicing, other than cleaning, should to done by an authorized service representative. See warranty section.
SAVE THESE INSTRUCTIONS
HOUSEHOLD USE ONLY
POLARIZED PLUG
This appliance has a polarized plug (one blade is wider than the other). To reduce the risk of electric shock, this plug will fit in a polarized outlet only one way. If the plug does not fit fully in the outlet, reverse the plug. If it still does not fit, contact a qualified electrician. Do not modify the plug in any way.
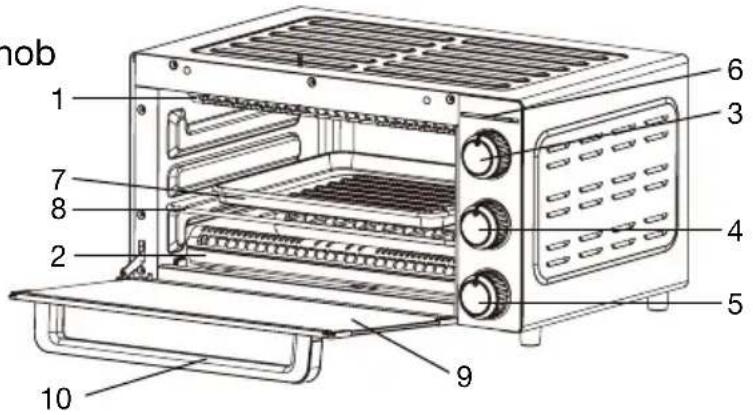
DESCRIPTION OF PARTS
- Top Heating Elements
- Bottom Heating Elements
- Function Knob
- Temperature Control Knob
- Timer Knob
- Indicator Light
- Baking/Broiling Pan
- Wire Rack
- Glass Door
- Door Handle
BEFORE FIRST USE
-
Remove all accessories and shipping materials packed inside the Oven.
-
Wash all the accessories in warm soapy water. Rinse and dry thoroughly.
-
Wipe the inside of the Oven and door with a damp cloth or sponge. Wipe dry with paper towels to be sure the unit is dry before using.
-
Place the Oven on a flat counter or other stable surface close to a 120V wall outlet. DO NOT OPERATE ON THE SAME CIRCUIT WITH ANOTHER APPLIANCE.
-
Position the Oven so that it is a least 4 inches (10 cm) from any surrounding object. Ensure that nothing has been placed on top of the Oven.
-
Make sure the Crumb Tray is properly installed before using.
-
For the first time only, turn the Temperature Control Knob to 450°F (230°C), set the Function Knob to Roast and turn the Timer Knob clockwise to 20 minutes. This will burn off any manufacturing oils still on the oven. NOTE: The oven may smoke during this process. This is normal for a new Oven and will not last more than 10 – 15 minutes.
GENERAL INSTRUCTIONS
Always use the appropriate accessory for the type of cooking selected. The accessories provided are designed specifically for the Oven. Some of your own ovenware (loaf, muffin tins, bundt or spring form pans) may also be used provided they are oven safe and leave an open space all around to permit air circulation. Heat resistant glass or ceramic ovenware should only be used if they can be placed at least 2 inches (5 cm) away from the heating elements. Food and/or containers must never touch the Elements or the Oven interior or interfere with closing the Door.
- Never use glass or ceramic lids.
- Never use plastic or cardboard containers in the Oven.
- Glass ovenware should never be used on the bottom rack level.
- Remove all cardboard covers from aluminum containers.
- If necessary, cover ovenware with aluminum foil tucked tightly around the edges.
- Do not allow foil to touch Oven sides or Heating Elements.
- Never cover the Crumb Tray with aluminum foil as this could cause accumulated grease or crumbs to ignite.
• Always use oven mitts when removing hot racks or pans. - Always turn the Timer Knob to the 'OFF' position when cooking is complete.
- Handles and knobs may become hot when appliance is in use. Use oven mitts when touching handles and knobs.
HOW TO USE
- Place the Oven on a dry, level surface. Make sure the Crumb Tray is securely in place.
- Place the Wire Rack into one of the rack guides inside of the unit.
- Plug the Oven into a 120V wall outlet.
-
Set the Function Knob to the desired function setting. Refer to DESCRIPTION OF FUNCTIONS below.
-
Set the Temperature Control Knob to the desired temperature between 150^ F ( 65^ C) and 450^ F ( 230^ C).
- Set Timer Knob to the cooking time required - up to 60 minutes, to begin cooking. The indicator light will be illuminated once the timer has been set. The timer will countdown and there will be an audible bell when the timer has reached 0. IMPORTANT: When cooking is complete, ensure to turn any control to 'OFF'.
- ALWAYS use oven mitts when putting in or taking out trays from a heated Oven.
- Handles and knobs may become hot when appliance is in use. Use oven mitts when touching handles and knobs.
DESCRIPTION OF FUNCTIONS
Toast
Top and Bottom Heating Elements simultaneously heat to evenly toast bagels, bread, English muffins and more. It is not necessary to preheat the Oven prior to using this function. Center food on the Wire Rack for optimal results. Select Roast function (top and bottom elements heating), and set the temperature to 450^ F ( 230^ C).
Select one of the browning levels using the icons on the Timer Knob to begin.
Roast
Top and Bottom Elements are heating simultaneously for uniform cooking. It is recommended to preheat the Oven for 10 minutes at the desired temperature setting.
Broil/Grill
Top Element heats. It is not necessary to preheat the Oven for this function.
Set the Function Knob to the Broil/Grill setting.
Bake
Bottom Element heats. It is recommended to preheat the Oven for 10 minutes at the desired temperature setting.
HELPFUL HINTS
- Check baked goods 10 minutes before the end of the cooking cycle to adjust time or temperature as required.
- When baking cookies or cakes on two levels simultaneously, halfway through the cooking time move the pan on the top level to the bottom and the pan on the bottom level to the top.
- For meats and poultry, use a meat thermometer to check doneness and adjust time and temperature as required.
CARE AND CLEANING
- Unplug Oven from outlet and allow it to cool completely before cleaning.
- Wash the accessories in warm soapy water. If necessary, use a nylon scrubber, safe for non-stick coating, to remove stuck on food.
- Wipe the inside of the Oven and door with a damp cloth or sponge. Wipe dry with paper towels to be sure the Oven interior is dry.
NOTE: If the glass door has stubborn stains, open the door and cover the inside of the door with a few damp paper towels. Leave for a few minutes, then remove paper towels and wipe door clean. Never use sharp utensils to clean the Oven glass door as scratching may weaken it and cause it to shatter. - Wipe the outside of the oven with a damp cloth or sponge.
- All Servicing, other than cleaning, should be performed by an authorized service representative. See Warranty Section.
IMPORTANT: DO NOT use abrasive cleaners or pads on the inside or outside of the Oven.
NOTE: The best way to keep your oven clean and operating safely is to let the Oven cool to room temperature and wipe away any spills, spatter and crumbs after each use.
A short supply cord is provided to reduce the hazards of becoming entangled in or tripping over a long cord. Extension cords may be used if care is exercised in their use. If an extension cord is used, the marked electrical rating of the detachable power-supply cord or extension cord should be at least as great as the electrical rating of the appliance. If the appliance is of the grounded type, the extension cord should be a grounded 3-wire cord. The extension cord should be arranged so that it will not drape over the counter top or table top, where it can be pulled on by children or tripped over.
LIMITED WARRANTY
**The original sales receipt is the only acceptable proof of purchase**
Salton Appliances (1985) Corp. warrants that this appliance shall be free from defects in material and workmanship for a period of five (5) year from the date of original purchase. Salton Appliances (1985) Corp. at its sole discretion during this warranty period, will repair or replace a defective product or issue a refund. Any refund to the purchaser will be at a pro-rated value based on the remaining period of the warranty. All liability is limited to the amount of the purchase price. This warranty covers normal domestic usage and does not cover damage which occurs in shipment or failure which results from alteration, accident, misuse, abuse, glass breakage, neglect, improper maintenance, use contrary to the operating instructions or commercial use. This warranty is not available to retailers or other commercial purchasers or owners.
This warranty does not include the cost of shipping, which is to be borne by the customer.
TO OBTAIN PROMPT WARRANTY SERVICE:
Contact one of our many Service Centers found on our website www.salton.com/customer-care
or
Securely package and return the appliance to us. Please enclose:
• Original proof of purchase
- The completed form below with a \$12.50 Return Shipping & Handling fee – either a cheque, money order or credit card (A personal cheque will delay return shipping by 2-3 weeks)
For added protection, we suggest that you use an insured delivery service with tracking information when returning your product. Salton Appliances (1985) Corp. will not be held responsible for in-transit damage or for packages that are not received.
This warranty does not include the cost of shipping, which is to be borne by the customer.
Name
Address
City Prov/State Postal/Zip Code
Daytime Phone No. Email
Product defect:
Type of payment Cheque/Money Order Visa MasterCard □
□ □
Name on card Expiry Date CSV No
Card No.
To contact our Customer Service Department:
Salton Appliances (1985) Corp.
Telephone: 514-685-3660
81A Brunswick,
E-mail: service@salton.com
Dollard-des-Ormeaux, Quebec H9B 2J5
Fax: 514-685-8300
Canada
www.salton.com
- Instruction Booklet
- IMPORTANT SAFEGUARDS
- SAVE THESE INSTRUCTIONS
- HOUSEHOLD USE ONLY
- POLARIZED PLUG
- DESCRIPTION OF PARTS
- BEFORE FIRST USE
- GENERAL INSTRUCTIONS
- HOW TO USE
- DESCRIPTION OF FUNCTIONS
- Toast
- Roast
- Broil/Grill
- Bake
- HELPFUL HINTS
- CARE AND CLEANING
- LIMITED WARRANTY
- TO OBTAIN PROMPT WARRANTY SERVICE:
Brand : Salton
Model : TO2091BK
Category : Small Appliances