
BIC 244 - Cooker Equator - Free user manual and instructions
Find the device manual for free BIC 244 Equator in PDF.


| Product Type | Freestanding Cooker |
| Brand | Equator |
| Model | BIC 244 |
| Dimensions (H x W x D) | 85 cm x 60 cm x 60 cm |
| Weight | Approx. 50 kg |
| Power Supply | 220-240 V, 50/60 Hz |
| Power Consumption (Max) | 10.5 kW (hob + oven) |
| Hob Type | Ceramic Glass (4 zones) |
| Oven Type | Electric Multifunction |
| Oven Capacity | 72 L |
| Oven Functions | Bake, Grill, Fan, Defrost |
| Temperature Range (Oven) | 50°C - 250°C |
| Control Type | Knobs + Digital Timer |
| Energy Efficiency Class | A (Oven) |
| Cleaning | Easy-clean enamel interior |
| Safety Features | Child lock, Auto shut-off, Overheat protection |
| Spare Parts Availability | Replaceable heating elements, knobs, glass top |
| Warranty | 2 years (parts and labor) |
| Color | Stainless Steel / White (depending on variant) |
| Manual Pages | 24 |
Frequently Asked Questions - BIC 244 Equator
User questions about BIC 244 Equator
0 question about this device. Answer the ones you know or ask your own.
Ask a new question about this device
Download the instructions for your Cooker in PDF format for free! Find your manual BIC 244 - Equator and take your electronic device back in hand. On this page are published all the documents necessary for the use of your device. BIC 244 by Equator.
USER MANUAL BIC 244 Equator
Read the instructions carefully and keep for future reference
Equator Appliances undertakes to the consumer-owner to repair or, at our option, to replace any part of this product which proves to be defective in workmanship or material under normal personal, family or household use, in USA and Canada, for a period of one year from the date of original purchase. During this period, we will provide all labor and parts necessary to correct such defect, free of charge, if the appliance has been assembled and operated in accordance with the written instructions with the appliance.
Exclusions
In no event shall Equator Appliances be liable for incidental or consequential damages or for damages resulting from external causes such as abuse, misuse, incorrect voltage or acts of God. This warranty does not cover service calls which do not involve defective workmanship or materials covered by this warranty. Accordingly, diagnosis and repair costs for a service call which does not involve defective workmanship or materials will be the responsibility of the consumer-owner.
Specifically, the following work is not covered under warranty and does not constitute warranty work:
Installation - e.g. installing incorrectly Maintenance - e.g. cleaning appliance using solvents Mishandling - e.g. breakage of glass
Most work is covered. The defining factor is, has the machine malfunctioned (Equator Appliances is responsible) or has the customer omitted or done something to cause the appliance to malfunction (customer is responsible). Some States do not allow the exclusion or limitation of incidental or consequential damages, so the above limitation or exclusion may not apply to you.
This warranty is given by:
Equator Appliances
10216 Georgibelle Drive, Suite 900D
Houston, Texas 77043-5249
For Customer Service:
Appliance Desk
Business hours: 9:00 am to 5:00 pm weekdays
You can register your Warranty by any of the following methods:
- Mail in the Warranty Registration Card
- Register online at www.ApplianceDesk.com
- Scan the QR Code

GENERAL
Since it is a responsibility of the consumer-owner to establish the warranty period by verifying the original purchase date, Equator Appliances recommends that a receipt, delivery slip or some other appropriate payment record be kept for that purpose.
This warranty gives you specific legal rights, and you may also have other rights which vary from State to State.
All rights reserved. Manual subject to change without notice.
Important Safety Instructions
IMPORTANT
Keep these instructions handy for future use.
The appliance is manufactured in compliance with the relevant safety standard.
WARNING
Read all instructions carefully before installation and operation
of the appliance.
WARNING
Failure to follow these warnings could result in a fire or explosion
that causes property damage, personal injury or death. To reduce the risk of fire, electric shock or injury, take the following precautions:
Intended Use
- This appliance is designed for built-in household use only.
- Do not use outdoors.
- Do not use the appliance to heat a room.
WARNING
Cooking Safety
- Do not allow aluminum foil, paper or cloth to come in contact with a hot element.
- Avoid preparing food in aluminum foil or plastic containers over the hot cooking zones.
- Protective liners - Do not use aluminum foil to line cooking zone, drip bowls or oven bottoms, except as suggested in the manual. Improper use of these liners may result in a risk of electric shock or fire.
- Do not allow pans to boil dry or empty.
- Never leave the cooktop unattended when in use.
• Always use the proper pot and pan size.
- The use of undersized cookware will expose a portion of the hot element, which can result in ignition of clothing or personal burners.
• Always remove the covers on sealed or canned goods and before heating to avoid explosion.
- Close supervision is necessary when any appliance is used by or near children.
- Do not touch hot surfaces. Use dry pot holders to hold the handles of pots and pans.
- Use only dry potholders - moist or damp potholders on hot surfaces may result in burns from steam. Do not let the potholder touch hot heating elements.
- Do not use a towel or other bulky cloth.
- Nevertheless, we strongly recommend that a person with physical or mental impairments not use the appliance unless accompanied by a qualified person. The same recommendation applies to children.
- When the unit is on, do not touch outside the control panel as the surface may contain residual heat. It is important to be aware that the unit's surface will remain hot for a short period of time after use. Do not touch hot surfaces.
WARNING
Cleaning Safety
- CAUTION Clean Cook - Top with Caution - If a wet sponge or cloth is used to wipe spills on a hot cooking area, be careful to avoid steam burns.
- Some cleaners can produce steam or noxious fumes if applied to a hot surface.
- Do not use steam cleaners or high-pressure cleaners to clean the cooktop, as this may result in electric shock.
Condition of Unit
- WARNING Do not operate any appliance with a damaged cord or after the appliance malfunctions or has been damaged in any manner. Return appliance to the nearest authorized service facility for examination, repair, or adjustment.
• IMPORTANT Do Not Cook on Broken Cook-Top. If cook-top break, cleaning solutions and spillovers may penetrate the broken cook-top and create a risk of electric shock.
IMPORTANT
Environment of Unit
- To reduce the risk of fire, do not let any objects(glass, paper, etc.) obstruct the inlet and outlet of your cooktop.
- To reduce the risk of electric shock, do not mount unit over a sink.
- To reduce the risk of fire, do not store anything directly on top of the appliance surface when the appliance is in operation.
• Always have a working smoke detector in or near the kitchen. - ⚠️CAUTION Do not leave lids or other metal objects such as knives, forks or spoons on the cooktop. If the cooktop is turned on, these objects
can heat up quickly and may cause burns.
- Do not place rough or uneven objects on the units as they may damage the surface. If the cooktop is near a window, ensure that curtains do not blow over or near the unit.
• ⚠ IMPORTANT Do not use the cooktop as a work surface. Certain substances such as salt, sugar, or sand can scratch the glass ceramic surface.
- Do not store hard or pointed objects over the cooktop as they can damage the unit if they fall on top.
Important Safety Instructions
Environment of Unit
- Do not put detergents or flammable materials in the equipment installed under the cooktop.
- Extreme caution must be used when moving an appliance containing hot oil or other hot liquids.
- While cooking any overflowed fat or oil on the cooktop may ignite. There is a risk of burning and fire; therefore, control the cooking process at all times.
- The use of accessory attachments not recommended by the appliance manufacturer may cause injuries.
- Items with a magnetic field such as: radios, televisions, credit cards, cassette tapes etc., can affect the unit.
- The marked electrical rating should be at least as great as the electrical rating on the appliance.
• To prevent accidents and achieve optimal ventilation, allow for sufficient space around the cooking area.
WARNING
Power Cord Safety
- ⚠WARNING To protect against electric shock, do not immerse cord, or main body in water or any other liquid.
- Do not let cord hang over edge of table or counter.
-
Do not allow cord to touch hot surface. A short power supply cord or detachable power supply cord should be used to reduce the risk of becoming entangled in or tripping over a longer cord.
-
⚠CAUTION Do not store items of interest to children in cabinets above the range or on the backguard of a range - children climbing on the range to reach items could get seriously injured.
- Use proper cookware size - This appliance is equipped with four for five Cooking Elements of different sizes. Choose cookware with a flat bottom large enough to cover the unit heating surface. The use of undersized cookware will expose a portion of the heating surface where direct contact may be made and cause serious injury. Compatible cookware will improve efficiency.
- To reduce risk of burns, ignition of flammable materials, and spillage due to unintentional contact with cookware, the cookware handles should be turned inward and not extend over adjacent heating surface.
-
Wear proper apparel - loose fitting or hanging garments should never be worn while using the appliance.
-
Unplug from outlet when not in use and before cleaning. Allow to cool before performing any maintenance or repairs.
• Always attach plug to appliance first, then plug cord into the wall outlet. To disconnect, turn any control to off, then remove plug from wall outlet. - The cord should be arranged so that it will not drape over the countertop where it can be pulled on by children or tripped over.
Service and Repair Safety
- ⚠️WARNING Do not repair or replace any part of the appliance unless specifically recommended in the manual. All other services should be referred to a qualified technician.
• There are no user serviceable parts on this appliance. Only an authorized service representative should attempt to service your cooktop.
This product may not be treated as household waste. Instead it should be handed over to the applicable collection point for the recycling of electrical and electronic equipment. By ensuring this product is disposed of correctly, you will help prevent potential negative consequences for the environment and human health, which could otherwise be caused by inappropriate waste handling of this product. For more detailed information about recycling of this product, please contact your local city office, your household waste disposal service or the shop where you purchased the product.
SAVE THESE INSTRUCTIONS


IMPORTANT SAFETY INFORMATION
⚠ WARNING Installation and service must be performed by a qualified installer or service technician.
IMPORTANT
Read and save these instructions for future reference.
⚠️ DANGER Always read and obey all safety information, failure to follow these instructions can be killed or seriously injured.
Before Installing the cooktop
-
Visually inspect the cooktop for damage. Also make sure all cooktop screws are on tight.
-
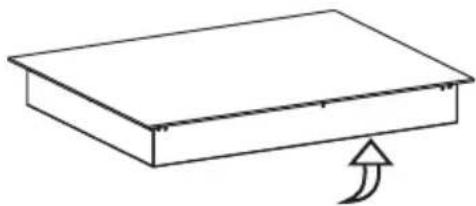
Record the model and serial number as found on the front of your cooktop. When ordering parts for or making inquires about your cooktop, always be sure to include the model and serial numbers and a lot number or letter from the rating label on your cooktop.
natural_image
Simple line drawing of a rectangular box with an arrow pointing upward (no text or symbols)Rating label in located in front of the cooktop.
-
Cutout dimensions of the countertop.
-
Make sure the wall coverings, countertop and cabinets around the cooktop can withstand heat (up to 200°F) generated by the cooktop.
-
Gently lower the cooktop into the countertop cutout. NOTE: Do not seal the cooktop to the countertop, the cooktop must be removable if service is necessary.
Electrical Connection

IMPORTANT Observe all governing codes and local ordinances.
• Model BIC 244 needs 40 Amp service.
Maximum Connected Load
Model BIC 244 .....7.4 kW at 240 VAC,6.4 kW at 208VAC
Installation Instructions
The Induction Cooktops must connect to a separate, grounded wire, single phase, AC Only electrical supply with their own circuit breaker. These appliances must be installed in accordance with National Electrical Codes, as well as all state, municipal and local codes. This appliance must be supplied with the proper voltage and frequency and amperage, which is protected by a properly sized circuit breaker or time delay fuse.
WARNING The cable from appliance is equipped with 3-wire: If 3-Wire Cable from Home Power Supply
IMPORTANT: Use the 3-wire cable from Home Power Supply where local codes permit a 3-wire connection.
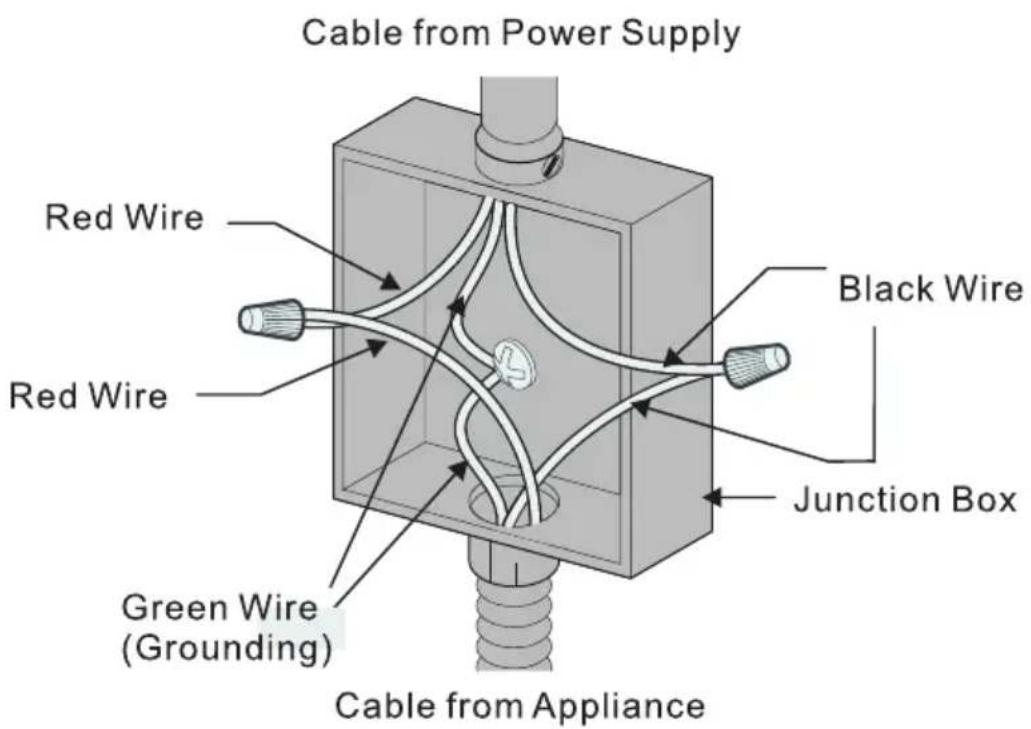
3-Wire Cable from Home Power Supply
If 4-Wire Cable from Home Power Supply
IMPORTANT: Use the 4-wire cable from Home Power Supply where local codes do not allow grounding through neutral.
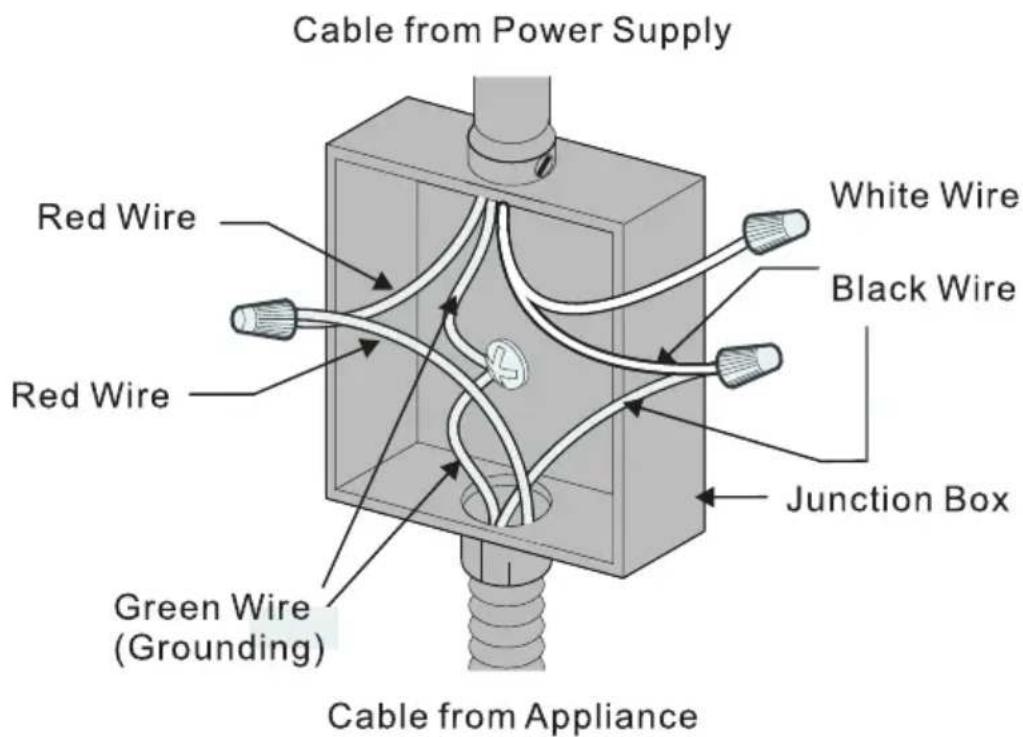
4-Wire Cable from Home Power Supply
Electrical ground is required on this appliance
WARNING The cooktop conduit wiring is approved for copper wire connection only, if you have aluminum house wiring, use only special connectors which are approved for joining copper and aluminum wires conform with local codes and ordinances. Follow the electrical connector manufacturer's recommended procedure closely.
Installation — 24" (59cm) Model BIC 244
| Cooktop Dimensions | ||
| A. Width | B. Depth | C. Height |
| 23 732 ′′(590) | 20 ^15/_32 ′′(520) | 2 18 ′′(55) |
* DO NOT obstruct these areas.
IMPORTANT: For perfect ventilation, provide a vent of under the countertop, in the front of the cabinet and in the back of the cabinet. The ventilation opening is to extend the full length of the cooktop cutout.
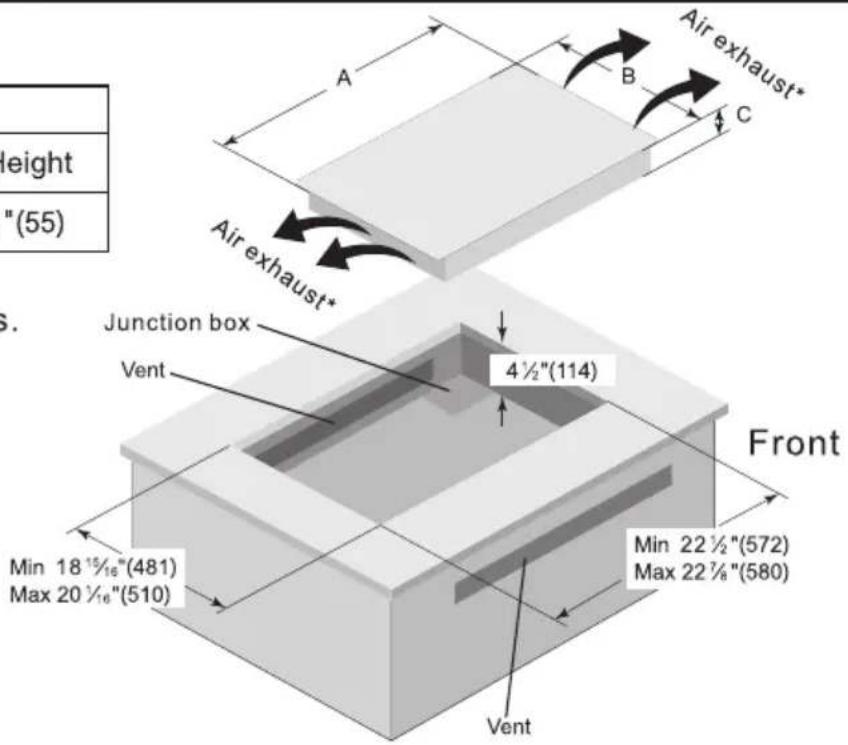
BIC 244 Cooktop and Cutout Dimension
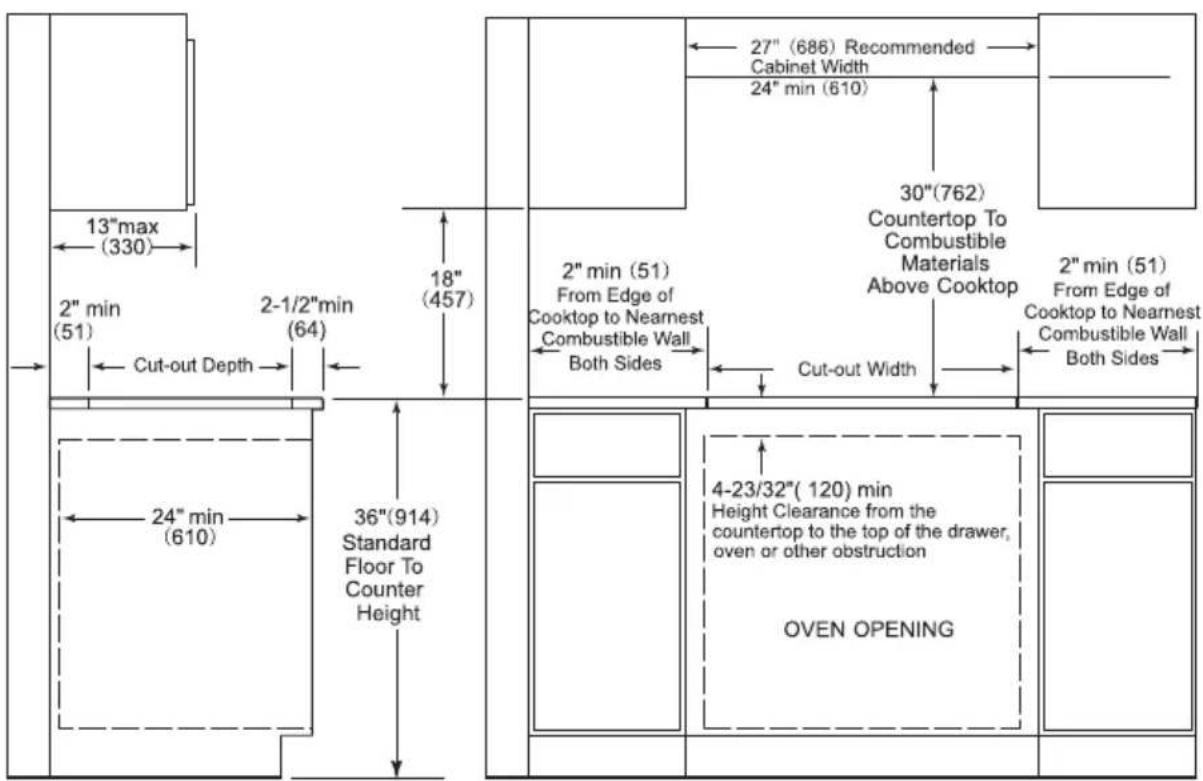
BIC 244 Countertop Cut-Out Opening
All dimensions are stated in inches and (mm).
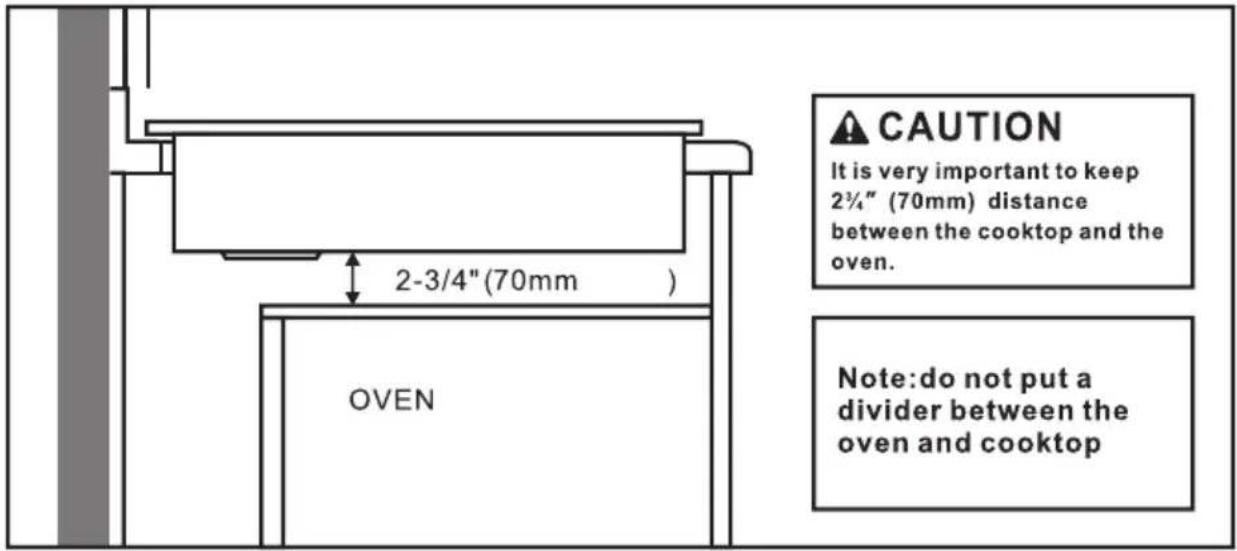
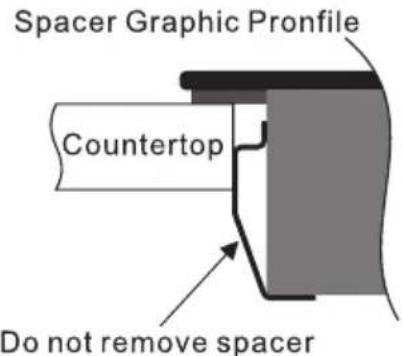
Fig.1
NOTE: The cooktops include spacers on both sides to ensure proper airflow once installed. Do not remove the spacers (fig.1).
After Installation
- Remove all the stickers and items from the top of the cooktop surface.
- Clean cooktop before use. Dry with a soft cloth. See Cleaning Your Cooktop for reference.
- Read Using Your Cooktop.
- Turn on the power to the cooktop.
- Verify all function operation properly.
Cooktop Features
Model: BIC 244 (4 Burners 24")
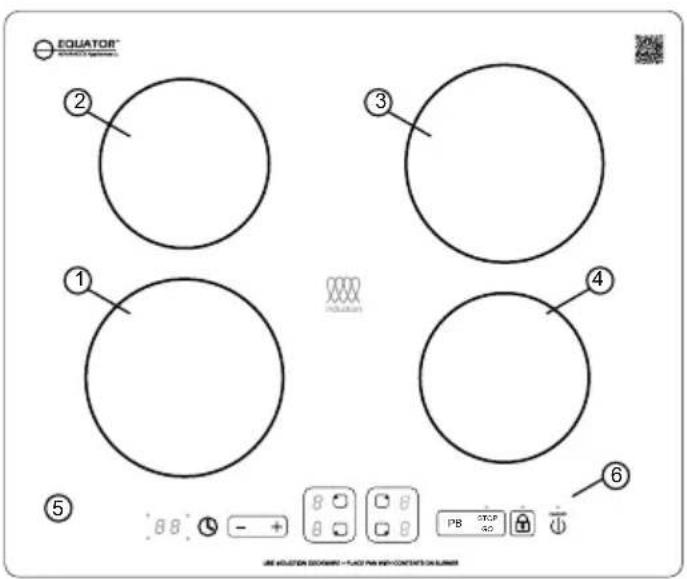
- Left Front Burner
- Left Rear Burner
- Right Rear Burner
- Right Front Burner
- Ceramic Glass
- Control Panel
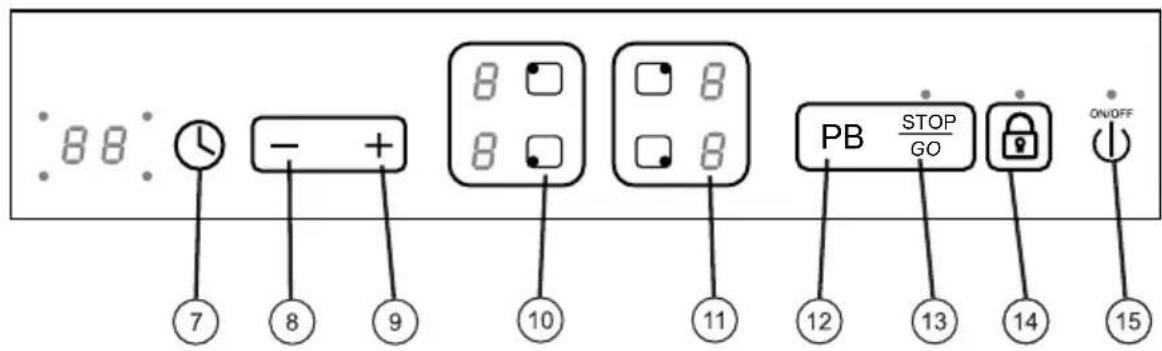
- Timer
- Decrease Power or Time
- Increase Power or Time
- Individual Burner Power On
-
Display Power Level
-
Power Boost
- STOP/GO
- Control Lock
- Main Power On/Off
Specification
| Model | BIC 244 |
| Product dimension(wxdxh) inch | 23.2" x 20.5" x 2.1" |
| Cut-out dimension(wxd) inch | Min.: 2212" × 18^15/_16" Max.: 2278" × 20115" |
| Voltage (volts) | 240 |
| Frequency (Hz) | 60 |
| Total power (Watts) | 7400 |
| Elements | 4 |
| Front Left | 2100W/2700W |
| Rear Left | 1600W/2000W |
| Front Right | 1600W/2000W |
| Rear Right | 2100W/2700W |
Heat Setting Displays
| DISPLAY | DESCRIPTION |
| - | No Power level selected for burner |
| L | Burner is warm |
| 1-9 | Power level |
| P | Power Boost |
| H | Burner is still hot to touch (residual heat) |
| E | Electronics fault error message |
| EO-E9 | Error codes |
| O | STOP / GO |
Induction cooking is a safe, advanced, efficient, and economical cooking technology. It works by electromagnetic field generating instant heat directly to bottom of cookware, rather than indirectly through heating the glass surface. The glass becomes hot only because the cookware warms it up.
Power ON
When inserting the power plug into an electric socket, the induction cooktop will make a sound once, and all the digital lights on the cooktop will blink once, indicating the unit is ready to use.
Press the main Power ON/OFF “ON/OFF” icon. A beep will sound and the indicator light will come on. If no burner Power is selected within 30 seconds, the main Power light will go off.
Operating the Cooktop
To turn on one or more burners, place a compatible pot or pan on the desired burner, containing water or food. If the pot or pan is empty the cooktop will not operate. With the cooktop being ON as mentioned above, touch the □ icon of the desired burner and the Power display will show a “_”, indicating no power level for the burner has been set yet. Then press either “+”, “-” or “PB” to select a cooking level. The selected burner will automatically turn off if a selection is not pressed within 30 seconds.
Press the minus icon (-) to lower the cooking level.
Press the Plus icon (+) to raise the cooking level.
Pressing the “PB” icon will show on the display as a “P”, boosting the heating power to the highest level.
Power Boost is the highest power level, designed for quickly heating or boiling larger quantities. Power Boost will operate for a maximum of 10 minutes.
After 10 minutes, it will automatically revert to power level 9.
STOP/GO
Use the “ ” function to 'pause' the burner for up to 10 minutes while cooking. The burner will be automatically turn Off if “ ” is not touched again within 10 minutes.
Using The Cooktop
Lock
Activating the Child Safety Lock during cooktop use:
Child Lock prevents activation of any sensor icon, except for the “☐” icon and the “☐” icon.
A. Manual
Press the “🔒” icon to activate the function. The unit will make a “beep” sound and the indicator light will turn on above the “🔒” key. The controls are now locked.
B. Automatic
The induction cooktop will automatically enter into Lock mode if any icon is not pressed within 5 minutes. The unit will make a "beep" sound and the indicator light will turn on above the "🔒" icon when the automatic Lock mode is activated.
Switch off the lock
While in Lock mode, press the “🔒” icon to deactivate the function. The indicator light will turn off.
Turn off
When Cooktop is On:
a. Press the desired cooking zone on “-” icon until the digital display reads “L”, press “-” icon again, the desired element will shut off.
b. Press the “ON/OFF” icon, it will make a “beep” sound once, and it will turn off.
Note: Please do not pull the power plug until the cooling fan has stopped.
Timer
Setting the Timer to Automatic switch-off:
With the desired heating zone Powered ON, press the “💡” icon. The timer display will blink and show a “00”, Press the “+” or “-” to increase or decrease to the desired time until the desired time appears in the display (Choose up to 99 minutes). Once the Timer is set, if keys haven't been pressed after 5 seconds, it will
begin to countdown, the timer display will remain lit, the indicator for that particular burner will flash. When the time reaches "0", a "beeping" sound will go off indicating that the time is up, and selected heating zone shut off automatically.
If you want to set another burner to switch-off automatically, press "①" key to until the desired timer indicator blink, repeat the same steps.
If you want to check the remaining time for another zone, press the “💡” until the indicator for the desired burner blinks.
If more than one switch-off time is programmed, the shortest time remaining will show in the display, the indicator for that particular burner will flash.
Cancelling the timer:
Press the “💡” until the indicator for the desired burner blinks, then press the “+” or “-” to set the timer to “00”. The Timer display will blink for 5 seconds and then turn off, indicating that the timer of selected heating zone has been cancelled.
WARNING
WARNING Your cooktop has a residual heat indicator H for each Cooking Zone.
This indicator will warn that this area has been used and is still giving off enough heat to cause burns.
Avoid touching the burner when this indicator is shown. Although the cooktop is OFF, the H will stay lit until the cooktop has cooled down.
Power Sharing
Four burner cooktops are divided into two separate cooking area, the right and left side cooking elements share power of an inverter.
Power sharing is activated when the cooking element in the same area are activated; the controls adjust the power automatically for "Power Sharing". This power sharing is administered by unit's microprocessors, which will alternate power in one area.
Power sharing tips: Remember to select the power setting last for the cooking element you want to maintain at full setting heat. To maintain full setting heat for two items, place one item on a element in one section (left side), and the other item on a element in another section (right side).
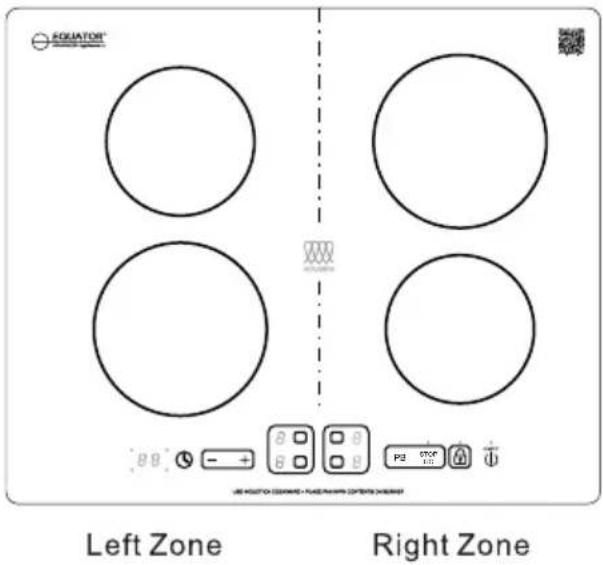
Model: BIC 244
Operational Cooktop Noises
Cookware Noise
The induction fields are generated by electronics equipment, which are pretty much silent but they do produce heat at high power level. A soft-sounding cooling fan run when the unit is running multiple cooking elements at high settings at once or when a cooking element is set at very high power settings.
What can sometimes produce sound with induction cooking is not the induction equipment but the cookware itself. Slight sounds may be produced by different types of cookware. Some of the possible causes include:
- Heavier pans such as enameled cast iron produce less noise than a lighter weight multi-ply stainless steel pan; Light weight cookware may also vibrate. Heavy weight quality cookware is recommended.
• Cookware with irregular or warped bottoms can vibrate audibly on the ceramic glass surface, though again typically only at high power settings.
- A "Cracking" noise may be heard if the cookware base is made of layer of different material.
- A low "humming" noise occurs when cooking, which is normal particularly at high power settings.
- Whistling can occur if both elements are being used at the same time at the high settings, and the cookware has bases made of layer of different material.
- Loose-fitting handles on cookware, typically when riveted on, can vibrate slightly.
- High quality cookware of solid cast iron including enamelware will lower the noise.
The quality of your cooking is dependent on the cookware you use.
Because induction cooking requires a magnetic vessel for heating, only certain materials can be used on your cooktop.
Proper Cookware
Flat-bottomed pots or pans with or made from the following:
• Magnetic stainless steel
- Cast iron
- Enameled iron
- Nickel
Improper Cookware
Pots or pans with or made of the following CANNOT be used on your cooktop:
• Non-magnetic stainless steel
• Bottom measuring less than 4.7 inches (12 cm)
- Pot with stands
- Heat resistant glass
- Ceramic container
- Copper
- Aluminum
Optimally the cookware will have this induction image on the retail box:
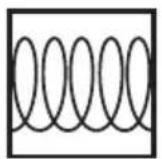
Induction
Check that the bases of your pans are attracted by a magnet to find out if they are suitable.
NOTE: Some cookware can produce noises when used on induction cooking zones. This is not a fault in the cooktop, and its function will not be impaired in any way as a result.
Cleaning Your Cooktop
After each use, be sure the controls are turned to OFF and let your cooktop COOL down completely, and then start cleaning your cooktop. When it is cool to the touch, apply approximately 1 teaspoon (5ml) of non-abrasive cleaner to the surface of the ceramic glass with a lightly damaged cloth. Use a second cloth to remove any remaining cleaner residue. Wipe dry with a dry cloth.
Do NOT use the following to clean your unit
- Glass cleaners which contain ammonia or chlorine bleach as these materials may stain the cooktop
• Caustic cleaners that may etch the surface - Abrasive cleaners
• Metal scouring pads and scrub sponges - Powdery cleaners containing chlorine bleach
- Flammable cleaners such as lighter fluid or WD-40
NOTE: Sugary products can damage the ceramic glass surface. If dry sugar, sugar syrup, tomato products, or milk spills on the surface DURING heating, clean immediately.
Metal Marks and Scratches
-
Be careful not to slide pots and pans across your cooktop. It will leave metal markings on the cooktop surface. These marks are removable using a ceramic cooktop cleaner with cleaning pad for ceramic glass.
-
If pots with a thin overlay of aluminum or copper are allowed to boil dry, the overlay may leave black discoloration on the cooktop. This should be removed immediately before heating again or the discoloration may be permanent.
Troubleshooting Guide
If you encounter the following problems while using your cooktop, check the guide below to see if you can correct the problem yourself before calling for assistance or service:
| Problem | Possible Cause | Solutions |
| Cooktop does not work | Cooktop controls are lockedPower outageInstallation wire not completeCircuit breaker has tripped or fuse is blown | Make sure Lock mode is turned offCheck house lights to confirm power outage |
| Cooktop does not heat | No cookware or improper cookware placement on the cooking elementIncorrect cookware size for the selected cooking elementCookware is not properly resting on cooking elementIncorrect cooking element selectedNo power to cooktop | Make sure that the cookware is centered on the cooking element, and that cookware is also of correct type for induction cooking. See COMPATIBLE COOKWAREThe bottom of the cookware must be large enough to cover cooking element completely.See COMPATIBLE COOKWARECookware bottoms must be flat and centered on the cooking element. See COMPATIBLE COOKWAREMake sure the correct control is ON for the cooking element being usedSee “Cooktop does not work” above |
| Cooktop turns off while cooking | Cooktop internal heat sensor has detected high temperature inside the cooktop, activating automatic shut offLiquid or object on the controls area | Make sure the cooktop vents are not blockedThe cooktop features an automatic shutoff feature that turns off the entire cooktop if any cooking element has been on continuously for 2 hoursThe cooktop control panel may register liquids or objects obstructing the panel, which can cause the cooktop to shut off. Clean up spills or remove objects and restart the unit |
Troubleshooting Guide
If you encounter the following problems while using your cooktop, check the guide below to see if you can correct the problem yourself before calling for assistance or service:
| Problem | Possible Cause | Solutions |
| Power boost does not work | Total using power reach rated power 3700W in the same section | See POWER SHARING |
| The fans keep running for one minute after the cooking element has been switched off | The electronics are cooling down | This is a normal occurrence |
| "E"appears in the Power display | Electronics fault error message of particular cooking element | See E0, E1, E2, E3, E7, E8, E9, EE |
| "E0"appears in the Timer display | IGBT overheating | Turn off unit to allow IGBT to cool. Restart unit |
| "E1" appears in the Timer display | No cookware found or improper placement of cookware on the cooking element | Make sure that the cookware is centered on the cooking element, and that it is also induction compatible. See COMPATIBLE COOKWARE |
| "E2" appears in the Timer display | Supplied voltage to cooktop is too low | This may be caused by reduced voltage being supplied to the house circuit. If connections are correct and the supplied voltage returns to normal, the code will disappear |
| "E3" appears in the Timer display | Supplied voltage to cooktop is too high | This may be caused by increased voltage being supplied to the house circuit. If the connections are correct and the supplied voltage returns to normal, the code will disappear |
| "E7" appears in the Timer display | NTC1 Break off | Turn the cooktop OFF; then pull plug out for about 30 seconds. Then re-insert the plug and turn the cooktop on using the POWER pad. If the error message is still displayed, call for service |
| "E8" appears in the Timer display | NTC1 Short circuit | |
| "E9" appears in the Timer display | NTC2 Break off | |
| "EE" appears in the Timer display | NTC2 Short circuit | |
| Noise | Noise like humming, crackling and buzzing | This is a normal occurrence, See Operational Cooktop Noises |
- Exclusions
- Equator Appliances
- For Customer Service:
- Appliance Desk
- GENERAL
- Important Safety Instructions
- IMPORTANT
- WARNING
- Intended Use
- Cooking Safety
- Cleaning Safety
- Condition of Unit
- Environment of Unit
- Power Cord Safety
- Service and Repair Safety
- SAVE THESE INSTRUCTIONS
- IMPORTANT SAFETY INFORMATION
- Before Installing the cooktop
- Electrical Connection
- Maximum Connected Load
- Installation Instructions
- WARNING The cable from appliance is equipped with 3-wire: If 3-Wire Cable from Home Power Supply
- If 4-Wire Cable from Home Power Supply
- Electrical ground is required on this appliance
- Installation — 24" (59cm) Model BIC 244
- After Installation
- Cooktop Features
- Power ON
- Operating the Cooktop
- STOP/GO
- Using The Cooktop
- Lock
- Activating the Child Safety Lock during cooktop use:
- Manual
- Automatic
- Switch off the lock
- Turn off
- When Cooktop is On:
- Timer
- Setting the Timer to Automatic switch-off:
- Cancelling the timer:
- Power Sharing
- Operational Cooktop Noises
- Cookware Noise
- Proper Cookware
- Improper Cookware
- Cleaning Your Cooktop
- Do NOT use the following to clean your unit
- Metal Marks and Scratches
- Troubleshooting Guide
Brand : Equator
Model : BIC 244
Category : Cooker