RM-2-DG1000Z - Measurement Rigol - Free user manual and instructions
Find the device manual for free RM-2-DG1000Z Rigol in PDF.


| Product Type | Rack Mount Kit |
| Brand | Rigol |
| Model | RM-2-DG1000Z |
| Compatible Devices | DG1000Z Series Function/Arbitrary Waveform Generators |
| Rack Height | 2U (3.5 in / 88 mm) |
| Mounting Type | 19-inch rack mount |
| Material | Steel |
| Color | Black |
| Dimensions (Approx.) | 88 mm (H) x 483 mm (W) x 100 mm (D) |
| Weight (Approx.) | 2.0 kg (4.4 lbs) |
| Package Contents | 2 rack mount ears, mounting screws, user manual |
| Installation | Attach ears to generator with provided screws, slide into rack and secure with rack screws |
| Ventilation | Ensure rack allows proper airflow for the generator |
| Grounding | Follow standard rack grounding practices |
| Maintenance | Clean with a soft, dry cloth; periodically check screw tightness |
| Safety | Do not block ventilation; use only with compatible rack cabinets |
| Spare Parts | Screws and ears available through Rigol service |
| Repairability | Contact Rigol support for damaged components |
Frequently Asked Questions - RM-2-DG1000Z Rigol
User questions about RM-2-DG1000Z Rigol
0 question about this device. Answer the ones you know or ask your own.
Ask a new question about this device
Download the instructions for your Measurement in PDF format for free! Find your manual RM-2-DG1000Z - Rigol and take your electronic device back in hand. On this page are published all the documents necessary for the use of your device. RM-2-DG1000Z by Rigol.
USER MANUAL RM-2-DG1000Z Rigol
This rack mount kit is designed to mount RIGOL DG2000/DG1000Z series function/arbitrary waveform generator or DSG800 RF signal source into a 19-inch cabinet that conforms to the Electronic Industries Association (EIA) standard. This manual takes DG1000Z as an example to introduce the installation method.
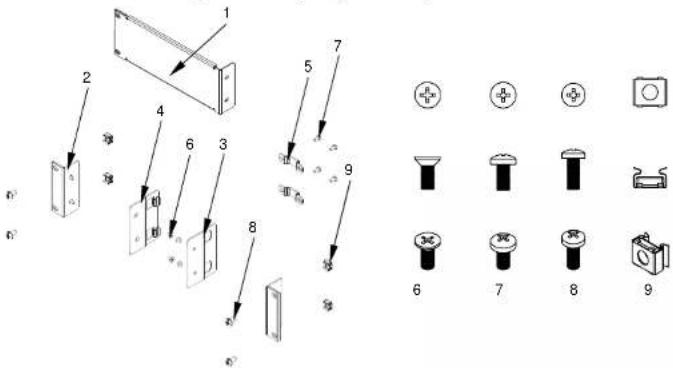
Kit Part Checklist
| No. | Name | Qty. | Description | |
| RM-1-DG1000Z[1] | RM-2-DG1000Z [1] | |||
| 1 | Front Plate | 1 | None | |
| 2 | Fastener | 1 | 2 | -- |
| 3 | Connecting Plate A. None 1 | -- | ||
| 4 | Connecting Plate B. None 1 | -- | ||
| 5 | Retaining Bracket | None | 2 | -- |
| 6 | M4 Countersunk Flat Head Screw | None | 4 | M4x10 Phillips Pan Head Screw |
| 7 | M4 Pan Head Screw | 4 | 8 | M4x8 Phillips Pan Head Screw |
| 8 | M6 Pan Head Screw | 4 | 4 | M6x16 Phillips Pan Head Screw |
| 9 | M6 Nut | 4 | 4 | M6 Square Lock Cage Nut |
Note ^[1] : RM-1-DG1000Z is designed for installing a single instrument, and RM-2-DG1000Z for two instruments.
Installation Guide RIGOL
Installation Tool
The PH2 Phillips screwdriver and T20 Phillips screwdriver are recommended.
Space Requirements
To mount the instrument into the cabinet correctly, please ensure that the following requirements are met.
● The cabinet must be a standard 19-inch one.
● The available height of the cabinet should be at least 2U (88mm).
● The depth of the cabinet should be at least 400mm.
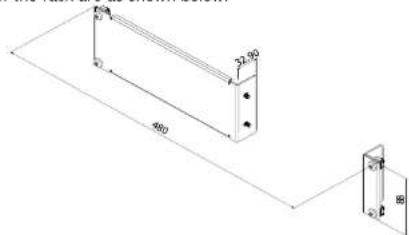
The dimensions of the rack are as shown below.
natural_image
Technical drawing of two rectangular metal components with dimension annotations (no text or symbols)RM-1-DG1000Z
Unit: mm
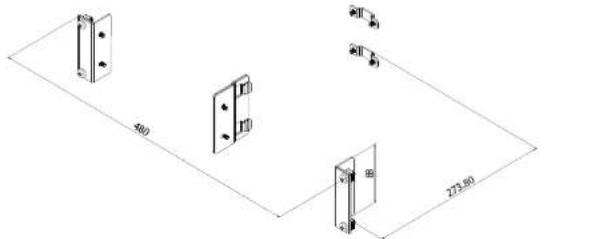
RM-2-DG1000Z
Unit: mm
Installation Procedures

CAUTION
Only authorized operators are allowed to perform the installation. Improper installation might cause damage to the instrument or an installation failure.
Installation Guide RIGOL
Pre-Installation Preparation: Dissemble the handle and protective rubber covers
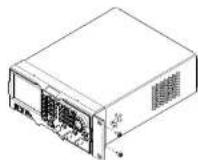
- Rotate the handle upright. Then, pull it out from the sides of the instrument to remove it.
- Use the T20 Phillips screwdriver to remove eight M4 screws at four corners of the front panel and four M4 screws at four corners of the rear panel. Then, take off the eight protective rubber covers.
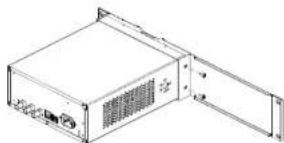
Mount a single instrument (Requiring to order a set of RM-1-DG1000Z)
- Attach the fastener to one side of the front panel, then secure the fastener with two M4 pan head screws.
- Attach the front plate to the other side of the front panel, then secure the plate using two M4 pan head screws.
- Mount the assembled instrument and rack into a standard 19-inch cabinet using four M6 pan head screws and four M6 square nuts.
-End-
natural_image
Line drawing of a computer rack unit with ventilation slots and drive bays (no text or symbols)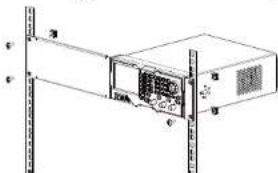
natural_image
Diagram of a server rack unit with front panel and rear panel, showing internal components (no text or labels)Mount two instruments (Requiring to order a set of RM-2-DG1000Z)
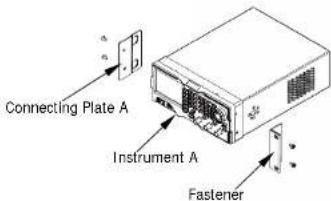
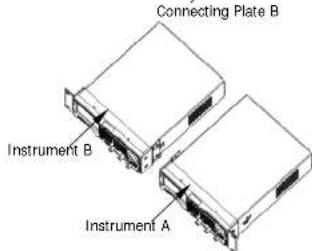
- Attach one fastener to the right side of the front panel of Instrument A, then secure the fastener with two M4 pan head screws. Attach Connecting Plate A to the left side of the front panel of Instrument A, and then use two M4 countersunk head screws to fasten Connecting Plate A to Instrument A.
Installation Guide RIGOL
- Attach another fastener to the left side of the front panel of Instrument B, then secure the fastener with two M4 pan head screws. Attach Connecting Plate B to the right side of Instrument B, and then use two M4 countersunk head screws to fasten Connecting Plate B to Instrument B.
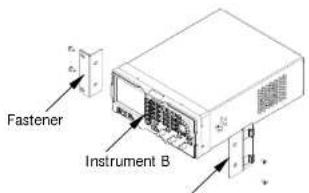
- Joint Connecting Plate A with Connecting Plate B.
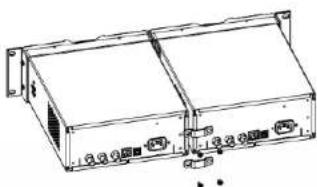
- Place two retaining brackets onto the connecting position of rear panels of two instruments, and then secure the retaining brackets with four M4 pan head screws.
natural_image
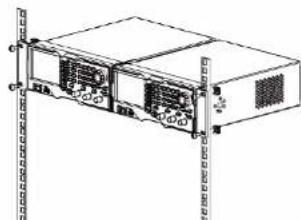
Technical line drawing of a rectangular electronic device with internal components and mounting holes (no text or symbols)- Mount the assembled instrument and rack into a standard 19-inch cabinet using four M6 pan head screws and four M6 square nuts.
natural_image
Technical line drawing of a server rack unit with mounting brackets and ventilation grilles (no text or symbols)-End-
Brand : Rigol
Model : RM-2-DG1000Z
Category : Measurement