
CCHM350MFX - Microwave CORBERO - Free user manual and instructions
Find the device manual for free CCHM350MFX CORBERO in PDF.


| Product Type | Microwave Oven with Grill |
| Brand | Corbero |
| Model | CCHM350MFX |
| Capacity | 25 Liters |
| Dimensions (W x D x H) | 480 x 350 x 280 mm |
| Weight | 12 kg |
| Power Supply | 230 V ~ 50 Hz, 1200 W |
| Microwave Power | 900 W |
| Grill Power | 1000 W |
| Control Type | Touch and Rotary Knob |
| Display Type | LED Digital |
| Number of Power Levels | 5 |
| Defrost Function | Yes, by time or weight |
| Auto Cook Programs | 8 |
| Turntable Diameter | 270 mm |
| Interior Light | Yes |
| Timer Function | Up to 95 minutes |
| Child Lock | Yes |
| Cleaning and Maintenance | Wipe with damp cloth, avoid abrasives |
| Spare Parts and Repairability | Turntable, glass plate, fuse available |
| Additional Features | Mute function, eco mode |
Frequently Asked Questions - CCHM350MFX CORBERO
User questions about CCHM350MFX CORBERO
0 question about this device. Answer the ones you know or ask your own.
Ask a new question about this device
Download the instructions for your Microwave in PDF format for free! Find your manual CCHM350MFX - CORBERO and take your electronic device back in hand. On this page are published all the documents necessary for the use of your device. CCHM350MFX by CORBERO.
USER MANUAL CCHM350MFX CORBERO
natural_image
Simple line drawing of a oven with three circular tops and a rectangular chamber (no text or symbols)BUILT-IN OVEN
Instruction Manual
CCHM350MF
Before using this product, please read this manual carefully and keep it for future reference.
DIRECTORY
| SAFETY INFORMATION | SAFETY INFORMATION | 1-3 |
| INSTALLATION | Cabinet Diagram (Standing Cabinet) | 4 |
| Cabinet Diagram (Ground Cabinet) | 5 | |
| Installation Important Instructions | 6 | |
| Installation steps | 7 | |
| PRODUCT INTRODUCTION | Control Panel introduction | 8 |
| Mode introduction | 9 | |
| First use | 10 | |
| Operation steps | 10 | |
| ACCESSORY | Accessory included | 11 |
| Accessory use | 11 | |
| CLEANING MAINTENANCE | cleaning method | 12 |
| Lamp Replacement | 13 | |
| FAULT HANDLING | FAULT HANDLING 14 | |
| TECHNICAL PARAMETERS | TECHNICAL PARAMETERS 14 | |
| PRODUCT RECYCLING | PRODUCT RECYCLING 15 | |
SAFETY INFORMATION
Thank you for choosing us! Please read all instructions before using this appliance. This book contains valuable information about operation, care and service. Keep it in a safe place for future reference. Should the appliance be sold or transferred to another owner, or should you move house and leave the appliance, always ensure that the book is supplied with appliance in order that new owner can be acquainted with the functioning of the appliance and relevant warnings.
THESE WARNINGS ARE PROVIDED IN THE INTEREST OF SAFETY. PLEASE READ THEM
CAREFULLY BEFORE INSTALLING OR USING THE APPLIANCE.
To maintain the EFFICIENCY and SAFETY of this appliance, we recommend:
- Call only the Service Centers authorized by store where you buy the cooker
• Always use original Spare Parts
-
When the oven is first switched on, it may give off an unpleasant smell. This is due to the bonding agent used for the insulating panels within the oven. Please run the new empty product with the conventional cooking function, 250°C, 90 minutes to clean oil impurities inside the cavity.
-
When you use it for the first time, there will be a pungent smell or smoke, which is normal. If it does happen, you should wait for the smell or smoke to disappear before putting food in the oven.
-
Please use the product under an open environment.
-
The appliance and its accessible parts become hot during use. Care should be taken to avoid touching heating elements. Children less than 8 years of age shall be kept away unless continuously supervised.
-
If the surface is cracked, switch off the appliance to avoid the possibility of electric shock.
-
This appliance can be used by children aged from 8 years and above and persons with reduced physical, sensory or mental capabilities or lack of experience and knowledge if they have been given supervision or instruction concerning use of the appliance in a safe way and understand the hazards involved. Children shall not play with the appliance. Cleaning and user maintenance shall not be made by children without supervision.
-
During use, the appliance becomes very hot. Care should be taken to avoid touching heating elements inside the oven.
- Do not allow children to go near the oven when it is operating, especially when the grill is on.
- Ensure that the appliance is switched off before replacing the oven lamp to avoid the possibility of electric shock.
- The means for disconnection must be incorporated in the fixed wiring in accordance with the wiring specifications.
- Children should be supervised to ensure that they do not play with the appliance.
- This appliance is not intended for use by persons (including children) with reduced physical, sensory or mental capabilities, or lack of experience and knowledge, unless they have been given supervision or instruction concerning use of the appliance by person responsible for their safety.
- Accessible parts may become hot during use. Young children should be kept away.
- An all-pole disconnection means must be incorporated in the fixed wiring in accordance with the wiring rules.
- If the supply cord is damaged, it must be replaced by the manufacturer, its service agent or similarly qualified persons in order to avoid a hazard.
- Do not use harsh abrasive cleaners or sharp metal scrapers to clean the oven door glass since they can scratch the surface, which may result in shattering of the glass.
- Only use the temperature probe recommended for this oven.
- A steam cleaner is not to be used.
- The appliance is not intended to be operated by means of an external timer or a separate remote control system.
-
The instructions for ovens that have shelves shall include details indicating the correct installations of the shelves.
-
Do not use the oven unless you are wearing something on your feet. Do not touch the oven with wet or damp hands or feet.
-
For oven: Oven door should not be opened often during the cooking period.
-
The appliance must be installed by an authorized technician and put into use. The producer is not responsible for any damage that might be caused by defective placement, and installation by unauthorized personnel.
-
When the door or drawer of oven is open do not leave anything on it, or you may unbalance your appliance or break the door.
-
Some parts of appliance may keep its heat for a long time; it is required to wait for it to cool down before touching onto the points that are exposed to the heat directly.
-
If you will not use the appliance for a long time, it is advised to plug it off.
DECLARATION OF COMPLIANCE
When you have unpacked the oven, make sure that it has not been damaged in any way. If you have any doubts at all, do not use it: contact a professionally qualified person. Keep packing materials such as plastic bags, polystyrene, or nails out of the reach of children because these are dangerous to children.
INSTALLATION
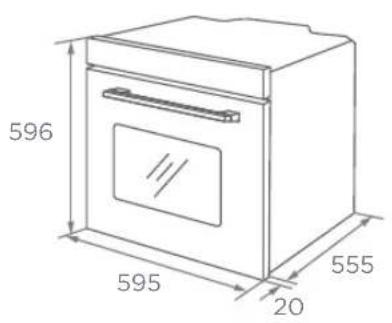
- As the appliance is constantly upgrading, the actual appliance shall prevail if the picture is different from the actual appliance.
- The thickness of the cabinet board is 20 mm.
- If the power socket is installed on the back of the appliance, the depth of the cabinet opening shall be increased from a minimum of 590 mm to 620 mm.
- The dimensions in the figures are in mm.
Cabinet Diagram (Standing Cabinet)
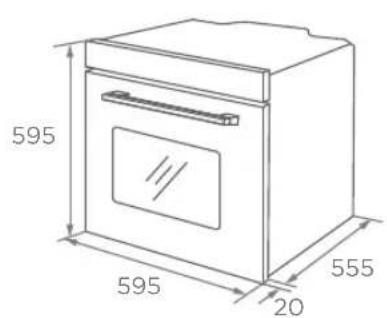
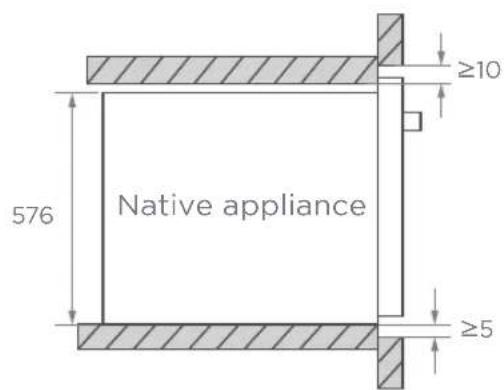
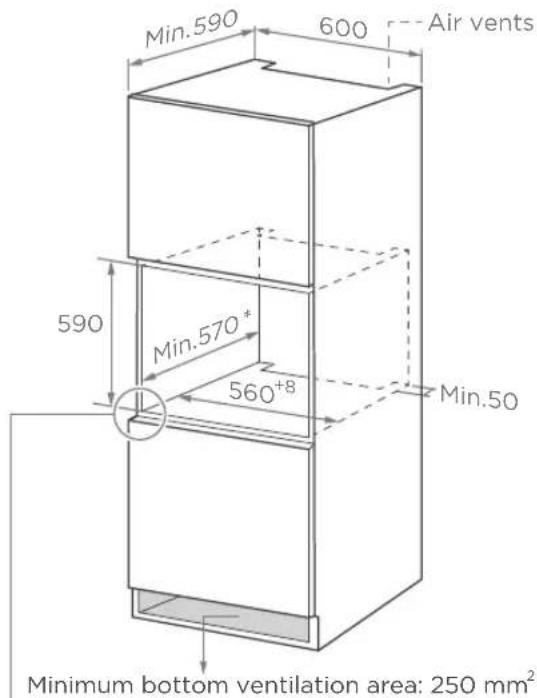
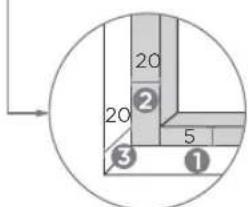
① Reserve 5 mm for the door panel at the top and bottom respectively.
② Reserve 20 mm for the door panel on the left and right respectively.
③ Reserve 20 mm for the door panel in thickness.
Cabinet Diagram (Ground Cabinet)
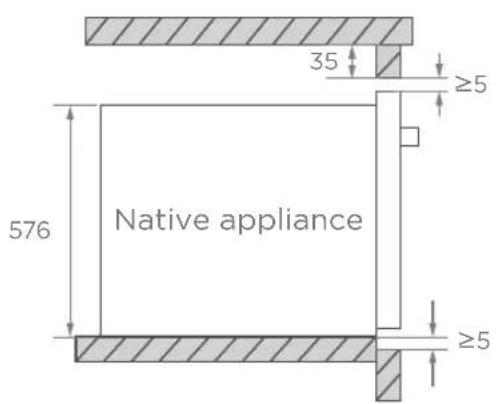
Without hob
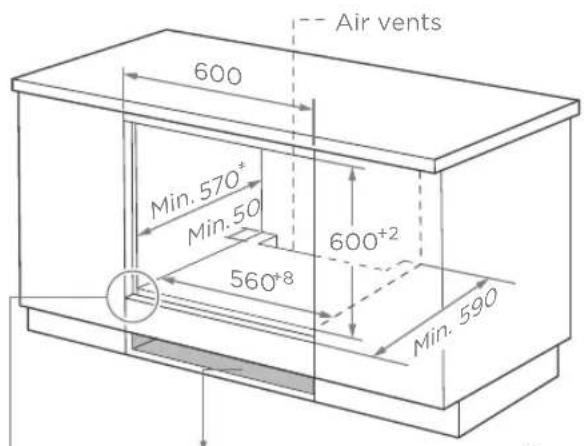
Minimum bottom ventilation area: 250 mm ^4
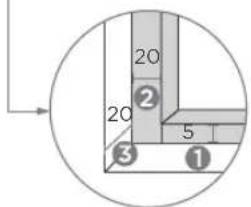
① Reserve 5 mm for the door panel at the top and bottom respectively.
② Reserve 20 mm for the door panel on the left and right respectively.
③ Reserve 20 mm for the door panel in thickness.
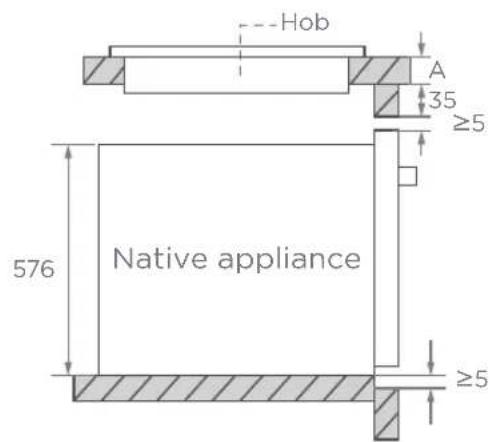
With hob
If the appliance is installed under the hob, the minimum thickness of worktop A is shown below:
| Hob type | worktop A |
| Induction hob 37 mm | |
| Full-surface induction hob 47 mm | |
| Gas hob | 30 mm |
| Electric hob | 27 mm |
Installation Important Instructions
Content that means [mandatory]
- The safe operation of this appliance can only be guaranteed if it has been installed to a professional standard in accordance with these installation instructions. The installer shall be liable for any damage resulting from incorrect installation.
- The entire installation process requires two professional installers. Wear dry protective gloves during installation to avoid scratch or electric shock.
- Fitted units must be heat-resistant up to 90^ C, and adjacent unit fronts up to 70^ C.
- Please use a 16A socket.
Content that means [prohibit]
- Do not install the appliance behind a decorative door or the door of a kitchen unit, as this may cause the appliance to overheat.
- Check the appliance for damage after unpacking it. Do not connect the appliance if it has been damaged in transit.
- Do not block the vent of the appliance and the gap between the cabinet and the appliance.
- Use extreme caution when moving or installing the appliance. It is very heavy, do not lift the appliance by the door handle.
- If the power cord or power plug is damaged, stop using the appliance immediately, to avoid fire, electric shock or other injuries.
⚠️ Content that means [note]
- Be very careful when moving or installing the appliance to avoid damage to the appliance or damage to the cabinets.
- Before starting up the appliance, remove all packaging materials and accessories from the cavity.
- The power socket shall be accessible to users (such as next to the cabinet) for easy power-off.
- After installation is complete, make sure that the power plug is firmly inserted into the socket.
- Please refer to the "Cabinet Diagram" for the requirements of net depth of the cabinet. The clearance between the cabinet bottom board and the rear board (or wall) shall not be less than 50 mm.
Installation steps
-
Please customize the cabinet according to the "Cabinet Diagram".
-
Before installation, please check for normal power socket and appropriate grounding, and check whether the cabinet dimension meets the installation requirements.
-
Place the appliance in designated locations in the kitchen, install it in a vertical cabinet, and connect the power supply.
-
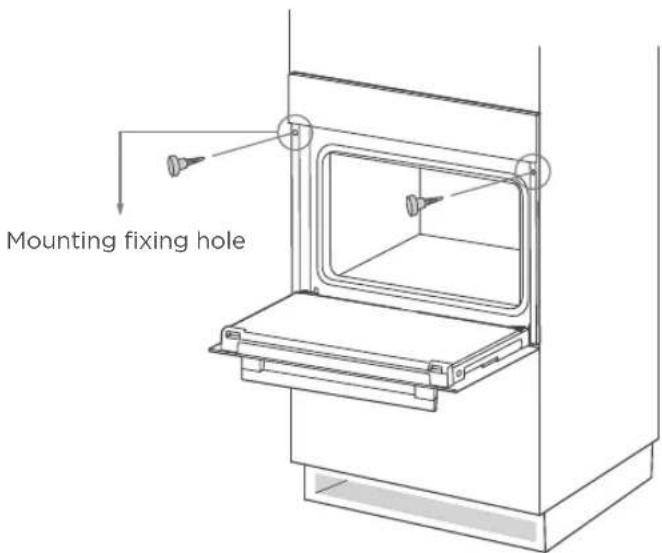
To locate the mounting fixing holes, open the appliance door and look at the side frame of the appliance(position shown above).
-
Fix the appliance to the cabinet with two rubber plugs A and screws B provided with the appliance.
PRODUCT INTRODUCTION
When removing food, please wear heat insulating gloves to prevent burns!
At the moment of opening the door of the furnace, pay attention to the steam. Please open the door at a small Angle to avoid the steam on your face.
As the product is constantly upgraded, if there is any difference between the real object and the picture below, please refer to the real object.
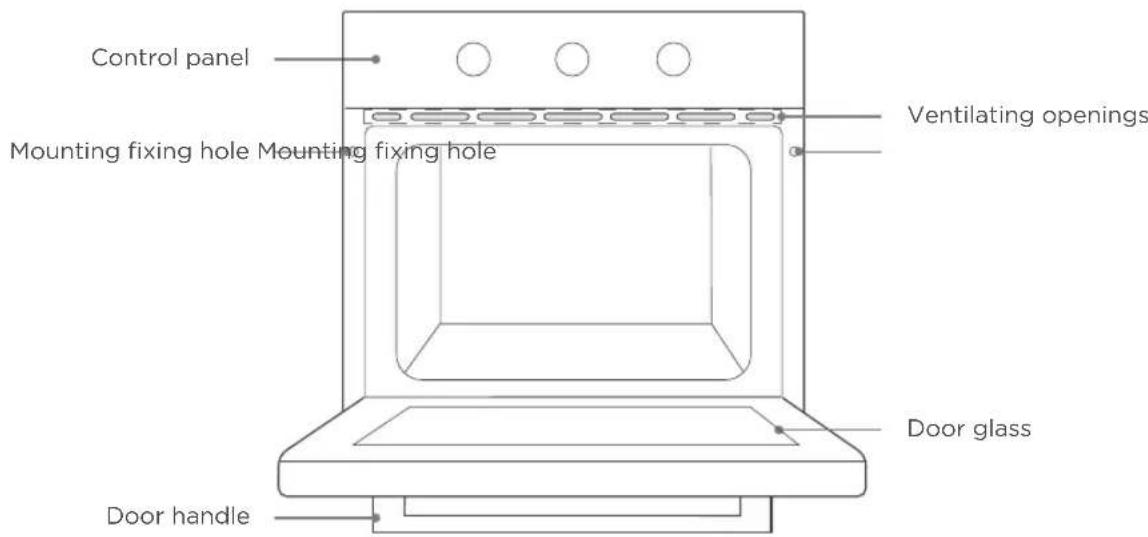
Control Panel introduction
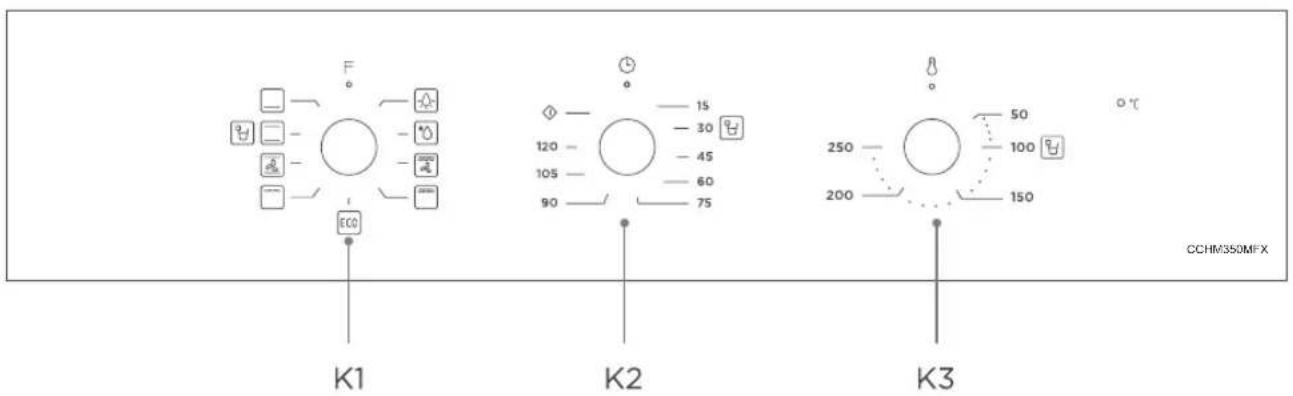
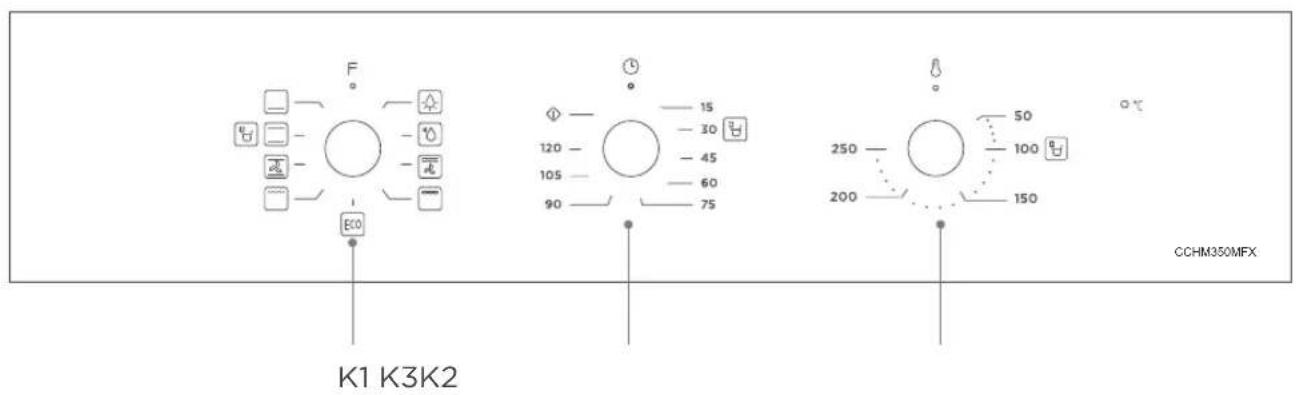
Turn knob K1 cooking mode.
Turn knob K2 to adjust the time.
Turn knob K3 to adjust the temperature.
Mode introduction
| Mode Mode introduction | |
 Lamp Lamp | Which enables the user to observe the progress of cooking without opening the door. Oven lamp will light for all cooking functions.except ECO function. |
 Defrost Defrost | Defrost frozen food. |
 Double grill + fan Double grill + fan | Barbecue flat food.Evenly distributed heat and top two heating elements work simultaneously. |
 Double grill Double grill | Bake small amounts of flat food.The top two heating elements work simultaneously. |
 ECO ECO | For energy-saved cooking. |
 Radiant heat Radiant heat | Bake small amounts of food. Please place food in the middle layer of the cavity. |
 Radiant heat Radiant heat | The combination of fans and heating elements provides more uniform heat penetration, saving up to 30-40% of energy. |
 Conventional Conventional | The top and bottom heating elements work at the same time, making them ideal for baking larger cakes. |
 Bottom heater Bottom heater | Heat is provided by heating pipes at the bottom of the oven.Mainly used for food keeping warm and food bottom coloring. |
 Clean Clean | Steam softens food residue or grease in the cavity. |
First use
Before using it for the first time, please clean the oven and accessories to a certain extent.
- Remove the oven packaging shipping protection parts.
- Remove all accessories (eg: baking trays, grills, foam, etc.) from the cavity.
- Thoroughly clean the attachment with soapy water and a rag or soft brush.
- Wipe cavity and oven surfaces with a soft damp cloth.
- To avoid fire, please make sure that the cavity is free of any remaining packing materials and accessories when using it for the first time.
- When using it for the first time, keep the kitchen highly ventilated (open the hood and windows). During this time, keep children and pets out of the kitchen and keep the doors of adjacent rooms closed.
- When used for the first time, the anti-corrosion coating of the oven heating tube evaporates when heated, which will produce a pungent smell or smoke, which is a normal phenomenon. Please run the following mode:
| Mode Temperature Time | ||
| Radiant heat 250°C | 0.5-1 Hour |
Operation steps
- Turn knob K1 cooking mode.
- Turn knob K2 to adjust the time.
- Turn knob K3 to adjust the temperature.
ACCESSORIES
As the products and accessories are constantly upgraded, if there is any difference between the real object and the picture below, please refer to the real object.
Your appliance is accompanied by a range of accessories. Here, you can find an overview of the accessories included and information on how to use them correctly.
Accessories included
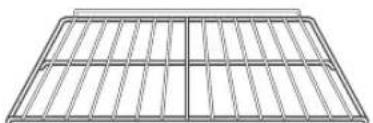
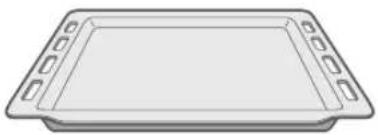
Your appliance is equipped with the following accessories:
natural_image
Pure structural steel frame diagram without any text, numbers, or symbolsBarbecue rack Baking Tray Grill food or place heat-resistant cooking containers
natural_image
Simple line drawing of a rectangular tray with side handles (no text or symbols)Cook large portions of food or catch food scraps
Accessories use
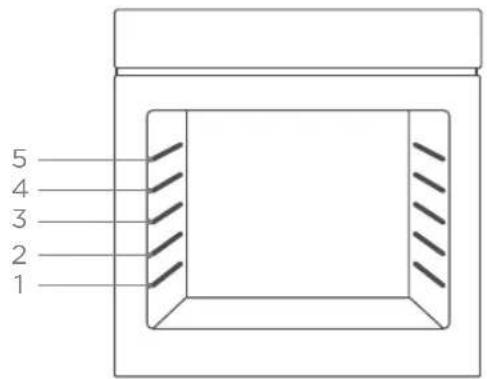
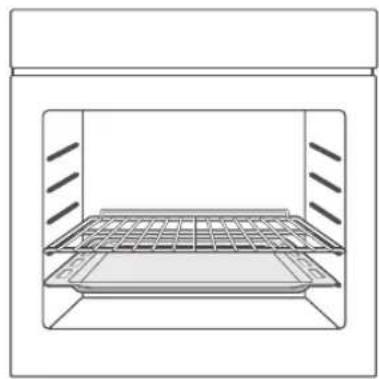
For the oven to work properly, the grill rack and Baking Tray should only be placed between the first and fifth levels. When used together, place the Baking tray under the grill.
natural_image
Line drawing of a laboratory or storage unit with internal mesh structure (no text or symbols)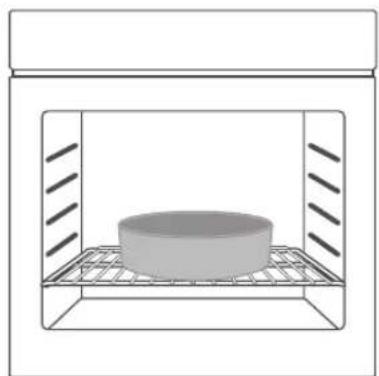
natural_image
Simple line drawing of a cylindrical object inside a rectangular chamber with grating (no text or symbols)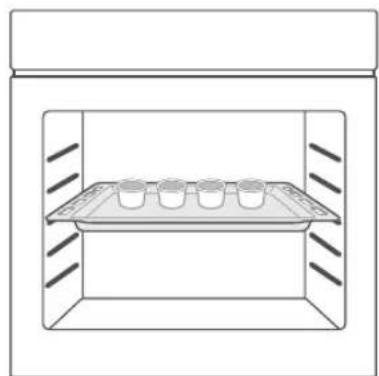
natural_image
Simple line drawing of a laboratory storage unit with a tray holding six small vials (no text or symbols)CLEAN AND MAINTENANCE
Disconnect the power supply before cleaning and maintenance.
In order to ensure the life of the machine, it should be thoroughly cleaned frequently.
cleaning method 1
- After cooking is complete, wait for the oven to cool down completely.
- Remove oven accessories, rinse with warm water and dry.
- Use a hot rag to clean food residue or grease from the oven.
- Clean the oven surface with a soft cloth dampened with detergent and dry.
cleaning method 2
- After cooking is complete, wait for the oven to cool down completely.
- Remove oven accessories, rinse with warm water and dry.
- Use a hot rag to clean food residue or grease from the oven.
- Clean the oven surface with a soft cloth dampened with detergent and dry.
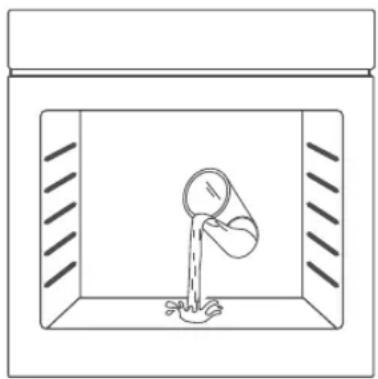
- Start the cleaning function. The operation steps are as follows:
1). Add about 250 ml of purified water and an appropriate amount of dish soap to the cavity and stir well.
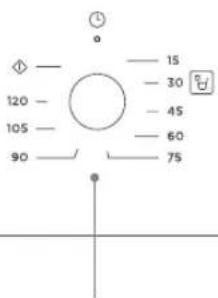
2). With the oven door closed, turn Knob 1 to the "☐" position.
3). Turn knob K2 to the "30 minutes" position.
4). Turn knob K3 to the "100°C" position.
- After the oven has cooled completely, dry the cavity with a clean absorbent sponge or soft cloth.
natural_image
Simple line drawing of a container with a funnel pouring liquid into a tank (no text or symbols)Lamp Replacement
- Switch off and disconnect the power from the oven. Ensure that the internal parts are cool before touching internal parts.
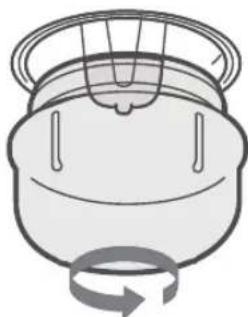
- Remove the lamp cover by turning it counter-clockwise (note, it may be stiff), replace the bulb with a new one of the same type.
- Insert the new bulb, which should be resistant to 300^ C. For replacement bulbs contact your local service centre.
- Re-fit the cover.
- If in any doubt, consult a qualified electrician for help.
natural_image
Simple line drawing of a bowl with a fan and circular arrow indicating rotation (no text or symbols)WARNING:
To avoid electric shocks-please ensure that the electricity supply to the appliance is switched off and the appliance is fully cold. before removing the lamp lens.
FAULT HANDLING
If the problem cannot be solved or other problems occur, please contact the after-sales service.
| The fault phenomenon Processing methodPossible causes | ||
| After cooking, the machine still has the sound of working (the sound of the fan rotating). | Fan delay blowing, used for heat dissipation. | Under normal conditions, food can be taken out normally without treatment;Do not unplug the fan while it is in operation. |
| There is a sound in the oven cavity when the oven is working. | 1. The sound of a cavity expanding by heat and contracting by cold.2. The furnace cavity is not cleaned for a long time, which accumulates a lot of grease. | 1. Belong to normal condition, need not deal with.2. Wipe the heating tube and furnace cavity with a clean towel. |
| The first use has an unpleasant smell. | Heating tube with anticorrosive coating, heating after melting smell. | For the first use, please heat the cavity in a well-ventilated environment for half an hour. |
| The machine was smoking. 1. Turn off the power and seek1. Product failure damage.2. The furnace cavity has oil, food residue, etc., not cleaned in time. | after service.2. Wipe the heating tube and furnace cavity with a clean towel | |
| The food is not cooked. 1. Prolong the heating time is too short.2. Oversized portions of food. | appropriately.2. Break the food into small pieces or cook it multiple times. | |
| Furnace light not on. Please seek after service.The furnace lamp is broken. | ||
TECHNICAL PARAMETERS
| Model | CCHM350MF X | |
| Usable Volume | 65L | Rated voltage 220-240V~ |
| ECelectric, cavity (☐) | 0.99 kW·h/cycle | Rated frequency 50Hz-60Hz |
| ECelectric, cavity (☒) | 0.77 kW·h/cycle | ECelectric power 3.0 kW |
| Energy efficiency class | A |
PRODUCT RECYCLING
This symbol on the product or instruction manual indicates that your device should be disposed of separately from your household waste at the end of its useful life.
There is a separate recycling system locally for recycling. For more information, please contact the local authority or retailer where you purchased the product.
When you have unpacked the oven, make sure that it has not been damaged in any way. If you have any doubts at all, do not use it: contact a professionally qualified person. Keep packing materials such as plastic bags, polys tyren, or nails out of the reach of children because these are dangerous to children.
Corberó
natural_image
Simple line drawing of a kitchen oven with three circular tops and a rectangular door (no text or symbols)FORNO DE ENCASTRAR
natural_image
Simple line drawing of a rectangular baking tray with side grout (no text or symbols)Tabuleiro de cozedura
natural_image
Line drawing of a laboratory or storage unit with a grid-patterned chamber (no text or symbols)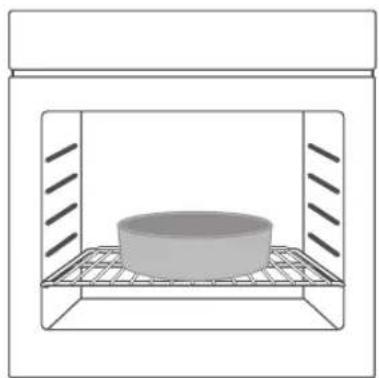
natural_image
Simple line drawing of a cylindrical object inside a rectangular chamber with grating (no text or symbols)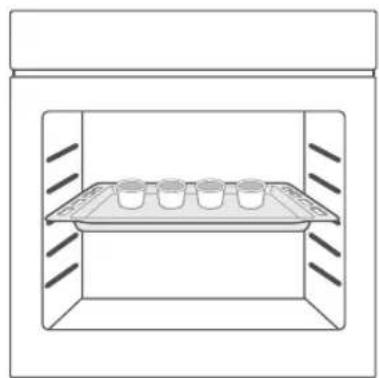
natural_image
Diagram of a laboratory storage unit with multiple beakers inside (no text or labels)natural_image
Simple line drawing of a container with liquid and a funnel inside, no text or symbols presentnatural_image
Simple line drawing of a fan or vent with a circular arrow indicating rotation (no text or symbols)AVISO:
natural_image
Simple line drawing of a kitchen oven with three circular tops and a rectangular door (no text or symbols)HORNO INTEGRABLE
flowchart
graph TD
    A[" "] --> B[" "]
    C[" "] --> D[" "]
    E[" "] --> F[" "]
    G[" "] --> H[" "]
    I[" "] --> J[" "]
    K[" "] --> L[" "]
    M[" "] --> N[" "]
    O[" "] --> P[" "]
    Q[" "] --> R[" "]
    S[" "] --> T[" "]
    U[" "] --> V[" "]
    W[" "] --> X[" "]
    Y[" "] --> Z[" "]
    AA[" "] --> AB[" "]
    AC[" "] --> AD[" "]
    AE[" "] --> AF[" "]
    AG[" "] --> AH[" "]
    AI[" "] --> AJ[" "]
    AK[" "] --> AL[" "]
    AM[" "] --> AN[" "]
    AO[" "] --> AP[" "]
    AQ[" "] --> AR[" "]
    AS[" "] --> AT[" "]
    AU[" "] --> AV[" "]
    AW[" "] --> AX[" "]
    AY[" "] --> AZ[" "]
    BA[" "] --> BB[" "]
    BC[" "] --> BD[" "]
    BE[" "] --> BF[" "]
    BG[" "] --> BH[" "]
    BI[" "] --> BJ[" "]
    BK[" "] --> BL[" "]
    BM[" "] --> BN[" "]
    BO[" "] --> BP[" "]
    BQ[" "] --> BR[" "]
    BS[" "] --> BT[" "]
    BU[" "] --> BV[" "]
    BW[" "] --> BX[" "]
    BY[" "] --> BZ[" "]
    CA[" "] --> CB[" "]
    CC[" "] --> CD[" "]
    CE[" "] --> CF[" "]
    CG[" "] --> DH[" "]
    DI[" "] --> DJ[" "]
    DK[" "] --> DL[" "]
    DM[" "] --> DJ
    DB[" "] --> DV[" "]
    DW[" "] --> DX[" "]
    DXN[" "] --> DXV[" "]
    DXV --> DXW[" "]
    DXW --> DXW1
    DXW1 --> DXW2
    DXW2 --> DXW3
    DXW3 --> DXW4
    DXW4 --> DXW5
    DXW5 --> DXW6
    DXW6 --> DXW7
    DXW7 --> DXW8
    DXW8 --> DXW9
    DXW9 --> DXW10
    DXW10 --> DXW11
    DXW11 --> DXW12
    DXW12 --> DXW13
    DXW13 --> DXW14
    DXW14 --> DXW15
    DXW15 --> DXW16
    DXW16 --> DXW17
    DXW17 --> DXW18
    DXW18 --> DXW19
    DXW19 --> DXW20
    DXW20 --> DXW21
    DXW21 --> DXW22
    DXW22 --> DXW23
    DXW23 --> DXW24
    DXW24 --> DXW25
    DXW25 --> DXW26
    DXW26 --> DXW27
    DXW27 --> DXW28
    DXW28 --> DXW29
    DXW29 --> DXW30
    DXW30 --> DXW31
    DXW31 --> DXW32
    DXW32 --> DXW33
    DXW33 --> DXW34
    DXW34 --> DXW35
    DXW35 --> DXW36
    DXW36 --> DXW37
    DXW37 --> DXW38
    DXW38 --> DXW39
    DXW39 --> DXW40
    DXW40 --> DXW41
    DXW41 --> DXW42
    DXW42 --> DXW43
    DXW43 --> DXW44
    DXW44 --> DXW45
    DXW45 --> DXW46
    DXW46 --> DXW47
    DXW47 --> DXW48
    DXW48 --> DXW49
    DXW49 --> DXW50
    DXW50 --> DXW51
    DXW51 --> DXW52
    DXW52 --> DXW53
    DXW53 --> DXW54
    DXW54 --> DXW55
    DXW55 --> DXW56
    DXW56 --> DXW57
    DXW57 --> DXW58
    DXW58 --> DXW59
    DXW59 --> DXW60
    DXW60 --> DXW61
    DXW61 --> DXW62
    DXW62 --> DXW63
    DXW63 --> DXW64
    DXW64 --> DXW65
    DXW65 --> DXW66
    DXW66 --> DXW67
    DXW67 --> DXW68
    DXW68 --> DXW69
    DXW69 --> DXW70
    DXW70 --> DXW71
    DXW71 --> DXW72
    DXW72 --> DXW73
    DXW73 --> DXW74
    DXW74 --> DXW75
    DXW75 --> DXW76
    DXW76 --> DXW77
    DXW77 --> DXW78
    DXW78 --> DXW79
    DXW79 --> DXW80
    DXW80 --> DXW81
    DXW81 --> DXW82
    DXW82 --> DXW83
    DXW83 --> DXW84
    DXW84 --> DXW85
    DXW85 --> DXW86
    DXW86 --> DXW87
    DXW87 --> DXW88
    DXW88 --> DXW89
    DXW89 --> DXW90
K1
natural_image
Simple line drawing of a rectangular tray with side scalloped edges (no text or symbols)Bandeja de cocción
natural_image
Line drawing of a simple indoor enclosure or storage unit with internal grid structure (no text or symbols)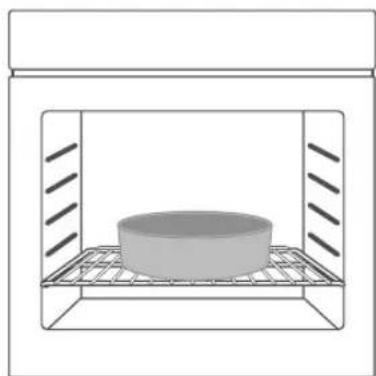
natural_image
Simple line drawing of a cylindrical object inside a rectangular chamber with grating (no text or symbols)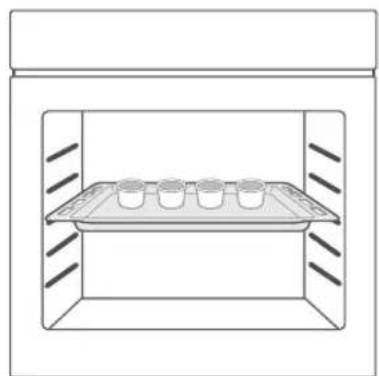
natural_image
Simple line drawing of a laboratory storage tray with six cups inside a container (no text or symbols)LIMPIEZA Y MANTENIMIENTO
natural_image
Simple line drawing of a container with a sprouting funnel and liquid, no text or symbols present.natural_image
Simple line drawing of a container with a rotating arrow, no text or symbols presentADVERTENCIA:
RECICLAJE DEL PRODUCTO
The presentation of the purchase invoice accompanied by this guarantee certificate is essential.
Covered Risks.
This appliance is guaranteed against any malfunction, provided that it is intended for domestic use, proceeding to its repair within the warranty period and only by the authorized SAT network.
Our Corberó appliances have the manufacturer's legal warranty that covers any breakdown or defect for 36 months, from the invoice date of January 1, 2022. If necessary, we take care of any possible incident whenever it is due to a defective component or manufacturing fault. Warranty Exceptions
Warranty Exceptions
- That the date of the certificate does not coincide with the date of sale of the original invoice.
• Faults produced by blow, by fall or any other cause of force majeure.
• If the device has been manipulated by unauthorized personnel. - Faults produced or derived as a consequence of improper use, installation defects, or modifications to the device that alter its operation.
- Start-up, maintenance, cleaning, components subject to wear, lamps, aesthetic parts, oxidation, plastics, rubbers, housings and crystals.
- Microwave ovens (with the exception of built-in ones) and tabletop ovens in the event of any incident of operation, they must be taken to the nearest technical service by the customer. They are not collected or repaired at home.
Electric thermos guarantee. 3-year warranty including travel and labor costs that correspond to the repair of the product, having to have maintenance once every 12 months. Especially if you have installed a gas appliance, keep in mind as the owner of the installation, the obligation to carry out a complete review of the equipment, (according to Royal Decree 238 / 2013, of April 5. RITE. IT3, M. Lo thermos electrical and boilers that include hot water storage tanks, for the benefit of the Guarantee to apply, it is mandatory that the magnesium anode is operational and that it performs the protection function adequately. For this, it is recommended that the anode be checked biannually by the Official Service and is renewed when necessary Periodicity that must be annual in those areas with critical waters (CaCO3 content greater than 200mg / L , that is, from 20^ of hardness) Deposits without the correct state of the protection anode are not covered by the warranty Regardless of the type of tank or product, all heating or DHW overpressure valves must be channeled to avoid damage and n the house due to water discharges. The product warranty does not cover damages caused by not channeling the water spilled by this valve.
"THESE EXCEPTIONS VOID THE WARRANTY, THE REPAIR BEING CHARGED TO THE CUSTOMER"
Period covered in devices according to the law of guarantees in the sale of consumer goods Current law is "RD 7/2021"
Official Technical Service: 911 08 08 08
CERTIFICADO DE GARANTIA
- BUILT-IN OVEN
- DIRECTORY
- SAFETY INFORMATION
- THESE WARNINGS ARE PROVIDED IN THE INTEREST OF SAFETY. PLEASE READ THEM
- DECLARATION OF COMPLIANCE
- INSTALLATION
- Cabinet Diagram (Standing Cabinet)
- Cabinet Diagram (Ground Cabinet)
- Installation Important Instructions
- Content that means [mandatory]
- Content that means [prohibit]
- ⚠️ Content that means [note]
- Installation steps
- PRODUCT INTRODUCTION
- Control Panel introduction
- Mode introduction
- First use
- Operation steps
- ACCESSORIES
- Accessories included
- Accessories use
- CLEAN AND MAINTENANCE
- cleaning method 1
- cleaning method 2
- Lamp Replacement
- WARNING:
- FAULT HANDLING
- PRODUCT RECYCLING
- Corberó
- FORNO DE ENCASTRAR
- AVISO:
- HORNO INTEGRABLE
- LIMPIEZA Y MANTENIMIENTO
- ADVERTENCIA:
- RECICLAJE DEL PRODUCTO
- Covered Risks.
- Warranty Exceptions
- Official Technical Service: 911 08 08 08
- CERTIFICADO DE GARANTIA
Brand : CORBERO
Model : CCHM350MFX
Category : Microwave