
OG-HA5-12G - Electronic board AJA - Free user manual and instructions
Find the device manual for free OG-HA5-12G AJA in PDF.


| Product Type | 12G-SDI to Fiber Optic Converter |
| Form Factor | OpenGear Card |
| Input Interface | 1x 12G-SDI BNC |
| Output Interface | 1x LC Duplex Optical Fiber (single-mode or multi-mode) |
| Video Formats Supported | SD-SDI, HD-SDI, 3G-SDI, 6G-SDI, 12G-SDI |
| Optical Wavelength | 1310 nm or 1550 nm (depending on SFP module) |
| Maximum Fiber Distance | Up to 10 km (single-mode, with appropriate SFP) |
| Power Consumption | Powered via OpenGear frame backplane (approx. 8W) |
| Dimensions (W x H x D) | 1.5 x 5.5 x 3.5 inches (38 x 140 x 89 mm) |
| Weight | 0.5 lb (0.23 kg) |
| Operating Temperature | 0°C to 40°C (32°F to 104°F) |
| Storage Temperature | -20°C to 70°C (-4°F to 158°F) |
| Relative Humidity | 10% to 90% non-condensing |
| Warranty | 2 years limited |
| Compliance | SMPTE ST 2082-1, ST 2081-1 |
Frequently Asked Questions - OG-HA5-12G AJA
User questions about OG-HA5-12G AJA
0 question about this device. Answer the ones you know or ask your own.
Ask a new question about this device
Download the instructions for your Electronic board in PDF format for free! Find your manual OG-HA5-12G - AJA and take your electronic device back in hand. On this page are published all the documents necessary for the use of your device. OG-HA5-12G by AJA.
USER MANUAL OG-HA5-12G AJA
Installation and Operation Guide
Trademarks
AJA® and Because it matters. are registered trademarks of AJA Video Systems, Inc. for use with most AJA products. AJATM is a trademark of AJA Video Systems, Inc. for use with recorder, router, software and camera products. Because it matters. is a trademark of AJA Video Systems, Inc. for use with camera products.
Corvid Ultra ® , Io ® , Ki Pro ® , KONA ® , KUMO ® , ROI ® and T-Tap ® are registered trademarks of AJA Video Systems, Inc.
AJA Control Room™, KiStor™, Science of the Beautiful™, TruScale™, V2Analog™ and V2Digital™ are trademarks of AJA Video Systems, Inc.
All other trademarks are the property of their respective owners.
Copyright
Copyright © 2023 AJA Video Systems, Inc. All rights reserved. All information in this manual is subject to change without notice. No part of the document may be reproduced or transmitted in any form, or by any means, electronic or mechanical, including photocopying or recording, without the express written permission of AJA Video Systems, Inc.
Contacting AJA Technical Support or Sales
Please have all pertinent information at hand prior to contacting AJA support or sales.
Support Telephone: +1.530.271.3190
Support Website: https://www.aja.com/support/contact
Support Email: support@aja.com
Sales Email: sales@aja.com
Shipping Address: AJA Video Systems
180 Litton Drive
Grass Valley, CA 95945, USA
Contents
Notices 2
Trademarks 2
Copyright 2
Contacting AJA Technical Support or Sales 2
Chapter 1 – Introduction .....4
Overview....4
Default Operation 4
Features 4
Block Diagram 5
I/O Connections 5
Signal Indicators on the OG-HA5-12G Card 5
Signal Indicators in the Dashboard Control System 6
User Controls 7
Dashboard Control System. 7
openGear and AJA 7
Installation. 8
Summary 8
Unpacking 8
OG-HA5-12G Rear Plate Installation 8
OG-HA5-12G Card Installation. 9
Cabling 11
Chapter 2 – Operation....12
Using the Dashboard Control System.... 12
Requirements 12
Configuration Settings Stored in OG Card 12
Control Interface Basic Components 12
Basic Tree View of Frames and Cards 13
Card Information and Status. 13
Parameter Controls 17
Input Tab Screen 17
EDID Tab Screen. 18
Output Tab Screen 19
HDR Tab Screen 20
Audio Tab Screen 21
Setup Tab Screen 22
Uploading New Software 22
To Upload New Software 23
Rebooting 24
To Reboot the OG-HA5-12G 24
Appendix A – Specifications ..... 26
OG-HA5-12G Family Tech Specs 26
Appendix B – Safety and Compliance ..... 29
5 Year Warranty and Liability Information. 39
Index. 40
Chapter 1 – Introduction
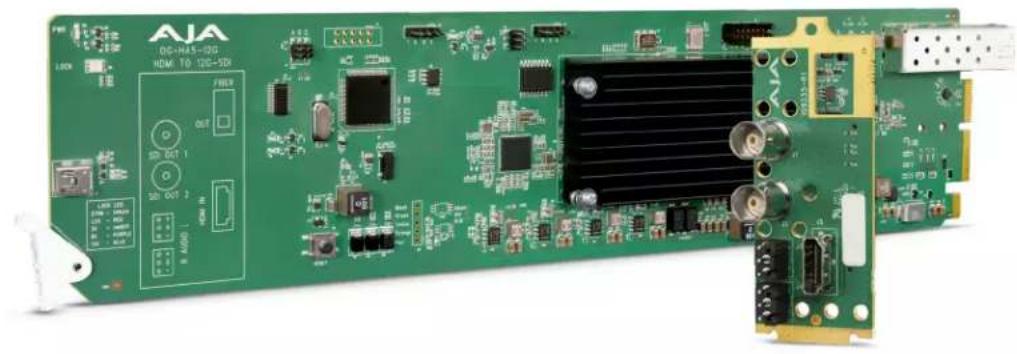
Overview
AJA's OG-HA5-12G converts an HDMI 2.0 input to 12G-SDI for 4K/UltraHD single link outputs. OG-HA5-12G includes two 12G-SDI distribution amplifier outputs with 8 or 2-channels of embedded audio from an HDMI source or two-channel analog audio input (3-pin terminal block connectors).
OG-HA5-12G also supports Extended Display Identification Data (EDID) emulation, which ensures the connected source continuously supplies custom preferred video formats on output.
OG-HA5-12G-T and OG-HA5-12G-T-ST Fiber SFP-equipped models are single channel transmitters capable of extending HDMI 4K/UltraHD signals over long distances, up to 10km over a single LC or ST Fiber link respectively. These models ship with SFPs installed, and include all functionality of the OG-HA5-12G, with the added benefit of extending audio and video signals further.
Designed for use in high-density openGear's 2RU frames and AJA's OG-X-FR 2RU frame, Dashboard Software support on Windows®, macOS® and Linux offers remote control and monitoring of the openGear architecture and provides convenient and industry-standard configuration, monitoring and control options over a PC or local network.
Default Operation
The OG-HA5-12G auto configures to the connected HDMI input. The auto-configure function identifies the connected input and outputs the equivalent SDI format.
Features
- Convert HDMI 2.0b to 4K/UltraHD 60 fps to 12G-SDI with a second mirrored output (see "Appendix A – Specifications" on page 26 for a complete list of supported inputs)
• Supports up to 60p input at 4:4:4/4:2:2/4:2:0
• EDID Emulation -
Two Sample Interleave (2SI) 4K/UltraHD source mapping
• Analyzes HDR Infoframe data coming in over HDMI in accordance with HDMI v2.0b/CTA-861-G -
HDR signaling metadata pass-through and optional override
- Simple Frame Rate Conversion (FRC) between Fractional and Integer rates
- Embedded audio can be selected from the HDMI or Analog audio inputs
- Embedded compressed audio pass-through of AC-3 (Dolby Digital) and E-AC-3 (Dolby Digital Plus), including DD+ JOC immersive sound.
- Remote configuration through Dashboard Control System for an openGear Frame
- Rear I/O plate included
• Compatible with OG-X-FR, OG3 and DFR-8321 openGear frames
• Fiber SFP models available - Five year warranty
Block Diagram
Figure 1. OG-HA5-12G Converter, Simplified Block Diagram
![graph LR A["HDMI v2.0 Input with Embedded Audio"] --> B["HDMI v2.0 RCVR"] B --> C["Video Processing"] C --> D["Embed Audio"] D --> E["SDI XMIT"] E --> F["12G SDI Out 1"] A --> G["Audio Disembed"] G --> H["Sample Rate Converter"] H --> I["Audio"] J["2-Channel Analog Audio Input"] --> K["A/D Converter…](/content/2026/05/956289/images/916d220d94d1750b0aab1491280a30d2fd92528fc3b228041c74d6f17b1db312.jpg)
NOTE: The SDI output will automatically mute if there is no valid signal on the HDMI input or if the HDMI cable is removed.
I/O Connections
Figure 2. OG-HA5-12G Converter Rear Plate Connections

Signal Indicators on the OG-HA5-12G Card
Located at the upper front area of the OG-HA5-12G card, the Lock LED indicates by color the type of signal detected by the HDMI input (Table 1).
Table 1. HDMI In Lock LED Signal Detected
| Signal Detected Color | |
| No Signal Off | |
| 270M Green | |
| 1.5G Red | |
| 3G Amber | |
| 6G Purple | |
| 12G Blue |
Signal Indicators in the Dashboard Control System
Card Alarm State – Red
These potential card states will result in a red alarm indicator:
• HW Status Unsupported Rear Module
- HW Status FPGA Load Failure
Card Alarm State – Yellow
When the signal is either not present or is not locked, the Dashboard Control System shows a yellow Card state alarm. Additionally, under the Status tab, the Input State is reported as "Not Connected."
Figure 3. Signal is Not Present or Not Locked

When a signal is present and locked, the Dashboard Control System shows a green Card state (OK) and a green Input (OK) under the Status tab. The SDI Format is also indicated.
Figure 4. Signal Present and Locked

User Controls
The OG-HA5-12G can be immediately used for many applications, since it is designed to recognize inputs and perform standard actions automatically. However, you can also manually configure the OG-HA5-12G using remote configuration through the Dashboard Control System for an openGear Frame.
Dashboard Control System
The Dashboard Control System, created by Ross Video, provides a control interface between Windows, macOS and Linux computers and the cards installed in an openGear frame. Dashboard operates through TCP/IP communication and requires an Ethernet connection between the controlling computer and an openGear frame.
For details about acquiring and using the Dashboard Control System, refer to "Using the Dashboard Control System" on page 12.
openGear and AJA
openGear is an open-architecture, modular frame system designed by Ross Video and supported by a diverse range of terminal equipment manufacturers, including AJA. Ross Video manufactures the frames, power supplies and network cards for openGear. AJA is a reseller of the openGear frames.
AJA Video is a leading manufacturer of video interface technologies, converters, digital video recording solutions and professional cameras, bringing high-quality, cost-effective products to the professional, broadcast and post-production markets. AJA products, including openGear cards, are designed and manufactured at our facilities in Grass Valley, California.
Installation
Summary
Installing an OG-HA5-12G card into an OG-X-FR openGear frame consists of the following steps:
- Install the rear plate onto the back of the frame corresponding to the slot pair you will be using for the OG-HA5-12G card.
- Insert the OG-HA5-12G card into the frame in the left (odd numbered) slot of the pair.
- Connect the BNC, HDMI and audio cabling to the rear plate.

ESD Susceptibility - Static discharge can cause serious damage to sensitive semiconductor devices. Avoid handling circuit boards in high static environments such as carpeted areas, and when wearing synthetic fiber clothing. Always exercise proper grounding precautions when working on circuit boards and related equipment.
Unpacking
Unpack each openGear product you received from the shipping container and ensure that all items are included. If any items are missing or damaged, contact your sales representative or AJA directly.
Parts List
Quantity Description
1 OG-HA5-12G Front Card in ESD bag
1 Compatible Rear Plate
2 WECO 3-Pin Terminal Connector Plug 3.5mm
OG-HA5-12G Rear Plate Installation
- Ensure that the chassis is properly installed in a secure rackframe.
- Locate the card frame slot on the rear of the openGear frame into which you wish to install the openGear card.
NOTE: An OG-HA5-12G card occupies two slots in the frame. - Using a Phillips screwdriver, unscrew the top screw from the desired blank rear plate and remove it.
- Seat the bottom of the rear plate in the seating slot at the base of the frame back plane (Figure 5).
Figure 5. Inserting Rear Plate Into Frame Seating Slot

- Align the top screw of the rear plate with the screw hole on the top edge of the frame back plane.
- Ensure the rear plate aligns with the desired card slot before tightening the screw.
- Using a Phillips screwdriver, fasten the rear plate to the frame back plane (Figure 6). Do not over tighten.
Figure 6. rear plate Inserted Into Frame Seating Slot

- Ensure proper frame cooling and ventilation by having all rear frame slots covered with either OG card rear plates or blank metal plates.
OG-HA5-12G Card Installation

Caution! The SFP module must be removed from an OG-HA5-12G card before inserting the card into or removing the card from an openGear frame.
- If necessary, remove the SFP module from the Front Card by lifting the lever (also referred to as a "bale") and pulling out the module.
- Open the openGear frame door as follows:
A. Gently pull the side door tabs towards the center of the door, releasing the door from the frame.
B. Using both hands, pull the door towards you. The door extender arms prevent the door from falling.
- Locate the rear plate you installed as described above. The interior slot number is dependent on the slot combinations into which you installed the
rear plate. This allows adequate spacing to avoid damaging the card, the cards installed in the neighboring slots, or both.
- Hold the card by the edges and carefully align the card edges with the rails inside the frame. The slots are numbered starting from the left-most slot when facing the frame front.
IMPORTANT: OG-HA5-12G cards are installed into the left (odd numbered) slot of the pair in order to connect with the rear plate.
- Insert the card into the frame until the card is properly seated in the Rear Plate. After you feel the card's first click, its position in the frame will resemble Figure 7.
Figure 7. Card on Right Not Fully Inserted

- Next, press against the white plastic tab again until you feel the second click. Make sure that the plastic tab at the bottom of the front edge of the card is completely upright. If it is tilting forward, the card is not yet fully inserted. A properly seated card position should resemble Figure 8.
Figure 8. Card Fully Inserted, White Plastic Tab Upright
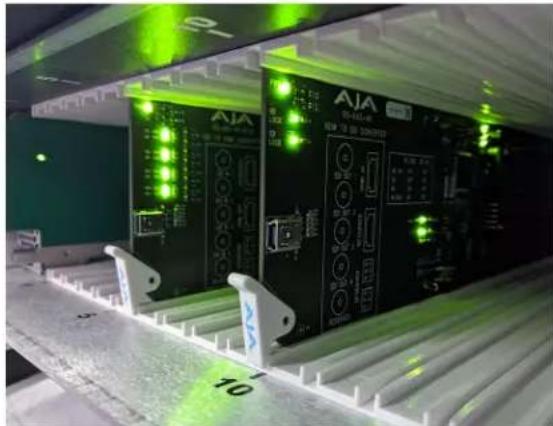
- Some OG cards require more pressure than others to be fully inserted. Because this OG card has a rear SFP port that passes through the rear plate, alignment is especially important. Do not apply excessive force if you cannot completely insert the card into its slot.
NOTE: If the SFP port at the rear of the card fails to line up with the square opening in the rear plate, the card will fail to insert fully into the rack. Please contact AJA Support if you are experiencing this issue.
- Close the frame door as follows:
A. Slide the door into the frame.
B. Pull and release the door tabs to ensure the frame door is securely locked to the frame.
9. After the front card is fully seated, locate the card retention screw on the rear plate. Torque the card-retention screw into the front card's L bracket using a Phillips screwdriver. Do not overtighten.
10. Insert the SFP fiber module into the socket until it clicks and locks. The lever handle is on the left.
NOTE: The SFP module must match the card's capabilities for proper operation. Input and output triangles next to the fiber ports identify which are inputs and which are outputs.
IMPORTANT: Reverse these steps for removal of the front card to avoid damage to the SFP. Remove the SFP, unscrew the card retention screw, and then withdraw the front card from the frame.
Cabling
Refer to Figure 2 on page 5 to identify the input and output signal connectors.
NOTE: Keep the protective dust cap in the SFP module until the fiber cabling is actually connected to the module.
Using the Dashboard Control System
The Dashboard Control System is available as a free download from the openGear Dashboard Software Download webpage:
https://www.opengear.tv/frame-and-control/control-system/download/
Ross Video offers comprehensive documentation that covers the extensive capabilities of the Dashboard Control System:
https://www.rossvideo.com/support/product-documentation/dashboard/
This AJA OG-HA5-12G manual addresses only those essential aspects of the Dashboard Control System needed to control the OG-HA5-12G card.
Requirements
The Dashboard Control System requires the following components:
- openGear frame with a Frame Controller card
- Ethernet connection between the controlling computer and the openGear frame
NOTE: The openGear frame ships from AJA with the MFC-8322-S Frame Controller card for controlling the new AJA Dashboard cards. The openGear frame also supports the MFC-0G3-N Advanced Networking Frame Controller card, which can be used to control compatible OG cards.
Dashboard automatically discovers openGear and Dashboard Connect devices, such as openGear frames and cards that are present and accessible on your network.
Configuration Settings Stored in OG Card
Configuration settings made through Dashboard are stored in the OG-HA5-12G unit through subsequent power cycles.
Control Interface Basic Components
The basic components of the Dashboard Control System user interface consist of the basic tree view of frames and cards, the card information and status panel, and the parameter controls panel. These elements are shown in Figure 9.
The basic tree view of frames and cards shows the frames and cards that are discoverable by Dashboard on your network.
The card information and status panel, shown in the middle panel, display the basic status of the card currently selected in Dashboard.
The parameter controls panel shows the tabs and parameters that the selected card has available for configuration and control.
Figure 9. Main Sections of the Dashboard User Interface

Basic Tree View of Frames and Cards
The basic tree view in the left column shows the frames and cards that are discoverable by Dashboard on your network.
Card Information and Status
The card information and status panel, shown in the middle panel, display the basic status of the card currently selected in Dashboard.
Figure 10. OG-HA5-12G Card Information Screen in Dashboard
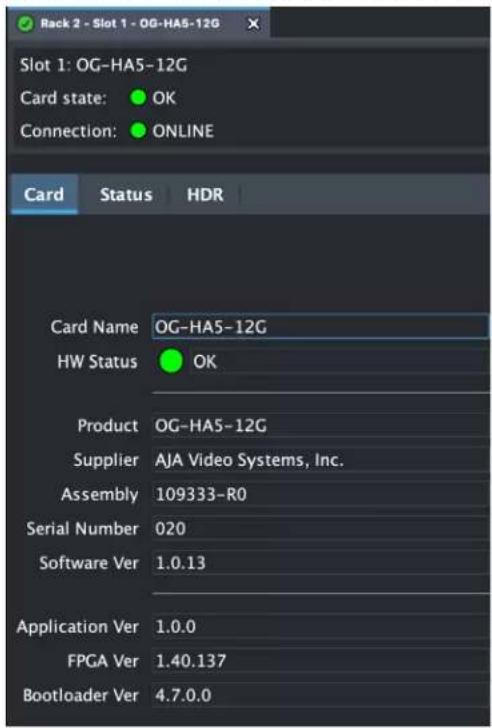
The Card information screen indicates the basic information about the card itself such as the card name, hardware status, serial number, software version and other items. This information is useful when calling AJA Support for service or technical support.
Card Name - This field reports that OG card's name, which you can define with the Setup Tab Screen see "Setup Tab Screen" on page 22.
Assembly - This is the factory assembly number.
Serial Number - This is the factory set unique serial number of your OG card. If you ever call AJA Support for service, you may be asked for this number.
Software Ver - This shows the currently installed firmware for that OG card.
Figure 11. OG-HA5-12G Status Information Screen in Dashboard

The Status tab provides detailed information on the current input and output signal status for the card. For example, the HDMI In status field reports whether the signal is connected. If the signal is not connected, the field would report No Input. The SDI Out field reports the signal being generated by the card for both SDI outputs.
Figure 12. OG-HA5-12G HDR Information Screen in Dashboard
![Slot 1: OG-HA5-12G Card state: OK Connection: ONLINE Card Status HDR HDMI HDR Input HDR Input Detected Yes SDR/HDR HLG Colorimetry BT.2020 Maximum CLL 1000 Maximum FALL 400 DM Lum. Minimum 0.0050 DM Lum. Maximum 1000 Red x[2] 0.70798 Red y[2] 0.29198 Green x[0] 0.17000 Green y[0] 0.79700 Blue x[1] 0…](/content/2026/05/956289/images/e5a110453e08a403775ebd7b73f7ec7f4f1447dfd9581166d436a5776fbd32ad.jpg)
Click on the HDR tab to view the received High Dynamic Range static metadata extensions settings.
The HDR Metadata tab indicates whether HDR metadata is being received on the HDMI input. If so, it decodes and presents the static metadata descriptors as defined in CTA-861.3 and HDMI v2.0a.
NOTE: The OG-HA5-12G HDR function does not modify the video data. See "HDR Tab Screen" on page 20 for related information.
The twelve Custom Metadata parameters displays the incoming HDR color, white point, and luminance values, if present.
HDR Infoframe Detected
Indicates whether an HDR Infoframe is being received.
- YES - HDR metadata is being received.
• NO - HDR metadata is not being received.
Red, Green, Blue, White Point
These eight values define the color gamut and white point, and are adjustable in units of 0.00002 cd/m 2 , with a range of 0.00000 to 1.00000 cd/m 2 .
DM Lum
These two parameters define the Display Mastering Luminance.
- Minimum: Defines the floor of the SMPTE ST 2086 color volume (in the case of HDR) and is determined by the mastering environment.
- Range: 0.00000 cd/m2 to 1.00000 cd/m2 .
- Step size: 0.00002 cd/m 2 .
- Maximum: Defines the ceiling of the SMPTE ST 2086 color volume (in the case of HDR) and is determined by the mastering environment.
• Range: 1 cd/m 2 to 65535 cd/m 2 . - Step size: 1 cd / m2 .
Maximum: CLL
Represents the highest-value pixel component in an entire scene. It is determined by analyzing each frame of video, and can be determined in the post environment.
• Range: 1 cd/m 2 to 65535 cd/m 2 .
- Step size: 1 cd / m2 .
Maximum: FALL
Represents the maximum of frame-based average light levels taken over an entire scene, and can be determined in the post environment.
• Range: 1 cd/m 2 to 65535 cd/m 2 .
- Step size: 1cd / m2
Parameter Controls
The parameter controls panel on the right side of Dashboard shows the tabs and parameters that are configurable for the selected card.
Input Tab Screen

NOTE: SDI output will automatically mute if there is no valid signal on the HDMI cable, or if the HDMI cable is disconnected.
About Bits Per Pixel
With HDMI, YCbCr is always reported as 24bpp, which is 12 bit depth (whether the input signal is 8, 10, or 12 bit depth).
To determine the bit depth for RGB, divide the bpp by 3. For example:
- 24bpp = 8 bit depth
- 30bpp = 10 bit depth
- 36bpp = 12 bit depth
RGB Range
Selects the Input Video Color Range for RGB signals.
NOTE: This setting has no effect on YCbCr signals.
Choose from:
- Auto (default)
- SMPTE
• Full
Preprocess
Can be used to add internal preprocessing to accept sources with high jitter.
Choose from:
• On
- Off (default)
EDID Tab Screen

EDID (Extended Display Identification Data) is used to find the highest signal resolution that is compatible with both the source and the destination (sink) devices. When an HDMI source device is initially connected to the OG-HA5-12G, the OG-HA5-12G sends its EDID information to that source. The source uses this information to decide what format to send.
Preferred Video Format
The OG-HA5-12G's EDID setting can be configured by the user to any of the following formats and frame rates:
| Auto | 1920x1080i25 | 2048x1080p50 |
| 1280x720p50 | 1920x1080i30 | 2048x1080p60 |
| 1280x720p60 | 1920x1080p50 | 3840x2160p50 |
| 1920x1080p60 | 3840x2160p60 |
YCbCr Support
This parameter determines whether the OG-HA5-12G will signal to its HDMI source that the OG-HA5-12G will support (Yes) or will not support (No) YCbCr input formats.
NOTE: RGB formats are always supported by default in an HDMI sink.
Max Audio Channels
Selects the number of audio channels to be used from the signal source. Choose from:
• 2 Ch
• 8 Ch
Output Tab Screen

Color Space
Selects the Output Video Color Space. Note that DVI output is limited to 4:4:4 RGB. Choose from the following:
- Auto - selects the video format based on the input video and the attached device's capabilities.
• 4:2:2 YCbCr
• 4:4:4 RGB
• 4:4:4 YCbCr
RGB Range
Selects the Color Range. Choose from the following:
- Auto - (default) The OG-HA5-12G automatically detects the RGB range (if the input signal is RGB).
- SMPTE
• Full
P to PsF
Choose to convert incoming progressive format HDMI video to PsF SDI video.
- Off - (default) No conversion.
- On - Converts the video to PsF (if it is progressive format and low frame rate).
3G-SDI Mode
Selects the 3G SDI Video Mode. Choose from the following:
- Level A - (default)
- Level B
Pad/Crop
Selects pixel padding and cropping conversions between UltraHD and 4K formats. Choose from the following:
- Off - (default) No processing.
- Pad - Add black pixels to the left and right sides of the raster to fill a wider aspect ratio (UltraHD to 4K, or HD to 2K).
- Crop - Crop pixels from left and right sides of the raster to fit a narrower aspect ratio (4K to UltraHD, or 2K to HD).
Frame Rate
The Frame Rate control can be set to convert an integer input frame rate (like p60) to the matching fractional or non-integer output frame rate (like p59.94). The frame rate converter accomplishes this by dropping a complete video frame every 1001 frames. This control can also be set to convert a fractional or non-integer input frame rate (like p59.94) to an integer output frame rate (like p60), accomplished by repeating a complete video frame every 1000 frames.
NOTE: Because audio is disembedded prior to any video processing and then re-embedded after video processing, there will be no disruption to audio when the frame rate converter is working.
- Off (default) - No frame rate conversion will be performed. The output frame rate will match the input frame rate.
- Fractional - If the input frame rate is an integer frame rate, the output frame rate will be converted to the matching fractional frame rate. Fractional frame rate input signals are unaffected.
- Integer - If the input frame rate is a fractional frame rate, the output frame rate will be converted to the matching integer frame rate. Integer frame rate input signals are unaffected.
HDR Tab Screen

Output override controls on this screen can be used to replace incoming or missing HDR metadata with alternative values for the OG-HA5-12G's SDI VPID outputs. See "HDR Information Screen" on page 16 for related information.
SDR/HDR
This setting controls what SDR/HDR metadata value is applied to the video output.
- Auto - Passes the SDR/HDR value from the video input to the output.
- SDR - An SDR value is applied to the output.
- PQ - A PQ value is applied to the output.
- HLG - An HLG value is applied to the output.
Colorimetry
This setting controls what Colorimetry metadata value is applied to the video output.
- Auto - Passes the Colorimetry value from the video input to the output.
• BT.601, BT.709 and BT.2020 values are passed through.
- If a non-supported colorimetry value is received, then BT.601 is signaled for SD formats and BT.709 is signaled for HD/UltraHD formats.
- BT.709 - A BT.709 value is applied to the output.
- BT.2020 - A BT.2020 value is applied to the output.
Audio Tab Screen
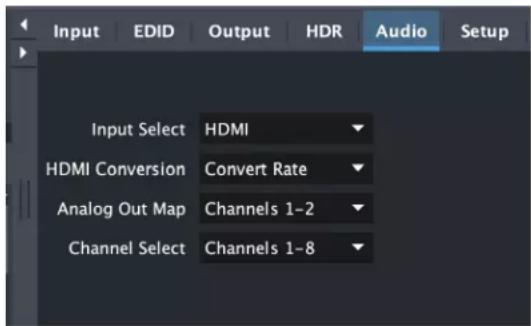
Input Select
Choose the audio input source. Select from the following:
• HDMI
- Analog
- Analog + HDMI
- None
HDMI Conversion
Choose the audio conversion to be performed on the incoming HDMI audio.
- Convert Rate - HDMI audio will be sample rate converted, if necessary, to 24-bit/48 kHz audio.
- Pass Through - HDMI audio will be passed to the SDI embedded audio channels without sample rate conversion.
Analog Out Map
Select which pair of audio channels will carry the analog audio output. Choose from the following:
- Ch 1+2 (9+10)
- Ch 3+4 (11+12)
- Ch 5+6 (13+14)
- Ch 7+8 (15+16)
NOTE: The actual channel pair depends on the selection made for the Channel Select control. For example, if Ch 1+2 is selected, but the Channel Select is set to Channels 9-16, then the Analog Audio will be embedded into SDI Ch 9+10.
Channel Select
Choose which set of SDI embedded audio output channels will receive up to eight channels of embedded audio received from the incoming signal. Choose from the following:
- Channels 1-8
- Channels 9-16
Setup Tab Screen
Click on the Setup tab to view and make changes to the card name or to restore card settings to factory default values.
Figure 13. OG-HA5-12G Setup Tab Screen in Dashboard

Click on the Setup tab to view and make changes to the card name, to identify the card in the openGear frame, or to restore card settings to factory default values.
Card Name
This field allows you to give your specific OG card a name. This can be useful if you have multiple OG-HA5-12G cards in your installation so you can distinguish between them easily. By default, this field is pre-populated with OG-HA5-12G. You can change the card name by editing the text in the Card Name field.
NOTE: Changing the Card Name in the Setup tab also changes the name of the card in the Dashboard tree view.
Identify Card
Select the checkbox to turn on the Identify Card function. When this function is turned on, an LED light on the front of the OG-HA5-12G card inside the openGear frame will blink to help you quickly identify the card. Open the front of the openGear frame in order to see the light blinking.
Factory Settings
If you would like to revert the card settings to factory default values, click Restore. A confirmation prompt displays. Select "Yes" to restore factory settings. Select "No" to cancel.
Uploading New Software
When available, you can upload updated software to the OG-HA5-12G through the Dashboard Control System by following the steps below.
To Upload New Software
- Check the AJA website for new software for your OG-HA5-12G. If new software is found, download it and uncompress the file archive (zip).
- Click the Upload button in the lower panel of the Dashboard Control System to open the Upload Software Wizard.
Figure 14. OG-HA5-12G Upload Software Wizard Window in Dashboard

- From the Upload Software Wizard window, select Browse.
- Navigate to the location of the downloaded .bin file containing the software update. Select the .bin file, then select Open. The Upload Software Wizard window displays characteristics of the selected file for uploading.
- Click Finish.
NOTE: Before the upload begins, Dashboard will erase the firmware on the card, taking approximately 20 seconds.
Figure 15. Note the message "Erasing, please wait 20 seconds"

After the erasing process has completed, the upload will begin, shown in the Uploading to Selected Devices window below.
Figure 16. OG-HA5-12G Uploading to Selected Devices window in Dashboard

- When the progress bar indicates that the uploading is finished and status indicates "Complete," click OK.
- To verify the version of software or firmware currently installed on your card, select the Card tab from the center panel of Dashboard.
Figure 17. Dashboard Card Screen Showing Software Version

Rebooting
Rebooting is a standard function built in to the Dashboard Control System, and should only be performed if the board has become unresponsive.
WARNING: During a reboot, any card operations will be briefly interrupted, but will be restored once the reboot has completed.
To Reboot the OG-HA5-12G
- Click the Reboot button in the lower panel of Dashboard. The reboot confirmation message displays.
Figure 18. Reboot confirmation window
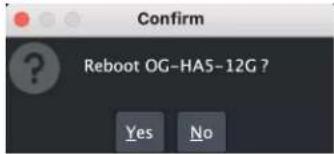
- Click Yes. The message "Loading data, please wait. Refreshing device data" displays for a moment. The card will be offline for a few seconds, and any current operations will be interrupted.
Figure 19. The OG-HA5-12G briefly pauses operations while rebooting

- Following a Reboot operation, the board configuration will return to the settings that were in place at the time of rebooting.
OG-HA5-12G Family Tech Specs
Video Formats
• (4K) 4096x2160p
• (UltraHD) 3840x2160p
• (2K) 2048x1080p
• (HD) 1920x1080p
• (HD) 1920x1080i
• (HD) 1280x720p
• (SD) 720x576i
• (SD) 720x480i
Note: Raster and Frame Rate Dependent, please see the OG-HA5-12G Video Formats Document.
Video Input Digital
- 1x HDMI Type A connector, HDMI v2.0b
• HDR Infoframe decoder as defined in CTA-861.3 and HDMI v2.0b - HDR VPID generation with pass-through or override for Colorimetry and Transfer Characteristic
- YCbCr 4:2:2/4:4:4/4:2:0
• RGB 4:4:4, SMPTE or Full level
• 8, 10, or 12-bit (HFR 4K/UltraHD 4:4:4 limited to 8-bit)
• (4K) 4096x2160p 23.98, 24, 25, 29.97, 30, 47.95, 48, 50, 59.94, 60
• (UltraHD) 3840x2160p 23.98, 24, 25, 29.97, 30, 50, 59.94, 60
• (2K) 2048x1080p 23.98, 24, 25, 29.97, 30, 47.95, 48, 50, 59.94, 60
• (HD) 1920x1080p 23.98, 24, 25, 29.97, 30, 50, 59.94, 60
• (HD) 1920x1080i 50, 59.94, 60
• (HD) 1280x720p 50, 59.94, 60
• (SD) 720x576i 50
• (SD) 720x480i 59.947
HDCP Decryption
- Not supported. By definition, SDI outputs are unencrypted.
Video Output Digital
• 1x 12G-SDI BNC, SMPTE 259/292/424/2081/2082
- YCbCr 4:2:2/4:4:4
- RGB 4:4:4, SMPTE or Full level
- 10-bit, 12-bit*
- 1x 12G-SDI
• (4K) 4096x2160p 23.98, 24, 25, 29.97, 30, 47.95, 48, 50, 59.94, 60
• (4K) 4096x2160PsF 23.98, 24, 25, 29.97, 30
• (UltraHD) 3840x2160p 23.98, 24, 25, 29.97, 30, 50, 59.94, 60
• (Ultra HD) 3840x2160PsF 23.98, 24, 25, 29.97, 30
- 1x 6 Gb SDI DL
• (4K) 4096x2160p 23.98, 24, 25, 29.97, 30
• (4K) 4096x2160PsF 23.98, 24, 25, 29.97, 30
• (UltraHD) 3840x2160p 23.98, 24, 25, 29.97, 30
• (Ultra HD) 3840x2160PsF 23.98, 24, 25, 29.97, 30
• 1x 3 Gb SDI (Level A or B DL)
• (2K) 2048x1080p 23.98, 24, 25, 29.97, 30, 47.95, 48, 50, 59.94, 60
• (2K) 2048x1080PsF 23.98, 24, 25, 29.97, 30
• (HD) 1920x1080p 23.98, 24, 25, 29.97, 30, 50, 59.94, 60
• (HD) 1920x1080PsF 23.98, 24, 25, 29.97, 30
• (HD) 1920x1080i 50, 59.94, 60
• (HD) 1280x720p** 50, 59.94, 60
- 1x 1.5 Gb SDI
• (2K) 2048x1080p 23.98, 24, 25, 29.97, 30
• (2K) 2048x1080PsF 23.98, 24, 25, 29.97, 30
• (HD) 1920x1080p 23.98, 24, 25, 29.97, 30
• (HD) 1920x1080PsF 23.98, 24, 25, 29.97, 30
• (HD) 1920x1080i 50, 59.94, 60
• (HD) 1280x720p 50, 59.94, 60
- 1x 270 Mb SDI
• (SD) 625i 50
• (SD) 525i 59.94
*Some 12-bit formats not supported, please see OG-HA5-12G Video Formats in Documents and Manuals.
**1280x720p is Level A Only
Video Output Digital - Additional for OG-HA5-12G-T Only
• 1x 12G-SDI Fiber LC connector, SMPTE 297/259/292/424/2081/2082
- Nominal Wavelength: Tx 1260 nm (min), 1310 nm (typ), 1360 nm (max)
• Optical Power: -5 dBm (min), 0.5 dBm (max)
• Extinction Ratio: 3.5 dB (min)
Video Output Digital - Additional for OG-HA5-12G-T-ST Only
• 1x 12G-SDI Fiber ST connector, SMPTE 297/259/292/424/2081/2082
- Nominal Wavelength: Tx 1260 nm (min), 1310 nm (typ), 1360 nm (max)
• Optical Power: -5 dBm (min), 2 dBm (max)
• Extinction Ratio: 3.5 dB (min)
Audio Pass-Through Formats
- PCM
• Dolby Digital (AC-3)
• Dolby Digital Plus (E-AC-3), including Atmos Immersive Sound (JOC)
Audio Input Digital
• HDMI embedded audio, 24-bit, 8-channel
Audio Input Analog
- 2x 3-pin terminal block connector, 2-channel balanced analog audio +24dBu (nominal)
Audio Output Digital
• SDI embedded audio, 24-bit (SD limited to 20-bit), 16-channel
User Interface
- openGear Dashboard network control software via Windows, macOS, or Linux
Size (w x d x h)
- openGear standard form factor, front slot, and rear plate
- Two slots required for each card
Weight
• 0.5 lb (0.3 kg)
Power
- openGear frame compatible, 14 watts max per card
Environment
- Safe Operating Temperature: 0 to 40 C (32 to 104 F)
- Safe Storage Temperature (Power OFF): -40 to 60 C (-40 to 140 F)
- Operating Relative Humidity: 10-90% noncondensing
- Operating Altitude: <3,000 meters (<10,000 feet)
Appendix B – Safety and Compliance
Federal Communications Commission (FCC) Compliance Notices
Class A Interference Statement
This equipment has been tested and found to comply with the limits for a Class A digital device, pursuant to Part 15, Subpart B of the FCC Rules. These limits are designed to provide reasonable protection against harmful interference in a residential installation. This equipment generates, uses, and can radiate radio frequency energy and, if not installed and used in accordance with the instructions, may cause harmful interference to radio communications. However, there is no guarantee that interference will not occur in a particular installation. If this equipment does cause harmful interference to radio or television reception, which can be determined by turning the equipment off and on, the user is encouraged to try to correct the interference by one or more of the following measures:
- Reorient or relocate the receiving antenna.
- Increase the separation between the equipment and receiver.
- Connect the equipment into an outlet on a circuit different from that to which the receiver is connected.
- Consult the dealer or an experienced radio/TV technician for help.
FCC Caution
This device complies with Part 15 of the FCC Rules. Operation is subject to the following two conditions: (1) This device may not cause harmful interference, and (2) this device must accept any interference received, including interference that may cause undesired operation.
Canadian ICES Statement
Canadian Department of Communications Radio Interference Regulations
This digital apparatus does not exceed the Class A limits for radio-noise emissions from a digital apparatus as set out in the Radio Interference Regulations of the Canadian Department of Communications. This Class A digital apparatus complies with Canadian ICES-003.
European Union and European Free Trade Association (EFTA) Regulatory Compliance
This equipment may be operated in the countries that comprise the member countries of the European Union and the European Free Trade Association. These countries, listed in the following paragraph, are referred to as The European Community throughout this document:
AUSTRIA, BELGIUM, BULGARIA, CYPRUS, CZECH REPUBLIC, DENMARK, ESTONIA, FINLAND, FRANCE, GERMANY, GREECE, HUNGARY, IRELAND, ITALY, LATVIA, LITHUANIA, LUXEMBOURG, MALTA, NETHERLANDS, POLAND, PORTUGAL, ROMANIA, SLOVAKIA, SLOVENIA, SPAIN, SWEDEN, UNITED KINGDOM, ICELAND, LICHTENSTEIN, NORWAY, SWITZERLAND
Declaration of Conformity
Marking by this symbol indicates compliance with the Essential Requirements of the EMC Directive of the European Union 2014/30/EU.

This equipment meets the following conformance standards:
Safety
EN 62368-1: 2014 + A11 (T-Mark License),
IEC 62368-1: 2014; (CB Scheme Certificate)
Additional licenses issued for specific countries available on request.
Emissions
EN 55032: 2015/A11: 2020, CISPR 32: 2015,
EN 61000-3-2: 2014, EN 61000-3-3: 2013
Immunity
EN 55035: 2017, EN 61000-4-2:2009, EN 61000-4-3: 2006 + A1:2008 + A2:2010,
EN 61000-4-4: 2012, EN 61000-4-5: 2014 + A1: 2017, EN 61000-4-6: 2014,
EN 61000-4-8: 2010, EN 61000-4-11: 2020
Environments: E2, E3 and E4
Laser
EN 60825-1: 2014 and EN 60825-2:2004 + A1 + A2,
CDRH Compliant Class 1 (TUV Cert No. R 50408760)
Also Licensed for Standards: FDA 21 CFR 1040.10 and 1040.11
The product is also licensed for additional country specific standards as required for the International Marketplace

Warning! This is a Class A product. In a domestic environment, this product may cause radio interference, in which case, the user may be required to take appropriate measures.
This symbol on the product or its packaging indicates that this product must not be disposed of with your other household waste. Instead, it is your responsibility to dispose of your waste equipment by handing it over to a designated collection point for the recycling of waste electrical and electronic equipment. The separate collection and recycling of your waste equipment at the time of disposal will help conserve natural resources and ensure that it is recycled in a manner that protects human health and the environment. For more information about where you can drop off your waste for recycling, please contact your local authority, or where you purchased your product.
Korea KCC Compliance Statement
사용자안내문
Taiwan Compliance Statement
警告使用者:
This is a Class A product based on the standard of the Bureau of Standards, Metrology and Inspection (BSMI) CNS 13438, Class A. In a domestic environment this product may cause radio interference in which case the user may be required to take adequate measures.
Japanese Compliance Statement
This is a Class A product based on the standard of the VCCI Council (VCCI 32: 2016). If this equipment is used in a domestic environment, radio interference may occur, in which case, the user may be required to take corrective actions.
Translated Warning and Caution Messages
The following caution statements, warning conventions, and warning messages apply to this product and manual.

Warning Symbol

Hazard Symbol

Caution Symbol
Before Operation Please Read These Instructions

Warning! Read and follow all warning notices and instructions marked on the product or included in the documentation.
Warning! Do not use this device near water and clean only with a dry cloth.
Warning! Do not block any ventilation openings. Install in accordance with the manufacturer's instructions.
Warning! Do not install near any heat sources such as radiators, heat registers, stoves, or other apparatus (including amplifiers) that produce heat.
Warning! Do not defeat the safety purpose of the polarized or grounding-type plug. A polarized plug has two blades with one wider than the other. A grounding type plug has two blades and a third grounding prong. The wide blade or the third prong are provided for your safety. If the provided plug does not fit into your outlet, consult an electrician for replacement of the obsolete outlet.
Warning! Since the Mains plug is used as the disconnection for the device, it must remain readily accessible and operable.
Warning! Protect the power cord from being walked on or pinched particularly at plugs, convenience receptacles, and the point where they exit from the device.
Warning! Unplug this device during lightning storms or when unused for long periods of time.
Warning! Refer all servicing to qualified service personnel. Servicing is required when the device has been damaged in any way, such as power-supply cord or plug is damaged, liquid has been spilled or objects have fallen into the device, the device has been exposed to rain or moisture, does not operate normally, or has been dropped.
Warning! Do not open the chassis. There are no user-serviceable parts inside. Opening the chassis will void the warranty unless performed by an AJA service center or licensed facility.
Warning! Disconnect the external AC power supply line cord(s) from the mains power before moving the unit.
Warning! Only use attachments and accessories specified and/or sold by the manufacturer.
Hazardl High Voltage. This situation or condition can cause injury due to electric shock.
Caution! To meet safety regulations for leakage current, connect the dual power supplies to separate branch circuits.
Warning! Ensure Mains Power is disconnected before installing the OG-HA5-12G modules into the frame, or installing and removing options. If a Mains switch is not provided, the power cord(s) of this equipment provide the means of disconnection. The socket outlet must be installed near the equipment and must be easily accessible.
Warning! Dual Power Cord Notice—please read this. To reduce the risk of electrical shock, disconnect both power cords before servicing equipment.
Caution! The OG-X-FR front fan door is heavy. Remove with Caution.
Caution! OG-HA5-12G devices require the use of "single mode 1310nm compatible" fiber optic cable.
CLASS 1 LASER PRODUCT

PRODUTO LASER DE CLASSE 1

PRODUITS LASER DE CLASSE 1

PRODOTTO LASER DI CLASSE 1

CLASE 1 LASER PRODUCTO

KLASSE 1 LASER PRODUKT
Warning! Active fiber-optic cables emit radiation invisible to the human eye. Do not look directly at the end of an active fiber-optic cable; the OG-HA5-12G is a Class 1 Laser Product.
5 Year Warranty and Liability Information
Limited Warranty on Hardware
AJA Video Systems, Inc. (AJA Video) warrants that the hardware product, not including software components, will be free from defects in materials and workmanship for a period of five years from the date of purchase. AJA Video provides a separate software warranty as part of the license agreement applicable to software components.
If the Customer brings a valid claim under this limited warranty for a hardware product (hereafter, a "product") during the applicable warranty period, AJA Video will, at its sole option and as the Customer's sole remedy for breach of the above warranty, provide one of the following remedies:
- Repair or facilitate the repair the product within a reasonable period of time, free of charge for parts and labor.
- Replace the product with a direct replacement or with a product that performs substantially the same function as the original product.
- Issue a refund of the original purchase price less depreciation to be determined based on the age of the product at the time remedy is sought under this limited warranty.
To obtain service under this warranty, the Customer must notify AJA Video of the defect before expiration of the warranty period and make suitable arrangements for the performance of service by contacting AJA Video support through the channels set forth on the support contacts web page at https://www.aja.com/support. Except as stated, the Customer shall bear all shipping, packing, insurance and other costs, excluding parts and labor, to effectuate repair. Customer shall pack and ship the defective product to a service center designated by AJA Video, with shipping charges prepaid. AJA Video shall pay to return the product to Customer, but only if to a location within the country in which the AJA Video service center is located. SOME JURISDICTIONS DO NOT ALLOW THE EXCLUSION OF IMPLIED WARRANTIES OR LIMITATIONS ON APPLICABLE STATUTORY RIGHTS OF A CONSUMER, SO SOME OR ALL OF THE TERMS OF THIS PARAGRAPH MAY NOT APPLY TO YOU.
Limitation of Liability
Under no circumstances shall AJA video BE LIABLE IN ANY WAY FOR ANY LOST, CORRUPTED OR DESTROYED DATA, FOOTAGE OR WORK, OR FOR ANY OTHER INDIRECT, SPECIAL, INCIDENTAL OR CONSEQUENTIAL DAMAGES OR LOST PROFITS, OR FOR ANY THIRD PARTY CLAIM, IN CONNECTION WITH THE PRODUCT, WHETHER RESULTING FROM DEFECTS IN THE PRODUCT, SOFTWARE OR HARDWARE FAILURE, OR ANY OTHER CAUSE WHATSOEVER, EVEN IF AJA VIDEO HAS BEEN ADVISED OF THE POSSIBILITY OF SUCH DAMAGES. AJA VIDEO'S LIABILITY IN CONNECTION WITH THE PRODUCT SHALL UNDER NO CIRCUMSTANCES EXCEED THE PURCHASE PRICE PAID FOR THE PRODUCT. The foregoing limitations apply even if any remedy set forth in this LIMITED WARRANTY fails of its essential purpose. SOME JURISDICTIONS DO NOT ALLOW THE LIMITATION OF LIABILITY FOR PERSONAL INJURY, OR OF INCIDENTAL OR CONSEQUENTIAL DAMAGES, SO SOME OR ALL OF THE TERMS OF THIS PARAGRAPH MAY NOT APPLY TO YOU.
Governing Law and Language; Your Rights
This limited warranty is the only warranty provided by AJA Video on the hardware product. It supersedes all prior or contemporaneous understandings regarding such subject matter. No amendment to or modification of this warranty will be binding unless in writing and signed by AJA Video. The laws of the State of California, USA will govern this warranty and any dispute arising from it. Any translation of this Agreement is intended for convenience and to meet local requirements and in the event of a dispute between the English and any non-English versions, the English version of this warranty will govern. This limited warranty gives you specific legal rights and you may have other rights that vary from jurisdiction to jurisdiction, some of which are noted above.
Symbols
3G-SDI Mode
Output Tab Screen 19
A
AJA Support 2
Analog Out Map
Audio Tab Screen 21
Audio Tab Screen 21
B
Bits Per Pixel 17
C
Card Information Screen 14
Card Installation 9
Card Name 14
Changing 22
Card Retention Screw 11
Channel Select
Audio Tab Screen 22
CLL
Maximum 17
Colorimetry Override 21
Color Space 19
Configuration Settings
Stored in OG cards 12
CTA-861.3
Static Metadata Descriptors 16
D
Dashboard Control System 7
Documentation 12
Downloading 12
Rebooting 24
Requirements 12
Setup Tab Screen 22
Uploading New Software 22
Using 12
Default Operation 4
Diagram
Simplified Block 5
DM Lum 16
E
EDID Tab Screen 18
F
Factory Settings 22
Features 4
FLL
Maximum 17
Frame Rate 20
H
HDMI 2.0a
Static Metadata Descriptors 16
HDMI Conversion
Audio Tab Screen 21
HDR Detected
HDR Tab Screen 16
HDR Information Screen 16
HDR Metadata Tab Screen
Output Overrides 20
HDR Tab Screen 20
High Dynamic Range
HDR Tab Screen 16
|
Identify Card 22
Input Select
Audio Tab Screen 21
Input Tab Screen 17
Installation 8
Cabling 11
I/O Connections 5
J
Jitter 18
M
Maximum: CLL 17
Maximum: FALL 17
O
OG Card Installation 9
openGear and AJA 7
Output Tab Screen 19
Overview 4
P
Pad/Crop
Output Tab Screen 20
Preprocess 18
P to PsF 19
R
Rear Panel
Card Retention Screw 11
Rear Plate Installation 8
RGB Range
Input Tab Screen 18
Output Tab Screen 19
S
SDR/HDR Overrides 20
SFP Module
Removal Caution 9
Signal Indicators
Dashboard Control System 6 Status Information Screen 15
U
User Controls 7

- INSTALLATION AND OPERATION GUIDE
- TRADEMARKS
- COPYRIGHT
- CONTACTING AJA TECHNICAL SUPPORT OR SALES
- CONTENTS
- NOTICES 2
- CHAPTER 1 – INTRODUCTION .....4
- CHAPTER 2 – OPERATION....12
- APPENDIX A – SPECIFICATIONS ..... 26
- CHAPTER 1 – INTRODUCTION
- OVERVIEW
- DEFAULT OPERATION
- FEATURES
- BLOCK DIAGRAM
- I/O CONNECTIONS
- SIGNAL INDICATORS ON THE OG-HA5-12G CARD
- SIGNAL INDICATORS IN THE DASHBOARD CONTROL SYSTEM
- CARD ALARM STATE – RED
- CARD ALARM STATE – YELLOW
- USER CONTROLS
- DASHBOARD CONTROL SYSTEM
- OPENGEAR AND AJA
- INSTALLATION
- SUMMARY
- UNPACKING
- PARTS LIST
- OG-HA5-12G REAR PLATE INSTALLATION
- OG-HA5-12G CARD INSTALLATION
- CABLING
- USING THE DASHBOARD CONTROL SYSTEM
- REQUIREMENTS
- CONFIGURATION SETTINGS STORED IN OG CARD
- CONTROL INTERFACE BASIC COMPONENTS
- BASIC TREE VIEW OF FRAMES AND CARDS
- CARD INFORMATION AND STATUS
- HDR INFOFRAME DETECTED
- MAXIMUM: CLL
- MAXIMUM: FALL
- PARAMETER CONTROLS
- INPUT TAB SCREEN
- ABOUT BITS PER PIXEL
- RGB RANGE
- PREPROCESS
- EDID TAB SCREEN
- PREFERRED VIDEO FORMAT
- YCBCR SUPPORT
- MAX AUDIO CHANNELS
- OUTPUT TAB SCREEN
- COLOR SPACE
- P TO PSF
- 3G-SDI MODE
- PAD/CROP
- FRAME RATE
- HDR TAB SCREEN
- SDR/HDR
- COLORIMETRY
- AUDIO TAB SCREEN
- INPUT SELECT
- HDMI CONVERSION
- ANALOG OUT MAP
- CHANNEL SELECT
- SETUP TAB SCREEN
- CARD NAME
- IDENTIFY CARD
- FACTORY SETTINGS
- UPLOADING NEW SOFTWARE
- TO UPLOAD NEW SOFTWARE
- REBOOTING
- TO REBOOT THE OG-HA5-12G
- OG-HA5-12G FAMILY TECH SPECS
- VIDEO FORMATS
- VIDEO INPUT DIGITAL
- HDCP DECRYPTION
- VIDEO OUTPUT DIGITAL
- VIDEO OUTPUT DIGITAL - ADDITIONAL FOR OG-HA5-12G-T ONLY
- VIDEO OUTPUT DIGITAL - ADDITIONAL FOR OG-HA5-12G-T-ST ONLY
- AUDIO PASS-THROUGH FORMATS
- AUDIO INPUT DIGITAL
- AUDIO INPUT ANALOG
- AUDIO OUTPUT DIGITAL
- USER INTERFACE
- SIZE (W X D X H)
- WEIGHT
- POWER
- ENVIRONMENT
- APPENDIX B – SAFETY AND COMPLIANCE
- FEDERAL COMMUNICATIONS COMMISSION (FCC) COMPLIANCE NOTICES
- CLASS A INTERFERENCE STATEMENT
- FCC CAUTION
- CANADIAN ICES STATEMENT
- EUROPEAN UNION AND EUROPEAN FREE TRADE ASSOCIATION (EFTA) REGULATORY COMPLIANCE
- DECLARATION OF CONFORMITY
- KOREA KCC COMPLIANCE STATEMENT
- TAIWAN COMPLIANCE STATEMENT
- 警告使用者:
- JAPANESE COMPLIANCE STATEMENT
- TRANSLATED WARNING AND CAUTION MESSAGES
- BEFORE OPERATION PLEASE READ THESE INSTRUCTIONS
- 5 YEAR WARRANTY AND LIABILITY INFORMATION
- LIMITED WARRANTY ON HARDWARE
- LIMITATION OF LIABILITY
- GOVERNING LAW AND LANGUAGE; YOUR RIGHTS
- SYMBOLS
- A
- B
- C
- D
- E
- F
- H
- J
- M
- O
- P
- R
- S
- U
Brand : AJA
Model : OG-HA5-12G
Category : Electronic board