
SPIPH8AM - IP Audio Speco Technologies - Free user manual and instructions
Find the device manual for free SPIPH8AM Speco Technologies in PDF.


| Product Type | Audio IP Paging Horn Speaker |
| Brand | Speco Technologies |
| Model | SPIPH8AM |
| Audio Type | Two-way audio (full duplex) |
| Power Supply | Power over Ethernet (PoE), IEEE 802.3af |
| Power Consumption | 12W maximum |
| Network Interface | 10/100 Mbps Ethernet |
| Audio Output | 8W @ 8 ohms, built-in speaker |
| Frequency Response | 200 Hz – 10 kHz |
| IP Rating | IP66 (weatherproof) |
| Operating Temperature | -30°C to 60°C (-22°F to 140°F) |
| Dimensions (H x W x D) | 115 mm x 110 mm x 190 mm (4.5 x 4.3 x 7.5 in) |
| Weight | 0.9 kg (2.0 lbs) |
| Mounting | Wall or ceiling mount, adjustable bracket |
| Protocols Supported | TCP/IP, UDP, SIP (optional) |
| Main Functions | Paging, intercom, emergency broadcast, music streaming |
| Care and Cleaning | Wipe with a dry cloth; do not use abrasive cleaners |
| Safety Standards | CE, FCC, RoHS compliant |
| Spare Parts Available | Mounting bracket, speaker grille, PoE injector (sold separately) |
| Repairability | Modular design; refer to qualified service for repairs |
| General Information | Integrates with Speco NVRs and third-party VoIP systems |
Frequently Asked Questions - SPIPH8AM Speco Technologies
User questions about SPIPH8AM Speco Technologies
0 question about this device. Answer the ones you know or ask your own.
Ask a new question about this device
Download the instructions for your IP Audio in PDF format for free! Find your manual SPIPH8AM - Speco Technologies and take your electronic device back in hand. On this page are published all the documents necessary for the use of your device. SPIPH8AM by Speco Technologies.
USER MANUAL SPIPH8AM Speco Technologies
SPECO IP AUDIO USER MANUAL

technologies
IP Audio | User Manual
SPECO IP AUDIO USER MANUAL
Table of Contents
Overview 3
Web Configuration....4
Logging into the IP Speaker....5
Navigating the Web Interface .... 5
Status Menu....6
Basic Menu 6
ONVIF Menu....7
SIP Account Menu....7
Audio Menu....8
Media File Menu 8
Alarm Menu 9
Schedule Menu 9
RTP Multicast Menu....10
Firewall Menu 11
System Menu 12
Overview
The Speco SPIP series are IP based paging speakers designed for indoor and outdoor applications. Our Speco IP speakers are compatible with both the SIP & the ONVIF protocol. This will allow for the use of VoIP in applications. Each IP speaker has up to 10 RTP multicast addresses. Alarm in and HTTP URL can combine with our alarm systems. Pre-recorded messages and scheduled broadcasting are also another way that the Speco IP speakers meet the paging demands.


natural_image
Three white speaker antennas labeled SPIPC6A, SPIPC6AM, and SPIPH8A (no additional text or symbols visible)Web Configuration
1) Download Speco Audio Manager from Specotech.com.
2) This can be found under the support tab at Specotech.com.

3) Extract the zip-file and run the exe for Speco Audio Manager on your computer.
4) Put the Speco Audio Manager shortcut on to your desktop/laptop.
5) Lastly run Speco Audio Manager and click on scan device. This will find every Speco IP speaker on the network.
Speco Audio Manager
Logging into the IP Speaker
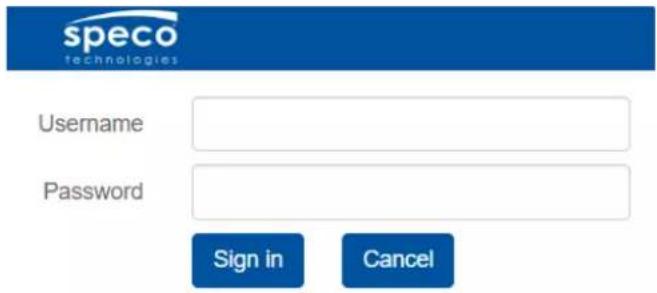
1) Through the Speco Audio Manager if you double click on one of the speakers IP addresses it will direct you to the web interface of that IP speaker.
2) Every Speco IP speaker will have the same default username & password.
3) Click on "Sign in" to log into the IP speaker.
Username: admin | Password: 1234
Navigating the Web Interface
Once logged into the IP speaker there will be eleven menus to choose from. The following menus are:
On this menu the information consists of the date/time, the devices ID, the firmware version, how much space is free on the device, the SIP account status, and the network information will also be listed at the bottom of the page. It's important to know that you can only view the information here.

Basic Menu
The Basic Menu will list the date/time, and the network settings. On this menu you will be able to make any necessary changes to the settings. Every IP speaker will be set to DHCP by default. If you wanted to change the IP speaker to static, you can do this by clicking on the static IP address button and clicking save at the bottom.
*If the IP speaker doesn't have a way to receive DHCP, the default IP address will be 192.168.5.200

SPECO IP AUDIO USER MANUAL
ONVIF Menu
The ONVIF menu consists of an enable/disable option for ONVIF. You can also set the ONVIF username and password.
*ONVIF will be enabled by default.

SIP Account Menu
The SIP account menu allows you to create up to two separate SIP accounts. SIP is a protocol that initiates a direct call to that specific VoIP device, and this will include IP speakers. This will give you the option to have two-way audio with IP speakers that have a built-in microphone.
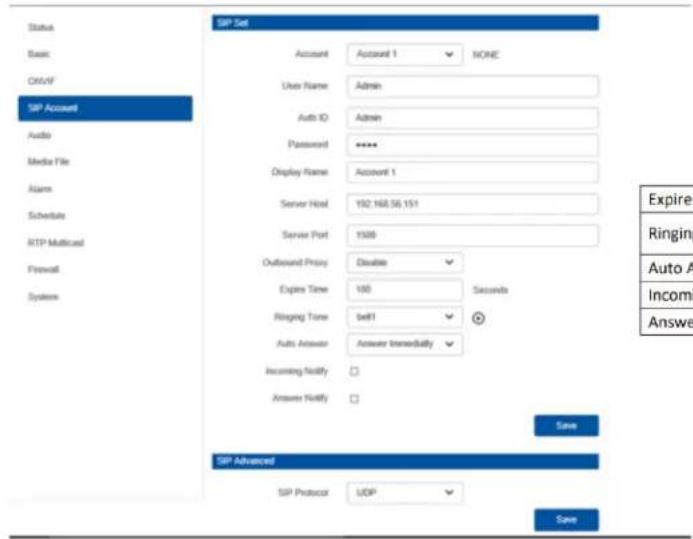
| Expire Time | Set the expire time of registered account information |
| Ringing Tone | 5 system ringtones and 10 users upload media files |
| Auto Answer | answer immediately and answer delay when a calling incomes |
| Incoming Notify | Put an input URL, when a incoming call ringing, URL take effect |
| Answer Notify | Put an input URL, when a incoming call answered, URL take effect |
Audio Menu
The Audio menu will have the option to select between four different audio codecs: OPUS, G.722, G.711U, and G.711. In this menu you can also set the volume control of the IP speaker. If the IP speaker has a microphone, you will see the option to enable the microphone and set the volume of the IP speaker.

Jitter buffer: Helps make the audio more stable.
Amp Auto OFF: Will be set to "Yes" by default. This will eliminate any noise when not broadcasting.
Media File Menu
The Media File menu consists of 5 preset bell options to choose from. You can also set up to 10 of your own audio files and play the files directly through the IP speaker. The Maximum media file size is listed as a total of 3836 kilobytes. *Through Speco Audio Manager there is no file size limit

SPECO IP AUDIO USER MANUAL
Alarm Menu
The Alarm menu allows for the user to set up one alarm input/output to the IP speaker. By default, you will have to enable the alarm input. The alarm output will have to be selected through this menu first, then it will play either one of the preexisting media files or it will play a custom audio clip. Once the alarm is enabled, you will also have the option to enable “Play File Enable”, which means you can take the example URL commands, and they will play the audio clip by just sending it through a web address.

Schedule Menu
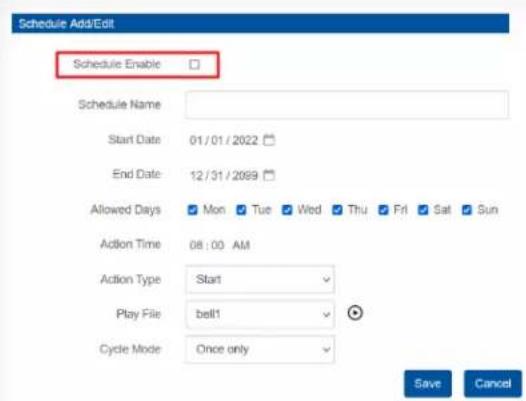
This menu will allow the user to create a custom schedule. The schedule menu is designed to be used for schools, factories, and office projects. The schedule allows for the user to make a regular bell, announcement or alarm happen at a specific time/date. In each IP speaker there are 10 different schedules that can be created. To create a schedule, click on the edit option, and then a new schedule window will come up. Enable the schedule and customize the schedule you wish to create by: giving it a name, start time/end time, allowed days in the schedule, action time, action type, the file it will be playing, and lastly the cycle mode. After creating the schedule click save at the bottom.

RTP Multicast Menu
The RTP multicast menu will be used to set up RTP addresses to zone out the IP speakers. RTP stands for Real-Time Transport Protocol. This allows the user to stream audio over the internet, thereby enabling VoIP (Voice over Internet Protocol). On this menu you will see a list from 1 through 10. This means you can create up to 10 RTP addresses, and depending on what slot you put the RTP address in will determine what priority it is set too. Number 1 being the highest priority on the list & number 10 being the lowest priority on the list. This will allow you to do priority paging. After creating an RTP list, click save at the bottom.
*RTP address Range: 224.0.0.0-239.255.255.0
*Port Range: 1500-6300

SPECO IP AUDIO USER MANUAL
Firewall Menu
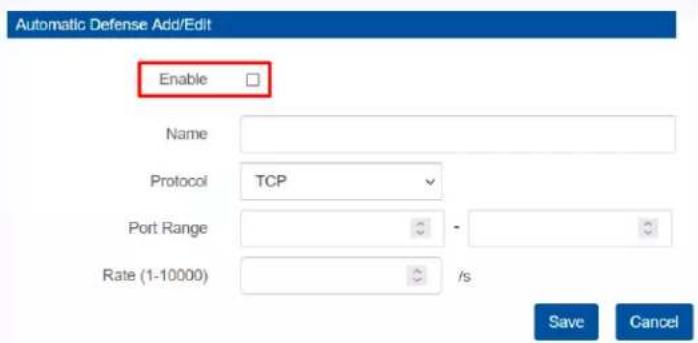
This menu is used primarily to keep your network safe. You can edit the firewall settings by clicking on the edit option. From the edit option, you can add any specific rules that you wish to add to your IP speaker's firewall. To do this you have to first enable the firewall rules to do this. You can also add firewall defensive rules to the IP speaker. Again, this will have to be enabled first to use this feature. You can create up to 5 rules for both categories in your firewall settings.
| Firewall Rules | |||||
| # | Name | Type | IP/MAC | Action | |
| 1 | ✔✔ | ||||
| 2 | ✔✔ | ||||
| 3 | ✔✔ | ||||
| 4 | ✔✔ | ||||
| 5 | ✔✔ | ||||
| Automatic Defense Rules | |||||
| # | Name | Protocol | Port Range | Rate | |
| 1 | - | ✔✔ | |||
| 2 | - | ✔✔ | |||
| 3 | - | ✔✔ | |||
| 4 | - | ✔✔ | |||
| 5 | - | ✔✔ | |||
Firewall Rules

Firewall Defensive Rules
System Menu
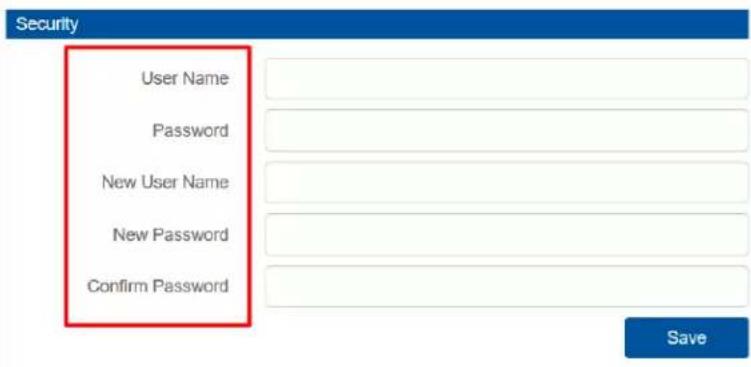
The System menu will allow you to Reboot, Reset, and upgrade the firmware of the IP speaker. On this page you will also be able to change the IP speaker's username and password from the default to a more unique username and password if needed.


Speco Technologies is constantly developing and improving products. We reserve the right to modify product design and specifications without notice and without incurring an obligation. Rev. 3/21/2023. We are not responsible for typographical errors. ©2023 Speco Technologies. All rights reserved.

- SPECO IP AUDIO USER MANUAL
- Table of Contents
- Overview
- Web Configuration
- Speco Audio Manager
- Logging into the IP Speaker
- Navigating the Web Interface
- Basic Menu
- ONVIF Menu
- SIP Account Menu
- Audio Menu
- Media File Menu
- Alarm Menu
- Schedule Menu
- Name Time Action File
- RTP Multicast Menu
- Firewall Menu
- System Menu
Brand : Speco Technologies
Model : SPIPH8AM
Category : IP Audio