
InstaCoffee Max RJ14-IC-L-BLACK-S - Coffee maker Chefman - Free user manual and instructions
Find the device manual for free InstaCoffee Max RJ14-IC-L-BLACK-S Chefman in PDF.


| Brand | Chefman |
| Model | InstaCoffee Max RJ14-IC-L-BLACK-S |
| Product Type | Single-serve coffee maker |
| Water Tank Capacity | 14 oz (414 ml) |
| Brew Size Range | 6 to 14 oz |
| Compatible With | K-Cup pods and ground coffee (via reusable filter) |
| Reusable Filter Included | Yes, large reusable coffee filter |
| Brewing Technology | One-touch operation, self-cleaning function |
| Movable Lift | Two-position lift for short cups or tall travel mugs |
| Overheat Protection | Yes, automatic shut-off |
| Polarized Plug | Yes (one blade wider) |
| Short Cord | Yes, to reduce entanglement risk |
| Materials | Stainless steel accents, plastic body |
| Dimensions (approx.) | 12 x 6 x 9 inches |
| Weight (approx.) | 3.5 lbs |
| Power Source | 120V, 60Hz, 900W |
| Cleaning | Hand wash capsule receptacle and filter; self-cleaning decalcification mode |
| Warranty | 1-year limited warranty |
| Safety Certifications | ETL listed, conforms to UL STD. 1924 |
Frequently Asked Questions - InstaCoffee Max RJ14-IC-L-BLACK-S Chefman
User questions about InstaCoffee Max RJ14-IC-L-BLACK-S Chefman
0 question about this device. Answer the ones you know or ask your own.
Ask a new question about this device
Download the instructions for your Coffee maker in PDF format for free! Find your manual InstaCoffee Max RJ14-IC-L-BLACK-S - Chefman and take your electronic device back in hand. On this page are published all the documents necessary for the use of your device. InstaCoffee Max RJ14-IC-L-BLACK-S by Chefman.
USER MANUAL InstaCoffee Max RJ14-IC-L-BLACK-S Chefman
- Safety Instructions
- Features
- Operating Instructions
- Tips
• Cleaning and Maintenance - Terms and Conditions
- Warranty Registration
RJ14-IC-L-SERIES
natural_image
Line drawing of a vertical mechanical device with no text or symbolsCOOKING FORWARD™
Welcome!
Whether this is your first Chefman® appliance or you're already part of our family, we're happy to be brewing with you. With your new InstaCoffee Max+ single-serve coffee maker, you can quickly make a large cup of joe to enjoy at home or to take on the road—the unit fits a 14-oz travel mug beautifully. Brew with convenient pre-measured K-Cup® capsules* or fill the large reusable filter with your favorite freshly ground coffee. Stainless steel accents make the InstaCoffee a good-looking choice for home while its trim size makes it a perfect fit for the office or dorm room. Wherever you use it, you'll enjoy its simple one-touch operation and self-cleaning function.
Because we want to make sure you get the best cup of coffee possible using the InstaCoffee, we ask that you take a couple minutes to read our directions, safety instructions, and warranty information.
From our kitchen to yours,
The Chefman ^® Team

READ ALL INSTRUCTIONS BEFORE USE
For your safety and continued enjoyment of this product, always read the instruction manual before using.
^* K-Cup ^® is a registered trademark of Keurig Green Mountain, Inc. The Chefman InstaCoffee is not affiliated with or sponsored by Keurig Green Mountain, Inc.
CONTENTS
1 Safety Instructions
5 Features
6 Operating Instructions
10 Tips
11 Cleaning and Maintenance
13 Terms and Conditions
15 Warranty Registration
SAFETY INSTRUCTIONS SAFETY INSTRUCTIONS
IMPORTANT SAFEGUARDS IN
When using electrical appliances, basic safety precautions should always be followed, including the following:
1. Read all instructions.
2. Do not touch hot surfaces. Use caution when handling coffee and other hot liquids.
3. To protect against fire, electric shock, and injury to persons, do not immerse cord or plug in water or other liquid.
4. Close supervision is necessary when any appliance is used by or near children.
5. Unplug from outlet when not in use and before cleaning. Allow to cool before putting on or taking off parts, and before cleaning the appliance.
6. Do not operate any appliance with a damaged cord or plug, or after the appliance malfunctions, or has been damaged in any manner. Contact Chefman Customer Support.
7. The use of accessory attachments not recommended by the appliance manufacturer may result in fire, electric shock, or injury to persons.
8. Do not use outdoors.
RTANT SAFEGUARDS
- Do not let cord hang over edge of table or counter, or touch hot surfaces.
- Do not place on or near a hot gas or electric burner, or in a heated oven.
- To power on, insert plug into wall outlet. Press brew button until power light illuminates. To disconnect, press the brew button until the power light goes out. Unplug unit from wall outlet.
- Do not use appliance for other than intended use.
- Only use capsules intended for this appliance. If the capsule does not fit, do not force the capsule into the appliance.
- WARNING: Do not open lid when coffee is brewing. Hot steam may be released, which can result in scalding and injuries.
SAVE THESE INSTRUCTIONS

Do not place the appliance on a stovetop or any other heatable surface, even if stovetop is not on. Doing so is a fire hazard.
SAFETY INSTRUCTIONS SAFETY INSTRUCTIONS
IMPORTANT SAFEGUARDS IN
WARNING: This appliance has a polarized plug (one blade is wider than the other). This plug is intended to fit into a polarized outlet only one way. If the plug does not fit fully into the outlet, reverse the plug. If it still does not fit, contact a qualified electrician. Do not attempt to modify the plug in any way or force it into the outlet. This could result in injury or electric shock.
SHORT CORD INSTRUCTIONS
A short power supply cord is provided to reduce the hazards of entanglement or tripping over a longer cord. Longer detachable power-supply cords or extension cords are available and may be used if care is exercised in their use. If a longer detachable power-supply extension cord is used:
- The marked electrical rating of the extension cord should be at least as great as the electrical rating of the appliance.
- The cord should be arranged so that it will not drape over the countertop or tabletop where it can be pulled on by children or tripped over.
RTANT SAFEGUARDS
POWER CORD SAFETY TIPS
- Never pull or yank on cord or the appliance.
- To insert plug, grasp it firmly and guide it into outlet.
- To disconnect appliance, grasp plug and remove it from outlet.
- Before each use, inspect the power cord for cuts and/or abrasion marks. If any are found, this indicates that the appliance should be serviced, and the power cord replaced. Please contact Chefman Customer Support for assistance.
- Never wrap the cord tightly around the appliance, as this could place undue stress on the cord where it enters the appliance and cause it to fray and break.
DO NOT OPERATE APPLIANCE IF THE POWER CORD SHOWS ANY DAMAGE OR IF APPLIANCE WORKS INTERMITTENTLY OR STOPS WORKING ENTIRELY.
CAUTION: To ensure continued protection against risk of electric shock, connect to properly grounded outlets only.
NOTE: During the first few minutes of initial use, you may notice smoke and/or a slight odor. This is normal and should quickly disappear. It will not recur after appliance has been used a few more times.
IMPORTANT: This appliance is not intended for use by persons (including children) with reduced physical, sensory, or mental capabilities, or lack of experience and knowledge, unless they have been given supervision or instruction concerning use of the appliance by a person responsible for their safety.
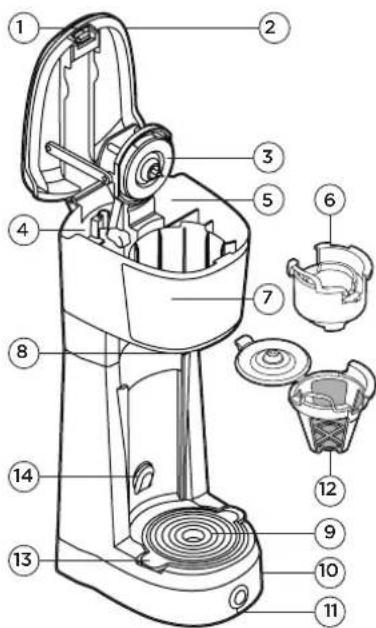
- Lid Release Button (on top)
- Lid
- Puncturing Needles (second needle located inside bottom of receptacle holder, not shown)
- Water Measurement Markings (6, 8, 10, 12, and 14 oz)
- Water Tank
- Removable Capsule Receptacle (for K-Cup ^® pods)
- Brew Chamber
- Drip Spout
- Removable Rubber Trivet
- Base
- Brew Button/Indicator Light
- Large Reusable Coffee Filter
- Movable Lift
- Movable Lift Button
OPERATING INSTRUCTIONSFEATURES
BEFORE FIRST USE
- Remove all packing materials and stickers from the inside and outside of the InstaCoffee Max+. Be sure that all parts are included before throwing out packaging.
- Gently wipe down the exterior with a damp cloth or paper towel. Never immerse the InstaCoffee, its base, cord, or plug in water or any other liquids. The electrical connections and the brew button must never come into contact with water or any other liquids.
- Rinse the coffee filter with water. Wash the capsule receptacle with a sponge and warm, soapy water. Dry completely.
- Before brewing coffee for the first time, use the instructions below to brew a full, 14-oz cup of hot water with NO coffee. This will prime the InstaCoffee for use and clean out any dust that may have accumulated before use.
- Read all instructions and follow them carefully.
OPERATING INSTRUCTIONS
PRIMING THE INSTACOFFEE
Priming the unit before first use is important. It removes any dust or debris that may have entered the unit during manufacturing and shipping.
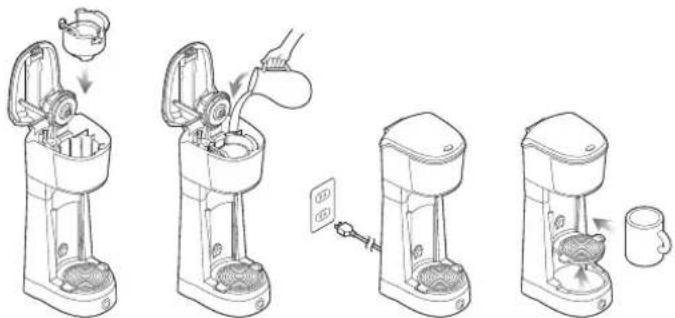
- Insert the empty capsule receptacle into the brew chamber.
- Fill the water tank. Do not exceed 14 oz.
- Plug in the InstaCoffee if necessary.
- Place a large mug or travel cup on the base of the InstaCoffee and press the brew button. Do not remove the mug until the brew indicator light stops flashing and turns off.
OPERATING INSTRUCTIONS
HOW TO USE THE INSTACOFFEE
- If not already plugged in, plug in unit. Ensure rubber trivet is set in place on the InstaCoffee's base.
- Press the lid release button to open the lid. CAUTION: When opening the lid and handling the capsule receptacle, be mindful of two small, sharp puncturing needles located above and below the capsule receptacle that puncture the K-Cup ^® before use.
- If using a K-Cup *, you must also use the capsule receptacle. Place the capsule receptacle in the brew chamber. The looped handle should be positioned on the left. The word "front" and the arrow below it (printed on the inner rim of the capsule receptacle) should be positioned toward the front. (Do not use the capsule receptacle if brewing with the reusable coffee filter).
- If using a K-Cup ^® , insert it into the capsule receptacle. Press on the K-Cup ^® firmly until you hear it being punctured. NOTE: Always use the removable capsule receptacle when brewing with K-Cups ^® ; if receptacle is not used, K-Cup ^® may explode.
- If using the reusable coffee filter, spoon desired amount of ground coffee into the coffee filter. The filter can hold up to 15 grams of ground coffee; do not exceed the max line on the filter. Gently push the coffee filter's lid closed so it snaps into place. Place the filled coffee filter into the brew chamber so that the word "front" is facing the front of the unit.
OPERATING INSTRUCTIONS
- Fill the water tank with no more than 14 oz of filtered water and no less than 6 oz. NOTE: Water should not pass the 14-oz measurement marking located on the back left wall of the water tank.
- Push the lid of the InstaCoffee down until it clicks into place.
- If using a tall cup or travel mug, place it securely on the base with the movable lift in its low position. If using a shorter mug, you can bring it closer to the drip spout by raising the movable lift to its higher position. Simply raise the lift from the lower position until it clicks into upper position. Place the mug securely on raised lift. NOTE: To lower the lift, press the arrow on the lift button and push the lift all the way down.
- Press the brew button. The brew indicator light will turn red while the InstaCoffee heats up and dispenses the hot coffee. NOTE: During last 10 seconds of brewing, the indicator light will blink before turning off. You will also hear a whirring sound, which is a normal part of the brewing cycle.
- After the indicator light has turned off, carefully remove the filled mug from base. CAUTION: Mug and coffee will be very hot.
- Allow InstaCoffee to cool. Once cool, discard the used coffee grounds and clean as directed in Cleaning and Maintenance.
OPERATING INSTRUCTIONS
OVERHEAT PROTECTION
For safety purposes, the InstaCoffee will automatically shut down if it overheats. (The indicator light will blink for rapidly as a warning just prior to the unit shutting down.) In most cases, overheating is due to brewing being started without water added. If, after the shutdown, water is added and the brew button is pressed, the indicator light will come back on solid and brewing will begin as normal. If no water is added, the indicator light will still come back on solid, but the unit will not brew for 2 minutes to allow the unit to cool down. (The machine will make noise as it's cooling down.) In order to begin brewing sooner, turn the unit off, add water, then press the button to begin brewing.
TIPS
- For a stronger cup of coffee made with a K-Cup ^® , use less water; for a weaker cup, use more water.
- For best results, rinse reusable coffee filter and capsule receptacle after every use.
- If coffee maker is making a whining noise, one of the (hollow) needles may be clogged. To unclog, try the self-cleaning feature on p. 12. If still clogged, carefully poke with a toothpick or similar to unclog.
CLEANING AND MAINTENANCE
- Ensure that the InstaCoffee is unplugged and cooled.
- Press the lid release button to open the lid upward. CAUTION: When opening the lid and handling the capsule receptacle, be mindful of sharp objects. There are two small, sharp puncturing needles located above and below the capsule receptacle that puncture the K-Cup® before use.
- Carefully remove the capsule receptacle with K-Cupor reusable coffee filter. NOTE: If brewed coffee grounds sit in the InstaCoffee or reusable coffee filter for an extended amount of time, they may begin to mold.
- DiscardK-Cup ^® or remove reusable coffee filter and discard coffee grounds from inside. Rinse with water and allow to dry completely. NOTE: The reusable coffee filter is designed to be reused. Do not throw out.
- Rinse or wash the capsule receptacle with a sponge and warm, soapy water. Dry completely.
- Leave the lid in the open position so the InstaCoffee can dry completely.
- If necessary, rinse or wash the removable rubber trivet with a sponge and warm, soapy water.
- If necessary, wipe down the base of the InstaCoffee with a damp sponge, cloth, or paper towel. Dry completely. Never immerse the InstaCoffee or its plug in water. The InstaCoffee is not dishwasher-safe.
- Calcium buildup, caused by minerals commonly found in water, can adversely affect brewing. To decalcify the coffee maker, use the self-cleaning function described on page 12, as needed.
CLEANING AND MAINTENANCE
SELF-CLEANING FEATURE
The InstaCoffee is equipped with a self-cleaning feature to prevent mineral buildup.
TO USE
- Fill the water tank with 14 oz of water or a combination of 13 oz of water and 1 oz white vinegar.
- Ensure lift is in its lower position. Place a mug or travel cup large enough to hold at least 14 oz of water onto the rubber trivet located on the base of the InstaCoffee.
- If necessary, plug in the InstaCoffee.
- Press and hold the brew button until it illuminates in red and starts flashing. The InstaCoffee will start dispensing some hot water. When this initial, partial dispensing of water stops, the light will continue flashing for approximately 20 more minutes until it dispenses the remaining water.
- Do not remove the coffee mug from the base until the brew indicator light stops flashing and turns off completely.
- After the light has turned off, carefully remove the filled mug from the base. Discard brewed water mixture. CAUTION: Mug and water mixture will be very hot!
- If using a water/vinegar combination, we suggest "brewing" two or three 14-oz cups of water just afterwards for a clean-tasting cup of coffee.
TERMS AND CONDITIONS
Limited Warranty
RJ Brands, LLC d/b/a Chefman ^® offers a limited 1-year Warranty (the "Warranty") available on sales through authorized distributors and retailers only. Please note that this Warranty becomes valid from the date of initial retail purchase and that the Warranty is non-transferable and applies only to the original purchaser.
This Warranty is void without proof of purchase within the United States and Canada. Please be aware that this Warranty supersedes all other warranties and constitutes the entire agreement between the consumer and Chefman ^® . Any changes to the Terms and Conditions of this Warranty must be in writing, signed by a representative of Chefman ^* . No other party has the right or ability to alter or change the Terms and Conditions of this Warranty.
We may ask you to please submit, via email, photos and/or video of the issue you are experiencing. This is to help us better assess the matter and possibly offer a quick fix. Photos and/or video may also be required to determine warranty eligibility.
We encourage you to register your product. Registering can make the Warranty process easier and can keep you informed of any updates or recalls on your product. To register, follow the directions on the Chefman® Warranty Registration page in the Chefman® User Guide. Please retain your proof of purchase even after registering. In the event that you do not have proof of your purchase date, we may declare your Warranty void or we may, at our sole discretion, apply the date of manufacture as the purchase date for purposes of this Warranty.
TERMS AND CONDITIONS
Limited Warranty
WHAT THE WARRANTY COVERS
- Manufacturer Defects - Chefman® products are warranted against defects in material and workmanship, under normal household use, for a period of 1 year from the date of purchase when used in accordance with the directions listed in the Chefman® User Guide. If your product does not work as it should, please contact Customer Support at support@chefman.com so that we may assist you.
THIS WARRANTY DOES NOT COVER
- Misuse - Damage that occurs from neglectful or improper use of products, including, but not limited to, damage that occurs as a result of usage with incompatible voltage, regardless of whether the product was used with a converter or adapter. See Safety Instructions in the Chefman® User Guide for information on proper use of product;
- Poor Maintenance - General lack of proper care. We encourage you to take care of your Chefman® products so that you may continue to enjoy them. Please see Cleaning and Maintenance directions in the Chefman® User Guide for information on proper maintenance;
- Commercial Use - Damage that occurs from commercial use;
- Altered Products - Damage that occurs from alterations or modifications by any entity other than Chefman ^7 such as the removal of the rating label affixed to the product;
- Catastrophic Events - Damage that occurs from fire, floods, or natural disasters; or
- Loss of Interest - Claims of loss of interest or enjoyment.
® WARRANTY REGISTRATION
What do I need to register my product?
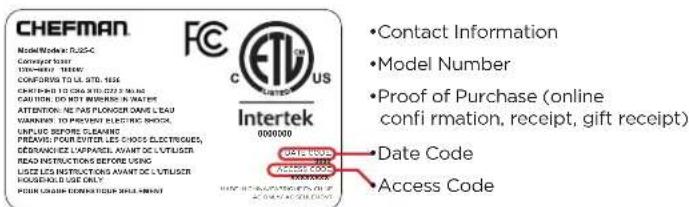
NOTE: Label depicted here is an example.
How do I register my product?
All you need to do is fill out a simple Chefman registration form. You can easily access the form in one of the two ways listed below:
- Visit chefman.com/register.
- Scan the QR code to access site:

CHEFMAN® WARRANTY REGISTRATIONCHEFMAN
For product information
Please visit us at Chefman.com.
EXCEPT WHERE SUCH LIABILITY IS REQUIRED BY LAW, THIS WARRANTY DOES NOT COVER, AND CHEFMAN® SHALL NOT BE LIABLE FOR, INCIDENTAL, INDIRECT, SPECIAL, OR CONSEQUENTIAL DAMAGES, INCLUDING WITHOUT LIMITATION, DAMAGE TO, OR LOSS OF USE OF THE PRODUCT, OR LOST SALES OR PROFITS OR DELAY OR FAILURE TO PERFORM THIS WARRANTY OBLIGATION. THE REMEDIES PROVIDED HEREIN ARE THE EXCLUSIVE REMEDIES UNDER THIS WARRANTY, WHETHER BASED ON CONTRACT, TORT OR OTHERWISE.
Chefman ^® is a registered trademark of RJ BRANDS, LLC. Cooking Forward ^™ is a trademark of RJ BRANDS, LLC. Intertek ^® is a registered trademark of Intertek Group, PLC.
CHEFMAN®


CHEFMAN.COM
@MYCHEFMAN
©CHEFMAN 2021
- COOKING FORWARD™
- Welcome!
- READ ALL INSTRUCTIONS BEFORE USE
- CONTENTS
- SAFETY INSTRUCTIONS SAFETY INSTRUCTIONS
- IMPORTANT SAFEGUARDS IN
- RTANT SAFEGUARDS
- SAVE THESE INSTRUCTIONS
- SHORT CORD INSTRUCTIONS
- POWER CORD SAFETY TIPS
- DO NOT OPERATE APPLIANCE IF THE POWER CORD SHOWS ANY DAMAGE OR IF APPLIANCE WORKS INTERMITTENTLY OR STOPS WORKING ENTIRELY.
- OPERATING INSTRUCTIONSFEATURES
- BEFORE FIRST USE
- OPERATING INSTRUCTIONS
- PRIMING THE INSTACOFFEE
- HOW TO USE THE INSTACOFFEE
- OVERHEAT PROTECTION
- TIPS
- CLEANING AND MAINTENANCE
- SELF-CLEANING FEATURE
- TO USE
- TERMS AND CONDITIONS
- Limited Warranty
- WHAT THE WARRANTY COVERS
- THIS WARRANTY DOES NOT COVER
- ® WARRANTY REGISTRATION
- What do I need to register my product?
- How do I register my product?
- CHEFMAN® WARRANTY REGISTRATIONCHEFMAN
- For product information
- CHEFMAN®
Brand : Chefman
Model : InstaCoffee Max RJ14-IC-L-BLACK-S
Category : Coffee maker