
Velobind V800 Pro - Binding GBC - Free user manual and instructions
Find the device manual for free Velobind V800 Pro GBC in PDF.


| Product Type | Binding Machine |
| Brand | GBC |
| Model | Velobind V800 Pro |
| Binding Method | VeloBind Strip Binding |
| Max Binding Capacity | 300 sheets (80 gsm) |
| Punch Capacity | 10 sheets (80 gsm) |
| Supported Paper Size | Letter (8.5 x 11"), A4 (210 x 297 mm) |
| Punch Pattern | 21 holes (for VeloBind strips) |
| Dimensions (W x D x H) | 18 x 12 x 8 inches (457 x 305 x 203 mm) |
| Weight | 9 lbs (4.1 kg) |
| Power Source | Manual (no electricity required) |
| Operation | Punch and bind strips manually |
| Maintenance | Wipe with dry cloth; avoid lubricants |
| Safety Features | Anti-jam mechanism, stable base |
| Included Accessories | 50 VeloBind strips (assorted sizes), punch pin |
| Repairability | Replaceable punch pin; contact GBC service for parts |
| Certifications | CE, RoHS compliant |
Frequently Asked Questions - Velobind V800 Pro GBC
User questions about Velobind V800 Pro GBC
0 question about this device. Answer the ones you know or ask your own.
Ask a new question about this device
Download the instructions for your Binding in PDF format for free! Find your manual Velobind V800 Pro - GBC and take your electronic device back in hand. On this page are published all the documents necessary for the use of your device. Velobind V800 Pro by GBC.
USER MANUAL Velobind V800 Pro GBC
1/8 in. (3.2 mm) X 14 in. (355.6 mm)
25 sheets of 20 lb. bond paper
*Note: No more than 4 composition covers, or
3 plastic covers should be punched at one time. Punching stacks of these materials may result in damage to the punch mechanism.
BIND CAPACITY:
1 in. (25 mm) X 14 in. (355.6 mm)
250 pages of 20 lb. bond paper
ELECTRICAL REQUIREMENTS:
120 VAC 230 VAC 100 VAC
60 Hertz 50 Hertz 50 Hertz
3 Amps 1.5 Amps 1.5 Amps
409.56 B.T.U.'s per hour
3-wire grounded outlet
CYCLE SPEED:
2 second punch cycle
8-10 second bind cycle
DIMENSIONS:
20 in. (50.8 cm) wide
7 in. (17.8 cm) high
15 in. (38.1 cm) deep
WEIGHT:
28 lbs. (12.7 kg)
3.0 INSTALLATION PROCEDURE
3.1 Unpacking Instructions
To unpack the machine, carefully remove the staples and open the carton. Remove the packing material from the top and around the machine, and lift the machine straight up out of the carton. Place the machine on a table near a 120 VAC or 220-240 VAC grounded outlet, and remove the plastic bag.
3.2 Power Cord Configuration
This machine is supplied with a power cord terminating in a conventional three prong electrical plug. Under no circumstances should the grounding prong of the power cord be removed to facilitate connection to a non-approved outlet.
3.3 Checking Machine Operation
The handle should operate with relative ease. Leave it in the "up" or starting position after testing several times.
With the handle in the starting position, check the pressure bar to ensure it can be easily lowered and raised by the operator. Leave it in the "up" position after testing several times.
The machine is now ready to operate. Instruct operator in proper punching and binding procedures. Point out the operating instructions found in the waste tray, and leave the owner's guide for the customer. Be sure to stress the importance of the document being properly placed on the locating pin for binding.
4.0 OPERATING INSTRUCTIONS
4.1 Punching
- Adjust the punch edge guide to the correct paper length. Check the punch alignment by punching a sheet of paper and folding it in half along the punched edge (See Figure 4-1). Match the holes up: if the corners of the paper match with no overlap, the alignment is correct. If not, readjust the guide and repeat the process until the edges are square.
- Place the paper fully in the punch throat and slide the paper to the left against the punch edge guide. Lower the handle with a firm, even motion. Raise the handle and remove the paper.
- To prevent jamming, only 25 sheets of 20 pound bond paper should be punched at one time (fewer sheets if the paper is heavier). Do not punch more than 4 composition covers or 3 plastic covers at one time.

natural_image
Line drawing of two hands holding a cylindrical object (no text or symbols)Figure 4-1
4.0 OPERATING INSTRUCTIONS
4.2 Document Assembly
- Check the bind edge guide alignment by inserting a receiving strip in the strip recess area. Lay a sheet of correctly aligned punched paper on the strip, matching up the holes and the strip so that the strip is not showing at the top or the bottom of the paper. Adjust the bind edge guide if necessary by sliding the guide to the edge of the paper.
- Place the back cover (face down), the punched sheets (last page on the bottom), and front cover (face up) on top of the receiving strip.
- Place the receiving strip (bottom binding strip with holes), textured side down in the strip recess, located in front of the backstop. Be sure the small hole in the receiving strip is over the locating pin. The locating pin is on the left hand side of the strip recess area in front of the backstop. The locating pin fits into the small hole in the plastic strip. The strip is positioned correctly over the locating pin when it is difficult to slide the strip to the right. Failure to properly align the strip can cause machine damage.
- Now determine the correct size of the pin strip. Use the scale on the backstop to determine the thickness of the document and the size of the pins required. Insert the strip through the document's holes and the receiving strip.

Figure 4-2
4.0 OPERATING INSTRUCTIONS
4.3 Binding
- Begin the binding process by pulling the pressure bar toward you and lowering it on top of the document. The indicator light will illuminate.
- Pull the handle down in a uniform, smooth motion and leave it down. (Don't apply pressure, the handle will remain down until you lift it.)
- Approximately 9 seconds after the handle is pulled down, the indicator light will go out, indicating the binding process is complete.
- Lift the handle to its starting position, raise the pressure bar, and remove the bound document.
NOTE: The waste tray should be emptied frequently to assure that the excess binding pins and punch scraps do not accumulate and cause a malfunction.
NOTE: When the pressure bar is placed on the document, the machine is automatically ready to deliver electrical current to the ribbon heater. When the handle is lowered, the ribbon heater turns "on" as it starts to move, and turns "off" as it finishes its cycle. A machine warm-up period is not necessary since warm-up is instantaneous. The machine remains completely "off" except during the binding operation.
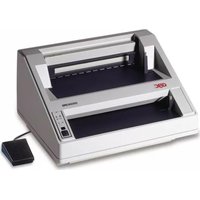

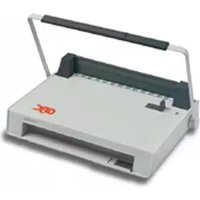
Brand : GBC
Model : Velobind V800 Pro
Category : Binding