
EATDE2767CW - Tumble drier Element - Free user manual and instructions
Find the device manual for free EATDE2767CW Element in PDF.


| Product Type | Tumble Dryer |
| Brand | Element |
| Model | EATDE2767CW |
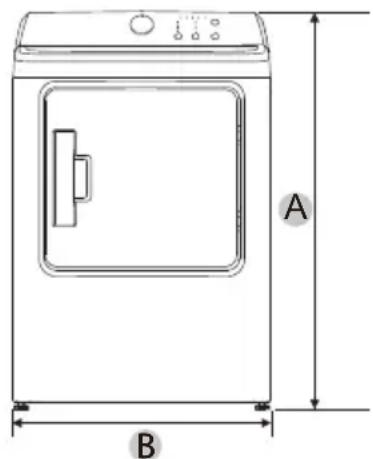
| Dimensions (H x W x D) | 41.7 x 27 x 30 in (1059 x 686 x 763 mm) |
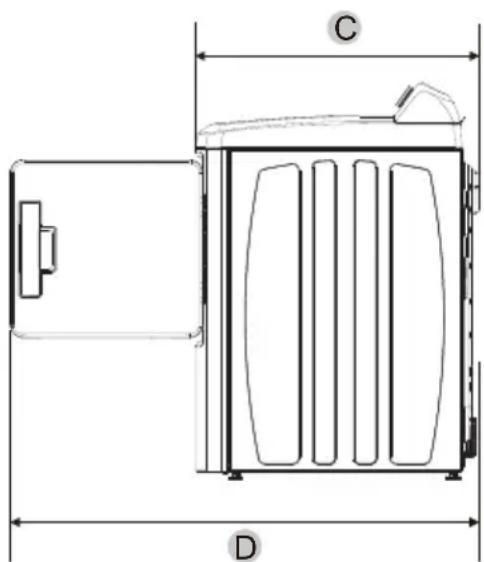
| Overall Depth with Door Open | 49.2 in (1250 mm) |
| Power Supply (Electric Models) | 120/240V, 60Hz, 30A |
| Power Supply (Gas Models) | 120V, 60Hz, 15A |
| Heating Type | Gas (Natural or LP) or Electric |
| Control Panel | Electronic with Cycle Selector, Dryness, Dry Temp, and Wrinkle Care |
| Drying Cycles | Sensor Dry: Normal, Heavy Duty, Towels, Casual, Delicates, Sanitize; Manual Dry: Quick Dry, 20/40/60/80 Min, Air Fluff |
| Dryness Levels | Very Dry, More Dry, Normal, Damp |
| Temperature Settings | High, Medium, Low, No Heat |
| Wrinkle Care Feature | 90-minute intermittent tumbling after cycle with no heat |
| Venting Options | Rear (default), Side, Bottom |
| Exhaust Duct Diameter | 4 in (10.2 cm) rigid metal |
| Lint Filter | Clean before or after each load; located on door frame |
| Maintenance | Clean lint filter regularly; inspect and clean exhaust system annually |
| Safety Features | Grounding required; gas model requires manual shut-off valve; do not use plastic duct |
| Warranty | 1 year, extendable to 2 years with product registration |
| Replacement Parts | Available through authorized service providers |
Frequently Asked Questions - EATDE2767CW Element
User questions about EATDE2767CW Element
0 question about this device. Answer the ones you know or ask your own.
Ask a new question about this device
Download the instructions for your Tumble drier in PDF format for free! Find your manual EATDE2767CW - Element and take your electronic device back in hand. On this page are published all the documents necessary for the use of your device. EATDE2767CW by Element.
USER MANUAL EATDE2767CW Element
Product may vary. Please refer to the actual product.
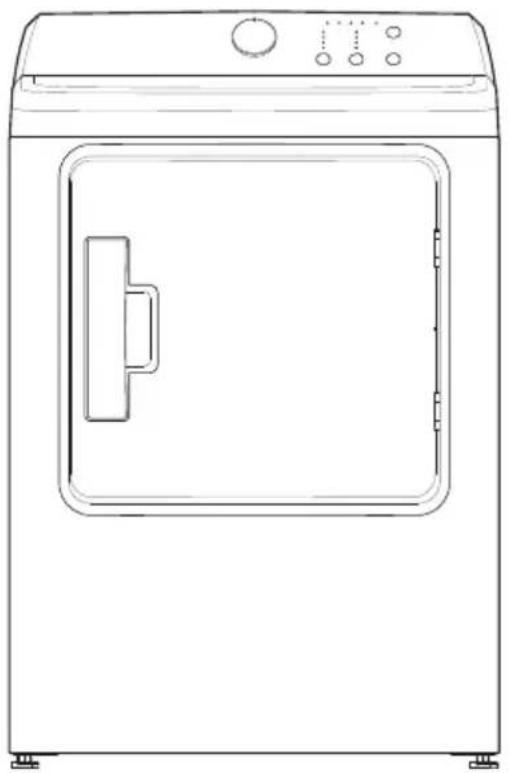
natural_image
Line drawing of a simple kitchen oven with control panel and door (no text or symbols)DRYER SAFETY 4
OPERATION REQUIREMENTS......8
Important to Installer ....8
Basic Requirements....9
Location Requirements....9
Ducting Requirements....12
Exhausting Requirements 14
Gas Requirements....14
Electric Requirements 16
Grounding 18
PARTS AND FEATURES ....19
Replacement Parts and Accessories ....19
INSTALLATION INSTRUCTIONS ....20
Removing From the Package 20
Tools Required....20
Choose the Proper Location 21
Install the Exhaust System.... 21
Connect the Gas Line (For Gas Models) 23
Connect the Electrical Wiring 24
Level the Dryer 27
Power On....27
Final Check 27
Door Reversal Procedure....28
Change the dryer vent location....31
DRYER USE....33
Control Panel 33
Drying a Load of Laundry 35
Special Laundry Tips 38
DRYER CARE....39
Cleaning and Maintenance 39
TROUBLESHOOTING 40
Check These Solutions if Your Dryer 40
Error Codes....42
APPENDIX 43
Fabric Care Chart 43
WARRANTY....44
READ AND KEEP THESE INSTRUCTIONS FOR FUTURE REFERENCE
This manual contains important information on the installation, use, and care of your appliance. Please read this manual carefully before installation and operation of this machine to prevent injury and property damage.
Warnings and Important Safety Instructions in this manual DO NOT cover all possible conditions and situations that may occur. It is your responsibility to use common sense, caution and care when installing, maintaining and operating your dryer.
DRYER SAFETY
YOUR SAFETY AND THE SAFETY OF OTHERS ARE VERY IMPORTANT
To prevent injury to the user or other people and property damage, the instructions shown here must be followed. Incorrect operation due to ignoring of instructions may cause harm or damage, including death.
The level of risk is shown by the following indications.
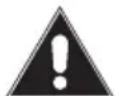
WARNINGWARNING
This symbol indicates the possibility of death or serious injury.

CAUTION
This symbol indicates the possibility of injury or damage to property.
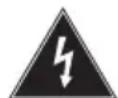
WARNING
This symbol indicates the possibility of dangerous voltage constituting a risk of electrical shock is present that could result in death or serious injury.

WARNING
For your safety the information in this manual must be followed to minimize the risk of fire or explosion, or to prevent property damage, personal injury or death.
- Do not store or use gasoline or other flammable vapors and liquids in the vicinity of this or any other appliance.
- Installation and service must be performed by a qualified installer, service agency, or the gas supplier.

WARNING
Fire Hazard
● Failure to follow safety warnings exactly could result in serious injury, death or property damage.
- Do not install a booster fan in the exhaust duct.
- Install all clothes dryers in accordance with the installation instructions of the manufacturer of the dryer.

WARNING
What to do if you smell gas:
- Do not try to light any appliance.
- Do not touch any electrical switch; do not use any phones in your building.
- Clear the room, building, or area of all occupants.
- Immediately call your gas supplier from a neighbor's phone. Follow the gas supplier's instructions.
• If you cannot reach your gas supplier, call the fire department.
IMPORTANT SAFETY INSTRUCTIONS

WARNING
To reduce the risk of fire, electric shock, or injury to persons when using your appliance, follow basic precautions, including the following:
- Read all instructions before using the appliance.
- Use this appliance only for its intended purpose as described in this Owner's Manual.
- Before use, the dryer must be properly installed as described in this manual.
- ALWAYS follow the fabric care instructions supplied by the garment manufacturer.
- Do not dry articles that have been previously cleaned in, washed in, soaked in, or spotted with gasoline, dry-cleaning solvents, other flammable or explosive substances as they give off vapors that could ignite or explode.
- Do not use the dryer to dry clothes which have traces of any flammable substance, such as vegetable oil, cooking oil, machine oil, flammable chemicals, thinner, etc., or anything containing wax or chemicals, such as mops and cleaning clothes. Flammable substances may cause the fabric to catch fire by itself.
- Do not store or use gasoline or other flammable vapors and liquids near this or any other appliance.
- Do not allow children to play on or in the appliance. Close supervision of children is necessary when the appliance is used near children.
- Before the appliance is removed from service or discarded, remove the lid of the washing or door of the drying compartment.
- Do not reach into the appliance if the drum is moving.
- Do not install or store this appliance where it will be exposed to the weather or freezing temperatures below 33°F.
- Do not tamper with the controls and latch.
-
Do not install a booster fan in the exhaust duct.
-
Do not repair or replace any part of the appliance or attempt any servicing unless it is specifically recommended in the user-maintenance instructions or in published user-repair instructions that you understand and have the skills to carry out.
- Keep the area underneath and around your appliances free of combustible materials (lint, paper, rags, etc.), gasoline, chemicals and other flammable vapors and liquids.
- Do not place items exposed to cooking oils in your dryer. Items contaminated with cooking oils may contribute to a chemical reaction that could cause a load to catch fire. To reduce the risk of fire due to contaminated loads, the final part of a tumble dryer cycle occurs without heat (cool down period). Avoid stopping a tumble dryer before the end of the drying cycle unless all items are quickly removed and spread out so that the heat is dissipated.
- Unplug the dryer if the machine is to be left for an extended period of time, such as during vacations.
- Packaging material can be dangerous for children. There is a risk of suffocation! Keep all packaging from children.
- Always check the inside of the dryer for foreign objects before loading laundry. Keep the door closed when not in use.
- Do not use fabric softeners or products to eliminate static unless recommended by the manufacturer of the fabric softener or product manufacture.
- Clean the lint screen before or after each load.
- Keep the area around the exhaust opening and surrounding areas free from lint, dust, and dirt.
- The interior of the dryer and exhaust duct should be cleaned periodically by qualified service personnel.
- Do not place items exposed to cooking oils in your dryer. Items contaminated with cooking oils may contribute to a chemical reaction that could cause a load to catch fire.
- This appliance must be grounded. See “Electric Requirements” and “Grounding” in the “Operation Requirements” section.
- This appliance must be properly grounded. Never plug the power cord into a receptacle that is not grounded adequately and in accordance with local and national codes. Refer to installation instructions for grounding this appliance.
- Ensure pockets are free from small irregularly shaped hard objects and foreign material, i.e. coins, knives, pins, etc. These objects could damage your dryer.
- Do not use heat to dry articles containing foam rubber or similarly textured rubber like - materials.

WARNING
To reduce the risk of fire or explosion
- Do not dry items that have been previously cleaned, washed, soaked, or spotted with gasoline, dry cleaning solvents, or other flammable or explosive substances. They emit vapors that could ignite or explode. Any material that has been in contact with a cleaning solvent or flammable liquids or solids should not be placed in the dryer until all traces of these flammable liquids or solids and their fumes have been removed.
- There are many highly flammable items used in homes, such as acetone, denatured alcohol, gasoline, kerosene, some liquid household cleaners, some spot removers, turpentine, waxes, and wax removers.
- Do not dry items containing foam rubber (may be labeled latex foam) or similarly textured rubber-like materials on a heat setting. Heated foam rubber materials can, under certain circumstances, produce fire by spontaneous combustion.

CAUTION
- Do not sit on top of the dryer.
- Do not dry clothing with large buckles, buttons, or other heavy metal or solid things.
- Install and use in accordance with the manufacturer's instructions.
- Do not place items in your dryer that have been spotted or soaked with vegetable oil or cooking oil. Even after being washed, these items may contain significant amounts of these oils.
- Residual oil on clothing can ignite spontaneously. The potential for spontaneous combustion increases when items containing vegetable oil or cooking oil are exposed to heat. Heat source such as your dryer can warm these items, allowing an oxidation reaction in the oil to occur.
- Oxidation creates heat. If this heat cannot escape, the items can become hot enough to catch fire. Piling, stacking, or storing these kinds of items may prevent heat from escaping and can create a fire hazard.
Take care that children's fingers are not caught in door when closing it. This may result in injury. - Gas leaks may occur in your system, resulting in a dangerous situation.
• Gas leaks may not be detected by smell alone. - Gas suppliers recommend you purchase and install a UL approved gas detector.
State of California Proposition 65 Warnings:

WARNING: Cancer and Reproductive Harm
-www.P65Warnings.ca.gov.
SAVE THESE INSTRUCTIONS
THIS APPLIANCE IS FOR HOUSEHOLD USE ONLY
- Clothes dryer installation must be performed by a qualified installer.
- Install the clothes dryer according to the manufacturer's instructions and local codes.
- Do not install a clothes dryer with flexible plastic venting materials. If flexible metal (foil type) duct is installed, it must be of a specific type identified by the appliance manufacturer as suitable for use with clothes dryer. Flexible venting materials are known to collapse, be easily crushed, and trap lint. These conditions will obstruct with the clothes dryer's airflow and increase the risk of fire.
- To reduce the risk of severe injury or death, follow all installation instructions
- Save these instructions.
IMPORTANT TO INSTALLER
Please read the following instructions carefully before installing the dryer. These instructions should be kept for future reference.

CAUTION
- The dryer is not suitable for installation in a mobile home.
- Remove the door from all discarded appliances to avoid the danger of a child being trapped and suffocating, after unplugging cut off Power Cord.
BASIC REQUIREMENTS
Make sure you have everything necessary for the proper installation.
- A GROUNDED ELECTRICAL OUTLET is required. Refer to the "Electric Requirements" section.
• A POWER CORD electric dryer (except for Canada).
• GAS LINES (if a gas dryer) must meet national and local codes. - The EXHAUST SYSTEM must be made of rigid metal or flexible stiff-walled metal exhaust ducting.
LOCATION REQUIREMENTS
- The dryer should be located where there is enough space at the front for loading the dryer, and enough space behind for the exhaust system.
- This dryer is factory-ready for the rear exhaust option. If you want to change the vent location, see “Change the dryer vent location” section.
- Make sure the room in which the dryer is located has enough fresh air. The dryer must be located where there are no air-flow obstructions. Ambient temperature should not be lower than 33^ F.
- For gas dryers, adequate clearance must be maintained as noted on the data plate to ensure adequate air for combustion and the proper dryer operation.
- The dryer must not be installed or stored in an area where it will be exposed to water and/or weather. The dryer area must be kept clear of combustible materials, gasoline, and other flammable vapors and liquids. A dryer produces combustible lint. The area around the dryer should be kept lint-free.
ALCOVE OR CLOSET OR WALL INSERT/RECESSED INSTALLATIONS

WARNING
- The dryer must be exhausted to the outside to reduce the risk of fire when installed any place inside the house.
- No other fuel-burning appliance should be installed in the same closet as the dryer.
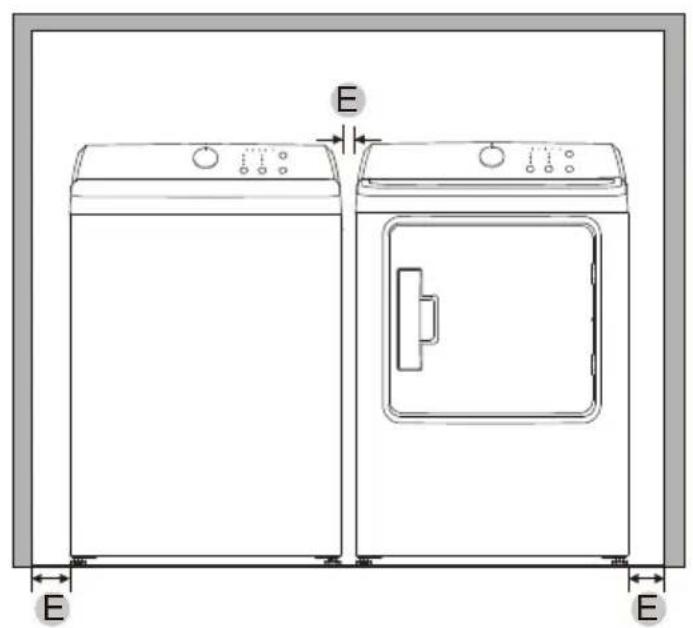
Minimum clearances between the dryer and adjacent walls or other surfaces:
| Sides 1 in. (25 mm) Rear 5 in. (127 mm) | ||
| Top 24 in. (610 mm) Closet front | 2 in. (51 mm) |
natural_image
Technical line drawing of a mechanical device with dimension labels C and D (no text or symbols on the diagram itself)| A 41.7 in. (1059 mm) B 27 in. (686 mm) |
| C 30 in. (763 mm) D 49.2 in. (1250 mm) |
natural_image
Line drawing of two front-loading washing machines with labeled dimensions (E), no text or symbols present.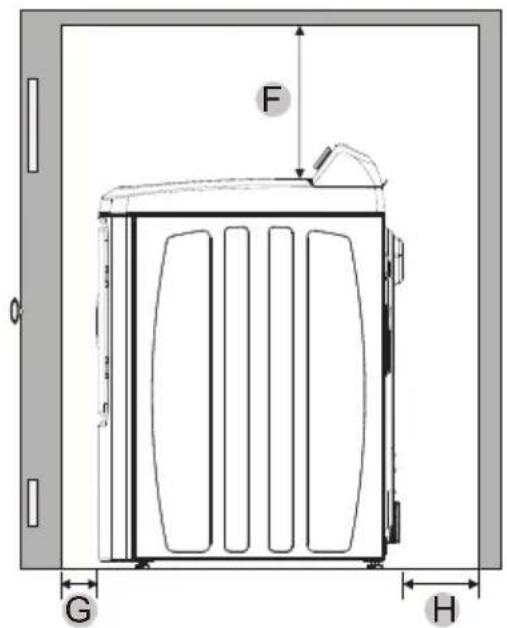
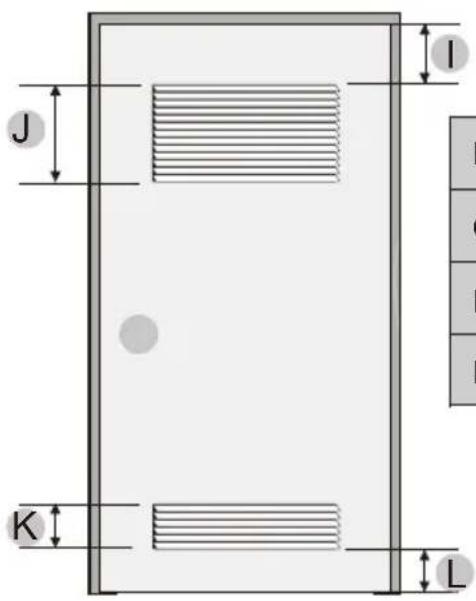
| E 1 | in. (25 mm) F 24 in. | (610 mm) |
| G | 2 in. (51 mm) | H 5 in. (127 mm) |
| I 3 | in. (76 mm) | J 48 in. (31000 mm) ^2 |
| K 2 | 4 in. (15500 mm) | L 3 in. (76 mm) |
NOTE:
The front of the closet must have two unobstructed air openings for a combined minimum total area of 72 sq.in. (465 sq.cm) with a minimum clearance of 3 in. (76 mm) at the top and bottom. A slatted door with equivalent space clearance is acceptable.
DUCTING REQUIREMENTS
| Recommended Use only for short-run installation | ||
| Weather Hood Type | 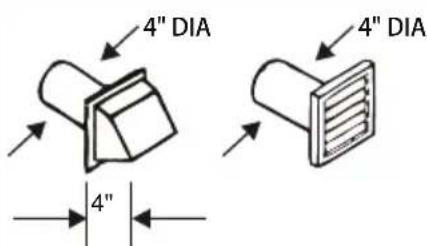 4 inch. (10.2 cm) 4 inch. (10.2 cm) | 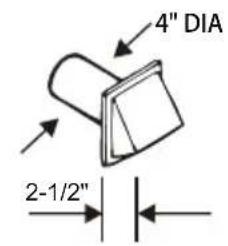 2.5 inch. (6.4 cm) 2.5 inch. (6.4 cm) |
| No. of 90° elbows | Rigid Metallic Rigid Metallic | |
| 0 90 ft. (27.4 m) | 60 ft. (18.3 m) | |
| 1 60 ft. (18.3 m) | 45 ft. (13.7 m) | |
| 2 45 ft. (13.7 m) | 35 ft. (10.7 m) | |
| 3 35 ft. (10.7 m) | 25 ft. (7.6 m) | |
If this new dryer is installed into an existing exhaust system you must make sure:
• The exhaust system meets all local, state, and national codes.
• That a flexible plastic duct is not used.
• To inspect and clean all lint buildup from inside the existing duct.
• The duct is not dented or crushed.
• The exhaust hood damper opens and closes freely.
Manometer measurements
The static pressure in any exhaust system for best results shall be between 0.3 to 0.8 inches of water column, and cannot be less than 0 under any circumstances. with installed duct of 4 inch diameter. Measurement must be done with the empty dryer working with a manometer at the point where the exhaust duct connects to the dryer. A no-heat setting should be used. Lint filter must be clean.

WARNING
The correct exhaust installation is YOUR RESPONSIBILITY.
- Use a 4-inch (10.2cm) diameter rigid aluminum or rigid galvanized steel duct.
- Do not use smaller diameter than recommended diameter duct.
- Ducts larger than 4 inches (10.2cm) in diameter can result in increased accumulation of lint and changes in performance
- Lint should be removed regularly from internal filter every cycle and from ducts.
- If a flexible metal duct must be used, use the type with a stiff sheet metal wall. Do not use a flexible duct with a thin foil wall. A serious blockage can result if the flexible metal duct is bent too sharply.
- Never install any type of flexible duct in walls, ceilings, or other concealed spaces.
- Keep the exhaust duct as straight, short as possible, minimum elbows
- Secure joints with aluminum tape. Do not use screws.
- Plastic flexible ducts can kink, sag, be punctured, reduce airflow, extend drying times, and affect the dryer operation.
- Exhaust systems longer than recommended 90 ft can extend drying times, affect machine operations, and collect lint.
- The exhaust duct should end with an exhaust hood with a swing-out damper to prevent back drafts and entry of wildlife. Never use an exhaust hood with a magnetic damper.
- The hood should have at least 12 inches (30.5cm) of clearance between the bottom of the hood and the ground or other obstruction. The hood opening should point down.
- Never install a screen over the exhaust outlet.
- To avoid lint buildup, do not exhaust the dryer directly into a window well. Do not exhaust under a house or porch.
- If the exhaust duct must run through an unheated area, the duct should be insulated and slope slightly down towards the exhaust hood to reduce condensation and lint buildup.
- Inspect and clean the interior of the exhaust system at least once a year. Unplug the power cord before cleaning.
- Check frequently to make sure the exhaust hood damper opens and closes freely.
- Check once per month, and clean at least once per year. NOTE: If your clothes are not getting dry, then check the ducting for obstructions.
- Do not exhaust the dryer into a wall, ceiling, crawl space, or concealed space of a building, gas vent, or any other common duct or chimney. This could create a fire hazard from the lint expelled by the dryer.
- Do not use non-metallic flexible duct.
- To reduce the risk of fire, this dryer MUST BE EXHAUSTED OUTDOORS.
EXHAUSTING REQUIREMENTS

WARNING
- The dryer should not be exhausted into a chimney, wall, ceiling, attic, crawl space, or a concealed space of a building.
- The dryer must be exhausted to the outside to reduce the risk of fire when installed in alcove or closet.
Exhausting the dryer to the outside will prevent large amounts of lint and moisture from being blown into the room.

WARNING
NEVER USE A PLASTIC OR NON-METAL FLEXIBLE DUCT
If your existing ductwork is plastic, non-metal, or combustible, replace it with metal before installation this appliance
Use only a metal exhaust duct that is non-flammable to ensure containment of the exhaust air, heat, and lint.
Refer to the “Ducting Requirements” section on page 12 for the maximum duct length and number of bends.
- All dryers must be exhausted to the outside.
- Do not assemble the duct with screws or other fastening means that extend into the duct and catch lint.
• The exhaust duct should be 4 inches (102mm) in diameter. - The total length of flexible metal duct should not exceed 7.8 feet (2.4 meters).
GAS REQUIREMENTS
Use only natural or LP (liquid propane) gases.
THE INSTALLATION MUST CONFORM WITH LOCAL CODES, OR IN THE ABSENCE OF LOCAL CODES, WITH THE NATIONAL FUEL GAS CODE, ANSI Z223.1/NFPA 54, LATEST REVISION (FOR THE UNITED STATES), OR THE NATURAL GAS AND PROPANE INSTALLATION CODE, CSA B149.1, LATEST REVISION (FOR CANADA).
Gas dryers are equipped with a burner vent for use with natural gas. If you plan to use your dryer with LP (liquid propane) gas, it must be converted for safe and proper performance by a qualified service technician.
A 1/2" (1.27 cm) gas supply line is recommended and must be reduced to connect to the 3/8" (1 cm) gas line on your dryer. The National Fuel Gas Code requires that an accessible, approved manual gas shut-off valve be installed within 6" (15,24 cm) of your dryer.
Gas dryers installed in residential garages must be raised 18" (46cm) above the floor.
Additionally, a 1/8"(0.3cm) N.P.T. (National Pipe Thread) plugged tapping, accessible for test gauge connection, must be installed immediately upstream of your dryer's gas supply connection.
Your dryer must be disconnected from the gas supply pipe system during any pressure testing of the system.
This dryer must be connected to the gas supply piping with a listed flexible gas connector that complies with the standard for connectors for gas appliances, ANSI Z21.24 or CSA 6.10.
DO NOT reuse old flexible metal gas lines. Flexible gas lines must be design certified by the American Gas Association (CGA in Canada).
- Any pipe joint compound used must be resistant to the action of any liquefied petroleum gas.
- As a courtesy, most local gas utilities will inspect a gas appliance installation.
GAS IGNITION - Your dryer uses an automatic ignition system to ignite the burner. There is no constant burning pilot.
COMMONWEALTH OF MASSACHUSETTS INSTALLATION INSTRUCTIONS
Your dryer must be installed by a licensed plumber or gas fitter. A "T" handle manual gas valve must be installed in the gas supply line to installed dryer at location of operation. If a flexible gas connector is used to connect dryer, the connector may not be longer than 3' (36", 91.5 cm).

WARNING
• Gas leaks may occur in your system, creating a dangerous situation.
• Gas leaks may not be detected by smell alone.
- Gas suppliers recommend that you purchase and install a UL-approved gas detector.
- Install and use it in accordance with the manufacturer's instructions.
ELECTRIC REQUIREMENTS
The wiring diagram is located on the back board of the unit.

WARNING
- The improper connection of the equipment grounding conductor can result in the risk of electric shock. Check with a qualified electrician or serviceman if you are in doubt as to whether your dryer is properly grounded. Do not modify the plug provided with your dryer - if it doesn't fit the outlet, have a proper outlet installed by a qualified electrician.
- To prevent unnecessary risk of fire, electrical shock, or personal injury, all wiring and grounding must be done in accordance with local codes, or in the absence of local codes, with the National Electrical Code, ANSI/NFPA No. 70 - Latest Revision (for the U.S.) or the Canadian Electrical Code CSA C22.1 - Latest Revisions and local codes and ordinances. It is your responsibility to provide adequate electrical services for your dryer.
- All gas installations must be done in accordance with the National Fuel Code ANSI/Z2231 - Latest Revision (for the U.S.) or CAN/CGA - B149 Installation Codes - Latest Revision (for Canada) and local codes and ordinances.
Electrical connections
An individual branch (or separate) circuit serving only your dryer is recommended. DO NOT USE AN EXTENSION CORD.
Gas models - U.S. and Canada
A 120Volt, 60Hz AC approved electrical service, with a 15 ampere fuse or circuit breaker is required.
Electric models - U.S. only
The dryers require a 120/240 volt, 60Hz AC approved electrical service. The electric service requirements can be found on the data label located behind the door. A 30-ampere fuse or circuit breaker on both sides of the line is required.
- If a power cord is used, the cord should be plugged into a 30-ampere receptacle.
- The power cord is NOT provided with U.S. electric model dryers.
Electrical Shock Hazard
When local codes allow, the electrical supply of the dryer may be connected by means of a new power supply cord kit, marked for use with a dryer, that is UL listed and rated at a minimum of 120/240 volts, 30-ampere with three No. 10 copper wire conductors terminated with closed loop terminals, open-end spade lugs with turned up ends, or with tinned leads
- Do not reuse a power supply cord from an old dryer. The power cord electric supply wiring must be retained at the dryer cabinet with a suitable UL-listed strain relief.
- Grounding through the neutral conductor is prohibited for (1) new branch-circuit installations, (2) mobile homes, (3) recreational vehicles, and (4) areas where local codes prohibit grounding through the neutral conductor. (Use a 4-prong plug for 4 wire receptacles, NEMA type 14-30R.)
Electric models - Canada only
- A 120/240 volt, 60Hz AC approved electrical service fused through a 30-ampere fuse or circuit breaker on both sides of the line is required.
- All Canadian models are shipped with the power cord attached. The power cord should be plugged into a 30-ampere receptacle.
GROUNDING
This dryer must be grounded. In the event of a malfunction or breakdown, the grounding the product will reduce the risk of electrical shock by providing a path of least resistance for the electrical current.

WARNING
Gas and Electric models
- Certain internal parts are intentionally not grounded and may present a risk of electric shock only during servicing. Service Personnel – Do not contact the following parts while the appliance is energized: inlet valve, control board and temperature-regulating thermistor (located on blower housing).

WARNING
Gas models
- Your dryer has a three prong power cord with grounding conductor. 120V 60 Hz
- The plug must be plugged into an appropriate individual outlet that is properly installed and grounded in accordance with all local codes and ordinances.

WARNING
Electric models
Dryer must be grounded with 3 or 4 wire cord power cord with ground grounding conductor and a grounding plug, which is sold separately.
- The plug must be plugged into an appropriate outlet that is properly installed and grounded in accordance with all local codes and ordinances.
- Do not modify the plug provided with your dryer - if it doesn't fit the outlet, have a proper outlet installed by a qualified electrician.
- If a power cord is not used and the electric dryer is to be permanently wired, the dryer must be connected to a permanently grounded metal wiring system, or an equipment grounding conductor must be run with the circuit conductors and connected to the equipment grounding terminal or lead on the dryer.
PARTS AND FEATURES
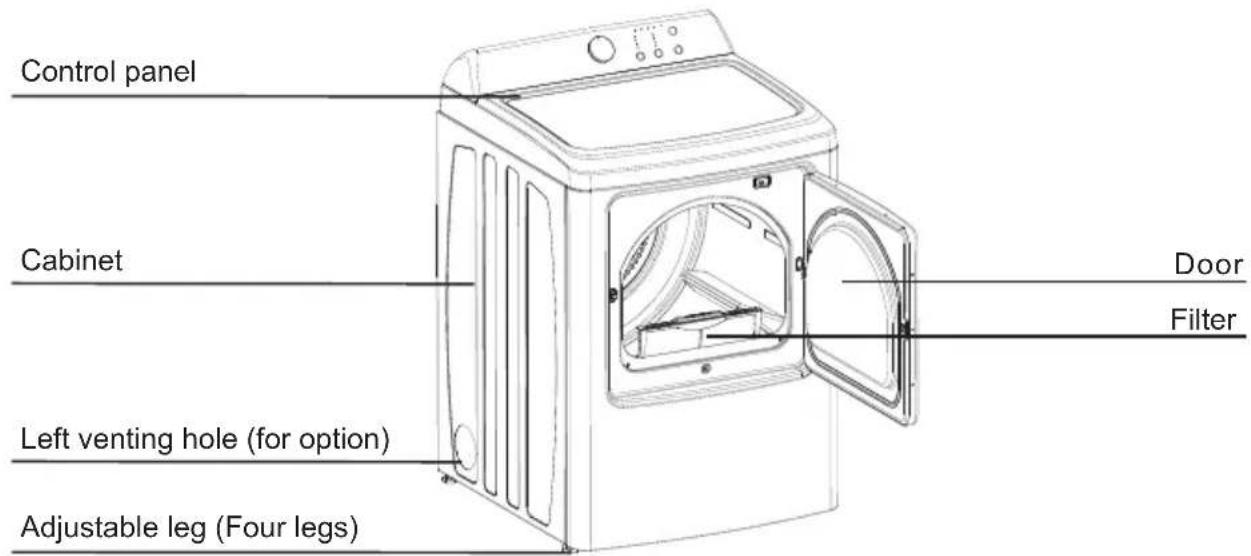
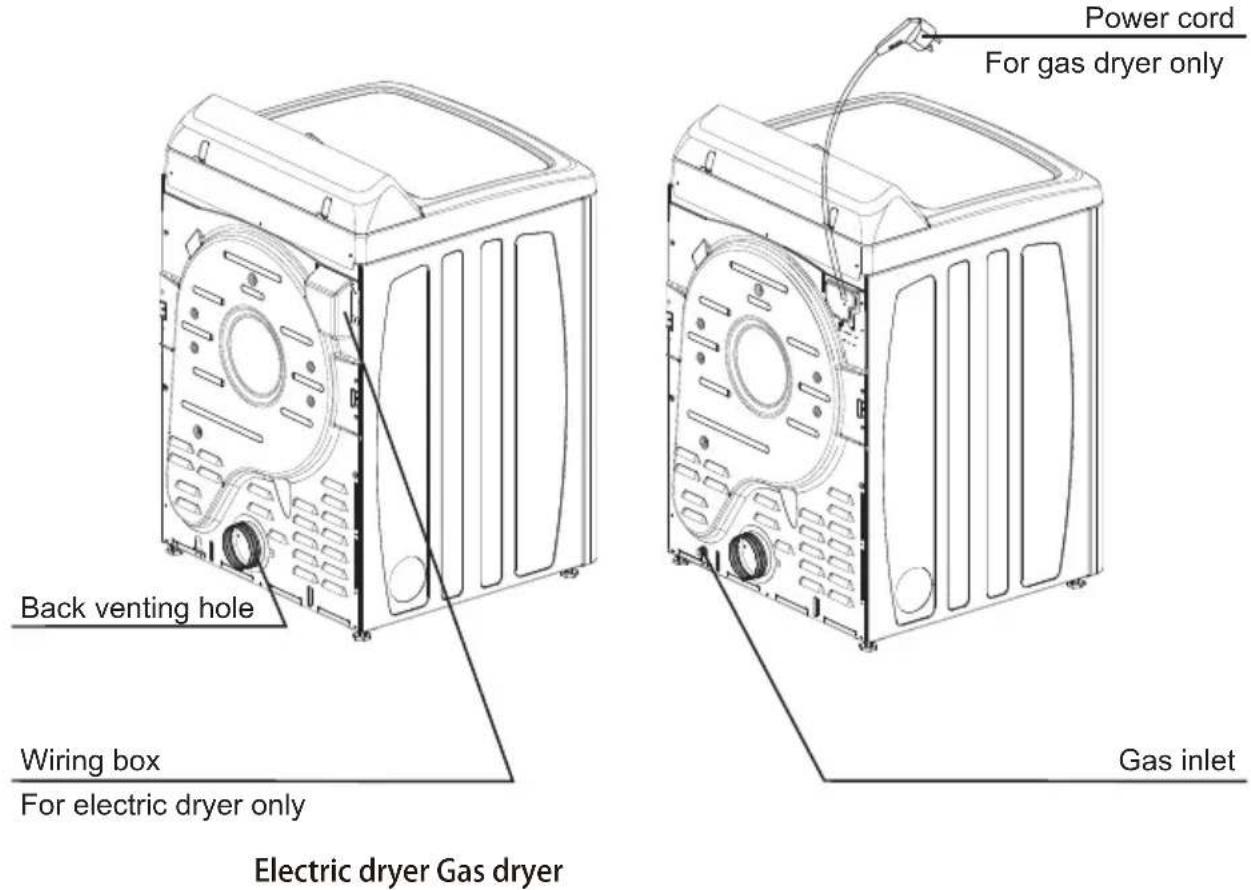
INSTALLATION INSTRUCTIONS
For the proper installation, we recommend that you hire a qualified installer.
REMOVING FROM THE PACKAGE
- Unpack your dryer and inspect it for shipping damage. Make sure you have received all the items shown below.
- To prevent personal injury or strain, wear protective gloves whenever lifting or carrying the unit.

WARNING
Packaging materials can be dangerous to children.
Keep all packaging material (plastic bags, polystyrene, etc.) well out of children's reach.
TOOLS REQUIRED
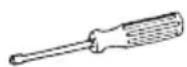


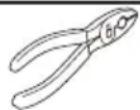
Phillips
screwdriver
Flat screwdriver Level Pliers

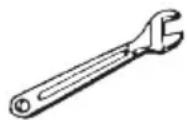
Adjustable wrench that opens to 1" (25 mm)
Aluminum tape
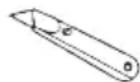
Cutting knife
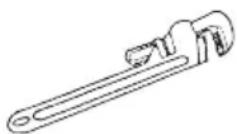
Pipe wrench (gas only)
- Move your dryer to an appropriate location for the installation. Consider installing the dryer and washer side-by-side, to allow access to the gas, electrical, and exhaust connections. Place two of the carton cushion-tops on the floor. Tip your dryer on its side so it lies across both cushion-tops.
- Set your dryer back in an upright position.
- Risk of Fire. Do not install a booster fan in the exhaust duct.
INSTALL THE EXHAUST SYSTEM
- Review the "Exhausting Requirements" section on before installing the exhaust system.
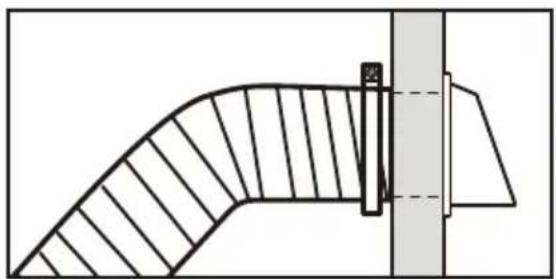
- Install the ductwork from your dryer to the exhaust hood. The crimped end of the duct sections must point away from your dryer.
- DO NOT use sheet metal screws when assembling the ducting.
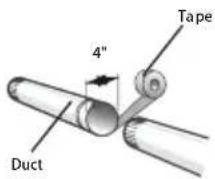
- These joints should be taped.
- Never use plastic flexible exhaust material.
- Tip for tight installations: install a section of the exhaust system onto your dryer before putting it in place.
- Use aluminum tape to secure this section to your dryer, but do not cover the ventilation slots at the back of the unit in dryer cabinet.
- The rear surface of appliances which, according to the instructions, should be placed against a wall.
natural_image
Technical diagram of a curved mechanical component with hatched fill and a vertical guide bar (no text or symbols)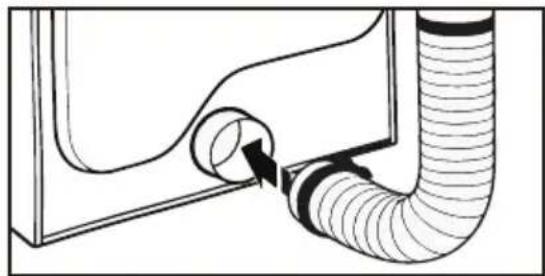
natural_image
Diagram of a pipe connection with a valve and tubing (no text or symbols)
WARNING
Make sure your dryer is installed properly so it exhausts air easily.
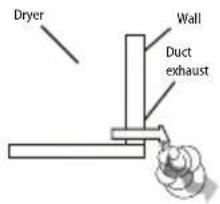
Use a 4" (10.2 cm) diameter rigid metal duct. Tape all joints, including at the dryer. Never use lint-trapping screws.
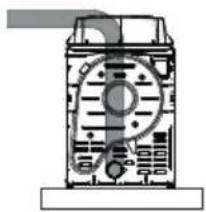
Keep ducts as straight as possible.
natural_image
Technical line drawing of a mechanical device with no visible text or symbolsClean all old ducts before installing your new dryer. Be sure the vent flap opens and closes freely. Inspect and clean the exhaust system annually.
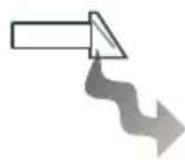
DO NOT restrict your dryer with a poor exhaust system.
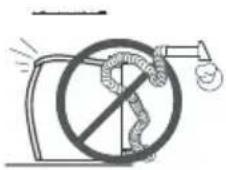
DO NOT use a plastic, thin foil, or non-metal flexible duct.
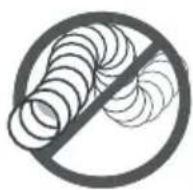
DO NOT use unnecessarily long ducts that have many elbows.
natural_image
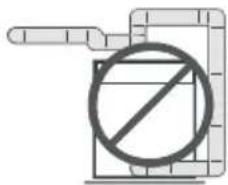
Pure electrical circuit lines without any symbolsDO NOT use dented or clogged ducts and vent.
- Review the “Gas Requirements” section on page 14. Remove the pipe thread protective cap.
- Apply a pipe joint compound or about 11/2" wraps of teflon tape over all threaded connections.
- The pipe joint compound must be resistant to the actions of any liquefied petroleum gas.
- Connect the gas supply to your dryer. An additional fitting is required to connect the 3/4" (1.9 cm) female thread end of a flexible connector to the 3/8" (1 cm) male threaded end on the dryer. Use only new AGA or CSA certified gas supply line with SS flexible connectors within 6 ft (1.8 m) of the dryer.
- Securely tighten the gas line fitting over the threads. Turn on the gas supply.
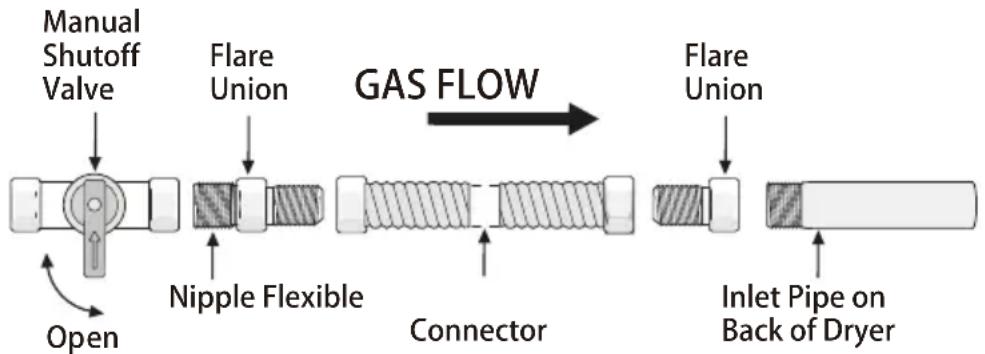
flowchart
graph LR
    A["Manual Shutoff Valve"] --> B["Open"]
    B --> C["Nipple Flexible"]
    C --> D["Connector"]
    D --> E["Inlet Pipe on Back of Dryer"]
    F["Flare Union"] --> G["Flare"]
    H["Flare Union"] --> I["Flare"]
    style A fill:#f9f,stroke:#333
    style B fill:#ccf,stroke:#333
    style C fill:#cfc,stroke:#333
    style D fill:#fcc,stroke:#333
    style E fill:#cff,stroke:#333
    style F fill:#ffc,stroke:#333
    style G fill:#cfc,stroke:#333
    style H fill:#fcc,stroke:#333
    style I fill:#cfc,stroke:#333
All connections must be wrench-tightened

WARNING
- All gas installations of the dryer must be equipped with Manual Shut-Off valve.
- Uncoated copper tubing will corrode when subjected to natural gas, causing gas leaks. Use ONLY black iron, stainless steel, or plastic-coated brass piping for gas supply.
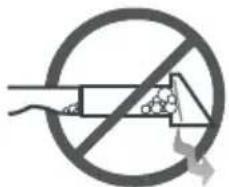
- Check all gas connections for leaks using a soap solution.
- If bubbles appear, tighten the connections and recheck. DO NOT use an open flame to check for gas leaks.
CONNECT THE ELECTRICAL WIRING
Review the "Electric Requirements" section on page 16.
BEFORE OPERATING OR TESTING, follow the grounding instructions in the “” section on page 18. Grounding
THREE WIRE OUTLET
natural_image
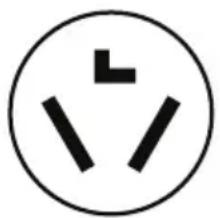
Simple electrical circuit symbol for a three-pin socket (no text or labels)3-Wire receptacle (10-30R)
Then choose a 3-wire power supply cord with ring or spade terminals and UL listed strain relief. The 3-wire power supply cord, at least 4 ft. (1.22 m) long, must have 3 10-gauge solid copper wires and match a 3-wire receptacle of NEMA Type 10-30R.
slot. Secure the cover with a screw.
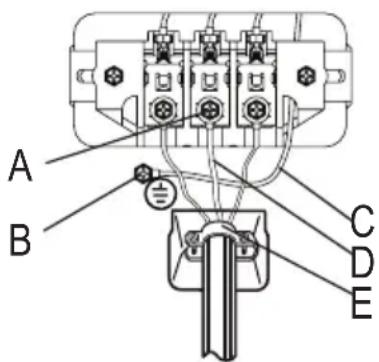
3-Wire system connections
- Remove the center terminal block screw.
- Connect the neutral wire (white or center wire) of the power cord to the center terminal screw of the terminal block. Be sure to cross the screw through the ring of the power cord terminal and tighten the screw.
- Connect the other wires to the outer terminal block screws. Be sure to cross the screw through the terminal ring and tighten the screw.
- Tighten the strain relief screws.
- Insert the tab of the terminal block cover into your dryer's rear panel slot. Secure the cover with a screw.
3-wire system instructions:
A Center terminal block screw
B External ground connector
C Neutral grounding wire (White)
D Neutral wire (white or center wire)
E 3/4" (1.9cm) UL-listed strain relief

WARNING
If converting from a 4-wire electrical system to a 3-wire, the ground strap must be reconnected to the terminal block support to ground the dryer frame to the neutral conductor. Ring-type terminals are recommended. If using strap terminals, make sure they are tightened.
FOUR WIRE OUTLET

natural_image
Simple electrical circuit symbol with three vertical lines and a circle (no text or labels)4-Wire receptacle (14-30R)
Then choose a 4-wire power supply cord with ring or spade terminals and UL listed strain relief. The 4-wire power supply cord, at least 4 ft. (1.22 m) long, must have 4 10-gauge solid copper wires and match a 4-wire receptacle of NEMA Type 14-30 R. The ground wire (ground conductor) may be either green or bare. The neutral conductor must be identified by a white color.
4-Wire system connections
- Remove the center terminal block screw.
- Connect the ground wire (green or unwrapped) of the power cord to the external ground conductor screw.
- Connect the neutral wire (white or center wire) of the power cord and the appliance ground wire (white) under the center screw of the terminal block. Be sure to cross the screw through the ring of the power cord terminal and tighten the screw.
- Connect the other wires to the outer terminal block screws. Be sure to cross the screw through the terminal ring and tighten the screw.
- Tighten the strain relief screws.
- Insert the tab of the terminal block cover into your dryer's rear panel slot. Secure the cover with a screw.
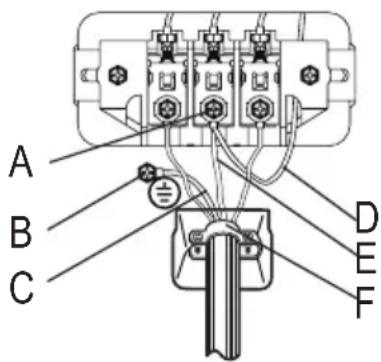
4-wire system instructions:
IMPORTANT: Ring-type terminals are recommended. If using strap terminals, make sure they are tightened.
A Center terminal block screw
B External ground connector
C Green or bare copper wire of the power cord
D Neutral grounding wire (White)
E Neutral wire (white or center wire)
F 3/4" (1.9cm) UL-listed strain relief

WARNING
Electrical Shock Hazard
All U.S. models are produced for a 3-WIRE SYSTEM CONNECTION.
The dryer frame is grounded to the neutral conductor at the terminal block. A 4-WIRE SYSTEM CONNECTION is required for new or remodeled construction, mobile homes, or if local codes do not permit grounding through neutral conductor. If the 4-wire system is used, the dryer frame cannot be grounded to the neutral conductor at the terminal block. Refer to the “Electric Requirements” section on page 16 for 3-WIRE or 4-WIRE SYSTEM CONNECTIONS.
Remove the terminal block cover plate.
Insert the power cord with a UL-listed strain relief through the hose provided in the cabinet near the terminal block.
- A strain relief must be used.
Do not loosen the nuts already installed on the terminal block. Be sure they are tight. Use a 3/8" (1 cm) deep-well socket.
LEVEL THE DRYER
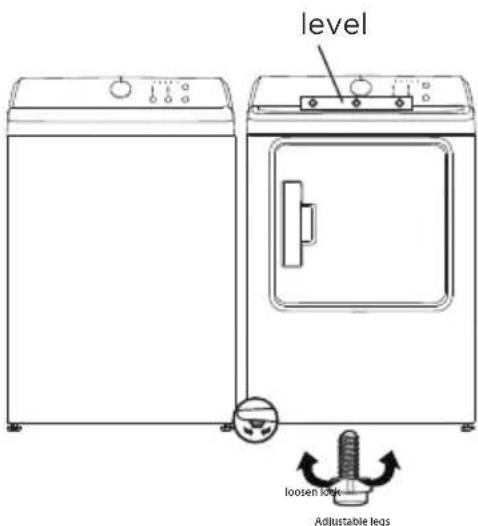
To ensure that the dryer provides the optimal drying performance, it must be leveled. To minimize vibration, noise, and unwanted movement, the floor must be a perfectly level, solid surface.
- Adjust the leveling feet only as much as necessary to level the dryer. Extending the leveling feet more than necessary can cause the dryer to vibrate.
POWER ON
Make sure all gas connections (Gas Models only), exhaust and electrical connections are complete. Plug in your dryer.
FINAL CHECK
- Make sure the dryer is plugged into an electrical outlet and is properly grounded.
• The exhaust ductwork is hooked up and the joints are taped.
• A plastic flexible duct in NOT used. - Use rigid or stiff-walled flexible metal vent material.
• The dryer is leveled and is sitting firmly on the floor.
• Gas models - the gas is turned on with no gas leakage. - Start your dryer to confirm that it runs, heats, and shuts off.
CAUTION
The burner may not ignite initially due to air in the gas line. Allowing your dryer to operate on a heat setting will purge the line. If the gas does not ignite within 5 minutes, turn your dryer off and wait 5 minutes. Be sure the gas supply to your dryer has been turned on. In order to con rm the gas ignition, check the exhaust for heat.
DOOR REVERSAL PROCEDURE
1 Make sure that the power cord is unplugged.
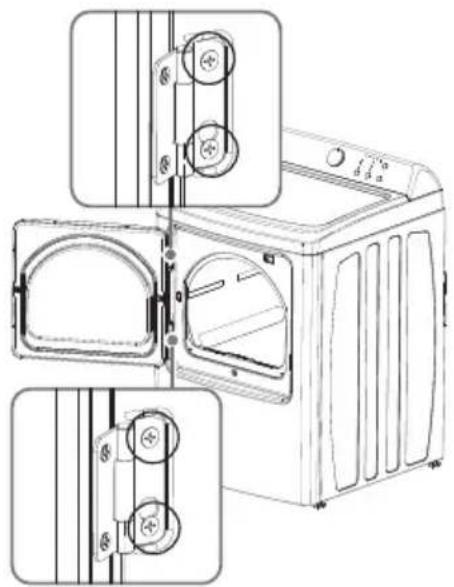
2 While supporting the door, remove the four hinge screws from the door, then lift the door to remove it and set the door aside.
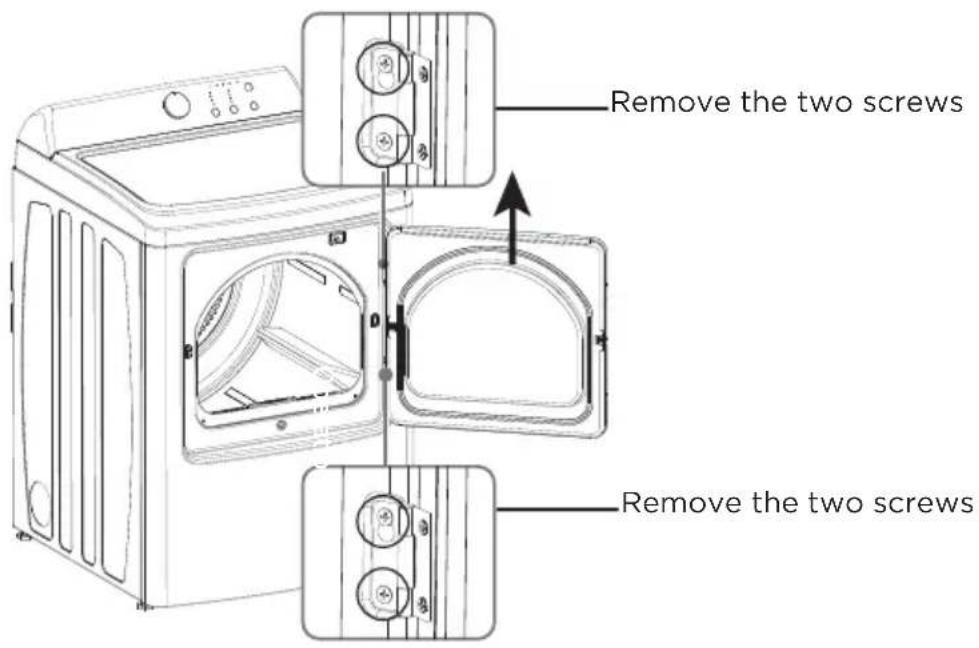
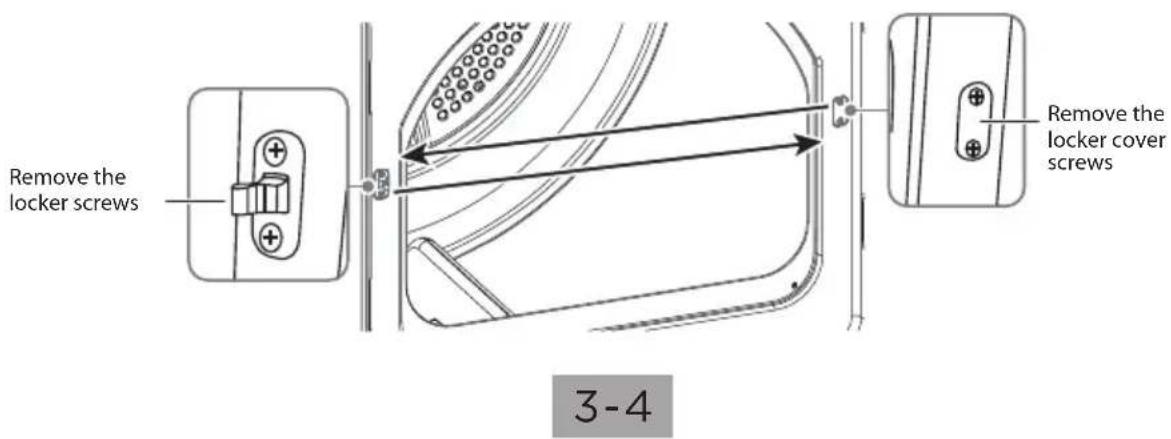
3 Remove the screws for the locker cover on the right side of the dryer and the screws for the locker cover on the left side of the dryer.
4 Install the locker onto the right side of the dryer with the screws you just removed, then install the locker cover on the left side of the dryer.
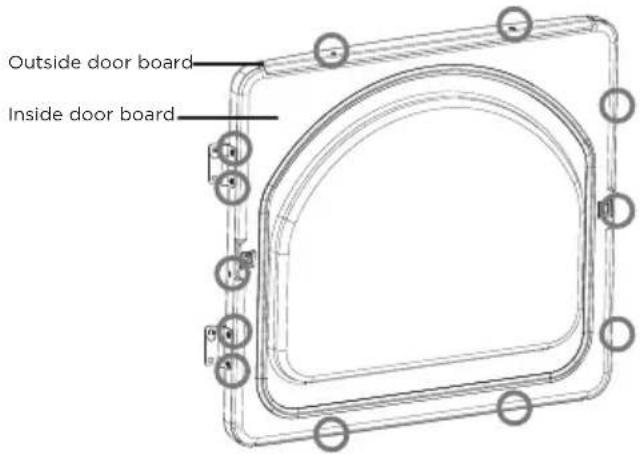
5 Remove the 12 screws around the door.
6 Pull the inside door board from the outside door board.
5-6
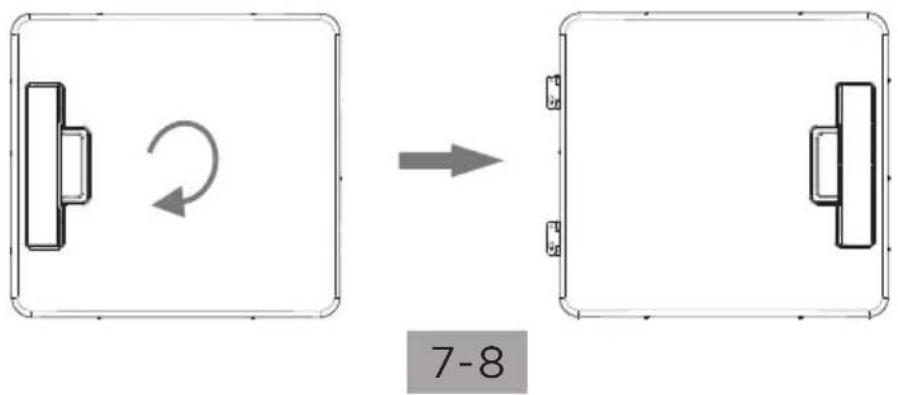
7 Rotate the outside door board 180°, then reassemble it with the inside door board with the screws you removed previously.
8 Install the hinges onto the left side of the dryer.
flowchart
graph LR
    A["Device with left-angle bracket"] -->|Rotation Arrow| B["Device with right-angle bracket"]
    style A fill:#f9f,stroke:#333
    style B fill:#bbf,stroke:#333
    note right of B "7-8"
9 Align the hinges on the door with the hinge screw holes on the front of your dryer, then secure the door with the four screws you previously removed.
natural_image
Line drawing of a microwave oven with three inset views showing internal components (no text or symbols)Your new dryer is shipped to vent to the rear. It can also be configured to vent to he bottom or left side (as seen from the front).
An Adapter kits which are standard components can be purchased from any retailer. This kit contains the necessary duct components to change the dryer vent location.
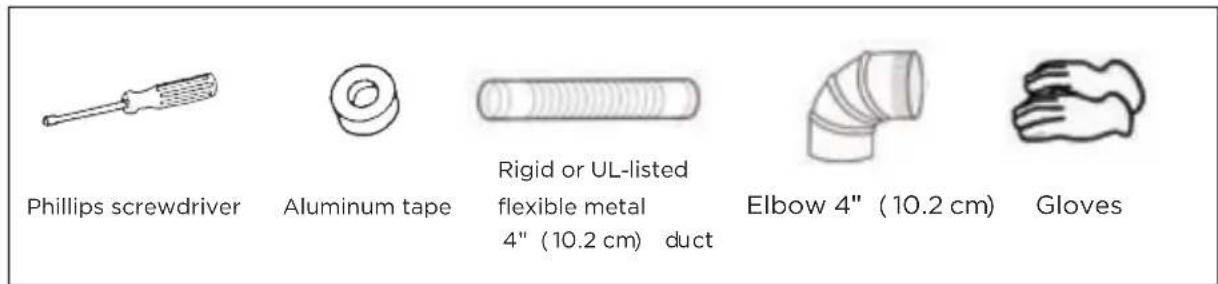
Tools and materials you will need
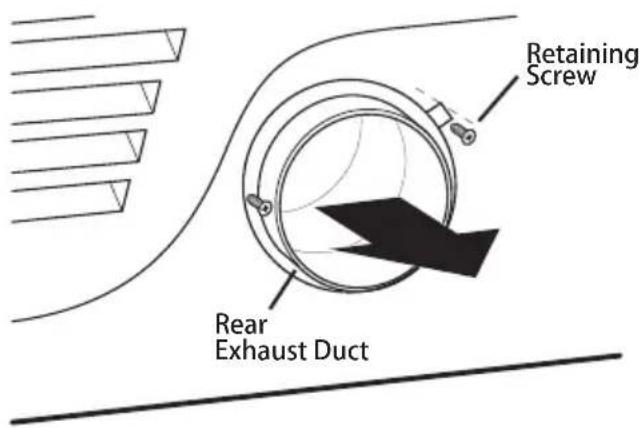
- Remove the two rear exhaust retaining screws, then pull out the exhaust duct.
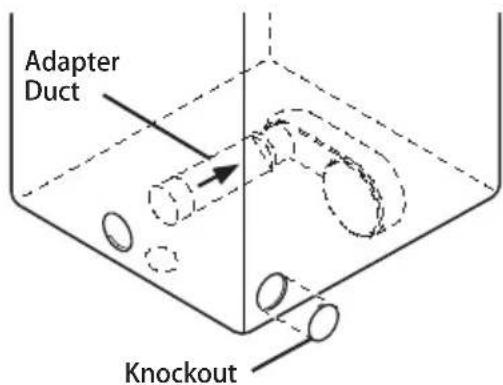
Option 1: Side venting
- Press the tabs on the knockout and carefully remove the knockout for the desired vent opening. Attach the adapter duct onto the blower housing of the dryer as shown.
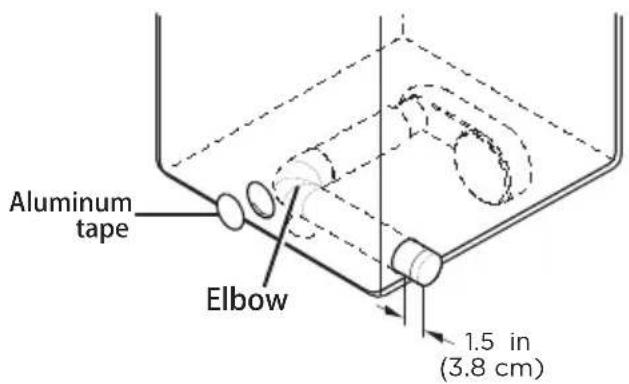
- Preassemble a 4 inches (10.2cm) elbow to the next 4 inches (10.2cm) duct section, and secure all joints with aluminum tape. Be sure that the male end of the elbow faces AWAY from the dryer.
Insert the elbow/duct assembly through the side opening and attach it onto the adapter duct.
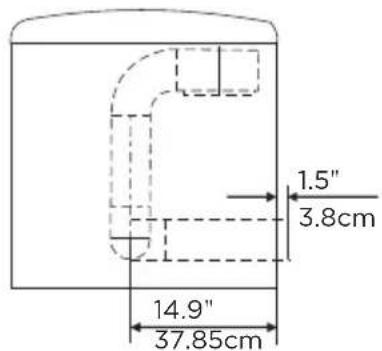
Secure in place with aluminum tape. Be sure that the male end of the duct protrudes 1.5 inches (3.8cm) to connect the remaining ductwork. Attach aluminum tape to the back of the dryer.
Option 2: Bottom venting
- Press the tabs on the knockout and carefully remove the knockout for the desired vent opening.
Attach the adapter duct onto the blower housing of the dryer as shown.
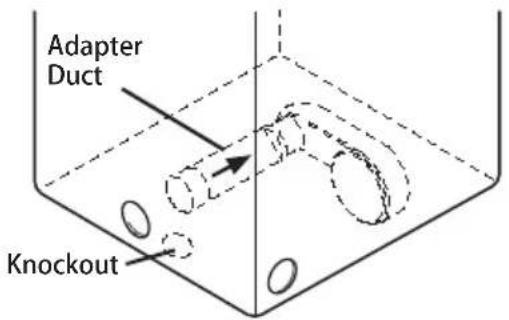
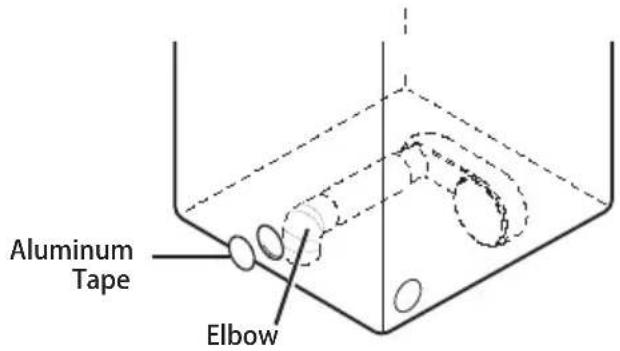
- Insert the 4 inches (10.2cm) elbow through the rear opening and attach it onto the adapter duct.
Be sure that the male end of the elbow faces down through hole in the bottom of the dryer.
Secure in place with aluminum tape.
Attach aluminum tape to the back of the dryer.
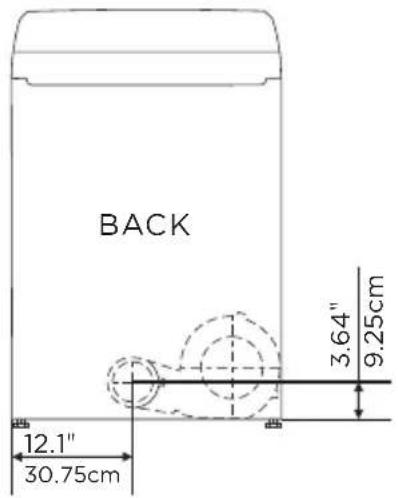
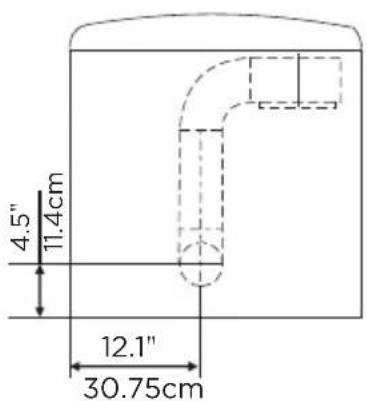
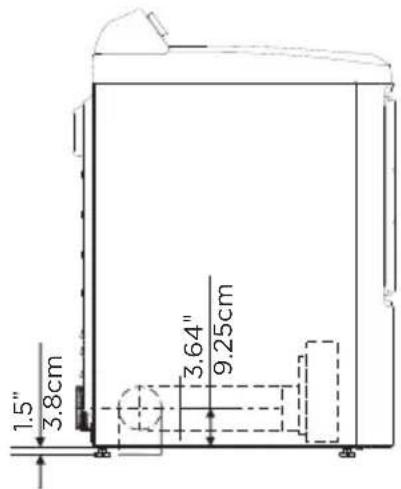
Dimensions for installation
- Rear Venting (Default)
- Side Venting
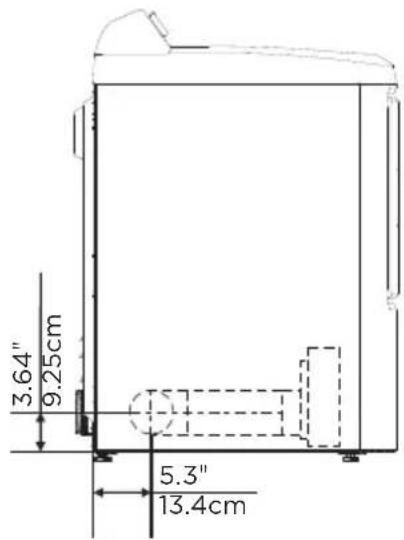
- Bottom Venting
DRYER USE
CONTROL PANEL

WARNING
To reduce the risk of re, electric shock, or injury to persons, read the IMPORTANT SAFETY INSTRUCTIONS before operating the appliance.
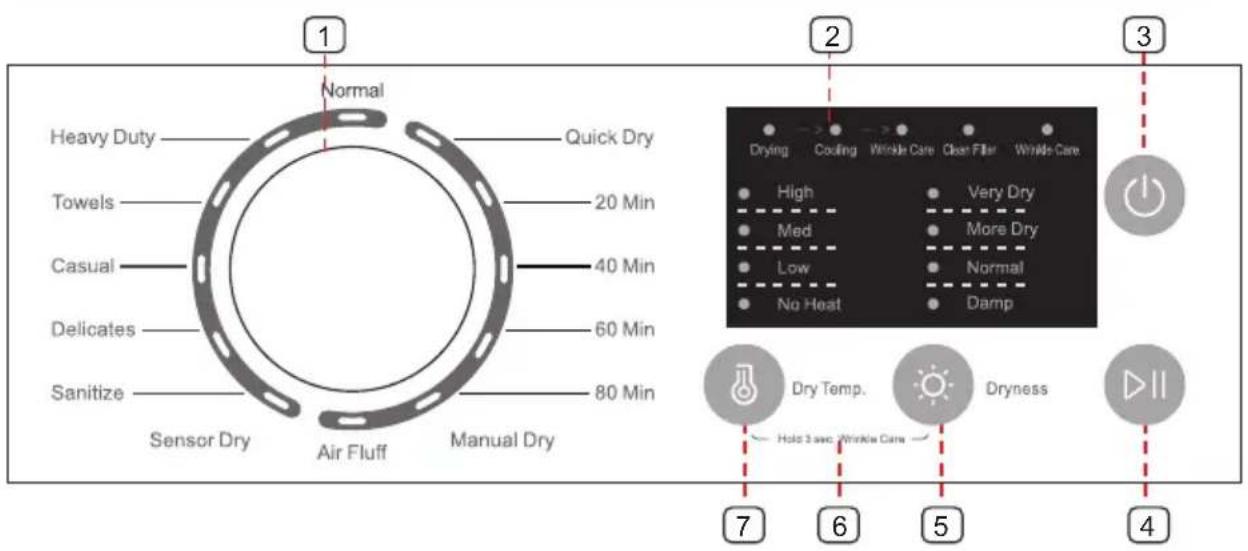
1 Cycle selector
Select your desired cycle for the type of load.
The cycle you select determines the heat control for the cycle.
The Normal, Heavy Duty, Towels, Casual, Delicates and Sanitize cycles are Sensor Dry cycles.
The Quick Dry, 20Min, 40Min, 60Min, 80Min and Air Fluff are Manual Dry cycles.
② Cycle status display
The relative indicator light will be flash when the dryer is in its drying program, other process indicators to be executed are lit.
③ POWER
Press to turn your dryer on or off. If your dryer is on for more than 10 minutes without any buttons being pressed, it automatically turns off.
4 START/PAUSE
Press to start or pause the program. You can't change any setting except add a garment.
5 Dryness
Press the button to select the dryness level. Different dryness level will result in different drying time. For clothes to be ironed manually, a lower dryness level should be selected.
6 Wrinkle Care
Press and hold the Dry Temp. and Dryness buttons at the same time for three seconds to add the Wrinkle Care step into the operating program. The “Wrinkle Care” indicator lit.
Press again to cancel selection.
Wrinkle Care provides approximately 90 minutes of intermittent tumbling in unheated air at the end of the cycle to reduce wrinkling. The load is already dry, and can be removed at any time during the Wrinkle Care cycle.
7 Dry Temp.
Press the button to select the drying temperature.
High - For sturdy cottons or those labeled Tumble Dry.
Med - For permanent press, synthetics, lightweight cottons, or items labeled Tumble Dry Medium.
Low - For lower heat than Medium to dry synthetic or washable knit fabrics.
No Heat - Provides just the air cycle without any heat.
DRYING A LOAD OF LAUNDRY
1. Power on your dryer.
- Press this Power button to power your dryer on.
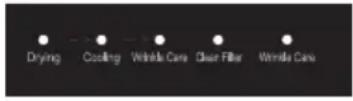
- The “Clean Filter” light in the process bar will flash 10 times when your dryer is powered on
- You should clean the filter before the dryer is loaded.
2. Load your dryer.
- Place only one wash load in your dryer at a time.
- Mixed loads of heavy and light weight fabrics will dry differently, which may result in lightweight fabrics being dry while heavy fabrics remain damp at the end of a drying cycle.
- Add one or more similar items to your dryer when only one or two articles of clothing need drying. This improves the tumbling action and drying efficiency.
- Overloading restricts tumbling action, resulting in uneven drying as well as excessive wrinkling of some fabrics.
3. Select the appropriate cycle and options for the load.
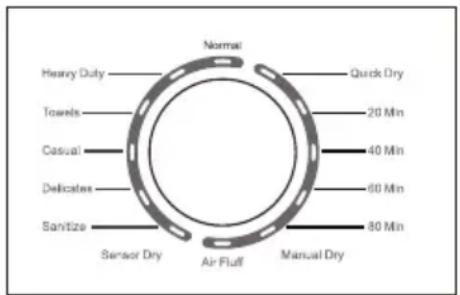
- Select the appropriate cycle by Cycle Selector according to the cycle chart on page 36.
- Select the appropriate optional function by buttons according to the chart on page 36.
4. Start your dryer.
Pressing START/PAUSE button will start the selected cycle. To PAUSE cycle press START/PAUSE button then open the door. To resume operation after closing the door always press START/PAUSE. Opening the door during the operation will instantly stop operation and will require to press START/PAUSE button to resume operation.
| Cycle | Fabric type | Dry Temp. | Dryness | WRINKLE CARE | Maximum Amount |
| Normal | Cotton Under wear Linen | High | Very Dry | Y |  |
| More Dry | |||||
| Normal | |||||
| Damp | |||||
| Heavy Duty Jeans | Corduroys Work clothes | High | Very Dry | Y |  |
| More Dry | |||||
| Normal | |||||
| Damp | |||||
| Towels | Towels Heavy cottons | High | Very Dry | Y |  |
| More Dry | |||||
| Normal | |||||
| Damp | |||||
| Casual | Wrinkle - free cottons Synthetic fabrics knits | Med | Very Dry | Y |  |
| More Dry | |||||
| Normal | |||||
| Damp | |||||
| Delicates Low | Sensitive items | Very Dry | Y |  | |
| More Dry | |||||
| Normal | |||||
| Damp | |||||
| Sanitize High | Bedding curtains | Very Dry | Y |  | |
| Quick Dry High | / | Y |  | ||
| Med | |||||
| Low | |||||
| No Heat | |||||
| 20Min | High | / | Y |  | |
| Med | |||||
| Low | |||||
| No Heat | |||||
| 40Min | High | / | Y |  | |
| Med | |||||
| Low | |||||
| No Heat | |||||
| 60Min | High | / | Y |  | |
| Med | |||||
| Low | |||||
| No Heat | |||||
| 80Min | High | / | Y |  | |
| Med | |||||
| Low | |||||
| No Heat | |||||
| Air Fluff No Heat | / | Y |  |
* Table in grey is an initial setting. "Y" are all optional functions you can select.
* For even better drying effect, please select higher dryness level.
Load Size Recommendations:
For best results, follow the wet load size recommendations noted for each cycle.

Small load: Fill the dryer drum with 3-4 items, not more than 1/4 full.

Medium load: Fill the dryer drum up to about 1/2 full.

Large load: Fill the dryer drum up to about 3/4 full. Do not overload. Items need to tumble freely.
5. Unloading your laundry.
• The dryer will beep 6 times after the cycle is done.
FILTER CLEAN
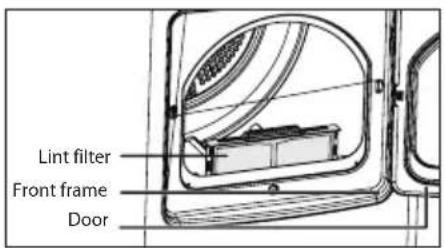
To prevent a risk of fire, make sure to clean the lint filter before or after every load.
• To shorten drying time.
• To operate more energy efficiently.
CAUTION
- Do not operate your dryer without the lint filter in place.
- Do not use a damage or broken lint filter. This may reduce performance and/or cause fire.
SPECIAL LAUNDRY TIPS
Please follow the care label or manufacturer's instructions for drying special items. If care label instructions are not available, use the following information as a guide.
| Items Drying guide | |
| Bedspreads & Comforters | Follow the care label instructions or dry in Heavy Duty cycle.Make sure the item is thoroughly dry before using or storing.May require repositioning to ensure even drying. |
| Blankets | Use the Normal cycle and dry only one blanket at a time for best tumbling action.Make sure the item is thoroughly dry before using or storing.May require repositioning to ensure even drying. |
| Curtains & Draperies | Use the Casual cycle, medium temperature and less dry to help minimize wrinkling.Dry these in small loads for best results and remove as soon as possible. |
| Cloth Diapers | Use the Normal cycle on High temperature for soft fluffy diapers. |
| Down Filled Items (jackets, sleeping bags, comforters, etc.) | Use the Normal cycle on High temperature.Add a couple of dry towels to shorten drying time and absorb moisture. |
| Foam Rubber (rug backs, stuffed toys, shoulder pads, etc.) | DO NOT dry on a heat setting. Use the Air Fluff cycle (no heat).WARNING: Drying a rubber item with heat may damage it or create a fire hazard. |
| Pillows | Use the Normal cycle.Add a couple of dry towels and a pair of clean sneakers to help the tumbling action and to fluff the item.DO NOT dry kapok or foam pillows in the dryer. You can dry these items in the dryer as long as you use the air fluff cycle. |
| Plastics (shower curtains, outdoor furniture covers, etc.) | Use the Air fluff cycle or the Time Dry cycle on the Low or Ultra Low temperature setting depending on the care label instructions. |
Items NOT to dry:
- Fiberglass items (curtains, draperies, etc.)
- Woolens, unless recommended on the label.
- Items spotted or soaked with vegetable or cooking oils.
DRYER CARE

WARNING
- Certain internal parts are intentionally not grounded and may present a risk of electric shock only during servicing. Service Personnel – Do not contact the following parts while the appliance is energized: inlet valve, control board and temperature-regulating thermistor (located on blower housing).
CLEANING AND MAINTENANCE
CONTROL PANEL
- Clean with a soft, damp cloth. Do not use abrasive substances.
- Do not spray cleaners directly on the panel.
- The control panel finish may be damaged by some laundry pretreatment soil and stain remover products. Apply such products away from your dryer and wipe up any spills or overspray immediately.
STAINLESS STEEL OR ANODIZED DRUM
- To clean the stainless steel or anodized drum, use a damp cloth with a mild, non-abrasive cleaner suitable for stainless steel and anodized surfaces.
- Remove the cleaner residue and dry with a clean cloth.
DRYER EXTERIOR
- Clean with a soft, damp cloth. Do not use abrasive substances.
- Protect the surface from sharp objects.
- Do not place any heavy or sharp objects or a detergent box on the dryer. Keep them on the purchased pedestal or in a separate storage box. This may scratch or damage the top cover of the dryer.
- Since the entire dryer has a high-gloss finish, the surface can be scratched or damaged.
- Avoid scratching or damaging the surface when using the dryer.
DRYER EXHAUST SYSTEM
- Should be inspected and cleaned yearly to maintain optimum performance.
- Disconnect the exhaust duct from the dryer and from the exhaust hood (at the exhaust outlet) outside of the building.
- Check the interior of the duct and remove any lint accumulation.
-
Be sure that lint is removed from the exhaust hood. Lint may collect in the exhaust hood so that the flappers or louvers will not open or close completely.
-
After cleaning the exhaust hood, check that the flapper or louvers move freely.
- Reassemble the exhaust duct and hood, checking that the joints are secure and sealed.
- Operate the dryer and verify that the exhaust air is not obstructed in the vent and that there are no leaks in the system.
- The outside exhaust hood should be cleaned more frequently to ensure proper operation.
TROUBLESHOOTING
CHECK THESE SOLUTIONS IF YOUR DRYER...
If your dryer has any problems as followings, you can check as the solutions listed below before making a service call. This will help you save time and money.
| Problem Solution | |
| The unit doesn’t start. | Make sure the door is latched shut.Be sure the power cord is plugged into a live electrical outlet.Check the home’s circuit breaker and fuses.Press the Start/Pause button again if the door is opened during the cycle. |
| The unit doesn’t heat. | Check the home’s circuit breaker and fuses.Select a heat setting other than Air fluff and the Temp selection is not on “No heat”On a gas dryer, check that the gas supply is on.Clean the lint filter and exhaust duct.Dryer may have moved into the cool-down process of the cycle. |
| Doesn’t dry. | Check all of the above, plus...Be sure the exhaust hood outside the home can open and close freely.Check exhaust system for lint buildup. Ducting should be inspected and cleaned annually.Use a 4” rigid metal exhaust duct.Do not overload. 1 wash load = 1 dry load.Sort heavy items from lightweight items.Large, bulky items like blankets or comforters may require repositioning to ensure even drying.Load may be too small to tumble properly. Add a few towels. |
| The unit is noisy. | Check the load for objects such as coins, loose buttons, nails, broken zips, etc. Remove promptly.It is normal to hear the dryer gas valve or heating element cycle on and off during the drying cycle.Be sure the dryer is leveled properly as outlined in the installation instruction.It is normal for the dryer to hum due to the high velocity of air moving through the dryer drum and exhaust system. |
| Clothes are unevenly dried. | Seams, pockets, and other similarly heavy areas may not be completely dry when the rest of the load has reached the selected dryness level. This is normal.Select the Extra Dry setting if desired.If one heavy item is dried with a lightweight load, such as one towel with sheets, it is possible that the heavy item will not be completely dry when the rest of the load has reached the selected dryness level.Sort heavy items from lightweight items for best drying results. |
| Shuts off before load is dry. | Dryer load is too small. Add more items or a few towels and restart the cycle.Dryer load is too large. Remove some items and restart the dryer. |
| The unit has a special odor. | Household odors from painting, varnishing, strong cleaners, etc. may enter the dryer with surrounding room air. This is normal as the dryer draws the air from surrounding air space of the dryer locations.When these odors linger in the air, ventilate the room completely before using the dryer. |
| Odors remain in clothing after refresh | Fabrics containing strong odors should be washed utilizing desired wash cycle. |
| Garments still wrinkled after Wrinkle-prevent | Small loads of 1 to 4 items work best.Load fewer garments. Load similar-type garments. |
| Lint on clothes | Clean lint filter before every cycle.Some fabrics are lint producers (for example, a fuzzy white cotton towel) and they should be dried separately from clothes that are lint trappers (for example, a pair of lack linen pants).Divide larger loads into smaller loads for drying.Check pockets thoroughly before washing and drying clothes. |
ERROR CODES
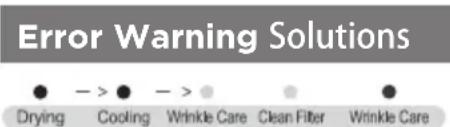 | Possible Cause | |
 | The PCB failed. | Call the service center for help do not use dryer. |
 | The humidity sensor failed. | The unit will complete the current operating cycle but garments could be over dried.The unit can still operate under the Time Cycles.Call the service center for help. |
 | ||
 | The temperature sensor failed. | Call the service center for help do not use dryer. |
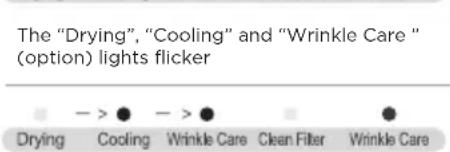
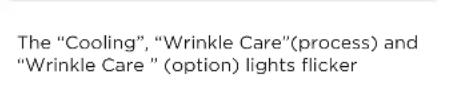
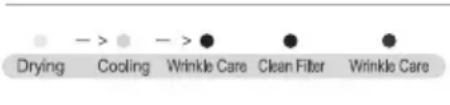
| The “Wrinkle Care”(process), “Clean Filter” and “Wrinkle Care” (option) lights flicker |
The "Wrinkle Care" (process), "Clean Filter" and "Wrinkle Care" (option) lights flicker
*When error happening, the buzzer will beep 5 seconds and repeat once per 15 minutes. After 24 hour, machine will power off automatically.
APPENDIX
FABRIC CARE CHART
The following symbols provide garment care direction. The Clothing care labels include symbols for washing, bleaching, drying and ironing, or dry cleaning when necessary. The use of symbols ensures consistency among garment manufacturers of domestic and imported items. Follow care label directions to maximize garment life and reduce laundering problems.
| Wash Cycle Special Instructions | Warning Symbols for Laundering | ||||
 | Normal |  | Line Dry/Hang to Dry |  | Do Not Wash |
 | Permanent Press / Wrinkle Resistant / Wrinkle Control |  | Drip Dry Do Not Wear |  | |
 | Gentle/Delicates Dry |  | Do Not Bleach |  | |
 | Hand Wash Heat Set |  | Do Not Tumble Dry |  | |
| Water Temperature** |  | High |  | No Steam (added to iron) | |
 | Hot Medium Do Not Ir |  |  | ||
 | Warm Low Dryclean |  | |||
 | Cold Any Heat Dry Cle |  |  | ||
| Bleach No Heat/ Air Do Not |  | Clean |  | ||
 | Any Bleach (when needed) |  | -Dry or Steam temperatures |  | Line Dry/ Hang to Dry |
 | Only Non-Chlorine (color-safe) Bleach (when needed) |  | High |  | Drip Dry |
 | Tumble Dry Cycle |  | Medium Dry Flat |  | |
| Normal |  | Low |  | ||
 | Permanent Press / Wrinkle Resistant / Wrinkle Control |  | For machine-washable wool. Loads should be under 8 pounds. |    | |
 | Gentle/ Delicates | ||||
**The number of dots represent appropriate wash water temperatures for various items. The temperature range for Hot is 105^ -125° F/41° -52° C, for Warm 85^ -105° F/29° -41° C and for Cold 60^ -85° F/16° -29° C.
LEGAL NOTICES
ELECTRICAL INFORMATION
THIS APPLIANCE MUST BE GROUNDED.
This appliance is fitted with a plug suitable for use in all houses fitted with sockets to current specifications.
If the fitted plug is not suitable for your socket outlets, it should be cut off and carefully disposed of. To avoid a possible shock hazard, do not insert the discarded plug into a socket.
This appliance complies with the following EEC Directives:
2014 / 35/ EU (Low Voltage Directive)
2014 / 30/ EU (EMC Directive).
WARRANTY
This Product (including any accessories included in the original packaging) as supplied and distributed in new condition, is warranted by Element Appliance Company, LLC ("Element") to the original customer who purchases the Product from an authorized Element retailer (the "Original Customer" or "you") against defects in material and workmanship under proper use, maintenance, and care according to the owner's manual, warnings, and instructions accompanying the Product ("Warranty") as follows:
* PLEASE NOTE – Proof of purchase evidencing the date of purchase by the Original Purchaser from an authorized Element retailer ("Valid Proof of Purchase") is required for all Warranty service. The express Warranty set forth herein is subject to all terms and conditions set forth below.
CORRECT DISPOSAL OF THIS PRODUCT
Old appliances still have some residual value. An environmentally friendly method of disposal will ensure that valuable raw materials can be recovered and used again.

This marking indicates that this product should not be disposed with other household wastes throughout the US. To
prevent possible harm to the environment or human health from uncontrolled waste disposal, recycle it responsibly to promote the sustainable reuse of material resources. To return your used device, please use the return and collection systems or contact the retailer where the product was purchased. They can take this product for environmentally safe recycling.
1. WARRANTY SERVICE:
A. ONE-YEAR WARRANTY: Except as provided in subpart 1.B below, for a period of one (1) year from the date of purchase by the Original Customer (the "Warranty Period"), if the parts or components covered by this Warranty are determined by Element or Element's authorized service provider to be defective in material or workmanship, Element will, at its sole and absolute discretion and option: (i) repair the defective part or component at no charge to the Original Customer, (ii) replace the defective Product with a new Product of similar or better quality, at no charge to the Original Customer, or (iii) refund the documented purchase price paid by the Original Customer (excluding tax) to the Original Customer upon return of the defective Product as directed by Element. After the Warranty Period expires, the Original Customer must pay for all parts, components, shipping and handling, labor, and replacement costs associated with the Product or any part or component thereof.
regardless of any defects in the Product or any part or component thereof.
B. LIMITED EXTENDED WARRANTY THROUGH PRODUCT REGISTRATION: If and only if the Original Customer registers the Product at www.elementetelectronics.com within ninety (90) days of the date of purchase by the Original Customer, then the Warranty Period discussed in subpart 1.A. above shall be extended an additional one (1) year to a new Warranty Period equaling two (2) years from the date of purchase by the Original Customer. If the Product is not registered as provided for in this subpart 1.B, then the standard one-year Warranty Period set forth in subpart 1.A shall apply.
C. TIMING AND PROCEDURE: Before Warranty service can commence, the Original Customer must contact either (i) the retailer from whom the Original Customer purchased the Product, or (ii) Element directly, in either case for problem determination and service procedures. Valid Proof of Purchase evidencing that the Product is within the Warranty Period MUST be presented by Original Customer in order to obtain the requested Warranty service. Please have your model and serial number available, along with your date of purchase of the Product. To remain eligible for Warranty service, Original Customer may not return the Product or any part or component thereof to the retailer or Element without Element's prior written consent.
2. EXCLUSIONS AND LIMITATIONS TO WARRANTY SERVICE
The Warranty covers manufacturing defects in materials and workmanship of the Product encountered in the normal, non-commercial use of the Product, and does not cover (a) damages or malfunctions resulting from improper or unreasonable use or maintenance, abuse, negligence, failure to follow instructions contained in any written materials that accompany the Product, deterioration by reason of excess moisture, corrosive atmosphere, lightning, power surges, connections to improper voltage supply, unauthorized
alteration, or other external causes such as extremes in temperature or humidity, modifications, scratches or discoloration; (b) improper or incorrectly performed repairs by service providers not authorized by Element; (c) transportation, shipping, delivery, pickup, insurance, installation, or set-up costs; (d) ordinary wear and tear, cosmetic damage, or damage due to acts of nature, including but not limited to, water, floods, wind, storm, tornado, earthquake, or fire, or due to damage caused by extraordinary impact events, such as dropping, crushing, demolition or other extraordinary damage;
(e) commercial use of the Product, or use of the Product for anything other than single-family household or residential use; or (f) modification of the Product or any part of the Product.
This Warranty is made to the Original Customer only and does not cover Products sold AS IS or WITH ALL FAULTS. The Warranty is invalid if the factory-applied serial number has been altered or removed from the Product. This Warranty is valid only in the United States, and only applies to Product if it was purchased and serviced in the United States. The addition of equipment or features to the Product that are not manufactured or recommended by Element could affect the intended function of the Product, and therefore may void the Warranty. Furthermore, the exposure of the Product to chemicals, heat, cold, humidity, or other elements can affect the Product components, and therefore, the Warranty does not cover discoloration, fading, cosmetic changes, rust, or any damages or failure related to any such items. The Warranty is contingent upon the proper use, maintenance, and care of the Product. The Warranty may be void if the Product has been used in a manner contradictory to, or in violation of, the terms of the user's manual, warnings, or instructions accompanying the Product.
THIS WARRANTY IS MADE IN LIEU OF AND SUPERSEDES ALL OTHER WARRANTIES OR CONDITIONS OF MERCHANTABILITY OR FITNESS FOR A PARTICULAR PURPOSE OR GENERAL USE, WHETHER EXPRESS, IMPLIED, COLLATERAL,

element®
STATUTORY, OR PROVIDED BY COMMON LAW, THE UNIFORM COMMERCIAL CODE, OR OTHERWISE. ELEMENT FURTHER DISCLAIMS ALL WARRANTIES AFTER THE END OF THE WARRANTY TERM DEFINED ABOVE. NO OTHER EXPRESS WARRANTY OR GUARANTY GIVEN BY ANY OTHER PERSON, FIRM, OR ENTITY WITH RESPECT TO THE PRODUCT SHALL BE BINDING ON ELEMENT. REPAIR, REPLACEMENT, OR REFUND OF THE ORIGINAL PURCHASE PRICE, AT ELEMENT'S SOLE DISCRETION, ARE THE EXCLUSIVE REMEDIES OF THE CUSTOMER.
ELEMENT SHALL NOT BE LIABLE FOR ANY INCIDENTAL OR CONSEQUENTIAL DAMAGES CAUSED BY THE USE, MISUSE, OR INABILITY TO USE THE PRODUCT. THESE INCLUDE, BUT ARE NOT LIMITED TO, ANY DAMAGES IN THE FORM OF LOST PROFITS, LOSS OF USE, LEGAL FEES, ECONOMIC LOSS, PERSONAL INJURIES, OR ANY OTHER DAMAGES CAUSED BY CIRCUMSTANCES BEYOND THE CONTROL OF ELEMENT. NOTWITHSTANDING THE FOREGOING, ELEMENT'S AGGREGATE LIABILITY TO ANY CUSTOMER SHALL NOT EXCEED THE ORIGINAL PURCHASE PRICE OF THE PRODUCT. THIS WARRANTY SHALL NOT EXTEND TO ANYONE OTHER THAN THE ORIGINAL CUSTOMER WHO PURCHASED THE PRODUCT, AND IS NOT TRANSFERRABLE. NO PERSON IS AUTHORIZED TO ALTER, EXTEND, OR WAIVE THIS WARRANTY OR ANY OF ITS TERMS OR CONDITIONS.
Some states do not allow the exclusion or limitation of incidental or consequential damages, or allow limitations on warranties, so the above limitations or exclusions may not apply to you. This Warranty gives you specific rights, and you may have other rights, which vary from state to state. The exclusions and limitations to the Warranty apply to the maximum extent permitted by law and unless restricted or prohibited by law. Where any term of this Warranty is prohibited by applicable law, it shall be null and void, but the remainder of this Warranty shall remain in effect.
PLEASE CONTACT THE RETAILER FROM WHOM YOU PURCHASED THE PRODUCT FOR CUSTOMER SERVICE OR TO CONFIRM PROCEDURES FOR WARRANTY SERVICE.
In the event you wish to contact Element, please direct all correspondence to:
Element Appliance Company, LLC
customerservice@elementelectronics.com
888-842-3577
https://elementelectronics.com/appliances
element®
element®
element®

element®
Element, the Element Logo, and Bring it home are trademarks of Element Brand Holding, LLC. All other trademarks are the property of their respective owner, who has not sponsored, endorsed, or approved this product. ©2023 Element Appliance Company, LLC. All rights reserved.
Distributed by Element Appliance Company, LLC Augusta, GA 30909
For service, support and warranty information: Call 888.842.3577, email us at customerservice@elementelectronics.com or visit www.elementetelectronics.com
- DRYER SAFETY 4
- OPERATION REQUIREMENTS......8
- PARTS AND FEATURES ....19
- INSTALLATION INSTRUCTIONS ....20
- DRYER USE....33
- DRYER CARE....39
- TROUBLESHOOTING 40
- APPENDIX 43
- WARRANTY....44
- READ AND KEEP THESE INSTRUCTIONS FOR FUTURE REFERENCE
- DRYER SAFETY
- YOUR SAFETY AND THE SAFETY OF OTHERS ARE VERY IMPORTANT
- WARNING
- Fire Hazard
- What to do if you smell gas:
- IMPORTANT SAFETY INSTRUCTIONS
- To reduce the risk of fire or explosion
- CAUTION
- SAVE THESE INSTRUCTIONS
- THIS APPLIANCE IS FOR HOUSEHOLD USE ONLY
- IMPORTANT TO INSTALLER
- BASIC REQUIREMENTS
- Make sure you have everything necessary for the proper installation.
- LOCATION REQUIREMENTS
- ALCOVE OR CLOSET OR WALL INSERT/RECESSED INSTALLATIONS
- NOTE:
- DUCTING REQUIREMENTS
- Manometer measurements
- The correct exhaust installation is YOUR RESPONSIBILITY.
- EXHAUSTING REQUIREMENTS
- NEVER USE A PLASTIC OR NON-METAL FLEXIBLE DUCT
- GAS REQUIREMENTS
- COMMONWEALTH OF MASSACHUSETTS INSTALLATION INSTRUCTIONS
- ELECTRIC REQUIREMENTS
- Electrical connections
- Gas models - U.S. and Canada
- Electric models - U.S. only
- Electrical Shock Hazard
- Electric models - Canada only
- GROUNDING
- Gas and Electric models
- Gas models
- Electric models
- INSTALLATION INSTRUCTIONS
- REMOVING FROM THE PACKAGE
- TOOLS REQUIRED
- INSTALL THE EXHAUST SYSTEM
- CONNECT THE ELECTRICAL WIRING
- THREE WIRE OUTLET
- 3-Wire system connections
- FOUR WIRE OUTLET
- 4-Wire system connections
- 4-wire system instructions:
- LEVEL THE DRYER
- POWER ON
- FINAL CHECK
- DOOR REVERSAL PROCEDURE
- Tools and materials you will need
- Option 1: Side venting
- Option 2: Bottom venting
- Dimensions for installation
- DRYER USE
- CONTROL PANEL
- Cycle selector
- ② Cycle status display
- ③ POWER
- START/PAUSE
- Dryness
- Wrinkle Care
- Dry Temp.
- DRYING A LOAD OF LAUNDRY
- Power on your dryer.
- Load your dryer.
- Select the appropriate cycle and options for the load.
- Start your dryer.
- Unloading your laundry.
- FILTER CLEAN
- SPECIAL LAUNDRY TIPS
- DRYER CARE
- CLEANING AND MAINTENANCE
- STAINLESS STEEL OR ANODIZED DRUM
- DRYER EXTERIOR
- DRYER EXHAUST SYSTEM
- TROUBLESHOOTING
- CHECK THESE SOLUTIONS IF YOUR DRYER...
- ERROR CODES
- APPENDIX
- FABRIC CARE CHART
- LEGAL NOTICES
- ELECTRICAL INFORMATION
- WARRANTY
- CORRECT DISPOSAL OF THIS PRODUCT
- WARRANTY SERVICE:
- EXCLUSIONS AND LIMITATIONS TO WARRANTY SERVICE
- element®
Brand : Element
Model : EATDE2767CW
Category : Tumble drier