ED15 - Lighting Eliminator Lighting - Free user manual and instructions
Find the device manual for free ED15 Eliminator Lighting in PDF.


| Product Type | 4 Channel Professional Digital Dimmer Pack |
| Dimensions | 261 x 173 x 62 mm |
| Weight | Approx. 1.7 kg |
| Power Input | AC 120V~ 50-60Hz, 15A max |
| Channel Output | 5A per channel, total 15A max |
| Fuse (Overload Protection) | Four F6A 250V 5x20mm fuses |
| Fuse (Electronic) | One F1A 250V 5x20mm fuse |
| Control Interfaces | DMX and Analog Input/Output |
| Built-in Programs | 16 programs with single/loop programming |
| Operating Modes | Auto, Audio, Slave, and Dimmer/Switch per channel pair |
| Audio Sensitivity | Adjustable via knob |
| Ropelight Connection | Yes, via dedicated connector |
| Indicators | Power, DMX signal, and per channel (1-4) LEDs |
| Power Switch | On/Off with indicator |
| Mounting | Designed to be hung with suitable clamp and safety cable |
| Safety | Must be earthed; no user-serviceable parts; operate only by adults |
| Maintenance | Clean with dry cloth; do not allow liquids or metal objects inside |
| Spare Parts | Fuses (F6A/F1A) are replaceable; contact dealer for others |
| General Information | Compact and dependable design for entertainment and lighting industry |
Frequently Asked Questions - ED15 Eliminator Lighting
User questions about ED15 Eliminator Lighting
0 question about this device. Answer the ones you know or ask your own.
Ask a new question about this device
Download the instructions for your Lighting in PDF format for free! Find your manual ED15 - Eliminator Lighting and take your electronic device back in hand. On this page are published all the documents necessary for the use of your device. ED15 by Eliminator Lighting.
USER MANUAL ED15 Eliminator Lighting
Eliminator® LIGHTING
ED15
4 Channel Dimmer Pack
USER'S MANUAL
Thank you for your purchase of this product by Eliminator. This ED15 unit features include:
■ 4 channel professional digital dimmer pack, dual Edison sockets per channel.
■ 16 built-in programs, single/loop programming available.
■ SLAVE, AUTO and AUDIO function mode available.
■ DMX & Analog Input/Output connector.
All four channels are user assignable between Dimmer and Switch modes.
■ Ropelight connection provided.
■ Audio sensitivity adjusting knob.
■ DMX address setting available.
■ "on" / "off" power switch with power indicator.
■ LED-indicators for 1-4 Channels.
■ Four 6A fuses for overloading protection, 250V 5x20mm.
Every effort has been made to design dependability, reliability and comfort into each unit. New products are being designed constantly to meet the needs of both entertainment and the lighting industry. We welcome your comments about our product and services.
It is both a privilege and a pleasure serving you.
This is a compact 4-channel dimmer pack with some useful functions. To optimize the performance of this product, please read this manual carefully to familiarize yourself with the basic operations. This manual contains important information for user, please keep it well for future reference.

Warnings
• This unit must be earthed.
- Do not make any inflammable liquids, water or metal objects enter the unit.
- There are no user serviceable parts inside.
- Do not attempt to dismantle or modify the unit.
- Any strong shocks or vibration may result in malfunction.
• Repairs must be done by authorized personnel.
- This unit must be operated by adults, do not allow children to play with it.

Cautions
- When unpacking, please check the unit is not damaged. Should something wrong happen to this product, contact the local dealer immediately.
- All rights reserved. No part of the manual included with this product may be reproduced, transmitted, transcribed or translated into any language in any form, by any means, without authorized permission.
Notice:
Specifications and improvements in the design of this product and the manual are subject to change without any prior notice.
1. Front View
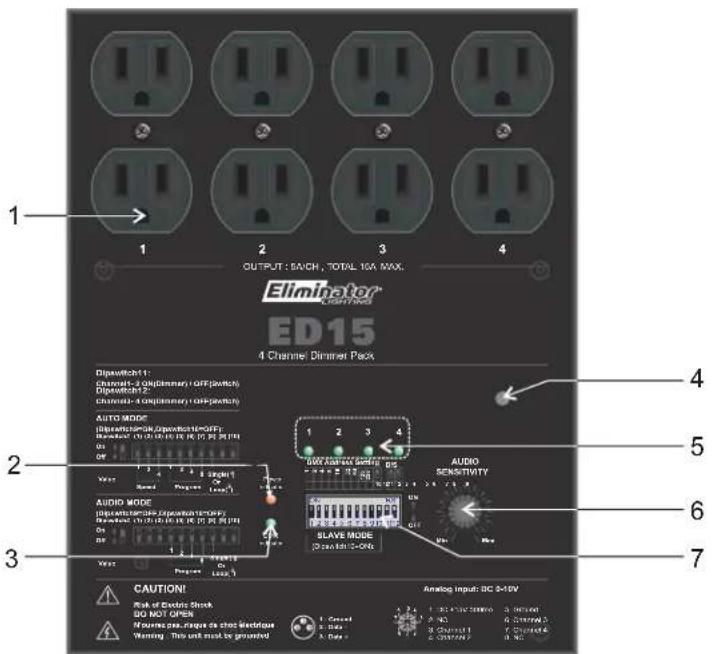
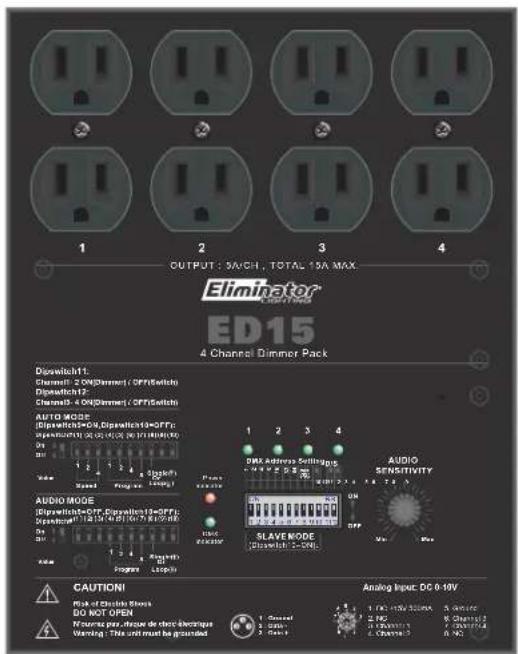
1. Output:
There are 4 dual Edison sockets for channel output. Up to 5amps can be connected to each channel.
2. Power indicator:
When this unit is powered on, this LED-indicator will be lit.
3. DMX indicator:
When there is any DMX signal input, this LED-indicator will be lit.
4. Mic:
With a built-in microphone inside this hole.
5. Channel indicators 1-4:
To indicate the input of 1-4 channels respectively.
6. Audio sensitivity adjusting knob:
To adjust the audio sensitivity level as user's desire.
7. Dip-switches 1-12:
To select desired function mode or set relevant parameters by using these dip-switches (see the operation guide for details).
2. Side View
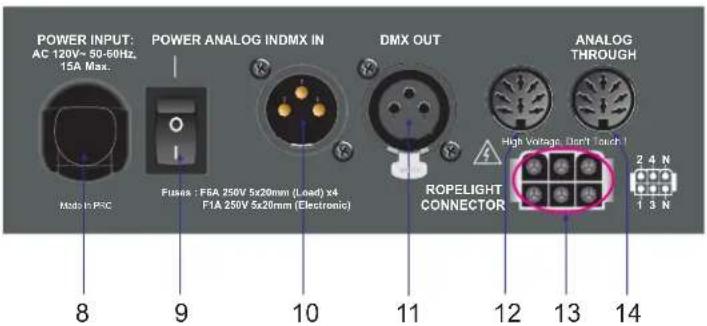
- Power input:
AC 120V\~50-60Hz, 15A Max.
- Power switch:
To turn on or turn off the main power.
- DMX IN:
To input DMX signal via this connector.
- DMX OUT:
To output DMX signal via this connector.
- Analog In:
To input analog signal via this connector.
- Analog Through:
To send out analog signal through this connector.
- Ropelight connector:
Used to connect with the rope lights.
1. Dimmer/Switch Mode(dip-switch 11/12=ON)
Push the dip-switch11 to the "ON" position to make the unit into Dimmer Mode for Channel1\~2, the "OFF" position into Switch Mode.(Dimmer=Dimming Enable, Switch=Dimming Disable). And push the dip-switch12 to the "ON" position to make the unit into Dimmer Mode for Channel 3\~4, the "OFF" position into Switch Mode.
Dipswitch# (11) (12)
On
Off

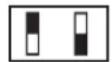
D=Dimmer Mode
S=Switch Mode
2. Slave Mode (dip-switch10=ON)
Push the dip-switch10 to the "ON" position to make the unit into Slave mode.
As the above illustration shows, user can use dip-switches1-9 to set relevant DMX address. When having finished your setting, add up all the values of the ON-switched dip-switches, the added value is the current DMX address.
For example: If you push dip-switch1, dip-switch3 and dip-switch5 to their "ON" positions, the current DMX address level is 21(1+4+16).
3. Auto Mode (dip-switch9=ON & dip-switch10=OFF)
Push the dip-switch10 to the "OFF" position and push the dip-switch9 to the "ON" position to make the unit into Auto mode.
As the above illustration shows, in Auto mode, dip-switch9 is "on", and dip-switch10 is "off". Dip-switches1-3 are used to select the Speed level, Dip-switches4-7 are used to select the Program, Dip-switch8 is used to select Single programming or Loop programming (16 programs in a loop).
4. Audio Mode (dip-switch9=OFF & dip-switch10=OFF)
Push dip-switch9 and dip-switch10 to the "OFF" position to make the unit into Audio mode.
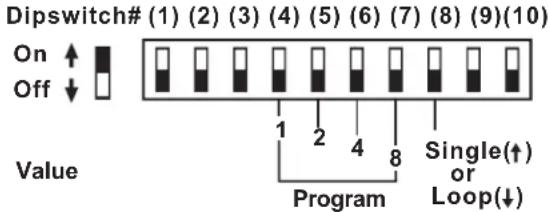
As the above illustration shows, dip-switch9 and dip-switch10 are switched to the "off" position in Audio mode. Chasing speed is controlled by the bass music effect, Dip-switches4-7 are used to select the Program, Dip-switch8 is used to select the Single programming or Loop programming (16 programs in a loop).
5. Notice Information
- When in link, only one ED15 unit can work in the Auto mode or Audio mode, the other connected units in link must be operated in the Slave mode.
- Other types of DMX receiver should not be connected into the linked ED15 units, or something wrong will occur to the connected DMX receiver.
- When each linked ED15 unit has received the linking signal or the DMX signal, the corresponding LED-indicator will blink in time. When the signal go out, the corresponding LED-indicator will go out subsequently.
- This unit has been designed to be hung. It is recommended that, for safety purpose, the unit should be properly mounted using a suitable hanging clamp and safety cable.
- The printings on the front panel of the unit give user important information for reference.
Technical Specifications
Power Input ......AC 120V\~50-60Hz, 15A max.
Channel Output 5A/CH., Total 15A max.
Fuse (loading) ......F6A 250V 5x20mm(x4)
Fuse (electronic) F1A 250V 5x20mm
Dimensions 261x173x62mm
Weight(approx.) 1.7 kg
- Eliminator® LIGHTING
- ED15
- Channel Dimmer Pack
- USER'S MANUAL
- Warnings
- Cautions
- Notice:
- Front View
- Output:
- Power indicator:
- DMX indicator:
- Mic:
- Channel indicators 1-4:
- Audio sensitivity adjusting knob:
- Dip-switches 1-12:
- Side View
- Dimmer/Switch Mode(dip-switch 11/12=ON)
- Slave Mode (dip-switch10=ON)
- Auto Mode (dip-switch9=ON & dip-switch10=OFF)
- Audio Mode (dip-switch9=OFF & dip-switch10=OFF)
- Notice Information
- Technical Specifications
Brand : Eliminator Lighting
Model : ED15
Category : Lighting