
Mistral - Hand blender Becken - Free user manual and instructions
Find the device manual for free Mistral Becken in PDF.


| Product Type | Cooker Hood (Extractor Hood) |
| Brand | Becken |
| Model | Mistral |
| Mounting Type | Wall-mounted |
| Ventilation Type | Exhausting (external duct) or Recirculating (carbon filter) |
| Number of Speeds | 3 (Low, Medium, High) |
| Lighting | LED/Low voltage 12V lamp |
| Filter Type | High-density stainless steel grease filter |
| Control Type | LCD touch buttons |
| Timer Function | Yes, 1-60 minutes auto shut-off |
| Clock Display | 24-hour clock with blue backlight |
| Installation Height | 65-75 cm above cooking surface |
| Width (Approx.) | 90 cm |
| Depth (Approx.) | 50 cm |
| Weight (Approx.) | 15 kg |
| Power Supply Voltage | 220-240 V, 50 Hz |
| Power Consumption (Approx.) | 150 W (motor + light) |
| Noise Level (Approx.) | <65 dB |
| Grease Filter Cleaning | Hand wash or dishwasher (60°C) |
| Carbon Filter (Optional) | Replaceable, for recirculation mode |
| Safety Features | Child lock (not specified), auto shut-off timer |
| Warranty | 2 years for manufacturing defects |
Frequently Asked Questions - Mistral Becken
User questions about Mistral Becken
0 question about this device. Answer the ones you know or ask your own.
Ask a new question about this device
Download the instructions for your Hand blender in PDF format for free! Find your manual Mistral - Becken and take your electronic device back in hand. On this page are published all the documents necessary for the use of your device. Mistral by Becken.
USER MANUAL Mistral Becken
Instructions' Manual
Campana Extractora
We thank you for purchasing this product.
This appliance was submitted to several laboratorial tests, which certify its quality. To simplify the use of this appliance, this instruction manual has been provided. The instructions must ensure a quick and safe use.
Please read carefully the instructions and safety measures described in this manual.
We wish our clients great satisfaction in using their new appliance.
Index
- Safety Instructions 04
1.1. Power Supply 05
1.2. Power Cord and Other Cables 05
1.3. Humidity and Water 05
1.4. Cleaning 06
1.5. General Precautions 06
- Use and Operation 07
2.1. Product Description 07
2.1.1.Installation Instructions 07
2.1.2.Installation 08
2.2. Operating Instructions 09
2.2.1. LCD Display 09
2.3. Maintenance 10
2.4. Troubleshooting 11
-
Customer Service 12
-
Protection of the Environment 13
1. Safety Instructions
 | ATTENTION |  |
| Risk of Electric ShockDo Not Open | ||
| Attention: to avoid the risk of electric shock, do not remove the cover. The interior does not contain any parts that may be repaired by the user. Ask for assistance to qualified personnel. | ||
Important Warnings
Before using your appliance read this instruction manual carefully and keep it in a safe place as you may need to consult it in the future.
Before powering on your appliance, and to ensure correct use, do not use it if:
- It has fallen on the ground;
- You notice any evidence of damage;
- Any anomaly occurs during its operation.
To avoid hazards and deterioration of your appliance through incorrect use it is advisable to read the instructions carefully and attentively.
Your appliance must not be used for other purposes than those described in the instruction manual. Safety is only guaranteed for household use and not for commercial use. Incorrect use is not covered and automatically voids the warranty.
Assistance
If there is a malfunction take your appliance to a qualified technician for assistance.
This appliance can be used by children from 8 years old and above and persons with reduced physical, sensory or mental capabilities or lack of experience and
knowledge if they have been given instruction concerning use of the appliance in a safe way and understand the hazards involved. Children shall not play with the appliance. Cleaning and maintenance shall not be made by children without supervision.
These instructions are also available on www.suporteworten.pt
1.1. Power Supply
Make sure the mains voltage is compatible with the appliance voltage. If this is not the case consult the vendor or Customer Support Service.
1.2. Power Cord and Other Cables
Turn off the device when not in use.
Do not roll up or pull the cord to disconnect the appliance, and do not use it to twine the appliance. Keep the cord away from warm surfaces.
Never use the appliance if it has a damaged cable or socket, or if it is not working properly.
If the power cord is damaged, do not use your appliance. Take it to technical assistance for replacement.
1.3. Humidity and Water
Do not use your appliance in humid places. Do not allow the appliance to become wet under any circumstances as this may be dangerous. TO AVOID FIRE HAZARD OR ELECTRIC SHOCK DO NOT EXPOSE YOUR APPLIANCE TO HUMIDITY OR WATER. Do not place your appliance under water (for example to wash it).
BECKEN®
1.4. Cleaning
Before cleaning, always ensure that you have switched your cooker hood off. Do not use abrasive detergent for it will damage the hood.
Clean the cooker hood according to the instruction manual and avoid all risks of the cooker hood burning.
The cooker hood and its filter mesh should be cleaned regularly in order to keep it in good working order.
1.5. General Precautions
- In order to get the most out of your cooker hood, carefully read the following important information regarding installation
read the following import safety and maintenance.
- Keep this information booklet accessible for further consultations.
- Before installation and use, read all the instructions and make sure that the voltage (V) and the frequency (Hz) indicated on your cooker hood are exactly the same as the voltage (V) and the frequency (Hz) in your home.
- The appliance has been designed as an exhausting version (external exhaust) or as a filter version (internal air recycling) cooker hood.
- Take care when the cooker hood is operating simultaneously with an open fireplace or burner that depends on the environment and are supplied by other than electrical energy, as the cooker hood removes the air from the environment which a burner or fireplace need for combustion.
- Provide adequate ventilation in the environment for a safe operation of the cooker hood.
- Follow the local laws applicable for external air evacuation.
- Your cooker hood is for domestic use only; it is not suitable for barbecue, roast shop or other commercial use.
- Any installation work must be carried out by a qualified electrician or competent person.
- Do not dry your cooker hood using a flame.
- If there is any fault with your cooker hood, please call the approved customer service department.
- Please keep the room ventilated when your cooker hood and gas hob are working.
- To make sure your cooker hood benefits from our guarantee, please return the warranty card and purchase receipt, failing
which the guarantee will not be available
- Accessible parts may become hot when used with cooking appliances.
- Observe the warning in the instruction sheet concerning the operation of the appliance when air is discharged from the room.
- Do not check the filters when the hood is running.
- Do not touch the lamps after a prolonged use of the appliance.
- No flambé food must be cooked underneath the hood.
- The use of an unprotected flame is dangerous for the filters and could cause a fire.
- Watch over frying food constantly in order to prevent the cooking oil from igniting.
- Before performing any maintenance operation, disconnect the hood from the mains.
2. Use and Operation
2.1. Product Description
- Equipped with a high power, low noise electric motor and fan, it generates high suction and low noise. Its non-stick grease filter is easy to clean.
- The insulated low voltage, 12V AC circuit board control makes the lamps safer.
- Its special wind tunnel and grease collection design means that any released matter will be absorbed in seconds.
2.1.1. Installation Instructions
- Before installation, please ensure the area is clean to avoid the suction of wood debris and dust.
- Do not connect it to the same air ventilation duct as other appliances such as the gas duct, heating ducts or hot air ducts.
- The ventilation duct curve should be ≥120^ , parallel or above the entry point and should be connected to the external wall.
- After installation, make sure that the extractor is leveled to avoid grease from accumulating at one end

natural_image
Pure geometric diagram of a T-shaped structure with vertical and horizontal lines, no text or symbols presentCorrect

natural_image
Simple line drawing of a rectangular frame with a vertical line and a small horizontal bar at the base (no text or symbols)Wrong
BECKEN®
2.1.2. Installation
- The cooker hood should be placed at a distance of 65-75cm (26-30inch) from the cooking surface for the best effect (See Pic 1).
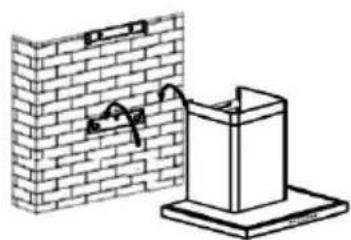
- Install the bracket in a suitable position once the installation height is fixed, and keep it in line. The fixed position of the inner chimney bracket is the chimney (See Pic 2).
- Fix the outside chimney bracket on the outside chimney and make sure that the inside chimney height can be adjusted freely as well as fixing the extendable duct. Then install the extendable duct and the chimney on the cooker hood (See Pic 3).
- Fit the cooker hood onto the bracket (See Pic 4).
- Adjust the height of the inside chimney to the position of the inside chimney bracket and screw it into place. After adjusting the position, fix the body using the safety screw (See Pic 5).
Note: The two 6 mm diameter safety vents are positioned on the back casing.

Pic. 1

natural_image
Diagram of a brick wall and a vertical support structure with anchor bolts (no text or symbols)Pic. 4

Pic. 5
2.2. Operating Instructions
2.2.1. LCD Display

Pic. 6
- Plug in the hood; The LCD will display a 24-hour clock with a blue backlight. The backlight will switch off after 30 seconds if no operations are carried out.
- Press the 🎨 button once; the light will turn on and the LCD will show 🔊. Press the 🔊 button again; the light will turn off and the 🔊 display on the LCD will disappear.
- Press the ✿ button once; the hood will run at LOW speed and the LCD will show ✿ and the ⏻ button will be on. Press the ⏻ button again; the hood will run at MEDIUM speed. Press the ✿ button one more time; the hood will run at HIGH speed. Press the ✿ button again; the hood returns to LOW speed again. When the ✿ button is pressed, the ⏻ button is always on. If you wish to turn off the hood, press the ⏻ button once.
- When the hood is not running, press the ⏻ button once. The hood will run at the speed it ran at the last time it was used, and the LCD will show ⏻. Press ⏻ again, the will hood stop and ⏻ will disappear from the LCD.
- When both the ⚙ and ⚙ buttons are not used, the Ⓞ button is used to set the time. Press the Ⓞ button for 2 to 3 seconds; ⏱ will be shown on the LCD and ⏱ will flash, representing the hours. Press the ⚙ button once to increase the value by 01.
Continue pressing the ✕ button, it will scroll through 13; 14... up to 23. When the LCD shows 23, the ✕ button is no longer active. Press the ✕ button once to reduce the number by 01. When the LCD shows 00 the ✕ button is no longer active. After having set the hour you can start setting the minutes by pressing the ⏻
BECKEN®
button again. ✉ flashes on the LCD showing the minutes. Press the ✉ button once to add 1 to the minutes. Continue pressing the ✉ button, to display from 01 ... up to 59. When the LCD shows 59 the ✉ button is no longer active. Press the ✉ button once to subtract 1 from the minutes. When the LCD shows 00, the ✉ button is no longer active. After having set the hours and minutes, press ⏻ to confirm.
When the ⚙ button is not used, the ⏻ button is used for the timer function. The timer function allows you to set the hood to automatically power off according to the timer you set, from 1 minute to 60 minutes. Press the ⏻ button once, it enters timer setting mode and the LCD shows 📋. Press the ⚙ button to add 1 to the timer value. Continue pressing the ⚙ button; it will display from 📋:100 📋:100 📋:100... up to 📋:100. Press the ⚙ button once to subtract 1 from the timer value. After setting the correct timer value, press the ⏻ button to confirm. If you set the timer to 05:00, the LCD display will count down from 05:00; 04:59... to 00:01 00:00.
When the LCD shows 00:00, the hood will automatically power off and the LCD display will only show the 24-hour clock with the blue backlight. After 30 seconds with no operations, the blue backlight will turn off.
Please note that the Lamp is not controlled by the timer. If you want to use the timer function again and press the Ⓞ button without changing the values, the hood will automatically count time down from your previous setting after 5 seconds.
2.3. Maintenance
Cleaning the carbon grease filter mesh:
The filter mesh is made of high-density stainless steel. Please do not use corrosive detergent on it. Keeping this filter clean will keep the appliance running correctly. Please follow the guidelines below strictly.
Method 1: Put the mesh into 40-50 cl of clean water, pour on detergent and soak for 2-3 minutes. Wear gloves and clean with a soft brush.
Please do not apply too much pressure as the mesh is fragile and can be easily damaged.
Method 2: If instructed to do so, it can be put into a dishwasher at a temperature of around 60 degrees.

Cleaning the cooker hood:
A. To protect the main body from corrosion over a long period of time, the cooker hood should be cleaned with hot water plus non corrosive detergent every two months.
B. Please do not use abrasive detergent as it will damage the body.
C. Keep the motor and other spare parts away from water, as this will damage the appliance.
D. Before cleaning the appliance please remember to cut off the power.
E. The carbon filter should not be exposed to heat.
F. Please do not tear open the fixed bar around the carbon filter
G. If the plug or cable is damaged, replace it with special flexible cable.
2.4. Troubleshooting
| Problem | Cause | Solution |
| Light on, but motor does not work | The fan is blocked | Remove the blockage |
| The capacitor is damaged | Replace the capacitor | |
| The motor is jammed and the bearing damaged | Replace the motor | |
| The internal motor is off or there is a bad smell from the motor | Replace the motor | |
| Light does not work, motor does not work | Besides the above, check the following | |
| Light is damaged | Replace the light | |
| Loose power cord | Connect the wires as per the electric diagram | |

| Light on, but motor does not work | The fan is blocked | Remove the blockage |
| The capacitor is damaged | Replace the capacitor | |
| The motor is jammed and the bearing damaged | Replace the motor | |
| The internal motor is off or there is a bad smell from the motor | Replace the motor | |
| Oil leakage | The one way valve and the air ventilation entry are not correctly sealed | Take down the one way valve and seal with glue |
| Leakage from the connection of the U-shaped section and the cover. | Take the U-shaped section down and seal with soap or paint | |
| Body vibrations | The fan is damaged and causes vibrations | Replace the fan |
| The motor is not securely fitted | Tighten the motor fixtures | |
| The body is not securely fitted | Tighten the body fixtures | |
| Insufficient suction | The distance between the body and the top of the hob is too great | Readjust the distance |
| Too much ventilation from open doors or windows | Choose a new location and refit the appliance | |
| The appliance is sloping | The fixture screw is not tight enough | Tighten the fixture screw until horizontal |
| The bracket screw is not tight enough | Tighten the bracket screw until horizontal |
3. Customer Service
Becken has designed this appliance in order to guarantee maximum reliability. However, if a problem occurs you may be able to determine its cause by following the procedures suggested in this section.
Do not attempt to open the appliance – there is a risk of electrical shock.
If you are not able to solve the problem please contact your seller or manufacturer.
All users must be familiar with this section. Knowing what could go wrong can help to prevent problems occurring.
WARNING: any attempt to repair the appliance without contacting the manufacturer will void the warranty.
If the problem persists take your appliance to the customer service of any Worten, Modelo or Continente store in order to solve the problem.
Worten Equipamentos para o Lar provides a 2 year warranty for manufacturing defects from the date of purchase of the appliance.
The warranty is applicable for correct use and maintenance of the appliance, namely according to the instructions in this manual. Malfunctions caused by any other situations are not covered by the warranty.
The repair of electric appliances must only be made by qualified technicians in order to prevent future problems.
To avoid unnecessary risks, any malfunctions concerning wires or other components must be repaired in a specialized technical support workshop because suitable tools are required.
4. Protection of the environment
In order to protect the environment we strive to reduce the volume of packaging used, limiting it to three easily sorted materials: cardboard, paper and plastic.
The appliance is manufactured using recyclable materials once disassembled by a specialized company. Comply with local regulations concerning recycling of all materials.

natural_image
Symbol of a waste bin with crossed lines indicating no waste, and a solid black rectangle below (no text or labels)natural_image
Simple line drawing of a T-shaped structure with vertical centerline and horizontal base (no text or symbols)Correcto

natural_image
Simple line drawing of a rectangular frame with a vertical centerline and two small rectangular elements at the base (no text or symbols)Incorrecto
2.1.2. Instalación
natural_image
Symbol of a trash bin crossed with two crossed lanes, no text or numbers presentCaro[a] cliente,
natural_image
Simple line drawing of a T-shaped structure with vertical centerline and horizontal base (no text or symbols)Correto

natural_image
Simple line drawing of a rectangular frame with a vertical centerline and a horizontal base (no text or symbols)Errado
2.1.2. Instalação
Limpar o exaustor:
natural_image
Symbol of a trash bin crossed with two crossed lanes, no text or numbers presentImported, produced and distributed by: Importado, producido y distribuido por: Importado, produzido e distribuído por:
Worten Equipamentos p/ Lar S.A.
- Index
- Safety Instructions
- Important Warnings
- Assistance
- Power Supply
- Power Cord and Other Cables
- Humidity and Water
- BECKEN®
- Cleaning
- General Precautions
- Use and Operation
- Product Description
- Installation Instructions
- Installation
- Operating Instructions
- LCD Display
- Maintenance
- Cleaning the carbon grease filter mesh:
- Cleaning the cooker hood:
- Troubleshooting
- Customer Service
- Protection of the environment
- Instalación
- Instalação
- Limpar o exaustor:
Brand : Becken
Model : Mistral
Category : Hand blender