
VME12SS - Vacuum Sealer VacPak-It - Free user manual and instructions
Find the device manual for free VME12SS VacPak-It in PDF.


| Product Type | Vacuum Sealer |
| Brand | VacPak-It |
| Model | VME12SS |
| Dimensions (L x W x H) | 15 x 6 x 4 inches |
| Weight | 5 lbs |
| Power Supply | 120V, 60Hz |
| Power Consumption | 120W |
| Sealing Mechanism | Automatic heat seal |
| Vacuum Modes | Dry and Moist food settings |
| Pulse Function | Yes, for delicate items |
| Bag Cutter | Built-in with roll storage |
| Maximum Bag Width | 12 inches |
| Material | Stainless steel and ABS plastic |
| Cleaning | Wipe exterior with damp cloth; interior removable drip tray |
| Safety Features | Auto shut-off, overheat protection |
| Spare Parts Available | Replacement sealing gasket, sealing strip, vacuum bags |
| Warranty | 1 year limited |
Frequently Asked Questions - VME12SS VacPak-It
User questions about VME12SS VacPak-It
0 question about this device. Answer the ones you know or ask your own.
Ask a new question about this device
Download the instructions for your Vacuum Sealer in PDF format for free! Find your manual VME12SS - VacPak-It and take your electronic device back in hand. On this page are published all the documents necessary for the use of your device. VME12SS by VacPak-It.
USER MANUAL VME12SS VacPak-It
186VME12SS
12" Seal Bar
120V·460W
186VME16SS
16" Seal Bar
120V·550W
TABLE OF CONTENTS
Safety Tips .... 1
Food Storage and Safety 2
Control Panel & Specifications .... 3
Cleaning & Care. 4
Operating Instructions
Making Vacuum Bags from Roll .... 4
How to Vacuum Seal Bags .... 5
How to Vacuum Seal Canisters ..... 5
Troubleshooting....6
Warranty 7
SAFETY TIPS
- Read this manual carefully before use
• DO NOT use on or near a heat source
• DO NOT immerse any part of the unit in water - Unplug unit when not in use
• DO NOT pull the cord when unplugging the unit
• DO NOT operate if plug or cord is damaged
• DO NOT operate if unit damaged or malfunctions - Only use unit for intended use
• DO NOT allow children to use unit
• Only use a grounded outlet
• DO NOT modify the plug in any way
• DO NOT allow cord to drape over counter or tabletop
• DO NOT use near burner or oven
• Use caution when sealing hot items
• DO NOT use outdoors
1 VACPAK-IT
Vacuum packaging with any model in the VACPAK-IT line will yield unbelievable results. These machines remove up to 90% of the air from the package. This will help keep food fresher up to 5 times longer than under normal storage methods. You can store dry foods like pasta, cereal and flour, fresh meats like pork, chicken and beef, vegetables like carrots, potatoes and squash, or even frozen liquids like soups and drink mixes. The possibilities are endless.
Once packaged, there are a variety of unique methods to cook your stored food. You can cook the food traditionally or sous vide it for a tender and lush flavor.
Vegetables should always be blanched – cook until crispy and then submerge in cold water to stop the cooking process – to kill any enzymes that may cause out-gassing when vacuumed.

IMPORTANT
NEVER vacuum pack garlic, fungi (like mushrooms), or soft cheese (like Brie, Camembert, and Ricotta).
A dangerous chemical reaction takes place when air is removed, causing them to be extremely dangerous if ingested.

| FOOD | TYPICAL STORAGE | VACUUM FRIDGE STORAGE | VACUUM FREEZER STORAGE |
| Fresh Beef & Veal 1-2 Weeks 1 Month 1-3 Years | |||
| Ground Meat 1-2 Weeks 1 Month 1 Year | |||
| Fresh Pork 1 Week 2-4 Weeks 2-3 Years | |||
| Fresh Fish 3-4 Days 2 Weeks 2 Years | |||
| Fresh Poultry 1 Week 2-4 Weeks 2-3 Years | |||
| Smoked Meats | 2-4 Weeks | 6-12 Weeks | 3 Years |
| Fresh Produce (Blanched) | 1-2 Weeks 2-4 Weeks 2-3 Years | ||
| Fresh Fruits | 3-4 Days 2 Weeks | 2-3 Years | |
| Hard Cheeses | 2-4 Days | 6-12 Weeks 6 Months | |
| Sliced Deli Meats | 1-2 Weeks | 6-12 Weeks | Not Recommended |
| Fresh Pasta | 1 Week 2-3 Weeks 6 Months | ||
CONTROL PANEL
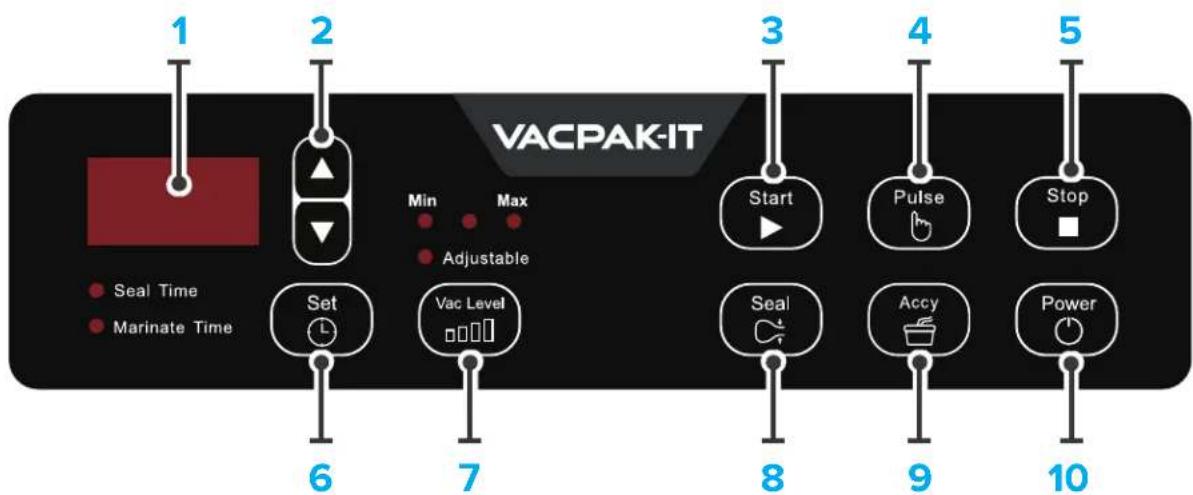
- LED Display - Displays current cycle time in seconds.
- Up/Down Arrow Buttons - Press to increase/decrease the sealing time.
- Start Button - Press to begin the vacuum process.
- Pulse Button - Press and hold for manual vacuuming.
- Stop Button - Press to stop the vacuum process.
- Set Button - Press to set the vacuum time.
- Vac Level Button - Press to cycle through vacuum strength levels.
- Seal Button - Press to begin the sealing process manually for fragile foods.
- Accessory Button - Press to begin the vacuum process manually for canisters and other external accessories.
- Power Button - Press to turn the machine on or off. Can also be used as an emergency stop button.
MODEL SPECIFICATIONS

NEMA 5-ISP
| Model | VME12SS VME16SS | |
| Dimensions | 15"W x 12"D x 6 14 "H 19"W x 12"D x 6 14 "H | |
| Material | Stainless Steel Body Stainless | Steel Body |
| Seal Bar | 12" Wide 16" Wide | |
| Roll Storage | up to 12" x 50' up to 15 12 " x 50' | |
| Voltage | 120V | 120V |
| Wattage | 460W | 550W |
| Seal Time | 0-6 Seconds | 0-6 Seconds |
3 VACPAK-IT
Note: Always power off and disconnect the power cord before cleaning.
Note: Never immerse the vacuum sealer in liquid.
Note: DO NOT spray cleaner directly on the machine or control panel.
Note: DO NOT store outside.
- Power off and disconnect the power cord.
- Check the sealing area and gasket to make sure it is clear of debris.
- Wipe down with a non-abrasive cleaner like Noble Chemical's 147QUIKSAN.
- Wipe the area dry.
OPERATING INSTRUCTIONS
How to Make a Bag from a Roll
- Choose suitable roll no wider than 12" for VME12SS or 15½" for VME16SS. This vacuum sealer includes a roll storage and cutter for your convenience. Place the roll in the storage area and pull out the desired length of bag. Lay the edge over the cutter and move the cutting blade across to create a clean even cut.
- Lay the open end of the bag across the seal bar, making sure the bags ends do not go past the edge of the seal pad.
- Close the lid by pressing firmly by using the handle.
- Select desired seal time by pressing set until the seal time light is illuminated. Use the arrows to set your seal time from 0-6 seconds.
- Press the "Seal" button, the following sequence will occur: Note: If the machine is used in a cold environment, select 6 seconds for seal time.
a. Vacuum cycle begins
b. "Seal" Light comes on, cycle starts
c. Vacuum cycle ends, Lid unlocks and lifts
- Remove bag from machine and inspect seal.
Note: A good seal will be clear upon inspection. Seals that are spotty, incomplete, wrinkled, milky, or white colored are inadequate. If this occurs, cut seal portion and restart process at Step 1.
- Use built in roll cutter to cut bag on the opposite end of seal to desired length.
- Follow the instructions below for how to Vacuum and Seal with Bags.
How to Vacuum Seal Bags
Note: If an instant seal is needed, simply press the "Seal" button.
- Press the "Power" button and set your desired vacuum level and seal time using the set button.
- Choose suitable sized vacuum bag no wider than 12" for VME12SS or 15½" for VME16SS, and place item(s) in bag, leaving at least 3 inches from the contents to the top of the bag to ensure best vacuum sealing.
-
Lay the open end of the bag across the seal bar, making sure the bag ends do not go past the edge of the seal pad.
-
Close the lid by pressing firmly by using the handle.
-
Press the "Start" button to begin the process
Note: If vacuuming fragile or easily crushed items, use the "Pulse" button to manually control the vacuum process. Repeatedly press "Pulse" on and off a few times until you reach the desired vacuum pressure.
-
If using the "Pulse" button, press the "Seal" button to manually seal the bag. Otherwise, the machine will vacuum until it achieves proper vacuum pressure and will automatically go into seal mode.
-
After the Vacuum & Seal cycle ends, the Lid unlocks and lifts. Remove bag from machine and inspect seal.
Note: A good seal will be clear upon inspection. Seals that are spotty, incomplete, wrinkled, milky, or white colored are inadequate. If this occurs, cut seal portion and restart process at Step 1.
- Store contents of bag normally. All perishable foods will need to be refrigerated or frozen to prevent spoilage.
How to Vacuum Seal Canisters
Note: Choose a container made for vacuum sealing. Place items in canister, making sure there is at least 1" space from the food to the lid, and that the lid is dry and free of food particles.
Note: Do not overfill container.
- Place lid on top of container, and turn the knob to the "Vacuum" position.
- Connect the hose from the Accessory Port on the machine to the port on the canister lid.
- Close the lid by pressing firmly using the handle.
- Press the "Accy" button while simultaneously pressing the canister lid for 3-5 seconds.
- After the vacuum process completes, turn the canister lid to the "Lock" position" and then remove the hose from the canister lid and machine. Wash the hose as necessary.
- Store the canister in refrigerator or pantry, depending on item stored. Do not freeze.
- To open the canister, twist the knob on the canister lid to the "Open" position.
| ISSUE | REMEDY |
| Unit won't turn on | ·Ensure the machine is properly plugged into a grounded outlet.·Check the power cord for tears, frays, or other damage.Do not use machine if the power cord is damaged. |
| Not achieving a complete vacuum | ·The edge of the bag must be across the seal bar, and not extend past the chamber, ensure there are no wrinkles in the bag and that the bag is inside the chamber.·Make sure the seal is complete and that the seal is clear. If the seal is spotty, incomplete, wrinkled, milky, or white colored, it is inadequate. Cut seal portion and restart the vacuum process.·Ensure both the sealer and bag are clean, dry and free of debris for the vacuum process to be successful. Wipe the surface of the seal bar and inside of the bag and try again. |
| Bag loses vacuum after being sealed | ·Check for sharp items such as bones, stems, cloves and others that can puncture the bags.·Some fruits and vegetables can release gases if not properly prepared before storing. Make sure to blanch or freeze food before packaging. If in doubt about the quality of the food, discard immediately. |
| Not vacuuming canisters properly | ·Ensure the accessory hose is properly attached to the machine and canister.·Ensure the canister lid knob is turned to the "Vacuum" position.·Leave at least 1" of space between the lid and the top of the food.·Make sure there is no damage to the canister and lid. If there is a crack in either, discard and use a new one. |
| Buttons not working | ·In rare cases, the buttons and/or programs may not work properly. If this occurs, unplug the machine and plug it back in to reset the programming. |
EQUIPMENT LIMITED WARRANTY
VacPak-It warrants its equipment to be free from defects in material and workmanship for a period of 1 year. This is the sole and exclusive warranty made by VacPak-It covering your VacPak-It brand equipment. A claim under this warranty must be made within 1 year from the date of purchase of the equipment. Only the equipment's original purchaser may make a claim under this warranty. VacPak-It reserves the right to approve or deny the repair or replacement of any part or repair request. The warranty is not transferable. VacPak-It Equipment installed in/on a food truck or trailer will be limited to a period of 30 days from the original date of purchase.
TO MAKE A WARRANTY CLAIM:
For Warranty Inquiries contact the location where you purchased the product:
• WebstaurantStore.com: Contact help@webstaurantstore.com. Please have your order number ready.
• The Restaurant Store: If you purchased this unit from your local store, please contact your store directly.
• TheRestaurantStore.com: Online purchases, call 717-392-7261. Please have your order number ready.
Failure to contact the designated location prior to obtaining equipment service may void your warranty.
VacPak-It makes no other warranties, express or implied, statutory or otherwise, and HEREBY DISCLAIMS ALL IMPLIED WARRANTIES, INCLUDING THE IMPLIED WARRANTIES OF MERCHANTABILITY AND OF FITNESS FOR A PARTICULAR PURPOSE.
This Limited Warranty does not cover:
• Equipment sold or used outside the Continental United States
- Use of unfiltered water (if applicable)
• VacPak-It has the sole discretion on wearable parts not covered under warranty
• Equipment not purchased directly from an authorized dealer
• Equipment used for residential or other non-commercial purposes
• Equipment that has been altered, modified, or repaired by anyone other than an authorized service agency
- Equipment where the serial number plate has been removed or altered.
- Damage or failure due to improper installation, improper utility connection or supply, and issues resulting from improper ventilation or airflow.
- Defects and damage due to improper maintenance, wear and tear, misuse, abuse, vandalism, or Act of God.
Any action for breach of this warranty must be commenced within 1 year of the date on which the breach occurred. No modification of this warranty, or waiver of its terms, shall be effective unless approved in a writing signed by the parties. The laws of the Commonwealth of Pennsylvania shall govern this warranty and the parties' rights and duties under it. VacPak-It shall not under any circumstances be liable for incidental or consequential damages of any kind, including but not limited to loss of profits.

- 186VME12SS
- 186VME16SS
- TABLE OF CONTENTS
- Safety Tips .... 1
- Food Storage and Safety 2
- Control Panel & Specifications .... 3
- Cleaning & Care. 4
- Operating Instructions
- Troubleshooting....6
- Warranty 7
- SAFETY TIPS
- VACPAK-IT
- IMPORTANT
- CONTROL PANEL
- MODEL SPECIFICATIONS
- VACPAK-IT
- How to Make a Bag from a Roll
- How to Vacuum Seal Bags
- How to Vacuum Seal Canisters
- EQUIPMENT LIMITED WARRANTY
- TO MAKE A WARRANTY CLAIM:
- This Limited Warranty does not cover:
Brand : VacPak-It
Model : VME12SS
Category : Vacuum Sealer