
DashCam 300 - Camcorder Rand McNally - Free user manual and instructions
Find the device manual for free DashCam 300 Rand McNally in PDF.


| Product Type | Dash cam (camcorder) |
| Brand | Rand McNally |
| Model | DashCam 300 |
| Dimensions | Approx. 10 x 5 x 3 cm |
| Weight | Approx. 200 g |
| Power Supply | Vehicle 12V charger; built-in rechargeable battery |
| Video Resolution | Full HD (1080p) at up to 30 fps |
| Recording Modes | Loop recording, parking mode, motion detection, time-lapse |
| Storage | microSD card up to 64 GB (not included) |
| GPS | Optional; records speed and location |
| Safety Features | G-sensor, FCWS (forward collision warning), LDWS (lane departure warning) |
| Wide Dynamic Range | Yes |
| Display | Built-in screen (size not specified) |
| Mount Type | Suction cup mount (included) |
| Ports | Mini USB (power/transfer), microSD card slot |
| Maintenance | Clean lens with soft cloth; format microSD card periodically |
| Spare Parts Included | Suction cup mount, vehicle charger, USB cable |
| Warranty | 1 year limited warranty |
| Certifications | FCC, CE (assumed) |
Frequently Asked Questions - DashCam 300 Rand McNally
User questions about DashCam 300 Rand McNally
0 question about this device. Answer the ones you know or ask your own.
Ask a new question about this device
Download the instructions for your Camcorder in PDF format for free! Find your manual DashCam 300 - Rand McNally and take your electronic device back in hand. On this page are published all the documents necessary for the use of your device. DashCam 300 by Rand McNally.
USER MANUAL DashCam 300 Rand McNally
www.randmcnally.com/support
800-333-0136

natural_image
Three black-and-white cameras with sensor domes mounted on a flat surface, no visible text or symbols.
DashCam 100, 200 & 300
Quick Start Guide

natural_image
Three identical black-and-white cameras with headsets and display screens, shown from different angles (no visible text or symbols)Important Information About Your Dash Cam
POWER BUTTON: Press and hold the power button to turn the device on or off. The power button can also be used to protect photos and videos saved to the microSD card. Once protected, the files cannot be overwritten or accidentally deleted.
RESET: Use the reset button on the left side of the device to restart. The hole for the button is located under the plastic cover. Insert a needle or paper clip into the hole to press the button, then power the unit on. Menu settings, photos, and videos will be saved.
BATTERY CHARGE: A red light around the Capture Photo/Delete button indicates the battery is charging; a green light indicates the battery is fully charged.
What's Included in the Box
- Dash Cam
- microSD Card (optional)
- Suction Cup Mount
- Vehicle Charger
- USB Cable

natural_image
Product photo of a black remote control device with USB, cable, and terminal connector (no visible text or symbols)Your Device

natural_image
Close-up of a camera lens with four buttons and ventilation slots (no visible text or symbols)

Power On/Off

Navigate Up/Left in menu settings

Navigate Down/Right in menu settings

Menu
- Tap once to access picture and video files
- Tap twice to access the menu
- Tap again to return to the camera

OK/Record Video

Capture Photo/Delete
Insert/Remove the microSD Card
Depending on the model, your dash cam may come with a microSD card. The microSD card must be inserted into the dash cam before you can record videos or take pictures.
NOTE: The device supports cards up to 64 GB.
To insert or remove the microSD card:
- Pull back the cover that protects the card slot using a paper clip or other thin tool. The slot is on the left end of the dash cam.
- If inserting, slide the card into the slot until it clicks into place, or
- If removing, push down gently on the microSD card with the blunt tip of a pen. It will pop up and can then be removed.
NOTE: If your card needs to be formatted, refer to "Format the microSD Card" on page 10.
Install the Mount
NOTE: Follow all local regulations governing the placement of the mount. For GPS-enabled models, select an area with a line of sight to the sky and GPS satellites to ensure reliable GPS information.
To install the mount:
- Slide the mount on to the front of the dash cam until it clicks.
- Press the suction cup against the windshield.
Install the Mount - continued
- Rotate the knob on the mount to lock it in place.

natural_image
Illustration of a device with a curved arrow indicating rotation or movement (no text or symbols)
natural_image
Top-down view of a mechanical device with a cylindrical component and a base (no visible text or symbols)- Adjust the angle of the camera to obtain the desired view.
Connect to the Vehicle/Charge the Battery
NOTE: The vehicle may need to be on for the device to charge.
To connect to the vehicle and charge the battery:
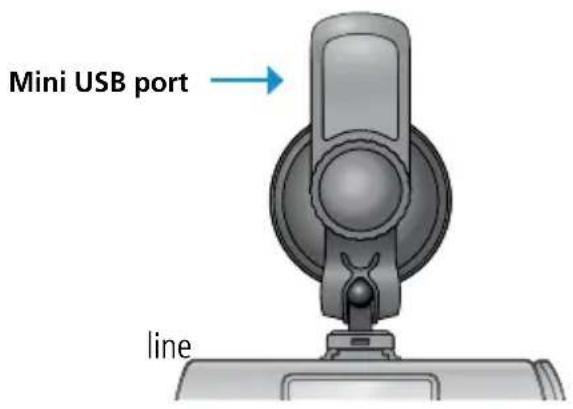
- Plug the charger into the mini USB port located on the suction lever as shown.
- Plug the other end into the vehicle's charging port.
- Adjust the cord so that it doesn't block the driver's of sight.
The charger has an extra USB port that allows you to charge a phone, tablet or other device while your dash cam is connected to the vehicle.
Power the Device On/Off
When the dash cam is plugged into a vehicle charger, it automatically turns on when the car is turned on. When the car is turned off, the dash cam powers off.
In the event you need to manually turn the device on/off:
- Tap to turn the device on.
- Tap and hold 📋 for two seconds to turn it off.
NOTE: You can adjust how quickly the dash cam turns on/off after the vehicle ignition is turned on/off by setting POWER ON DELAY and POWER OFF DELAY in the Menu settings. You can also set AUTO POWER OFF to automatically turn the dash cam off after a specified period of time.
Adjust the Menu Settings
The dash cam menu contains the device settings. They can be adjusted according to user preference.
To adjust the menu settings:
- Tap ■ twice to access the menu.
- Tap ◀ or ▶ to scroll through the list of features.
- Tap to select the feature.
- Tap ◀ or ▶ to scroll through the list of settings for that feature.
- Tap to select the desired setting.
Format the microSD Card
It is recommended to format the micro SD card before taking pictures or recording video.
To format the card:
- Open the menu and scroll down to the FORMAT feature.
- Tap to select it.
- Tap ▶ or ▶ until YES displays.
- Tap to select YES and begin the process.
CAUTION: If you ever need to reformat the card, all of the data on the card may be lost. Make sure to back up any important videos and photos from the card before formatting.
Enable Automatic Recording
The dash cam will automatically turn on when the vehicle is turned on, but if you want the device to automatically record, you must adjust the settings.
To adjust the settings to enable automatic recording:
- Tap M twice to access the menu settings.
- Tap ◀ or ▶ to scroll through the list of features until POWER ON RECORD displays.
- Tap to select the feature.
- Tap ◀ or ▶ to scroll to ON.
- Tap to select it.
Set the Resolution and Recording Speed
To set the video and photo resolution and recording speed:
- Open the menu by tapping twice.
- Tap ◀ or ▶ to scroll through the list of settings until RESOLUTION displays.
- Tap to select RESOLUTION.
- Tap ▶ or ▶ to scroll though the list of options.
- Tap to select the resolution and speed.
The recording speed is measured in frames per second (fps). The greater the fps, the smoother the video will play back. However, it also results in a larger file. To save space on the microSD card, you can decrease the fps in the TIME LAPSE settings.
Enable the GPS
GPS is an optional feature on the dash cam that records the speed and location of your vehicle.
To enable GPS:
- Tap M twice to open the menu.
- Scroll down to GPS SETUP and tap
- Scroll down to ON.
- Tap to select it.

A GPS stamp consists of the vehicle speed, location, device number, vehicle ID number, date, and time.
To add a GPS stamp to videos and photos:
- Select STAMP in the menu.
- Scroll down to GPS STAMP and select it.
- Tap ▶ to select the checkmark.
- Tap to confirm the selection.


Enable Wide Dynamic Range
Wide Dynamic Range (WDR) is a feature that allows the dash cam to produce the best video quality when the scene includes a wide variety of lighting conditions. For example, a person standing in front of a bright light or a building casting a dark shadow.
To set up WDR:
- Open the menu and scroll down to WDR.
- Tap to select it.
- Tap ▶ or ▶ until YES displays.
- Tap to select YES.
Take a Picture and Record Video Manually
To manually take a still picture, tap 📄. This feature may require you to stop recording.
To manually record a video:
- Tap to begin recording. The recording time will display at the bottom of the screen.
- Tap again to stop recording.
Adjust G Sensor
The G Sensor enables the dash cam to detect impact and start recording video in protected mode. In protected mode, the file cannot be overwritten. The G Sensor settings can be changed from one to seven depending upon the desired sensitivity; one being the most sensitive and seven being the least sensitive.
To adjust the sensitivity of the G sensor:
- Tap M twice to open the menu.
- Scroll down to G_SENSOR SET and tap
- Tap ▶ or ▶ to scroll through the list of settings.
- Tap to select the desired sensitivity level.
Enable Parking Mode
If parking mode is enabled, the dash cam will automatically start recording the moment an impact is detected, even though the vehicle is off. It will record for 30 seconds.
To enable parking mode:

- Tap M twice to open the menu.
- Scroll down to PARKING MODE and tap
- Scroll through the sensitivity level settings (Low, Medium, and High).
- Tap to select the desired level.
NOTE: The G Sensor must be activated for parking mode to work.
Activate Motion Detection
If motion detection is activated, the dash cam only records video if the vehicle is moving. For example, if the vehicle stops at a railway crossing, the dash cam will detect that the vehicle is not moving and stop recording.
To activate motion detection:
-
Tap M twice to open the menu.
-
Scroll down to MOTION DETECTION and tap

-
Tap ▶pr ▶until ON displays.
-
Tap to select it.
NOTE: The G Sensor must be activated for motion detection to work.
Forward Collision and Lane Departure Warnings
NOTE: Forward collision and lane departure warnings are not available on all models.
The Forward Collision Warning System (FCWS) senses how close your vehicle is to the vehicle in front of it. The following warning displays when your vehicle gets too close:
The Lane Departure Warning System (LDWS) detects the lane lines and calculates how close your vehicle is to them. The following warning displays when your vehicle gets too close to the line:

Activate the FCWS and LDWS Alerts
To activate the FCWS/LDWS alerts:
- Tap twice.
- Use ▶ or ▶ to scroll to FCWS DETECT or LDWS DETECT.
- Tap to select the feature.
- Use ◀ or ▶ to scroll to YES.
- Tap to select the feature.
NOTE: FCWS and LDWS are not available on all models.
Activate Loop Recording
If loop recording is activated, the dash cam records video in a continual loop. When enabled, it immediately begins to record when the vehicle is turned on. When the card is nearly full, the dash cam will overwrite the oldest, unprotected video until the vehicle is turned off.
If there is an accident and the recording captures the moment of impact, the current video, previous video, and subsequent video are automatically protected and will not be overwritten.
To enable loop recording:
- Tap M twice to open the menu.
- Tap or to scroll to LOOP RECORDING.
- Tap 📄 to see the list of options. You can choose between one minute and five minute recordings.
- Tap or to scroll through the options.
- Tap to select the feature.
View the Photos and Videos
To view the photos and videos:
- Tap M once.
- Tap ◀ or ▶ to scroll to Video only, Photo only, or both. Thumbnails of all your photos, videos, or both, depending on the previous selection, will display.
- Tap to select Video, Photo, or both.
- Tap ◀ or ▶ to move to the content you want to view.
- Tap to select content for viewing.
Protect the Photos and Videos
To protect the photos and videos to prevent them from being overwritten:
- Tap M once.
- Tap ◀ or ▶ to scroll to Video only, Photo only, or both. Thumbnails of all your photos, videos, or both, depending on the previous selection, will display.
- Tap to select Video, Photo, or both.
- Tap ▶ or ▶ to move to the content you want to protect.
- Tap 🔒 to protect the file. A yellow lock icon will display in the bottom left corner of the screen.
- Tap 🤳 again to unprotect the file. The lock icon will unlock and change to green.
To protect video that is currently recording:
- Tap M while recording. A yellow lock icon will display in the top right corner of the screen.
Delete the Photos and Videos
To delete the photos and videos:
- Tap M once.
- Tap ◀ or ▶ to select Video only, Photo only, or both.
- Tap 📷 to be able to select specific photos/videos for viewing. Thumbnails of all your photos, videos, or both will display, depending on the previous selection.
- Tap ◀ or ▶ to cursor to the content you want to view.
- Tap 📄 to delete the selected file. A pop-up will display that asks whether you want to delete just one file or all files.
- Tap ▶ to select an option.
- Tap to delete the file(s).
NOTE: If you wish to delete a protected file, you need to unprotect it first. See "Protect the Photos and Videos" on page 23 for details.
Transfer the Photos and Videos to a Computer
To access files using the microSD card:
- Pull back the rubber cover protecting the microSD Card slot.
- Remove the card. You can do this by pushing down gently on the card with the blunt tip of a pen.
- Insert the microSD card into an adaptor to convert it to a full size SD card.
- Insert the SD card into your PC or Mac and navigate to the files.
To access files using a USB cable:
- Connect the included USB cable to the dash cam and your PC.
- Use the PC's File Explorer (Windows) or Finder (Mac OS) to locate the files in the following folder: DCIM > 100MEDIA.
Additional Menu Settings
Setting
Options
Beep Sound Off / 20% / 40% / 60% / 80% / 100%
Mic On / Off
Time Setup Set the date and time
GPS Auto Update Time On / Off
GMT Setup Greenwich Mean Time (-11 through 12) Manually update the time zone
Speed Unit MPH / km/h
Vehicle ID Enter the vehicle ID number to display on the video/photo stamp
Stamp Date and Time / Logo / Speed / GPS / Vehicle ID
Auto Display Off Off / 30 seconds / 60 seconds / 3 minutes
Night Vision LED Set the extra LED light to automatically turn on at night for extra illumination
Video Rotation Rotate the display if mounting to the dashboard instead of the windshield
Contrast Standard / Hard / Soft
Sharpness Standard / Hard / Soft
White Balance Auto / Sunny / Cloudy / Fluorescent / Incandescent
Exposure Setting (-2, -1.7, -1.3, -1, -0.7, -0.3, 0, 0.3, 0.7, 1, 1.3, 1.7, 2)
Reset to Factory Default No / Yes
Firmware Version The software version installed on the dash cam
Warnings, End-User License Agreement, and Warranty
WARNING: This product contains chemicals known to the State of California to cause cancer and/or other harm.
Safe Driving Practices
Never attend to or handle the dash cam while driving. Always use your best judgment and exercise common sense when the vehicle is in motion and do not allow yourself to be distracted by the dash cam while driving. Pull over in a safe and legal manner before attempting to attend to or handle the dash cam.
End-User License Agreement
Rand McNally hereby grants you ("User") a single-user non-exclusive, non-transferable license to use the Rand McNally dash cam (hereinafter referred to as the "product" (including software and associated data)) for User's own internal business or personal use and not for resale, sublicense or commercial use.
This product and the software incorporated in it and related documentation are furnished under license and may be used only in accordance with this license. Except as permitted by such license, the contents of this product and software may not be disclosed to third parties, copied or duplicated in any form, in whole or in part, without the prior written permission of Rand McNally. This product and software contain proprietary and confidential information of Rand McNally and its licensors. Rand McNally grants User a limited license for use of this product and the software incorporated in the product for its normal operation. By using the product, User acknowledges that the content of this document and the product are the property of Rand McNally and its licensors and are protected by U.S. copyright, trademark and patent laws and international treaties.
THE USER MAY NOT:
• Use the product on a network or file server, time-sharing or to process data for other persons.
- Copy, loan or otherwise transfer or sublicense the product, its software or content.
- Modify, or adapt the product in any way, or decompile, disassemble, reverse engineer or reduce to human readable form the product and software incorporated therein.
• Alter, remove or obscure any copyright notice, trademark notice, or proprietary legend from the product, its software or content.
This license will terminate automatically if User fails to comply with any of the terms of this license and User agrees to stop using the product. Rand McNally may revise or update the product and is not obligated to furnish any revisions or updates to User.
Warnings, End-User License Agreement, and Warranty
Warranty
RM Acquisition, LLC d/b/a Rand McNally warrants that the product, and the component parts thereof, will be free of defects in workmanship and materials for a period of one (1) year from the date of first use as determined by contact with GPS satellites. This warranty may be enforced by the first consumer purchaser ("Customer"), provided that the product is utilized within the U.S.A. or Canada.
Rand McNally will, without charge, repair or replace (with a new or newly reconditioned unit), at its option, defective products or component parts. For repair or replacement of defective products, Customer must contact Rand McNally at 877-446-4863 for return authorization and instructions. Customer will be required to provide proof of date of first Customer purchase, such as a duplicate copy of a sales receipt, for the warranty to be valid. The Customer must pay any initial shipping charges required to ship the product for warranty service, but the return charges will be at Rand McNally's expense, if the product is repaired or replaced under warranty.
Repairs or replacements have a 90-day warranty. If the product sent in is still under its original warranty, then the new warranty is 90 days or to the end of the original one (1) year warranty, depending on which is longer.
This warranty gives the Customer specific rights. Other rights may be available to Customer which vary from state to state.
Exclusions: This limited warranty does not apply: 1) to any product damaged by accident; 2) in the event of misuse or abuse of the product or as a result of unauthorized alterations or repairs; 3) if the serial number has been altered, defaced or removed; or 4) if the owner of the product resides outside of the U.S.A. or Canada.
Caution: Rand McNally makes no warranty as to the accuracy of completeness of the information in the product and disclaims any and all express, implied or statutory warranties, including any implied warranty of merchantability or fitness for a particular purpose. It is the user's responsibility to use this product prudently.
RAND MCNALLY AND ITS LICENSORS DO NOT MAKE ANY OTHER WARRANTY OR REPRESENTATION, EITHER EXPRESS OR IMPLIED, WITH RESPECT TO THE PRODUCT, INCLUDING ANY WARRANTY AS TO QUALITY, PERFORMANCE, TITLE OR NON- INFRINGEMENT. IN NO EVENT WILL RAND MCNALLY OR ITS LICENSORS BE LIABLE FOR ANY INDIRECT, SPECIAL, INCIDENTAL, OR CONSEQUENTIAL DAMAGES ARISING OUT OF THE USE OR INABILITY TO USE THE PRODUCT, EVEN IF ADVISED OF THE POSSIBILITY OF SUCH DAMAGES.
Some states do not allow limitations on how long an implied warranty lasts and/or do not allow the exclusion or limitation of incidental or consequential damages, so the above limitations may not apply to some consumers.
©2016 Rand McNally. All rights reserved. Rand McNally and the Rand McNally globe logo are registered trademarks of RM Acquisition, LLC d/b/a Rand McNally.
- DashCam 100, 200 & 300
- Quick Start Guide
- Important Information About Your Dash Cam
- What's Included in the Box
- Your Device
- Menu
- Insert/Remove the microSD Card
- Install the Mount
- Install the Mount - continued
- Connect to the Vehicle/Charge the Battery
- Power the Device On/Off
- Adjust the Menu Settings
- Format the microSD Card
- Enable Automatic Recording
- Set the Resolution and Recording Speed
- Enable the GPS
- Enable Wide Dynamic Range
- Take a Picture and Record Video Manually
- Adjust G Sensor
- Enable Parking Mode
- Activate Motion Detection
- Forward Collision and Lane Departure Warnings
- Activate the FCWS and LDWS Alerts
- Activate Loop Recording
- View the Photos and Videos
- Protect the Photos and Videos
- Delete the Photos and Videos
- Transfer the Photos and Videos to a Computer
- Additional Menu Settings
- Setting
- Options
- Warnings, End-User License Agreement, and Warranty
- THE USER MAY NOT:
Brand : Rand McNally
Model : DashCam 300
Category : Camcorder