
OverDryve 7 Pro - Gps Rand McNally - Free user manual and instructions
Find the device manual for free OverDryve 7 Pro Rand McNally in PDF.


| Product Type | GPS Navigator |
| Screen Size | 7 inches |
| Dimensions | 7.5 x 4.5 x 0.6 inches (approx) |
| Weight | 1 lb (approx) |
| Power Source | Internal rechargeable battery & 12V car adapter |
| Battery Life | Up to 2 hours typical |
| Main Functions | GPS navigation, real-time traffic, Bluetooth hands-free, Wi-Fi connectivity, voice command, dash cam support (optional) |
| Map Updates | Free lifetime map updates via Wi-Fi |
| Mount | Included suction cup mount and adhesive disc |
| Safety | Do not mount in driver's line of sight; use only approved accessories |
| Care & Cleaning | Clean with soft damp cloth; do not use harsh chemicals |
| Spare Parts | Replacement mounts and power cords available from Rand McNally |
| Repairability | Contact Rand McNally support for service |
| General Info | Designed for cars and trucks; includes truck-specific routes (optional) |
Frequently Asked Questions - OverDryve 7 Pro Rand McNally
User questions about OverDryve 7 Pro Rand McNally
0 question about this device. Answer the ones you know or ask your own.
Ask a new question about this device
Download the instructions for your Gps in PDF format for free! Find your manual OverDryve 7 Pro - Rand McNally and take your electronic device back in hand. On this page are published all the documents necessary for the use of your device. OverDryve 7 Pro by Rand McNally.
USER MANUAL OverDryve 7 Pro Rand McNally
OverDryve™ Pro
USER MANUAL


natural_image
Close-up of a digital interface with a blue progress bar and control icons (no readable text or symbols)This device complies with Part 15 of the FCC Rules. Operation is subject to the following two conditions:
(1) this device may not cause harmful interference, and
(2) this device must accept any interference received, including interference that may cause undesired operation.
FCC Statement
This equipment has been tested and found to comply with the limits for a Class B digital device, pursuant to part 15 of the FCC Rules. These limits are designed to provide reasonable protection against harmful interference in a residential installation. This equipment generates uses and can radiate radio frequency energy and, if not installed and used in accordance with the instructions, may cause harmful interference to radio communications. However, there is no guarantee that interference will not occur in a particular installation. If this equipment does cause harmful interference to radio or television reception, which can be determined by turning the equipment off and on, the user is encouraged to try to correct the interference by one or more of the following measures:
—Reorient or relocate the receiving antenna.
—Increase the separation between the equipment and receiver.
—Connect the equipment into an outlet on a circuit different from that to which the receiver is connected.
—Consult the dealer or an experienced radio/TV technician for help.
FCC Radiation Exposure Statement
This device complies with FCC SAR exposure limits set forth for an uncontrolled environment.
SAR compliance for using the equipment in close proximity to the human body has been evaluated at 0mm.
This equipment must not be co-located or operating in conjunction with any other antenna or transmitter.
End-users and installers must be provide with antenna installation instructions and consider removing the no-collocation statement.
This device complies with Part 15 of the FCC Rules. Operation is subject to the following two conditions:
(1) this device may not cause harmful interference, and
(2) this device must accept any interference received, including interference that may cause undesired operation.
Caution!
Any changes or modifications not expressly approved by the party responsible for compliance could void the user's authority to operate the equipment.
Canada Statement
This device complies with Industry Canada's licence-exempt RSSs. Operation is subject to the following two conditions:
(1) This device may not cause interference; and
(2) This device must accept any interference, including interference that may cause undesired operation of the device.
This equipment should be installed and operated with a minimum distance of 0mm between the radiator and your body.
This transmitter must not be co-located or operating in conjunction with any other antenna or transmitter.
The device for operation in the band 5150–5250 MHz is only for indoor use to reduce the potential for harmful interference to co-channel mobile satellite systems.
The Global Positioning System (GPS) is a constellation of satellites that a GPS receiver uses to calculate geographical positions. To determine a position, data from at least three satellites is required. To determine elevation, the data from four or more satellites is required. Accuracy of the positioning varies from 10 feet to several hundred feet, depending on vehicle placement and the surrounding environment.
Geographical terrain (such as mountains), man-made structures (such as highway overpasses, bridges, and tall buildings), as well as weather can interfere with the GPS signal. For best GPS reception, position the device and mount with a clear line of sight to the sky. Some vehicles may have a limited view of the sky due to metal sun shields or a metallized windshield coating.
Map data includes the geographical coordinates for address locations and points of interest (POIs). With GPS reception, your device calculates a route to your selected location.
VIP Customer Support
Questions about using OverDryve™? Our team is ready to help.
Call toll-free:
800-237-7270
E-mail:
support@randmcnally.com
Table of Contents
1. Your OverDryve™ 1
Caution: Important Safety Information....1
Box Contents....2
Install the Mount 2
Using the Android Home Screen 4
2. Getting Started....5
Setup 5
Connect to the Internet....6
Register Your Device....7
Connect to Bluetooth....8
Connect to Your Truck Stereo 9
Device Settings....11
3. Messaging 14
4. Phone 16
5. Navigation....17
How the Truck GPS App Works ....17
Main Menu....18
Preferences 19
Search For an Address....23
Helpful Tips on Entering Addresses....24
Route Map Window 25
View Directions....26
Exits Quick View 28
Virtual Dashboard....29
Traffic....31
Weather 33
Fuel Prices 34
Route to Here, Set Origin, Add as Via 35
6. Truck Tools....36
7. DriverConnect 41
8. TripMaker....42
9. Road Atlas....43
10. Cameras 44
Dash Cam 45
Video Files 45
11. Entertainment......46
Bluetooth Player....46
Phone Playback....46
FM Transmitter 47
SiriusXM Radio 48
SiriusXM Functions....49
12. Troubleshooting....51
Restarting the Device 51
13. More Information....52
Caution: Important Safety Information
Navigation
- Use this device at your own risk.
- Attend to this device only when it is safe to do so.
- Traffic laws and regulations always have priority over any instructions from the navigation system.
NOTE: If you do not understand the spoken instructions or are unsure of what to do, refer to the navigation map on your device.
Installation
- Make sure that the mount is securely mounted and properly adjusted before each trip.
- Make sure that the mount does not impair the driver's visibility.
- Do not attach the mount within the airbag deployment zone.
- Install the mount in a manner that minimizes risk in the event of an accident.
- After installation, check all safety-related equipment to ensure that it operates without interference from the device, its cables, or any other accessories.
- Connect the wall charger to a 120V or 240V outlet only.
- Connect the vehicle charger to a 12V outlet only.
Device
- Do not use sharp-edged objects on the device touch screen.
- The device is not waterproof and is not protected against water damage.
- Protect the device from extreme temperatures. Operating temperature for the device is between 32 degrees F and 120 degrees F.
- Do not open the device casing.
- Do not attempt to replace the battery. Contact Rand McNally Customer Support with questions about the battery.
• Always follow local regulations when disposing of this device.
NOTE: Make sure that there are no kinks in the cable and that it will not be damaged by any sharp objects.
NOTE: Use only a moist cloth to clean the device.
NOTE: Do not pull the cable to unplug the unit.
Box Contents
1 VerDryve " tablet
2 mart mount
3 Ati-glare screen protector
4 Bracket with suction cup
5 M transmitter antenna
6 Ash mount disc
7 BX cable
8 Vehicle charger
9 \$B wall charger
10 SiusXM antenna

OverDryve™ Pro User Manual 2
Install the Mount
Note: Follow all local regulations governing the placement of the mount.
- Select an area with a line of sight to the sky and GPS satellites.
- Clean and dry the mounting area.
- Remove the suction cup protective film.
- Attach the two pieces of the mount together and lock into place.
- Adjust the angle of the mount.
- Pull the suction cup lever up to release suction.
- Plug the power cord into the mount and the vehicle's 12-volt power source.
- Optional: To use your vehicle's speakers, connect an AUX cable from the Smart Mount AUX out to your vehicle's AUX in port.
- Optional: To use the SiriusXM satellite radio features, see the instructions in Section 11 (Entertainment).
- Place and hold the mount suction cup against the mounting surface.
- Press the suction cup lever down until it snaps into place.
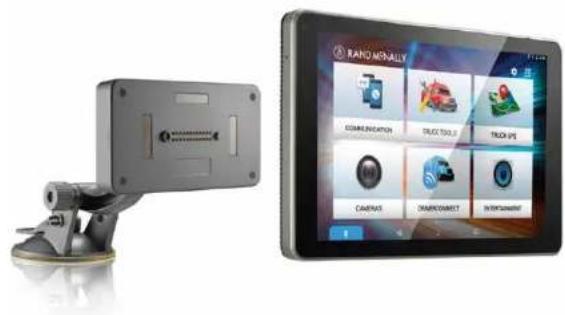
- Snap the tablet onto the mount.
- Adjust the tablet so that it can be easily seen and does not block the driver's line of sight.
OverDryve™ Pro

Sirius XM® smart mount

Using the Android Home Screen
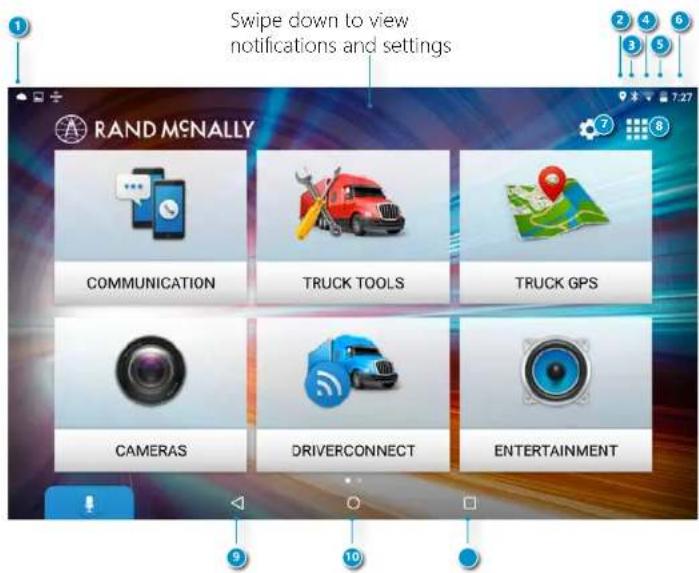
After you turn on your device, the home screen will display.
At the top of the home screen is the status bar. It displays important information like your Wi-Fi connection, remaining battery life, time, etc. The status bar will display at the top of almost every screen.
Swipe down at the top of the status bar and your Notifications panel will display. The tablet notifies you when something needs your attention, such as an e-mail, text message, or device update.
Tap or swipe down in the Notifications panel and a Quick Settings panel will display. The Quick Settings panel contains often used features such as Wi-Fi connection, Bluetooth, and location services (GPS). It also displays an Android Settings icon in the top right corner. Tap the Android Settings icon to access a full menu of device settings.
1 Notifications icons
2 GPS indicator
3 Bluetooth indicator
4 Wi-Fi indicator
5 Battery power
6 Current time
7 Settings (Android Settings and OverDryve™ Setup)
8 All apps
9 Back
10 Home
11 View open apps

Setup
Connect to the Internet
Enable the Wi-Fi hotspot on your smartphone or other in-vehicle device and then connect OverDryve ^™ or connect to your home Wi-Fi to complete setup.
Register your device
Register with Rand McNally for updates and support.
Connect to Bluetooth
Enable Bluetooth on your smartphone and pair OverDryve™ to enable hands-free calling and texting, music streaming, and voice assistance.
Connect to your truck stereo system
You can listen to audio through any of the following four methods:
- Plug an AUX cable into the Smart Mount and the AUX port in your truck Note: Do not plug the AUX cable into the audio out port on OverDryve".
- Use the Smart Mount speaker.
- Use the FM Transmitter. To use the FM transmitter, attach the antenna to the Smart Mount. On OverDryve™, tap Entertainment > FM Transmitter and follow the instructions
- Add an AUX input to your existing truck. Visit randmcnally.com/aux-install to learn more.
Note: If your device has not been able to detect your location, you may be asked to set your time zone.
2. Getting Started

Connect to the Internet
First activate the Wi-Fi hotspot on your phone or in your truck. From the OverDryve™ setup screen, tap Get Started to begin the setup process. Tap Find my hotspot.
Select a Wi-Fi network and connect.
A message will display that states you are connected. Tap Next.
2. Getting Started
Register Your Device
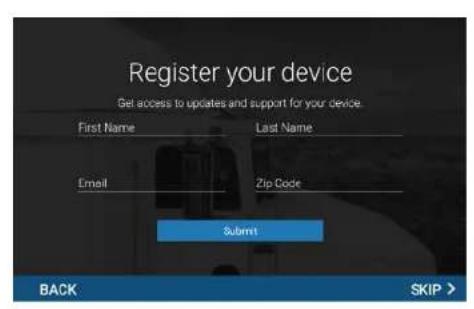
Register your device to receive important device updates and support.

Tap Next to proceed to the next step.


Connect to Bluetooth
Connect to your phone via Bluetooth to allow OverDryve™ to call and text hands-free and to stream music from your phone to your truck's stereo system.
First enable Bluetooth on your phone.
From OverDryve ^™ :
- Tap Connect.
- Tap Scan For Devices. A Bluetooth pairing request will display on your OverDryve™.
- Tap Pair. If successful, the screen will display a connected message. If the OverDryve™ failed to connect, verify that your phone is in range and Bluetooth is enabled.
Help for Connecting to Bluetooth
If you are having issues connecting OverDryve™ to your smartphone via Bluetooth, these steps can help:
- Make sure that your OverDryve™ and smartphone are in close proximity to each other, preferably within five feet.
- Check that both devices do not have a low battery. Some devices will disable Bluetooth to conserve power when the battery gets low.
- Power the devices off and then back on.
- Turn off any devices that may be interfering with the Bluetooth connection. For example, if you usually pair your OverDryve" with a different phone, turn off that phone.
2. Getting Started


Connect to Your Truck Stereo
To listen to audio through your truck stereo, the tablet must be in truck mode. To put the tablet in truck mode, place it on the Smart Mount and plug the mount into a power source using the vehicle charger.
The optimal way to connect to your truck stereo is with the provided AUX cord. You can also connect wirelessly via OverDryve's FM transmitter.
To connect with the AUX cable:
-
Tap Connect via AUX.
-
Plug the right-angle end of the AUX cable into the OverDryve™ Smart Mount.
Note: Do not plug the AUX cable into the audio out port on OverDryve™.
-
Plug the other end into your truck's AUX jack.
-
Set your truck's audio source to AUX.
To use the FM transmitter:
- Attach the FM antenna to the Smart Mount.
- Unplug the AUX cable if it is plugged in.
- Tap the settings icon located in the top right corner of the OverDryve™ screen.
- Tap OverDryve™ Setup > Audio > Connect via radio.

Connect to Your Truck Stereo (Continued)
Using the OverDryve™ Speakers
Your tablet has its own speaker, and there's another powerful speaker in the Smart Mount. You can use the OverDryve ^™ speakers instead of connecting to your truck stereo. If you want to connect to the truck stereo later, tap the Settings icon in the top right corner of the screen, then OverDryve ^™ Setup > Audio.

Device Settings
Swipe down from the top of the screen to view the Quick Settings panel and adjust the following frequently used features:
- Battery Power
- Settings Icon – Access a full menu of all settings
- Brightness – Changes the screen brightness
• Wi-Fi – Shows available networks - Bluetooth
• Airplane Mode – Turns off Wi-Fi and Bluetooth - Auto Rotate – Controls whether the screen rotates when you rotate the tablet
- Location – Turn on/off location services (GPS)
- Cast screen – Project your screen onto a compatible device.
2. Getting Started
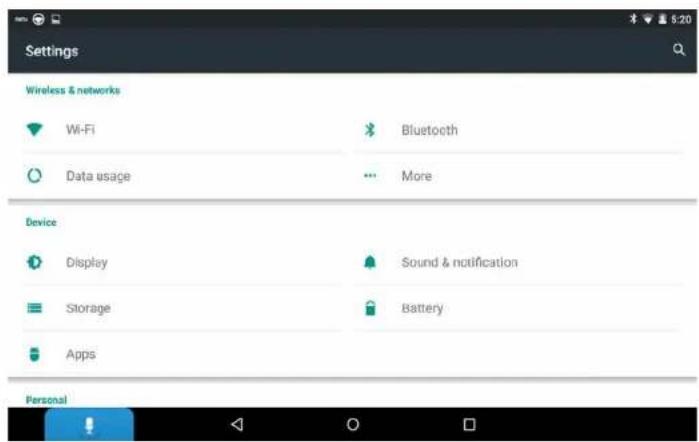
From the Quick Settings panel, tap the Settings icon to access a full menu of settings for your device.
Wireless and Networks
- Wi-Fi – View and connect to available Wi-Fi networks.
- Bluetooth – Pair with your smartphone using Bluetooth.
- Date Usage – View your Wi-Fi and app usage.
Device
- Display – Set brightness, wallpaper, appearance, etc.
- Sound & Notification – Set volumes for different features and enable and disable sounds.
- Storage – View how much storage is available on your OverDryve™
- Battery – View time spent on battery and battery power used by different apps.
- Apps – View apps. Swipe left to view: downloaded, running, all.
2. Getting Started
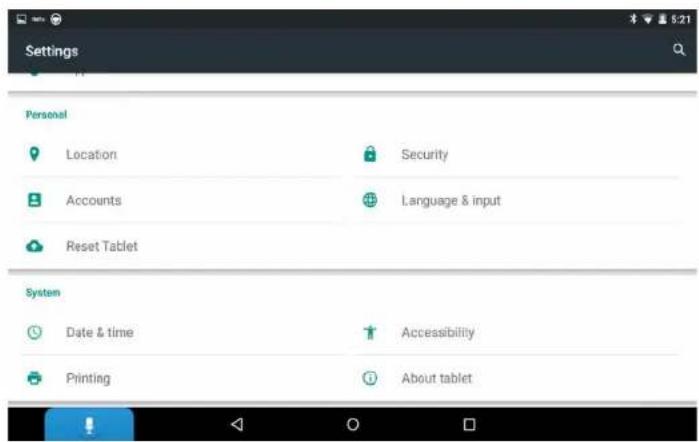
Personal
- Location – View location mode, location requests, and location services. High accuracy mode is recommended.
- Security – View lock, password, encryption, and credential settings.
- Accounts – View and add accounts for the Rand McNally market.
- Language & input – Set language and keyboard information, as well as speech options and pointer speed.
- Reset Tablet – Reset the device to its factory settings.
System
- Date & time – Set date, time, time zone, and date and time format.
- Accessibility – Enable spoken feedback, captions, and large text help visually impaired users.
- Printing – Enable printing services.
- About tablet – View battery and network status. Also view legal information such as model numbers and build numbers.
3. Messaging
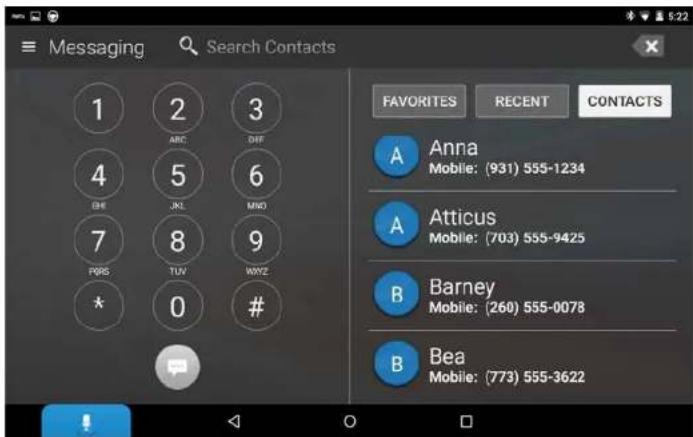

Pair OverDryve™ with your iPhone or Android phone via Bluetooth to send and receive texts hands-free. The OverDryve™ Voice Assistant integrates with your phone's voice assistant. OverDryve™ automatically syncs your text messages so you can see new messages and browse through old ones without reaching for your phone.*
Note: If you have an iPhone, make sure your phone is not open to the messaging screen. When the messaging screen is open, the iPhone automatically marks the message as "read". The iPhone won't transmit "read" messages over Bluetooth, so OverDryve™ will not be able to access them.
To send and receive texts hands-free, tap the Voice Assistant which will ask who you would like to text. Speak the name of any of your contacts. The Voice Assistant will prompt you for your message and then ask you if you would like to send it. The Voice Assistant can also read back text messages that you receive.
Set your favorite contacts by clicking the star icon next to their names. Easily access them in the favorites tab.
If you want to send a text without using the Voice Assistant:
- Tap Messaging.
- Enter the phone number or select a name from your Contacts.
- Tap the yellow messaging icon.
- Tap Write a message in the lower left corner of the screen.
- Write the message and tap the blue arrow to send it.
*Supported on Android phones only.
3. Messaging
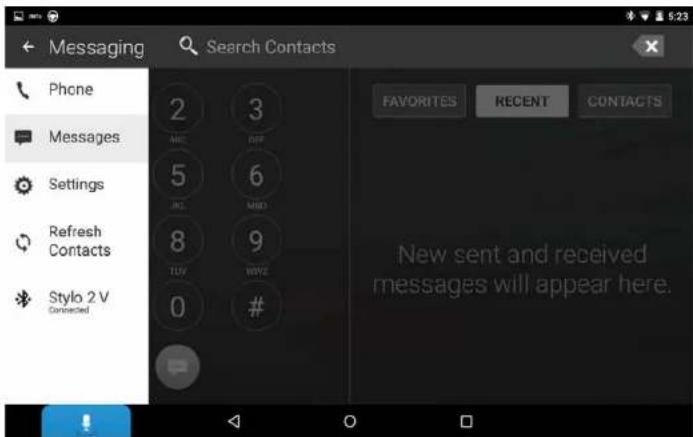

To enable text message notifications:
- From Messaging, tap the Settings icon in the top left corner of the screen.
- Tap Settings.
- If Enable Messaging Notifications is checked, notifications are already enabled. If not, tap to turn on the feature. The status will show "Enabled".
To control what text message information displays on OverDryve ^™ :
- From Messaging, tap the Settings icon in the top left corner of the screen.
- Tap Settings
- If Show Message Content is checked, tap to uncheck. The status will change to "Hide Content".
4. Phone

Pair OverDryve™ with your iPhone or Android phone via Bluetooth to make calls hands-free. OverDryve™ automatically downloads your contacts and call history when you get in the truck.
Set your favorite contacts by clicking the star icon next to their names. Easily access them in the favorites tab.
To set the ringtone or notification ringtone:
- From Phone, tap the Settings icon in the top left corner of the screen.
- Tap Settings.
- Tap Ringtone or Notification Ringtone and choose your selection.

OverDryve™ Pro User Manual 15

How the Truck GPS App Works
- When your tablet is attached to the magnetic mount, the Truck GPS boost within the mount will provide accurate GPS location, even without a Wi-Fi connection.
- Weather, traffic, fuel prices, local search within the Truck GPS app (including hands-free navigation), and device updates require a Wi-Fi connection.
- To exit the Truck GPS app at any time, swipe down from the top of the screen or up from the bottom to view the Android menu bars. Or, tap the home button on the top of the device.
5. Navigation
Basic Map View

Expanded Map View

OverDryve™ Pro User Manual 18
Main Menu
1 Search For an Address
Tap to type in any address or search by keyword.
20passDirection
Tap to change the map display. An icon displays the selected option: North up (N), heading up (arrow), or 3D.
3 ožm In
Tap to zoom in.
4 Rute Distance
Reflects the distance from your point of origin to your destination.
5 ožm Out
Tap to zoom out.
6 ap View Tab
Tap to expand the map screen. By default, icons are minimized to show simply the search bar, compass direction, and zoom. Tap again to switch back to the default view.
7 bPoints of Interest (POI)
Tap to view POIs along the exit ahead.
8 vlei Data
Tap to view fuel, weather, and traffic along the route. (Requires Wi-Fi)
9 Mutual Dashboard
10 uFrent Speed
Tap to display the Virtual Dashboard.
11 Cdk/Elevation
Tap to toggle between the clock and elevation.
12 Preferences
Tap to set general, route, map, or warning options.
Preferences
- Tap and to view the options.
• Tap the option to be set.
• Enter the new information.
• Tap Back ◀ to save changes.
General Preferences Options
| System SettingsGPS RepairSystem Update | System Settings |
| Skin Type | ModernClassic |
| Vehicle TypeCar/Light Truck | TruckBus |
| Yard Time Zone | HawaiiAlaska |
| Pacific Time | Arizona |
| Mountain TimeCentral TimeIndiana (East)Atlantic (Canada) | Newfoundland |
| Day / Night ModeAlways DayAlways Night | Automatic |
General Preferences Options
My Custom POIs Manage Custom POIs Select a Category to Edit Hide All Icons on Map Go to Map
Mileage Log Truck/Bus Only Car Only Truck & Car Don't Log Mileage
Screen Click Click Off Click On
Tutorial View Tutorial and Tips
Voice Name Allison Samantha Susan Tom Language English (Basic) English (Advanced) Español Français
For the screen and spoken instructions.
Units U.S. Standard Metric Auto Select
Load Prompt/ Prompt Notification Always Loaded
Preferences - continued
General Preferences Options
| Toll Prompt/Notification | EnabledDisabled |
| Clock Setting24-Hour Clock | 12-Hour Clock |
| Contact & About | Tap to show version information andcopyrights. |
Route Preferences Options
| Note: The default settings for your device were optimized for the vehicle route. Use the options below to fine-tune these settings. |
| Use Traffic | On |
| Off |
| Recalculation | Manual Recalculate |
| Auto Recalculate |
| Freeways | Allow All (Default) |
| Avoid Freeways | |
| Avoid Small Roads | |
| Prefer Freeways |
| Ferries | Allow Ferries |
| Avoid Ferries |
| TunnelsAvoid Tunnels | Allow Tunnels |
| Manage Avoid List | RoadsStates/ProvincesAreasRoutes |
OverDryve™ Pro User Manual 20
Route Preferences Options
Turn Announcements Set three distances at which you want to be warned about an upcoming turn. The first announcement will be the farthest from the turn and the third the closest.
Junction View Distance Tap - r + to set the distance
ETA Adjustment Increase ETA more Increase ETA some ETA OK Decrease ETA some Decrease ETA more
Route Fastest Route Shortest Route
Tollways Allow Tollways Avoid Tollways
U-Turns Allow U-Turns Avoid U-Turns
Cross Country Borders Allow Crossing Borders Avoid Crossing Borders
Dirt Roads Avoid Dirt Roads Allow Dirt Roads
Manage Avoid List Roads States/Provinces Areas Routes
Fast Recalc Off On
Preferences - continued
Map Preferences Options
| .Map Style | Light |
| Dark | |
| High Contrast |
Map Auto Zoom Off
| On, Auto Scale |
| On, Street Scale |
| On, City Scale |
| On, State Scale |
Set to auto scale to keep the current vehicle position and the next turn in the map view at all times. Set to street/city/state scale to specify the maximum scale of the zoom.
Note: When in 3D Map mode with Auto Zoom on, the map will change to North Up at certain zoom levels. Also, the visual turn screen will not appear in 3D mode with Auto Zoom on because a close up view of the turn is not needed.
Lane Guidance Off
On
POI Icons Off
On
Select icons to display on map.
Select restaurants, banks, gas stations, etc. to display on the map. Tap any category to fill in the square and display those icons.
Map Preferences Options
| Truck POI Icons | Off |
| On |
Select icons to display on map.
Address Book Icons Off
On
| Truck Icon | 2D |
| 3D |
| Bus Icon | 2D |
| 3D |
| Car/Light Truck Icon | 2D |
| 3D |
Scroll left or right to select the vehicle icon and color to display on the map.
| Map View Mode | Heading Up |
| North Up | |
| 3D View |
| Route Colorset the route color. | Move the slider to the left or right to |
Preferences - continued
Warning Preferences Options
Warning/Alert Prompts None
Audio & Visual
Visual
Audio
Auto Dismiss Warnings Never
After 2 Seconds
After 10 Seconds
After 30 Seconds
Curve Warnings Set warning distance to curves
areas by using the + and - buttons.
Hill Warnings Set warning distance to upcoming hills
areas by using the + and - buttons.
Engine Brake Warnings Set warning distance to begin braking
areas by using the + and - buttons.
Narrow Road Warnings Set warning distance to narrow roads
areas by using the + and - buttons.
State/Province
Border Alert
Set warning distance to state/province
borders by using the + and - buttons.
State or Province Border/ Off
Timezone Change
On
Warning Preferences Options
Warning Display Size
Small Bar
Full Screen
Toll Booth Alert
Set warning distance to toll booths
by using the + and - buttons.
Construction Area
Set warning distance to construction
areas by using the + and - buttons.
Speed Limit
Set warning distance to speed limit
- buttons.
Set the amount over the posted limit at
which the warning appears.
Set a user-defined maximum speed to
be warned whenever the vehicle
exceeds that speed, regardless of limits.
Speed Limit Change
Set warning distance to a change in
the speed limit by using the + and -
buttons.
Weigh Station
Set warning distance to weigh stations
by using the + and - buttons.
Note: To turn warnings off completely, tap "-" until OFF displays.
5. Navigation
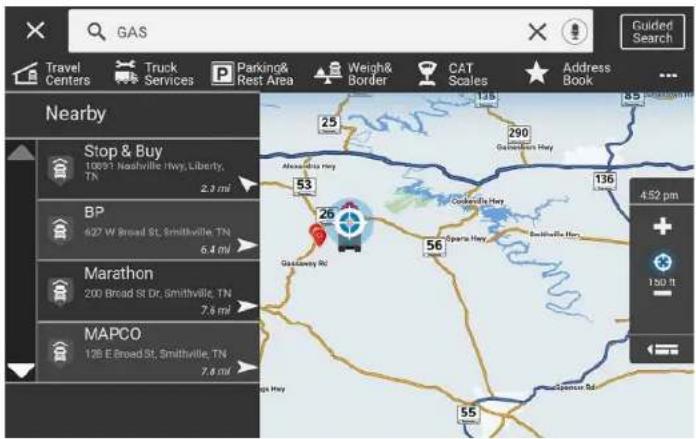

Search For an Address
- Tap the search bar at the top of the Navigation screen to type in any address or search by keyword. Or, tap any of the categories to search for specific types of destinations.
- Once a destination is entered, tap Navigate and your route options will display.
- Select either the fastest route or an alternate route.
- Tap Start Navigation to begin the route.

OverDryve™ Pro User Manual 24
Helpful Tips on Entering Addresses
Auto-Complete Feature
Enter the first few characters in a name and a short list displays names that start with the typed characters. Continue entering characters until the searched-for name displays in the list. Tap the name to select it.
Cities
Cities with common names, such as "Athens", may have multiple locations. The tablet will list all locations. If a name does not display, continue typing characters until the name you are looking for displays in the list.
State or County Routes
If you're entering a State or County Route, it's usually best to first either enter the State or County initials, (for example, State Road 535 would be entered as "SR") but you may also need to try other options, such as "State Road" or "CA" for California, for example.
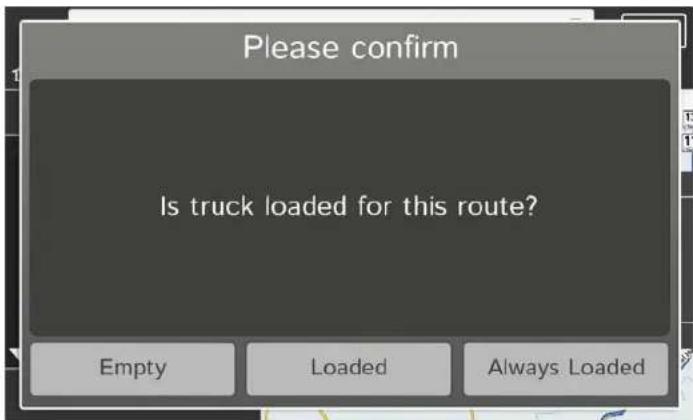
Truck Loads
After setting a destination, you must confirm if the truck is loaded or not. Tap a button to indicate:
Empty: The truck is not loaded
Loaded: The truck is loaded
Always Loaded: The Loaded option will always be selected, and this page will no longer display.
5. Navigation
Route Map Window

1 NextManeuver
Distance to the next maneuver. Tap to zoom in.
2 RoadName
Name of the street you will turn onto next.
3 Search For a Address
Tap to type in a new address or search by keyword.
4 ViewDirections
Tap to select a Route Display Option, such as detail view, highway view, trip summary, or summary map view.
5 CompassDirection
Tap to change the map display. An icon displays the selected option: North up (N), heading up (arrow), or 3D.
6 BxQuick View
Tap to view POIs along the exit ahead.
7 Vi Data
Tap to view fuel, weather, and traffic along the route.
8 o7m In
Tap to zoom in.
9 Rute Distance
Reflects the distance from your point of origin to your destination.
10 o7m Out
Tap to zoom out.
11 pSed Limit
Tap to open a "Tell Rand" message about speed limits.
12 View Tab
Tap to minimize the icons displayed. Tap again to switch back.
13 oRate Options
Tap to change route settings, save, or cancel the route.
14 Mual Dashboard
15 u Brent Speed
Tap to display the Virtual Dashboard.
16 Current Information
Tap to view current information by city, street, or upcoming intersection. Also displays advanced lane guidance and weather overlay key, when enabled. Tap to change.
17 ETA/Remaining Mileage and Elevation
Tap to toggle between ETA/Mileage and elevation.
18 Preferences
Tap to set general, route, map, or warning options.
Detail View

Highway View

View Directions
Route Display Options
When first opened, the slide-out list displays in Detail View showing each maneuver.
Use

and

w the instructions.
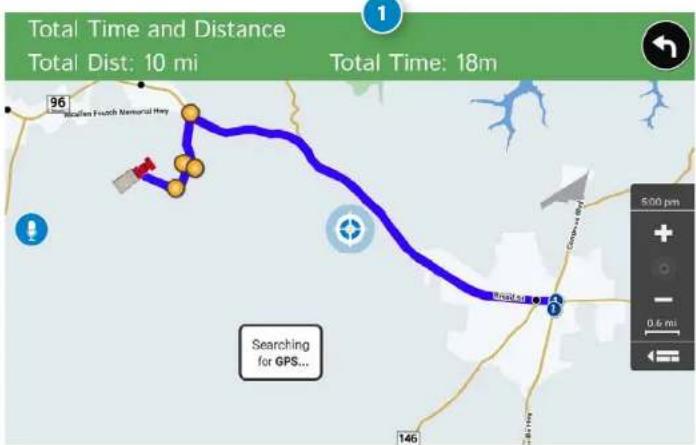
To change the route display, choose Detail View, Highway View, Trip Summary (for multi-stop trips), or Map View (to view the route from start to finish).
1 Distance
Displays the distance for each road segment.
2 Street/RoadName
Displays the street name you will be on after performing the next maneuver. Tap any item in the list to view it on the map and to detour around it if necessary.
3 Leg
Number of the leg (for multi-stop trips) and distance.
4 gliway Name
Displays the highway you will be on.
Trip Summary View (for multi-stop trips)

Map View (entire route)
View Directions Continued
1 Total Distance and Time
Displays the total distance and time for the entire multi-stop trip.
2 Leg
Number of the leg (for multi-stop trips) and distance.
3 Destination
Destination for that leg of the trip.
4 eMove Stop
Tap to remove the stop from the trip.
5. Navigation

Exits Quick View
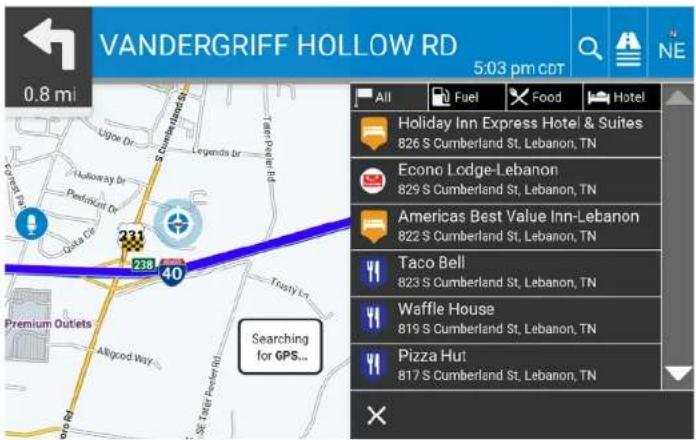
Slide out to show Points of Interest and amenities at upcoming exits. The list displays the distance to the next exit, exit number, and a count of available amenities.
- Tap an exit to bring up a list of POIs and amenities at that exit.
- Tap All, Fuel, Food, or Hotel to display locations by category.
- Tap any item in the list to route to that location.
OverDryve™ Pro User Manual 28
Tap here
Virtual Dashboard
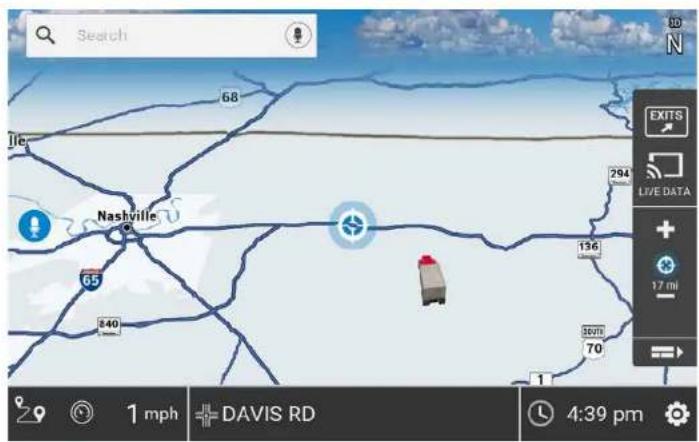
To show the Virtual Dashboard, tap the Virtual Dashboard icon or the Current Speed.
1 Gather trip information for up to three trips. Includes odometer settings, hours, and speeds.
2 Return to the Route Map Window.
3 frise and sunset times based on vehicle location (latitude/longitude) and day.
4 Current speed
NOTE: Turns red when speed limit warning exceeded.
5 Elevation at current location.
6 Nearest cross street and current location.
7 Latitude and longitude of your current location.
8 Save your current address to your address book.
9 Your current location as the route origin.
10 Reset trip information for the selected trip (Tab 1, Tab 2 or Tab 3).
11 Select to automatically reset the information in each tab after the vehicle has remained stationary for the specified number of hours.
12 Percentage of current trip completed, distance to next maneuver, and the number of miles and time spent on the trip to this point.

OverDryve™ Pro User Manual 29

Manually Reset Trip Information
To manually reset trip information:
- Tap the tab you want to reset (1, 2, or 3).
- To set the odometer for the selected tab back to zero, tap Reset. Information is captured as you travel the route.
Automatically Reset Trip Information
To reset trip information after the vehicle has remained stationary after a specific number of hours:
- Tap the tab you want to reset (1, 2, or 3).
- Tap Auto Reset.
- Tap + to increase the number of hours.
-
Tap - to decrease the number of hours.
-
To save changes, tap Change. The tab displays the auto reset number of hours.
5. Navigation


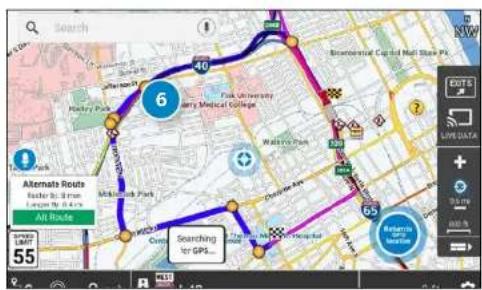
OverDryve™ Pro User Manual 31
Traffic
NOTE: This feature requires a Wi-Fi connection.
To view current traffic information along your route and near your location:
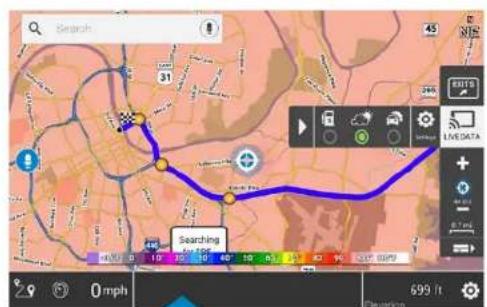
1 Tap Live Data > Settings on the map screen. Tap the Traffic radio button to display the traffic overlay on the map.
2 Tap the Traffic tab.
3 The Traffic tab displays traffic events along your route.
4 Use the Flow and Incidents checkboxes to view or hide each type of traffic events
5 TaptheX to return to the map.
6 Traffic pattern display on the map as colored lines. Traffic Incidents display as icons.
Traffic indicators:
Green: Light or no traffic
Yellow: Moderate to heavy traffic
Red: Slow traffic
5. Navigation
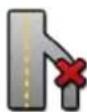
Traffic Icons

Accident Accident


Incident

Closure
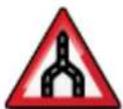
Carriageway
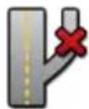
Exit blocked Entrance blocked Traffic Carpool Road Work


Obstruction

Dangerous Road Condition


Temperature
Chance of Precipitation

Wind

Activities

Security

Delay

Cancel

Travel Time

Size/Weight Limit Visibility


Heavy Traffic

Moderate Traffic

Light Traffic
5. Navigation


Tap to toggle between weather, city, street, and/or intersection.
OverDryve™ Pro User Manual 33
Weather
• This feature requires a Wi-Fi connection.
- The refresh speed of the weather display is dependent on the connection speed. Weather information is updated every few minutes while the Wi-Fi connection is active.
- Weather display depends on active weather patterns and map zoom level.
To view current weather information and the three-day forecast for your location, tap Live Data > Settings on the map screen and tap the Weather tab.
1 View details for current weather alerts.
2 Select type of weather overlay to display on the map.
3 View weather information at your destination.
NOTE: You can view weather information at any other location by tapping the map and then the Wi-Fi icon and the Weather tab.
4 Select from a variety of weather types to display on the map:
- No weather (turn off)
- Traffic impact
- Temperature
- Feels like
• Current precipitation intensity and type
• Probability of precipitation
• Forecasted precipitation intensity, type, and clouds
• Forecasted precipitation intensity and type - Dew point
- Relative humidity
- Wind speed
5 Slide to adjust the transparency of the overlay on the map. Note: Use the slider to readjust for visibility when switching between day and night modes.
5. Navigation
OverDryve™ Pro User Manual 34
Fuel Prices
Note: This feature requires a Wi-Fi connection.
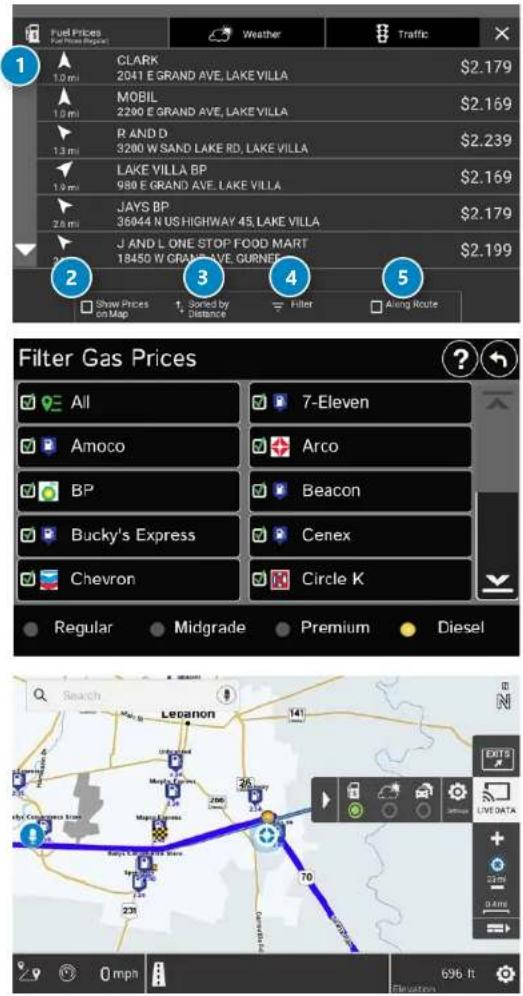
To show fuel prices, tap Live Data on the map screen and tap Settings > Fuel Prices.
1 Displays stations and prices, with distance as the crow flies.
2 h€ck to show the icons and prices on the map screen.
3 of by distance.
4 Apply filters for type of fuel and specific brand.
5 h€ck to show fuel prices along the route.

Route to Here, Set Origin, Add as Via
You can drag the map with your finger to move it to another location. The crosshairs will display when you move the map. Place the crosshairs over the location you are looking for. When you find the location, press and hold the screen for a few seconds and choose Route to Here, Set Origin, or Add as Via.
1 Crosshairs
Drag the crosshairs over the desired location.
2 Route to Here
Tap Route to Here to navigate to the location.
3 Set Origin
Tap to set the location as the origin. The origin is the starting point of the route.
4 Save to Address Book
Add the location to your address book.
5 sAs Via
Add the location as a via point (interim stop) between the origin and the destination.
6 ePmanent Avoid
Add the location as a point to avoid on all future routes.

Truck Tools
Note: Some features are not available in Truck mode.
Truck Info: Enter truck information (weight, length, etc.).
Status, Trails, Mileage, and Fuel: View driving, on-duty, and maintenance timers; state logs; trails; and fuel purchase information.
Motor Carrier's Road Info: Quickly access contact information for emergency and local regulatory agencies.
Fuel Manager: Track fuel efficiency, usage averages, maintenance, and repairs. Requires a separate account.
Motor Carrier's Road Atlas: Displays the Road Atlas app.
Notes: Add, edit, and manage notes.
Calendar: Sync with an existing calendar program.
Calculator: Access a scientific calculator.
Quick Planner: Between any two cities or towns, quickly calculate the distance, driving time, and cost.
Tell Rand: Compose a message to send to Rand McNally.
Truck It Smart: Locate loads or trucks in your area, and fulfill routine, last-minute, rush or complex freight orders with ease. Requires a separate account.
Unit Converter: Quickly convert distance, weight, and temperature.

Status
Note: Odometers count up and record the current mileage. Maintenance counters count down. When a maintenance timer counts down to 2,000 miles, a reminder displays each time the TND starts.
- Tap Truck Tools.
- Tap Status, Trails, Mileage, and Fuel.
- Tap the Status tab.
Tap a field to make adjustments to mileage. The mileage continue to count down from the changed value.
- Tap -- to decrease the setting.
- Tap + to increase the setting.
- Tap the calculator to display a keyboard. Enter a number and tap Enter.
- Tap Change.
On the right, use the Reset To field to set the most common reset value, normally zero. At the beginning of each day or run, tap Reset to set the value back to zero for odometers and 15,000 or 35,000 for maintenance odometers.
- Tap -- to decrease the setting.
- Tap + to increase the setting.
- Tap the calculator to display a keyboard. Enter a number and tap Enter.
- TapReset.
Mileage
- TapTruck Tools.
- Tap Status, Trails, Mileage, and Fuel.
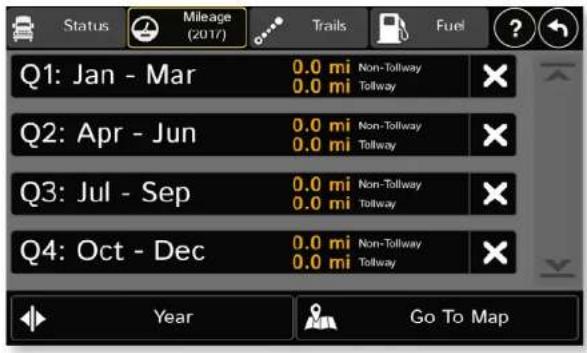
- Tap the Mileage tab to view list of logs for the current year, ordered by quarter.
- To view quarterly mileage logs for previous years, tap Year. Tap on a quarter to view log entries.
- Tap on a quarter to view details. Tap View by Date/View by State and Empty/Loaded for more information.
To delete a log, tap on the ✗ next to the log entry to be deleted. Tap Yes to delete the log.
Note: Load Option and Driver Status control how logs are recorded.
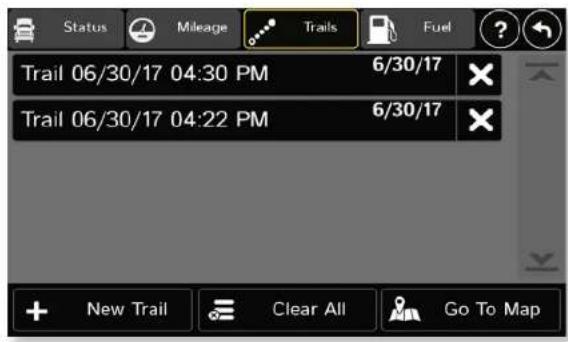

Trails
Use Trails to record a "bread-crumb" path of GPS coordinates where your truck has traveled.
- Tap Truck Tools.
- Tap Status, Trails, Mileage, and Fuel.
- Tap the Trails tab.
- To record a trail, tap New Trail.
- To end the trail, tap the pause icon on the map screen.
- The trail is recorded in the Trails tab.
- Tap on a trail to view details.
- Tap Show on Map to display the trail on the map screen.
- Tap Edit Name to change the name of the trail.
- Tap Set Color to change the color of the trail.

Note: The Trails feature is also accessible from the Address Book.
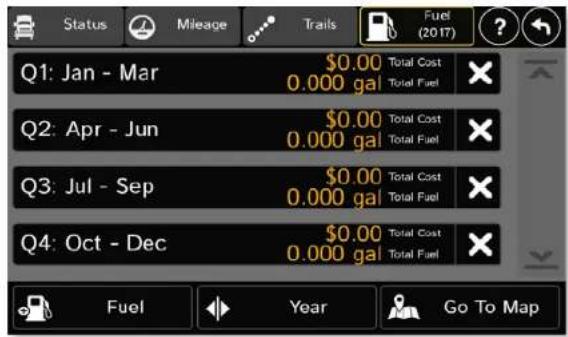

Fuel Logs
- Tap Truck Tools.
- Tap Status, Trails, Mileage, and Fuel.
- Tap the Fuel tab to view a list of fuel logs by quarter.
- Tap +Fuel to record the date, location and cost of fuel purchase.
- Tap on any field to edit.
- Check Taxable to include the purchase in the fuel log.
- Tap Save (Note: Fuel economy is calculated automatically.)
- Once fuel purchases have been entered, tap on a quarter to view the details.
- You can View by State or View by Month.
- Tap the state or month to view fuel purchases.
- Tap View All to see all fuel purchases.

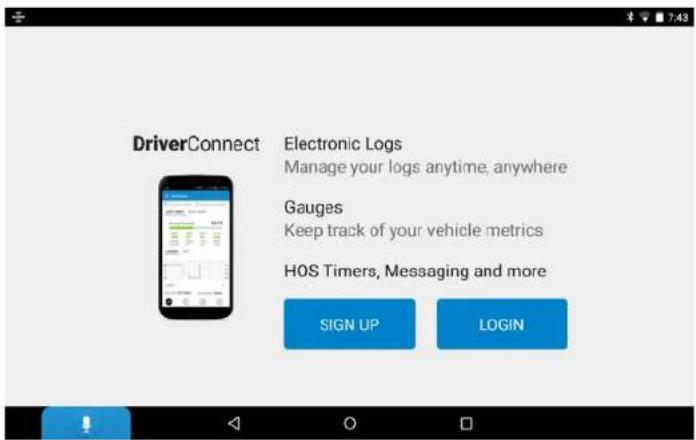
DriverConnect
The DriverConnect app provides a fully-compliant electronic logbook solution. DriverConnect lets you track and log Hours of Services, Driver-Vehicle Inspection Reports, Fuel purchases, and more. Reports can be generated for roadside inspections.
The DriverConnect app connects to a Rand McNally Electronic Logging Device (ELD) over a Bluetooth connection. The app automatically syncs driving data from the ELD with the Rand McNally DriverConnect web services via a Wi-Fi or cellular transmission.
Visit http://www.randmcnally.com/category/e-logs for up-to-date information on compatible ELDs.
Sign Up or Log In
To use DriverConnect, you must log in with an existing account, or create a new account. If you are part of a fleet, your Fleet Manager will provide login information for you.
You can use your login information to access the DriverConnect portal, where you can view reports and stored information.
Visit https://www.driverconnect.randmcnally.com to access the DriverConnect portal.
8. TripMaker
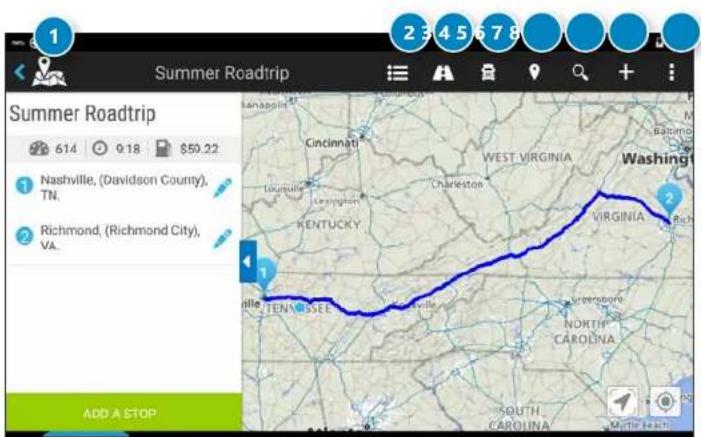

TripMaker is a trip planning app that allows you to easily browse the map and set up a multi-stop trip. Add via points and send your trip to the GPS app for routing. To access TripMaker, tap the app tray, swipe to the right to view the second app screen, then tap the TripMaker icon.
To create a trip:
- Enter the starting and ending point for your trip.
- Choose a name for it.
- Tap Create Trip.
1 Access Menu
Manage your trip options, such as update route and fuel costs.
2 Itinerary
View your itinerary.
3 Directions
Once your trip is created, tap this icon for driving directions.
4 My Trips
Access trips that you have created.
5 Points of Interest
Search categories along your route, such as The Great Outdoors.
6 Search
Search for an address or place along your route.
7 Create a Trip
Enter addresses, cities, states, or zip codes to create a trip. Add stops as needed. TripMaker will automatically order stops to minimize driving distance, but you can re-order stops by pressing and dragging stops to your desired position along the route.
8 Manage Menu
Manage your account settings, map options, and find online help.
9. Road Atlas

The Rand McNally Road Atlas is a digital version of Rand McNally's Road Atlas.
1 Legend
Tap Legend at the top right of the screen to view the roads and related symbols.
2 Maps
Tap Maps at the top right of the screen to select pages by state/area. You can also update maps here.

10. Cameras

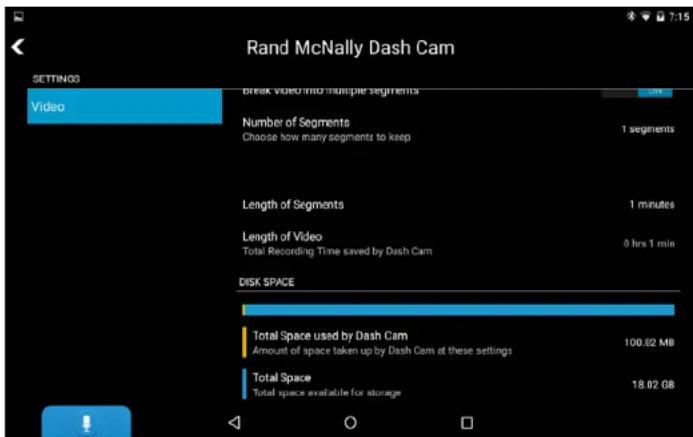
Your OverDryve™ tablet includes a built in dash cam; the lens is in the back of the device. The Wi-Fi backup camera accessory is sold separately.

Dash Cam
The Dash Cam records a video loop as you drive. Tap the red button to start or stop recording.

Records Video
Use the settings icon in the upper right corner of the camera screen to access preferences for video quality, audio, and segments.
Video Files
You can record sound and use an external storage device to keep longer videos. Use the table below to choose Quality, Segments, and Length based on the space used.
| Video Quality | Number of Segments | Length of Segments (Minutes) | Disk Space Used |
| Low 4 | 143.26 MB | ||
| Low 9 5 | 486 MB | ||
| Low 15 10 | 1.58 GB | ||
| High 4 | 189 MB | ||
| High 9 5 | 1006 MB | ||
| High | 15 10 | 3.28 GB |
11. Entertainment
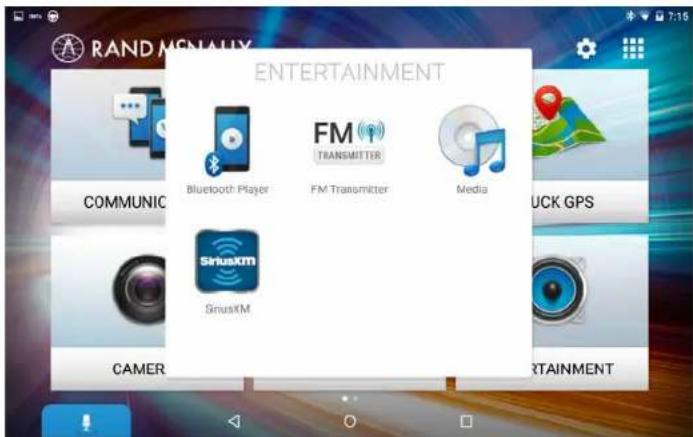
There are four options for listening to music, podcasts, audiobooks, etc.:
- Stream music from your smartphone via Bluetooth. Access the audio controls in the Bluetooth Player.
- Stream music right from OverDryve™ by downloading music apps.
- Download mp3s or other types of audio files. Access the audio controls in the Media Player.
- Listen to SiriusXM satellite radio.
You can activate the FM Transmitter to listen to audio through your speakers. For more ways to listen to audio, refer to "Connect to Your Truck Stereo" on page 9.
Note: To listen to music, the tablet must be in truck mode. To put the tablet in truck mode, place it on the Smart Mount and plug the mount into the vehicle adapter.
Bluetooth Player
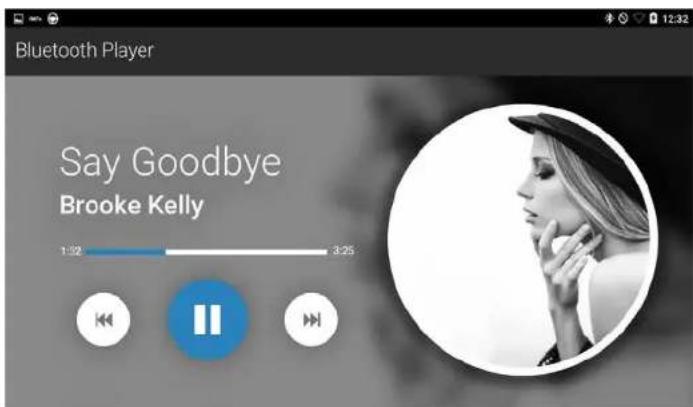
The Bluetooth player lets you stream any audio (music, podcasts, audiobooks, etc.) from your phone to OverDryve™. To get started, play some music from your phone. On OverDryve™, tap Entertainment > Bluetooth
Player. Swipe right or left anywhere on the Bluetooth player screen to change tracks. For optimal sound, turn the volume on your phone and OverDryve™ up all the way.
Note: For help with connecting to Bluetooth, see See "Connect to Bluetooth" on page 8.
Phone Playback
You can control your phone's audio controls such as Next, Previous, Play, and Pause from your OverDryve™. From the main menu, simply tap Entertainment > Bluetooth Player to access the controls.
FM Transmitter
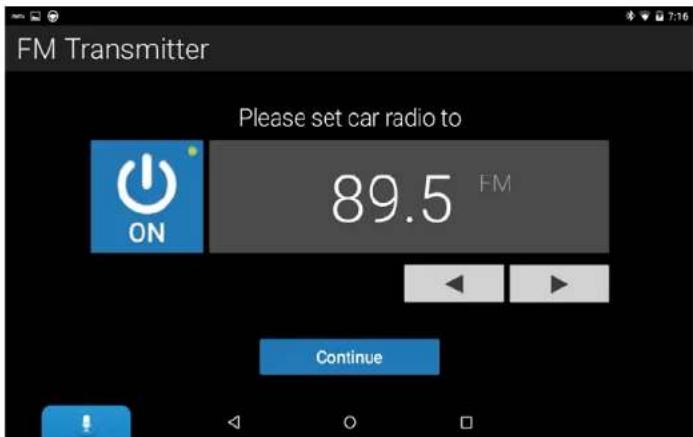
The FM Transmitter makes it easy to listen to music from OverDryve". Just tap Entertainment > FM Transmitter > On. Tune your truck radio to an open FM station and you're set.
Finding the Best Station
In order to get the best possible reception from the FM Transmitter on your truck stereo, you need to find the best FM frequency to transmit to. The best frequency to use is one where no FM radio stations are currently broadcasting on or near. FM reception can vary by geography and can also vary depending on the location of your vehicle's FM Antenna.
To start, attach the FM Transmitter antenna to OverDryve's smart mount. Next, lune your truck's FM Radio to different stations until you hear only static on a station. Be sure to use the "Tune" option in your truck and not the "Seek" option, as Seek will skip over open stations. Once you have found an open station, open the FM Transmitter app on OverDryve, turn it on and tune it to the same frequency. You should hear the static stop and you will now hear any audio playing from OverDryve.
Next, change the direction of OverDryve's FM Transmitter Antenna until you get the clearest sound. If you still hear static or the audio from OverDryve isn't clear, tune your truck's FM radio to a different open station and repeat the process.


SiriusXM Radio
Your OverDryve Pro tablet comes with a SiriusXM radio app pre-installed. To access SiriusXM, tap Entertainment > SiriusXM. The SiriusXM antenna cable must be installed, and the tablet connected to the Smart Mount.
Antenna Cable Routing
When routing antenna cable, always be careful to include enough slack in your cable to accommodate open doors and driver space. Use things typically found around the home, like electrical tape, to secure cables in areas so that hinges do not pinch the cable with the door. Hide any excess cable in the cabin trim.
Activating Your Radio
After installing your OverDryve Pro tablet with SiriusXM smart mount and the antenna, launch the SiriusXM application from the ENTERTAINMENT category. You should be able to hear the SiriusXM preview channel on Channel 1. If you cannot hear the preview channel, please check the installation instructions to make sure your SiriusXM smart mount tuner is properly installed.
After you can hear the preview channel, tune to Channel 0 to find the Radio ID of your tuner. In addition, the Radio ID is located on the bottom of the SiriusXM smart mount tuner. You will need this number to activate your subscription. Write the number down for reference. Note: the SiriusXM Radio ID does not include the letters I, O, S or F.
In the USA, activate online or by calling SiriusXM Listener care:
www.siriusxm.com/activatenow or 1-866-635-2349
For Canadian Subscriptions, please contact:
www.siriusxm.ca/activatexm or 1-877-438-9677
The SiriusXM satellites will send an activation message to your SiriusXM. When your radio receives the activation message, your radio will display "Subscription Updated" Note, the activation process usually takes 10 to 15 minutes, but may take up to an hour. Your radio will need to be powered on and receiving the SiriusXM signal to receive the activation message.


SiriusXM Functions
Direct Tune
Tap to display the Direct Tune interface.
Up (>) / Down (<)
Click Up (>) / Down (<) to switch to the next available station.
Related
Displays similar genre channels based on the currently playing channel.
FFW, RRW, Pause/Play, LIVE
Fast forward (FFW, >>) and fast backward (RRW, <<) buttons play the songs as buffered (up to 30 minutes) within the selected station in its entirety. Pause button stops the music play without skipping any music stream. Play button resumes music play in a continued stream. LIVE button stops playing buffered content and syncs with Live broadcast.
Smart FAVORITES
Tune to, or set, a Smart FAVORITE.
TuneScan
Tap to get a short preview of songs that you have missed on each of your SmartFavorites music channels. Find a song you like and tap the TuneScan button again to continue listening to that song.
Tune Mix
Tap to play a unique blend of songs from your SmartFavorites music channels from the current SiriusXM Preset Band.
Categories
Tap to group stations into corresponding genres..
Featured
Tap to display the SiriusXM recommended/promoted channels of the month.
History
Tap to display the channels in the order of most recently listened stations. History stores the last 8 stations you listened to.

Direct Tune
Scroll to the left or right, or lap the
Tap a station icon to listen.
Tap the X to close Direct Tune.
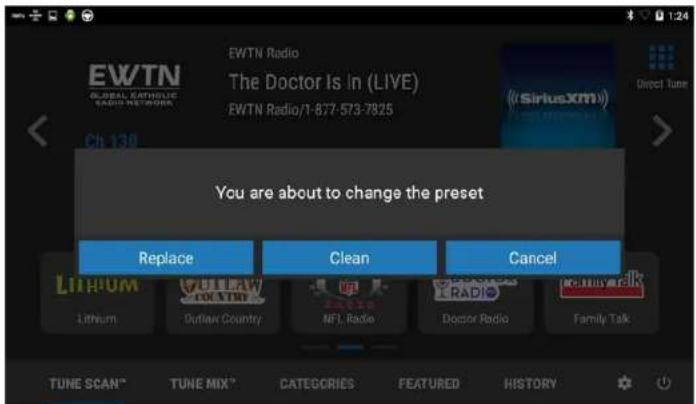
Smart FAVORITES
You can set up to 15 presets, or Smart FAVORITES, in three scrollable panels.
Tap and hold a Smart FAVORITES icon to set the station.
Tap and hold again to:
Replace: Set a new Smart FAVORITES channel over the existing one.
Clean: Delete the Smart FAVORITE
Cancel: Return to the SiriusXM interface.
Once a Smart FAVORITE is set, tap the channel icon to play that channel.
Rand McNally has designed OverDryve ^™ for speed and reliability. However, from time to time, all Android devices run into problems. If your unit becomes unresponsive for any reason, it's always best to restart the unit by turning it off and on again.
Restarting the Device
- Restart the unit by holding down the power button for 3 seconds, or until you see the Power Off screen.
- Press Power Off.
- Once the unit has shut down, press and hold the power button for 2 to 4 seconds to turn it back on.
If the unit is unresponsive and you don't see the power down button appear on the screen, hold down the power button for 10 to 15 seconds and the device will turn off completely. Once the unit has shut down, press and hold the power button for 2 to 4 seconds to turn it back on.
Resetting the Device
To reset the OverDryve™ to its factory state:
- Press the power button to turn it off. If it will not power off, force it to shut down by pressing and holding the power button for 10 seconds.
- Press the Volume Up button.
- While pressing Volume Up, press and hold the Power button. The tablet will load the Engineering menu.
- Press the Volume Down button to highlight the "Android Recovery Mode" option.
- Press the Power or Volume Up button to select. The Android robot with an Error sign will display.
- Press the Volume Down button followed by the Volume Up button and then release. The tablet will show the system recovery menu.
- Using the Volume buttons, highlight the "wipe data/factory reset" option and press the Power button to select.
- Using the Volume buttons, highlight the "Yes – delete all user data" and press the Power button to confirm. The screen will indicate that the data and cache partitions were formatted. The tablet will return to the Engineering menu.
- Using the Volume buttons, highlight "reboot system now" and press the Power button to select.
- Wait for the tablet to complete its reboot. The tablet will be in factory-reset state.
For additional help and FAQs, visit randmcnally.com/support.
For more information
• Rand McNally Website
randmcnally.com/overdryve
• Support
randmcnally.com/support
• Accessories
store.randmcnally.com
• Facebook
facebook.com/randmcnally
Trademarks
OverDryve ^™ is a trademark of RM Acquisition, LLC, d/b/a Rand McNally.
InfoGation is a registered trademark of InfoGation Corporation.
Local search information provided by CityGrid Media.
Weather data provided by myweather.com.
Fuel prices provided by OPIS.
Traffic information provided by INRIX, Inc.
© 2017 Rand McNally. © 2017 HERE. All rights reserved.
Rand McNally follows a continuous improvement process and reserves the right to provide enhancements that may not be reflected in the pictures and specifications in this manual.
The information contained herein may be changed at any time without prior notification. Neither this manual nor any parts thereof may be reproduced for any purpose whatsoever without the express written consent of Rand McNally, nor may it be transmitted in any form either electronically or mechanically, including photocopying and recording. All technical specifications, drawings, etc. are subject to copyright law.
Pay attention to road conditions and street signs, and obey all traffic and safety laws. Traffic laws and current traffic conditions must always be observed and take precedence over the instructions issued by the Rand McNally® navigation system. The User should be aware of situations where current traffic conditions and the instructions from the navigation system may be in conflict. Some states prohibit the use of windshield mounts and may otherwise restrict the usage of navigation and other electronic devices in the vehicle. It is the User's responsibility to operate his/her vehicle in a safe manner and to ensure compliance with all laws and regulations. The use of the navigation system does not relieve the User of his/her responsibilities. If after reading the following terms and conditions, the User decides not to accept the terms, the User should not use this navigation system.
Rand McNally hereby grants you ("User") a single-user non-exclusive, non-transferable license to use the Rand McNally navigation system, including software incorporated and associated data incorporated therein and all related documentation that accompanies the product (hereinafter referred to as the "Product") for User's own internal business or personal use and not for resale or sublicense.
This Product is furnished under license and may be used only in accordance with the terms and conditions of this license. Except as permitted by such license, the contents of this Product may not be disclosed to third parties, copied or duplicated in any form, in whole or in part, without the prior written permission of Rand McNally. This Product contains proprietary and confidential information of Rand McNally and its licensors. Rand McNally grants User a limited license for use of this Product for its normal operation. By using the Product, User acknowledges that the contents of the Product are the property of Rand McNally and its licensors and are protected by U.S. copyright, trademark and patent laws and international treaties.
THE USER MAY NOT:
- Use the Product on a network or le server, time-sharing or to process data for other persons.
- Use the Product to create any routing tables, les, databases or other compendiums.
- Copy, loan or otherwise transfer or sublicense the Product, its software or content.
- Modify or adapt the Product in any way, or decompile, disassemble, reverse engineer or reduce to human readable form the software incorporated in the Product.
- Alter, remove or obscure any copyright notice, trademark notice, or proprietary legend from the Product.
This license will terminate automatically if User fails to comply with any of the terms of this license, and in such case, User agrees to immediately stop using the Product. Rand McNally may revise or update the Product at its sole discretion, but it is not obligated to furnish any revisions or updates to User.
RM Acquisition, LLC d/b/a Rand McNally warrants that the Product, and the component parts thereof will be free of defects in workmanship and materials for a period of one (1) year from the date of purchase. This warranty may be enforced only by the first consumer purchaser ("Customer"), provided that the product is utilized within the U.S.A. or Canada.
During the warranty term, Rand McNally will, without charge, repair or replace (with a new or newly reconditioned unit), at its option, defective Products or component parts. For repair or replacement of defective Products, Customer must contact Rand McNally at 1-800-333-0136 for return authorization and instructions. Customer will be required to provide proof of date of first Customer purchase by providing a copy of the original sales receipt for the warranty to be valid. The Customer must pay any initial shipping charges required to ship the Product to Rand McNally for warranty service, but the return charges will be at Rand McNally's expense, if the Product is found to be defective and is repaired or replaced under the terms of this warranty.
If the Product sent in is still under its original warranty, then following repair or replacement by Rand McNally, the new warranty is 90 days or to the end of the original one (1) year warranty, whichever is longer. If the Product is out of warranty, Rand McNally shall have no obligation to repair or replace the Product, but if it does choose to repair or replace the Product, such repair or replacement shall be at Rand McNally's then-current cost. In such case, customer shall be responsible for all shipping charges associated with the shipment of the Product to Rand McNally and its return to the customer.
This warranty gives the Customer specific rights. Other rights may be available to Customer which vary from state to state.
Exclusions: This limited warranty does not apply; 1) to any product damaged by accident; 2) in the event of misuse or abuse of the product or as a result of unauthorized alterations or repairs; 3) if the serial number has been altered, defaced or removed; 4) if the Product is used other than as provided in the documentation that accompanies the Product, or 5) if the owner of the product resides outside of the U.S.A. or Canada.
CAUTION: RAND MCNALLY MAKES NO WARRANTY AS TO THE ACCURACY OR COMPLETENESS OF THE INFORMATION IN THE PRODUCT, THE SOFTWARE OR THE DOCUMENTATION, AND DISCLAIMS ANY AND ALL EXPRESS, IMPLIED OR STATUTORY WARRANTIES, INCLUDING ANY IMPLIED WARRANTIES OF MERCHANTABILITY OR FITNESS FOR A PARTICULAR PURPOSE, AND ANY WARRANTY AS TO QUALITY, PERFORMANCE, TITLE OR NON-INFRINGEMENT. SOME STATES DO NOT ALLOW LIMITATIONS ON HOW LONG AN IMPLIED WARRANTY LASTS AND/OR DO NOT ALLOW THE EXCLUSION OR LIMITATION OF INCIDENTAL OR CONSEQUENTIAL DAMAGES, SO THE ABOVE LIMITATIONS MAY NOT APPLY TO SOME CONSUMERS. IN NO EVENT WILL RAND MCNALLY OR ITS LICENSORS BE LIABLE FOR ANY INDIRECT, SPECIAL, INCIDENTAL, OR CONSEQUENTIAL DAMAGES ARISING OUT OF THE USE OR INABILITY TO USE THE PRODUCT, EVEN IF ADVISED OF THE POSSIBILITY OF SUCH DAMAGES.
IT IS THE USER'S RESPONSIBILITY TO USE THIS PRODUCT PRUDENTLY AND IN ACCORDANCE WITH THE DOCUMENTATION. THIS PRODUCT IS INTENDED TO BE USED ONLY AS A TRAVEL AID AND MUST NOT BE USED FOR ANY PURPOSE REQUIRING PRECISE MEASUREMENT OF DIRECTION, DISTANCE, LOCATION OR TOPOGRAPHY.
The User agrees to allow information provided by the User to Rand McNally to be used for internal business evaluation purposes, including, but not limited to, evaluating the effectiveness of the Product and the services provided and methods to simplify or improve User experiences. Such information will not be provided to third parties in any way that discloses the identity of the User.
Rand McNally may make use of third party software in the Product. Notwithstanding the terms and conditions of this license, use of some third party materials included in the Product may be subject to such third party's terms and conditions. The third party copyright notices are provided at the end of this License.
The User agrees to indemnify, defend and hold Rand McNally and its licensors (including their respective licensors, suppliers, assignees, subsidiaries, affiliated companies, and the respective of officers, directors, employees, shareholders, agents and representatives of each of them) free and harmless from and against any liability, loss, injury (including injuries resulting in death), demand, action, cost, expense or claim of any kind or character, including but not limited to attorney's fees, arising out of or in connection with any use or possession by the User of this Product.
These terms and conditions constitute the entire agreement between Rand McNally (and its licensors and suppliers) and the User pertaining to the subject matter hereof, and supersedes in their entirety any and all written or oral agreements previously existing between us with respect to such subject matter. The terms and conditions (including the license) may be updated from time to time with or without notice.
The above terms and conditions shall be governed by the laws of Illinois, without giving effect to (i) its conflict of laws provisions, or (ii) the United Nations Convention for Contracts for the International Sale of Goods, which is explicitly excluded. The User agrees to submit to the jurisdiction of Illinois courts for any and all disputes, claims and actions arising from or in connection with the User's license and use of the Product hereunder.
User shall not export the Product in violation of any U.S. or foreign laws. Rand McNally's licensors shall be third party beneficiaries of Rand McNally's rights under this license, but are not parties hereto and have no obligations hereunder.
By using this Product you agree to be bound both by the foregoing and to any additional terms of use found at www.randmcnally.com.
Actual toll costs may vary from estimates depending upon a number of factors including inaccurate or imprecise source data and variable toll costs, which are dependent upon vehicle characteristics (class, axle number, weight, etc.) that vary across toll roads.
Restricted Rights Legend. For governmental agencies: Use, reproduction or disclosure is subject to restrictions set forth in subparagraph (c) (1) (iii) of the Right in Technical Data and Computer Software clause at DFARS 52.227-7013, as amended.
Rand McNally, TripMaker, the Rand McNally logo and the globe design mark are registered trademarks and OverDryve is a trademark of RM Acquisition, LLC, d/b/a Rand McNally. Portions © 2017 HERE. All rights reserved. This data includes information taken with permission from Canadian authorities, including © Her Majesty the Queen in Right of Canada, © Queen's Printer for Ontario. © 2017 InfoGation. All rights reserved.
© 2017 Rand McNally. All rights reserved. U.S. Patent Nos. 7,580,791 and 8,214,141.

VIP Customer Support
Questions about using OverDryve"? Our team is ready to help.
Call toll-free:
800-237-7270
E-mail:
support@randmcnally.com
- OverDryve™ Pro
- FCC Statement
- FCC Radiation Exposure Statement
- Caution!
- Canada Statement
- VIP Customer Support
- Call toll-free:
- E-mail:
- Table of Contents
- Your OverDryve™ 1
- Getting Started....5
- Messaging 14
- Phone 16
- Navigation....17
- Truck Tools....36
- DriverConnect 41
- TripMaker....42
- Road Atlas....43
- Cameras 44
- Entertainment......46
- Troubleshooting....51
- More Information....52
- Caution: Important Safety Information
- Navigation
- Installation
- Device
- Box Contents
- Install the Mount
- Using the Android Home Screen
- Setup
- Connect to the Internet
- Register your device
- Connect to Bluetooth
- Connect to your truck stereo system
- Getting Started
- Help for Connecting to Bluetooth
- Connect to Your Truck Stereo
- Connect to Your Truck Stereo (Continued)
- Using the OverDryve™ Speakers
- Device Settings
- Wireless and Networks
- Personal
- System
- Messaging
- Phone
- How the Truck GPS App Works
- Navigation
- Main Menu
- Preferences
- General Preferences Options
- Preferences - continued
- Route Preferences Options
- Warning Preferences Options
- Warning/Alert Prompts None
- Auto Dismiss Warnings Never
- Curve Warnings Set warning distance to curves
- Hill Warnings Set warning distance to upcoming hills
- Engine Brake Warnings Set warning distance to begin braking
- Narrow Road Warnings Set warning distance to narrow roads
- State/Province
- Border Alert
- State or Province Border/ Off
- Timezone Change
- Warning Display Size
- Toll Booth Alert
- Construction Area
- Speed Limit
- Speed Limit Change
- Weigh Station
- Search For an Address
- Helpful Tips on Entering Addresses
- Auto-Complete Feature
- Cities
- State or County Routes
- Truck Loads
- NextManeuver
- RoadName
- Search For a Address
- ViewDirections
- CompassDirection
- BxQuick View
- Vi Data
- o7m In
- Rute Distance
- o7m Out
- pSed Limit
- View Tab
- oRate Options
- Mual Dashboard
- u Brent Speed
- Current Information
- ETA/Remaining Mileage and Elevation
- Preferences
- View Directions
- Route Display Options
- Distance
- Street/RoadName
- Leg
- gliway Name
- View Directions Continued
- Total Distance and Time
- Leg
- Destination
- eMove Stop
- Exits Quick View
- Virtual Dashboard
- Manually Reset Trip Information
- Automatically Reset Trip Information
- Traffic
- Traffic Icons
- Weather
- Fuel Prices
- Route to Here, Set Origin, Add as Via
- Crosshairs
- Route to Here
- Set Origin
- Save to Address Book
- sAs Via
- ePmanent Avoid
- Truck Tools
- Status
- Mileage
- Trails
- Fuel Logs
- DriverConnect
- Sign Up or Log In
- TripMaker
- To create a trip:
- Access Menu
- Itinerary
- Directions
- My Trips
- Points of Interest
- Search
- Create a Trip
- Manage Menu
- Road Atlas
- Legend
- Maps
- Cameras
- Dash Cam
- Video Files
- Entertainment
- Bluetooth Player
- Phone Playback
- FM Transmitter
- Finding the Best Station
- SiriusXM Radio
- Antenna Cable Routing
- Activating Your Radio
- In the USA, activate online or by calling SiriusXM Listener care:
- For Canadian Subscriptions, please contact:
- SiriusXM Functions
- Direct Tune
- Up (>) / Down (<)
- Related
- FFW, RRW, Pause/Play, LIVE
- Smart FAVORITES
- TuneScan
- Tune Mix
- Categories
- Featured
- History
- Restarting the Device
- Resetting the Device
- For more information
- Trademarks
- THE USER MAY NOT:
Brand : Rand McNally
Model : OverDryve 7 Pro
Category : Gps