
ETW4527BW - Washing machine Element - Free user manual and instructions
Find the device manual for free ETW4527BW Element in PDF.


| Product Type | Top-Loading Washer |
| Model | ETW4527BW |
| Capacity | 4.5 cu. ft. |
| Dimensions (W x D x H) | 27 x 28.6 x 43.9 inches |
| Weight | 127.8 lbs |
| Power Requirements | 120V~, 60Hz, 680W, 10A |
| Pulsator Type | Agitator |
| Drum Type | Ellipse |
| Display | LED, Red |
| Motor Type | Series Motor |
| Number of Cycles | 10 (Normal, Heavy Duty, Bulky, Towels, Whites, Quick 28, Delicates, Casual, Tub Clean, Drain & Spin) |
| Water Temperature Options | Hot, Warm, Cold, Tap Cold |
| Water Level Options | Auto, High, Medium, Low |
| Soil Level Options | Extra Heavy, Heavy, Medium, Light |
| Delay Start | Up to 24 hours |
| Additional Functions | Extra Rinse, Fill Up (max water level) |
| Water Pressure (min/max) | 14 - 116 psi (100 - 800 kPa) |
| Drain Hose Length | Up to 96 inches (standpipe height 39-96 in) |
| Safety Features | Lid lock, Child lock, Grounding, Automatic imbalance detection |
| Warranty | 1 year (2 years with product registration within 90 days) |
| Customer Service | Phone: 888-842-3577, Email: customerservice@elementelectronics.com |
Frequently Asked Questions - ETW4527BW Element
User questions about ETW4527BW Element
0 question about this device. Answer the ones you know or ask your own.
Ask a new question about this device
Download the instructions for your Washing machine in PDF format for free! Find your manual ETW4527BW - Element and take your electronic device back in hand. On this page are published all the documents necessary for the use of your device. ETW4527BW by Element.
USER MANUAL ETW4527BW Element
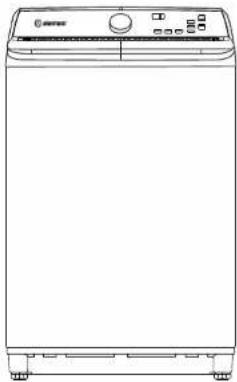
Product may vary. Please refer to the actual product.

element
CONTACT US:
Element Appliance Company, LLC. Customer Service
Customer Support: 888-842-3577
customerservice@elementelectronics.com
Copyright ©2022
Element Appliance Company, LLC. All rights reserved.
Element Appliance Company and E Element are trademarks of Element Brand Holding, LLC
natural_image
Line drawing of a single washing machine (no text or symbols visible)Before using your new product, please read these instructions to prevent any damage.
4.5 cu. ft. TOP-LOADING WASHER - USER MANUAL
REGISTER YOUR WASHER
Thank you for purchasing the Element 4.5 cu.ft.Top-Load Washer. If you have questions about your washer, our customer support team is ready to help:
• Phone: 888-842-3577
• Email: customerservice@elementelectronics.com
To register your washer, go to https://elementelectronics.com/register, fill out the Product Registration form, and upload a picture of you receipt. Your serial number is located on the rating label on the back of your washer.
Use the space below to record information about your washer and keep your original purchase receipt for future reference. You'll need this information to receive warranty service.

element
4.5 cu.ft. Washer
Model Number:
Serial Number:
(located on the rating label on the back of your washer)
Date of Purchase:
Keep this information and
your original purchase receipt
to receive warranty service.

element
Contents
Contents
Safety Instructions 2
Safety Instructions 2
Explanation of the symbols 3
Electrical shock 4
Risk to children 5
Risk of explosion 5
Installing the product 6
Risk of damaging appliance 6
Operating the appliance 7
Packaging/Old appliance 8
Installation....9
Removing from the package.... 9
Package list....9
Tools and parts needed in installation....9
Parts identification....10
Location requirements.... 11
Installation steps.... 14
Operation....17
Control panel 17
Washing a load of laundry.... 19
Program function 21
Maintenance.... 22
Cleaning the exterior.... 22
Cleaning the interior 22
Cleaning the detergent, bleach, softener compartments.... 22
Storing your washer.... 22
Tub clean 22
Troubleshooting.... 23
Check these solutions if your washer.... 23
Appendix 26
Fabric care chart.... 26
Technical specifications....27
*** If your user manual lost or broken, you could get it from dealers.
SAFETY INSTRUCTIONS
SAFETY INSTRUCTIONS
For your safety, the information in this manual must be followed to minimize the risk of fire or explosion, electric shock, or to prevent property damage, personal injury or loss of life.
- This appliance is not intended for use by persons(including children) with reduced physical, sensory or mental capabilities or lack of experience and knowledge unless they have been given supervision or instruction concerning use of the appliance by a person responsible for their safety.
• Children should be supervised to ensure that they do not play with the appliance. - If the supply cord is damaged, it must be replaced by the manufacturer, its service agent or similarly qualified persons in order to avoid a hazard.
- The new hose-sets supplied with the appliance are to be used and that old hose-sets should not be reused.
• The openings must not be obstructed by a carpet. - This appliance is intended to be used in household and similar applications such as:
- staff kitchen areas in shops, offices and other working environments;
- farm houses;
- by clients in hotels, motels and other residential type environments;
- bed and breakfast type environments;
- areas for communal use in blocks of flats or in launderettes.
SAFETY INSTRUCTIONS
| Model | ETW4527BW | ||
| Rated power supply | 120V~/60Hz | Current draw | 10A |
| Rated power | 680W | Weight of whole machine | 127.8lbs |
| Pulsator type | Agitator | Drum grain | Ellipse |
| Display type | LED | Display color | Red |
| Overall dimensions(inches) | 43.9 x 27 x 28.6 | Motor | Series |
Explanation of the symbols

Warning!
This combination of symbol and signal word indicates a potentially dangerous situation which may result in death or serious injuries unless it's avoided.

Caution!
This combination of symbol and signal word indicates a potentially dangerous situation which may result in slight or minor injuries or damage to property and the environment.

Note!
This combination of symbol and signal word indicates a potentially dangerous situation which may result in slight or minor injuries.
| This graphic represents CAUSE ATTENTION, and detailed cautions will be displayed in side the graphic △. | |
| This graphic represents OPERATION PROHIBITED, and detailed prohibitive items will be displayed in side the graphic ☑. | |
| This graphic represents FORBIDDEN EXECUTION, and detailed forbidden execution items will be displayed inside the graphic ●. |
SAFETY INSTRUCTIONS
Electrical shock

Warning!
• This appliance is for indoor use only.
• Do not put washing machine at humid place.
• Hands should not be placed into running spin-dry tub.
- If the spin-dry tub does not stop within 15 seconds after opening the cover, please stop using the machine and have it repaired.
• Before any maintenance of the device, unplug the appliance from the socket.
• Always unplug the machine and turn off the water supply after use. The max. inlet water pressure, in pascals. The min. inlet water pressure, in pascals.
- To ensure your safety, power plug must be inserted into an earthed three-pole socket. Carefully check and make sure that your socket is properly and reliably earthed.
• Make sure that the water and electrical devices must be connected by a qualified technician in accordance with the manufacturer's instructions and local safety regulations.
SAFETY INSTRUCTIONS
Risk to children
- EN countries: the appliance can be used by children aged from 8 years and above and persons with reduced physical, sensory or mental capabilities or lack of experience and knowledge if they have been given supervision or instruction concerning use of the appliance in a safe way and understand the hazards involved. Children should not play with the appliance. Cleaning and user maintenance should not be made by children without supervision.
• Animals and children may climb into the machine. Check the machine before every operation. - Young children should be supervised that they do not play with the appliance.
- Machine may be very hot during the operation. Keep kids and pets far away from the machine during the operation very wet rooms as well as in the rooms with explosive or caustic gas.
- Remove all packages before using the appliance. Otherwise, serious damage may result.
- The washing machine with single inlet valve only can be connected to the cold water supply. The product with double inlet valves should be correctly connected to the hot water and cold water supply.
• Plug must be accessible after installation.
Risk of explosion
- Do not wash or dry articles that have been cleaned in, washed in, soaked in, or dabbed with combustible or explosive substances (such as wax, oil, paint, gasoline, degreasers, dry-cleaning solvents, kerosene, etc.) This may result in fire or explosion.
• Beforehand, thoroughly rinse items of washing by hand.
SAFETY INSTRUCTIONS
Installing the product

Caution
• This washing machine is for indoor use only.
• It isn't intended to be used as a built-in.
• The openings must not be obstructed by a carpet.
- Washing machine must not be installed in bath room or very wet rooms as well as in the rooms with explosive or caustic gases.
- Remove all packages and transport bolts before using the appliance. Otherwise, serious damage may result.
- The washing machine with single inlet valve only can be connected to the cold water supply. The product with double inlet valves should be correctly connected to the hot water and cold water supply.
• Plug must be accessible after installation.
Risk of damaging appliance
- Your product is only for home use and is only designed for the textiles suitable for machine washing.
• Do not climb up and sit on top cover of the machine.
• Do not lean against machine door.
• Cautions during Handling Machine: - Transport bolts must be reinstalled to the machine by a specialized person.
- The accumulated water must be drained out of the machine.
- Handle the machine carefully. Never hold each protruded part on the machine while lifting. Machine door can not be used as the handle during the conveyance.
- This appliance is heavy. Transport with care.
SAFETY INSTRUCTIONS
Risk of damaging appliance
- Please do not close the door with excessive forces.
• It is forbidden to wash carpets.
Operating the appliance
- Before washing the clothes a first time, the product should be operated in one round of the whole procedures without the clothes inside.
- Flammable and explosive or toxic solvents are forbidden. Gasoline and alcohol etc. should not be used as detergents. Only use the detergents suitable for machine washing, especially for drum.
• Make sure that all pockets are emptied. Sharp and rigid items such as coin, broach, nail, screw or stone etc. may cause serious damages to this machine. - Check whether the water inside the drum has been drained before opening its door. Do not open the door if there is any water visible.
- Be careful of burning when the product drains hot washing water.
• Never refill the water by hand during washing.
• After the program is completed, wait two minutes to open the door.
SAFETY INSTRUCTIONS
Packaging/Old appliance

This marking indicates that this product should not be disposed with other household wastes throughout the EU. To prevent possible harm to the environment or human health from uncontrolled waste disposal, recycle it responsibly to promote the sustainable reuse of material resources. To return your used device, please use the collection systems or contact the retailer where the product was purchased. They return and can take this product for environmental safe recycling.
Installation
Removing from the package
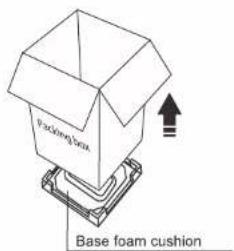
- Remove the package and take out the machine from the carton box and foam cushion.
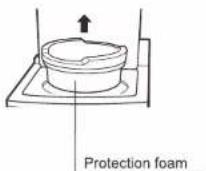
- Open the lid of washer to take out all accessories including a protection foam.

Packaging materials can be dangerous to children;
Keep all packaging material (plastic bags, polystyrene, etc.) well out of children's reach.
Do not operate this appliance on the foam cushion.
- Failing to do so will result in serious vibration.
Package list
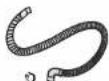
Drain hose (x1)

Hose holder
(x1)

Owner's manual
(x1)

Hose clamp+Screw
(x2)
TOOLS and PARTS needed in installation

Pliers
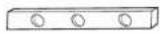
Level
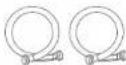
Water inlet hoses
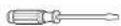
Flat screwdriver

Phillips screwdriver
Installation
Parts identification
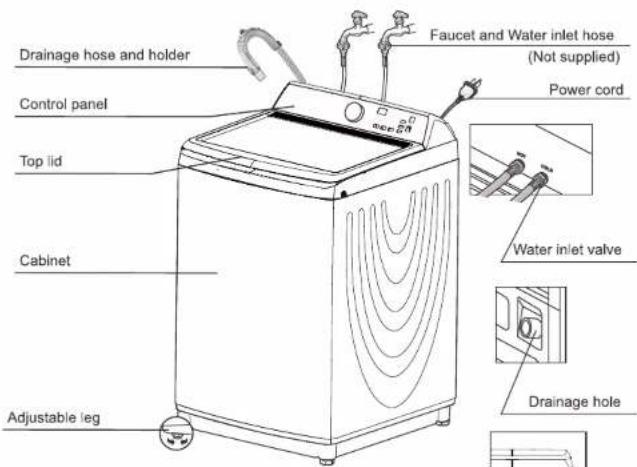
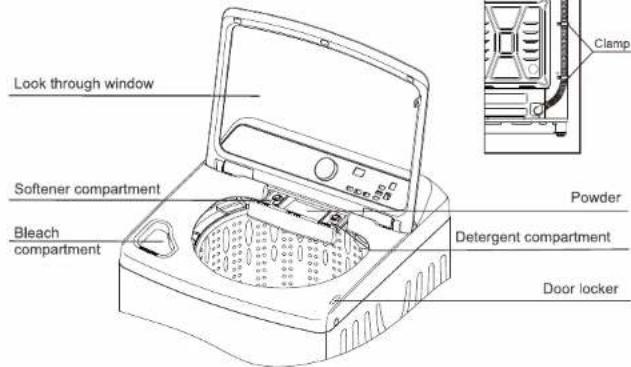
Installation
Location requirements

Do not install your washer in areas where water may freeze, since your washer will always retain some water in its water valve, pump, and hose areas. Frozen water can damage the belts, the pump, hoses, and other components.
Electric
- Individual branch circuit serving only for your washer is recommended. - Your washer is equipped with a power cord.

NEVER USE AN EXTENSION CORD.
- Grounding
ELECTRICAL GROUNDING IS REQUIRED FOR THIS APPLIANCE.
- This appliance must be grounded. In the event of malfunction or breakdown, grounding will reduce the risk of electric shock by providing a path of least resistance for electric current.
- This appliance is equipped with a power cord having a three-prong grounding plug for use in a properly installed and grounded outlet.
- The plug must be plugged into an appropriate outlet that is properly installed and grounded in accordance with all local codes and ordinances.

An improperly connected equipment-grounding conductor can increase the risk of electrical shock. Check with a qualified electrician or serviceman if you are not sure whether the appliance is properly grounded. Do not modify the plug provided with the appliance.
- If it does not fit the outlet, have a proper outlet installed by a qualified electrician. To prevent unnecessary risk of fire, electrical shock or personal injury, all wiring and grounding must be done in accordance with the National Electrical Code ANSI/FNPA, No.70 Latest Revision and local codes and ordinances. It is the personal responsibility of the appliance owner to provide adequate electrical service for this appliance.
The electrical valve, retractor, motor and drain pump of this appliance are intentionally not grounded and may present a risk of electric shock during serving. Do not contact these electronic devices while the appliance is energized.

NEVER CONNECT THE GROUND WIRE TO PLASTIC PLUMBING LINES, GAS LINES, OR HOT WATER PIPES.
• Water
To correctly fill your washer in the proper amount of time, water pressure of 14 to 116psi (100 to 800kPa) is required.
- Water pressure less than 14psi may cause water valve failure, or may not allow the water valve to shut off completely, or may extend the fill time beyond what your washer controls allow, causing your washer to turn off and set off an error alarm. A time limit is built into the controls to prevent flooding in your home if a hose becomes loose.
The water faucet must be within 4 feet / 122cm of the back of your washer to match the inlet hoses.
Inlet hoses are available in various lengths up to 8 feet / 240cm for faucets that are further away from the back of your washer.
To avoid the possibility of water damage. - Have water faucets easily accessible
- Turn off faucets when the washer is not in use.
- Periodically check that there is no leakage from the water inlet hose fittings.

CHECK ALL CONNECTIONS AT THE WATER VALVE AND FAUCET FOR LEAKS.
Installation
Location requirements
- Flooring
For best performance, you must install your washer on a solidly constructed floor. Wood floors may need to be reinforced to minimize vibration and/or unbalanced load situations. - Carpeting and soft tile surfaces are contributing factors to vibration which can cause your washer to move slightly during the spin cycle.

NEVER INSTALL ON A PLATFORM OR WEAKLY SUPPORTED STRUCTURE
- Drain facility
The recommended height of the standpipe is 48in. / 120cm. The suitable drainage is available in various height up to 96in. / 240cm. The drain hose must be routed through the drain hose clip to the standpipe. The standpipe must be large enough to accept the outside diameter of the drain hose. The drain hose is attached to the washer at the factory
• Room for washer
Required dimensions for installation
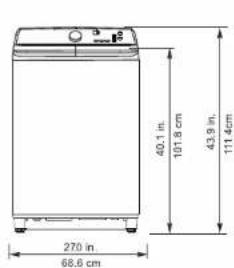
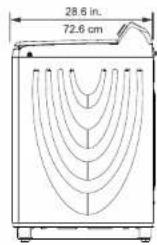
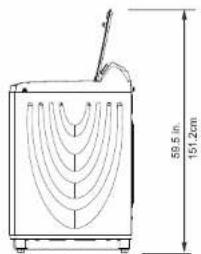
* Required spacing
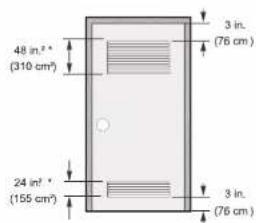
Closet or Door
Installation
Location requirements
Minimum clearances for closet and alcove installations
Sides - 1 in. / 2.5cm
Rear - 6 in. / 15.2cm
Closet Front - 2 in. / 5.1cm
Top - 24 in. / 61cm
Gap between end of water valve and the wall.
- Case 1. Assemble supply hose after installing: Over 3.9 in. (10cm)
- Case 2. Assemble supply hose before installing: Over 2.8 in. (7cm)
If the washer and dryer are installed together, the closet front must have at least a 72 in (465 cm ^3 ) unobstructed air opening. Your washer alone does not require a specific air opening.
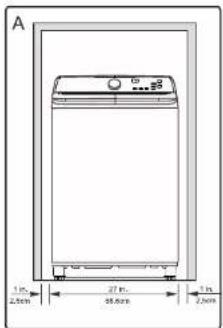
A. Recessed area
B. Side view - closet or confined area
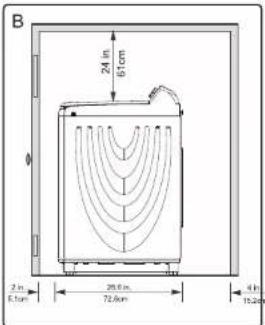
Installation
Installation steps

These instructions should be retained for future reference. Follow the following STEP by STEP to ensure a successful installation.
- STEP 1: Select a location
Before you install the washer, make sure the location:
- Has a hard, level surface without carpeting or flooring that may obstruct ventilation.
- is away from direct sunlight.
- Has adequate ventilation
- Is not exposed to freezing temperatures (temperature under 32^ F or 0^ C).
- Is away from heat sources such as oil or gas.
- Has enough space so that the washer doesn't rest on its power cord.
• STEP 2: Connect the water hose

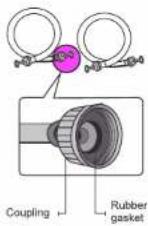
The water supply hoses are not supplied with your washer and must be purchased separately. Before installing the water supply hoses, make sure there are rubber gaskets inside the fittings at both ends of each new water hose. Installing the water supply hoses without rubber gaskets can cause water leakage. When you initially install the washer, be sure to use new hoses. Failing to do so may result in a water leakage or overflow and may damage your property. Do not connect multiple water supply hoses together to increase the length of the supply hose. Hoses connected this way can leak and the leakage can cause electrical shock. If a hose is too short, replace the hose with a longer, high pressure hose.
- Connect the ends of the water supply hoses to the HOT and COLD faucets.
- Tighten the fittings by hand until they are snug, and then tighten them an additional two-thirds of a turn with a wrench.
When you fasten the fittings, do not fasten them too tightly or apply tape or sealant to the faucets or water supply intakes. This can damage the fittings After you have connected the water supply hoses to the faucets, ensure that they are connected correctly by pulling the water supply hoses downwards.
- Place the unconnected ends of the hoses into a bucket and open the faucets connected to the two water supply hoses for 10 or 15 seconds to remove any foreign substances from the hoses. Close the faucets before continuing.
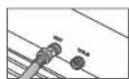
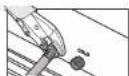
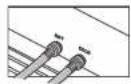
- Connect the ends of the water supply hoses to the water supply intake connections at the back of the washer.
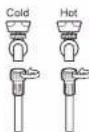
The water supply hose connected to the HOT faucet must be connected to the hot water supply intake and the water hose connected to the COLD faucet must be connected to the cold water supply intake.
5. Tighten the fittings by hand until they are snug, and then tighten them an additional two-thirds of a turn with a wrench.
Confirm that the water supply hoses are not twisted or bent. If the hoses are twisted or bent, the hoses can leak and cause electric shock due to the water leakage.

Installation
Installation steps

To ensure the correct water usage, connect both the HOT and COLD water faucets. If either or both are not connected, an error code can occur. If you do not want to use the HOT water supply hose, insert the water intake cap into the HOT water supply intake hole. In this case, you must select the Tap Cold option for the water temperature.
- Turn on the HOT and COLD water supplies and check all the water supply intake connections and the faucets for water leaks.
• STEP 3: Connect the drain hose
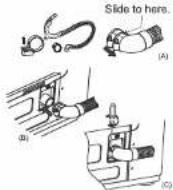
- Connect the drain pipe onto your washer. The drain pipe is attached as accessory with your washer.
A. Find the clamp on one end of the drain hose. Move the clamp forward as shown in right figure.
B. Insert the drain hose onto the washer until it contacts the pump outlet. Then move the clamp near the pump outlet. C. Screw the clamp tightly with a flat screwdriver clockwise.
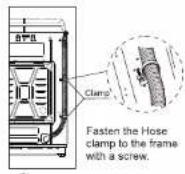
D. Find the hose clamp, and fasten the drain hose to the washer frame at the indicated locations with the hose clamps (2) provided, using a Phillips screwdriver.

Failure to slide the drain hose over the sewer completely may result in water leakage. Failure to move the hoop back will result in water leakage
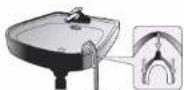
- Position the other end of the drain hose. It can be positioned in three ways.
A. Over the edge of a wash basin Secure the guide to the side of the basin wall with a hook or to the tap with a piece of string to prevent the drain hose from moving.
B. In a standpipe The standpipe must be no shorter than 39 in. (99cm) and no longer than 96 in. (245cm).
C. In a laundry tub. The laundry tub must be no shorter than 39 in. (99cm) and no higher than 96 in. (245cm).

Make sure that the connection between the drain hose and the wash basin, or standpipe, or laundry tub is not airtight.
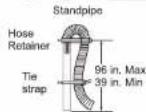
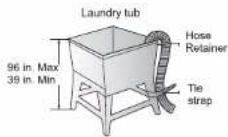
Installation
Installation steps
• STEP 4: Leveling your washer
See if the washer is level by checking the position of the tub or using a leveling gauge.
1. Slide the washer into position.
2. Open the lid of the washer, and pour the water into the tub to just below the agitator level.
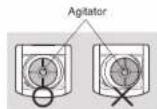
- If the washer is level, the pulsator is positioned at the center of the washer as shown in the figure right. If not, level your washer by turning the front leveling feet clockwise or counterclockwise as necessary.

DO NOT use the washing machine without leveling. It may result in malfunction caused by the production of excess vibration and noise.
Use the leveling feet only when you level the washing machine. If you raise the leveling feet unnecessarily, it may cause abnormal vibration of the washing machine.
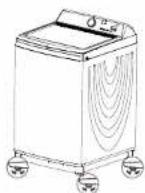
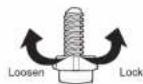
Adjustable legs
• STEP 5: Powering your washer
Your washer is grounded through the third prong of the power cord when plugged into a 3-prong grounded electrical outlet.
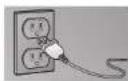
• STEP 6: Running a test cycle
Run a test cycle as following to check if your washer is properly installed.
- Load about 6 pounds of laundry into the tub.
- Select the Cycles to turn on your washer
- Select the Rinse&Spin cycle by turning the Cycle Selector
- Press the Start/Pause button to start the test cycle.
- The washer should not rock or vibrate excessively when water is supplied or when washing or spinning, and should drain well during the spin cycle.
If water leaks while water is being supplied or drained, check the water connections. Refer to the "Connect the water hose" and "Connect the drain hose" section for instructions.
If the washer rocks and vibrates excessively, level your washer again. Refer to the "Leveling your washer" section for instructions.
Operation
Control panel
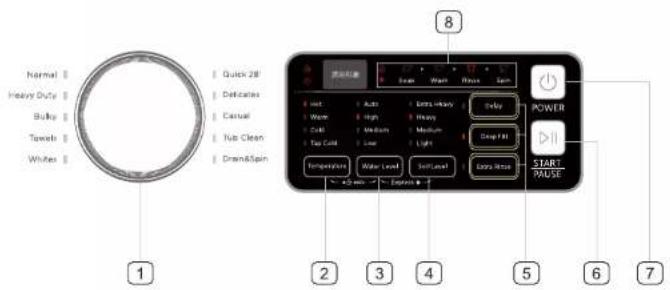
Model: ETW4527BW

Program selector
Select the appropriate program for the type of loading.

Temp.
Select the washing water temperature. The rinsing water temperature will always keep in Cold. There is always one option selected for temperature, except when the selected programs are Tub clean, Drain&Spin.
Hot - Hot water with no cold water added.
Warm - Mixture of hot and cold water. Cold - Cold water with no warm water added.
Tab Cold - Automatically selects the water temperature according to the selected program.

Water level
Select the washing water level. The rinsing water level is the same as the washing water level. There is always one option selected for water level, except when the selected programs are Tub clean, Drain&Spin.
High - Select for the large loading level. Medium - Select for the medium loading level.
Low - Select for the low loading level. Auto - Automatically selects the water level according to the loading level.

Soil level
Select the soil level. Different soil level settings. There is always one option selected for Soil level, except when the selected programs are Tub clean, Drain&Spin.

Options selector
Select one additional program before the machine runs. If the selector is adjusted while the program is running, the position of the selector will take effect after the program has finished running.
Operation
Control panel

Start/Pause button
Press once to start the program. Press again to pause the program. You can add a garment. Only Cycles and Water Level could be changed. Once again, to restart the program.

Power
Press to turn on your washer. Press again to turn off your washer. If you leave your washer and do not press ▶/Start Pause button within 10 minutes, your washer automatically turns off.

Cycle status lights
The relative light will be lighted when the washer is in its washing program, as the soak will light when the washer is operating in soak process. The door can't be opened when the lock light is on. When the light is lit, it means the program will be finished quicker than normal. When the whole program is finished, the light will flash 6 times.
Operation
Washing a load of laundry

To reduce the risk of fire, electric shock, or injury to persons when using your washer, follow important safety instructions, including the following:
• STEP 1: Power on your washer
- Select any program (except blank) to power your washer on.
- Your washer will start up with initial setting according to user's choice.
- The lights will display a different combination according to different program.
• STEP 2: Load your washer

Before loading your laundry, be sure to take out coins, keys and other hard objects, and close the zipper to prevent clothes from damage.
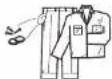

- You can fill the tub with dry, unfolded clothes. Load the tub no more than 3/4 full.
- Overloading may reduce washing efficiency, cause excess wear, and possibly cause creasing or wrinkling of the load.
- When washing big bulky items or a few smaller items that don't fill the tub completely, for example, a rug, a pillow, stuffed toys, or one or two sweaters, add a few towels to improve spin performance.
- Do not insert bulky items except for Heavy Duty cycle.
- When washing heavily soiled loads, do not overload your washer to ensure good cleaning results.
- To add a garment:
- Press the Start/Pause button to pause the washer.
- Wait for the door to unlock automatically, and then open the door.
- Add the item, close the door, and then press the Start/Pause button. The cycle will resume.
• STEP 3: Add liquid detergent and powder to the dispenser
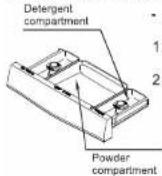
- Loading the liquid detergent or powder compartment
- Pour the recommended amount of laundry detergent directly into the detergent compartment before starting your washer
- If you are using color-safe bleach, add it with the detergent to the detergent compartment. When adding color-safe bleach with detergent, it is best if both laundry products are in the same form - liquid.
Operation
Washing a load of laundry
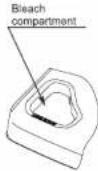
- Loading the Bleach compartment (Liquid chlorine bleach only)
- Add chlorine bleach to the bleach compartment.
- DO NOT exceed the bleach compartment.
- As no water inlet to bleach dispenser, the bleach will directly load
- Avoid splashing or over-filling the compartment.

Never pour undiluted liquid chlorine bleach directly onto the load or into the tub. It is a powerful chemical and can cause fabric damage, such as weakening of the fibers or color loss, if not used properly.
If you prefer to use color-safe, non-chlorine bleach, add it into the tub when you pour in.
DO NOT pour color-safe bleach into the Bleach compartment.
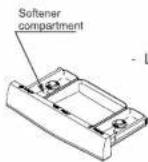
- Loading the Fabric softener compartment
- Pour the recommended amount of liquid fabric softener into the softener compartment.
- The dispenser automatically releases liquid fabric softener at the proper time during the rinse cycle.
- If using fabric softener on NORMAL cycles, please make sure to press the FABRIC SOFTENER button on.

Use the softener compartment ONLY for liquid fabric softeners. DO NOT use the Downy Ball in the fabric softener compartment with this washer. It will not add fabric softener at the appropriate time. Use the detergent compartment.
Do not use liquid fabric softener that is too sticky as it may not mix with the water sufficiently.
- STEP 4: Select the appropriate cycle and options for the load
- Select appropriate cycle by Cycle Selector according to cycle chart on next page.
- Select appropriate option function according to cycle chart.

Delay the start of any cycle for up to 24 hours in one-hour increments. Displayed hour indicates the time the wash will be started.

Press once to get the highest water level.
Press again to cancel selection.
There will be no change if the water level has been the highest.
Note: when the machine start, the function cannot be canceled.

Press once to add an extra rinse into the washing program. Press again to cancel selection.
Operation
Program function
| Cycle | Water Level | Temp. | Soil Level | Delay (h) | Fill up | Extra Rinse | Express |
| Normal | Auto ● | Hot ○ | Extra Heavy ○ | 0-24 | ○ | ○ | - |
| High ○ | Warm ● | Heavy ○ | |||||
| Medium ○ | Cold ○ | Medium ● | |||||
| Low ○ | Tap Cold ○ | Light ○ | |||||
| Heavy duty | Auto ● | Hot ● | Extra Heavy ● | 0-24 | ○ | ○ | ○ |
| High ○ | Warm ○ | Heavy ○ | |||||
| Medium ○ | Cold ○ | Medium ○ | |||||
| Low ○ | Tap Cold ○ | Light ○ | |||||
| Bulky | Auto ● | Hot ● | Extra Heavy ○ | 0-24 | ○ | ○ | ○ |
| High ○ | Warm ○ | Heavy ● | |||||
| Medium ○ | Cold ○ | Medium ○ | |||||
| Low ○ | Tap Cold ○ | Light ○ | |||||
| Towels | Auto ● | Hot ○ | - | 0-24 | ○ | ○ | ○ |
| High ○ | Warm ○ | Heavy ○ | |||||
| Medium ○ | Cold ● | Medium ○ | |||||
| Low ○ | Tap Cold ○ | Light ● | |||||
| Whites | Auto ● | Hot ○ | Extra Heavy ○ | 0-24 | ○ | ○ | ○ |
| High ○ | Warm ● | Heavy ○ | |||||
| Medium ○ | Cold ○ | Medium ○ | |||||
| Low ○ | Tap Cold ○ | Light ● | |||||
| Dram & Spin | - | - | - | 0-24 | - | - | - |
| Tub Clean | High ● | Hot ● | Extra Heavy● | 0-24 | ○ | - | - |
| Casual | Auto ● | - | - | 0-24 | ○ | ○ | ○ |
| High ○ | Warm ○ | Heavy ○ | |||||
| Medium ○ | Cold ● | Medium ● | |||||
| Low ○ | Tap Cold ○ | Light ○ | |||||
| Delicates | - | Hot ○ | - | 0-24 | ○ | ○ | ○ |
| - | Warm ○ | Heavy ○ | |||||
| Medium ● | Cold ● | Medium ○ | |||||
| Low ○ | Tap Cold ○ | Light ● | |||||
| Quick 28' | - | Hot ○ | - | 0-24 | ○ | ○ | - |
| - | Warm ● | - | |||||
| Medium ○ | Cold ○ | Medium ○ | |||||
| Low ● | Tap Cold ○ | Light ● |
● Means default ○ Means optional — Means no selection
1: When you turn to one option and there is no beep notice, it means the function cannot be selected with this program.
Maintenance
Cleaning the exterior
Turn off the water faucets after final use.
This will shut off the water supply to your washer and prevent the unlikely possibility of damage from escaping water. Leave the lid open to allow the inside of your washer to dry out.
Use a soft cloth to wipe up all detergent, bleach or other spills as they occur. Clean the following as recommended:
Control Panel - Clean with a soft, damp cloth. Do not use abrasive powders or cleaning pads. Do not spray cleaners directly on the panel.
Cleaning the interior
Clean the interior of your washer periodically to remove any dirt, soil, odor, mold, mildew, or bacterial residue that may remain in your washer as a result of washing clothes. Failure to follow these instructions may result in unpleasant conditions, including odors and/or permanent stains on your washer or laundry.
Hard water deposits may be removed, if needed. Use cleaners labeled "Washer safe".
Cleaning the detergent, bleach, softener compartments
You may find laundry product residue leftover in your compartments. To remove residue, wipe with a damp cloth and towel dry. Do not attempt to remove the compartments or trims for cleaning. The compartments and trims are not removable.
Storing your washer
Washers can be damaged if water is not removed from hoses and internal components before storage.
Preparing your washer for storage as follows:
- Select the Quick wash cycle and add bleach to the washer. Run your washer through the cycle without a load.
- Turn the water faucets off and disconnect the inlet hoses
- Unplug your washer from the electrical outlet and leave your washer lid open to let air circulate inside the drum.
- If your washer has been stored in below-freezing temperatures, allow time for any leftover water in your washer to thaw out before use.
Tub clean
Tub clean is a self-cleaning cycle that removes mold that may occur inside the washer.
- Select the Tub Clean on the Cycle selector.
-
Once the Tub Clean is selected, the other function will be automatically cancelled.
-
Press the Start/Pause button.
- If you press the Start/Pause button, Tub Clean begins.
Using Tub Clean, you can clean the tub and drum without using a cleansing agent.

Never use Tub Clean cycle when laundry is in the washer. This may cause damage to the laundry or a problem with the washer.
Troubleshooting
Check these solutions if your washer...
| Problem | Solution |
| The unit doesn't start | - Check the fuse or reset the circuit breaker.- Make sure your washer is plugged in.- Make sure the lid is closed.- Make sure the water source faucets are open.- Make sure to press the Start/Pause button to start your washer.- Before your washer starts to fill, it will make a series of clicking noises to check the lid lock and go a quick drain |
| No water or not enough water. Detergent / Softener remains in its box after the wash cycle is completed. | - Turn both faucets on fully.- Check if the water pressure is in the normal range.- Straighten the water inlet hoses.- Disconnect hoses and clean the screens. Hose filter screens may be clogged. |
| Vibrates or is too noisy. | - Make sure your washer is set on a level surface. If the surface is not level, adjust your washer's feet to level the appliance.- Make sure your washer is not touching any other object.- Make sure the laundry load is balanced.During the spin process, if clothes are piled at one side of basket, it will stop due to imbalance. The unit will try to solve the problem automatically. If the washer can't solve the problem in three trials, you should replace the clothes and make it as even as possible manually. |
| Stops | - Plug the power cord into a live electrical outlet.- Check the fuse or reset the circuit breaker.- Close the lid and press the Start/Pause button to start your washer. For your safety, your washer will not spin unless the lid is closed.- Before your washer starts to fill, it will make a series of clicking noises to check the lid lock and do a quick drain.- There may be a pause or stop period in the cycle. Wait and it may start.- Check the screens on the inlet hoses at the faucets for obstructions. Clean the screens periodically. |
| Lid locked or will not open. | - Press the Start/Pause button to stop your washer.- It may take a few moments for the lid lock to disengage. |
| Does not drain or spin. | - Check the fuse or reset the circuit breaker.- Straighten the drain hoses. Eliminate kinked hoses. If there is a drain restriction, call for service.- Close the lid and press the Start/Pause button. For your safety, your washer will not spin unless the lid is closed.- Check the height of drain hose end. |
Troubleshooting
Check these solutions if your washer...
| Problem | Solution |
| Fills with wrong temperature water. | - Turn both faucets fully.- Make sure the temperature selection is correct- Make sure the hoses are connected to the correct faucets.Flush water lines.- Disconnect the hoses and clean the screens. The hose filter screens may be clogged. |
| Load is too wet at the end of the cycle. | - Use high efficiency detergent to reduce over-sudsing.- The load is too small. Very small loads (one or two items) may become unbalanced and not spin out completely. |
| Leaks water. | - Make sure all hose connections are tight.- Make sure the end of the drain hose is correctly inserted and secured to the drainage system.- Avoid overloading.- Use high efficiency detergent to prevent over-sudsing. |
| Has excessive suds. | - Use high efficiency detergent to prevent over-sudsing.- Reduce the detergent amount for soft water, small or lightly soiled loads.- Non-HE detergent is NOT recommended. |
| Has an odor. | - Run a Tub Clean cycle to clean the tub and basket periodically.See page 13.- Check your detergent. Excessive suds collect in nooks and crannies and cause mold.- Dry the interior of your washer after the total cycle has finished. |
Troubleshooting
Check these solutions if your washer...
- Error Codes
| Error Code | Possible Cause | Solutions |
| E1 | The washer takes more than 30 minutes to fill with water. After water finishes entering your washer, the water level has not changed in 5 minutes. | Check if the lid is openCheck as "No water or not enough water"Check for water leakage. |
| E2 | The unit takes more than 10 minutes to drain | Check as "Does not drain or spin" |
| E3 | The lid is open. | Close the lid.The door lock or PCB is failed. Call service center. |
| E4 | The unit is out of balance in spin operation. | Check as "Vibrates or is too noisy"Call service center. |
| E5 | Washer is not level.Impact switch failed. | Adjust the washer level refer to installation. If situation continues, call service center. |
| F5 | Load sensing failed | Call service center. |
| F8 | Water leveling sensor failed | Call service center. |
| Fd | Door lock failed | Call service center. |
Appendix
Fabric care chart
The following symbols provide garment care direction. The Clothing care labels include symbols for washing, bleaching, drying and ironing, or dry cleaning when necessary. The use of symbols ensures consistency among garment manufacturers of domestic and imported items. Follow care label directions to maximize garment life and reduce laundering problems.
| Wash Cycle | Special Instructions | Warning Symbols for Laundering | |||
| Normal | Line Dry/Hang Dry | Do Not Wash | |||
| Permanent Press / Wrinkle Resistant / Wrinkle Control | Drip Dry | Do Not Wring | |||
| Gentle/Delicates | Dry Flat | Do Not Bleach | |||
| Hand Wash | Heat Setting | Do Not Tumble Dry | |||
| Water Temperature** | High | No Steam (added to iron) | |||
| ... | Hot | Medium | Do Not Iron | ||
| .. | Warm | Low | Dryclean | ||
| • | Cold | Any Heat | Dry Clean | ||
| Bleach | No Heat /Air | Do Not Dry Clean | |||
| Any Bleach (when needed) | Iron-Dry or Steam Temperatures | Line Dry/Hang Dry | |||
| Only Non-Chlorine (color-safe) Bleach (when needed) | High | Drip Dry | |||
| Tumble Dry Cycle | Medium | Dry Flat | |||
| Normal | Low | For machine-washable wool. Loads should be under 8 pounds. | |||
| Permanent Press/ Wrinkle Resistant/ Wrinkle Control | |||||
| Gentle/ Delicates | |||||
** The dot symbols represent appropriate wash water temperatures for various items. The temperature range for Hot is 105°-125°F/41°-52°C, for Warm 85°-105°F/29°-41°C and for Cold 60°-85°F/16°-29°C. (Wash water temperature must be a minimum of 60°F/16°C for detergent activation and effective cleaning). The washing machine cannot ensure these temperatures because the actual temperature of the water entering your washer depends on water heater settings and regional water supply temperatures. For example, cold water entering the home in the northern states during winter may be 40°F/4C* which is too cold for effective cleaning. In this situation, you will need to adjust the water temperature by selecting a warm setting, adding some hot water to the MAX FILL line, or using your washer's heating option, if available.
Technical specifications
| TYPE | ETW4527BW |
| Dimensions(W x D x H) | 27" x 28.6" x 43.9" |
| Weight | 127.8/bs |
| Power | 120V~/60Hz 680W |
| Current draw | 10A |
| Pulsator type | Agitator |
| Drum grain | Ellipse |
| Display type | LED |
| Display color | Red |
| Motor | Series |
element
LEGAL NOTICES
ELECTRICAL INFORMATION
THIS APPLIANCE MUST BE GROUNDED.
This appliance is fitted with a plug suitable for use in all houses fitted with sockets to current specifications.
If the fitted plug is not suitable for your socket outlets, it should be cut off and carefully disposed of. To avoid a possible shock hazard, do not insert the discarded plug into a socket.
This appliance complies with the following EEC Directives:
2014 / 35/ EU (Low Voltage Directive)
2014 / 30/ EU (EMC Directive).
WARRANTY
This Product (including any accessories included in the original packaging) as supplied and distributed in new condition, is warranted by Element Appliance Company, LLC ("Element") to the original customer who purchases the Product from an authorized Element retailer (the "Original Customer" or "Iou") against defects in material and workmanship under proper use, maintenance, and care according to the owner's manual, warnings, and instructions accompanying the Product ("warranty": as follows:
* *LEASE NOTE | Proof of purchase evidencing the date of purchase by the Original Purchaser from an authorized Element retailer ("Valid Proof of Purchase") is required for all Warranty service. The express Warranty set forth herein is subject to all terms and conditions set forth below.
CORRECT DISPOSAL OF THIS PRODUCT
Did appliances still have some residual value. An environmentally friendly method of disposal will ensure that valuable raw materials can be recovered and used again.
This marking indicates that this product should not be disposed with other household wastes throughout the U.S. To
prevent possible harm to the environment or human health from uncontrolled waste disposal, recycle it responsibly to promote the sustainable reuse of material resources. To return your used device, please use the return and collection systems or contact the retailer where the product was purchased. They can take this product for environmentally safe recycling.
1. WARRANTY SERVICE:
A. ONE-YEAR WARRANTY: (except as provided in subpart 1.B below, for a period of one (1) year from the date of purchase by the Original Customer (the "Warranty Period"), if the parts or components covered by this, Warranty are determined by Element or Element's authorized service provider to be defective in material or workmanship, Element will, at its sole and absolute discretion and option; (i) repair the defective part or component at no charge to the Original Customer, (ii) replace the defective Product with a new Product of similar or better quality, at no charge to the Original Customer, or (iii) refund the documented purchase price paid by the Original Customer (excluding tax) to the Original Customer upon return of the defective Product as directed by Element. After the Warranty Period expires, the Original Customer must pay for all parts, components, shipping and handling, labor, and replacement costs associated with the Product or any part or component thereof.

element
regardless of any defects in the Product or any part or component thereof.
B. LIMITED EXTENDED WARRANTY THROUGH PRODUCT REGISTRATION: If and only if the Original Customer registers the Product at www.elementetelectronics.com within ninety (90) days of the date of purchase by the Original Customer, then the Warranty Period discussed in subpart 1.A. above shall be extended an additional one (1) year to a new Warranty Period equaling two (2) years from the date of purchase by the Original Customer. If the Product is not registered as provided for in this subpart 1.B, then the standard one-year Warranty Period set forth in subpart 1.A shall apply.
C. TIMING AND PROCEDURE: Before Warranty service can commence, the Original Customer must contact either (i) the retailer from whom the Original Customer purchased the Product, or (ii) Element directly, in either case for problem determination and service procedures. Valid Proof of Purchase evidencing that the Product is within the Warranty Period MUST be presented by Original Customer in order to obtain the requested Warranty service. Please have your model and serial number available, along with your date of purchase of the Product. To remain eligible for Warranty service, Original Customer may not return the Product or any part or component thereof to the retailer or Element without Element's prior written consent.
2. EXCLUSIONS AND LIMITATIONS TO WARRANTY SERVICE
The Warranty covers manufacturing defects in materials and workmanship of the Product encountered if the normal, non-commercial use of the Product, and does not cover (a) damages or malfunctions resulting from improper or unreasonable use or maintenance, abuse, negligence, failure to follow instructions contained in any written materials that accompany the Product, deterioration by reason of excess moisture, corrosive atmosphere, lightning, power surges, connections to improper voltage supply, unauthorized
alteration, or other external causes such as extremes in temperature or humidity, modifications, sc'titches or discoloration; (b) improper or incorrectly performed repairs by service providers not authorized by Element; (c) transportation, shipping, delivery, pickup, insurance, installation, or set[1] costs; (d) ordinary wear and tear, cosmetic damage, o) damage due to acts of nature, including but not limited to, water, floods, wind, storm, tornado, earthquake, or fire, or due to damage caused by extraordinary impact events, such as dropping, crushing, demolition or other extraordinary damage; (e) commercial use of the Product, or use of the Product for anything other than single[1] Emily household or residential use; or (f) modification of the Product or any part of the Product.
This Warranty is made to the Original Customer only and does not cover Product; solid AS is OR WITH ALL FAULTS. The Warranty is invalid if the factory applied serial number has been altered or removed from the Product. This Warranty is valid only in the United States, and only applies to Product if it was purchased and serviced in the United States. The addition of equipment or features to the Product that are not manufactured or recommended by Element could affect the intended function of the Product, and therefore may void the Warranty. Furthermore, the exposure of the Product chemicals, heat, cold, humidity, or other elements can affect the Product components, and therefore, the Warranty does not cover discoloration, fading, cosmetic changes, rust, or any damages or failure related to any such items. The Warranty is contingent upon the proper use, maintenance, and care of the Product. The Warranty may be void if the Product has been used in a manner contradictory to, or in violation of, the terms of the user's manual, warnings, or instructions accompanying the Product.
THIS WARRANTY IS MADE IN LIEU OF AND SUPERSEDES ALL OTHER WARRANTIES OR CONDITIONS OF MERCHANTABILITY OR FITNESS FOR A PARTICULAR PURPOSE OR GENERAL USE, WHETHER EXPRESS, IMPLIED, COLLATERAL,

element
STATUTORY, OR PROVIDED BY COMMON LAW, THE UNIFORM COMMERCIAL CODE, OR OTHERWISE. ELEMENT FURTHER DISCLAIMS ALL WARRANTIES AFTER THE END OF THE WARRANTY TERM DEFINED ABOVE. NO OTHER EXPRESS WARRANTY OR GUARANTY GIVEN BY ANY OTHER PERSON, FIRM, OR ENTITY WITH RESPECT TO THE PRODUCT SHALL BE BINDING ON ELEMENT. REPAIR, REPLACEMENT, OR REFUND OF THE ORIGINAL PURCHASE PRICE, AT ELEMENT'S SOLE DISCRETION, ARE THE EXCLUSIVE REMEDIES OF THE CUSTOMER.
ELEMENT SHALL NOT BE LIABLE FOR ANY INCIDENTAL OR CONSEQUENTIAL DAMAGES CAUSED BY THE USE, MISUSE, OR INABILITY TO USE THE PRODUCT. THESE INCLUDE, BUT ARE NOT LIMITED TO, ANY DAMAGES IN THE FORM OF LOST PROFITS, LOSS OF USE, LEGAL FEES, ECONOMIC LOSS, PERSONAL INJURIES, OR ANY OTHER DAMAGES CAUSED BY CIRCUMSTANCES BEYOND THE CONTROL OF ELEMENT. NOTWITHSTANDING THE FOREGOING, ELEMENT'S AGGREGATE LIABILITY TO ANY CUSTOMER SHALL NOT EXCEED THE ORIGINAL PURCHASE PRICE OF THE PRODUCT. THIS WARRANTY SHALL NOT EXTEND TO ANYONE OTHER THAN THE ORIGINAL CUSTOMER WHO PURCHASED THE PRODUCT, AND IS NOT TRANSFERRABLE. NO PERSON IS AUTHORIZED TO ALTER, EXTEND, OR WAIVE THIS WARRANTY OR ANY OF ITS TERMS OR CONDITIONS.
Some states do not allow the exclusion or limitation of incidental or consequential damages, or allow limitations on warranties, so the above limitations or exclusions may not apply to jou. This Warranty gives you specific rights, and you may have other rights, which vary from state to state. The exclusions and limitations to the Warranty apply to the maximum extent permitted by law and unless restricted or prohibited by law. Where any term of this Warranty is prohibited by applicable law, it shall be null and void, but the remainder of this Warranty shall remain in effect.
PLEASE CONTACT THE RETAILER FROM WHOM YOU PURCHASED THE PRODUCT FOR CUSTOMER SERVICE OR TO CONFIRM PROCEDURES FOR WARRANTY SERVICE.
In the event you wish to contact Element, please direct all correspondence to
Element Appliance Company, LLC
customerservice@elementelectronics.com
888-842-3577
https://elementelectronics.com/appliances
- element
- REGISTER YOUR WASHER
- Contents
- SAFETY INSTRUCTIONS
- Explanation of the symbols
- Electrical shock
- Warning!
- Risk to children
- Risk of explosion
- Installing the product
- Caution
- Risk of damaging appliance
- Operating the appliance
- Packaging/Old appliance
- Installation
- Removing from the package
- Package list
- TOOLS and PARTS needed in installation
- Parts identification
- Location requirements
- Electric
- - Grounding
- • Water
- - Flooring
- - Drain facility
- • Room for washer
- Installation steps
- - STEP 1: Select a location
- • STEP 2: Connect the water hose
- • STEP 3: Connect the drain hose
- • STEP 4: Leveling your washer
- • STEP 5: Powering your washer
- • STEP 6: Running a test cycle
- Operation
- Program selector
- Temp.
- Water level
- Soil level
- Options selector
- Control panel
- Start/Pause button
- Power
- Cycle status lights
- Washing a load of laundry
- • STEP 1: Power on your washer
- • STEP 2: Load your washer
- • STEP 3: Add liquid detergent and powder to the dispenser
- - STEP 4: Select the appropriate cycle and options for the load
- Maintenance
- Cleaning the exterior
- Cleaning the interior
- Cleaning the detergent, bleach, softener compartments
- Storing your washer
- Tub clean
- Troubleshooting
- Appendix
- Fabric care chart
- LEGAL NOTICES
- ELECTRICAL INFORMATION
- WARRANTY
- CORRECT DISPOSAL OF THIS PRODUCT
- WARRANTY SERVICE:
- EXCLUSIONS AND LIMITATIONS TO WARRANTY SERVICE
Brand : Element
Model : ETW4527BW
Category : Washing machine