
EATW2537CW - Washing machine Element - Free user manual and instructions
Find the device manual for free EATW2537CW Element in PDF.


| Brand | Element |
| Model | EATW2537CW |
| Product Type | Freestanding Washing Machine |
| Capacity | 7 kg |
| Spin Speed | 1200 rpm |
| Energy Class | A+++ |
| Dimensions (H x W x D) | 85 x 60 x 55 cm |
| Weight | 62 kg |
| Power Supply | 220-240 V ~ 50 Hz |
| Water Consumption | 49 L per cycle |
| Noise Level (Wash/Spin) | 56 dB / 76 dB |
| Number of Programs | 15 |
| Key Functions | Delay Start, Child Lock, Quick Wash, Eco Wash, Rinse Hold |
| Door Type | Front-loading, 180° opening |
| Drum Material | Stainless Steel |
| Control Type | Electronic with LED display |
| Maintenance | Clean pump filter regularly; run drum cleaning cycle monthly |
| Safety Features | Overflow protection, unbalanced load detection, child lock |
| Spare Parts Availability | Authorized service centers; common parts online |
Frequently Asked Questions - EATW2537CW Element
User questions about EATW2537CW Element
0 question about this device. Answer the ones you know or ask your own.
Ask a new question about this device
Download the instructions for your Washing machine in PDF format for free! Find your manual EATW2537CW - Element and take your electronic device back in hand. On this page are published all the documents necessary for the use of your device. EATW2537CW by Element.
USER MANUAL EATW2537CW Element
3.7 cu. ft. 12-CYCLE TOP LOADING WASHING MACHINE
EATW2537CW
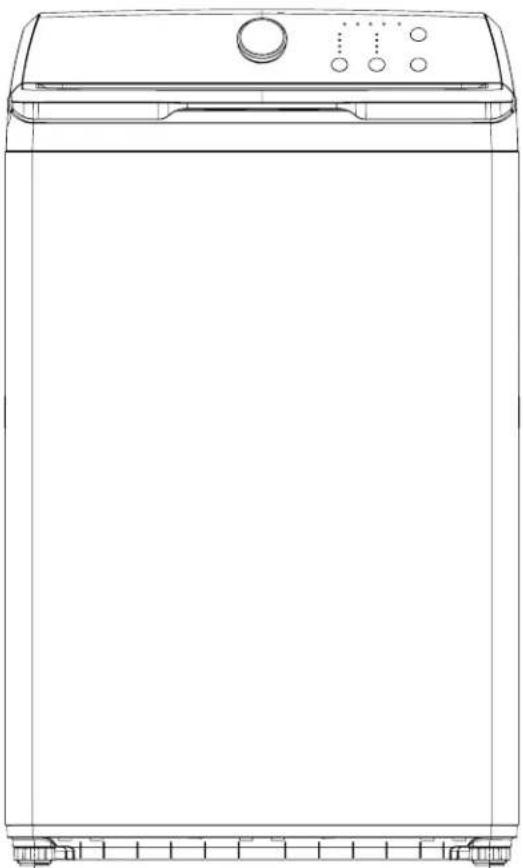
Product may vary. Please refer to the actual product
natural_image
Line drawing of a single kitchen appliance with control panel and side-mounted buttons (no text or symbols)TOP LOADING WASHER
Contents
Introduction 2
Important Safety Instructions 3
Features 7
Package contents 7
Main components 8
Unpacking your washer....9
Choosing a location....10
Washer dimensions and installation measurements 10
Electrical requirements....12
Water requirements 13
Drainage requirements....13
Installing your washer 14
Tools you will need 14
Step-by-Step instructions....14
Control panel 21
Using your washer 22
Washing a load of laundry 22
Washer options and settings 25
Maintaining your washer 27
Cleaning the exterior 26
Cleaning the interior 26
Cleaning the control panel 26
Cleaning the detergent, bleach, or softener compartment 26
Storing your washer 26
Cleaning the tub 26
Troubleshooting 26
Understanding the error codes 28
Specifications 28
Introduction
Congratulations on your purchase of a high-quality washing machine. Your washer represents the state of the art in top-load washing machine technology and is designed for reliable and trouble-free performance.
Important Safety Instructions
SAVE THESE INSTRUCTIONS
This User Guide contains important information on the installation, use, and care of your appliance. Please read this guide carefully before installation and operation of this machine to prevent injury and property damage.
The Warnings and Important Safety Instructions in this guide do not cover all possible conditions and situations that may occur. It is your responsibility to use common sense, caution, and care when installing, maintaining, and operating your washer.

CAUTION RISK OF ELECTRIC SHOCK DO NOT OPEN

WARNING
This indicates that hazards or unsafe practices may cause serious personal injury or death.
To reduce the risk of fire, explosion, electric shock, or personal injury when using your washing machine, follow these basic safety precautions.

CAUTION
This indicates that hazards or unsafe practices may cause minor personal injury or property damage.
This symbol indicates that there are important operating and maintenance instructions in the literature accompanying your washing machine.
State of California Proposition 65 Warnings
WARNING: Cancer and Reproductive Harm -www.P65Warnings.ca.gov.
WARNING
Do not store or use gasoline or other flammable vapors and liquids in the vicinity of this or any other appliance.
Basic Precautions

WARNING
1 Read all instructions before using the appliance.
2 Use this appliance only for its intended purpose as described in this User Guide.
3 Before use, the washer must be properly installed as described in this guide.
4 Always follow the fabric care instructions supplied by the garment manufacturer.
5 Do not wash or dry articles that have been previously cleaned in, washed in, soaked in, or spotted with gasoline, dry-cleaning solvents, or other flammable or explosive substances as they give off vapors that could ignite or explode.
6 Do not allow children to play on or in the appliance. Close supervision of children is necessary when the appliance is used near children.
7 Before the appliance is removed from service or discarded, remove the lid of the washing compartment.
8 Do not reach into the appliance if the tub is moving.
9 Do not install or store this appliance where it will be exposed to the weather or freezing temperatures.
10 Do not tamper with the controls.
11 Do not repair or replace any part of the appliance or attempt any servicing unless it is specifically recommended in the user-maintenance instructions or in published user-repair instructions that you understand.
12 Under certain conditions, hydrogen gas may be produced in a hot-water system that has not been used for 2 weeks or more. HYDROGEN GAS IS EXPLOSIVE. If the hot-water system has not been used for such a period, before using a washing machine, turn on all hot-water faucets and let the water flow from each for several minutes. This will release any accumulated hydrogen gas. As the gas is flammable, do not smoke or use an open flame during this time.
13 Keep the area underneath and around your appliance free of combustible materials (lint, paper, rags, and so on), gasoline, chemicals, and other flammable vapors and liquids.
14 Do not place items exposed to cooking oil in your washer. Items contaminated with cooking oil may contribute to a chemical reaction that could cause a load to catch fire.
15 This washer is not designed for maritime use or for mobile installations such as in Rvs, aircraft, and other mobile platforms.
16 Turn off the water faucets and unplug the washer if the machine is to be left for an extended period of time, such as during vacations.
17 Packaging material can be dangerous for children. There is a risk of suffocation! Keep all packaging away from children.
18 Always check the inside of the washer for foreign objects before loading laundry. Keep the lid closed when not in use.
19 Do not add gasoline, dry-cleaning solvents, or other flammable or explosive substances to the wash water. These substances give off vapours that could ignite or explode.

WARNING
Installation Warnings and Precautions
1 Plug the power cord into an AC 120V/60Hz wall socket rated at 15 amps or higher. Use the socket for this washer only. Do not use an extension cord.
- Sharing a wall socket with another appliance, using a power strip, or extending the power cord may result in electric shock or fire.
- Do not use an electric transformer. It may result in electric shock or fire.
• Make sure that the power voltage, frequency, and current match the product's specifications. Failing to do so may result in electric shock or fire.
2 Remove all foreign substances such as dust or water from the power plug terminals and contact points using a dry cloth on a regular basis.
- Unplug the power plug and clean it with a dry cloth.
- Failing to do so may result in electric shock or fire.
3 Plug the power plug into the wall socket in the right direction so that the cord runs towards the floor.
- If you plug the power plug into the socket in the opposite direction, the electric wires within the cable may be damaged and this may result in electric shock or fire.
4 Plug the power plug into the wall socket firmly. Do not use a damaged power plug, or loose wall socket, because this may result in electric shock or fire.
5 Do not pull or excessively bend the power cord. Do not twist or tie the power cord.
6 Do not hook the power cord over a metal object, place a heavy object on the power cord, insert the power cord between objects, or push the power cord into the space behind the appliance, because this may result in electric shock or fire.
7 Do not pull the power cord when unplugging the power plug.
- Unplug the power plug by holding the plug.
- Failing to do so may result in electric shock or fire.
8 If the power plug or power cord are damaged, contact your nearest service center.
9 Do not install on carpet. Install the washer on a level and solid floor that can support its weight. Failure to do so may result in abnormal vibrations, noise, or problems with the product.
10 The washer is heavy. Two or more people may be needed to install and move the appliance. Failure to do so may result in bodily or other injuries.
11 Store and install the washer where it will not be exposed to temperatures below freezing or exposed to outdoor weather conditions. Failure to do so may result in serious leak damage.
12 Position the appliance so that the power plug is easily accessible. Failure to do so may result in electric shock or fire due to an electrical short circuit.
13 Failure to closely follow these instructions may result in an abnormal vibrating and out-of-balance condition that could result in physical injury, property damage, and/or appliance damage.

WARNING
Use and Maintenance Warnings and Precautions
1 If the appliance is flooded, cut the power immediately and contact your nearest service center.
2 If the appliance emits a strange noise, a burning smell, or smoke, unplug the power plug immediately and contact your nearest service center. Failure to do so may result in electric shock or fire.
3 In the event of a gas leak (such as propane or LP gas), ventilate the area immediately. Do not turn any appliance or light on or off.
- Do not use a ventilating fan.
• A spark may result in an explosion or fire.
4 Do not force the washer lid open while the washer is operating (high-temperature washing, drying, or spinning).
• Water flowing out of the washer may cause burns or cause the floor to be slippery. This may result in injury.
- Forcing the lid open can damage the product or cause injury.
5 Make sure to remove the packaging (sponge, styrofoam) attached to the bottom of the washer before using it.
6 Do not insert your hand or a metal object under the washer. This may result in injury.
7 Do not attempt to operate this appliance if it is damaged, malfunctioning, partially disassembled, or has missing or broken parts, including a damaged cord or plug. This may result in electric shock, fire, or death.
8 Do not touch the power plug with wet hands. This may result in electric shock.
9 Do not turn the appliance off by unplugging the power plug while the washer is in operation. Plugging the power plug into the wall socket again may cause a spark and result in electric shock or FIRE.
10 Keep all packaging material well out of the reach of children, as packaging materials can be dangerous to children. If a child places a bag over his or her head, he or she may suffocate.
11 Do not let children or infirm persons use this washer unsupervised. Failure to do so may result in electric shock, burns, or injury.
12 Do not attempt to repair, disassemble, or modify the appliance yourself.
- Do not use any fuse (such as copper, steel wire, etc.) other than the standard fuse.
- If you need to repair or reinstall the appliance, contact your nearest service center.
- Failure to do so may result in electric shock, fire, problems with the product, or injury.
13 If any foreign substance such as water enters the appliance in any area other than the tub, unplug the power plug and contact your nearest service center. Failure to do so may result in electric shock or fire.
14 If the water supply hose comes loose from the faucet and floods the appliance, unplug the power plug. Failure to do so may result in electric shock or fire.
15 Do not mix chlorine bleach with ammonia or acids such as vinegar. Incorrect usage can produce poisonous gas, resulting in serious injury.
16 Do not reach into the washer while parts are moving. Before loading, unloading, or adding items, press the ▶I START/PAUSEbutton and allow the tub to come to a complete stop before reaching inside. Failure to do so may result in electric shock, injury, or fire.
17 Do not allow children to play on or in the washer. Close supervision of children is necessary when the washer is used near children. As children grow, teach them the proper, safe use of all appliances. Failure to do so may result in serious injury.
18 Keep laundry products out of reach of children. Observe all warnings on product labels and follow them. Failure to do so may result in serious injury.
19 Disconnect this appliance from the power supply before attempting any user maintenance. Pressing the Power button does not disconnect this appliance from the power supply. Failure to do so may result in electric shock, injury, or fire.
20 Do not clean the appliance by spraying water directly onto it.
21 Do not use benzene, thinner, or alcohol to clean the appliance. This may result in discoloration, deformation, damage, electric shock, or fire.
22 Unplug the power plug when the appliance is not being used for long periods of time or during a thunder/lightning storm. Failure to do so may result in electric shock or fire.
23 Keep hands and foreign objects clear of the lid and latch area when closing the lid. Failure to do so may result in personal injury.
24 If the washer is contaminated by a foreign substance such as detergent, dirt, or food waste, unplug the power plug and clean the washer with a damp, soft cloth. Failure to do so may result in discoloration, deformation, damage, or rust.
25 The clear portion of the lid can be broken by a strong impact. Take care when using the washer. If the clear portion is cracked or broken, it may result in injury.
26 After a water supply failure or when reconnecting the water supply hose, open the faucet slowly.
27 Open the faucet slowly after a long period of non-use. The air pressure in the water supply hose or the water pipe may result in damage to a part or in water leakage.
28 If a drain error occurs during an operation, check if there is a draining problem. If the washer is used when it is flooded because of a draining problem, it may result in electric shock or fire due to an electrical short circuit. Do not insert your hand or a metal object under the washer. This may result in injury.
29 Insert laundry into the washer completely so that the laundry does not get caught in the lid. If laundry gets caught in the lid, it may result in damage to the laundry or the washer, or result in water leakage.
30 Make sure that the faucet is turned off when the washer is not being used.
31 Make sure that the water supply hose connectors are properly tightened. Failure to do so may result in property damage or injury.
32 Open the faucet and check if the water supply hose connector is firmly tightened and that there is no water leaking before using the product. If the water supply hose connectors are loose, it may result in water leakage.
33 Do not stand on top of the appliance or place objects (such as laundry, lighted candles, lighted cigarettes, dishes, chemicals, metal objects, etc.) on the appliance. This may result in electric shock, fire, problems with the product, or injury.
34 Do not operate the appliance with wet hands. This may result in electric shock.
35 Do not spray volatile material such as insecticide onto the surface of the appliance. As well as being harmful to humans, it may also result in electric shock, fire, or problems with the product.
36 Do not place an object that generates an electromagnetic field near the washer. This may result in injury due to a malfunction.
37 Since the water drained during a high temperature wash or drying cycle is hot, do not touch the water. This may result in burns or injury.
38 Do not wash, spin, or dry water-proof seats, mats, or clothing.
39 Do not wash thick, hard mats even if the washer mark is on the care label. This may result in injury or damage to the washer, walls, floor, or clothing due to abnormal vibrations.
40 Do not operate the washer when the detergent dispenser is removed. This may result in electric shock or injury due to water leakage.
41 Do not insert your hand into the detergent dispenser after opening it. This may result in injury because your hand may be caught.
42 Do not place any non-laundry objects, such as shoes, food waste, or animals into the washer. This can cause abnormal vibrations that can damage the washer, and, in the case of pets, cause severe injury or death.
43 Do not press the buttons using sharp objects such as pins, knives, or fingernails. This may result in electric shock or injury.
44 Do not wash laundry contaminated by oils, creams, or lotions usually found in skin-care shops or massage clinics. This may result in the rubber seal becoming deformed and water leakage.
45 Make sure that the water inlet pipe is connected and the tap is opened before washing clothes.
46 Do not leave metal objects (safety pins, hair pins, and so on) or bleach in the tub for long periods of time. This may cause the tub to rust.
- If rust appears on the surface of the tub, apply a neutral cleansing agent to the surface and use a sponge to clean it. Never use a metal brush.
47 Do not use hot water from water cooling/heating devices. This may result in problems with the washer.
48 Do not use natural hand-washing soap in the washer. If it hardens and accumulates inside the washer, it may cause problems with the product, discoloration, rust, or bad odors.
49 If using a washing net with this machine (not provided), do not wash laundry items such as bedding in the washing net. Doing so may result in injury due to abnormal vibrations. Place only smaller items, such as lace socks and lingerie, in the washing net.
50 Do not use hardened powdered detergent. If it accumulates inside the washer, it may result in water leakage.
51 Do not wash throw rugs or doormats. Doing so may cause sand to accumulate inside the washer, resulting in mechanical problems.
52 Do not wash water-resistant or water-repellent clothing. This may result in an abnormal vibrating and out-of-balance condition that could result in physical injury, property damage and/or appliance damage.
Grounding/Earthing
1 This appliance must be grounded. In the event of malfunction or breakdown, grounding will reduce the risk of electric shock by providing a path of least resistance for electric current. This appliance is equipped with a cord having an equipment-grounding conductor and a grounding plug. The plug must be plugged into an appropriate outlet that is properly installed and grounded in accordance with all local codes and ordinances.
2 Do not ground the appliance to a gas pipe, plastic water pipe, or telephone line.
WARNING – Improper connection of the equipment-grounding conductor can result in a risk of electric shock, fire, explosion, or problems with the product. Check with a qualified electrician or serviceman if you are in doubt as to whether the appliance is properly grounded.
3 Do not modify the plug provided with the appliance – if it will not fit the outlet, have a proper outlet installed by a qualified electrician.
Choosing a Proper Location
1 Do not install this appliance near a heater or inflammable material.
2 Do not install this appliance in a humid, oily, or dusty location, or in a location exposed to direct sunlight or water (rain drops).
3 Do not install this appliance in a location where gas may leak. Failure to do so may result in electric shock or fire.
4 If the washer is moved to a new location, have it checked and re-installed by a qualified service technician. Failure to follow this warning may result in electric shock or fire.
Features
Package contents
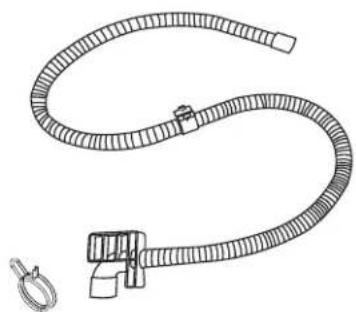
Make sure that the following items came with your washer:
natural_image
Line drawing of a flexible hose with a connector and hook (no text or symbols)Drain hose
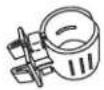
Clamp

Filter
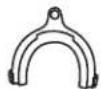
Hose holder
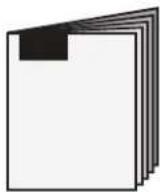
User Guide
Main components
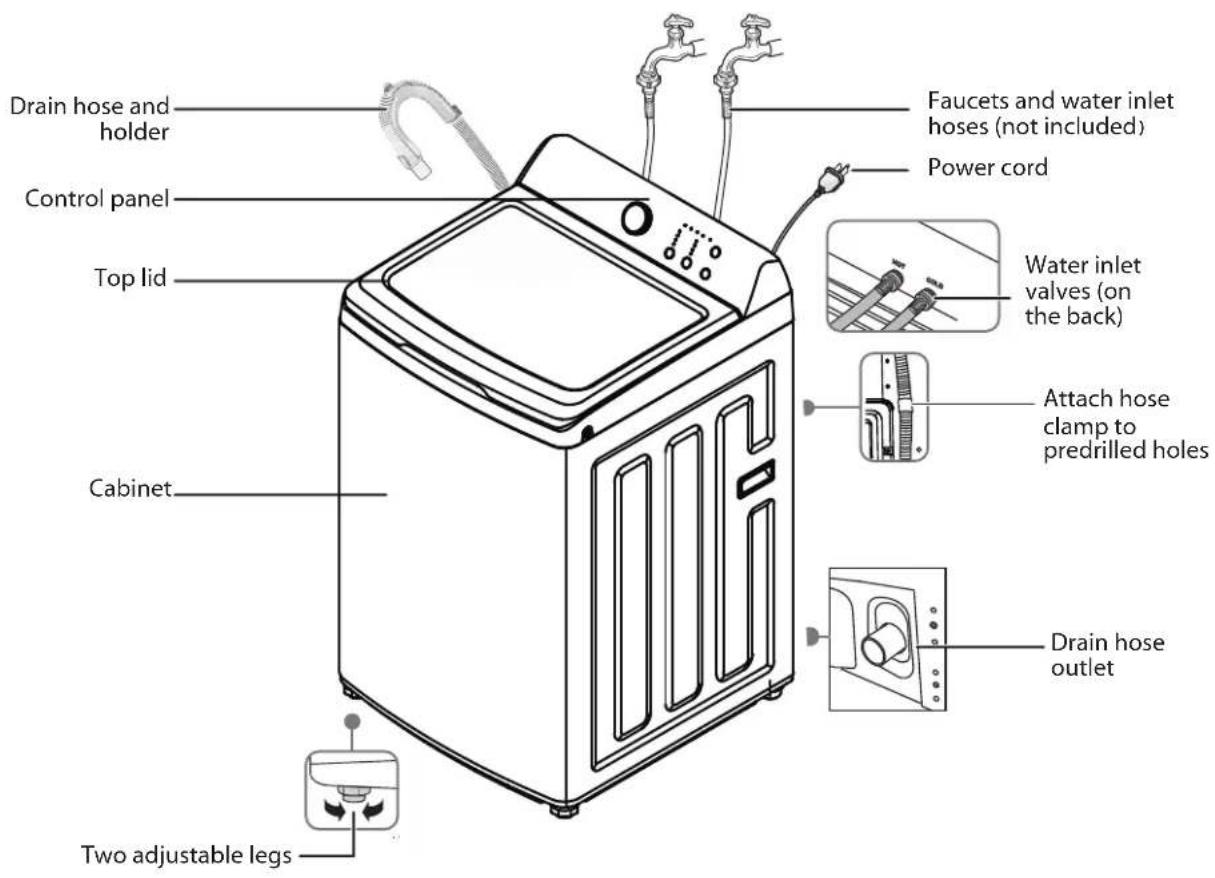
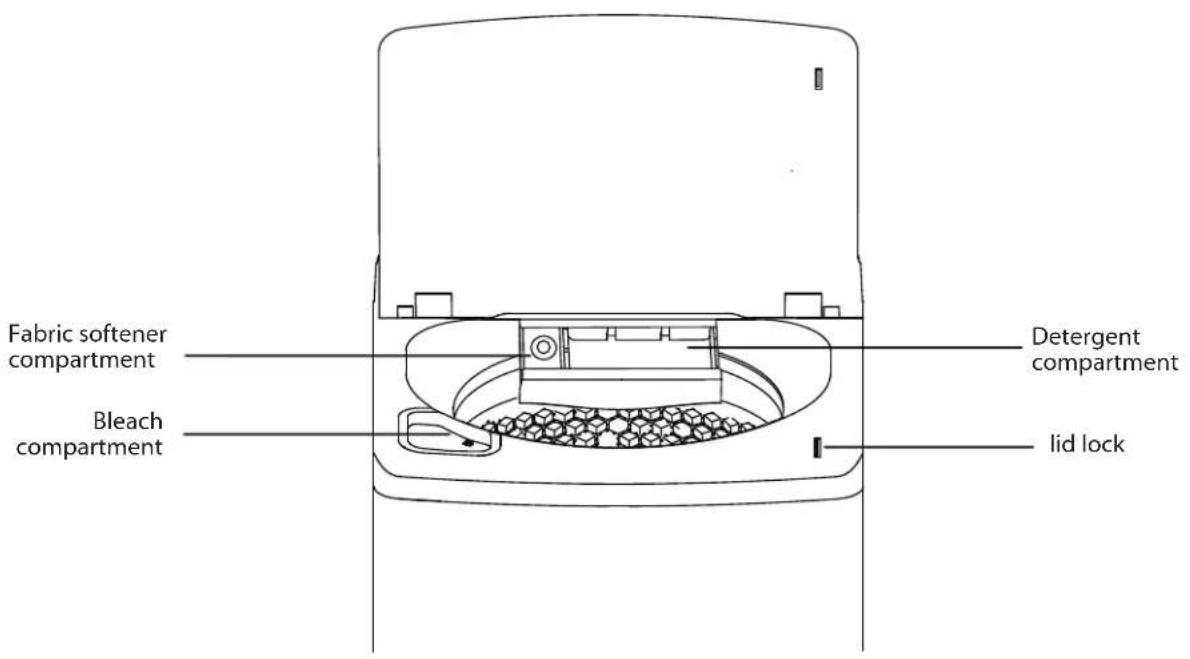
Unpacking your washer
Warning
- Packing materials can be dangerous to children. Keep all packing materials (plastic bags, polystyrene, and so on) well out of the reach of children.
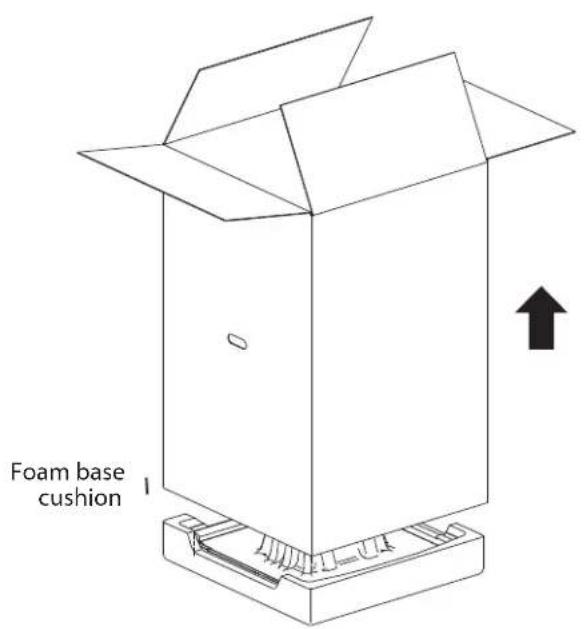
- Do not operate your washer on the foam base cushion. Doing so will result in serious vibration, which could cause equipment damage or result in physical injury.
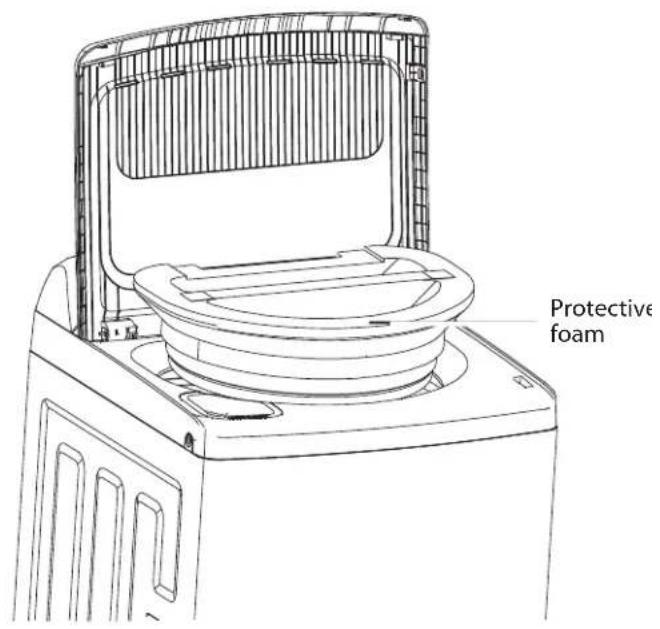
- Remove the packing box and lift the washer up and away from the foam base cushion. Open the lid of the washer to take out all accessories including the protective foam.
Choosing a location
Warning
- Do not install your washer in areas where water may freeze, because your washer always retains some water in its water valve, pump, and hose areas. Frozen water can damage the belts, pump, hoses, and other components.
- Never install on a platform or weakly supported structure.
For best performance, you must install your washer on a solid, level floor.
Wooden floors may need to be reinforced to minimize vibration or unbalanced load situations.
Carpeting and soft tile surfaces can contribute to excessive vibration, which can cause your washer to move slightly during the spin cycle.
Washer dimensions and installation measurements
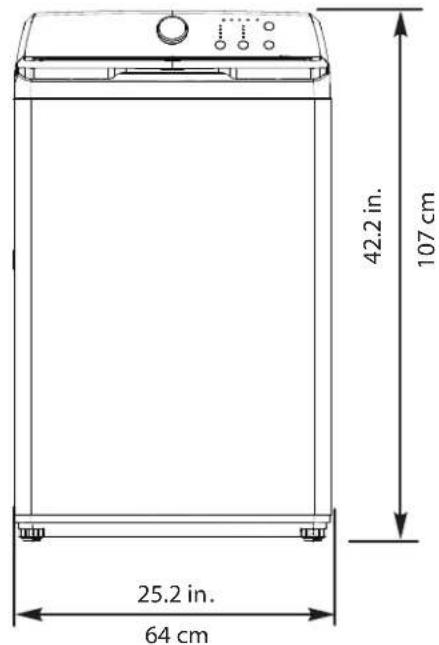
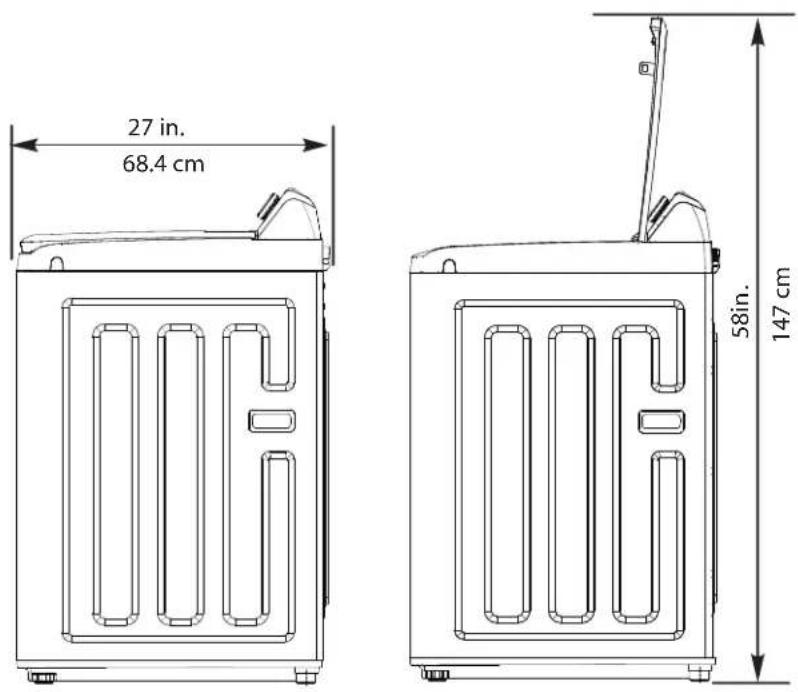
If you install your washer in an alcove or closet, the front of the closet must have two unobstructed air openings for a combined minimum total area of 72sq.in. (465 sq.cm) with a minimum clearance of 3in. (7.6 mm) at the top and bottom. A slatted door with equivalent space clearance is acceptable.
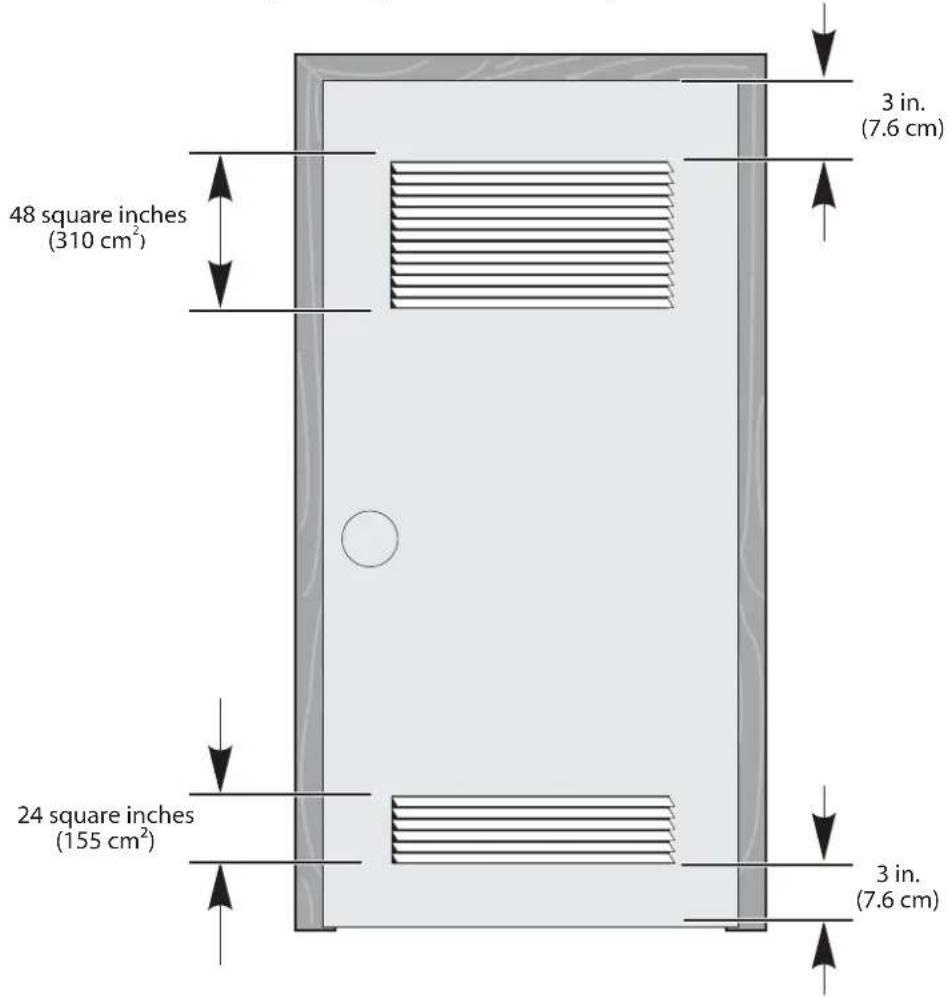
Installing in an alcove or closet
Minimum clearances between your washer and adjacent walls or other surfaces are:
• Either side: 1 in. (2.5 cm)
• Rear: 6 in. (15.2 cm)
• Closet Front: 2 in. (5.1 cm)
• Top: 24 in. (61 cm)
- Gap between the end of water valve and the wall:
• Case 1: If you connect the supply hose after you install your washer: Over 3.9 in. (10 cm)
• Case 2: If you connect the supply hose before you install your washer: Over 2.8 in. (7 cm)
If you install your washer and dryer side-by-side in a closet, the closet front must have an unobstructed air opening of at least 72 square inches (465 square cm).
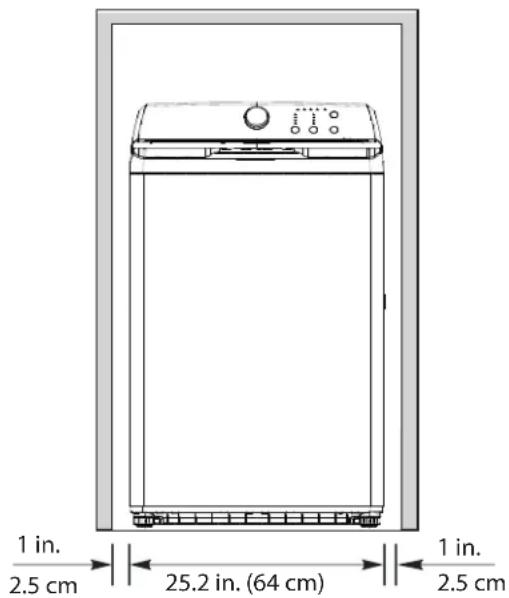
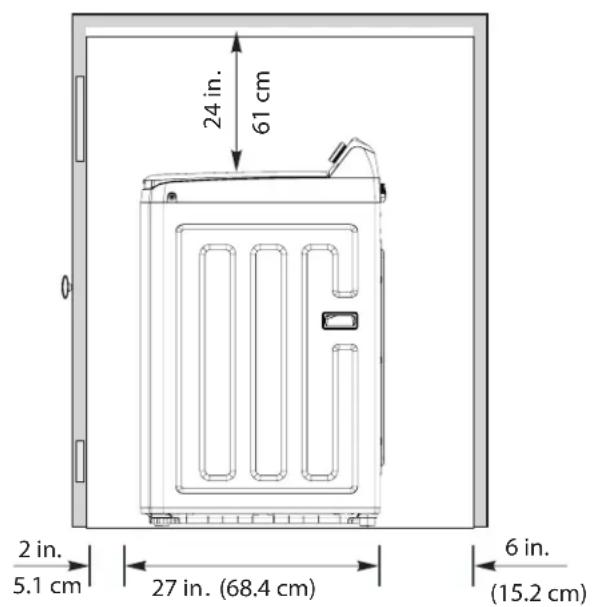
Electrical requirements
Warning
To reduce the risk of fire, electric shock, or injury to persons, read the IMPORTANT SAFETY INSTRUCTIONS before operating this appliance.
Use a 120 Volt, 60Hz, 15 amp fuse or circuit breaker. We recommend an individual branch circuit that serves only your washer.
Warning
Never use an extension cord.
Electrical grounding is required for your washer.
You must ground your washer. In the event of a malfunction or breakdown, grounding reduces the risk of electric shock by providing a path of least resistance for the electric current.
Your washer is equipped with a power cord with a three-pronged grounding plug for use in a correctly installed and grounded outlet.
Warning
- You are responsible for providing adequate electrical services for your washer.
• To prevent unnecessary risk of fire, electrical shock, or personal injury, all wiring and grounding must be done in accordance with the National Electrical Code ANSI/FNPA, No.70 Latest Revision and local codes and ordinances. - Never connect the ground wire to plastic plumbing lines, gas lines, or hot water pipes.
Water requirements
To fill your washer in the correct amount of time, the water pressure needs to be between 14 and 116 psi (100 to 800kPa).
If the water pressure is less than 14psi (100kPa):
• The water valve may fail or may not shut off completely.
- The time it takes to fill your washer may be longer than the time your washer controls allow. Your washer will turn off and report an error. A time-limit is built into the controls to prevent flooding in your home if a hose becomes loose.
• Water inlet hoses must be purchased separately. You can buy inlet hoses in various lengths up to 8 ft. (240 cm).
To avoid the possibility of water damage:
- Make sure that the water faucets are easily accessible.
- Turn off the faucets when you are not using your washer.
- Periodically check to make sure that water is not leaking from the water hose fittings.
Drainage requirements
Note
The drain hose is attached to the washer at the factory.
• The recommended height for the drain standpipe is 48in. (122 cm).
- The drain hose must be routed through the drain hose clip to the standpipe.
• The standpipe must be large enough to accept the outside diameter of the drain hose.
Installing your washer
Tools you will need
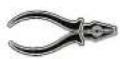
Pliers
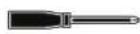
Phillips
screwdriver
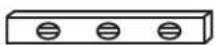
Level
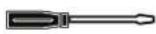
Flat-head screwdriver
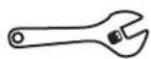
Wrench
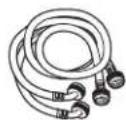
Washer inlet hoses
Step-by-Step instructions
Step 1: Select a location
Before you install your washer, make sure that the location:
• Is a hard, level surface without carpeting or soft flooring that can obstruct ventilation.
• Is away from direct sunlight.
- Has adequate ventilation.
• Is not exposed to freezing temperatures (32°F or 0°C).
• Is away from heat sources such as oil or gas.
- Has enough space so that the washer does not rest on its power cord.
Step 2: Connect the water hoses
Note
The water supply hoses are not supplied with your washer and must be purchased separately.
Caution
- Use new water supply hoses. Using old hoses can result in leakage or overflow that can damage your property.
- Do not connect multiple water supply hoses together to increase the length of the hose. Hoses connected this way can leak and cause electrical shock. If a hose is too short, replace the hose with a longer, high-pressure hose.
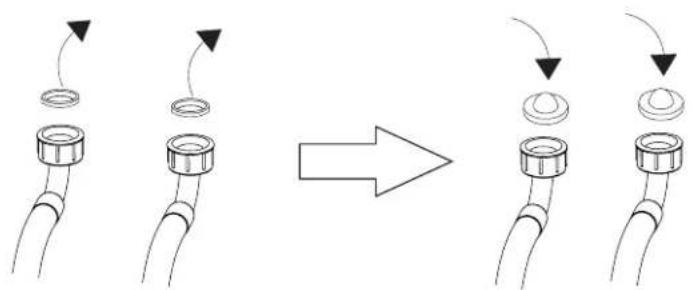
1 Before connecting the water-inlet hose to the tap, remove the rubber blanket inside the water-inlet hose connector first, and take the rubber blanket with filter out of the accessory bag, to install it into the water-inlet hose connector (as shown in the figure).
flowchart
graph LR
    A["Initial State with Valve"] --> B["Arrow to Next State"]
    B --> C["Final State with Valve"]
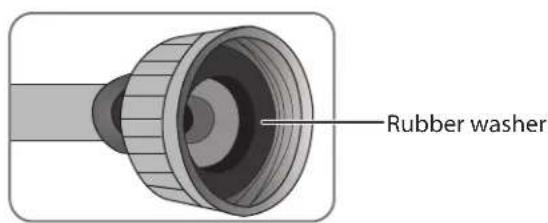
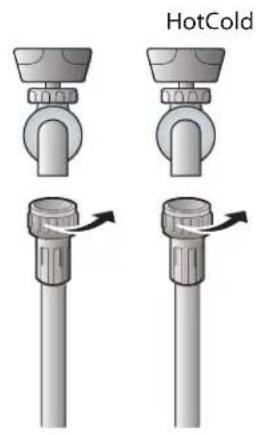
2 Tighten the hose and faucet things by hand until they are snug, then tighten them an additional two-thirds of a turn with pliers or a wrench. Pull the water supply hoses downwards to make sure that they are connected securely.
Caution
Do not overtighten the fittings or apply tape or sealant to the faucets or water supply intakes. This can damage the fittings.
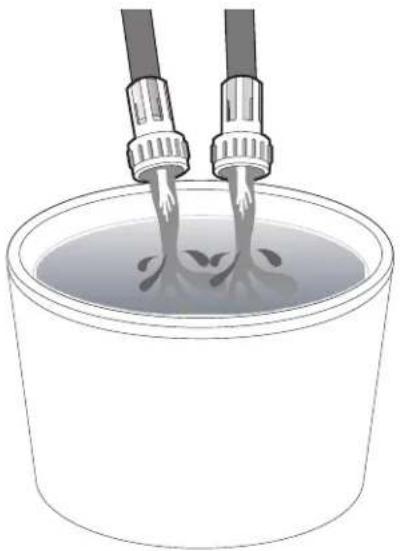
3 Place the unconnected ends of the hoses into a bucket and turn on the faucets connected to the water supply hoses for 10 or 15 seconds to remove any foreign substances. Turn off the faucets.
natural_image
Illustration of two tubes dispensing liquid into a container (no text or symbols)4 Connect the ends of the water supply hoses to the water supply intake connections at the top of the washer. Make sure that the rubber washers are in place. The water supply hose connected to the hot faucet must be connected to the hot water supply intake and the water hose connected to the cold faucet must be connected to the cold water supply intake.
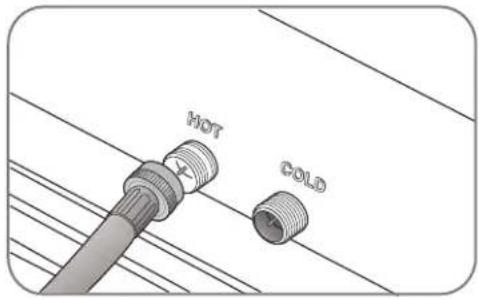
Notes
• If you do not want to use the hot water supply hose, insert a water intake cap into the hot water supply intake hole. In this case, you must select the Tap Cold option for the water temperature.
- No intake cap is provided with your washer. It must be purchased separately.
5 Tighten the fittings by hand until they are snug, then tighten them an additional two-thirds of a turn with a wrench.
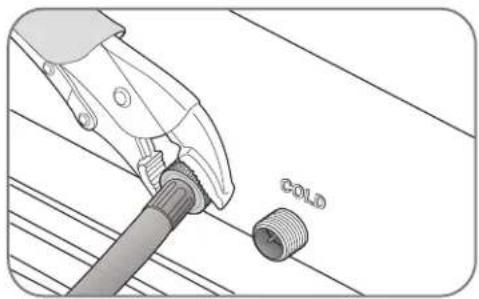
natural_image
Diagram of a pliers applying a cold pipe to a threaded component (no text or symbols present)Caution
- Do not overtighten the fittings or apply tape or sealant to the faucets or water supply intakes. This can damage the fittings.
- Make sure that the water supply hoses are not twisted or bent. A bent or twisted hose can leak and cause an electric shock due to the water leakage. To ensure the correct water usage, connect both hot and cold water faucets. If either or both are not connected, an error code could occur.
6 Turn on the hot and cold water supplies and check all the water supply intake connections and the faucets for water leaks.
Step 3: Connect the drain hose
Caution
- Failure to slide the drain hose completely over the washer's drain pipe may result in water leakage.
- Failure to move the clamp or hoop onto the washer's drain pipe will result in water leakage.
1 Find the end of the drain hose that has the clamp, then slide the clamp away from the end of the hose.
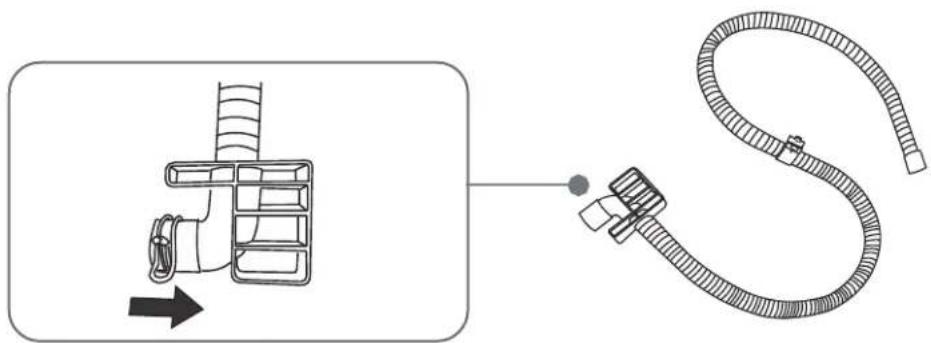
natural_image
Diagram showing a mechanical device with a curved pipe and a separate schematic view (no text or symbols)2 Insert the drain hose with the clamp onto the washer's drain pipe. Make sure that the drain hose completely covers the end of the drain pipe.
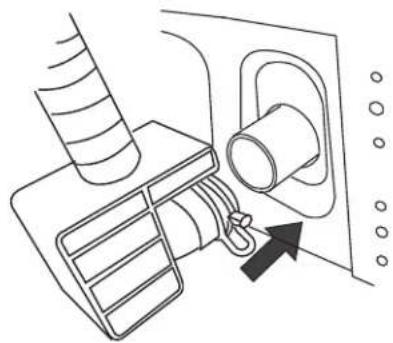
natural_image
Diagram of a vehicle's exhaust system showing pipe connection and valve mechanism (no text or labels)3 Move the clamp toward the drain pipe outlet. Tighten the clamp with plies.
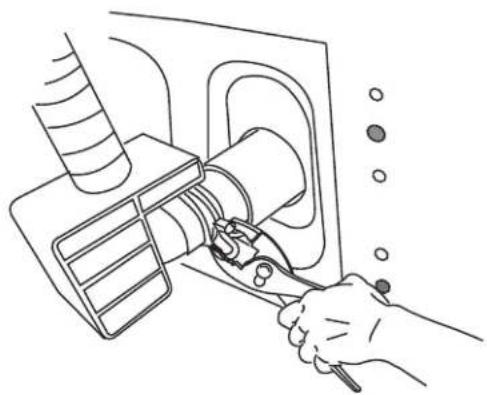
natural_image
Line drawing of a hand using a tool to adjust or install a component, no text or symbols present4 Fasten the drain hose to the washer frame at the indicated locations with the hose clamp provided, using pliers.
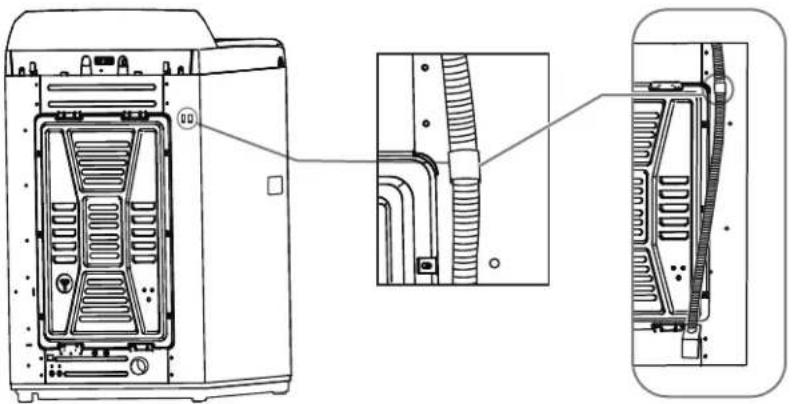
natural_image
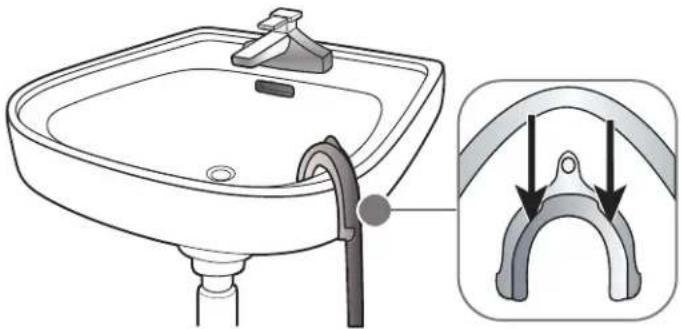
Technical line drawing of a server rack with internal components and connectors (no text or symbols)5 Position the other end of the drain hose (the loose end) in one of the following ways:
Caution
Make sure that the connection between the drain hose and the wash basin, standpipe, or laundry tub is not airtight.
• Over the edge of a wash basin - Secure the guide to the side of the basin wall with a hook, tape it, or tie it with a piece of cord to prevent the drain hose from moving.
natural_image
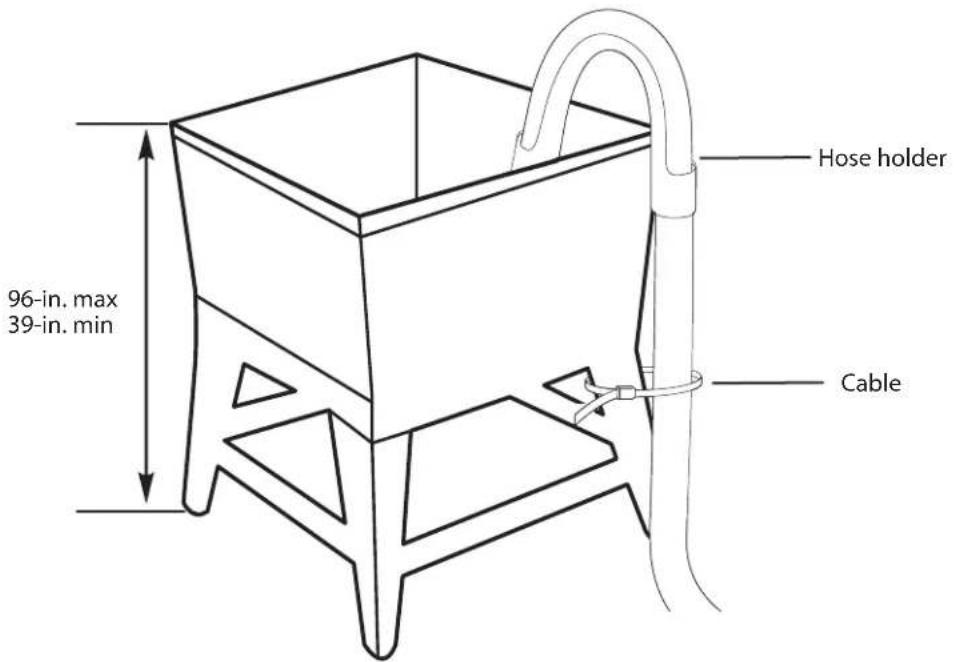
Illustration of a square sink with a hand valve and a magnified inset showing the curved arm joint (no text or symbols)• In a standpipe - The standpipe must be no shorter than 39-in. (99 cm) and no longer than 96-in. (244 cm).
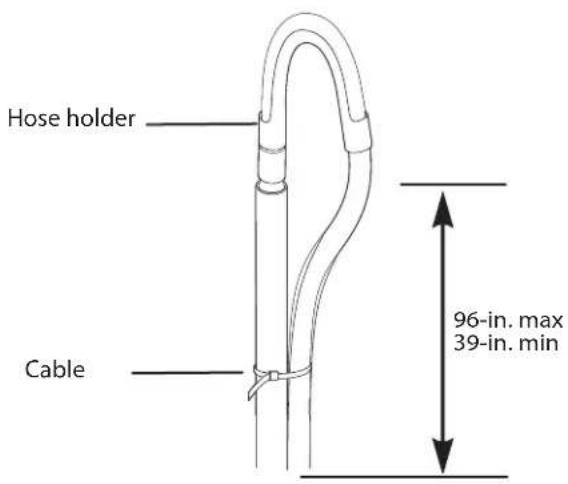
• In a laundry tub - The laundry tub must be no shorter than 39-in. (99 cm) and no higher than 96-in (244 cm) maximum.
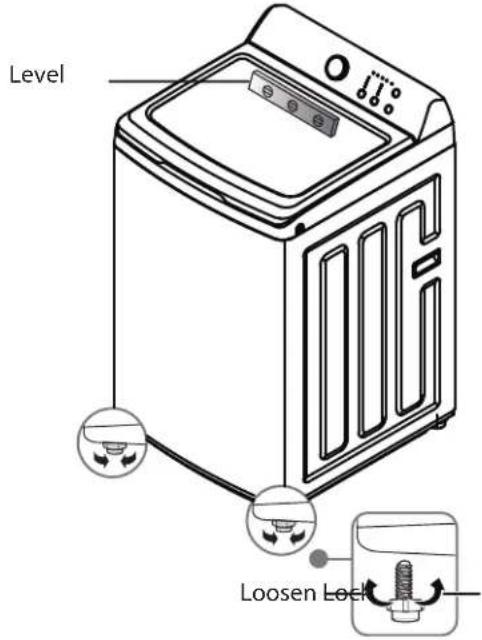
Step 4: Level your washer
Caution
Do not use your washing machine without leveling. If your washer is not level, it may:
•Vibrate excessively which can cause your washer to malfunction
• Make excessive noise.
- Indicate error codes E3, E4 or E5 when the washer is running. Extend the leveling feet only as much as is necessary. If the feet are extended too much, your washer may vibrate.
Determine if the washer is level by checking the position of the tub or by using a level.
1 Slide the washer into position.
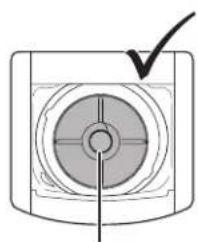
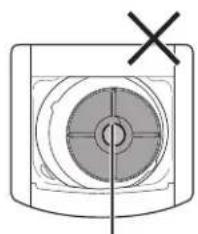
2 Open the lid of the washer, then pour water into the tub to the leveling circle. If the washer is level the water will touch the leveling circle all the way around. If the washer is not level, the water will only touch part of the leveling circle.
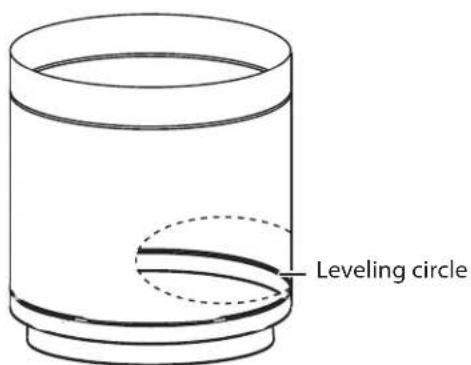
Add water to the washer until it reaches the leveling circle. If the washer is level, the water will touch the leveling circle all the way around. If it's not level, it will only touch part of the leveling circle.
natural_image
Simple line drawing of a mechanical component with a circular center and a checkmark indicating a detail (no text or symbols)Washer is level - the water touches the leveling circle all the way around.
natural_image
Pure technical diagram of a mechanical component with cross mark and centerlines (no text or symbols)Washer not level - the water does not touch the leveling circle all the way around.
3 If your washer is not level, carefully tilt your washer just enough to adjust the leveling feet on the bottom of your washer. Extend the feet only as much as is necessary. If the feet are extended too much, your washer may vibrate.
Step 5: Power your washer
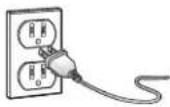
Plug the power cord into a well-grounded, 3-prong, 120 Volt 60Hz approved electrical outlet, protected by a 15-amp fuse or comparable circuit breaker. Your washer is grounded through the third prong of the power cord.
Step 6: Run a test cycle
Run a test cycle to make sure that your washer is properly installed.
1 Load about 6 pounds (2.7 kg) of laundry into the tub.
2 Press the ⏻/Power button to turn on your washer.
3 Turn the cycle selector to select the Rinse & Spin cycle.
4 Press the ▶/Start Pause button to start the test cycle. Your washer should not rock or vibrate excessively when water fills the tub, or when washing or spinning. The washer should drain well during the spin cycle.
Caution
- If you detect any water leaks while the washer is filling or draining, check the water connections. See Step 2: Connect the water hoses on page 14 or Step 3: Connect the drain hose on page 17.
- If the washer rocks and/or vibrates excessively, level it again. See Step 4: Level your washer on page 20.
Control panel
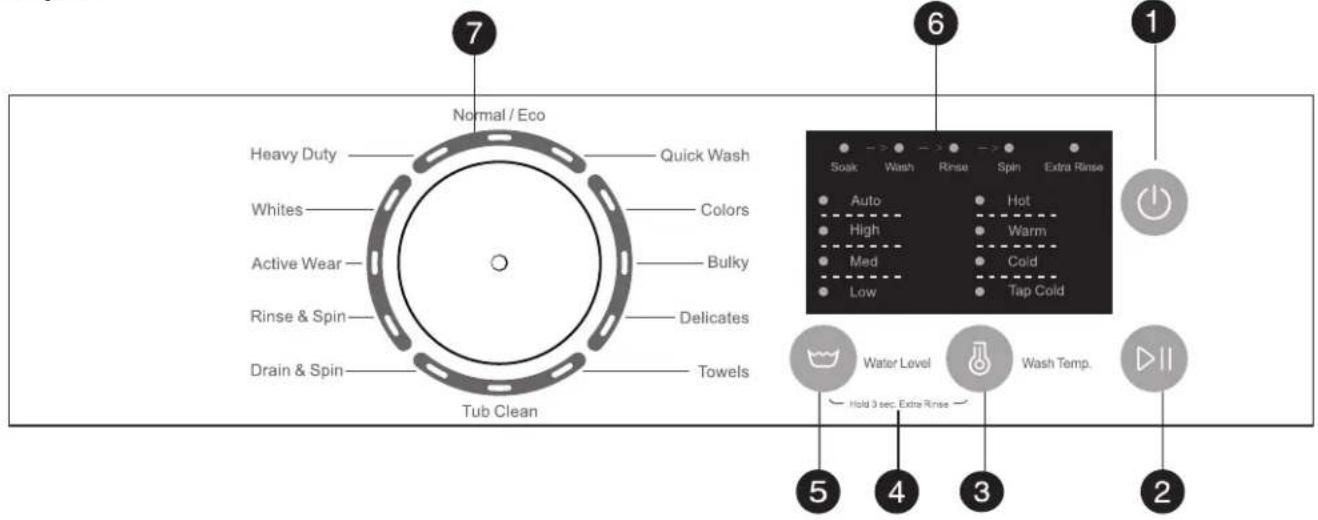
| # | ITEM | DESCRIPTION |
| 1 /Power button | Press to turn on your washer. Press again to turn off your washer. If you leave your washer on and do not press the ▶II/Start Pause button within 10 minutes, your washer automatically turns off. | |
| 2 | ▶II/Start Pause button | Press once to start the wash cycle. Press again to pause the cycle. If you pause the cycle, you can add or remove items, but you cannot change any settings. Press again to restart the cycle. |
| 3 | Temp. button | Press to select the washing water temperature.The rinse water temperature is always cold. |
| 4 | Extra Rinsebutton | Press to Water Level+Wash Temp. 3 sec. button, extra rinse to the wash cycle.Press again to cancel. |
| 5 | Water Level button | Press the button, increase one water level. And press again to cancel the function. |
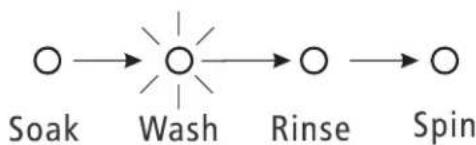
| 6 | Cycle status lights | Flash to indicate what part of the cycle your washer is in. For example, the Soak Flash turns on when your washer is in the Soak process. |
| 7 | Cycle selector | Turn to select a wash cycle. The cycle you select determines the wash pattern for the cycle. For more information, See Washer options and settings on page 25. |
Using your washer
Washing a load of laundry
WARNING – To reduce the risk of fire, electric shock, or injury to persons, read the IMPORTANT SAFETY INSTRUCTIONS before operating this appliance.
Selecting a detergent
Your washer is designed to use high efficiency (HE) detergents.
- For the best cleaning results, use an HE detergent. We recommend that you do not use a regular detergent. HE detergents contain suppressors that reduce or eliminate suds. When fewer suds are produced, the load tumbles more efficiency and cleaning is maximized.
- Reducing the amount of detergent may reduce the quality of cleaning. Make sure that you:
- Pre-treat stains
- Sort carefully by color and soil level
- Avoid overloading
Step 1: Turn on your washer
Press the ∅Power button to turn on your washer.
Step 2: Load your washer
Caution
Before loading your laundry, make sure that you remove coins, keys, and other hard objects, and close zippers. These items may damage clothes.
1 Sort laundry by fabric type, color, and load size.
2 Fill the tub with dry, unfolded clothes. Load the tub no more than 3/4 full.
Note
• Overloading may reduce washing efficiency, cause excess wear, and possibly cause creasing or wrinkling of the load.
- Wash delicate items such as bras, hosiery, and other lingerie on the Delicates cycle with similar lightweight items.
- When washing big, bulky items (such as rugs or pillows) or a few smaller items (such as stuffed toys or one or two sweaters) that do not fill the tub completely, add a few towels to improve spin performance.
• Always use the Bulky cycle for bulky items.
- When washing heavily soiled loads, do not overload your washer to ensure good cleaning results.
Step 3: Add detergent and additives to the compartments
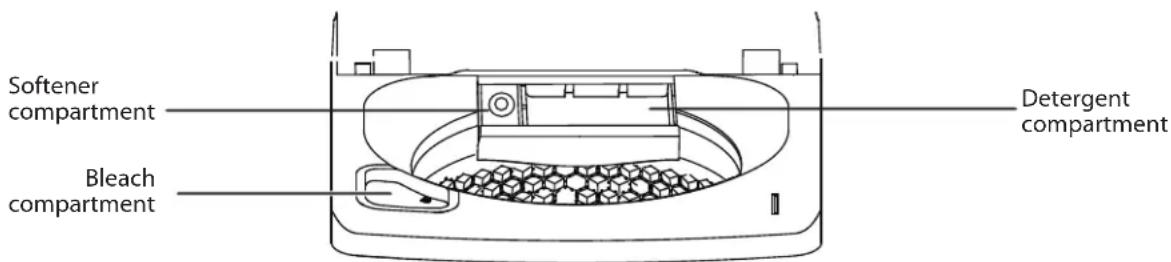
Loading the liquid detergent compartment
1 Pour the recommended amount of laundry detergent directly into the compartment before starting your washer.
2 If you are using color-safe bleach, add it with the detergent to the detergent compartment.
Note
- When adding color-safe bleach with detergent, both laundry products must be in the same form (liquid).
- Detergent powder should be placed in the bottom of the washer tub before adding the load.
Loading the bleach compartment (liquid bleach only)
- Add chlorine bleach to the bleach compartment. Do not over-fill the compartment.
- There is no water inlet to the bleach dispenser, so the bleach will directly load into the tub when you pour it in.
Caution
- Avoid splashing or over- filling the compartment.
- Never pour undiluted liquid chlorine bleach directly onto the load or into the tub. Doing so can damage fabrics, by weakening of the fibers or stripping the color.
Note
Do not pour color-safe bleach into the bleach compartment. Instead, add it to the detergent compartment.
Loading the fabric softener compartment
- Pour the recommended amount of liquid fabric softener into the softener compartment. The dispenser automatically releases liquid fabric softener at the correct time during the rinse cycle.
Caution
- Use the softener compartment only for liquid fabric softeners.
- Do not use the Downy Ball® in washer.
- Do not use liquid fabric softener that is too sticky as it may not mix with the water sufficiently.
Step 4: Select the appropriate cycle and options for the load
1 Turn the cycle selector to select a washing cycle. For information on wash cycles, see Washer options and settings on page 25.
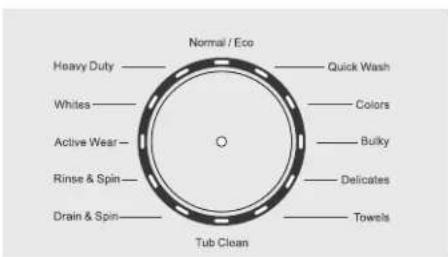
2 Optional: Use the control panel buttons (like Water Level) to customize the washing cycle. For descriptions of buttons, See Control panel on page 21. For information about which buttons are available for each cycle type, see Washer options and settings on page 25.
Step 6: Start your washer
1 Press the /Start Pause button.
Note
As your washer moves from stage to stage in the wash cycle, the related light turns on (such as Rinse or Spin).
flowchart
graph LR
    A["○"] --> B["○"]
    B --> C["○"]
    C --> D["○"]
    style A fill:#fff,stroke:#000
    style B fill:#fff,stroke:#000
    style C fill:#fff,stroke:#000
    style D fill:#fff,stroke:#000
2 If you need to pause the cycle (for example to add or remove items or adjust the load), press the ▶/Start Pause button, then open the lid. Your washer stops. When you are ready to resume washing, close the lid, then press the ▶/Start Pause button.
Washer options and settings
Options and settings table of NS-TWM35W1:
- For best washing performance, we suggest the loading weight be less than 15.4 lbs. (6.99 kg) (Dry clothes)
- Bolded options are initial settings. (dots) indicate optional functions you can select.
| Program Water Level Wash Temp. Extra Rinse | |||
| Normal | AutoLowMedHigh | Hot //Cold /Tap coldWarm | Y/N |
| Active Wear | AutoLowMedHigh | Hot /Warm/ /Tap coldCold | Y/N |
| Whites | AutoLowMedHigh | Hot //Cold /Tap coldWarm | Y/N |
| Heavy Duty | AutoLowMedHigh | Hot //Cold /Tap coldWarm | Y/N |
| Rinse& Spin | AutoLowMedHigh | Tap cold | — |
| Drain&Spin | — | — | — |
| Tub Clean | High | Hot | — |
| Quick Wash | Med | Hot //Cold /Tap coldWarm | Y/N |
| Colors | AutoLowMedHigh | Warm/Cold /Tap cold | Y/N |
| Bulky | AutoLowMedHigh | Hot //Cold /Tap coldWarm | Y/N |
| Delicates | Med | Hot //Cold /Tap coldWarm | Y/N |
| Towels | LowMedHigh | Hot //Cold /Tap coldWarm | Y/N |
Maintaining your washer
Caution
Turn off the water faucets after normal use. This shuts off the water supply to your washer and prevents the possibility of damage from escaping water. Leave the lid open to let the inside of your washer dry out.
Cleaning the exterior
- Use a soft cloth to wipe up all detergent, bleach, or other spills as they occur.
Cleaning the interior
- Clean the interior of your washer periodically to remove any dirt, soil, odor, mold, mildew, or bacterial residue that may remain in your washer as a result of washing clothes.
Failure to follow these instructions may result in unpleasant conditions, including odors or permanent stains in your washer or on your laundry.
• To remove hard water deposits, use a cleaner labeled "Washer safe."
Cleaning the control panel
- Clean with a soft, damp cloth. Do not use abrasive powders or cleaning pads.
- Do not spray cleaners directly on the panel. The control panel finish may be damaged by some laundry pre-treatment soil and stain remover products. Apply such products away from your washer and wipe up any spills or over-spray immediately.
Cleaning the detergent, bleach, or softener compartment
• To remove laundry product residue, wipe with a damp cloth and towel dry.
- You can remove the detergent and softener compartments to clean them. However, the bleach compartment is not removable, so you must flush the compartment while it is in your washer.
Cleaning the tub
The Tub Clean cycle is a self-cleaning cycle that removes the causes of odors that may occur inside your washer without using a cleaning agent. We suggest cleaning the tub about once a month.
Caution
Never use the Tub Clean cycle when laundry is in your washer. This may damage the laundry or your washer.
1 With the tub empty, add one cup of chlorine bleach to the bleach dispenser.
2 Press the Power button.
3 Turn the cycle selector to Tub Clean
4 Press the /Start Pause button.
Storing your washer
You can damage your washer if you do not remove water from hoses and internal components before storage.
To prepare your washer for storage:
1 Select the Quick Wash cycle and add bleach to the washer. Run your washer through the cycle without a load.
2 Turn the water faucets off and disconnect the inlet hoses.
3 Unplug your washer from the electrical outlet and leave your washer lid open to let air circulate inside the tub.
Caution
If your washer has been stored in below-freezing temperatures, allow time for any leftover water in your washer to thaw out before use.
Troubleshooting
Caution
Do not try to repair your washer yourself. Doing so invalidates the warranty.
| PROBLEM SOLUTION | |
| Washer does not start | Make sure that your washer is plugged in.Make sure that the lid is closed.Make sure that the water source faucets are open.Make sure that you press the /Start Pause button to start your washer.Before your washer starts to fill, it makes a series of clicking noises to make sure that the lid is locked and to do a quick drain.Check the fuse or reset the circuit breaker. |
| No water or not enough waterDetergent or softener is still in its compartment after the wash cycle is completed | Make sure that both faucets are fully turned on.Make sure that the water pressure is in the range listed in Water requirements on page 13.Make sure that the water inlet hoses are not kinked. Straighten if necessary.Disconnect the hoses and clean the screens. The hose filter screens may be clogged. |
| Washer vibrates or is too noisy | Make sure that your washer is set on a level surface. If the surface is not level, adjust your washer's feet to level your washer.Make sure that your washer is not touching any other object.Make sure that the laundry load is balanced.During the spin process, if clothes are piled to one side of the tub, your washer may stop because of the unbalance. Your washer tries up to three times to solve the problem automatically. If the washer cannot solve the problem, try to manually redistribute clothes inside the tub. |
| Washer stops | Make sure that the power outlet is a working outlet.Check the fuse or reset the circuit breaker.Close the lid, then press the ▶/Start Pause button to start your washer. For your safety, your washer does not spin unless the lid is closed.Before your washer starts to fill, it makes a series of clicking noises to make sure that the lid is locked and to do a quick drain.Sometimes your washer may pause between stages in the cycle. Wait to see if your washer starts again.Disconnect the inlet hoses and clean the screens periodically. The hose filter screens may be clogged. |
| Lid is locked or will not open | Press the /Start Pause button to pause the washer. You cannot open the lid if the washer is spinning.After you pause the washer, it may take a few seconds for the lid lock to release.If the lid is locked when your washer is not running, press the#/Power button to turn on your washer.If power fails while your washer is running, when power is restored, the lid unlocks. Your washer waits three minutes, then runs the rest of the cycle. |
| Washer does not drain or spin | Check the fuse or reset the circuit breaker.Close the lid, then press the ▶/Start Pause button to start your washer. For your safety, your washer does not spin unless the lid is closed.Make sure that the drain hose is not kinked. Straighten as necessary.Make sure that the height of the drain hose is within specified limits. SeeDrainage requirements on page 13.The pipes to your sewer system may be clogged. Contact a plumber or qualified repair professional. |
| The water temperature is not correct | Make sure that you have selected the correct temperature.Make sure that the water source faucets are fully opened.Make sure that the hoses are connected to the correct faucet and water intake connections on your washer, then flush the lines. SeeStep 2: Connect the water hoses on page 14.Disconnect the hoses and clean the screens. The hose filter screens may be clogged. |
| Load is too wet at the end of the cycle | Use a high-efficiency detergent to reduce over-sudsing. See Selecting a detergent on page 22.The load may be too small. Very small loads (one or two items) may become unbalanced and not spin out completely. |
| Water leaks | Make sure that all hose connections are tight. SeeStep 2: Connect the water hose on page 14andStep 3: Connect the drain hose on page 17.Make sure that the end of the drain hose is correctly inserted and secured to the drainage system. SeeStep 3: Connect the drain hose on page 17.Avoid overloading.Use a high-efficiency detergent to reduce over-sudsing. SeeSelecting a detergent on page 22. |
| Load has too many suds | Use a high-efficiency detergent to reduce over-sudsing. See Selecting a detergent on page 22.If you have "soft" water, reduce the amount of detergent.For small or lightly soiled loads, reduce the amount of detergent. |
| Washer has an odor | Periodically run aTub Cleancycle to clean the tub. SeeCleaning the tub on page 26.Use a high-efficiency detergent to reduce over-sudsing. Excessive suds collect in nooks and crannies and cause odor. SeeSelecting a detergent on page 22.Dry the interior of your washer after the total cycle has finished. |
Understanding the error codes
Your washer is equipped with an automatic error-monitoring system to detect and diagnose problems at an early stage.
| ERROR CODE | POSSIBLE CAUSE SOLUTIONS |
| ○○○○ | Your washer takes more than 30 minutes to fill with water. After water finishes entering your washer, the water level has not changed in five minutes. |
| ○○○○ | The unit takes more than 10 minutes to drain. |
| ○○○○ | The lid is open. The washer is not level. |
| ○○○○ | Your washer is out of balance more than three times in spin operation. |
| ERROR CODE | POSSIBLE CAUSE SOLUTIONS |
| Impact switch was pressed by the outer tub cover. Impact switch was not be connected. | |
| The EEPROM failed. | |
| Load sensing failed. | |
| Water level sensor failed. | |
| Lid lock failed. | |
| The PCB failed. |
Notice :
1.LED Display :
1) When error happening, Extra Rinse LED will flash and Process LED indicates error code.
2) ○ -off, ◎ -flash, ● -on
2. When error is happening, the buzzer will beep 5 seconds and repeat once per 15 minutes. After 24 hours, machine will power off automatically.
Specifications
| TYPE | EATW2537CW |
| Dimensions (H x W x D) | 42.2 in.x 25.2 in. x 27 in.(107 cm x 64 cm x 68.4 cm) |
| Weight | 112.44lbs (51kg) |
| Power | 120V~/60Hz |
| Current draw | 8A |
| Pulsator type | Agitator |
| Drum grain | Cubic |
| Display type | LED |
| Display color | White |
| Motor | Single phase induction motor |
LEGAL NOTICES
ELECTRICAL INFORMATION
THIS APPLIANCE MUST BE GROUNDED.
This appliance is fitted with a plug suitable for use in all houses fitted with sockets to current specifications.
If the fitted plug is not suitable for your socket outlets, it should be cut off and carefully disposed of. To avoid a possible shock hazard, do not insert the discarded plug into a socket.
This appliance complies with the following EEC Directives:
2014 / 35/ EU (Low Voltage Directive)
2014 / 30/ EU (EMC Directive).
WARRANTY
This Product (including any accessories included in the original packaging) as supplied and distributed in new condition, is warranted by Element Appliance Company, LLC ("Element") to the original customer who purchases the Product from an authorized Element retailer (the "Original Customer" or "you") against defects in material and workmanship under proper use, maintenance, and care according to the owner's manual, warnings, and instructions accompanying the Product ("Warranty") as follows:
* PLEASE NOTE – Proof of purchase evidencing the date of purchase by the Original Purchaser from an authorized Element retailer (“Valid Proof of Purchase”) is required for all Warranty service. The express Warranty set forth herein is subject to all terms and conditions set forth below.
CORRECT DISPOSAL OF THIS PRODUCT
Old appliances still have some residual value. An environmentally friendly method of disposal will ensure that valuable raw materials can be recovered and used again.
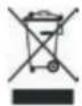
This marking indicates that this product should not be disposed with other household wastes throughout the US. To prevent possible harm to the environment or human health from uncontrolled waste disposal, recycle it responsibly to promote the sustainable reuse of material resources. To return your used device, please use the return and collection systems or contact the retailer where the product was purchased. They can take this product for environmentally safe recycling.
1. WARRANTY SERVICE:
A. ONE-YEAR WARRANTY: Except as provided in subpart 1.B below, for a period of one (1) year from the date of purchase by the Original Customer (the "Warranty Period"), if the parts or components covered by this Warranty are determined by Element or Element's authorized service provider to be defective in material or workmanship, Element will, at its sole and absolute discretion and option: (i) repair the defective part or component at no charge to the Original Customer, (ii) replace the defective Product with a new Product of similar or better quality, at no charge to the Original Customer, or (iii) refund the documented purchase price paid by the Original Customer (excluding tax) to the Original Customer upon return of the defective Product as directed by Element. After the Warranty Period expires, the Original Customer must pay for all parts, components, shipping and handling, labor, and replacement costs associated with the Product or any part or component thereof.
regardless of any defects in the Product or any part or component thereof.
B. LIMITED EXTENDED WARRANTY THROUGH PRODUCT REGISTRATION: If and only if the Original Customer registers the Product at www.elementetelectronics.com within ninety (90) days of the date of purchase by the Original Customer, then the Warranty Period discussed in subpart 1.A. above shall be extended an additional one (1) year to a new Warranty Period equaling two (2) years from the date of purchase by the Original Customer. If the Product is not registered as provided for in this subpart 1.B, then the standard one-year Warranty Period set forth in subpart 1.A shall apply.
C. TIMING AND PROCEDURE: Before Warranty service can commence, the Original Customer must contact either (i) the retailer from whom the Original Customer purchased the Product, or (ii) Element directly, in either case for problem determination and service procedures. Valid Proof of Purchase evidencing that the Product is within the Warranty Period MUST be presented by Original Customer in order to obtain the requested Warranty service. Please have your model and serial number available, along with your date of purchase of the Product. To remain eligible for Warranty service, Original Customer may not return the Product or any part or component thereof to the retailer or Element without Element's prior written consent.
2. EXCLUSIONS AND LIMITATIONS TO WARRANTY SERVICE
The Warranty covers manufacturing defects in materials and workmanship of the Product encountered in the normal, non-commercial use of the Product, and does not cover (a) damages or malfunctions resulting from improper or unreasonable use or maintenance, abuse, negligence, failure to follow instructions contained in any written materials that accompany the Product, deterioration by reason of excess moisture, corrosive atmosphere, lightning, power surges, connections to improper voltage supply, unauthorized
alteration, or other external causes such as extremes in temperature or humidity, modifications, scratches or discoloration; (b) improper or incorrectly performed repairs by service providers not authorized by Element; (c) transportation, shipping, delivery, pickup, insurance, installation, or set-up costs; (d) ordinary wear and tear, cosmetic damage, or damage due to acts of nature, including but not limited to, water, floods, wind, storm, tornado, earthquake, or fire, or due to damage caused by extraordinary impact events, such as dropping, crushing, demolition or other extraordinary damage;
(e) commercial use of the Product, or use of the Product for anything other than single-family household or residential use; or (f) modification of the Product or any part of the Product.
This Warranty is made to the Original Customer only and does not cover Products sold AS IS or WITH ALL FAULTS. The Warranty is invalid if the factory-applied serial number has been altered or removed from the Product. This Warranty is valid only in the United States, and only applies to Product if it was purchased and serviced in the United States. The addition of equipment or features to the Product that are not manufactured or recommended by Element could affect the intended function of the Product, and therefore may void the Warranty. Furthermore, the exposure of the Product to chemicals, heat, cold, humidity, or other elements can affect the Product components, and therefore, the Warranty does not cover discoloration, fading, cosmetic changes, rust, or any damages or failure related to any such items. The Warranty is contingent upon the proper use, maintenance, and care of the Product. The Warranty may be void if the Product has been used in a manner contradictory to, or in violation of, the terms of the user's manual, warnings, or instructions accompanying the Product.
THIS WARRANTY IS MADE IN LIEU OF AND SUPERSEDES ALL OTHER WARRANTIES OR CONDITIONS OF MERCHANTABILITY OR FITNESS FOR A PARTICULAR PURPOSE OR GENERAL USE, WHETHER EXPRESS, IMPLIED, COLLATERAL,
STATUTORY, OR PROVIDED BY COMMON LAW, THE UNIFORM COMMERCIAL CODE, OR OTHERWISE. ELEMENT FURTHER DISCLAIMS ALL WARRANTIES AFTER THE END OF THE WARRANTY TERM DEFINED ABOVE. NO OTHER EXPRESS WARRANTY OR GUARANTY GIVEN BY ANY OTHER PERSON, FIRM, OR ENTITY WITH RESPECT TO THE PRODUCT SHALL BE BINDING ON ELEMENT. REPAIR, REPLACEMENT, OR REFUND OF THE ORIGINAL PURCHASE PRICE, AT ELEMENT'S SOLE DISCRETION, ARE THE EXCLUSIVE REMEDIES OF THE CUSTOMER.
ELEMENT SHALL NOT BE LIABLE FOR ANY INCIDENTAL OR CONSEQUENTIAL DAMAGES CAUSED BY THE USE, MISUSE, OR INABILITY TO USE THE PRODUCT. THESE INCLUDE, BUT ARE NOT LIMITED TO, ANY DAMAGES IN THE FORM OF LOST PROFITS, LOSS OF USE, LEGAL FEES, ECONOMIC LOSS, PERSONAL INJURIES, OR ANY OTHER DAMAGES CAUSED BY CIRCUMSTANCES BEYOND THE CONTROL OF ELEMENT. NOTWITHSTANDING THE FOREGOING, ELEMENT'S AGGREGATE LIABILITY TO ANY CUSTOMER SHALL NOT EXCEED THE ORIGINAL PURCHASE PRICE OF THE PRODUCT. THIS WARRANTY SHALL NOT EXTEND TO ANYONE OTHER THAN THE ORIGINAL CUSTOMER WHO PURCHASED THE PRODUCT, AND IS NOT TRANSFERRABLE. NO PERSON IS AUTHORIZED TO ALTER, EXTEND, OR WAIVE THIS WARRANTY OR ANY OF ITS TERMS OR CONDITIONS.
Some states do not allow the exclusion or limitation of incidental or consequential damages, or allow limitations on warranties, so the above limitations or exclusions may not apply to you. This Warranty gives you specific rights, and you may have other rights, which vary from state to state. The exclusions and limitations to the Warranty apply to the maximum extent permitted by law and unless restricted or prohibited by law. Where any term of this Warranty is prohibited by applicable law, it shall be null and void, but the remainder of this Warranty shall remain in effect.
PLEASE CONTACT THE RETAILER FROM WHOM YOU PURCHASED THE PRODUCT FOR CUSTOMER SERVICE OR TO CONFIRM PROCEDURES FOR WARRANTY SERVICE.
In the event you wish to contact Element, please direct all correspondence to:
Element Appliance Company, LLC
customerservice@elementelectronics.com
888-842-3577
https://elementelectronics.com/appliances

element®
Element, the Element Logo, and Bring it home are trademarks of Element Brand Holding, LLC. All other trademarks are the property of their respective owner, who has not sponsored, endorsed, or approved this product. ©2023 Element Appliance Company, LLC. All rights reserved.
Distributed by Element Appliance Company, LLC Augusta, GA 30909
For service, support and warranty information: Call 888.842.3577, email us at customerservice@elementelectronics.com or visit www.elementetelectronics.com
- TOP LOADING WASHER
- Contents
- Introduction
- Important Safety Instructions
- SAVE THESE INSTRUCTIONS
- CAUTION RISK OF ELECTRIC SHOCK DO NOT OPEN
- WARNING
- CAUTION
- State of California Proposition 65 Warnings
- Basic Precautions
- Installation Warnings and Precautions
- Use and Maintenance Warnings and Precautions
- Grounding/Earthing
- Choosing a Proper Location
- Features
- Package contents
- Unpacking your washer
- Choosing a location
- Installing in an alcove or closet
- Electrical requirements
- Electrical grounding is required for your washer.
- Water requirements
- Drainage requirements
- Note
- Installing your washer
- Tools you will need
- Step-by-Step instructions
- Step 1: Select a location
- Step 2: Connect the water hoses
- Notes
- Step 3: Connect the drain hose
- Step 4: Level your washer
- Step 5: Power your washer
- Step 6: Run a test cycle
- Using your washer
- Washing a load of laundry
- Selecting a detergent
- Step 1: Turn on your washer
- Step 2: Load your washer
- Step 3: Add detergent and additives to the compartments
- Loading the liquid detergent compartment
- Loading the bleach compartment (liquid bleach only)
- Loading the fabric softener compartment
- Step 4: Select the appropriate cycle and options for the load
- Step 6: Start your washer
- Washer options and settings
- Maintaining your washer
- Cleaning the exterior
- Cleaning the interior
- Cleaning the control panel
- Cleaning the detergent, bleach, or softener compartment
- Cleaning the tub
- Storing your washer
- Troubleshooting
- Understanding the error codes
- Specifications
- LEGAL NOTICES
- ELECTRICAL INFORMATION
- WARRANTY
- CORRECT DISPOSAL OF THIS PRODUCT
- WARRANTY SERVICE:
- EXCLUSIONS AND LIMITATIONS TO WARRANTY SERVICE
- element®
Brand : Element
Model : EATW2537CW
Category : Washing machine