
CPG-4000 - Grill CUISINART - Free user manual and instructions
Find the device manual for free CPG-4000 CUISINART in PDF.


| Product Type | Gas Grill |
| Fuel Type | Propane (LPG) |
| Number of Main Burners | 4 |
| BTU Output (Main Burners) | 40,000 BTU total |
| Side Burner | Built-in side burner (12,000 BTU) |
| Primary Cooking Area | 400 sq. in. |
| Warming Rack | Integrated warming rack (150 sq. in.) |
| Ignition Type | Electronic ignition with control knobs |
| Material | Stainless steel hood and body |
| Cooking Grates | Porcelain-coated cast iron |
| Dimensions (H x W x D) | 42 x 48 x 24 inches |
| Weight | 50 lbs |
| Propane Tank Capacity | Standard 20 lb propane tank |
| Primary Functions | Grilling, searing, roasting, smoking |
| Cleaning & Maintenance | Removable drip tray, grease management system |
| Safety Features | CSA certified, flame tamers, lid counterbalance |
| Assembly Required | Yes (includes assembly tools and manual) |
| Warranty | 3 years limited warranty |
| Replacement Parts Availability | Contact Cuisinart customer service |
| User Manual Included | Yes (downloadable PDF) |
Frequently Asked Questions - CPG-4000 CUISINART
User questions about CPG-4000 CUISINART
0 question about this device. Answer the ones you know or ask your own.
Ask a new question about this device
Download the instructions for your Grill in PDF format for free! Find your manual CPG-4000 - CUISINART and take your electronic device back in hand. On this page are published all the documents necessary for the use of your device. CPG-4000 by CUISINART.
USER MANUAL CPG-4000 CUISINART
natural_image
Technical line drawing of a mechanical device with wheels and a central body (no text or symbols)Wood Pellet BBQ Grill & Smoker
CPG-4000
OWNER'S MANUAL
Email or call our Customer Service Department from 9:00am to 5:00pm Eastern time, Monday through Friday
Customer Service Phone: 1-866-994-6390
Customer Service Email: grilling@thefulhamgroup.com
WEBSITE: www.cuisinartgrill.com
TABLE OF CONTENTS
Table of Contents 1
Warnings....2
Component List 4
Exploded View 5
Initial Firing Instructions 6
Assembly Instructions....12
Subsequent Start-up....13
Operating Tips....15
Maintenance & Cleaning 16
Troubleshooting 18
Digital Thermostat Control Wiring Diagram 20
Warranty 22
Distributed by:
The Fulham Group
Newton, MA
USA
Manufacturer:
Jiangsu Zgrills Technology Co., Ltd.
No 85 Baoying Road, Economic Development Zone,
Baoying, Yangzhou, Jiangsu, China.
WARNINGS!
Please read the entire manual before installation and use of this electric, pellet fuel burning appliance. Failure to follow these instructions could result in property damage, bodily injury or even death. Contact local building or fire officials about restrictions and installation inspection requirements in your area.
MAJOR CAUSES OF APPLIANCE FIRES ARE A RESULT OF POOR MAINTENANCE AND A FAILURE TO MAINTAIN REQUIRED CLEARANCE TO COMBUSTIBLE MATERIALS. IT IS OF UTMOST IMPORTANT THAT THIS PRODUCT BE USED ONLY IN ACCORDANCE TO THE FOLLOWING INSTRUCTIONS.
DANGERS AND WARNINGS
- A minimum clearance of 12 inches from combustible constructions to the sides of the grill, and 12 inches from the back of the grill to combustible constructions must be maintained. Do not use this appliance indoors, garage or in an enclosed, unventilated area.
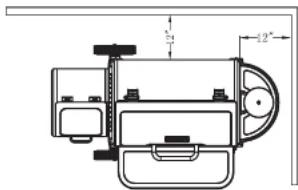
-
The appliance shall not be located used under overhead unprotected combustible construction.
-
Keep your grill in an area clear and free from combustible materials, gasoline and other flammable vapors and liquids when in use or storage.
Should a grease fire occur, turn the grill off and leave the lid closed until the fire is out. Do not unplug the power cord. Do not throw water on. Do not try to smother the fire. Use of an all-class (class ABC) approved fire extinguisher is valuable to keep on site. If an uncontrolled fire does occur, call the Fire Department.
Keep electrical supply cords and the fuel away from heated surfaces. Do not use your grill in the rain or around any water source.
Do not transport your grill while in use or while the grill is hot. Ensure the fire is completely out and that the grill is completely cool to the touch before moving.
It is recommended to use heat-resistant barbecue mitts or gloves when operating the grill. Do not use accessories not specified for use with this appliance. Do not put a barbecue cover or anything flammable in the storage space area under the barbecue.
To prevent fingers, clothing or other objects from coming in contact with the auger feed system, the appliance is equipped with a metal safety screen, mounted to the interior of the hopper. This screen must not be removed unless directed by Customer Service or an authorized dealer.
Do not enlarge burn grate orifices, igniter holes or burn pots. Failure to follow this warning could lead to a fire hazard and bodily harm and will void your warranty.
This grill is for outdoor use only, and shall not be used in a building, garage, or any other enclosed area.
DO NOT leave a lit grill unattended. Keep children and pets away from the grill at all times.
DO not move your grill while operating or while it is hot until the grill is completely cold.
Clean and maintain your grill after each time use.
DO NOT touch metal parts of grill until it has completely cooled (about 45 minutes) to avoid burns, unless you are wearing protective gear (pot holders, gloves, BBQ mittens, etc).
For convenient and safe assembly, use at least two people to assemble the grill.
Make sure the power cord is disconnected before performing any service or maintenance.
Always keep the Pellet Hopper dry, the wood pellets will expand greatly, break apart and even jam the feed system if the pellets get wet or exposed to high humidity.
This grill is NOT for commercial use.
This outdoor grill is not intended for installation in or on recreation vehicles and/or Boats.
Do not use the grill unless it is COMPLETELY assembled and all parts are securely fastened and tightened.
DO NOT place this grill on any type of tabletop surface. The grill should be placed on a flat and level surface.
Never use the grill in windy areas. The grill will operate best if it is not facing directly into the wind.
ALWAYS open grill lid slowly and carefully as heat and steam trapped within the grill can burn.
DO NOT obstruct the flow of combustion and ventilation air to this appliance.
Keep all electrical cords away from a hot grill.
DO NOT use grill for indoor cooking or heating. TOXIC fumes can accumulate and cause asphyxiation.
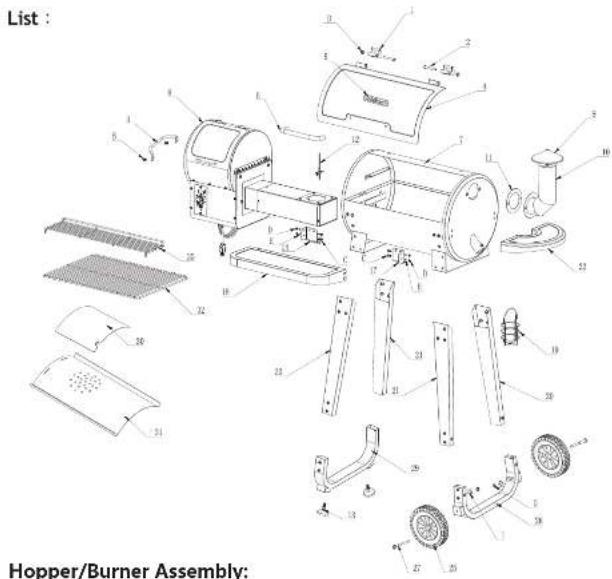
COMPONENT LIST
| ITEM | QTY | DESCRIPTION | ITEM | QTY | DESCRIPTION |
| 1 | 2 | Hinge Assembly | |||
| 2 | 2 | Hinge Pin 33 1 Warming Rack | |||
| 3 | 1 | Side Handle 34 1 Hopper Bottom Cover | |||
| 4 | 1 | Grill Lid 35 1 Hopper Safety Screen | |||
| 5 | 1 | Name Plate 36 1 Hopper Assembly | |||
| 6 | 1 | Lid Handle 37 1 Cable Box | |||
| 7 | 1 | Grill Chamber Assembly | |||
| 8 | 1 | Hopper Assembly 39 1 Digital Control W/SDC | |||
| 9 | 1 | Chimney Cap | |||
| 10 | 1 | Chimney | |||
| 11 | 1 | Chimney Gasket | |||
| 12 | 1 | Temperature Sensor | |||
| 13 | 2 | Adjustable Foot | |||
| 14 | 1 | Front Shelf Left Bracket | |||
| 15 | 1 | Hot Rod a space(Ignitor) | |||
| 16 | 1 | Feeder Assembly | |||
| 17 | 1 | Front Shelf Right Bracket | |||
| 18 | 1 | Front Shelf | |||
| 19 | 1 | Grease Cup Holder | |||
| 20 | 2 | Front Left / Back Right Leg | |||
| 21 | 2 | Front Right / Back Left Leg | |||
| 22 | 1 | Side Shelf | |||
| 23 | 1 | Strain Relief Bushing | |||
| 24 | 1 | Hopper Lid Handle | |||
| 25 | 2 | Wheels | |||
| 26 | 1 | Fire Pot Assembly | |||
| 27 | 2 | Wheel Axle Bolt | |||
| 28 | 1 | Wheel Base | |||
| 29 | 1 | Adjustable Foot Base | |||
| 30 | 1 | Flame Slider | |||
| 31 | 1 | Grease Drain Pan |
Remarks: 46*(Hardware Package) has 25 screws in total, including 24 necessary screws and 1 spare part screw.
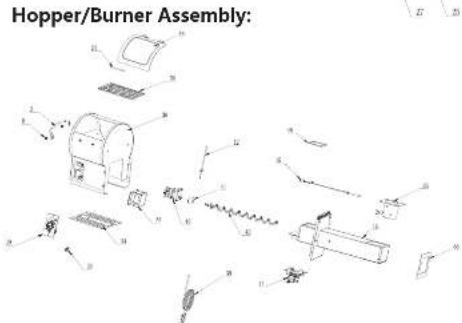
EXPLODED VIEW
BASE ASSEMBLY
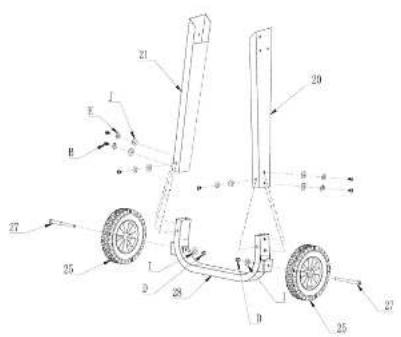
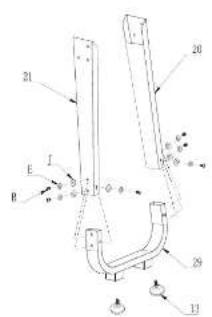
1) Attach on Front Leg (20) and one Rear Leg (21) to the Wheel Base (28) using 3 Flat Spacers (J), 3 Spring Washers (E) and 3 Bolts (B) per leg. Repeat the same steps with the Adjustable Foot Base (22).
2) Attach wheels to the Wheel Base (28) using Wheel Axle Bolt (27). Tighten with Flat Washer (I) and Cap Nut (M).
MOUNTING THE BASE TO THE CHAMBER
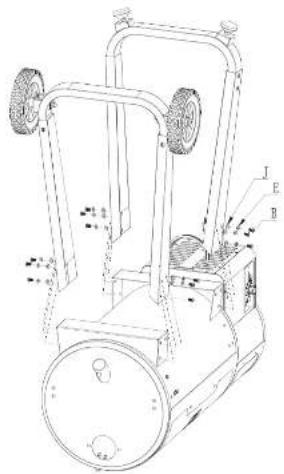
1) On a soft surface, place Grill Chamber (7) on its side or back. Attach the Wheel Base Assembly, from previous step, on to the Grill Chamber. Attach with 3 Flat Spacer (J), 3 Spring Washers (E), and 3 Bolts (B). Tighten with screwdriver. See Image.
2) Attach the Adjustable Foot Base Assembly to the Grill Chamber with 3 Flat Spacer (J), 3 Spring Washers (E), and 3 Bolts (B). Tighten with screwdriver. See Image.
ATTACHING HANDLE TO LID
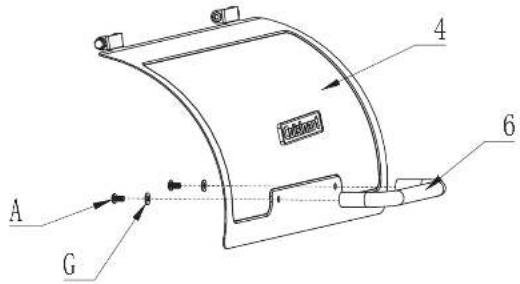
1) Place one Hexagon Bolt (A) through one Flat Washers (G), then place both through the back side of the Lid (4) and meet with the Lid Handle (6). Tighten loosely with a wrench. Repeat on other side. Fully tighten both sides. (Do not over tighten these Bolts)
ATTACHING HOPPER HANDLE TO HOPPER LID
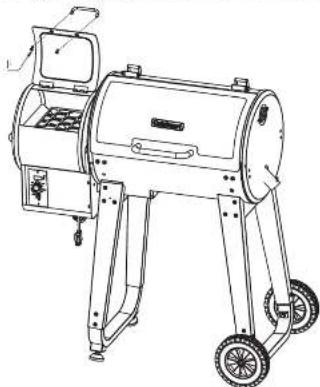
1) Keeping the Hopper Burner Lid open, insert one Bolt (B) through the back side of the Hopper Burner Lid and align with the Hopper Lid Handle (24). Tighten loosely with a wrench. Repeat on the other side. Fully tighten both sides.
2) Align the Side Handle (3) with the corresponding holes on side of the Hopper Burner. Insert one Bolt (B) and tighten slightly. Repeat on the other side. Fully tighten both sides.
natural_image
Line drawing of a portable electric stove with wheels and control panel (no text or symbols)ATTACHING SMOKESTACK TO GRILL CHAMBER
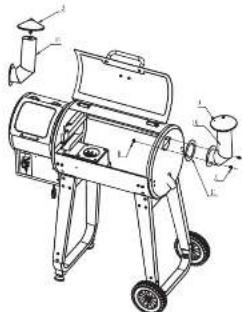
1) Place the Chimney Gasket (11) between the Chimney (10) and the Grill Chamber. Align the holes between the Chimney (10), Chimney Gasket (11) and Grill Chamber. Secure by placing a Hexagon Bolt (A) through the corresponding holes. Place a Flat Washers (G) on each Bolt inside the Grill Chamber and secure with a Nut (H) using a wrench. 2) Screw the Chimney Cap (9) into the bracket in the top of the Chimney (10). Hand tighten the cap to the desired height.
ATTACHING SHELVES
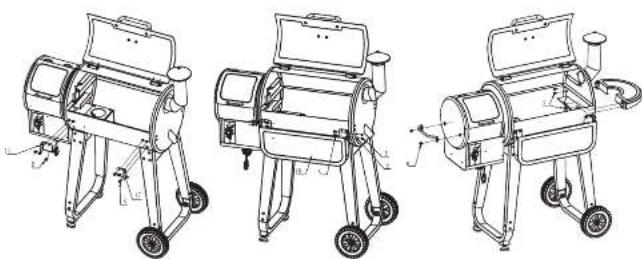
1) Mount the Front Shelf Left Bracket (14) and Front Shelf Right Bracket (17) on each side by aligning the two holes on the top and one on the bottom (the flange should be on the outside of the bracket). Secure with 3 Screw (B) for each bracket. Placing the FRONT TABLE in between the two brackets and aligning bottom holes and securing using a Shoulder Screw (C) and Nut (D). Attached a Shoulder Screw (C) and Nut (D) to the top hole of each bracket flange. To use the Front Shelf (18), lift and secure over the Should Screw. 2) Align the holes in the Side Shelf (22) with the corresponding holes on the right side of the Grill Chamber. With Grill Chamber Lid open, insert two Bolts (B) and thread into the Side Shelf. Repeat the process on other side. Tighten the Bolts.
natural_image
Three line drawings of a portable grill with wheels and doors, showing internal components and wiring (no text or symbols)POSITIONING THE GREASE DRAIN PAN
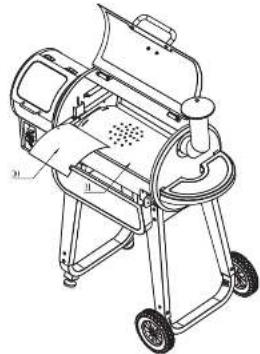
Open lid, place the Grease Drip Pan (31) inside the Grill Chamber onto the supporting brackets. The Grease Drip Pan will fit at an angle. Rest the Sliding Plate on top of the Grease Drip Pan.
natural_image
Line drawing of a portable grill with wheels and control panel (no text or symbols)ATTACHING COOKING GRATE AND WARMING RACK
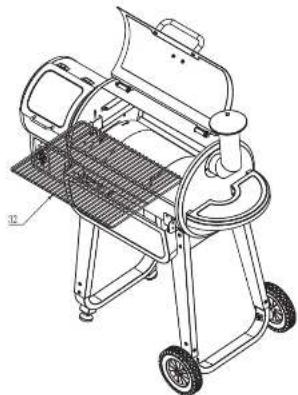
Attaching the Porcelain cooking grate (32) and warming rack (33) in the chamber, as shown.
natural_image
Technical line drawing of a portable grill with wheels and a grating (no text or symbols)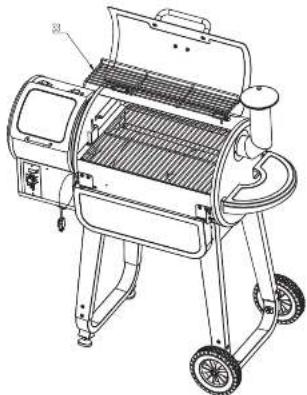
natural_image
Line drawing of a portable grill with wheels and handle (no text or symbols)HANG ON THE GREASE BASKET
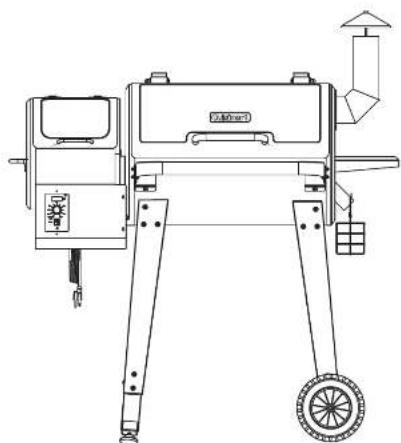
Locate the Grease Drain Tube which is on the right side of the chamber, then hang the Grease Basket (19) on the hook. As shown.
natural_image
Technical line drawing of a mechanical device with wheels and a central component (no text or symbols)INITIAL FIRING INSTRUCTIONS
Please read this manual carefully and follow it step by step before starting your grill f or the first time and each time the grill runs out of pellets.
-
Remove the Porcelain Grills, Grease Drain Pan and Flame slider from the interior of the grill.
-
Open the Pellet Hopper Lid, make sure there are no foreign objects in the Auger and Hopper.
-
With the Switch is in the OFF(O) position, plug the power cord into 110 Volt AC grounded outlet.
-
Turn on your grill and turn the Temperature Dial to SMOKE position. Please check the following things:
(WARNING: Please do not touch the Auger)
- Confirm the Auger is turning.
- Hold your fingers a bove the Firepot to confirm the fan is blowing air through the Firepot.
● Look to see if the Hot Rod is slowly glowing red.
(It takes approximately 1-2 minutes.)
- Turn the Temperature Dial to SHUT DOWN CYCLE.
(Please note the draft fan will stay on for 10 minutes in this mode.)
-
Fill the Pellet Hopper with Pellets. Then turn the Temperature Dial to HIGH. It takes some time for the Pellets to travel through the tube, when the Pellets start to drop, turn the Temperature Dial to SHUT DOWN CYCLE.
-
Turn the Temperature Dial to SMOKE. Allow the Pellets come to full flame. Once flames are coming out of the Firepot, turn the Temperature Dial to SHUT DOWN CYCLE and let the grill cool down.
[We suggest that you should wrap Grease Drain Pan up with heavy-duty aluminum foil before using.]
-
Place components back in the grill. Open the lid and turn the Temperature Dial to SMOKE. A few minutes later, when you see whitish-gray smoke coming out of the grill then close the lid.
-
Set Temperature Dial to HIGH and let grill run for 45 minutes at this setting to rid it of any foreign matter. This step must be done before cooking any food.
-
Please preheat the grill for 10 minutes before placing food. This helps your grill heat up and quickly return to your desired temperature once your food is placed. Otherwise it will take a longer period of time to bring both the grill and the food to your desired cooking temperature.
ALWAYS START THE GRILL ON SMOKE SETTING WITH THE LID OPEN After the Pellets are ignited, you can turn the Temperature Dial to any cooking temperature desired.
SUBSEQUENT START-UP
TURNING ON GRILL:
-
Fill the hopper with pellets. The hopper will hold about 15 pounds. Adding additional pellets while cooking will depend on the temperature and length of time you are cooking for.
-
Switch the Power Button ON, which is located on the Control Panel.
-
Set the desired temperature by turning the Temperature Dial.
-
Initial Firing first use, make sure you have completed the Initial Firing (see Initial Firing Instructions on page 12)
-
It will take about 20 minutes for the grill to reach 350 degrees. Depending on the outside temperature, the time to get to your desired temperature may vary.
ATTENTION: If the grill fails to light or the fire in the Firepot goes out while cooking, it is vital to follow these steps when sufficient pellets are still in the Pellet Hopper. Failure to follow the steps may cause a hazardous "over-firing" of your grill due to an excess of unburned pellets in the Firepot.
-
Turn OFF the appliance and unplug the Power Cord. After the grill cools down, remove all food, the Porcelain Grills, Grease Drain Pan and the Flame Slider.
-
Remove all unburned pellets and ash from inside and around the Firepot. (See instruction for proper handling and disposal of ash)
-
Plug in the Power Cord and turn on the grill. Pellets should fall into the Firepot and the Hot Rod should begin to heat (it will start to turn red).
-
If this step is successful, you will see flames come out of the Firepot. Then turn off the grill and let it cool down. Then place components back in place.
Open the lid and turn the Temperature Dial to SMOKE . After running for a few minutes, when you see whitish-gray smoke coming out of the grill then close the lid and turn the Temperature Dial to any cooking set ting desired. 5.If this step is not successful, see TROUBLESHOOTING or contact Customer Service to help diagnose the problem before proceeding to the MANUAL LIGHTING INSTRUCTIONS below:
1. Manual Lighting Instructions:
The grill can still be used to cook and smoke by using the MANUAL LIGHTING PROCEDURE below if the Hot Rod only is not operating:
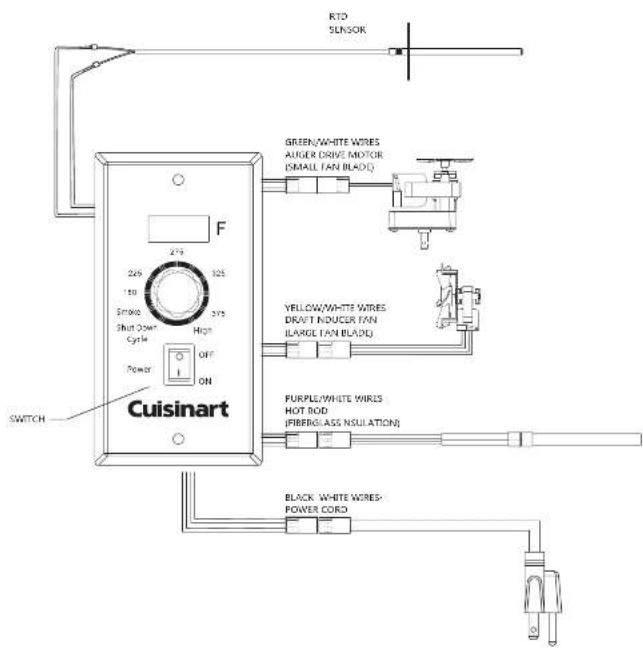
1.Turn OFF the appliance and unplug the Power Cord. After the grill has cooled down, disconnect the Hot Rod (Purple/White wire pair as shown in the WIRING DIAGRAM) from beneath the Pellet Hopper. Also, you need to remove the Hopper Bottom Panel to access the wiring . Once the Hot Rod is disconnected, replace the Hopper Bottom Panel and plug the Power Cord into a grounded outlet.
- Fill the Pellet Hopper with pellets. (Note: Only Dia 6MM Pellets can be used.)
-
Remove the Porcelain Grills, Grease Drain Pan and Heat Baffle, then pour 1/2 cup of pellets into the Firepot.
-
Squirt 2 tablespoons of Alcohol Gel fire lighter into the Firepot on top of the Pellets.
DANGER: Never use gasoline, kerosene, lighter fluid or similar liquids to light a fire in this grill.
- Carefully light the Alcohol Gel with a fireplace match or a long-reach butane lighter.
DANGER: Never squirt Alcohol Gel into a burning fire or a hot Firepot. The Alcohol Gel bottle could explode and cause a fire, serious injury or death. 6. Let the Alcohol Gel and Pellets burn for approximately 4 minutes.
-
After assuring the Pellets have ignited. Now there is a fire in the Firepot so you should be careful not to burn yourself when you place components back in place.
-
Turn on the grill and turn the Temperature Dial to any setting desired. With the lid closed, preheat the grill for 10 minutes before placing food.
2.Shutdown Cycle
After finished cooking, turn the Temperature Dial to Shutdown Cycle position, the function of this setting is to leave the Draft Induction Fan running for 10 minutes to burn redundant pellets in the fire pot. After the fan runs for 10 minutes the fan will stop running and the controller will power off.
CAUTION: The main power switch will shut the power off to the controller and the Temperature Dial Knob switch will cut off power to the grill components only. When servicing the controller or any parts ensure that the power supply is disconnected to avoid a shock hazard.
Please note: A fter Shutdown Cycle running for 10 minutes, then you can turn the Switch in the OFF(O) position. Otherwise, it may even cause the fire in the Firepot go into the Pellet Hopper.
OPERATING TIPS
-
Just like other barbecues, the actual temperature of this grill or the cooking times will be affected by external temperature, humidity, wind conditions, quality of pellets and so on.
-
It is better to shelter your grill from the wind, this will aid in temperature out heat retention and heat recovery time when opening the lid.
-
Do not open the lid frequently, it will increase your cooking time. But you can open the lid when you want the grill to cool down quickly.
-
Never move your grill while it is running.
-
Never put water into the Pellet Hopper or Firepot.
-
Never add pellets to Firepot directly. It is dangerous. If you run out of pellets and lose your fire while cooking, let the grill cool down and start again with the INITIAL FIRING INSTRUCTIONS.
7.We recommend you cover your Grease Drain Pan with heavy-duty aluminum foil and change it frequently. This is the simplest way to maintain your Grease Drain Pan. Failure to clean the Grease Drain Pan, V-shaped Grease Drain and Grease Drain Tube may cause grease fires. If this situation happens, turn the Switch OFF(O) to reduce the amount of oxygen in the Chamber and keep the lid open until the fire is completely out. AT THE SAME TIME, BE CAREFUL NOT TO BURN YOURSELF. When the grill is completely cool, clean any grease accumulation from the V-shaped Grease Drain and the Grease Drain Pan. Replace the foil on the Grease Drain Pan. Then restart the grill and resume cooking.
MAINTENANCE & CLEANING
Your Cuisinart also needs your maintenance.
Make sure your grill is OFF and cold completely before performing any maintenance and cleaning.
Grease
- With long-term use, it caused the accumulation of grease on the e Chimney Lining, the Grease Drain Tube, the V-shaped Grease Drain and the Grease Drain Pan. Always be sure these grease catch area is clean and free of debris. You should check and clean these area periodically to reduce the risk of fire.
- Our design of the Grease Basket allows you to easily replace disposable paper cups without having to clean the basket.
- It is easier to clean of accumulated grease when the grill is still warm -- not hot. Be Careful Not To Burn Yourself. Gloves are recommended.
If too much grease is allowed to build up in the V-shaped Grease Drain or is allowed to plug the Grease Drain Tube, a grease fire could result. So it is necessary to clean these area regularly. You can scarp the grease accumulation from inside the V-shaped Grease Drain and Grease Drain Tube by using a stiff, nonmetallic tool. Much of the loosened grease can be push down through the Grease Drain Tube and fall into the Grease Basket. Wipe up remaining grease residue with paper towels or disposable rags.
Flue Pipe(Smoke Stack)
- Remove the Chimney Cap Assembly, clean it with warm soap water. Scrape the creosote and grease accumulation from inside of the vertical and horizontal sections of the Flue Pipe using a stiff, nonmetallic tool such as a wooden paint stir stick. Once the creosote and grease residue has been loosened from the Flue Pipe Lining, much of it can be cleaned with paper towels or disposable rags. Do not spray water or other liquid cleaners onto the inside of the grill.
Outside surfaces
- Use a warm soap water to wipe the grease. Do not use oven cleaner, abrasive cleansers or abrasive cleaning pads on the outside grill surfaces.
● Use Cuisinart Cover to protect your grill is highly recommended. - Use a high-quality car wax on the outside surfaces of the grill can protect your paint finish.
Internal component
● For the Porcelain-coated Grill Grates, we recommend using a long-handled
cleaning brush to give the warm porcelain-coate d Grill Grates a quick brushing when you finish the barbecue. It takes only a minute and it will be ready the next time you want to use the grill.
● Clean the inner temperature probe after each time use.
Ash
● Clean the ash from the interior of the grill periodically, otherwise excess ash in the firepot may cause your fire to go out, especially in the SMOKE setting.
A shop vac is an excellent tool to handle the ash. (WARNING: Make sure you grill is cold when you want to clean the ash from the grill.)
We suggest that you should wrap Grease Drain Pan up with heavy-duty aluminum foil before using because it is easy to clean.
TROUBLESHOOTING
CAUTION: Make sure the grill is completely cool and unplugged before you do any inspection, cleaning, maintenance or service work.
| Problem | Potential Cause | Solution |
| Grill does not work properly | Power | Make sure the power cord is plugged in. Verify there is power at the electrical outlet. |
| Fuse | Remove the control, check the fuse on back. Replace the fuse if blown. | |
| Hot Rod | If both of the Draft Inducer Fan and the Auger Driver Motor are operating, the Hot Rod needs to be replaced. If one or both are not operating, please contact us. | |
| Control Board | Remove the Control Board, check the wires and connections. Feel free to contact us if you need help. | |
| Auger Drive Motor | Locate the small fan blade on the back of the auger drive motor, turn unit on, if the fan does not turn, it indicates the Auger Drive Motor need to be replaced. | |
| Fire goes out | Too much ash | Clean the ash. Refer to MAINTENANCE & CLEANING. |
| How to start | SMOKE setting | Start your grill on SMOKE setting with the lid open, after 2 minutes, close the lid and turn to any cooking setting desired. |
| Unexpected grill temperature is displayed | External Factor | Grill temperature is influenced by environmental factors such as high temperature, wind and direct sun. Place unit in shaded area. Open the lid to reduce inside temperature. |
| Excess or discolored smoke | Pellets | Replace moist pellets with fresh dry pellets. |
| Get your new parts | Contact Customer Service to place an order | Please state your authorized dealer, your name, phone number, address, Cuisinart model number, serial number and part identification number from the COMPONENT LIST. |
Error Code from the Controller Display:
The digital control of the grill stops working when one of these error codes shown on the controller display and need your attention!
LEr(Low Temperature Alarm)
Grill temp was below 150°F for more than 20 minutes.
HEr(High Temperature Alarm)
Grill temp reached 550°F
Er1
Ensure temperature probe is properly connected to controller board.
Er2
Temperature probe short circuit.
Whenever either of these alarm conditions occurs you should check to see what caused this condition and fix the problem.
DIGITAL THERMOSTAT CONTROL WIRING DIAGRAM
Email or call our Customer Service Department from
9:00am to 5:00pm Eastern time, Monday through Friday
Customer Service Phone 1-866-994-6390
Customer Service Email: grilling@thefulhamgroup.com
WEBSITE: www.cuisinartgrill.com
WARRANTY
Cuisinart 1 YEAR LIMITED WARRANTY
PROOF OF PURCHASE is required to access this warranty program, which is in effect from the date of purchase. Customers will be subject to parts, shipping, and handling fees if unable to provide proof of the purchase or after the warranty has expired. If you have any questions or problems, you can call our customer service department at 1-866-994-6390 from 9:00am to 5:00pm Eastern time, Monday through Friday for assistance.
LIMITED WARRANTY
Manufacturer warrants this product for 1 year on all parts from the date of purchase.
WARRANTY PROVISIONS
This warranty is non-transferable and does not cover failures due to misuse of improper installation or maintenance.
This warranty is for replacement of defective parts only. We are not responsible for incidental or consequential damages or labor costs.
This warranty does not cover corrosion or discoloration after the grill is used, or lack of maintenance, hostile environment, accidents, alterations, abuse or neglect.
This warranty does not cover damage caused by heat, abrasive and chemical cleaners, or any damage to other components used in the installation or operation of the grill.
Paint is not warranted and may require touch-up. Some states do not allow the limitation or exclusion of incidental or consequential damages, so the above limitations or exclusions may not apply to you. This warranty gives you specific legal rights, and you may also have other rights that vary from state to state.
For replacement parts, call our customer service department at 1-866-994-6390 from 9:00am to 5:00pm Eastern time, Monday through Friday for assistance.
- TABLE OF CONTENTS
- WARNINGS!
- DANGERS AND WARNINGS
- COMPONENT LIST
- EXPLODED VIEW
- BASE ASSEMBLY
- MOUNTING THE BASE TO THE CHAMBER
- ATTACHING HANDLE TO LID
- ATTACHING HOPPER HANDLE TO HOPPER LID
- ATTACHING SMOKESTACK TO GRILL CHAMBER
- ATTACHING SHELVES
- POSITIONING THE GREASE DRAIN PAN
- ATTACHING COOKING GRATE AND WARMING RACK
- HANG ON THE GREASE BASKET
- INITIAL FIRING INSTRUCTIONS
- Please read this manual carefully and follow it step by step before starting your grill f or the first time and each time the grill runs out of pellets.
- [We suggest that you should wrap Grease Drain Pan up with heavy-duty aluminum foil before using.]
- SUBSEQUENT START-UP
- TURNING ON GRILL:
- Manual Lighting Instructions:
- 2.Shutdown Cycle
- OPERATING TIPS
- MAINTENANCE & CLEANING
- Grease
- Flue Pipe(Smoke Stack)
- Outside surfaces
- Internal component
- Ash
- TROUBLESHOOTING
- DIGITAL THERMOSTAT CONTROL WIRING DIAGRAM
- WARRANTY
- Cuisinart 1 YEAR LIMITED WARRANTY
- LIMITED WARRANTY
- WARRANTY PROVISIONS
Brand : CUISINART
Model : CPG-4000
Category : Grill