
5qt Programmable Slow Cooker with Dipper - Casserole BELLA - Free user manual and instructions
Find the device manual for free 5qt Programmable Slow Cooker with Dipper BELLA in PDF.


| Product Type | Programmable Slow Cooker with Dipper |
| Brand | BELLA |
| Model | 5qt Programmable Slow Cooker with Dipper |
| Slow Cooker Capacity | 5 quarts (4.7 liters) |
| Dipper Capacity | 0.65 quarts (21 ounces) |
| Dimensions (approx.) | 12.5 x 10.5 x 10 inches (32 x 27 x 25 cm) |
| Weight (approx.) | 8.6 lbs (3.9 kg) |
| Power Supply | 120V AC, 60Hz, 200W (estimated total) |
| Cooking Presets | 4hr HIGH, 6hr HIGH, 8hr LOW, 10hr LOW |
| Keep Warm Function | Automatic 4-hour warm cycle after cooking |
| Dipper Function | Heats and holds dips; continuous heating until unplugged |
| Material | Stoneware crock, tempered glass lid, plastic dipper lid |
| Dishwasher Safe | Stoneware pot and glass lid (top rack); dipper lid (top rack) |
| Hand Wash Recommended | Dipper stoneware liner |
| Safety Features | Polarized plug, short cord, auto shut-off, hot surface warning |
| Warranty | 2-year limited warranty |
| Included Accessories | Stoneware pot, glass lid, 0.65qt dipper with lid, recipe guide |
| Reparability | No user-serviceable parts; contact qualified technician |
Frequently Asked Questions - 5qt Programmable Slow Cooker with Dipper BELLA
User questions about 5qt Programmable Slow Cooker with Dipper BELLA
0 question about this device. Answer the ones you know or ask your own.
Ask a new question about this device
Download the instructions for your Casserole in PDF format for free! Find your manual 5qt Programmable Slow Cooker with Dipper - BELLA and take your electronic device back in hand. On this page are published all the documents necessary for the use of your device. 5qt Programmable Slow Cooker with Dipper by BELLA.
USER MANUAL 5qt Programmable Slow Cooker with Dipper BELLA
natural_image
Exterior view of a BELLA cooking pot with control panel and power indicator (no text or symbols on main body)5 QT
PROGRAMMABLE SLOW COOKER
WITH 0.65QT DIPPER
Instruction Manual and Recipe Guide
natural_image
Abstract graphic with a heart shape and a stylized letter 'T' (no text or symbols)THANK YOU
for your purchase
REGISTER
AND SIGN UP

natural_image
Generic user profile icon with a plus sign, no text or symbols presentfor special announcements and trendy recipes!
TELL US WHAT YOU THINK!

natural_image
Silhouette of a person with five stars above it, no text or symbols presentRate, review or ask us a question.
GO TO: bellahousewares.com
myBELLAlife


BellaLifestyle


BellaLife
Table of Contents
Important Safeguards....4
Additional Important Safeguards....5
Notes on the Cord....5
Notes on the Plug 5
Plasticizer Warning....5
Electric Power....5
Getting to Know Your 5 Quart Programmable Slow Cooker....6
Introduction To Slow Cooking ....7
Before Using for the First Time....7
Stoneware Pot Care....7
Tempered Glass Lid Care 7
Operating Instructions....8
5 Quart Slow Cooker Cooking Chart....8
USDA Cooking Guidelines....9
Hints for Slow Cooking....9
User Maintenance Instructions....9
Cleaning Instructions....9
Storing Instructions....9
0.65 Qt. BONUS Dipper....10
Operating Instructions....10
Care & Cleaning Instructions....10
Storing Instructions 10
Recipes....11-14
Warranty 15
Índice
WARNING: When using electrical appliances, basic safety precautions should always be followed, including the following:
1. READ ALL INSTRUCTIONS.
- Do not touch hot surfaces. Use handles or knobs. Use potholders when removing lid or handling hot containers.
- To protect against electrical shock do not immerse cord, plugs, or appliance in water or other liquid.
- This appliance is not intended for use by persons (including children) with reduced physical, sensory or mental capabilities, or lack of experience and knowledge, unless they have been given supervision or instruction concerning use of the appliance by a person responsible for their safety.
- Close supervision is necessary when any appliance is used by or near children.
- Unplug from outlet when not in use and before cleaning. Allow to cool before putting on or taking off parts.
- Do not operate any appliance with a damaged cord or plug or after the appliance malfunctions, or has been damaged in any manner. Bring it to a qualified technician for examination, repair or for electrical or mechanical adjustment.
- The use of accessory attachments not recommended by the appliance manufacturer may cause injuries.
- Do not use outdoors.
- Do not let cord hang over edge of table or counter, or touch hot surfaces.
- Do not place on or near a hot gas or electric burner, or in a heated oven.
- Extreme caution must be used when moving an appliance containing hot oil or other hot liquids.
CAUTION: To protect against damage or electric shock, do not cook in the base unit. Cook only in the stoneware pot provided.
- To disconnect, press the OFF button, then remove plug from wall outlet.
- Do not use appliance for other than intended use.
- Avoid sudden temperature changes, such as adding refrigerated foods into a heated stoneware pot.
- Do not use stoneware pot or tempered glass lid if chipped, cracked, or severely scratched.
- Intended for countertop use only.
- WARNING: Spilled food can cause serious burns. Keep appliance and cord away from children. Never drape cord over edge of counter, never use outlet below counter, and never use with an extension cord.
FOR HOUSEHOLD USE ONLY SAVE THESE INSTRUCTIONS
ADDITIONAL IMPORTANT SAFEGUARDS
CAUTION HOT SURFACES: This appliance generates heat and escaping steam during use. Proper precautions must be taken to prevent the risk of burns, fires, or other injury to persons or damage to property.
- A person who has not read and understood all operating and safety instructions is not qualified to operate this appliance. All users of this appliance must read and understand this owner's manual before operating or cleaning this appliance.
- If this appliance falls or accidentally becomes immersed in water, unplug it from the wall outlet immediately. Do not reach into the water!
- When using this appliance, provide adequate air space above and on all sides for air circulation. Do not operate this appliance while it is touching or near curtains, wall coverings, clothing, dishtowels or other flammable materials.
- Do not leave this appliance unattended during use.
- If this appliance begins to malfunction during use, press the OFF button, then immediately unplug the cord. Do not use or attempt to repair a malfunctioning appliance!
- The cord to this appliance should be plugged into a 120V AC electrical wall outlet.
- Do not use this appliance in an unstable position.
- Never use the stoneware pot on a gas or electric cooktop, in a heated oven, or on an open flame.
- Lift off lid carefully to avoid scalding, and allow water to drip into stoneware pot. CAUTION: To protect against damage or electric shock, do not cook in the base unit. Cook only in the stoneware pot provided.
NOTES ON THE PLUG
This appliance has a polarized plug (one blade is wider than the other). To reduce the risk of electric shock, this plug will fit in a polarized outlet only one way. If the plug does not fit fully into the outlet, reverse the plug. If it still does not fit, contact a qualified electrician.
Do not modify the plug in any way.
NOTES ON THE CORD
The provided short power-supply cord (or detachable power-supply cord) should be used to reduce the risk resulting from becoming entangled in or tripping over a longer cord. Do not use an extension cord with this product.
PLASTICIZER WARNING
CAUTION: To prevent Plasticizers from migrating to the finish of the counter top or table top or other furniture, place NON-PLASTIC coasters or place mats between the appliance and the finish of the counter top or table top. Failure to do so may cause the finish to darken; permanent blemishes may occur or stains can appear.
ELECTRIC POWER
If the electrical circuit is overloaded with other appliances, your appliance may not operate properly. It should be operated on a separate electrical circuit from other appliances.
Getting to Know your 5 QT Programmable Slow Cooker
Product may vary slightly from illustration
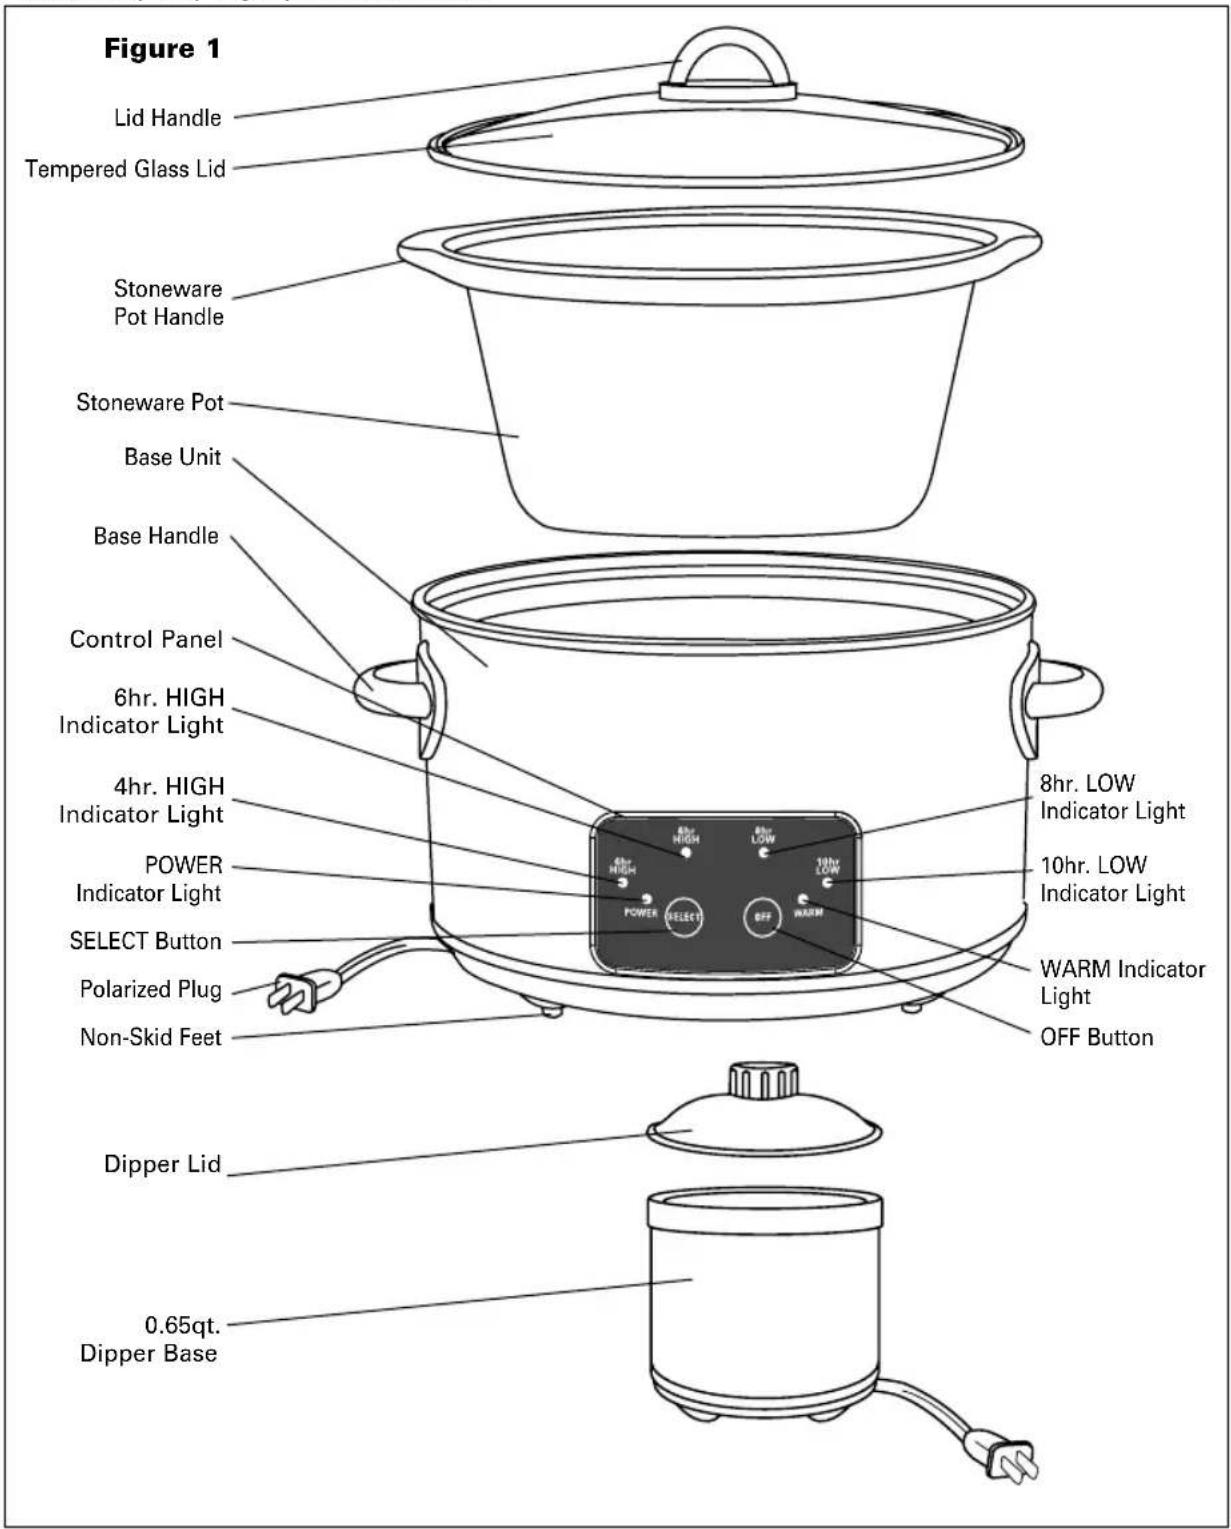
Introduction To Slow Cooking
Slow cooking occurs at temperatures just around boiling. The Programmable Slow Cooker can operate at LOW all day or night if required. When cooking on a HIGH setting, it is very much like a covered pot on the stove top. Foods will cook on HIGH in about half the time required for LOW cooking. Additional liquid may be required as foods do boil on HIGH. To turn the Slow Cooker OFF, press the power OFF button. Always unplug from electrical outlet when not in use.
Before Using for the First Time
- Carefully unpack your Programmable Slow Cooker and clean, see CLEANING INSTRUCTIONS.
- It is necessary to operate the Slow Cooker one time before placing food in the stoneware pot. Pour 4 cups of water into the stoneware pot and place it inside the base unit. Cover with the glass lid.
- Plug into a 120V AC outlet. The POWER indicator light will begin to flash.
- Press the SELECT button once. The 4hr. HIGH indicator light will illuminate.
NOTE: You will notice a slight odor; this is normal and should quickly disappear. - After 30 minutes, press the OFF button and unplug the Slow Cooker. Allow the unit to cool.
- Wearing oven mitts, grasp the pot handles carefully to lift and remove the stoneware pot from the base unit; pour out the water from the stoneware pot.
- Rinse stoneware pot, dry thoroughly and replace inside the base unit.
STONEWARE POT CARE
Like any ceramic, the stoneware pot may crack or break if not properly handled. To prevent damage, handle with care!
WARNING: Failure to follow these instructions can cause breakage resulting in injury or property damage.
- ALWAYS USE POT HOLDERS OR OVEN MITTS WHEN HANDLING HOT STONEWARE.
- DO NOT place hot stoneware pot on counter top. Use a protective trivet.
- DO NOT place stoneware pot on any range top burner, under a broiler, microwave browning element, or in a toaster oven.
- DO NOT strike utensils against rim of stoneware pot to dislodge food.
- DO NOT use stoneware pot to pop corn, caramelize sugar, or make candy.
- DO NOT use abrasive cleaners, scouring pads, or any object that will scratch the cookware or base unit.
- DO NOT use or repair any stoneware pot or lid that is chipped, cracked, or broken.
- DO NOT use stoneware pot for reheating foods or for general food storage.
- Always place foods into the stoneware pot at room temperature; then place stoneware pot into the base unit before turning unit ON. NEVER heat the stoneware pot when it is empty.
TEMPERED GLASS LID CARE
WARNING: To prevent cracking or breaking of the glass lid, which may cause personal injury, glass lid should be treated with special care.
CAUTION: Glass lid may shatter if it is exposed to direct heat or subjected to severe temperature changes. Chips, cracks or deep scratches may also weaken the glass lid.
- KEEP GLASS LID AWAY FROM broiler, microwave oven, hot stovetop burners, in a heated oven, oven heat vents. If glass lid has been utilized in any of these locations, do not use it again, even if there are no signs of damage.
• IF GLASS LID BECOMES CHIPPED, CRACKED OR SCRATCHED, DO NOT USE IT. Discard it. - ALWAYS LET GLASS LID COOL on a dry, heat-resistant surface before handling. Do not place it on cold or wet surfaces, as this may cause it to crack or shatter.
- ALWAYS USE POTHOLDERS OR OVEN MITTS when removing the hot glass lid. To avoid burns from escaping steam, always tilt lid away from hands and face.
Operating Instructions
-
Prepare recipe according to instructions.
-
Place food into the stoneware pot and cover with glass lid. DO NOT FILL THE POT TO THE TOP WITH FOOD. For best results, the Slow Cooker should be at least half-filled. If cooking soups or stews, allow a 2-inch space between the food and the top of the stoneware pot, to allow ingredients to come to a simmer.
NOTE: When cooking a meat and vegetable combination, place the vegetables in the bottom of the stoneware pot first. Then add the meat and other ingredients.
NOTE: When cooking on HIGH, keep checking progress, as some soups may come to boil.
Remember that frequent lifting of the lid during cooking delays the cooking time.
WARNING: The stoneware pot CANNOT withstand the shock of sudden temperature changes. If the pot is hot, DO NOT add cold food. Before cooking frozen food, add some warm liquid.
-
Plug into a 120V AC outlet. The POWER indicator light will begin to flash.
-
Press the SELECT button once. The 4hr. HIGH indicator light will illuminate.
-
Following recipe instructions, press the SELECT button until the desired program indicator light illuminates: 4hr. HIGH or 6hr. HIGH, 8hr. LOW or 10hr. LOW, or WARM.
-
The Slow Cooker will begin operation. When the desired cook time has elapsed, the Slow Cooker will automatically advance to WARM, for 4 hours. The WARM indicator light will illuminate. At the end of 4 hours, the Slow Cooker will automatically turn OFF.
NOTE: When cooking is complete, press the OFF button; then unplug the Slow Cooker.
-
Using oven mitts, carefully remove the glass lid by grasping the lid knob and lifting the lid slightly away from you. This will allow the steam to escape before removing the lid.
-
Allow a few seconds for all steam to escape. Then, using oven mitts, remove the stoneware pot from the base unit. Serve contents. If serving directly from the stoneware pot, always place a trivet or protective padding under the pot before placing it on a table or countertop.
-
Unplug from electrical outlet. Allow to cool completely before cleaning, see Cleaning Instructions.

NOTE: If you are moving the Programmable Slow Cooker, grasp the unit by the base unit handles; use pot holders or oven mitts. (See Figure 2.)
- Even when turned OFF and unplugged, the Slow Cooker base unit remains hot for some time after using; set aside and allow unit to cool before cleaning or storing.
5 QT Slow Cooker Cooking Chart
NOTE: This chart is intended as a general guide. Please check temperatures with a meat thermometer and follow USDA food safety guidelines listed below.
| Food Weight LOWTimer (hours) HIGH Timer (hours) | |||
| Beef Roast 3 lbs 3:00 - 4:00 | 1:30 | ||
| Beef Brisket 4-5 lbs 8:00 6:00 | |||
| Turkey Breast 6-7 lbs 6:00 - 7:00 | 3:00 - 4:00 | ||
| Whole Chicken | 4-6 lbs 6:00 4:00 | ||
| Chicken Pieces, bone-in | 3-4 lbs 4:00 - 5:00 1:30 | ||
| Fully Cooked Ham | 7.5 lbs | 4:00 - 5:00 | 3:00 |
| Pork Shoulder | 4-5 lbs 8:00 - 10:00 | 4:00 - 6:00 | |
| Pork Roast 4-5 lbs 4:00 - 5:00 2:00 - 2:30 |
USDA Cooking Guidelines
PLEASE NOTE: The USDA recommends that meats such as beef and lamb, etc. should be cooked to an internal temperature of 145^ F/63°C. Pork should be cooked to an internal temperature of 160^ F/71°C and poultry products should be cooked to an internal temperature of 170^ F/77°C - 180^ F/82°C to be sure any harmful bacteria has been killed. When reheating meat/poultry products, they should also be cooked to an internal temperature of 165^ F/74°C.
Hints For Slow Cooking
- Less tender, cheaper cuts of meat are better candidates for slow cooking than more expensive varieties.
- Meats will not brown during the cooking process. Browning fatty meats will reduce the amount of fat and help to preserve color while adding richer flavor. Heat a small amount of oil in a skillet and brown meats prior to putting into the stoneware pot.
- Whole herbs and spices flavor better in slow cooking than crushed or ground.
- When cooking in a Slow Cooker, remember that liquids do not boil away like they do in conventional cooking. Reduce the amount of liquid in any recipe that is not designed for a Slow Cooker. The exceptions to this rule would be rice and soups. Remember, liquids can always be added at a later time if necessary. If a recipe results in too much liquid at the end of the cooking time, remove the cover and re-program the Slow Cooker to continue to cook HIGH for 45 minutes. Check every 15 minutes. After about 30-45 minutes the amount of liquid will be reduced.
- Most recipes that call for uncooked meat and vegetables require about 6-8 hours on LOW temperature.
- Foods cut into uniform pieces will cook faster and more evenly than foods left whole such as roast or poultry.
- Vegetables such as carrots, potatoes, turnips and beets require longer cooking time than many meats. Be sure to place them on the bottom of the Slow Cooker and cover them with liquid.
- Add fresh dairy products (milk, sour cream or yogurt) prior to serving. Evaporated milk or condensed creamed soups may be added at the start of cooking.
- Rice, noodles and pasta are not recommended for long cooking periods. Cook them separately and then add to the Slow Cooker during the last 30 minutes.
User Maintenance Instructions
This appliance requires little maintenance. It contains no user serviceable parts. Do not try to repair it yourself. Any servicing requiring disassembly other than cleaning, must be performed by a qualified appliance repair technician.
- Avoid sudden, extreme temperature changes. For example, do not place a hot glass lid or stoneware pot into cold water or onto a wet surface.
- Do not use the stoneware pot to store food in the refrigerator, and then reheat in the base unit. The sudden temperature change may crack the pot.
- Avoid hitting the stoneware pot and glass lid against the faucet or other hard surfaces.
- Do not use stoneware pot or glass lid if chipped, cracked, or severely scratched.
Cleaning Instructions
CAUTION: NEVER IMMERSE BASE UNIT OR CORD IN WATER OR OTHER LIQUID.
- Always unplug and allow to cool completely before cleaning.
- Both the stoneware pot and the glass lid may be cleaned in the dishwasher. To avoid damage, position the stoneware pot in dishwasher rack so that it will not hit other items during cleaning. To clean by hand, wash the stoneware pot and glass lid in warm, soapy water.
- If food sticks to the stoneware pot, fill with warm soapy water and allow to soak before cleaning. A paste of baking soda may be used with a plastic scouring pad.
- To remove water spots or mineral deposits, wipe pot with distilled white vinegar. For difficult stains, pour a small amount into the stoneware pot and allow to soak. Rinse and dry thoroughly.
- Wipe interior and exterior of the base unit with a soft, slightly damp cloth or sponge. Never use abrasive cleansers or scouring pads to clean the base unit, as they may damage the surfaces.
Storing Instructions
- Be sure all parts are clean and dry before storing.
- Store appliance in its box or in a clean, dry place.
- Never store Programmable Slow Cooker while it is hot or wet.
- To store, place stoneware pot inside the base unit and the glass lid over the stoneware pot; to protect the glass lid, it may be wrapped with a soft cloth and placed upside down over the pot.
- Never wrap cord tightly around the appliance; keep it loosely coiled.
NOTE: If the supply cord is damaged, it must be replaced by the manufacturer or its service agent or similarly qualified person in order to avoid hazard. This appliance is not intended for use by persons (including children) with reduced physical, sensory or mental capabilities, or lack of experience and knowledge, unless they have been given supervision or instruction concerning use of the appliance by a person responsible for their safety. Children should be supervised to ensure that they do not play with the appliance.
0.65 Qt. BONUS Dipper
The 0.65 Quart (21 ounce) Little Dipper is intended to heat, hold and is perfect for serving your favorite cheeses, dips and warm, cooked appetizers at the ideal temperature.
Operating Instructions
- Fill the cooking pot with the desired dip. The Dipper should be at least half-filled for best results.
- When serving hot salsas and dips, fill up to, but never fill more than 75% of the cooking pot, 15 ounces.
- Plug cord into a 120V AC electrical outlet.
- Heat the contents until they are fully melted and hot, stirring occasionally. Depending on the amount and type of food to be served, allow 30 to 75 minutes.
- Serve and enjoy. Food will stay warm for up to 4 hours.
- Always unplug after use. The Dipper will remain ON until it is unplugged. For best results: keep the lid on the Dipper to help retain heat and keep food at the ideal serving temperature.
WARNING: The cooking pot should NOT be used to cook foods. IT WILL NOT COOK MEATS. All food should be fully cooked before placing in the Dipper.
Care & Cleaning Instructions
CAUTION: Always unplug Dipper before cleaning.
CAUTION: Never immerse Dipper in water or any other liquid.
- Empty the contents of the Dipper.
- If food sticks to the stoneware liner, fill with warm soapy water and allow to soak before cleaning with a plastic scouring pad. Rinse and dry thoroughly.
- Wipe interior and exterior of the base unit with a soft, slightly damp cloth or sponge.
- Never use abrasive cleansers or scouring pads to clean the base unit, as they may damage the surfaces.
- The plastic lid is top-rack dishwasher-safe.
Storing Instructions
- Be sure all parts are clean and dry before storing.
- Store appliance in its box or in a clean, dry place.
- Never store Dipper while it is hot or wet.
- To store, place the lid upside down into the stoneware liner.
- Never wrap cord tightly around the appliance; keep it loosely coiled.
Recipes
Ground Beef Chili with Soy Chorizo
Soy chorizo embraces the spiciness and full bodied spice of Chorizo, but without the greasiness. Coffee adds depth of flavor. This knock-out chili is guaranteed to be a winner.
Makes 12 cups
• 2 tablespoons vegetable oil
• 3 medium onions, minced
- 6 medium garlic cloves, minced
• 2 (1.25 oz.) packets Taco Seasoning Mix
• 1 teaspoon red pepper flakes
- Kosher salt to taste
• 2 lbs. 80% lean ground beef
- 6 oz. soy chorizo
• 1 (28 oz.) can fire roasted tomatoes
• 1/4 cup tomato paste
• 1 teaspoon red pepper flakes
- Kosher salt to taste
• 2 (15.5 oz.) cans pinto, dark red kidney or black beans, rinsed and drained
• 3 tablespoons soy sauce
- 2 cups beef broth
• 1 cup very strong brewed coffee
• 2 - 4 jalapeno peppers, whole, to taste
- Heat oil in a large skillet over medium heat until oil is hot and shimmering.
Add onions, garlic, taco seasoning, pepper flakes and salt. Cook 5 to 10 minutes until onions are softened and lightly browned. - Add ground beef. Remove casing from soy chorizo and crumble over the meat. Use a wooden spoon or a potato masher to break up the meat/chorizo and mix into the onions. When meat is browned, drain meat and discard oil. Add meat mixture to stoneware pot.
- Stir tomatoes with juice into the skillet, scraping up any browned bits.
- Pour over meat mixture. Add the remaining ingredients to the stoneware pot. Add whole jalapeno peppers to the top of the chili.
- Add cover. Press SELECT button until 4hr. HIGH or 8hr. LOW indicator light illuminates.
- When cook time is elapsed, stir well. Use a fork to smash beans to against the side of the stoneware pot to thicken.
For a delicious vegetarian version, simply use the recipe above, except use meatless ground beef. Sweet and savory, this slow cooked chicken dish is bursting with flavor. Loaded with traditional Moroccan spices, dried cranberries and sweet apricots, your family will appreciate this exotic comfort meal. Serve over cilantro white rice or Israeli couscous.
Recipes
Moroccan Chicken
Serves 4 - 6
- 3 – 4 lbs. chicken thighs/drumsticks.
-
1 tablespoon coconut oil (or vegetable oil)
• 1 tablespoon cumin
• 1 tablespoon turmeric
• 1 tablespoon cinnamon
• 1 tablespoon cayenne pepper, crushed
• 4 cloves fresh garlic, minced -
2 onions, chopped
• 3 tablespoons fresh ginger, grated
• 2 teaspoons Kosher salt, or more to taste
• 2 cups chicken broth
• 1 cup dried apricots, roughly chopped
• 1/2 cup craisins (or raisins)
• 3 small sweet potatoes, chopped -
Combine cumin, turmeric, cinnamon, cayenne, and minced garlic (and optional) in a small bowl. Set aside.
- In a large skillet, brown chicken pieces over medium heat, about 3 to 4 minutes on each side.
- Remove chicken and place into stoneware pot.
- Sauté onions in the skillet for 3 to 4 minutes. Add spice mixture and oil and continue to stir for another 30 seconds.
- Add chicken broth, ginger, and salt to skillet. Mix well; scrape the brown bits to deglaze skillet. Pour over chicken.
- Add cover. Press SELECT button until 4hr. HIGH or 8hr. LOW indicator light illuminates.
- Add the dried apricots, craisins and chopped sweet potatoes halfway through cook time.
Italian Turkey Meatballs with Quinoa
These healthy meatballs are the most tender, juicy Italian Turkey Meatballs you will ever try. Serve warm over sautéed spiralized zucchini, whole wheat/white pasta, quinoa, or polenta. Make meatball subs or serve alone as an appetizer.
Makes 26 - 30 meatballs
• 1/3 cup milk, full fat or non-fat
- 3 large eggs
• 1-1/2 lbs. lean ground turkey
• 3/4 lb. (12 oz.) sweet Italian turkey sausage
• 1 cup cooked quinoa
- 1/2 cup finely shredded Italian style cheese, plus additional for serving
• 1/2 cup finely chopped fresh basil
• 1 1/2 teaspoons kosher salt
• 2 tablespoons cayenne pepper
• 2 tablespoons garlic salt -
4 cups homemade or prepared tomato pasta sauce
-
In a large mixing bowl, whisk milk and eggs.
- Remove casings from the sausage. Use your hands to crumble the sausage into tiny pieces and add to the milk mixture. Add the remaining ingredients.
- Lightly mix with a fork or your fingers, until combined. Do not overwork the meat.
- Use a scoop to create evenly shaped 1-1/2-in. balls.
- Place balls on a tray or flat container and refrigerate for 30 minutes.
- Preheat oven to 400^ F and bake the meatballs for 3 to 5 minutes, then flip. Meatballs should be lightly browned, but not cooked through.
- Arrange a layer of meatballs over the bottom of the Slow Cooker, pour over half the sauce. Stack remaining meatballs and add the rest of the sauce.
- Add cover. Press SELECT button until 4hr. HIGH or 8hr. LOW indicator light illuminates.
- Cook on HIGH for 2 hours or LOW for 4 hours, until the meatballs are cooked through and reach an internal temperature of 160^ F.
Recipes
Orange Shoyu Pork
Shoyu Pork is a traditional Okinawan dish where pork belly is slowly braised in a combination of sake, mirin, brown sugar, and ginger. We've replaced the belly with pork shoulder and added a fruity orange essence. This gently simmered pork dish will melt over steamed rice or your favorite noodles.
• 4 lbs. boneless pork shoulder,
• 1-1/2 cups reduced sodium soy sauce
• 1 cup dark brown sugar, packed
- 1/4 cup mirin
• 3/4 cup orange juice - 2 inch ginger, peel and sliced
-
8 garlic cloves, peeled and smashed
• 2 oranges, zested and sliced -
Trim excess fat from pork.
- Whisk together soy sauce, brown sugar, mirin and orange juice in the stoneware pot. Add pork, ginger, and garlic. Add orange zest to pork; then arrange orange slices over the top.
- Add cover. Press SELECT button until 6hr. HIGH or 10hr. LOW indicator light illuminates.
- Turn pork midway through cooking. Shoyu pork is done with meat can be easily shredded with a fork.
- Remove from heat and allow to cool. Strain ginger and garlic and discard.
- Shred pork with 2 forks. Defat liquid and pour over shredded pork.
Beef Goulash
Traditionally, this tasty, slow-cooked beef stew is served with sour cream over egg noodles.
Serves 8 -12
- 4 oz. sliced bacon, cut into 1/2-in. pieces
-
3 lb. beef chuck, trimmed, cut into 1-1/2-in. cubes
• 2 teaspoons ground black pepper
• 2 teaspoons garlic salt
• 2 large yellow onions, chopped
• 2 medium red bell peppers, seeded, chopped -
6 cloves garlic
• 2 tablespoons tomato paste
• 1 teaspoon dried thyme - 1 cup white wine
• 2 cups low-sodium beef broth
• 1 tablespoon Worcestershire sauce
• 2 large carrots, peeled and sliced
• 2 parsnips, peeled and sliced - 2 bay leaves
For Serving
• 1/2 cup parsley, chopped
• 1/2 cup sour cream
• 8 cups cooked noodles
- Cook bacon in a large skillet over medium heat until golden, about 7 minutes. Drain bacon drippings except for 2 tablespoons and reserve the rest.
- Turn the heat to medium high. Add half the meat to the bacon grease and brown on all sides. Remove browned beef and place into stoneware pot. Add more bacon grease and continue browning the remainder of the meat.
- Add more grease and continue to sauté the onions and pepper, about 5 to 10 minutes until onions are softened and lightly browned.
- Add bacon and remaining ingredients to the stoneware pot.
- Add cover. Press SELECT button until 4hr. HIGH or 8hr. LOW indicator light illuminates.
- When cook time has elapsed, press the OFF button.
- Stir in parsley and sour cream, discard bay leaves, adjust seasonings and serve. NOTE: Make sure Slow Cooker is OFF before adding sour cream. Do not allow Beef Goulash to simmer or boil.
Recipes
Fruit Cobbler
A simple dessert; soft, sweet, fruity, especially good for a crowd. Serve hot with a scoop of vanilla bean ice cream, drizzled with fresh berries.
- cooking spray
• 2 cups frozen peach slices
• 2 cups mixed frozen berries
• 2 tablespoons cornstarch
• 1 teaspoon vanilla extract
• 1/2 cup brown sugar
• 1/2 teaspoon ground cinnamon
• 1/2 teaspoon pumpkin pie spice
• 1 (18.25 ounce) package white cake mix
• 1 stick unsalted butter, melted
- fresh blueberries and/or chopped berries to serve vanilla bean ice cream, to serve
- Lightly coat the slow cooker with cooking spray.
- Stir vanilla into berry mixture; add brown sugar, cinnamon, and nutmeg. Pour cake mix over berry mixture and drizzle with melted butter.
- Add cover. Press SELECT button until 4hr. HIGH indicator light illuminates.
- When cook time has elapsed, press the OFF button.
Mix peaches and berries together in the slow cooker; sprinkle with cornstarch and toss to coat.
BELLA
Limited TWO-YEAR Warranty
SENSIO Inc. hereby warrants that for a period of TWO YEARS from the date of purchase, this product will be free from mechanical defects in material and workmanship, and for 90 days in respect to non-mechanical parts. At its sole discretion, SENSIO Inc. will either repair or replace the product found to be defective, or issue a refund on the product during the warranty period.
The warranty is only valid for the original retail purchaser from the date of initial retail purchase and is not transferable. Keep the original sales receipt, as proof of purchase is required to obtain warranty validation. Retail stores selling this product do not have the right to alter, modify, or in any way revise the terms and conditions of the warranty.
EXCLUSIONS:
The warranty does not cover normal wear of parts or damage resulting from any of the following: negligent use of the product, use of improper voltage or current, improper routine maintenance, use contrary to the operating instructions, disassembly, repair, or alteration by anyone other than qualified SENSIO Inc. personnel. Also, the warranty does not cover Acts of God such as fire, floods, hurricanes, or tornadoes.
SENSIO Inc. shall not be liable for any incidental or consequential damages caused by the breach of any express or implied warranty. Apart from the extent prohibited by applicable law, any implied warranty of merchantability or fitness for a particular purpose is limited in time to the duration of the warranty. Some states, provinces or jurisdictions do not allow the exclusion or limitation of incidental or consequential damages, or limitations on how long an implied warranty lasts, and therefore, the above exclusions or limitations may not apply to you. The warranty covers specific legal rights which may vary by state, province and/or jurisdiction.
HOW TO OBTAIN WARRANTY SERVICE:
You must contact Customer Service at our toll-free number: 1-866-832-4843. A Customer Service Representative will attempt to resolve warranty issues over the phone. If the Customer Service Representative is unable to resolve the problem, you will be provided with a case number and asked to return the product to SENSIO Inc. Attach a tag to the product that includes: your name, address, daytime contact telephone number, case number, and description of the problem. Also, include a copy of the original sales receipt. Carefully package the tagged product with the sales receipt, and send it (with shipping and insurance prepaid) to SENSIO Inc.'s address. SENSIO Inc. shall bear no responsibility or liability for the returned product while in transit to SENSIO Inc.'s Customer Service Center.
natural_image
Line drawing of a rice cooker with hands holding its lid, showing control panel and buttons (no text or symbols on the device itself)natural_image
Abstract graphic with a heart outline and stylized letter 'C' (no text or symbols)GRACIAS
por su compra
REGISTRARSE

natural_image
Generic user profile icon with a plus sign, no text or symbols presentnatural_image
Silhouette of a person with a star rating and speech bubble (no text or symbols)natural_image
Three social media and video platform icons: Facebook, Twitter, and YouTube (no text or symbols beyond logos)BellaLife

BellaLifestyle

bellahousewares.com
For customer service questions or comments Dudas o comentarios contactar el departamento de servicio al cliente
1-866-832-4843 / help@bellahousewares.com
Sensio Inc.
New York, NY 10016/USA
17188 R1
- PROGRAMMABLE SLOW COOKER
- THANK YOU
- for your purchase
- myBELLAlife
- Table of Contents
- Índice
- READ ALL INSTRUCTIONS.
- FOR HOUSEHOLD USE ONLY SAVE THESE INSTRUCTIONS
- ADDITIONAL IMPORTANT SAFEGUARDS
- NOTES ON THE PLUG
- NOTES ON THE CORD
- PLASTICIZER WARNING
- ELECTRIC POWER
- Getting to Know your 5 QT Programmable Slow Cooker
- Introduction To Slow Cooking
- Before Using for the First Time
- STONEWARE POT CARE
- TEMPERED GLASS LID CARE
- Operating Instructions
- QT Slow Cooker Cooking Chart
- USDA Cooking Guidelines
- Hints For Slow Cooking
- User Maintenance Instructions
- Cleaning Instructions
- Storing Instructions
- Qt. BONUS Dipper
- Care & Cleaning Instructions
- Recipes
- Ground Beef Chili with Soy Chorizo
- Makes 12 cups
- Moroccan Chicken
- Serves 4 - 6
- Italian Turkey Meatballs with Quinoa
- Makes 26 - 30 meatballs
- Orange Shoyu Pork
- Beef Goulash
- Serves 8 -12
- For Serving
- Fruit Cobbler
- BELLA
- Limited TWO-YEAR Warranty
- EXCLUSIONS:
- HOW TO OBTAIN WARRANTY SERVICE:
- GRACIAS
- por su compra
- REGISTRARSE
Brand : BELLA
Model : 5qt Programmable Slow Cooker with Dipper
Category : Casserole