
0.9L Deep Fryer - Deep fryer BELLA - Free user manual and instructions
Find the device manual for free 0.9L Deep Fryer BELLA in PDF.


| Product Type | Deep Fryer |
| Brand | Bella |
| Model | 0.9L Deep Fryer |
| Capacity | 0.9 liters |
| Dimensions (W x D x H) | Approx. 25 x 20 x 18 cm |
| Weight | Approx. 1.5 kg |
| Power | 1500 W |
| Voltage | 120 V (US standard) |
| Frequency | 60 Hz |
| Temperature Control | Adjustable thermostat (150°C - 190°C) |
| Frying Basket | Removable, non-stick coated |
| Lid | Lockable lid with viewing window |
| Safety Features | Cool-touch handles, automatic shut-off, overheat protection |
| Filter | Permanent odor filter (washable) |
| Cleaning | Non-stick basket and pot, dishwasher-safe parts recommended hand wash |
| Indication Lights | Power and ready indicator |
| Cord Length | Approx. 0.9 m |
| Material | Stainless steel body, plastic handles |
| Spare Parts Availability | Basket, filter, and lid available via manufacturer |
| Repairability | User-replaceable fuse and power cord; thermostat not user-serviceable |
| Warranty | 1 year limited warranty |
Frequently Asked Questions - 0.9L Deep Fryer BELLA
User questions about 0.9L Deep Fryer BELLA
0 question about this device. Answer the ones you know or ask your own.
Ask a new question about this device
Download the instructions for your Deep fryer in PDF format for free! Find your manual 0.9L Deep Fryer - BELLA and take your electronic device back in hand. On this page are published all the documents necessary for the use of your device. 0.9L Deep Fryer by BELLA.
USER MANUAL 0.9L Deep Fryer BELLA
natural_image
Bella French food oven with open lid and mesh filter, no visible text or symbols on the main subject0.9 L
DEEP FRYER
Instruction Manual and Recipe Guide
0.9 L
FREIDORA
natural_image
Abstract graphic with a heart shape and a stylized letter 'T' (no text or symbols)THANK YOU
for your purchase
REGISTER AND SIGN UP

natural_image
Generic user profile icon with a plus sign, no text or symbols presentfor special announcements and trendy recipes!
TELL US WHAT YOU THINK!

natural_image
Silhouette of a person with five stars above them, no text or symbols presentRate, review or ask us a question.
GO TO: bellahousewares.com
myBELLAlife


TABLE OF CONTENTS
Important Safeguards....2
Additional Important Safeguards....3
Notes on the Plug (Detachable Cord Instructions) 4
Notes on the Cord....4
Plasticizer Warning 4
Electric Power 4
Getting to Know Your Deep Fryer 5
Before Using for the First Time 6
Operating Instructions 6-7
Deep Fryer Helpful Hints 8
Draining & Recycling Oil....9
Cooking Chart 9
User Maintenance Instructions....10
Care & Cleaning Instructions....10
Storing Instructions....10
Trouble Shooting....11
Recipes....12-13
Warranty 14
ÍNDICE
WARNING: When using electrical appliances, basic safety precautions should always be followed, including the following:
- READ ALL INSTRUCTIONS.
- Do not touch hot surfaces. Use handles or knobs. Use oven mitts or potholders.
- To protect against electric shock do not immerse cord, plugs, or appliance in water or other liquid.
- This appliance is not intended for use by persons (including children) with reduced physical, sensory or mental capabilities, or lack of experience and knowledge, unless they have been given supervision or instruction concerning use of the appliance by a person responsible for their safety.
- Close supervision is necessary when any appliance is used by or near children
- Unplug from outlet when not in use and before cleaning. Allow to cool before putting on or taking off parts, and before cleaning the appliance.
- Do not operate any appliance with a damaged cord or plug or after the appliance malfunctions, or has been damaged in any manner. Return appliance to the nearest authorized service facility for examination, repair or adjustment.
- The use of accessory attachments not recommended by the appliance manufacturer may cause injuries.
- Indoor, countertop use only. Do not use the appliance outdoors.
- Do not let the cord hang over edge of the table or counter, or touch hot surfaces.
- Do not place on or near a hot gas or electric burner, or in a heated oven.
- Extreme caution must be used when moving the deep fryer containing hot oil
- Always attach plug to appliance first, then plug cord in the wall outlet. To disconnect, slide the temperature control to OFF or lower temperature setting. Then remove plug from wall outlet.
- Do not leave this appliance unattended during use.
- Do not use appliance for other than intended use.
- Be sure handle is properly assembled to fry basket and locked in place. See detail assembly instructions.
- Follow all instructions for removal of moisture/ice and thawing before cooking.
- Always cook with lid in closed position, except when frying French fries and high moisture foods. Ensure both lid and vessel are completely dry after washing and before use.
FOR HOUSEHOLD USE ONLY SAVE THESE INSTRUCTIONS
ADDITIONAL IMPORTANT SAFEGUARDS
CAUTION HOT SURFACES: This appliance generates heat and escaping steam during use. Proper precautions must be taken to prevent the risk of burns, fires, or other injury to persons or damage to property.
CAUTION: This appliance is hot during operation and retains heat for some time after turning OFF. Always use oven mitts when handling hot materials and allow metal parts to cool before cleaning. Do not place anything on top of the appliance while it is operating or while it is hot.
- All users of this appliance must read and understand this owner's manual before operating or cleaning the appliance.
- The cord to this appliance should be plugged into a 120V AC electrical outlet only.
- If this appliance begins to malfunction during use, immediately unplug the cord. Do not use or attempt to repair the malfunctioning appliance.
- Do not immerse detachable power cord in any liquid. If the cord falls in water or other liquid, DISCARD IMMEDIATELY and replace it with a new cord. If the supply cord to this appliance is damaged, it must be replaced by contacting Consumer Service.
- Keep the cord out of reach from children and infants to avoid the risk of electric shock and choking.
- Use fry basket handle to raise and lower fry basket. Always raise fry basket out of hot oil and allow cooked food to rest for 5 to 10 seconds before removing food from basket.
- Dry damp foods before placing into oil. When deep frying frozen foods, remove any excessive ice as it can cause hot oil to spatter.
- Always keep lid closed while Deep Fryer is frying foods.
- Do not obstruct the filtered air outlet vent on top of lid with any objects. Avoid contact with escaping steam from the filtered air outlet during operation.
- Keep appliance at least 4 inches away from walls or other objects during operation. Do not place any objects on top of appliance while it is operating. Place the appliance on a flat surface that is resistant to heat.
- Be sure oil tank is filled with oil to a level above MIN as marked. Do not operate appliance without oil or with an insufficient amount of oil. Do not over-fill the tank with oil past the MAX mark.
WARNING: Under- or over-filling the oil tank may damage the Deep Fryer and could result in serious personal injury. - Always pour unheated oil into tank before plugging in and heating. Never pour oil into heated tank.
- Ensure that there are no flammable objects on or near the appliance. If the oil catches fire, unplug the appliance and replace the lid. Never use water to extinguish the fire.
- Do not operate this appliance if the lid and the tank are not completely dry.
- It is not recommended to move the Deep Fryer containing hot oil. Allow to cool before moving.
- Do not use this Deep Fryer to boil water.
Notes on the Plug
This appliance has a polarized plug (one blade is wider than the other).
To reduce the risk of electric shock, this plug will fit in a polarized outlet only one way. If the plug does not fit fully into the outlet, reverse the plug. If it still does not fit, contact a qualified electrician. Do not modify the plug in any way.
Notes on the Cord (Detachable Cord Instructions)
CAUTION: A short detachable power-supply cord is provided to reduce the risk of personal injury resulting from becoming entangled in or tripping over a longer cord.
The cord is designed to break away from the Deep Fryer quickly and smoothly to prevent the unit from tipping over when someone unintentionally pulls on the cord.
This detachable cord is designed for use with this Deep Fryer only. Do not try using it on any other appliance.
WARNING: Serious hot-oil burns may result from a deep fat fryer being pulled off a countertop. Do not allow the cord to hang over the edge of the counter where it may be grabbed by children or become entangled with the user. Do not use with an extension cord.
Plasticizer Warning
CAUTION: To prevent Plasticizers from migrating to the finish of the counter top or table top or other furniture, place NON-PLASTIC coasters or place mats between the appliance and the finish of the counter top or table top. Failure to do so may cause the finish to darken; permanent blemishes may occur or stains can appear.
Electric Power
If the electrical circuit is overloaded with other appliances, your appliance may not operate properly. It should be operated on a separate electrical circuit from other appliances.
Getting to Know Your Deep Fryer
Product may vary slightly from illustrations.
Figure 1

Before Using for the First Time
- Remove all packing material and labels from the fry basket, fry basket handle and the inside and outside of the Deep Fryer.
- During first use of the Deep Fryer, the oil tank and fryer basket may emit a slight odor. This is normal. To avoid this odor, please follow the instructions outlined below.
3 Pull the plastic basket handle to separate from metallic handle bar. - Assemble the fry basket handle onto the basket. With the black handle in hand, squeeze both handle bars together. Pull the black handle out to extend it to its longest position. Continue to squeeze, fitting the bars in through the basket support wires and lock into the 2 wire tabs. (See Figure 2 and 3.) Set the fry basket aside.
- Add 3.75 cups/.9 L water to the MAX level on the oil tank.
- Following the Operating Instructions outlined in this Instruction Manual, heat water at the lowest temperature (225°F) for 10 minutes.
- Allow water to cool.
- Wash fry basket and handle in hot, soapy water. Use a slightly soapy sponge and wipe the inside of the oil tank. Wipe clean with a damp paper towel. Wipe the Deep Fryer body with a damp cloth.
- Dry the oil tank and fry basket thoroughly before deep frying.

natural_image
Illustration of a hand holding a tool interacting with a mechanical component (no text or symbols visible)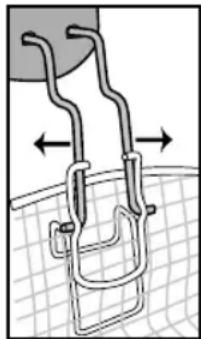
natural_image
Diagram of a mechanical clamp or bracket with arrows indicating direction, set against a grid background (no text or symbols)Figure 2
Operating Instructions
WARNING! This unit should not be used to boil water.
- Place the Deep Fryer on a clean, dry, flat, heat-resistant surface such as a table or counter top, approximately 2 feet from a standard 120V AC electrical outlet.
- Use the lid handle to open the lid.
- Set the assembled fry basket with handle aside. (If necessary, see detailed fry basket handle assembly instructions described in the Before Using for the First Time section of this Instruction Manual.)
- Pour liquid cooking oil (corn, vegetable, rapeseed, peanut, etc.) into the tank. Fill with oil to a level between the MIN (2 cups /.5 L) and MAX (3.75 cups/.9 L) marks. WARNING: Under - or over - filling the oil tank may damage the Deep Fryer and could result in serious personal injury.
- Close the lid until it snaps securely onto the body.
- Turn the temperature control to OFF.
- Connect the detachable power cord into the appliance receptacle, with the "THIS SIDE UP" topside. (See Figure 3.) Make sure the cord is firmly in place. Then connect the polarized plug to the wall outlet.
CAUTION: Do not let the cord hang over the edge of table or counter.
- Turn the temperature control to the desired cooking temperature.
- The red HEATING light will illuminate as the Deep Fryer heats the oil. Oil may make a "popping" sound inside the Deep Fryer as the oil heats. This is normal. When the oil reaches the selected cooking temperature, the red HEATING light will turn OFF indicating the Deep Fryer is ready for use.
NOTE: Allow 5 to 7 minutes for the oil to preheat.
- Carefully place food into the fry basket. Do not overfill fry basket with food.
NOTE: Maximum food frying capacity is 1.1 cups at one time. The fry basket should never be more than 2/3 full of food to be fried.

Figure 3
-
Use the lid handle to open the lid.
-
With the basket handle centered at the front of the Deep Fryer, carefully lower the fry basket with food into the hot oil. Fit the handle bars into the grooves in the lid and close. (See Figure 4.)
WARNING: This appliance generates heat and escaping steam during use. Use proper precautions to prevent the risk of burns, fires, or other injury to persons or damage to property.
- As the Deep Fryer cooks the food and the oil cools, the red HEATING light will cycle on and off as proper cooking temperature of the oil is maintained.
See the Cooking Chart for sample cooking times and temperatures.

natural_image
Line drawing of a cooking pot with handle and side outlets, labeled Figure 4 (no text or symbols on the device itself)- CAUTION: Do not open lid during cooking! Hot oil could spatter out of the Deep Fryer causing burns or other injuries.
WARNING: Use caution when opening lid; steam escapes as soon as the lid is opened. Use oven mitts when handling hot materials.
- Open the lid and turn food as needed. When food is cooked to desired doneness, using oven mitts, lift the fry basket out of the oil and carefully hook the fry basket's wire hangers up and over the front of the oil tank. Allow cooked foods to drain for 5-10 seconds. (See Figure 5.)
NOTE: To prevent early degradation of the oil, do not add salt or other spices to the food during frying or when the food is draining above the frying oil.
CAUTION: DO NOT touch fry basket wires as they are very hot!
-
Use a heat-resistant long-handled fork or tongs to remove cooked food or pour cooked foods from fry basket onto absorbent paper towels to soak up excess oil.
-
Replace fry basket into the oil. Close lid, allow unit to reheat to desired temperature and continue to deep fry another batch of food, if desired.
-
When all cooking is complete, turn the temperature control to OFF; finish removing all fried food from the fry basket onto wire racks or absorbent paper towels.
-
Unplug the polarized plug from the wall outlet, then detach the cord from the appliance receptacle.
-
Close the lid and allow oil and Deep Fryer to cool.

natural_image
Line drawing of a kitchen electric oven with lid open, labeled Figure 5 (no text or symbols on the device itself)WARNING! Oil will remain hot for an extended period of time. Be sure all parts of the Deep Fryer and the oil have cooled completely before discarding or storing oil and cleaning the unit.
Deep Fryer Helpful Hints
Deep Frying
- Never over-fill the fry basket with food. NOTE: Maximum food frying capacity is 1.1 cups at one time. The fry basket should never be more than 2/3 full of food to be fried.
- Fry more batches of smaller amounts of food. Best results are obtained when the hot oil can freely circulate all around the food.
- In general, pre-cooked foods require higher temperatures and less cooking time.
- Cut or sort food into uniform sizes. Cook same-size pieces together so they will be cooked in the same amount of time.
- Be sure foods are free from ice crystals and excess moisture before frying.
Water on the surface of the food can cause the oil to spatter and foam. - When using a breading, evenly coat the food to be fried. Fine, uniform crumbs stick better than coarse, uneven ones. Shake off all extra breading to help keep oil clean.
- To prevent contamination of the oil, do not add salt or other spices to the food during frying or when the food is draining above the oil.
- Space coated foods so they do not touch while cooking.
- For best results when frying doughs or foods dipped in a liquid batter, place the foods into the basket first and then lower the fry basket into the hot oil.
- Always use the fry basket to lift food out of the oil; hook the basket to the rim and allow oil to drain. Then remove fried food from the fry basket.
- Place fried foods on brown grocery bags to drain oil and keep fried foods crispy.
Frying Oil
WARNING! Never, under any circumstances, add water or any other liquid to the oil.
- Never over-fill or under-fill the fryer with oil. The MAX oil capacity is (3.75 cups/.9 L). The MIN oil capacity is (2 cups/450ml). Both the MIN and MAX oil levels are marked on the inside of the tank. WARNING: Under or over-filling the oil tank may damage the Deep Fryer and could result in serious personal injury.
- Always use sunflower oil, rapeseed oil, vegetable oil or corn oil. Never use hard fats, olive oil or oil with a high water content.
- Never mix different oils together to fry foods.
- Never use butter or margarine to fry foods.
- When frying fish or seafood, the oil may absorb a "fishy" taste or odor. To eliminate transferring this "fishy" taste or odor to other foods, we suggest changing the oil before frying other foods.
- Cooled, used oil should be removed from the tank and filtered after every frying session. Cleaned oil can be used several times.
- Replace used oil with fresh if the oil smokes when heated.
- Replace used oil with fresh if the oil foams or bubbles when heated.
Draining and Recycling Oil
WARNING! Be careful around hot parts and hot spitting oil. Remember that the oil is actually hotter than boiling water! Never put hands in the oil. Always keep hands and face away from rising steam or spitting oil.
IMPORTANT: Cooled, used oil should be removed from the tank and filtered after every frying session.
- Use the handle lid to open; remove the fry basket from unit. Set aside.
- Remove the lid by releasing the black tabs from the central spindle. Grasp lid firmly and pull lid up and off. (See Figure 6.) Set lid aside.
- Use the special oil drain spout to pour used oil from the tank. NOTE: DO NOT pour used oil down any household drain. Discard used oil into a container with a lid and dispose in garbage.
- Filter the cooled oil through a fine sieve into a wide-neck, airtight, covered container. Use a funnel to avoid oil spillage. NOTE: A paper towel, coffee filter or piece of clean cotton material can be placed in the fry basket and used to filter used oil.
- As oil will absorb food flavors and odors, it's a good idea to label the container with the type of food that was cooked in the oil. For example: sweet desserts, vegetables, chicken, fish, etc.
- Replace used oil with fresh if the oil has an unpleasant odor, if it smokes, foams, or bubbles when it is heated.

Cooking Chart
WARNING! ALWAYS USE A MEAT THERMOMETER TO ENSURE THAT MEAT, POULTRY AND FISH ARE COOKED THOROUGHLY BEFORE EATING.
The following chart is intended as a basic guide only. The quantity of food fried at one time and the type/size of food being fried may alter the total cooking time. Remember, frying smaller batches will result in better cooking times and a higher food quality. Adjust cooking temperature and cooking time to suit your taste.
| FOOD | TEMP COOKING TIME |
| Fish, battered, fresh or thawed 325°F - 350°F 5 to 10 minutes | |
| Vegetables, breaded, thawed 350°F 4 to 6 minutes | |
| Donuts 350°F 3 to 5 minutes | |
| Chicken pieces, bone-in, fresh or thawed 350°F 10 to 15 minutes | |
| Chicken strips, frozen | 375°F 5 to 10 minutes |
| Shrimp, breaded, thawed | 350°F 2 to 3 minutes |
| Shrimp, breaded, frozen | 375°F 4 to 5 minutes |
| Fritters | 375°F 2 to 4 minutes |
| French fries/onion rings, frozen | 375°F 3 to 5 minutes |
PLEASE NOTE: The USDA recommends that meats such as beef and lamb, etc. should be cooked to an internal temperature of 145°F/63°C. Pork should be cooked to an internal temperature of 160°F/71°C and poultry products should be cooked to an internal temperature of 170°F/77°C - 180°F/82°C to be sure any harmful bacteria has been killed. When reheating meat/poultry products, they should also be cooked to an internal temperature of 165°F/74°C.
NOTE: Frozen foods may require different cooking times and temperatures; follow package directions. Use 374°F/191°C for all foods that have package instructions for a higher temperature and adjust times as necessary.
IMPORTANT: Remove ice crystals from frozen foods before placing in the hot oil.
CAUTION: NEVER fill the fry basket more than 2/3 full.
User Maintenance Instructions
This appliance requires little maintenance. It contains no user-serviceable parts. Any servicing requiring disassembly other than cleaning must be performed by a qualified appliance repair technician.
Care & Cleaning Instructions
WARNING! Allow the fryer to cool fully before emptying the oil and cleaning the appliance.
- Make sure your Deep Fryer is unplugged and the fry basket and oil/oil tank have cooled completely.
- Remove the fry basket from the oil tank. Squeeze both handle bars together to disassemble fry basket from handle.
- Remove the Lid. Carefully strain the oil from the tank into a suitable container. (See section Draining and Recycling Oil in this Instruction Manual for complete details.)
NOTE: It is best to work over a sink or garbage can in case of any spillage.
-
The removable lid, fry basket and handle are dishwasher-safe, or may be washed by hand in hot, soapy water. Dry all parts thoroughly.
-
Oil Tank Cleaning: Fill emptied tank with hot, soapy water and allow to soak. Use a stiff nylon brush to remove stubborn or burned-on residue. Do not use harsh or abrasive cleaning products as they may damage the surface of the tank.
WARNING: Never immerse the Deep Fryer body in water or other liquids.
CAUTION: Make sure the oil tank is completely dry after washing and before use.
- Wipe the Deep Fryer Stainless Steel body with a damp cloth and dry completely.
Storing Instructions
- Make sure your Deep Fryer is unplugged and all parts are clean and dry before storing.
- Never store Deep Fryer while it is hot or wet.
- To store, disassemble fry basket from handle. Squeeze handlebars and collapse black handle for storage. Place the clean basket and handle into the oil tank.
- Store detachable cord in the fry basket.
- Push the lid closed until it snaps securely onto the body.
- Store appliance in its box or in a clean, dry place.

Trouble Shooting
Deep Fryer does not operate
- Make sure the detachable power supply cord is properly attached to the receptacle. WARNING: Always check to make sure there is sufficient oil in the oil tank before sliding the temperature control ON. Dry frying will cause damage to the Deep Fryer
Oil temperature is too high
- Not enough oil in oil tank. Unplug Deep Fryer and check oil level. Oil level should be between MIN and MAX fill lines. Add oil as necessary.
Oil bubbles over
- Too much oil in Deep Fryer oil tank. Never fill with oil above the MAX fill line.
- Too much food added to fry basket. Fry smaller quantities at a time.
- Food is too wet. Pat dry with paper towels before placing in fryer basket.
Food tastes greasy or not crisp
- The wrong type of oil has been used. Use a high-quality oil such as peanut, vegetable, canola or corn.
- Too much food added to fry basket. Fry smaller quantities at a time. – especially frozen foods.
- Frying temperature is too low. Allow unit to preheat or reheat to the recipe temperature prior to use. Adjust recipe temperature if needed.
Food or Deep Fryer emits unpleasant odors
- Oil has deteriorated. Change oil as needed.
- Lid odor filter is saturated. Remove lid and clean in hot, soapy water or place in dishwasher. Dry thoroughly and replace.
• Used oil absorbs food odors. Do not fry desserts in oil that has been used to fry fish.
Recipes
Roasted Red Pepper Cheese Fritters
• 3-3/4 cups vegetable or canola oil for frying
- 4 oz. cream cheese, room temperature
- 2 tablespoons roasted red peppers, drained, finely chopped
• 1/2 teaspoon smoked paprika
• 2 tablespoons mayonnaise
- 6 oz. cheddar cheese, grated
• 4 oz. pepper-jack cheese, grated
• 1/2 teaspoon Kosher salt, or more to taste
• 1/8 teaspoon cayenne pepper, optional - pepper jelly, for serving
3 Stations for Breading:
• 2/3 cup all-purpose flour + 1/3 cup corn starch
- 1 cup buttermilk
• 1 cup panko breadcrumbs
- In a medium mixing bowl, mix cream cheese, chopped peppers, mayonnaise and paprika until well combined.
- Add the grated cheese and salt/pepper to the cream cheese mixture. Combine well. If desired, add more salt and/or cayenne pepper to taste.
- Chill for 2 hours or preferably, overnight.
- Use a measuring tablespoon to make uniform balls of roasted red pepper cheese and roll into fritters.
- Set up 3 stations for breading: flour + cornstarch, buttermilk and panko breadcrumbs
- Use a fork to mix flour and cornstarch together. Roll each fritter in the flour mixture until completely coated. Dust off the excess.
- Add the floured fritter into the buttermilk and coat completely.
- Roll wet buttermilk fritter in the panko breadcrumbs, pressing the panko firmly into the fritters. IMPORTANT: Fritters must be completely coated to prevent fried cheese from leaking during deep frying.
- Continue until all fritters are breaded.
- Chill breaded fritters for 1 to 2 hours or freeze for 1/2 hour. IMPORTANT: Fritters must be very cold to prevent fried cheese from leaking during deep frying. Keep fritters refrigerated before frying.
- Preheat oil to 375°F.
- Fry 3 to 5 fritters at a time for about 2 to 4 minutes, turning halfway, until golden brown. Continue frying until all of the fritters are cooked.
- Serve the roasted red pepper cheese fritters warm with pepper jelly.
Recipes
Fried Eggplant Sticks
These sticks are so crunchy and tasty, and so easy to prepare!
Makes 36 to 40 sticks
• 3-3/4 cups peanut or canola oil for frying
- salt and pepper to taste freshly grated Parmesan cheese
- 1 firm, medium sized eggplant (6-1/2" long)
- marinara sauce
- 2 eggs
• 2 cups panko breadcrumbs
1. Preheat oil to 350°F.
2. Peel eggplant, if desired. Cut eggplant into 1/2-in. thick x 3-in. long sticks.
3. Fry eggplant in batches of 10 sticks, for 4 to 5 minutes, turning halfway.
4. Drain golden brown eggplant sticks on brown paper bags or absorbent paper toweling. Sprinkle with salt, pepper and Parmesan cheese while hot.
5. Serve with marinara sauce.
Sweet Potato Cottage Fries for 1
Makes 1-1/2 cups
• 3-3/4 cups peanut or canola oil for frying
- salt to taste
• 1 medium sweet potato
- 2 tablespoons brown sugar, optional
- Preheat oil to 375°F.
- Peel sweet potato, if desired. Cut into 1/4" thick discs. Dry potato discs with paper towels before frying.
- Deep fry sweet potatoes 8 to 9 minutes, turning after 5 minutes.
- Drain golden cottage fries on brown paper bags or absorbent paper toweling. If desired, sprinkle with salt and/or brown sugar while hot.
BELLA
Limited TWO-YEAR Warranty
SENSIO Inc. hereby warrants that for a period of TWO YEARS from the date of purchase, this product will be free from mechanical defects in material and workmanship, and for 90 days in respect to non-mechanical parts. At its sole discretion, SENSIO Inc. will either repair or replace the product found to be defective, or issue a refund on the product during the warranty period.
The warranty is only valid for the original retail purchaser from the date of initial retail purchase and is not transferable. Keep the original sales receipt, as proof of purchase is required to obtain warranty validation. Retail stores selling this product do not have the right to alter, modify, or in any way revise the terms and conditions of the warranty.
EXCLUSIONS:
The warranty does not cover normal wear of parts or damage resulting from any of the following: negligent use of the product, use of improper voltage or current, improper routine maintenance, use contrary to the operating instructions, disassembly, repair, or alteration by anyone other than qualified SENSIO Inc. personnel. Also, the warranty does not cover Acts of God such as fire, floods, hurricanes, or tornadoes.
SENSIO Inc. shall not be liable for any incidental or consequential damages caused by the breach of any express or implied warranty. Apart from the extent prohibited by applicable law, any implied warranty of merchantability or fitness for a particular purpose is limited in time to the duration of the warranty. Some states, provinces or jurisdictions do not allow the exclusion or limitation of incidental or consequential damages, or limitations on how long an implied warranty lasts, and therefore, the above exclusions or limitations may not apply to you. The warranty covers specific legal rights which may vary by state, province and/or jurisdiction.
HOW TO OBTAIN WARRANTY SERVICE:
You must contact Customer Service at our toll-free number: 1-866-832-4843. A Customer Service Representative will attempt to resolve warranty issues over the phone. If the Customer Service Representative is unable to resolve the problem, you will be provided with a case number and asked to return the product to SENSIO Inc. Attach a tag to the product that includes: your name, address, daytime contact telephone number, case number, and description of the problem. Also, include a copy of the original sales receipt. Carefully package the tagged product with the sales receipt, and send it (with shipping and insurance prepaid) to SENSIO Inc.'s address. SENSIO Inc. shall bear no responsibility or liability for the returned product while in transit to SENSIO Inc.'s Customer Service Center.

natural_image
Diagram of a hand holding a U-shaped tool or bracket with arrows indicating movement, set on a grid background (no text or symbols)
natural_image
Diagram of a mechanical clamp or hook assembly with directional arrows, no text or symbols presentFigura 2

Figura 3
natural_image
Line drawing of a cooking pot with handle and side ports, labeled as Figure 4 (no text or symbols on the device itself)natural_image
Line drawing of a kitchen electric oven with grating and lid open, labeled as Figure 5 (no text or symbols on the device itself)natural_image
Abstract graphic with a heart and stylized letter 'C' (no text or symbols)GRACIAS
para su compra
REGISTRARSE Y FIRMAR

natural_image
Generic user profile icon with a plus sign, no text or symbols presentnatural_image
Icon of a person with a star rating and speech bubble (no text or symbols)natural_image
Three social media and video platform icons: Facebook, Twitter, and YouTube (no text or symbols beyond logos)BellaLife

BellaLifestyle

bellahousewares.com
For customer service questions or comments
- DEEP FRYER
- FREIDORA
- THANK YOU
- for your purchase
- myBELLAlife
- TABLE OF CONTENTS
- ÍNDICE
- FOR HOUSEHOLD USE ONLY SAVE THESE INSTRUCTIONS
- ADDITIONAL IMPORTANT SAFEGUARDS
- Notes on the Plug
- Notes on the Cord (Detachable Cord Instructions)
- Plasticizer Warning
- Electric Power
- Getting to Know Your Deep Fryer
- Before Using for the First Time
- Operating Instructions
- WARNING! This unit should not be used to boil water.
- Deep Fryer Helpful Hints
- Deep Frying
- Frying Oil
- Draining and Recycling Oil
- Cooking Chart
- User Maintenance Instructions
- Care & Cleaning Instructions
- Storing Instructions
- Trouble Shooting
- Deep Fryer does not operate
- Oil temperature is too high
- Oil bubbles over
- Food tastes greasy or not crisp
- Food or Deep Fryer emits unpleasant odors
- Recipes
- Roasted Red Pepper Cheese Fritters
- Stations for Breading:
- Fried Eggplant Sticks
- Makes 36 to 40 sticks
- Sweet Potato Cottage Fries for 1
- Makes 1-1/2 cups
- BELLA
- Limited TWO-YEAR Warranty
- EXCLUSIONS:
- HOW TO OBTAIN WARRANTY SERVICE:
- GRACIAS
- para su compra
- REGISTRARSE Y FIRMAR
Brand : BELLA
Model : 0.9L Deep Fryer
Category : Deep fryer