
Cherish F680 - Security Camera KODAK - Free user manual and instructions
Find the device manual for free Cherish F680 KODAK in PDF.


| Product Type | Smart Home Security Camera |
| Model | Kodak Cherish F680 |
| Camera Sensor | Color CMOS 2 Megapixel 1080p |
| Lens Viewing Angle | 110° (M12 lens) |
| Night Vision | IR LEDs (IR Lens included) |
| Two-Way Audio | Yes (built-in microphone and speaker) |
| Power Adapter | Input: 100-240V AC, Output: 5.0V DC, 1500mA (included) |
| Battery | Rechargeable Li-ion 3.7V, 2100mAh |
| Frequency Band | 2.4 GHz (Wi-Fi 802.11 b/g/n) |
| Operating Temperature | 0°C to 40°C |
| Storage | MicroSD card slot (Class 10 recommended, not included) |
| App | KODAK Smart Home (iOS & Android) |
| Mounting | Desktop or wall mount (keyhole slots in stand) |
| Motion Detection | Yes (app notifications) |
| Sound Detection | Yes (app notifications) |
| Temperature & Humidity Sensor | Yes (reading may take 5 min to stabilize) |
| Warranty | 2 years for product, 1 year for accessories |
| LED Indicators | Solid red (charging), solid blue (powered), blinking blue (connecting), blue/red (pairing), purple/red/blue (firmware update) |
| Dimensions (approx.) | Not specified in manual, typical size around 7x7x11 cm |
| Weight (approx.) | Not specified, estimated ~150 g (with battery) |
Frequently Asked Questions - Cherish F680 KODAK
User questions about Cherish F680 KODAK
0 question about this device. Answer the ones you know or ask your own.
Ask a new question about this device
Download the instructions for your Security Camera in PDF format for free! Find your manual Cherish F680 - KODAK and take your electronic device back in hand. On this page are published all the documents necessary for the use of your device. Cherish F680 by KODAK.
USER MANUAL Cherish F680 KODAK
natural_image
Exterior view of a modern digital camera with a lens and control buttons (no text or symbols visible)
User Manual
The features described in this User Manual are subject to modifications without prior notice.
WELCOME ASSEMBLY
Thank you for buying the KODAK CHERISH F680 Smart Home Monitor.
With your mobile device, now you can monitor your home from your smart phone anywhere, anytime!
Please keep your original dated sales receipt. You will need to produce a copy of your dated sales receipt to confirm warranty status.
For product-related questions, please send an email to: support@kodaksmarthome.com.
This User's Guide covers all the information you'll need to get the most from your product.
Prior to using the Home Monitor, we recommend to fully charge the battery of your home monitor. This way, the device will continue to work even if you disconnect it from the power supply to carry it to another location. Please read the Safety Instructions on page 12 carefully before installation.
Check List:

1 x Home Unit(Camera)

1 x Power adapter for Home Unit
HOME UNIT OVERVIEW

- Camera Lens
- IR Lens
- Microphone
-
Pair Button
-
SD Card Cover
- Lens Frame
- LED Power Indicator
- Power ON/OFF Switch
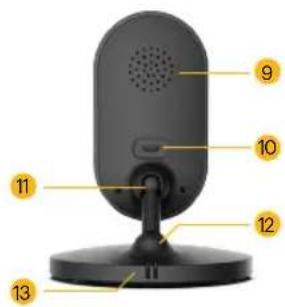
- Speaker
- Charging Socket
-
Ball Joint Arm
-
Thermometer and humidity sensor
- Battery Door
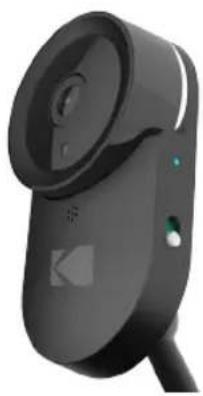
LED Behaviors for Home Unit
natural_image
Black handheld device with circular lens and control buttons (no visible text or symbols)| Camera is OFF, battery is charging: Solid Red | |
| Camera powering up: Solid Blue for first few seconds | |
| Camera locating router: Blue blinking every one second | |
| Camera connected to router: Solid Blue | |
 | Camera in pair mode: Blinking Blue & Red |
 | Firmware upgrading. DO NOT SWITCH OFF THE CAMERA: Blinking Purple, Red & Blue |
| Camera is OFF, battery is fully charged: No Light |
ESSENTIAL GUIDELINES FOR INSTALLING YOUR HOME MONITOR
- The signal strength may also be reduced by other solid structures, like walls or electrical equipment, such as radios, TVs, computers, cordless or mobile phones, fluorescent lights or dimmer switches.
- Use of other 2.4 GHz products, such as wireless networks (Wi-Fi routers), Bluetooth systems, or microwave ovens, may cause interference with this product, so keep the Home Monitor at least 5 feet from these types of products, or turn them off if they appear to be causing interference.
- If the signal is weak, try moving the Home monitor to another position in the room.
TABLE OF CONTENTS
-
Safety Instructions 12
-
Getting Started 14
-
Using the Home Monitor 16
3.1 Setting Up
3.2 Power On or Off the Home Unit
-
Disposal of the Device (Environment) 18
-
Cleaning 19
-
Troubleshooting 20
-
"KODAK Smart Home" In-App Setup 22
-
Monitoring Your Home Via App 34
- Grant Access 38
-
Further Information 42
-
Exclusion
• How to Obtain Warranty Service or Other Information?
• FCC, IC And CE Regulations -
Warning
• EC Declaration of Conformity -
Technical Specifications 56
1. SAFETY INSTRUCTION

WARNING:
Strangulation Hazard: Children have STRANGLED in cords.
Keep this cord out of the reach of children (more than 3ft away). Do not remove this tag. NEVER use extension cords with AC Adapters. Only use the AC Adapters provided.
Home Unit Set Up & Use:
- Determine a location for the Home Unit that will provide the best view of your monitoring area
- Place the Home Unit on a flat surface, such as a dresser, bureau, or shelf or mount the Unit to a wall securely using the keyhole slots in the underside of the stand.
- NEVER place the Home Unit or cords within the cot.
This Home Monitor is compliant with all relevant standards regarding electromagnetic fields and is, when handled as described in the User's Guide, safe to use. Therefore, always read the instructions in this User's Guide carefully before using the device.
- Adult assembly required. Keep small parts away from children when assembling.
- This product is not a toy. Do not allow children to play with it.
- This Home Monitor is not a substitute for responsible adult supervision.
- Keep this User's Guide for future reference.
- Do not place the Home Unit or cords in the cot or within reach of the sound (the Unit and cords should be more than 3 feet away).
- Keep the cords out of reach of children.
- Do not cover the Home Monitor with a towel or blanket.
- Test this monitor and all its functions so that you are familiar with it prior to actual use.
- Do not use the Home Monitor in damp areas or close to water.
- Only use the chargers and power adapters provided. Do not use other chargers or power adapters as this may damage the device and battery pack.
- Only insert a battery pack of the same type.
- Do not touch the plug contacts with sharp or metal objects.
- Connect the power adapters to easily accessible electrical outlets.
CAUTION:
- Risk of explosion if battery is replaced by an incorrect type.
- Dispose of used batteries according to their instructions.
2. GETTING STARTED
Home Unit Power Supply
The Home monitor comes with a built-in Li-ion battery. Charging the rechargeable battery pack fully before use is recommended. This will allow the unit to operate on battery in the event of a power failure.
-
Insert the small end (USB) of the Home Unit's power adapter (Output 5V, 1500mA) into the USB socket in the back of the camera.
-
Insert the other end of the power adapter into a suitable electrical outlet.
-
Slide the ON/OFF switch to the ON position to switch on the Home Unit. The power indicator lights up in blue.
-
Slide the ON/OFF switch to the OFF position to switch off the Home Unit. The power indicator lights up in red, indicating that the battery is being charged.
*IMPORTANT: Only use the supplied power adapter.*
3. USING THE HOME MONITOR
Please read these instructions carefully, and be aware that Home Monitor is only intended as an aid. It is not a substitute for responsible adult supervision.
3.1 Setting Up 3.2 Power On or Off the Home Unit
- Make sure that the Home Unit is switched on.
- Place the Home Unit in a convenient location (e.g. on a table, mount on wall...etc) and point the camera lens towards the area you want to monitor.
NOTE:
- Do not place the Home Unit within reach of a child or baby! If there is interference with the picture or sound, try moving the units to different locations, and ensure that they are not close to any other electrical equipment.
- If you hear a high pitched noise. This is not a fault. The unit is designed to be operated at some distance apart. So move the units further apart.
-
It is recommended to use a Class 10 SD Card. (Insert the SD card with the labels facing towards you)
-
To turn on the Home Unit, slide the ON/OFF switch to the ON position to switch on the Home Unit. The power indicator lights up in blue.
- To turn off the Home Unit, slide the ON/OFF switch to the OFF position to switch off the Home Unit. The power indicator goes off if the battery is not being charged, or lights up in red if it is charging.
4. PROPER DISPOSAL OF THE DEVICE

natural_image
Symbol of a trash bin with crossed lines indicating no waste or restriction (no text or labels)When the product comes to the end of its lifecycle, you should not dispose of it with normal household waste. Take the product to a collection point for the recycling of its electrical and electronic components.
This is indicated by the symbol on the product, User's Guide and/or packaging.
Some of the product materials may be reused if you take them to a recycling point. By reusing some parts or raw materials from used products, you make a significant contribution to environmental conservancy.
Please contact your local authorities if you required any further information on the collection points in your area.
Please dispose of the battery pack in an environmentally-friendly manner in accordance with your local regulations.
5. CLEANING YOUR DEVICE
Wipe your Home Monitor with a slightly moistened or anti-static cloth. Refrain from using cleaning agents or abrasive solvents.
Cleaning and Maintenance
- Never clean any part of the product with thinners or other solvents and chemicals – this may result in permanent damage to the product which is out of the scope of coverage of the Warranty.
- Make sure that your Home Monitor stays away from hot, humid areas or conditions, strong sunlight and avoid moisture.
- We have made every effort to ensure that your Home Monitor is highly reliable. Yet, if anything goes wrong, please do not try to repair it yourself – instead, contact our Customer Service for help.
Note:
Always turn off and disconnect the power adapter prior to cleaning your Home Monitor.
6. TROUBLESHOOTING
Power Indicator on the Home Unit does not turn on
- Check whether the Home Unit is powered on.
- Check whether the battery is charged.
- Recharge the Home Unit by connecting it to the power supply.
Temperature and humidity reading on Home Unit
- The temperature and humidity display does not reflect a correct reading.
- Upon power on, the temperature and humidity will indicate an accurate reading after 5 minutes, as the home unit requires to adjust to surrounding ambiance temperature and humidity.
7. "KODAK SMART HOME" IN-APP SETUP
You can connect the Home Unit with your mobile device. Read on for a step-by-step guide.
Step 1: Download the "KODAK Smart Home" App
To download the "KODAK Smart Home" app:
- On your mobile device, visit the App Store (iOS) or Google Play (Android)
• Search for "KODAK Smart Home" - Download and install the "KODAK Smart Home" app on your mobile device


scan to install
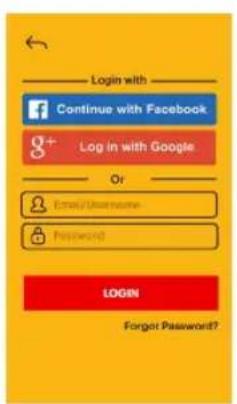
Step 2: Create or Login to Your Account
If this is your first KODAK Smart Home product, you will be asked to create an account. To set up an account:
- On your mobile device, open the "KODAK Smart Home" app
- Tap SIGN UP
- Follow the in-app instructions to create a new account


If you already have another KODAK Smart Home product installed, simply select LOGIN:
Step 3: Add the Home Monitor to Your App
Having your Wi-Fi network name and password handy, you will now pair your Home Monitor near your wireless router with the "KODAK Smart Home" app:
- Select Add new device...
- Select Home Series > KODAK CHERISH F680
- The app will then walk you through the setup process

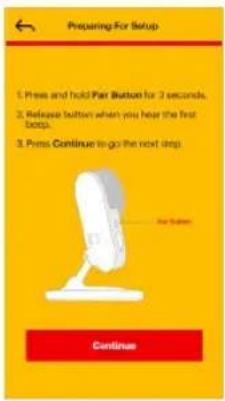
Step 4: Get Your Home Unit (Camera) into the Setup Mode
In the middle of the setup process, you will be required to get your KODAK CHERISH F680 Wi-Fi Home Monitor into the setup mode. To do this:
- Press and hold the Pair button for 3 seconds until you hear a beep sound
- You will then hear "Start Pairing Mode," indicating that the Home Unit has entered the setup mode. You may now release the Pair button and tap Continue on your mobile device
Step 4.1: Connect to the Camera's Wi-Fi from Your Phone(For IOS Only)
For IOS devices, you will have to connect to the camera's Wi-Fi through your Wi-Fi settings of your phone. To do this:
- Tap the Go To Settings button to access to the Wi-Fi settings on your phone
- In the Wi-Fi settings of your phone, connect to KodakCam-FXXXXXXXXX and return to the app.


Step 5: Wait While Pairing is in Progress
Your Home Monitor should now start pairing with your mobile device automatically:
- You will hear "Setup Completed" when the Home Monitor is successfully paired
- You may choose one of the recommended names or rename your Home Monitor by selecting Custom.


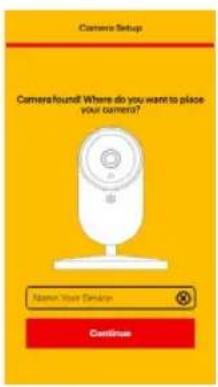


Step 6: Test Your Home Monitor
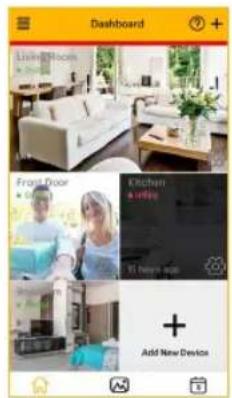
The Home Monitor is now added to the Dashboard of the "KODAK Smart Home" app:
- You may now run a test by clicking on the snapshot view from your desired camera in order to access the live view.
- You should be able to see video from your Home Monitor in the "KODAK Smart Home" app
8. MONITORING YOUR HOME VIA THE APP
- After you have created an account and installed a baby unit, simply click on the "KODAK Smart Home" app icon to monitor your home by visiting the dashboard.


- You can pinch outwards to zoom in on the video image, or pinch inwards to zoom out.
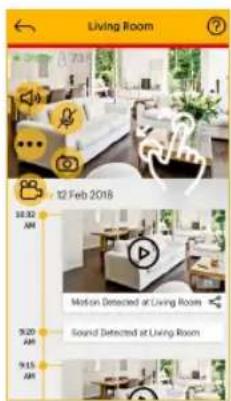

KODAK Smart Home Icons
You may also perform one or more of the following actions by clicking on the MENU icon:


Menu
Click to open/close menu

Mute
Press this button to toggle between mute/unmute

Talk
Press this button to talk to your baby

Record a Video
Press this button to record a video

Take a Photo
Press this button to take a photo

Melody
Press this to play music to your baby

Zoom in/out
Press this to zoom in/out
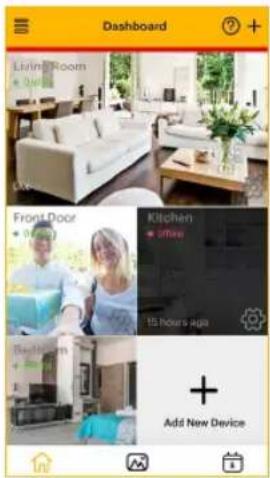

Dashboard
Tap here to return to the "Home" screen

Video Gallery
Tap here to view your recorded footage

Events
Tap here to check history of your actions

Add New Device
Tap to add new device

Side Menu
Press this open/close the side menu

Camera Settings
Tap to open and edit the settings of a device

Hints
Tap to open hints on the operations of the app
9. GRANT ACCESS
9.1 Add Friend
You may grant access to your family and friends using feature called "Grant Access" which is located on the side menu of the Dashboard.

- Click on "≡" which was located on the Dashboard

- Select "Grant Access" under Device

- Click on "+" which is located on the top right

- Simply follow the directions on the app and click "Save" to add friend
9.2 Edit Friend
You can edit friends and make changes the settings anytime you want.

- Click on the email of the person that you'd like to make changes on

- Click "Save" to save changes

- Click on " ” to remove friend

- Click "Remove" to confirm
10. FURTHER INFORMATION
If your product is not operating properly:
www.kodaksmarthome.com
- Consult this User's Guide or the Quick Start Guide.
- Check out our website:
• To get in touch with our Customer Service, simply email us at support@kodaksmarthome.com - To order a replacement battery pack, please get in touch with our Customer Service.
To order a replacement battery pack, contact Customer Service. Consumer Products and Accessories Limited Warranty ("Warranty")
What does this warranty cover?
- Subject to the exclusions contained below, eBuyNow warrants that this product or certified accessory sold for use with this product is manufactured to be free from defects in materials and workmanship under normal consumer usage for the period outlined below. This Warranty is your exclusive warranty and is non-transferable.
Who is covered?
- This Warranty extends only to the first consumer purchaser, and is non-transferable.
What will eBuyNow do?
- eBuyNow or its authorised distributor at its option and within a commercially reasonable time, will at no charge repair or replace any Products or Accessories that do not conform to this Warranty. We may use functionally equivalent reconditioned/refurbished/pre-owned or new Products, Accessories or parts.
What other limitations are there?
- ANY IMPLIED WARRANTIES, INCLUDING WITHOUT LIMITATION THE IMPLIED WARRANTIES OF MERCHANTABILITY AND FITNESS FOR A PARTICULAR PURPOSE, SHALL BE LIMITED TO THE DURATION OF THIS LIMITED WARRANTY, OTHERWISE THE REPAIR OR REPLACEMENT PROVIDED UNDER THIS EXPRESS LIMITED WARRANTY IS THE EXCLUSIVE REMEDY OF THE CONSUMER, AND IS PROVIDED IN LIEU OF ALL OTHER WARRANTIES, EXPRESS OR IMPLIED. IN NO EVENT SHALL EBUYNOW OR ITS AUTHORISED DISTRIBUTOR BE LIABLE, WHETHER IN CONTRACT OR TORT (INCLUDING NEGLIGENCE) FOR DAMAGES IN EXCESS OF THE PURCHASE PRICE OF THE PRODUCT OR ACCESSORY, OR FOR ANY INDIRECT, INCIDENTAL, SPECIAL OR CONSEQUENTIAL DAMAGES OF ANY KIND, OR LOSS OF REVENUE OR PROFITS, LOSS OF BUSINESS, LOSS OF INFORMATION OR OTHER FINANCIAL LOSS ARISING OUT OF OR IN CONNECTION WITH THE ABILITY OR INABILITY TO USE THE PRODUCTS OR ACCESSORIES TO THE FULL EXTENT THESE DAMAGES MAY BE DISCLAIMED BY LAW.
- Some jurisdictions do not allow the limitation or exclusion of incidental or consequential damages, or limitation on the length of an implied warranty, so the above limitations or exclusions may not apply to you. This Warranty gives you specific legal rights, and you may also have other rights that vary from one jurisdiction to another.
| Products Covered Length of Coverage | |
| Consumer Products Two | (2) years from the date of the Products' original purchase by the first consumer purchaser of the product. |
| Consumer Accessories | One (1) year from the date of the Accessories' original purchase by the first consumer purchaser of the product. |
| Consumer Products and Accessories that are Repaired and Replace | The balance of the original warranty or for Ninety (90) days from the date returned to the consumer, whichever is longer. |
EXCLUSION
- Normal Wear and Tear. Regular maintenance, repair and replacement of parts and components due to normal wear and tear are not covered.
- Batteries. Only batteries whose fully charged capacity falls below 80% of their rated capacity and batteries that leak are within the coverage of this Warranty.
- Abuse & Misuse. Defects or damage due to:
(a) improper operation, storage, misuse or abuse, accident or neglect, such as physical damage (such as cracks and scratches) to the surface of the product resulting from misuse;
(b) contact with liquid, water, rain, extreme humidity or heavy perspiration, sand, dirt or the like, extreme heat, or food;
(c) use of the Products or Accessories for commercial purposes or subjecting the Product or any Accessory to abnormal usage or conditions; or
(d) other acts which are not the fault of eBuyNow or its authorised distributor, are not covered.
- Use of Non-eBuyNow branded Products and Accessories. Defects or damage due to the use of non-eBuyNow branded or certified Products or Accessories or other peripheral equipment are not covered.
- Unauthorised Service or Modification. Defects or damage due to service, testing, adjustment, installation, maintenance, alteration, or modification in any way by someone other than eBuyNow, or its authorised service centers, are not covered.
- Altered Products. Products or Accessories with (a) serial numbers or date tags that have been removed, altered or obliterated; (b) broken seals or that show evidence of tampering; (c) mismatched board serial numbers; or (d) nonconforming or eBuyNow branded housings, or parts, are not covered.
- Communication Services. Defects, damages, or the failure of Products or Accessories resulting from any communication service or signal you may subscribe to or use with the Products or Accessories are not covered.
HOW TO OBTAIN WARRANTY SERVICE OR OTHER INFORMATION?
To obtain service or information, please email to support@kodaksmarthome.com.
You will receive instructions on how to ship the Products or Accessories at your expense and risk, to an eBuyNow Authorised Repair Center.
To obtain service, you must include:
(a) the Product or Accessory;
(b) the original proof of purchase (receipt) which includes the date, place and seller of the Product;
(c) if a warranty card was included in your box, a completed warranty card showing the serial number of the Product;
(d) a written description of the problem; and, most importantly;
(e) your address and telephone number.
These Terms and Conditions constitute the complete warranty agreement between you and eBuyNow regarding the Products or Accessories purchased by you, and supersede any prior agreement or representations, including representations made in any literature publications or promotional materials issued by eBuyNow or representations made by any agent employee or staff of eBuyNow, that may have been made in connection with the said purchase.
FCC, IC AND CE REGULATIONS
FCC Part I5
NOTE: This equipment has been tested and found to comply with the limits for a Class B digital device, pursuant to Part 15 of the Federal Communications Commission (FCC) rules. These limits are designed to provide reasonable protection against harmful interference in a residential installation. This equipment generates, uses and can radiate radio frequency energy and, if not installed and used in accordance with the instructions, may cause harmful interference to radio communications. However, there is no guarantee that interference will not occur in a particular installation. If this equipment does cause harmful interference to radio or television reception, which can be determined by turning the equipment off and on, the user is encouraged to try to correct the interference by one or more of the following measures:
- Reorient or relocate the receiving antenna.
- Increase the distance between the equipment and receiver.
- Connect the equipment into an outlet on a circuit different from that to which the receiver is connected.
- Consult the dealer or an experienced radio/TV technician for help.
Changes or modifications to this equipment not expressly approved by the party responsible for compliance could void the user's authority to operate the equipment.
- This device complies with Part 15 of the FCC rules. Operation is subject to the following two conditions:
(1) this device may not cause harmful interference, and
(2) this device must accept any interference received, including interference that may cause undesired operation. Privacy of communication may not be ensured when using this device.
To ensure safety of users, the FCC has established criteria for the amount of radio frequency energy that can be safely absorbed by a user or bystander according to the intended usage of the product. This product has been tested and found to comply with the FCC criteria.
This Class B digital apparatus complies with Canadian ICES-003. CAN ICES-3(B)/NMB-3(B)
WARNING
Changes or modifications, to this equipment not expressively approved by the party responsible for compliance could void the user's authority to operate the equipment.
The socket-outlet shall be installed near the equipment and shall be easily accessible.
Industry Canada
This device complies with Industry Canada license-exempt RSS standard(s): Operation is subject to the following Two conditions:
(1) this device may not cause interference, and
(2) this device must accept any interference, including interference that may cause undesired operation of the device.
The term "IC:" before the certification/registration number only signifies that the Industry Canada technical specifications were met. This product meets the applicable Industry Canada technical specifications.
FCC RF Radiation Exposure Statement Caution:
This Transmitter must be installed to provide a separation distance of at least 20cm from all persons.
EC DECLARATION OF CONFORMITY
We the manufacturer/ Importer: PerimeterSafe/eBuyNow declare under our sole responsibility that the following product
Type of equipment: Smart Home Security Monitor
Model Name: F680
Brand: KODAK
complies with the essential protection requirements of RED Directive 2014/53/EU on the approximation of the laws of the Member States relating to Radio Spectrum Matters, the Council Directive 2004/108/EC on the approximation of the laws of the Member States relating to electromagnetic compatibility (EMC) and the European Community Directive 2006/95/EC relating to Electrical Safety. Directive 2011/65/EC on the restriction of use of hazardous substances (RoHS) and 2009/125/EC relating to eco-design requirement for Energy-Related Products (ErP).
Assessment of compliance of the product with the requirements relating to the essential requirements:
Radio Spectrum: EN300328 V2.1.1
EMC: EN301489-17 V3.2.0
EN301489-1 V2.2.2
Electrical Safety: EN60950-2006+A11+A1+A12+A2
RF Safety: EN62311:2008
ErP: EN50564:2011
The product is labelled with the European Approval Marking CE as shown. Any unauthorised modification of the product voids this Declaration.
CE
11. TECHNICAL SPECIFICATIONS
| Home Unit | |
| Camera Sensor color CMOS 2Mpixel1080p sensor | |
| Lens Viewing Angle | M12 lens FOV 110 degrees |
| Power Adapter Input: 100-240V AC,Output: 5.0V DC, 1500mA | |
| WARNINGUse only with supplied power supply.Battery: 3.7V, 2100mAhLithium-Ion Polymer,rechargeable battery pack | |
| Frequency Band 2400-2483.5 MHz | |
| Operating Temperature 0°C - 40°C | |
| Maximum RF Power 20dBm (for CE) | |
KODAKSMARTHOME.COM
Manufactured, distributed or sold by eBuyNow eCommerce Ltd. All other trademarks are the property of their respective owners. © 2018 eBuyNow eCommerce Ltd. All rights reserved.

- User Manual
- WELCOME ASSEMBLY
- Check List:
- HOME UNIT OVERVIEW
- LED Behaviors for Home Unit
- ESSENTIAL GUIDELINES FOR INSTALLING YOUR HOME MONITOR
- TABLE OF CONTENTS
- SAFETY INSTRUCTION
- WARNING:
- Home Unit Set Up & Use:
- CAUTION:
- GETTING STARTED
- Home Unit Power Supply
- USING THE HOME MONITOR
- Setting Up 3.2 Power On or Off the Home Unit
- NOTE:
- PROPER DISPOSAL OF THE DEVICE
- CLEANING YOUR DEVICE
- Cleaning and Maintenance
- TROUBLESHOOTING
- Power Indicator on the Home Unit does not turn on
- Temperature and humidity reading on Home Unit
- "KODAK SMART HOME" IN-APP SETUP
- Step 1: Download the "KODAK Smart Home" App
- Step 2: Create or Login to Your Account
- Step 3: Add the Home Monitor to Your App
- Step 4: Get Your Home Unit (Camera) into the Setup Mode
- Step 4.1: Connect to the Camera's Wi-Fi from Your Phone(For IOS Only)
- Step 5: Wait While Pairing is in Progress
- Step 6: Test Your Home Monitor
- MONITORING YOUR HOME VIA THE APP
- KODAK Smart Home Icons
- Menu
- Mute
- Talk
- Record a Video
- Take a Photo
- Melody
- Zoom in/out
- Dashboard
- Video Gallery
- Events
- Add New Device
- Side Menu
- Camera Settings
- Hints
- GRANT ACCESS
- Add Friend
- Edit Friend
- FURTHER INFORMATION
- www.kodaksmarthome.com
- What does this warranty cover?
- Who is covered?
- What will eBuyNow do?
- What other limitations are there?
- EXCLUSION
- HOW TO OBTAIN WARRANTY SERVICE OR OTHER INFORMATION?
- FCC, IC AND CE REGULATIONS
- FCC Part I5
- WARNING
- Industry Canada
- FCC RF Radiation Exposure Statement Caution:
- EC DECLARATION OF CONFORMITY
- TECHNICAL SPECIFICATIONS
- KODAKSMARTHOME.COM
Brand : KODAK
Model : Cherish F680
Category : Security Camera