FMV156DS - Microwaves FRIGIDAIRE - Free user manual and instructions
Find the device manual for free FMV156DS FRIGIDAIRE in PDF.


| Product Type | Over-the-Range Microwave Oven |
| Brand | Frigidaire |
| Model | FMV156DS |
| Exterior Dimensions (W x H x D) | 29 15/16" x 16 1/4" x 15 9/16" |
| Cavity Dimensions (W x H x D) | 17 1/2" x 9 7/8" x 14 15/16" |
| Capacity | 1.5 cu. ft. |
| Net Weight | 55 lb |
| Power Supply | 120 V, 60 Hz, AC only, 15 A |
| Output Power (IEC) | 950 W |
| Frequency | 2450 MHz |
| Control Type | Electronic touch control with digital display |
| Cooking Features | Popcorn, Reheat, Cook, Auto Defrost, Manual Defrost, Time Cook, 10 Power Levels, Multiple Sequence Cooking |
| Convenience Features | Plus 1 Min, Timer, Child Lock, Audible Signal Elimination, Demonstration Mode, Clock |
| Ventilation | Fan with automatic operation; Grease filters (cleanable); Charcoal filter for recirculation |
| Lighting | 2 incandescent bulbs, 20 W each |
| Turntable | Removable, rotates clockwise and counterclockwise |
| Door | Side-opening with see-through window and safety interlock system |
| Safety Features | Door safety latches, child lock, automatic shutoff, grounding plug |
| Cleaning | Easy-clean interior; Removable turntable and support; Grease filters washable; Charcoal filter replaceable |
| Warranty | 1 year limited |
| Included Accessories | Turntable, turntable support, grease filters, charcoal filter, installation instructions, wall template, top cabinet template |
Frequently Asked Questions - FMV156DS FRIGIDAIRE
User questions about FMV156DS FRIGIDAIRE
0 question about this device. Answer the ones you know or ask your own.
Ask a new question about this device
Download the instructions for your Microwaves in PDF format for free! Find your manual FMV156DS - FRIGIDAIRE and take your electronic device back in hand. On this page are published all the documents necessary for the use of your device. FMV156DS by FRIGIDAIRE.
USER MANUAL FMV156DS FRIGIDAIRE
Important Safety Instructions .... 2-6

Part Names ...... 7

Before Operating 8

Manual Operation 8

natural_image
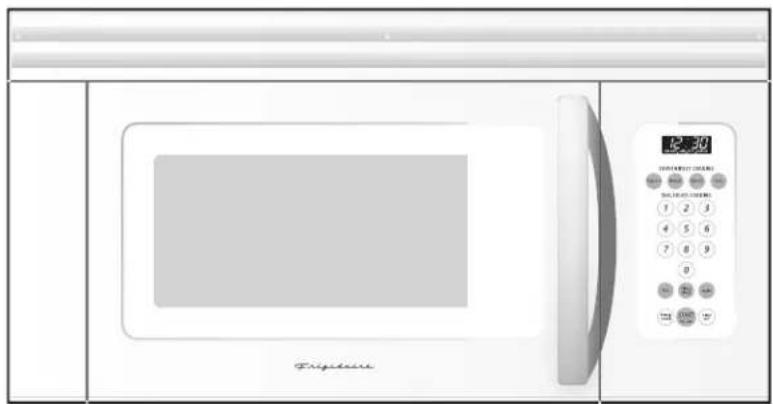
Front view of a white microwave oven with control panel and digital display (no visible text or symbols)Operating Instructions 9-12

Cleaning and Care 13-14

Specifications 15

Service Call Check 15

Warranty 16

Visit the Frigidaire Web Site at:
http://www.frigidaire.com
Welcome & Congratulations
Questions?
1-800-944-9044
(United States)
1-800-668-4606
(Canada)
Please attach sales receipt here for future reference.
Congratulations on your purchase of a new microwave oven! At Electrolux Home Products, we are very proud of our product and are completely committed to providing you with the best service possible. Your satisfaction is our number one priority.
We know you'll enjoy your new microwave oven and Thank You for choosing our product. We hope you consider us for future purchases.
PLEASE CAREFULLY READ AND SAVE THESE INSTRUCTIONS
This Use & Care Manual provides specific operating instructions for your model. Use your microwave oven only as instructed in this manual. These instructions are not meant to cover every possible condition and situation that may occur. Common sense and caution must be practiced when installing, operating and maintaining any appliance.
Please record your model and serial numbers below for future reference.
Model Number: ____
Serial Number: ____
Purchase Date: ____
NEED HELP?
Visit the Frigidaire Web Site at: http://www.frigidaire.com
Before you call for service, there are a few things you can do to help us serve you better.
Read this manual.
It contains instructions to help you use and maintain your microwave oven properly.
If you received a damaged Microwave Oven... immediately contact the dealer (or builder) that sold you the Microwave Oven.
Save time and money.
Check the section titled "Service Call Check". This section helps you solve common problems that might occur. If you do need service, you can relax knowing help is only a phone call away. A list of toll-free customer service numbers is included in the back of this manual. Or call Frigidaire Customer Services at 1-800-944-9044, 24 hours a day, 7 days a week.

IMPORTANT SAFETY INSTRUCTIONS

PRECAUTIONS TO AVOID POSSIBLE EXPOSURE TO EXCESSIVE MICROWAVE ENERGY
For your safety the information in this manual must be followed to minimize the risk of fire or explosion or to prevent property damage, personal injury or loss of life.
- Do Not Attempt to operate this microwave oven with the door open since open-door operation can result in harmful exposure to microwave energy. It is important not to defeat or tamper with the safety interlocks.
- Do Not Place any object between the microwave oven front face and the door or allow soil or cleaner residue to accumulate on sealing surfaces.
-
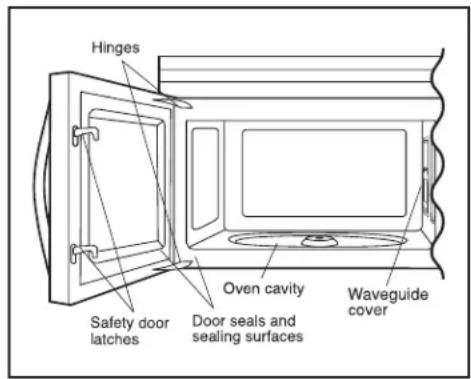
Do Not Operate the microwave oven if it is damaged. It is particularly important that the microwave oven door close properly and that there is no damage to the:
-
door (bent)
- hinges and latches (broken or loosened)
- door seals and sealing surfaces.
- The Microwave Oven Should Not be adjusted or repaired by anyone except properly qualified service personnel.
WARNING
will help alert you to situations that may cause serious bodily harm, death or property damage.
CAUTION
will help alert you to situations that may cause bodily injury or property damage.
READ ALL INFORMATION BEFORE USING
WARNING
To reduce the risk of fire, burns, electric shock, injury to persons, or exposure to excessive microwave energy when using your appliance, follow basic precautions, including the following sections.
- Read all instructions before using the appliance.
- Read and follow the specific "PRECAUTIONS TO AVOID POSSIBLE EXPOSURE TO EXCESSIVE MICROWAVE ENERGY" on page 2.
- This appliance must be grounded. Connect only to properly grounded outlet. See “ELECTRICAL GROUNDING INSTRUCTIONS” on page 4.
- Install or locate this appliance only in accordance with the provided installation instructions.
- Some products such as whole eggs and sealed containers—for example, closed glass jars—are able to explode and should not be heated in this microwave oven.
- Use this appliance only for its intended use as described in this manual. Do not use corrosive chemicals or vapors in this appliance. This type of microwave oven is specifically designed to heat, cook or dry food. It is not designed for industrial or laboratory use.
- As with any appliance, close supervision is necessary when used by children.
- Do not operate this appliance if it has a damaged cord or plug, if it is not working properly or if it has been damaged or dropped.
- This appliance should be serviced only by qualified service personnel. Contact nearest Electrolux Authorized Servicer for examination, repair or adjustment.
- Do not cover or block any openings on the appliance.
- Do not store or use this appliance outdoors. Do not use this product near water—for example, near a kitchen sink, in a wet basement or near a swimming pool, or similar locations.
- Do not immerse cord or plug in water.
- Keep cord away from heated surfaces.
- Do not let cord hang over edge of table or counter.
• See door surface cleaning instructions on page 13.
- To reduce the risk of fire in the microwave oven cavity:
- Do not overcook food. Carefully attend appliance when paper, plastic or other combustible materials are placed inside the microwave oven to facilitate cooking.
- Remove wire twist-ties from paper or plastic bags before placing bag in microwave oven.
- If materials inside the microwave oven should ignite, keep microwave oven door closed, turn microwave oven off and disconnect the power cord or shut off power at the fuse or circuit breaker panel.
- Do not use the cavity for storage purposes. Do not leave paper products, cooking utensils or food in the cavity when not in use.
- Liquids, such as water, coffee or tea are able to be overheated beyond the boiling point without appearing to be boiling. Visible bubbling or boiling when the container is removed from the microwave oven is not always present. THIS COULD RESULT IN VERY HOT LIQUIDS SUDDENLY BOILING OVER WHEN A SPOON OR OTHER UTENSIL IS INSERTED INTO THE LIQUID.
To reduce the risk of injury to persons:
- Do not overheat the liquid.
- Stir the liquid both before and halfway through heating it.
- Do not use straight-sided containers with narrow necks. Use a wide-mouthed container.
- After heating, allow the container to stand in the microwave oven at least for 20 seconds before removing the container.
-
Use extreme care when inserting a spoon or other utensil into the container.
-
Clean ventilation openings and grease filters frequently. Grease should not be allowed to accumulate on ventilation openings, louver or grease filters.
- Use care when cleaning the louver and the grease filters. Corrosive cleaning agents, such as lye-based oven cleaners, may damage the louver and the grease filters.
- When flaming food under the hood, turn the fan on.
- This appliance is suitable for use above both gas and electric cooking equipment 36" wide or less.
SAVE THESE INSTRUCTIONS
UNPACKING AND EXAMINING YOUR MICROWAVE OVEN
Open the bottom of the carton, bend the carton flaps back and tilt the microwave oven over to rest on plastic foam pad. Lift carton off microwave oven and remove all packing materials, Wall Template and Top Cabinet Template, Installation Instruction, Turntable and Turntable Support. SAVE THE CARTON AS IT MAY MAKE INSTALLATION EASIER.
- Remove the feature sticker from the outside of the door, if there is one.
- DO NOT REMOVE THE WAVEGUIDE COVER, which is located on the right side wall of the microwave oven cavity. Check to see that there are Installation Instruction, Wall Template and Top Cabinet Template. Read enclosures and SAVE the Use and Care Manual.
Check the microwave oven for any damage, such as misaligned or bent door, damaged door seals and sealing surfaces, broken or loose door hinges and latches and dents inside the cavity or on the door. If there is any damage, do not operate the microwave oven and contact your dealer or ELECTROLUX SERVICER. See Installation Instructions for more details.
GROUNDING INSTRUCTIONS
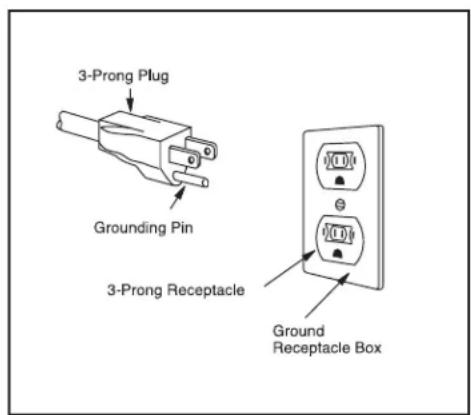
This appliance must be grounded. This microwave oven is equipped with a cord having a grounding wire with a grounding plug. It must be plugged into a wall receptacle that is properly installed and grounded in accordance with the National Electrical Code and local codes and ordinances. In the event of an electrical short circuit, grounding reduces risk of electric shock by providing an escape wire for the electric current.
WARNING Improper use of the grounding plug can result in a risk of electric shock.
Electrical Requirements
Check Installation Instructions for proper location for the power supply.
The electrical requirements are a 120 volt 60 Hz, AC only, 15 amp. or more protected electrical supply. It is recommended that a separate circuit serving only the microwave oven be provided.
The microwave oven is equipped with a 3-prong grounding plug. It must be plugged into a wall receptacle that is properly installed and grounded. DO NOT UNDER ANY CIRCUM-STANCES CUT OR REMOVE THE GROUNDING PIN FROM THE PLUG.
NOTES:
- If you have any questions about the grounding or electrical instructions, consult a qualified electrician or service person.
- Neither Electrolux nor the dealer can accept any liability for damage to the microwave oven or personal injury resulting from failure to observe the correct electrical connection procedures.
Radio or TV Interference
Should there be any interference caused by the microwave oven to your radio or TV, check that the microwave oven is on a different electrical circuit, relocate the radio or TV as far away from the microwave oven as feasible or check position and signal of receiving antenna.
IMPORTANT SAFETY INSTRUCTIONS

This Use and Care Manual is valuable: read it carefully and always save it for reference.
A good microwave cookbook is a valuable asset. Check it for microwave cooking principles, techniques, hints and recipes.
NEVER use the microwave oven without the turntable and support nor turn the turntable over so that a large dish could be placed in the microwave oven. The turntable will turn both clockwise and counterclockwise.
ALWAYShave food in the microwave oven when it is on to absorb the microwave energy.
When using the microwave oven at power levels below 100%, you may hear the magnetron cycling on and off. It is normal for the exterior of the microwave oven to be warm to the touch when cooking or reheating.
Condensation is a normal part of microwave cooking. Room humidity and the moisture in food will influence the amount of moisture that condenses in the microwave oven. Generally, covered foods will not cause as much condensation as uncovered ones. Ventilation openings must not be blocked.
The microwave oven is for food preparation only. It should not be used to dry clothes or newspapers.
Your microwave oven is rated 950 watts by using the IEC Test Procedure. In using recipes or package directions, check food a minute or two before the minimum time and add time accordingly.
ABOUT MICROWAVE COOKING
- Arrange food carefully. Place thickest areas towards outside of dish.
- Watch cooking time. Cook for the shortest amount of time indicated and add more as needed. Food severely overcooked can smoke or ignite.
- Cover foods while cooking. Check recipe or cookbook for suggestions: paper towels, wax paper, microwave plastic wrap or a lid. Covers prevent spattering and help foods to cook evenly.
- Shield with small flat pieces of aluminum foil any thin areas of meat or poultry to prevent overcooking before dense, thick areas are cooked thoroughly.
- Stir foods from outside to center of dish once or twice during cooking, if possible.
- Turn foods over once during microwaving to speed cooking of such foods as chicken and hamburgers. Large items like roasts must be turned over at least once.
- Rearrange foods such as meatballs halfway through cooking both from top to bottom and from the center of the dish to the outside.
- Add standing time. Remove food from microwave oven and stir, if possible. Cover for standing time which allows the food to finish cooking without overcooking.
- Check for doneness. Look for signs indicating that cooking temperatures have been reached.
Doneness signs include:
- Food steams throughout, not just at edge.
- Center bottom of dish is very hot to the touch.
- Poultry thigh joints move easily.
- Meat and poultry show no pinkness.
- Fish is opaque and flakes easily with a fork.
ABOUT FOODS
- Do not pop popcorn in your microwave oven unless in a special microwave popcorn accessory or unless you use popcorn labeled for use in microwave ovens.
- Some products such as whole eggs and sealed containers—for example, closed jars—will explode and should not be heated in this microwave oven. Such use of the microwave oven could result in injury.
- Do not boil eggs in a microwave oven. Pressure will build up inside egg yolk and will cause it to burst, possibly resulting in injury.
- Operating the microwave with no food inside for more than a minute or two may cause damage to the microwave oven and could start a fire. It increases the heat around the magnetron and can shorten the life of the microwave oven.
- Foods with unbroken outer "skin" such as potatoes, hot dogs, sausages, tomatoes, apples, chicken livers and other giblets, and egg yolks should be pierced to allow steam to escape during cooking.
- Avoid heating baby food in glass jars, even with the lid off. Make sure all infant food is thoroughly cooked. Stir food to distribute the heat evenly. Be careful to prevent scalding when warming formula or breast milk. The container may feel cooler than the milk really is. Always test the milk before feeding the baby.
- Spontaneous boiling—Under certain special circumstances, liquids may start to boil during or shortly after removal from the microwave oven. To prevent burns from splashing liquid, we recommend the following: before removing the container from the microwave oven, allow the container to stand in the microwave oven for 30 to 40 seconds after the microwave oven has shut off. Do not boil liquids in narrow necked containers such as soft drink bottles, wine flasks and especially narrow necked coffee cups. Even if the container is opened, excessive steam can build up and cause it to burst or overflow.
- Do not defrost frozen beverages in narrow-necked bottles (especially carbonated beverages). Even if the container is opened, pressure can build up. This can cause the container to burst, possibly resulting in injury.
- Hot foods and steam can cause burns. Be careful when opening any containers of hot food, including popcorn bags, cooking pouches and boxes. To prevent possible injury, direct steam away from hands and face.
- Do not overcook potatoes. They could dehydrate and catch fire, causing damage to your microwave oven.
- Cook meat and poultry thoroughly—meat to at least an INTERNAL temperature of 160^ and poultry to at least an INTERNAL temperature of 180^ . Cooking to these temperatures usually protects against foodborne illness.
ABOUT UTENSILS AND COVERINGS
It is not necessary to buy all new cookware. Many pieces already in your kitchen can be used successfully in your new microwave oven. Make sure the utensil does not touch the interior walls during cooking.
Use these utensils for safe microwave cooking and reheating:
- glass ceramic (Pyroceram®), such as Corningware®.
- heat-resistant glass (Pyrex®)
- microwave-safe plastics
- paper plates
- microwave-safe pottery, stoneware and porcelain
- browning dish (Do not exceed recommended preheating time. Follow manufacturer's directions.)
These items can be used for short time reheating of foods that have little fat or sugar in them:
- wood, straw, wicker
DO NOT USE
• metal pans and bakeware
• dishes with metallic trim
• non-heat-resistant glass
• non-microwave-safe plastics (margarine tubs)
• recycled paper products
- brown paper bags
- food storage bags
- metal twist-ties
Should you wish to check if a dish is safe for microwaving, place the empty dish in the microwave oven and microwave on HIGH for 30 seconds. A dish which becomes very hot should not be used.
The following coverings are ideal:
- Paper towels are good for covering foods for reheating and absorbing fat while cooking bacon.
- Wax paper can be used for cooking and reheating.
- Plastic wrap that is specially marked for microwave use can be used for cooking and reheating. DO NOT allow plastic wrap to touch food. Vent so steam can escape.
- Lids that are microwave-safe are a good choice because heat is kept near the food to hasten cooking.
- Microwave oven cooking bags are good for large meats or foods that need tenderizing. DO NOT use metal twist ties. Remember to slit bag so steam can escape.
How to use aluminum foil in your microwave oven:
- Small flat pieces of aluminum foil placed smoothly on the food can be used to shield areas that are either defrosting or cooking too quickly.
- Foil should not come closer than one inch to any surface of the microwave oven.
Should you have questions about utensils or coverings, check a good microwave cookbook or follow recipe suggestions.
ACCESSORIES There are many microwave accessories available for purchase. Evaluate carefully before you purchase so that they meet your needs. A microwave-safe thermometer will assist you in determining correct doneness and assure you that foods have been cooked to safe temperatures. Electrolux is not responsible for any damage to the microwave oven when accessories are used.
ABOUT CHILDREN AND THE MICROWAVE
Children below the age of 7 should use the microwave oven with a supervising person very near to them. Between the ages of 7 and 12, the supervising person should be in the same room.
As with any appliance, close supervision by an adult is necessary when used by children.
At no time should anyone be allowed to lean or swing on the microwave oven door.
Children should be taught all safety precautions: use potholders, remove coverings carefully, pay special attention to packages that crisp food because they may be extra hot.
Don't assume that because a child has mastered one cooking skill he/she can cook everything.
Children need to learn that the microwave oven is not a toy. See page 12 for Child Lock feature.
ABOUT SAFETY
- Check foods to see that they are cooked to the United States Department of Agriculture's recommended temperatures.
160°F - For fresh pork, ground meat, boneless white poultry, fish, seafood, egg dishes and frozen prepared food.
165°F - For leftover, ready-to-reheat refrigerated, and deli and carry-out "fresh" food.
170°F - White meat of poultry.
175°F - Dark meat of poultry.
To test for doneness, insert a meat thermometer in a thick or dense area away from fat or bone. NEVER leave the thermometer in the food during cooking, unless it is approved for microwave oven use.
- ALWAYS use potholders to prevent burns when handling utensils that are in contact with hot food. Enough heat from the food can transfer through utensils to cause skin burns.
- Avoid steam burns by directing steam away from the face and hands. Slowly lift the farthest edge of a dish's covering and carefully open popcorn and oven cooking bags away from the face.
- Stay near the microwave oven while it's in use and check cooking progress frequently so that there is no chance of overcooking food.
- NEVER use the cavity for storing cookbooks or other items.
- Select, store and handle food carefully to preserve its high quality and minimize the spread of foodborne bacteria.
- Keep waveguide cover clean. Food residue can cause arcing and/or fires.
- Use care when removing items from the microwave oven so that the utensil, your clothes or accessories do not touch the safety door latches.
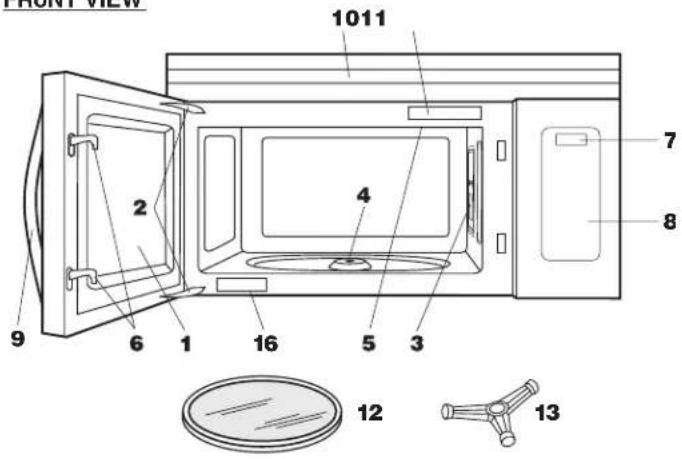
FRoNT VIEW
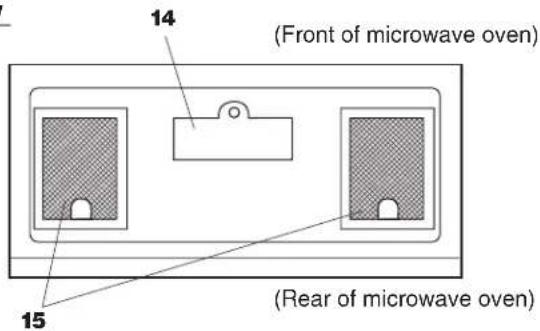
BoTToM VIEW
1 Microwave oven door with see-through window
2 Door hinges
3 Waveguide cover: DO NOT REMOVE.
4 Turntable motor shaft
5 Microwave oven light
It will light when microwave oven is operating or door is open.
6 Safety door latches
The microwave oven will not operate unless the door is securely closed.
7 Time display: Digital display, 99 minutes, 99 seconds
8 Auto-Touch control panel
9 Handle
10 Louver
11 Menu label
12 Removable turntable
The turntable will rotate clockwise or counterclockwise. Only remove for cleaning.
13 Removable turntable support
First, carefully place the turntable support in the motor shaft in the center of the microwave oven floor. Then, place the turntable on the turntable support securely.
14 Light cover
15 Grease filter
16 Serial plate
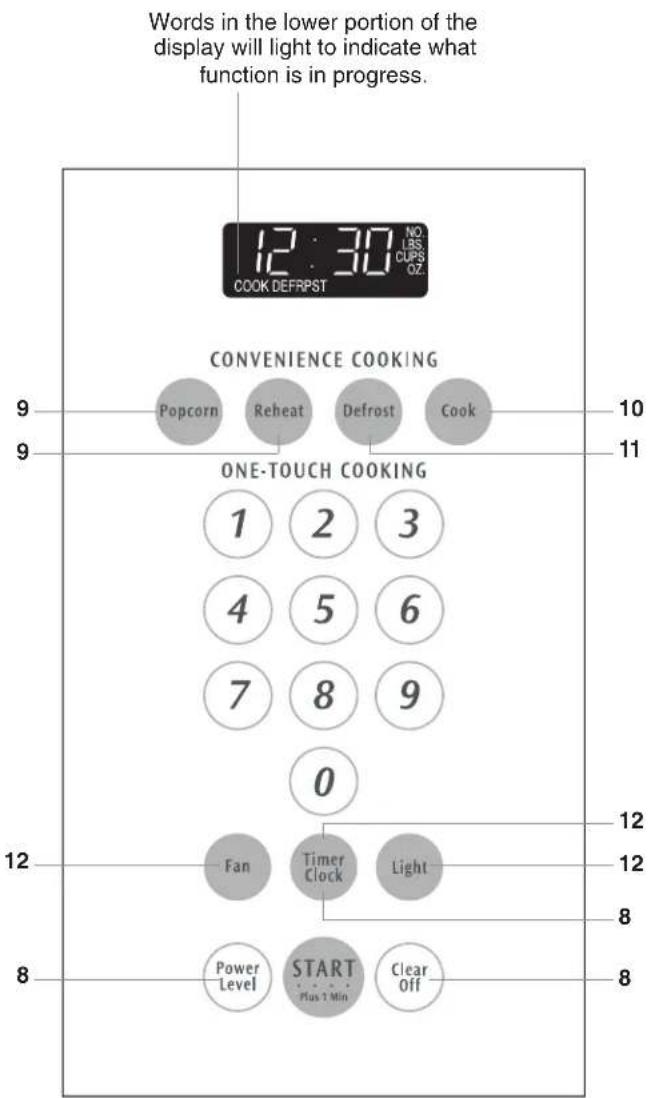
Number next to the control panel illustration indicates page on which there are a feature description and usage information.

Before Operating
- Before operating your new microwave oven make sure you read and understand this Use and Care manual completely.
-
Before the microwave oven can be used, follow these procedures:
-
Plug in the microwave oven. Close the door. The microwave oven display will then begin flashing 88:88.
-
Touch the Clear/Offpad. : will appear.
- Set clock.
TO SET THE CLOCK
- Suppose you want to enter the correct time of day 12:30 (A.M. or P.M.).
-
Touch Timer/Clock pad.
-
Enter time 1,2,3,0 and touch Timer/Clock pad again.
This is a 12 hour clock. If you attempt to enter an incorrect clock time, ERROR will appear in the display. Touch the Clear/Off pad and re-enter the time.
- If the electrical power supply to your microwave oven should be interrupted, the display will inter-mittently show 88:88 after the power is reinstated. If this occurs during cooking, the program will be erased. The time of day will also be erased. Simply touch Clear/Off pad and reset the clock for the correct time of day.
NOTE: Your microwave oven can be programmed with the door open except for Popcorn, START and Plus 1 Min.
CLEAR/OFF
Touch the Clear/Off pad to:
- Erase if you make a mistake during programming.
- Cancel timer.
- Stop the microwave oven temporarily during cooking.
- Return the time of day to the display.
- Cancel a program during cooking, touch twice.

Manual Operation
TIME COOKING
Your microwave oven can be programmed for 99 minutes 99 seconds (99.99). Always enter the seconds after the minutes, even if they are both zeros.
- Suppose you want to cook for 5 minutes at 100% .
- Enter cooking time 5,0,0.
- Touch START/Plus 1 Minpad.
TO SET POWER LEVEL
There are eleven preset power levels.
Using lower power levels increases the cooking time, which is recommended for foods such as cheese, milk and long slow cooking of meats. Consult cookbook or recipes for specific recommendations.
| TOUCH POWER LEVEL PAD NUMBER OF TIMES FOR DESIRED POWER | APPROXIMATE PERCENTAGE OF POWER | COMMON WORDS FOR POWER LEVELS |
| POWER LEVEL x 1 100% High | ||
| POWER LEVEL x 2 90% | ||
| POWER LEVEL x 3 80% | ||
| POWER LEVEL x 4 70% Medium High | ||
| POWER LEVEL x 5 60% | ||
| POWER LEVEL x 6 50% Medium | ||
| POWER LEVEL x 7 40% | ||
| POWER LEVEL x 8 30% Med Low/Defrost | ||
| POWER LEVEL x 9 20% | ||
| POWER LEVEL x 10 10% Low | ||
| POWER LEVEL x 11 0% | ||
- Suppose you want to defrost for 5 minutes at 30% .
-
Enter defrosting time 5,0,0.
-
Touch Power Levelpad eight times or hold down until the desired power level appears.
-
Touch START/Plus 1 Minpad.
When the defrost time is complete, a long tone will sound and END will appear in the display.
MANUAL DEFROST
If the food that you wish to defrost is not listed on the DEFROST CHART or is above or below the limits in the Amount column on the DEFROST CHART, you need to defrost manually.
You can defrost any frozen food, either raw or previously cooked, by using Power Level for 30%. Follow the exact 3-step procedure found under TO SET POWER LEVEL. Estimate defrosting time and press Power Level pad eight times for 30%.
For either raw or previously cooked frozen food the rule of thumb is approximately 4 minutes per pound. For example, defrost 4 minutes for 1 pound of frozen spaghetti sauce.
Always stop the microwave oven periodically to remove or separate the portions that are defrosted. If food is not defrosted at the end of the estimated defrosting time, program the microwave oven in 1 minute increments on Power Level 30% until totally defrosted.
When using plastic containers from the freezer, defrost only long enough to remove from the plastic in order to place in a microwave-safe dish.
Operating Instructions
Special features
POPCORN
The Popcorn setting automatically provides the correct cooking time for most brands of microwave popcorn. You may wish to try several and choose your favorite. Pop only one bag at a time. Unfold bag and place in microwave oven according to directions.
- Suppose you want to pop a 3.5 oz bag (regular) of popcorn.
Touch Popcorn once. The microwave oven starts automatically.
- Touch Popcorn once for 3.5 oz bag (regular).
- Touch Popcorn twice within 2 seconds for 2.85 - 3.5 oz bag (light regular).
- Touch Popcorn three times within 2 seconds for 1.5 or 1.75 oz bag (snack).
NOTE:
To use Popcorn pad, touch within 3 minutes after cooking, opening and closing the door or touching the Clear/Off pad.
REHEAT
Reheat automatically computes the correct warming time and microwave power level for foods shown in the chart below.
- Suppose you want to reheat 3 cups of soup.
- Touch Reheat pad once.
- Touch number pad 4 to select 1 cup of soup.
- Touch 2 more times for 3 cups or hold down until the desired quantity appears.
- Touch START/Plus 1 Minpad.
NOTE:
- To reheat different foods or foods above or below the quantity allowed on the REHEAT CHART, use manual operation.
- Reheat can be programmed with More or Less Time Adjustment. See page 12.
REHEAT CHART
| FOOD | AMOUNT | PROCEDURE |
| 1. Dinner Plate | 1 plate | Use this setting to reheat precooked foods from the refrigerator. Place meaty portions and bulky vegetables to outside of plate. Cut large items like baked potatoes in smaller pieces. Flatten foods such as mashed potatoes and other dense foods. Cover with wax paper or plastic wrap. ONE PLATE ONLY.After cooking, check that food is very hot throughout and that the bottom center of the plate is very hot. If not, continue heating using time and power level. Allow to stand, covered, 1 to 2 minutes. |
| 1 Regular | Touch Reheat and then the number pad 1 once for a regular amount of food: approximately 4 oz sliced meat or poultry, 1/2 cup potato or rice and 1/2 cup of vegetables or equivalent. REG will appear in the display. | |
| 1 Large | Touch Reheat and then the number pad 1 twice within 2 seconds for a larger amount of food on a dinner plate. LARGE will appear in the display. | |
| 1 Small | Touch Reheat and then the number pad 1 three times within 3 seconds for a smaller amount of food on a dinner plate. SMALL will appear in the display. | |
| 2. Beverage | .5 - 2.0 cups | This setting is good for restoring cooled beverages to a better drinking temperature. Touch Reheat and then the number 2 pad for a 0.5 cup increase per touch. Stir liquid briskly before heating and stir carefully at end of cycle to avoid “eruption.” |
| 3. Rolls/ Muffins | 1 - 8 | Use this setting to warm rolls, muffins, biscuits, bagels etc. Large items should be considered as 2 or 3 regular size. Arrange on plate; cover with paper towel. For refrigerated rolls or muffins, it may be necessary to double the entered amount to ensure the proper serving temperature. For example, enter quantity of 2 for 1 refrigerated muffin. |
| 4. Soup | 1 - 6 cups | Place in a bowl or casserole. Cover with lid or plastic wrap. At end, stir, re-cover and let stand 1 to 3 minutes. |
Operating Instructions
Special features
COOK
Cook automatically computes the correct cooking time and microwave power level for foods shown in the chart below.
- Suppose you want to cook 3 medium baked potatoes.
- Touch Cook pad.
- Touch number pad 1 to select Baked Potatoes.
- Touch 2 more times for 3 potatoes or hold down until the desired quantity appears.
- Touch START/Plus 1 Minpad.
TIPS: Foods can be covered with wax paper or vented plastic wrap. Temperatures of foods covered with plastic wrap tend to be slightly higher than those covered with wax paper.
NOTE:
- More or less food than the quantity listed in the chart should be cooked following the guidelines in any microwave cookbook.
- Cook can be programmed with More or Less Time Adjustment. See page 12.
- The final cooking result will vary according to the food condition (e.g. initial temperature, shape, quality). Check food for temperature after cooking. If additional time is needed, continue to cook manually.
COOK CHART
| FOOD | AMOUNT | PROCEDURE |
| 1. Baked Potatoes | 1 - 6 med. | Pierce with fork in several places; place on paper towel on turntable. At end of cooking time, remove from microwave oven, wrap in foil and let stand 5 to 10 minutes. |
| 2. Fresh Vegetables | 1 - 6 cups | For beans, carrots, corn and peas, add 1 tablespoon of water per cup. For broccoli, Brussels sprouts, cabbage and cauliflower, cook immediately after washing with no additional water. If you like tender crisp vegetables, double or triple measured quantity per setting. After cooking, remove from microwave oven, stir, cover and let stand 3 to 5 minutes before serving. |
| 3. Frozen Vegetables | 1 - 6 cups | Add no water. Cover with lid or plastic wrap. After cooking, stir and let stand, covered, for 3 minutes. |
| 4. Frozen Entrees | 6 - 17 oz | Use this setting for frozen, convenience foods. It will give satisfactory results for most brands. You may wish to try several and choose your favorite. Remove package from outer wrapping and follow package directions for covering. After cooking, let stand, covered, for 1 to 3 minutes. |
| 6 - 8 oz | Touch Cook and number pad 4 once for package weight of 6-8 oz. 6-8 will appear in the display. | |
| 9 - 11 oz | Touch Cook and number pad 4 twice for package weight of 9-11 oz. 9-11 will appear in the display. | |
| 12 - 14 oz | Touch Cook and number pad 4 three times for package weight of 12-14 oz. 12-14 will appear in the display. | |
| 15 - 17 oz | Touch Cook and number pad 4 four times for package weight of 15-17 oz. 15-17 will appear in the display. |
Operating Instructions
Special features
DEFROST
Defrost automatically defrosts all the foods shown in the DEFROST CHART below. Round the weight to the nearest tenth of a pound. To enter weight, touch Defrost and number pad for desired food then number pads for weight.
- Suppose you want to defrost a 3.0 pound steak.
-
Touch Defrostpad.
-
Touch number pad 2 to select Steak/Chops.
-
Touch number pads 3,0 for 3.0 lb.
-
Touch START/Plus 1 Minpad.
The microwave oven will stop and directions will be displayed.
-
After the 1st stage, open the door, turn steak over and shield any warm portions. Close the door. Touch START/Plus 1 Min pad.
-
After the 2nd stage, open the door and shield any warm portions. Close the door. Touch START/Plus 1 Min pad.
After defrost cycle ends, cover and let stand as indicated in chart below.
NOTE:
- Defrost can be programmed with More or Less Time Adjustment. See page12.
- To defrost other foods or foods above or below the weights allowed on the DEFROST CHART, use time and 30% power. See MANUAL DEFROST on page 8.
- If you attempt to enter more or less than the allowed amount as indicated in the chart below, ERROR will appear in the display.
DEFROST CHART
| FOOD | AMOUNT | PROCEDURE |
| 1. Ground Meat | .5 - 2.0 lb | Pull apart and remove any thawed pieces after each stage. Let stand, covered, for 5 to 10 minutes. |
| 2. Steaks/Chops | .5 - 3.0 lb | After each stage, rearrange and if there are warm or thawed portions, shield with small flat pieces of aluminum foil. Remove any meat that is nearly defrosted. Let stand, covered, for 10 to 20 minutes. |
| 3. Boneless Poultry | .5 - 2.0 lb | After each stage, if there are warm or thawed portions, rearrange or remove. Let stand, covered, for 10 to 20 minutes. |
| 4. Bone-in Poultry | .5 - 3.0 lb | After each stage, if there are warm or thawed portions, rearrange or remove. Let stand, covered, for 10 to 20 minutes. |
NOTE: Check foods when microwave oven signals. After final stage, small sections may still be icy. Let stand to continue thawing. Do not defrost until all ice crystals are thawed.
Shielding prevents cooking from occurring before the center of the food is defrosted. Use small smooth strips of aluminum foil to cover edges and thinner sections of the food.
MULTIPLE SEQUENCE COOKING
Your microwave oven can be programmed for up to 3 automatic cooking sequences, switching from one power level setting to another automatically.
Sometimes cooking directions tell you to start on one power level and then change to a different power level. Your microwave oven can do this automatically.
- Suppose you want to cook roast beef for 5 minutes at 100% and then continue to cook for 30 minutes at 50% .
- First enter cooking time 5,0,0. Then touch Power Level pad once for 100% power.
- Enter second cooking time. Touch Power Levelpad 6 times for 50% power.
- Touch START/Plus 1 Minpad.
NOTE:
- If Power Level pad is touched, P-HI will be displayed.
- If 100% is selected as the final sequence, it is not necessary to touch the Power Level pad.
TIMER
- Suppose you want to time a 3-minute long distance phone call.
-
Touch 3,0,0 to enter time.
-
Touch Timer/Clock pad.
To cancel the timer, touch Clear/Off pad once.
MORE OR LESS TIME ADJUSTMENT
Should you discover that you like any of the Popcorn, Reheat, Defrost or Cook settings slightly more done, touch the Power Level pad once after touching your choice of pads or before touching START/Plus 1 Min pad. The display will show MORE.
Should you discover that you like any of the Popcorn, Reheat, Defrost or Cook settings slightly less done, touch the Power Level pad twice after touching your choice of pads or before touching START/Plus 1 Min pad. The display will show LESS.
PLUS 1 MIN
Plus 1 Min allows you to cook for a minute at 100% by simply touching the Plus 1 Min pad. You can also extend cooking time in multiples of 1 minute by repeatedly touching the Plus 1 Min pad during manual cooking.
NOTE:
- To use Plus 1 Min, touch pad within 3 minutes after cooking, closing the door, touching the Clear/Off pad or during cooking.
- Plus 1 Min cannot be used with special features.
CHILD LOCK
The Child Lock prevents unwanted microwave oven operation such as by small children. The microwave oven can be set so that the control panel is deactivated or locked. To set, touch Timer/Clock, the number 1 and then touch the START/Plus 1 Min pad and hold for three seconds. Should a pad be touched, LOCK will appear in the display.
To cancel, touch Timer/Clock, the number 1 and Clear/Off pad.
AUDIBLE SIGNAL ELIMINATION
If you wish to have the microwave oven operate with no audible signals, touch Timer/Clock, the number 5, START/Plus 1 Min and hold for three seconds
To cancel and restore the audible signal, touch Timer/Clock, the number 5 and Clear/Off pads.
DEMONSTRATION MODE
To demonstrate, touch Timer/Clock, the number 0 and then touch the START/Plus 1 Min pad and hold for three seconds. DEMO will appear in the display. Cooking operations and specific special features can now be demonstrated with no power in the microwave oven. For example, touch Plus 1 Min pad and the display will show 1.00 and count down quickly to END.
To cancel, touch Timer/Clock, the number 0 and Clear/Off pads. If easier, unplug the microwave oven from the electrical outlet and replug.
FAN
The fan will automatically start when heat rises from range surface units or burners. This protects the microwave oven from excessive temperature rise. The fan will stay on until the temperature decreases. It cannot be turned off manually during this time.
Press Fan pad one time to turn it on and once again to turn it off.
LIGHT
Press the Light pad one time to turn on and once again to turn the light off.
EXTERIOR
The outside surface is precoated steel and plastic. Clean the outside with mild soap and water; rinse and dry with a soft cloth. Do not use any type of household or abrasive cleaner.
DOOR
Wipe the window on both sides with a damp cloth to remove any spills or spatters. Metal parts will be easier to maintain if wiped frequently with a damp cloth.
Cleaners which are marked specifically for use with stainless steel may be used for stainless steel model. Follow package directions exactly. Avoid the use of any harsh cleaner or one not marked for stainless steel use as they may stain, streak or dull the door surface.
TOUCH CONTROL PANEL
Care should be taken in cleaning the touch control panel. If the control panel becomes soiled, open the microwave oven door before cleaning. Wipe the panel with a cloth dampened slightly with water only. Dry with a soft cloth. Do not scrub or use any sort of chemical cleaners. Close door and touch Clear/Off.
INTERIOR
Cleaning is easy because little heat is generated to the interior surfaces; therefore, there is no baking and setting of spills or spattering. To clean the interior surfaces, wipe with a soft cloth and warm water. DO NOT USE ABRASIVE OR HARSH CLEANERS OR SCOURING PADS. For heavier soil, use baking soda or a mild soap; rinse thoroughly with hot water. The rack can be cleaned with hot soapy water, rinsed and dried.
WAVEGUIDE COVER
The waveguide cover is located on the right side wall of the microwave oven cavity. It is made from mica so requires special care. Keep the waveguide cover clean to assure good microwave oven performance. Carefully wipe with a damp cloth any food spatters from the surface of the cover immediately after they occur. Built-up splashes may overheat and cause smoke or possibly catch fire. DO NOT REMOVE THE WAVEGUIDE COVER.
ODOR REMOVAL
Occasionally, a cooking odor may remain in the microwave oven. To remove, combine 1 cup water, grated peel and juice of 1 lemon and several whole cloves in a 2-cup glass measuring cup. Boil for several minutes using 100% power. Allow to set in microwave oven until cool. Wipe interior with a soft cloth.
TURNTABLE/TURNTABLE SUPPORT
The turntable and turntable support can be removed for easy cleaning. Wash them in mild, sudsy water; for stubborn stains use a mild cleanser and non-abrasive scouring sponge. They are also dishwasher-proof. Use upper rack of dishwasher. The turntable motor shaft is not sealed, so excess water or spills should be wiped up immediately.
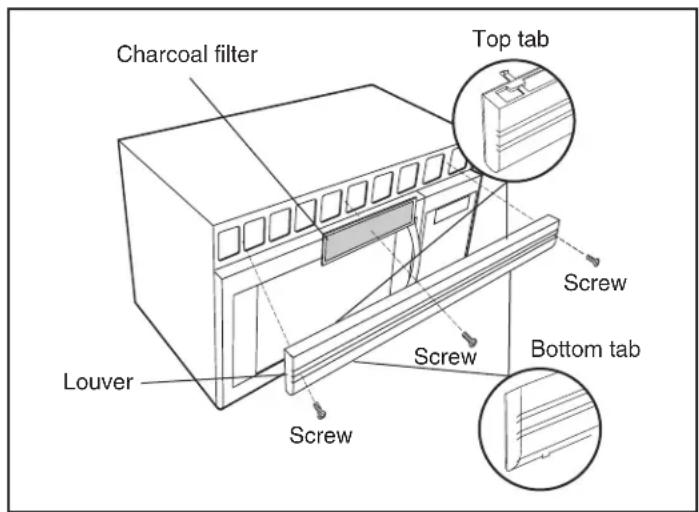
CHARCOAL FILTER
Charcoal Filter, which was enclosed with your microwave oven, is used for nonvented, recirculated installation. The filter should be changed every 6 to 12 months depending on use.
- Disconnect power to the microwave oven at the circuit breaker panel or by unplugging.
- Remove the three louver mounting screws and push down carefully on the tab at each end of the louver to disengage. (See illustration.)
- Pull the louver away from the unit.
- Change the charcoal filter.
- Carefully push the louver back into place (engaging both the bottom and top tabs) and replace the screws removed in step 2.
GREaSE FIITERS
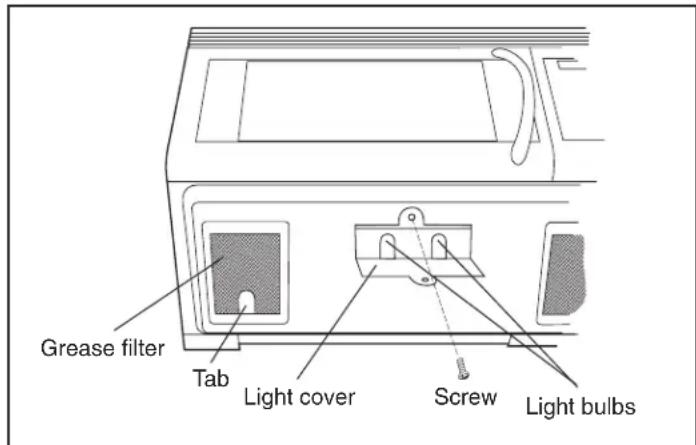
Filters should be cleaned at least once a month. Never operate the fan or microwave oven without the filters in place.
- Pull down slightly on the tab toward the front of the microwave oven and remove the filter. Repeat for the other filter.
- Soak the filters in a sink or dish pan filled with hot water and detergent. DO NOT use ammonia or other alkali; they will react with the filter material and darken it.
- Agitate and scrub with a brush to remove embedded dirt.
- Rinse thoroughly and shake dry.
- Replace by fitting the filter back into the opening.
IIGHT
- To replace light bulbs, first disconnect power to the microwave oven at the circuit breaker panel or by unplugging.
- To release cover, remove the screw on the light cover. (See illustration.)
- Replace light bulbs with equivalent watt bulb available from your Electrolux Authorized Service or parts distributor. Bulbs are also available at most hardware stores or lighting centers. DO NOT USE A BULB LARGER THAN 30 WATTS.
- Close light cover and secure with screw removed in step 2.
CAUTION
Light cover may become very hot. Do not touch
glass when light is on.
Specifications
| AC Line Voltage: UL Rating: Single phase 120V, 60Hz, AC only | |
| CUL Rating: Single phase 120V, 60Hz, AC only | |
| AC Power Required: | UL Rating: 1640W 14.0 amps. (FMV156DB, DS, DC, DQ, EM) |
| CUL Rating: 1500W 13.0 amps. (CFMV156DB, DS, DC, FM) | |
| Output Power*: | 950W |
| Frequency: | 2450 MHz |
| Outside Dimensions (not including handle): | 29 15/16"(W) x 16 1/4"(H) x 15 9/16"(D) |
| Cavity Dimensions: | 17 1/2"(W) x 9 7/8"(H) x 14 15/16"(D) |
| Microwave oven Capacity**: | 1.5 Cu.Ft. |
| Cooking Uniformity: | Turntable / Stirrer Fan System |
| Weight: | Approx. (net) 55 lb, (gross) 60 lb |
| Work/Night Light: | 2 bulbs 20w each (incandescent light bulbs) |
* The International Electrotechnical Commission's standardized method for measuring output wattage. This test method is widely recognized.
** Internal capacity is calculated by measuring maximum width, depth and height. Actual capacity for holding food is less.
In compliance with standards set by:
FCC – Federal Communications Commission Authorized.
DHHS – Complies with Department of Health and Human Services (DHHS) rule, CFR, Title 21, Chapter I, Subchapter J.
NHW – Department of National Health and Welfare of Canada.

is symbol on the nameplate means the product is listed by Underwriters Laboratories, Inc.

– This symbol on the nameplate means the product is listed by Underwriters Laboratories, Inc. for use in USA or Canada.
This microwave oven is listed by the Canadian Standard Association as certified (CFMV156).
Service Call Check
Please check the following before calling for service:
Place one cup of water in a glass measuring cup in the microwave oven and close the door securely.
Operate the microwave oven for one minute at HIGH 100%.
A Does the microwave oven light come on? YES ____ NO ____
B Does the cooling fan work? (Put your hand on the louver above the Interactive Display.) YES ____ NO ____
C Does the turntable rotate? (It is normal for the turntable to turn in either direction.) YES ____ NO ____
D Is the water in the microwave oven warm? YES ____ NO ____
If "NO" is the answer to any of the above questions, please check electrical outlet, fuse and/or circuit breaker. If they are functioning properly, CONTACT YOUR NEAREST ELECTROLUX AUTHORIZED SERVICER.
A microwave oven should never be serviced by a "do-it-yourself" repair person.
NOTE:
- If time appearing in the display is counting down very rapidly, check Demonstration Mode on page 12 and cancel.
- If the microwave oven is set for more than 30 minutes at 80, 90 or 100 percent power level, after the first 30 minutes the power level will automatically adjust itself to 70 percent power to avoid overcooking.
Your appliance is covered by a one year limited warranty. For one year from your original date of purchase, Electrolux will pay all costs for repairing or replacing any parts of this appliance that prove to be defective in materials or workmanship when such appliance is installed, used and maintained in accordance with the provided instructions.
Exclusions This warranty does not cover the following:
- Products with original serial numbers that have been removed, altered or cannot be readily determined.
- Product that has been transferred from its original owner to another party or removed outside the USA or Canada.
- Rust on the interior or exterior of the unit.
- Products purchased "as-is" are not covered by this warranty.
- Food loss due to any refrigerator or freezer failures.
- Products used in a commercial setting.
- Service calls which do not involve malfunction or defects in materials or workmanship, or for appliances not in ordinary household use or used other than in accordance with the provided instructions.
- Service calls to correct the installation of your appliance or to instruct you how to use your appliance.
- Expenses for making the appliance accessible for servicing, such as removal of trim, cupboards, shelves, etc., which are not a part of the appliance when it is shipped from the factory.
- Service calls to repair or replace appliance light bulbs, air filters, water filters, other consumables, or knobs, handles, or other cosmetic parts.
- Surcharges including, but not limited to, any after hour, weekend, or holiday service calls, tolls, ferry trip charges, or mileage expense for service calls to remote areas, including the state of Alaska.
- Damages to the finish of appliance or home incurred during installation, including but not limited to floors, cabinets, walls, etc.
- Damages caused by: services performed by unauthorized service companies; use of parts other than genuine Electrolux parts or parts obtained from persons other than authorized service companies; or external causes such as abuse, misuse, inadequate power supply, accidents, fires, or acts of God.
DISCLAIMER OF IMPLIED WARRANTIES; LIMITATION OF REMEDIES
CUSTOMER'S SOLE AND EXCLUSIVE REMEDY UNDER THIS LIMITED WARRANTY SHALL BE PRODUCT REPAIR OR REPLACEMENT AS PROVIDED HEREIN. CLAIMS BASED ON IMPLIED WARRANTIES, INCLUDING WARRANTIES OF MERCHANTABILITY OR FITNESS FOR A PARTICULAR PURPOSE, ARE LIMITED TO ONE YEAR OR THE SHORTEST PERIOD ALLOWED BY LAW, BUT NOT LESS THAN ONE YEAR. ELECTROLUX SHALL NOT BE LIABLE FOR CONSEQUENTIAL OR INCIDENTAL DAMAGES SUCH AS PROPERTY DAMAGE AND INCIDENTAL EXPENSES RESULTING FROM ANY BREACH OF THIS WRITTEN LIMITED WARRANTY OR ANY IMPLIED WARRANTY. SOME STATES AND PROVINCES DO NOT ALLOW THE EXCLUSION OR LIMITATION OF INCIDENTAL OR CONSEQUENTIAL DAMAGES, OR LIMITATIONS ON THE DURATION OF IMPLIED WARRANTIES, SO THESE LIMITATIONS OR EXCLUSIONS MAY NOT APPLY TO YOU. THIS WRITTEN WARRANTY GIVES YOU SPECIFIC LEGAL RIGHTS. YOU MAY ALSO HAVE OTHER RIGHTS THAT VARY FROM STATE TO STATE.
If You Need Service Keep your receipt, delivery slip, or some other appropriate payment record to establish the warranty period should service be required. If service is performed, it is in your best interest to obtain and keep all receipts. Service under this warranty must be obtained by contacting Electrolux at the addresses or phone numbers below.
This warranty only applies in the USA and Canada. In the USA, your appliance is warranted by Electrolux Major Appliances North America, a division of Electrolux Home Products, Inc. In Canada, your appliance is warranted by Electrolux Canada Corp. Electrolux authorizes no person to change or add to any obligations under this warranty. Obligations for service and parts under this warranty must be performed by Electrolux or an authorized service company. Product features or specifications as described or illustrated are subject to change without notice.
USA
1.800.944.9044
Electrolux Major Appliances
North America
P.O. Box 212378
Augusta, GA 30907
Electrolux
Canada
1.800.668.4606
Electrolux Canada Corp.
5855 Terry Fox Way
Mississauga, Ontario, Canada
L5V 3E4
- Welcome & Congratulations
- Questions?
- PLEASE CAREFULLY READ AND SAVE THESE INSTRUCTIONS
- NEED HELP?
- Visit the Frigidaire Web Site at: http://www.frigidaire.com
- Read this manual.
- Save time and money.
- IMPORTANT SAFETY INSTRUCTIONS
- PRECAUTIONS TO AVOID POSSIBLE EXPOSURE TO EXCESSIVE MICROWAVE ENERGY
- WARNING
- CAUTION
- READ ALL INFORMATION BEFORE USING
- SAVE THESE INSTRUCTIONS
- UNPACKING AND EXAMINING YOUR MICROWAVE OVEN
- GROUNDING INSTRUCTIONS
- Electrical Requirements
- NOTES:
- Radio or TV Interference
- ABOUT MICROWAVE COOKING
- Doneness signs include:
- ABOUT FOODS
- ABOUT UTENSILS AND COVERINGS
- Use these utensils for safe microwave cooking and reheating:
- These items can be used for short time reheating of foods that have little fat or sugar in them:
- DO NOT USE
- The following coverings are ideal:
- How to use aluminum foil in your microwave oven:
- ABOUT CHILDREN AND THE MICROWAVE
- ABOUT SAFETY
- Before Operating
- TO SET THE CLOCK
- CLEAR/OFF
- Manual Operation
- TIME COOKING
- TO SET POWER LEVEL
- MANUAL DEFROST
- Operating Instructions
- Special features
- POPCORN
- NOTE:
- REHEAT
- COOK
- DEFROST
- MULTIPLE SEQUENCE COOKING
- TIMER
- MORE OR LESS TIME ADJUSTMENT
- PLUS 1 MIN
- CHILD LOCK
- AUDIBLE SIGNAL ELIMINATION
- DEMONSTRATION MODE
- FAN
- LIGHT
- EXTERIOR
- DOOR
- TOUCH CONTROL PANEL
- INTERIOR
- WAVEGUIDE COVER
- ODOR REMOVAL
- TURNTABLE/TURNTABLE SUPPORT
- CHARCOAL FILTER
- GREaSE FIITERS
- IIGHT
- Specifications
- Service Call Check
- Exclusions This warranty does not cover the following:
- DISCLAIMER OF IMPLIED WARRANTIES; LIMITATION OF REMEDIES
- USA
- 1.800.944.9044
- Electrolux
- Canada
- 1.800.668.4606
Brand : FRIGIDAIRE
Model : FMV156DS
Category : Microwaves