TRH3005 - Range hood Thor - Free user manual and instructions
Find the device manual for free TRH3005 Thor in PDF.


| Product Type | Range Hood |
| Brand | Thor |
| Model | TRH3005 |
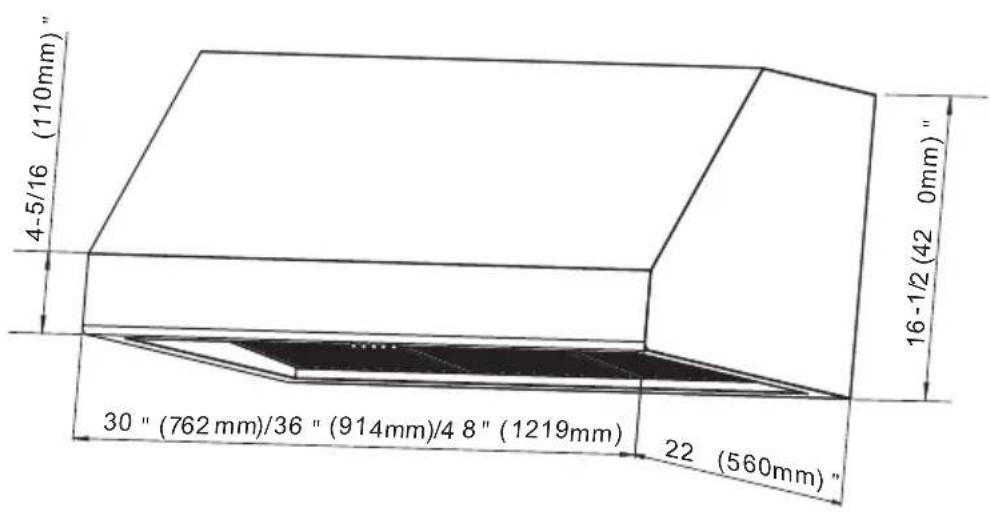
| Available Widths | 30" (762mm), 36" (914mm), 48" (1219mm) |
| Mounting Type | Wall-mounted |
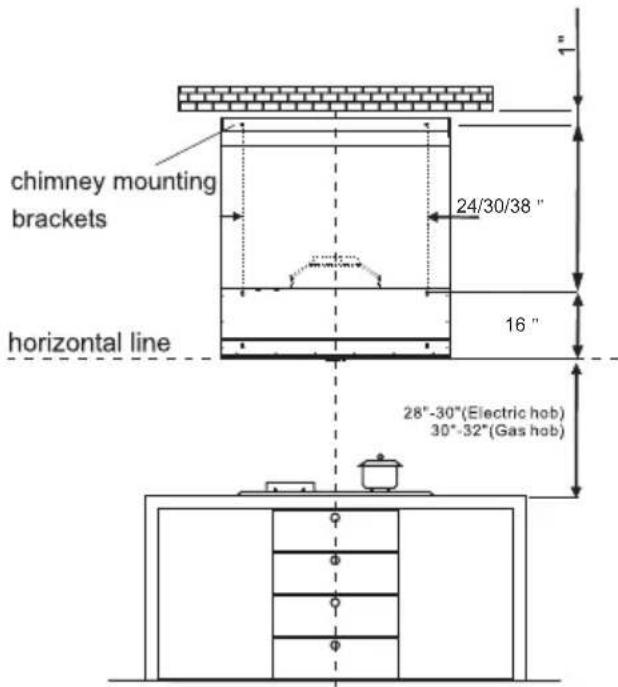
| Minimum Distance from Electric Hob | 28" - 30" (710 - 762mm) |
| Minimum Distance from Gas Hob | 30" - 32" (762 - 813mm) |
| Duct Size | 7" (178mm) round |
| Ducting Mode | Ducted (exterior) or Recirculation (with optional charcoal filter) |
| Fan Speeds | 3 (Low, Medium, High) |
| Controls | Buttons: Light on/off, Speed 1/2/3, Off |
| Lighting | 2 x 2.0W DC12V LED bulbs (GU10 compatible) |
| Grease Filter | Washable aluminum mesh, clean every 2 months |
| Charcoal Filter | Optional (not included), replace every 3 months |
| Electrical Rating | 120V, 60Hz |
| Plug Type | 3-prong grounded plug |
| Material | Stainless Steel |
| Chimney | Telescopic, included |
| Installation Requirement | Two or more people for installation |
| Warranty | See thorkitchen.com/warranty-registration |
Frequently Asked Questions - TRH3005 Thor
User questions about TRH3005 Thor
0 question about this device. Answer the ones you know or ask your own.
Ask a new question about this device
Download the instructions for your Range hood in PDF format for free! Find your manual TRH3005 - Thor and take your electronic device back in hand. On this page are published all the documents necessary for the use of your device. TRH3005 by Thor.
USER MANUAL TRH3005 Thor
If you follow the recommendations contained in this Instruction Manual, our appliance will give you constant high performance and will remain efficient for many years to come.
CONTENTS
| ATTENTION | 1 |
| SAFETY INSTRUCTIONS | 2-3 |
| MAINTENANCE | 4 |
| WARNING | 4-5 |
| DIMENSIONS | 6 |
| INSTALLATION & USE | 7-13 |
ATTENTION
* The manufacturer will not be held liable for any damages resulting from incorrect or improper installation.
* Please read this instruction manual before installing and using this range hood. Properly keep this instruction manual in a safe place for future reference.
* This range hood can be used either in the Ducted Mode (ducting fumes to the outside) or in the Recirculation Mode (internal recycling). Accessories are sold separately.
* Only a qualified and trained service technician can do the installation and service.
IMPORTANT SAFETY INSTRUCTIONS
READ AND SAVE THESE INSTRUCTIONS.
WARNING: TO REDUCE THE RISK OF FIRE, ELECTRIC SHOCK, OR INJURY TO PERSONS, OBSERVE THE FOLLOW INSTRUCTIONS:
- Use this unit only in the manner intended by manufacturer. If you have questions, please contact the manufacturer.
■ Before servicing or cleaning the unit, securely fasten a prominent warning device, such as a tag, to the service panel. -
Installation work and electrical wiring must be done by qualified technician(s) in accordance with all applicable codes and standards including fire-rated construction.
-
Do not operate any fan with a damaged cord or plug.
- Sufficient air is needed for proper combustion and exhausting of gas through the flue(chimney) of fuel burning equipment to prevent backdrafting. Follow the heating equipment manufacturer's guideline and safety standards such as those published by National Fire Protection Association(NFPA), the American Society for Heating, Refrigeration and Air Conditioning Engineers(ASHRAE), and the local code authorities.
- When cutting and drilling into wall or ceiling; do not damage electrical wiring and other utilities.
■ Ducted fans must always be vented outdoors.
- CAUTION: For general ventilating use only. Do not use to exhaust hazardous or explosive materials and vapors.
- CAUTION: To reduce risk of fire and to properly exhaust air, be sure to duct air outside-do not vent exhaust air into space within walls or ceilings, attics or into crawl spaces, or garages.
* WARNING - TO REDUCE THE RISK OF FIRE, USE ONLY METAL DUCTWORK.
* WARNING – TO REDUCE THE RISK OF A RANGE TOP GREASE FIRE:
a) Never leave surface units unattended at high settings. Boilovers cause smoking and greasy spillovers that may ignite. Heat oils slowly on low or medium settings.
b) Always turn hood ON when cooking at high heat or when flambeing food (i.e.
Crepes Suzette, Cherries Jubilee, Peppercorn Beef Flambe').
c) Clean ventilating fans frequently. Grease should not be allowed to accumulate on fan or filter.
d) Use proper pan size. Always use cookware appropriate for the size of the surface element.
* WARNING – TO REDUCE THE RISK OF INJURY TO PERSONS IN THE EVENT OF A RANGE TOP GREASE FIRE, OBSERVE THE FOLLOWING:
a) SMOTHER FLAMES with a close-fitting lid, cookie sheet, or metal tray, then turn off the burner. BE CAREFUL TO PREVENT BURNS. If the flames do not go out immediately, EVACUATE AND CALL THE FIRE DEPARTMENT.
b) NEVER PICK UP A FLAMING PAN – You may be burned.
c) DO NOT USE WATER, including wet dishcloths or towels – a violent steam explosion will result.
d) Use an extinguisher ONLY if:
1) You know you have a Class ABC extinguisher, and you already know how to operate it.
2) The fire is small and contained in the area where it started.
3) The fire department is being called.
4) You can fight the fire with your back to an exit.
Base on "Kitchen Fire Safety Tips" published by NFPA.
WARNING: To reduce the risk of fire or electrical shock, do not use this fan with any solid-state speed control device.
* Check that the mains voltage corresponds to the one indicated on the rating plate fixed inside the hood.
* Check that the domestic power supply guarantees adequate earthing.
* Do not connect the hood to exhaust ducts carrying combustion fumes (boilers, fireplaces, etc.)
* If the hood is used in conjunction with non-electrical appliances (e. g. gas burning appliances), a sufficient degree of aeration must be guaranteed in the room in order to prevent the backflow of exhaust gas. The kitchen must have an opening directly with the open air in order to guarantee the entry of clean air.
* The minimum distance is 30 inches from the range hood to a gas hob, and is 25 inches to an electric hob. If the installation instructions for gas hobs specify a greater distance, this must be taken into account.
NOTICE: Considering excessive weight, two or more people are required to install or move this appliance. Failure to do so can cause physical injuries.
* The range hood has been designed only for domestic use to eliminate kitchen fumes.
* Never use the hood for purposes other than what it has been designed for.
* Never leave high naked flames under the hood when it is in operation.
* Adjust the flame intensity to direct it onto the bottom of the pan only; making sure that it does not engulf the pan sides.
* Deep fat fryer must be continuously monitored during use: overheated oil can burst into flame.
* The hood should not be used by children or person not instructed in its correct use.
MAINTENANCE
* Proper maintenance of the Range Hood will assure proper performance of the unit.
* Disconnect the hood from the main supply before carrying out any maintenance work.
* Check and/or replace stainless steel filter every 2 months if you are using it at daily basis. You can purchase the filters at www.thorkitchen.com
* Clean the hood using a damp cloth and a neutral liquid detergent.
* DISPOSAL: Do not dispose this product as unsorted municipal waste. Collection of such waste separately for special treatment is necessary.
WARNING!!
In certain circumstances electrical appliances may be a danger hazard.
* Do not check the status of the filters while the range hood is operating.
* Do not touch the light bulbs after appliance use.
* Do not disconnect the appliance with wet hands.
* Avoid free flame, as it is damaging for the filters and a fire hazard.
* Constantly check food frying to avoid that the overheated oil may become a fire hazard.
* Disconnect the electrical plug prior to any maintenance.
* Children don't recognize the risks of electrical appliances. Therefore use or keep the appliance only under supervision of adults and out of the reach from children.
* Don't use this product outdoor.
* There shall be adequate ventilation of the room when the range hood is used at the same time as appliances burning gas or other fuels.
* There is a fire risk if cleaning is not carried out in accordance with instructions.
* Do not flambé under the range hood.
* The discharge air must not be discharged into a flue which is used for exhausting fumes from appliances burning gas or other fuels.
WARNING: TO PROVIDE PROTECTION AGAINST ELECTRIC SHOCK, CONNECT TO PROPERLY GROUNDED OUTLETS ONLY.
GROUNDING INSTRUCTIONS
This appliance must be grounded. In the event of an electrical short circuit, grounding reduces the risk of electric shock by providing an escape wire for the electric current. This appliance is equipped with a cord having a grounding wire with a grounding plug. The plug must be plugged into an outlet that is properly installed and grounded.
WARNING – Improper grounding can result in a risk of electric shock.
Consult a qualified electrician if the grounding instructions are not completely understood, or if doubt exists as to whether the appliance is properly grounded. Do not use an extension cord. If the power supply cord is too short, have a qualified electrician install an outlet near the appliance.
NEVER CUT THE PLUG FROM THE ELECTRIC CORD AND ENSURE THE OUTLET IS GROUNDED, CUTTING THE CORD WILL VOID THE WARRANTY.
• All measurements in parenthesis are in millimeter.
- All inch measurements are converted form millimeters, thus inch measurements are estimated.
USE ONLY WITH RANGE HOOD CORD CONNECTION KITS THAT HAVE BEEN INVESTIGATED AND FOUND ACCEPTABLE FOR USE WITH THIS MODEL RANGE HOOD.
Note 1: On stainless steel hoods, carefully remove the plastic protective film from all exterior surfaces of the hood and chimney prior to final installation.
Note 2: At least two people will be required to mount the hood.
INSTALLATION DRILLING AND LINING
- Draw a vertical line on the supporting wall up to the ceiling, or as high as practical, at the centre of the area in which the hood will be installed.
- Draw a horizontal line 28-30 inches above an electric hob or 30-32 inches above a gas hob.
- Place chimney mounting brackets on the wall as shown about 1" (27mm) from the ceiling or upper
limit aligning the centre (notch) with the vertical reference line.
MOUNTING THE HOOD
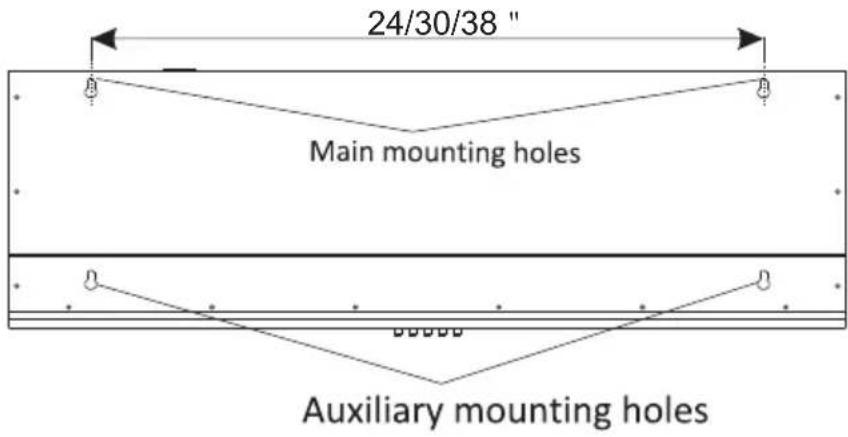
- Mount two main mounting screws into the wall along
the line that is 16 " above the horizontal line.
To ensure that two screws are paralleling with horizontal line.
-
Hook the hood body on the wall by mounted screws and screw up the screws.
-
Mounting the auxiliary two screws to fix the hood body.
Fix the air outlet
-
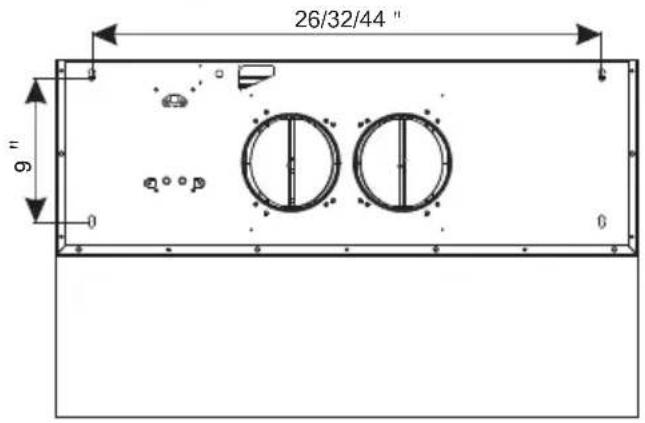
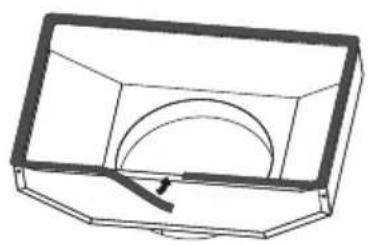
Use the sponge strip in the accessories bag and stickit around the air outlet by one circle and make sure there is no air leakage.
-
Fix the air outlet with sponge strip onto the range hood body by 4 screws.
natural_image
Simple line drawing of a rectangular container with a curved top and a diagonal arrow inside (no text or symbols)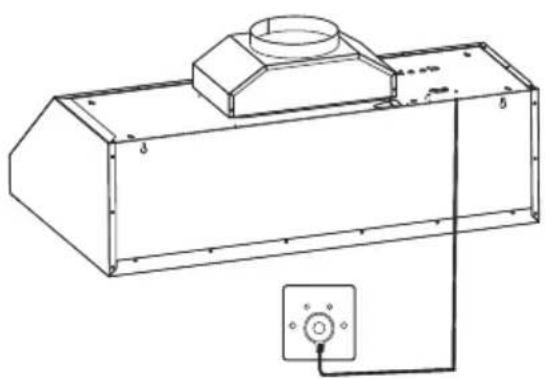
natural_image
Technical line drawing of a rectangular industrial or mechanical component with a central cylindrical top and mounting base, connected to a small electrical outlet (no text or symbols present)DUCT FIXING
Caution: To reduce the risk of fire, use metal ductwork only. (Metal duct should be sourced by locally.)
-
Attach an adequate length of 7" round duct on the top the outlet adapter.
-
Secure the duct using fastener. Make sure the duct is fixed well on.
CONNECTIONS
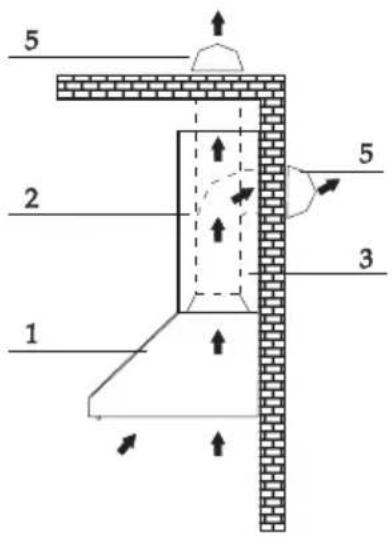
Ducted mode air exhaust system
Caution: To reduce the risk of fire, use metal ductwork only. (Metal duct should be sourced by locally.)
-
Decide where the ductwork will run between the hood and the outside.
-
A straight, short duct run will allow the hood to perform most efficiently.
-
Long duct runs, elbows, and transitions will reduce the performance of the hood. Use as few of them as possible. Larger ducting may be required for best performance with longer duct runs.
-
Attach an adequate length of 7" round duct to the air outlet adapter.
-
The air must not be discharge into a flue that is used for exhausting fumes from appliances burning gas or other fuels" "Regulations concerning the discharge of air have to be fulfilled.
-
Install a roof/wall cap. Connect round metal ductwork to cap and work back towards hood location. Use duct tape to seal the joints between ductwork sections.
Recirculation Mode
Caution: Do not use plastic or rigid metal ducting.
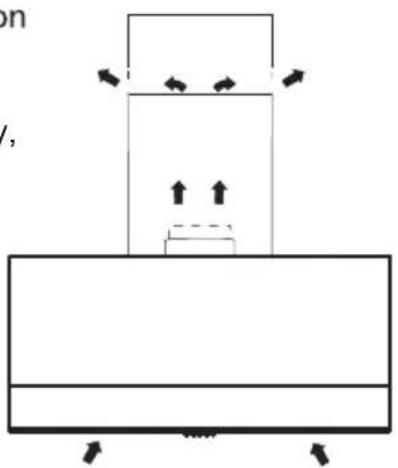
- Install the charcoal filter on.
- Please note that the air will flow out from the two grids on the two sides of the chimney top.
- If choosing recirculation kit, for exhausting air smoothly, please make sure that there is a gap of 20mm at least between the cabinet or chimney cover and the ceiling.
natural_image
Simple line drawing of a mechanical or architectural component with arrows indicating motion, no text or symbols present.Electrical connection
* Electrical wiring must be done by a qualified person(s) in accordance with all applicable codes and standards. Turn off electrical power at service entrance before wiring.
* If the supply cord is damaged, it must be replaced by the manufacturer, its service agent or similarly qualified persons in order to avoid a hazard.
* Do not use the plug and an extension cord other than the ones initially supplied with the hood.
* The earthing of this hood is compulsory. Do not remove ground prong of the plug.
☀️ – Turns the light on/off
1 - Low speed setting
2 - Medium speed setting
3 - High speed setting
- - Turns off the hood
MAINTENANCE
GREASE FILTER
* The grease filters should be cleaned frequently (every two months of operation, or more frequently for heavy use). Use a warm detergent solution.
* Grease filters are washable.
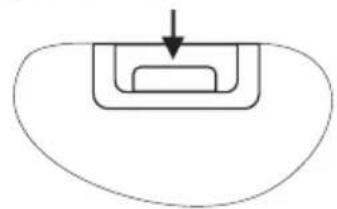
(1) PUSH DOWN
natural_image
Simple diagram showing a downward arrow pointing to a rectangular object inside a rounded rectangle (no text or symbols)(2) LIFT OUT
natural_image
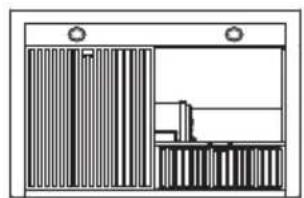
Simple line drawing of a window with vertical bars and a small object inside (no text or symbols)- Remove the grease filter one by one by pushing down each latch. This will disengage the filter from the hood. Tilt the filter downward and remove.
- Wash the filters, taking care not to bend them. Allow them to be dry before refitting.
- When refitting the filters, make sure that the handle is visible from the outside.
- To install the grease filter, align rear filter tabs with slots in the hood. Push down the latch, push filter into position and release. Make sure the filter is securely engaged after assembly.
NON-DUCTED RECIRCULATION CHARCOAL FILTER(not included)
This filter not washable, can not be regenerated, and should be replaced approximately every 3 months of operation, or more frequently in the case of heavy usage.
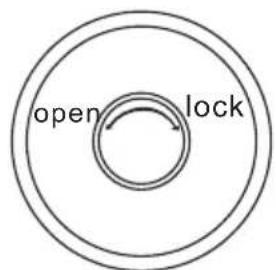
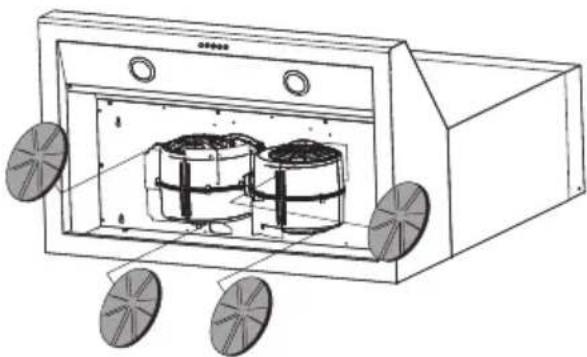
- To install the charcoal filter(not included), and lock it until the stop click is heard.
- Install grease filter after charcoal filter(not included) is installed.
natural_image
Technical line drawing of a two-cylinder heating unit with circular components and mounting holes (no text or labels)LED BULBS
This range hood may require two DC12V 2.0W LED.
WARNING: Always switch off the electrical supply before carrying out any operation on the appliance.
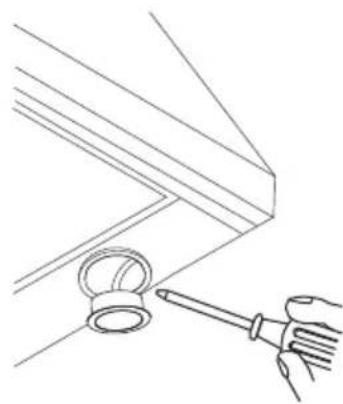
To change bulbs:
- Switch off power and wait for 5 minute till the bulbs cool down.
- Wear gloves and remove the bulb by pulling sideward (as the direction instructed).
- Replace with 120V, GU10, 2.0W LED.
natural_image
Line drawing of a hand using a screwdriver to clean a wall corner (no text or symbols)CAUTION:
- THE SURFACE OF THE HALOGEN BULBS MAY BE HOT. TAKE CARE WHEN TAKING THE REPLACEMENT.
HOOD CLEANING
Stainless steel is one of the easiest materials to keep clean. Occasional care will help preserve its fine appearance.
Cleaning tips:
* Hot water with soap or detergent is all that is usually needed.
* Follow all cleaning by rinsing with clear water. Wipe dry with a clean, soft cloth to avoid water marks.
* For discolorations or deposits that persist, use a non-scratching household cleanser or stainless steel polishing powder with a little water and a soft cloth.
* For stubborn cases use a plastic scouring pad or soft bristle brush together with cleanser and water. Rub lightly in direction of polishing lines or "grain" of the stainless finish. Avoid using too much pressure that may mar the surface.
* Do not allow deposits to remain for long periods of time.
* Do not use ordinary steel wool or steel brushes. Small bits of steel may adhere to the surface causing rust.
* Do not allow salt solutions, disinfectants, bleaches, or cleaning compounds to remain in contact with stainless steel for extended periods. Many of these compounds contain chemicals that may be harmful. Rinse with water after exposure and wipe dry with a clean cloth.
* Painted surfaces should be cleaned with warm water and mild detergent only.
Warranty
This product has been manufactured by Thor Group, 4651 E Airport Drive, California 91761
For Customer Service, please call (877) 288 - 8099
For the most up to date warranty and service policy, please refer to our website WWW.THORKITCHEN.COM/WARRANTY-REGISTRATION
For in-warranty service requests, please visit our website at WW WHORKITCHEN.COM/SERVICE
Please Note: You must provide proof of purchase or installation date for any in-warranty service requests
WELCOME TO THE CLUB
You chose THOR Kitchen to enhance your culinary journey and we're stoked to have you in the club. Think of it as a secret society of really savvy people, such as yourself, choosing professional power and performance at an affordable price.

Register your product by following the steps below.
WARRANTY REGISTRATION

Scan theQR code or visit thorkitchen.com/warranty

Input your product info and select register

You're done. Let's get cookin'.

For additional information and product support, visit thorkitchen.com/service
- CONTENTS
- ATTENTION
- IMPORTANT SAFETY INSTRUCTIONS
- MAINTENANCE
- WARNING!!
- GROUNDING INSTRUCTIONS
- INSTALLATION DRILLING AND LINING
- MOUNTING THE HOOD
- Fix the air outlet
- DUCT FIXING
- CONNECTIONS
- Ducted mode air exhaust system
- Recirculation Mode
- Electrical connection
- GREASE FILTER
- NON-DUCTED RECIRCULATION CHARCOAL FILTER(not included)
- LED BULBS
- CAUTION:
- HOOD CLEANING
- Warranty
- WELCOME TO THE CLUB
- WARRANTY REGISTRATION
Brand : Thor
Model : TRH3005
Category : Range hood