
GM5216B - Car radio Scosche - Free user manual and instructions
Find the device manual for free GM5216B Scosche in PDF.


| Brand | Scosche |
| Model | GM5216B |
| Product Type | In-Dash Installation Kit |
| Compatible Vehicles | 2015-Up Chevrolet Equinox (base model radio, dash modification required) |
| Radio Size Support | Single DIN and Double DIN |
| Included Components | Mounting brackets (2), trim panel, screws, pocket (only for single DIN) |
| Mounting Type | In-dash, behind climate control unit |
| Tools Required | Panel Removal Tool (PRT), screwdriver |
| Safety Notes | Disconnect negative battery terminal before installation; avoid all factory airbag wiring |
| Installation Steps | Disassembly of factory radio and climate control panel, bracket mounting, trim panel placement |
| Liability Disclaimer | Scosche not responsible for discrepancies due to vehicle changes or installation damage |
| Customer Support | Toll-free: 1-800-621-3695 ext. 3 (Mon-Fri 8am-5:30pm PST, Sat 8am-2pm PST) |
| Material | Plastic and metal brackets |
| Color | Black (typical) |
| Weight | Approximately 0.5 lbs |
| Dimensions | Approximately 7 x 5 x 2 inches |
Frequently Asked Questions - GM5216B Scosche
User questions about GM5216B Scosche
0 question about this device. Answer the ones you know or ask your own.
Ask a new question about this device
Download the instructions for your Car radio in PDF format for free! Find your manual GM5216B - Scosche and take your electronic device back in hand. On this page are published all the documents necessary for the use of your device. GM5216B by Scosche.
USER MANUAL GM5216B Scosche
IN-DASH INSTALLATION KIT FOR FOR 2015-UP CHEVROLET EQUINOX VEHICLES

Tools Required:
• PRT (Panel Removal Tool)
- Screwdriver
INTRODUCTION/PRELIMINARY
This premium installation kit is for 2015-UP Chevrolet Equinox vehicles with base model radio (dash modification required). Included are all the parts you need to mount your car stereo or CD player into your vehicle's dash. Refer to individual instruction in this manual to remove your vehicles factory radio and assemble the kit.
CAUTION: DISCONNECT YOUR VEHICLE NEGATIVE BATTERY TERMINAL BEFORE THE INSTALLATION TO HELP PREVENT ELECTRICAL DAMAGE. WE RECOMMEND THE USE OF A VOLT/OHM METER OVER A TEST LIGHT TO CHECK WIRING. A TEST LIGHT OR GROUNDED WIRE PROBE CAN CAUSE DAMAGE TO THE VEHICLE'S COMPUTER AND/OR DIAGNOSTIC SYSTEMS. AVOID ALL FACTORY AIRBAG WIRING - AIRBAGS CAN ACCIDENTALLY DEPLOY CAUSING SERIOUS INJURY OR DEATH.
NOTES
- See your vehicle's instructions for any special tools your installation might require.
- Read all instructions accompanying your car stereo for proper wiring and mounting instructions.
STOP
IMPORTANT!
DO NOT RETURN PRODUCT TO THE RETAILER
IF YOU NEED ASSISTANCE OR REPLACEMENT PARTS CALL US TOLL FREE: 1800-621-3695 X3
HOURS: MON-FRI 8AM-5:30PM (PST) SATURDAY 8AM-2PM (PST)
LIABILITY DISCLAIMER
This instruction booklet is based on carefully documented data and research of automobile disassembly, wire harness/codes and information pertaining to the installation of this kit. Scosche Industries, Inc. cannot be held responsible for discrepancies/inconsistencies that may occur due to the automobile manufacturing changes or options, or damage that may occur in the automobile during the installation of components while using this booklet.
If you have any further questions, call our toll free technical help line at:
1-800-621-3695x3
INSTALLATION GUIDE
Disassembly
Step 1 Disassembly
Remove the two screws from inside of the pocket to disengage it from the dash. Carefully unclip and remove the pocket and retain for later.

Step 2 Disassembly
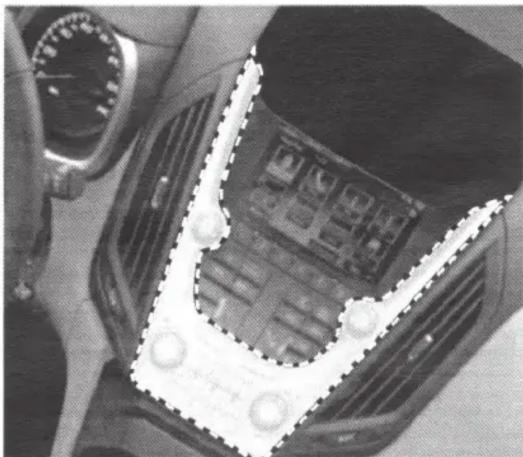
Now, Remove the climate control and radio panel (dashed highlighted area) and Carfully unplug all wiring.
Step 3 Disassembly
Next remove the two lower side panels (dashed highlighted area) from the dash with a PRT (Panel Removal Tool.
Then remove the pocket (arrow) by unscrewing the four screws holding it in place.


Step 4
Disassembly
Remove the two screw from each air vents, then unclip and remove (dash shaded area). The remove the two screws exposed inside the vent cavities.
With the panels detached remove the four screws holding the radio cage in place. Release the cage from below the climate control panel.
INSTALLATION GUIDE
Kit Assembly
Step 1
Kit Assembly
Mount brackets (2) to the sides of the aftermarket head until with the units pre-existing screws. (*Only if installing a single DIN radio, mount the included pocket to the brackets at this point)

Step 2
Kit Assembly
Position the head unit and bracket assembly into the holde beneath the climate control unit (Step 3 on Page 2 of the “Disassembly”). Following this, place the trim panel around the new head unit and fix in place with the supplied screws.
Step 3
Kit Assembly
Reassemble Dash
in reverse order to complete the installation
INSTALLATION GUIDE
Application Variation

Double DIN Application

Single DIN Application
NOTES


- IN-DASH INSTALLATION KIT FOR FOR 2015-UP CHEVROLET EQUINOX VEHICLES
- TOOLS REQUIRED
- INTRODUCTION/PRELIMINARY
- NOTES
- STOP
- IMPORTANT
- DO NOT RETURN PRODUCT TO THE RETAILER
- LIABILITY DISCLAIMER
- INSTALLATION GUIDE
- DISASSEMBLY
- STEP 1 DISASSEMBLY
- STEP 2 DISASSEMBLY
- STEP 3 DISASSEMBLY
- STEP 4
- STEP 1
- STEP 2
- STEP 3
- REASSEMBLE DASH
- APPLICATION VARIATION
Brand : Scosche
Model : GM5216B
Category : Car radio