C300 - Door handle Dormakaba - Free user manual and instructions
Find the device manual for free C300 Dormakaba in PDF.


| Product Type | Door lever and rose set |
| Brand | Dormakaba |
| Model | C300 |
| Material | Metal (zinc alloy) |
| Lever Length | Approx. 5.5 inches (14 cm) |
| Rose Diameter | Approx. 2.5 inches (6.4 cm) |
| Weight | Approx. 0.5 kg (1.1 lbs) |
| Power Source | None (mechanical) |
| Tool Required | Phillips screwdriver |
| Mounting Type | Surface mounted with rose insert |
| Number of Screws | 2 (wood/sheet metal) |
| Functions | Door latch operation with lever handle |
| Installation | Template provided; mount rose insert, attach rose, push lever onto spindle |
| Maintenance | Clean with damp cloth, avoid abrasive cleaners or solvents |
| Safety | Ensure lever clip oriented towards door edge for proper function |
| Spare Parts | Lever, rose, screws, rose insert assembly |
| Compatibility | Standard residential doors with 2-1/8 inch bore (pre-drilled) |
| Finish | Satin chrome (typical) |
Frequently Asked Questions - C300 Dormakaba
User questions about C300 Dormakaba
0 question about this device. Answer the ones you know or ask your own.
Ask a new question about this device
Download the instructions for your Door handle in PDF format for free! Find your manual C300 - Dormakaba and take your electronic device back in hand. On this page are published all the documents necessary for the use of your device. C300 by Dormakaba.
USER MANUAL C300 Dormakaba
Installation Instructions
Overall Exploded View
Tools required for installation
2 Phillips screwdriver
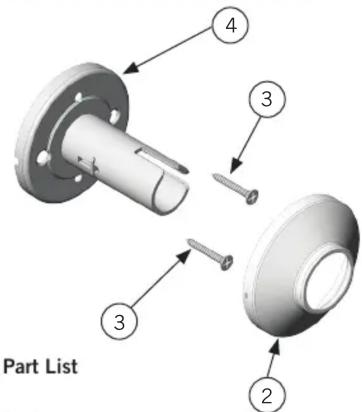
1 - Lever
2 - Rose
3 - Wood/sheet metal screws (x2)
4 - Rose insert assembly

natural_image
3D rendering of a curved mechanical part with an arrow pointing to a numbered point (1), no text or symbols present.www.dorma.com
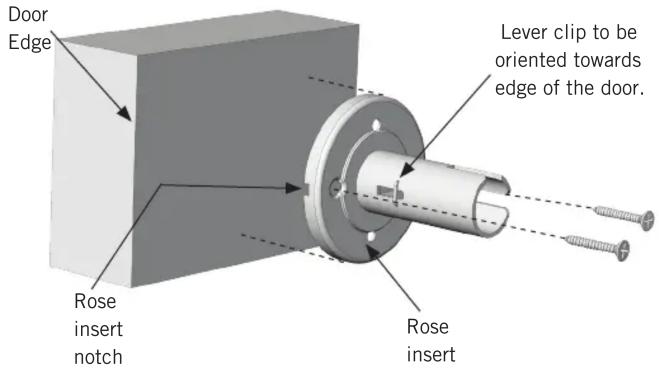
1. Mount rose insert
Use the included template to properly prepare the door face for the lever assembly.
Orient the rose insert such that open notches are on the sides of the insert.
1.1 Secure to the door with two wood/sheet metal screws.
76019328 1/14
2. Install rose
2.1 Place the rose onto the rose insert oriented such that the dimples line up with the insert notches, and the notch is towards the bottom of the rose. (See figure)
2.2 Push the rose into place against the face of the door.

3. Install lever
3.1 Push the lever onto the spindle until it clicks into place.

natural_image
3D mechanical assembly diagram showing a spindle tool interacting with a cylindrical component (no text or symbols)Brand : Dormakaba
Model : C300
Category : Door handle