PMXU67BT - Turntable Pyle - Free user manual and instructions
Find the device manual for free PMXU67BT Pyle in PDF.


| Product Type | DJ & Studio Console Mixer System |
| Brand | Pyle |
| Model | PMXU67BT |
| Input Channels | 6-Channel (+ FX/Headphones) |
| Bluetooth | Built-in Bluetooth 2.0, network name "KG-08A", range 16.4 ft |
| DSP Effects | 16-bit DSP processor, 32-bit dual engine, 24-bit ADC/DAC |
| Equalizer | 3-band EQ per channel (High/Mid/Low) + 7-band graphic EQ on main output |
| Phantom Power | +48V (switchable) |
| Dimensions (L x W x H) | 15.2 x 12.5 x 3.66 inches |
| Power Supply | 100-240V AC, +/-15V DC adapter |
| Input Connectors | (2) XLR/1/4" combo, 1/4" mono/stereo, RCA tape in |
| Output Connectors | (2) 1/4" L/R main, 1/4" headphone, RCA tape out, speaker outputs |
| USB Ports | USB flash drive reader, USB for computer connection |
| MP3 Playback | Built-in MP3 player supporting MP3, WAV files |
| Microphone Input Sensitivity | 1.5 mV / 750 Ohm |
| Frequency Response | 20 Hz - 20 kHz, +/-3 dB |
| Total Harmonic Distortion | 0.03% at 1 kHz, 150 mV input |
| Channel Gain Adjustment | +20 to +64 dB (MIC), -6 to +38 dB (LINE) |
| Equalizer Gain | +/-15 dB at 12 kHz (High), 2.5 kHz (Mid), 80 Hz (Low) |
| Cooling Fan | Yes, built-in amplifier cooling fan |
| Fuse Type | Replace only with same type and rating |
| Included Accessories | Power adapter cable with 3-pin connector |
Frequently Asked Questions - PMXU67BT Pyle
User questions about PMXU67BT Pyle
0 question about this device. Answer the ones you know or ask your own.
Ask a new question about this device
Download the instructions for your Turntable in PDF format for free! Find your manual PMXU67BT - Pyle and take your electronic device back in hand. On this page are published all the documents necessary for the use of your device. PMXU67BT by Pyle.
USER MANUAL PMXU67BT Pyle
Need service or repair?
Want to leave a comment?
PyleUSA.com/ContactUs

PYLE
PyleUSA.com
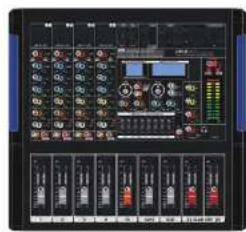
PMXU46BTPMXU67BT
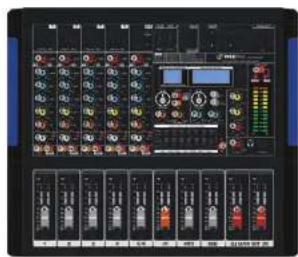
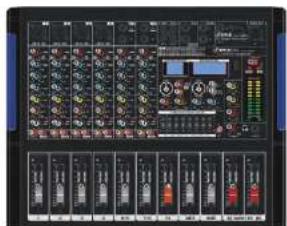
PMXU88BTPMXU128BT

★★★√×+*△★★★★×+*△★★★★×+*△★★★★○×+*
★□※▲☆*□※○■*◆□★|
DJ Controller Audio Mixing Console System
USER MANUAL
Balanced, Unbalanced- What's the Difference?
In a word: "noise." The whole point of balanced lines is noise rejection, and its something they're very good at. Any length of wire will act as an antenna to pick up the random electromagnetic radiation we're constantly surrounded by: radio and TV signals as well as spurious electromagnetic noise generated by power lines, motors, electric appliances, computer monitors, and a variety of other sources. The longer the wire, the more noise it is likely to pick up. That's why balanced lines are the best choice for long cable runs. If your "studio" is basically confined to your desktop and all connections are no more than a meter or two in length, then unbalanced lines are fine-unless you're surrounded by extremely high levels of electromagnetic noise. Another place balanced lines are almost always used is in microphone cables. The reason for this is that the output signal from most microphones is very small, so even a tiny amount of noise will be relatively large, and will be amplified to an alarming degree in the mixer's high-gain head amplifier.
Balanced Noise Cancellation

flowchart
graph LR
    A["Source"] --> B["Phase inversion"]
    B --> C["Hot (+)"]
    B --> D["Cold (−)"]
    B --> E["Ground"]
    B --> F["Cable"]
    G["Receiving device"] --> H["Phase inversion"]
    H --> I["Noise cancelled"]
    I --> J["Noise-free signal"]
    J --> K["Noise"]
    style A fill:#f9f,stroke:#333
    style G fill:#f9f,stroke:#333
    style J fill:#f9f,stroke:#333
| Microphones | Use balanced lines. |
| Short Line - Level runs | Unbalanced lines are fine if you're in a relatively noise free environment |
| Long Line - Level runs | The ambient electromagnetic noise level will be the ultimate deciding factor, but balanced is best |
Signal Levels and the Decibel
Let's take a look at one of the most commonly used units in audio: the decibel (dB). If the smallest sound that can be heard by the human ear is given an arbitrary value of 1, then the loudest sound that can be heard is approximately 1,000,000 (one million) times louder. That's too many digits to deal with for practical calculations, and so the more appropriate "decibel" (dB) unit was created for sound-related measurements. In this system the difference between the softest and loudest sounds that can be heard is 120 dB. This is a non-linear scale, and a difference of 3 dB actually results in a doubling or halving of the loudness.
You might encounter a number of different varieties of the dB: dBu, dBV, dBM and others, but the dBu is the basic decibel unit. In the case of dBu, "0 dBu" is specified as a signal level of 0.775 volts. For example, if a microphone's output level is \~40 dBu (0.00775 V), then to raise that level to 0 dBu (0.775 V) in the mixer's preamp stage requires that the signal be amplified by 100 times. A mixer may be required to handle signals at a wide range of levels, and it is necessary match input and output levels as closely as possible. In most cases the "nominal" level for a mixer's input and outputs is marked on the panelor listed in the owner's manual.

bar
| Category | Value | | -------- | ----- | | Most professional mixers, power amplifiers, and other types of equipment have inputs and outputs with a nominal level of +4 dBu | 0.775 V | | Inputs and outputs on home-use audio gear usually have a nominal level of -7.8 dBu (-10 dBV). | -7.8 dBu | | Microphone signal levels vary over a wide range depending on the type of microphone and the source. Average speech is about -30 dBu, but the twittering of a bird might be lower than -50 dBu while a solid bass drum beat might produce a level as high as 0 dBu | -30 dBu |To EQ or Not to EQ
In general: less is better. There are many situations in which you'll need to cut certain frequency ranges, but use boost sparingly, and with caution. Proper use of EQ can eliminate interference between instruments in a mix and give the overall sound better definition. Bad EQ-and most commonly bad boost-just sounds terrible.
Cut for a Cleaner Mix
For example: cymbals have a lot of energy in the mid and low frequency ranges that you don't really perceive as musical sound, but which can interfere with the clarity of other instruments in these ranges. You can basically turn the low EQ on cymbal channels all the way down without changing the way they sound in the mix. You'll hear the difference, however, in the way the mix sounds more spacious," and instruments in the lower ranges will have better definition. Surprisingly enough, piano also has an incredibly powerful low end that can benefit from a bit of low-frequency roll-off to let other instruments-notably drums and bass-do their jobs more effectively. Naturally you won't want to do this if the piano is playing solo.
The reverse applies to kick drums and bass guitars: you can often roll off the high end to create more space in the mix without compromising the character of the instruments. You'll have to use your ears, though, because each instrument is different and sometimes you'll want the snap of a bass guitar, for example, to come through.
The fundamental ■ and harmonic □ frequency ranges of some musical instruments

bar
| Instrument | Value (Hz) | | :--- | :--- | | Cymbal | 200 | | Piano | 600 | | Bass Drum | 1500 | | Snare Drum | 400 | | Bass | 300 | | Guitar | 500 | | Trombone | 400 | | Trumpet | 1000 |■ Fundamental: The frequency that determines the basic musical pitch.
☐ Harmonics: Multiples of the fundamental frequency that play a role in determining the timbre of the instrument.
3
Some Frequency Facts
The lowest and highest frequencies than can be heard by the human ear are generally considered to be around 20 Hz and 20,000 Hz, respectively. Average conversation occurs in the range from about 300 Hz to about 3,000 Hz.
The frequency of a standard pitchfork used to tune guitars and other instruments is 440Hz (this corresponds to the "A3" key on a piano tuned to concert pitch).
Double this frequency to 880Hz and you have a pitch one octave higher (i.e"A4" on the piano keyboard). In the same way you can halve the frequency to 220Hz to produce "A2" an octave lower.
Boost with Caution
If you're trying to create special or unusual effects, go ahead and boost away as much as you like. But if you're just trying to achieve a good-sounding mix, boost only in very small increments. A tiny boost in the midrange can give vocals more presence, or a touch of high boost can give certain instruments more "air." Listen, and if things don't sound clear and clean try using cut to remove frequencies that are cluttering up the mix rather than trying to boost the mix into clarity.
One of the biggest problems with too much boost is that it adds gain to the signal, increasing noise and potentially overloading the subsequent circuitry.

4
Ambience
Your mixes can be further refined by adding ambience effects such as reverb or delay. The internal effects can be used to add reverb or delay to individual channels in the same way as external effects processors. (Refer to page 15).
Reverb and Delay Time
The optimum reverb time for a piece of music will depend on the music's tempo and density, but as a general rule longer reverb times are good for ballads, while shorter reverb times are more suited to up tempo tunes. Delay times can be adjusted to create a wide variety of "grooves". When adding delay to a vocal, for example, try setting the delay time to dotted eighth notes corresponding to the tune's tempo.
Reverb Tone
Different reverb programs will have different "reverb tone" due to differences in the reverb time of the high or low frequencies. Too much reverb, particularly in the high frequencies, can result in unnatural sound and interfere with the high frequencies in other parts of the mix. It's always a good idea to choose a reverb program that gives you the depth you want without detracting from the clarity of the mix.
Reverb Level
It's amazing how quickly your ears can lose perspective and fool you into believing that a totally washed-out mix sounds perfectly fine. To avoid falling into this trap start with reverb level all the way down, then gradually bring the reverb into the mix until you can just hear the difference. Any more than this normally becomes a "special effect".
The Modulation Effects:
Phasing, Chorus, and Flanging
All of these effects work on basically the same principle: a portion of the audio signal is "time-shifted" and then mixed back with the direct signal. The amount of time shift is controlled, or "modulated", by an LFO (Low-frequency Oscillator). For phasing effects the shift is very small. The phase difference between the modulated and direct signals causes cancellation at some frequencies and reinforces the signal at others and this causes the shimmering sound we hear.
For chorus and flanging the signal is delayed by several milliseconds, with the delay time modulated by an LFO, and recombined with the direct signal. In addition to the phasing effect described above, the delay modulation causes a perceived pitch shift which, when mixed with the direct signal, results in a harmonically rich swirling or swishing sound. The difference between chorus and flanging effects is primarily in the amount of delay time and feedback used--flanging uses longer delay times than chorus, whereas chorus generally uses a more complex delay structure.
Chorus is most often used to thicken the sound of an instrument, while flanging is usually used as an outright "special effect" to produce other worldly sonic swoops.
Compression
One form of compression known as "limiting" can, when properly used, produce a smooth, unified sound with no excessive peaks or distortion. A common example of the use of compression is to "tame" a vocal that has a wide dynamic range in order to tighten up the mix. With the right amount of compression you'll be able to clearly hear whispered passages while passionate shouts are still well balanced in the mix. Compression can also be valuable on bass guitar. Too much compression can cause feedback, however, so use it sparingly. Most compressors require several critical parameters to be set properly to achieve the desired sound. The MG compressor makes achieving great sound much easier: all you need to do is set a single "compression" control and all of the pertinent parameters are automatically adjusted for you.

line
| INPUT | OUTPUT | |-------|--------| | 0 | 0 | | 10 | 10 |Caution!
• To prevent fire or shock hazard, do not expose the unit to rain or moisture.
- Do not open the top cover (or the rear section), high voltage exist inside the unit dangerously. No user serviceable parts inside.
• Refer servicing to qualified personnel.
Precautions!
-
Do not use this apparatus near water, if any liquid or water fall into the cabinet, unplug the unit and have it checked by a qualified personnel before operating it any further.
-
Clean only with dry cloth.
-
Do not block any ventilation openings.
-
Be sure that there is enough space around the unit for cooling purposes, do not install near any heat sources such as radiators, heat registers, stoves, or other apparatus (including amplifiers) that produce heat.
-
Operate only on designated power supply which is printed on the unit.
-
Unplug the unit from the wall outlet or set the Master switch to OFF if it is not to be used for several days.
-
To disconnect the cord, pull it out by the plug. Never pull the cord itself.
-
Please note that all units is properly grounded, for your safety, you should never remove any gound connectors from electronic devices, or render them inoperative.
Contents
Balanced, Unbalanced - What's the Difference? 1
Signal Levels and the Decibel 2
To EQ or Not to EQ 3
Ambience 5
Contents 7
Connection Diagram 8
Functional Specification 9-12
Installation 13
Troubleshooting 14
Specifications 15
Connection Diagram
Built-in Power Amplifier
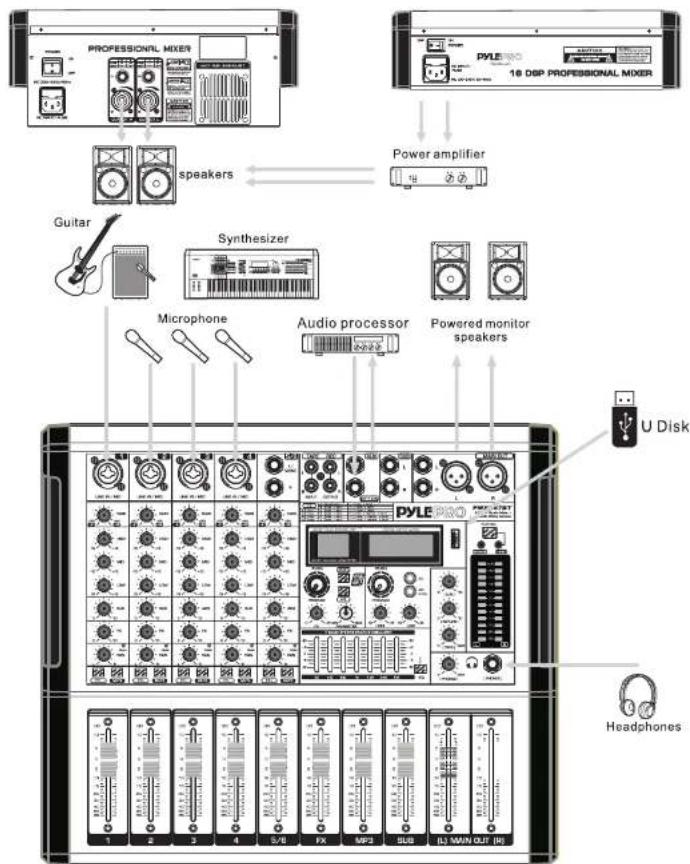

4/6/8/12/16 Input Channel Mixer, New Multi-Voltage Power Supply for Worldwide Use
4/6/8/12/16 Input Channel, Powered Mixer
• Built-in Bluetooth connects the mobile phone or in other Bluetooth player
• Built-in MP3 player that supports variety of music formats
- Connect the computer to record and play music
- Digital DSP, 16 Multi-FX effects
• Ultra -musical 3-band EQ on all channels
• Peak LED all Channels
• High accurate level indicator
- Phantom power switch (+48V)
• Sealed rotary controls to resist dust and grime
• Rugged steel chassis

1. MIC Input jacks
These are balanced XLR-type microphone input jacks. (1: Ground; 2: Hot; 3: Cold)
2. LINE Input Jacks (monaural channels)
These are balanced TRS phone-jack line inputs. (T: Hot; R: Cold; S: Ground). You can connect either balanced or unbalanced phone plugs to these jacks.
3. GAIN Control
Adjusts the input signal level. To get the best balance between the S/N ratio and the dynamic range, adjust the gain so that the PEAK indicator only occasionally and briefly on the highest input transients. The -60 to +10 scale is the MIC input adjustment range. The 40 to +10 scale is the LINE input adjustment range.
4. Equalizer 3 (HIGH, MID and LOW)
This three-band equalizer adjusts the channel's high, mid and low frequency bands. Setting the knob to the "0" position produces a flat response in the corresponding band. Turning the knob to the right boosts the corresponding frequency band, while turning to the left attenuates the band.
5. AUX Control
Used to adjust the output to AUX pin signal level.
6. FX Control
Adjusts the level of the signal sent from the channel to the FX SEND buses.
7. PEAK LED
The PEAK-LED lights up when the input signal is driven too high. If this happens, back off the TRIM control and if necessary, check the setting of the EQ channel.
8. PAN Control
The PAN control determines the position of the channel signal within the stereo image. When working with sub groups, you can use the PAN control to assign the signal to just one output, which gives you additional flexibility in recording situations.
9. M UTE Switch
The MUTE switch breaks the signal path pre-channel fader, hence muting that channel in the main mix. The aux sends which are set to post-fader are likewise muted for that channel, while the pre-fader monitor paths remain active irrespective of whether the channel is muted or not.
10. PFL Switch
The PFL switch is used to route the channel signal to the the PFL bus (Pre Fader Listen). This enables you to listento a channel signal without affecting the main output signal. The signal you hear is taken either be fore the pan control (PFL mono).
11. CHANNEL FADER
Adjusts the level on the channel signal. Use these faders to adjust the balance between the various channels.
12. TAPE INPUT/OUTPUT SOCKET
The TAPE IN jack (on stereo RCA) allows the connection of play-back devices such as CD players etc. Use the TAPE OUT jack to connect, for example, a tape deck for recording applications.
13. AUX/RETURN jacks
These are unbalanced phone-jack type line inputs. These jacks are typically used to receive the signal returned from an external effect device (reverb, delay, etc.). These pins can be connected, such as the effect of external equipment.
14. SUB Jack Bass Output Jack
15. Main IN/OUT (L,R) Jacks
These jacks delivers the mixer's stereo output. You use these jacks to connect the power amplifier to your main speakers.
16. EFFECTOR DISPLAY: Shows the kind of effector.
17. PROGRAM Control
You can select the effects preset by turning the PROGRAM control. The display flashes with the number of the current preset. To recall the selected preset, press ON the button; the flashing stops. You can also recall the selected preset with the foot switch.
18. DSP MUTE SWITCH: Mutes the DSP or effects.
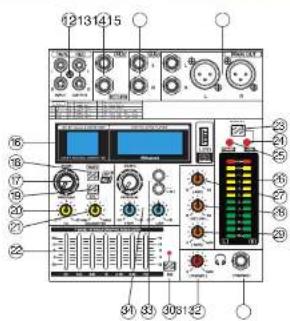

19. AFL SWITCH
The AFL switch is used to route the channel signal to AFL bus (post-fader listen), it allows you to listen to a channel signal that is affected by the main output signal. The signal you hear is taken after PAN control.
-
FX Control Used to adjust size effect.
-
PARAMETER Control
Used to adjust the depth of the selected effect, speed, etc.
This 7-band equalizer adjusts the sound of the signal sent to the MAIN OUT jacks.
-
- 48 V PHANTOM Power
This switch toggles phantom power ON and OFF. When the switch is turned ON, the mixer supplies +48V phantom power to all channels that have XLR mic input jacks. Turn this switch ON when using one or more phantom-powered condenser microphones.
-
+48 V Indicator: This indicator lights up when the +48V is turned ON.
-
POWER Indicator: This indicator lights up when the mixer is turned ON.
-
Level Meter: Shows the signals level
-
AUX Control: Used to adjust the output to the AUX pin signal level.
-
RETURNS Control: Adjusts the level at which the signal received at the RETURN jacks (L (MONO) and R) is sent to the STEREO L/R bus.
-
TAPE Control: Used to adjust the output to the TAPE pin signal level.
-
EQ IN SWITCH: Use this switch to activate the graphic equalizer.
-
PHONES Control: Controls the level of the signal output to the PHONES jack OUT jacks.
-
PHONES Jacks: Connect a pair of headphones to this TRS phone-type output jack.
11
33. MP3 Control
a. Selected Songs / Play / Pause: When playing music, rotate to change up / down the song, press to pause / play.
b. Recording: When playing music, long press to record, short press to finish recording and enter to playback the recorded music. When playing the recorded music, short press to switch into playing the USB music first track. When playing the USB music, short press to switch into playing the recorded music first track
c. Mode/Repeat: Short press to switch into USB model or BLUETOOTH, long press to repeat the current song. While playing the current song, long press to return to normal play.
-
MP3 player EQ: Adjust the MP3 Player two-band equalizer level.
-
FX SEND Fader: Control effect input signal level.
-
MP3 VOL Fader: To increase or decrease the MP3 VOL.
-
SUB Fader: Adjust the SUB output level.
-
MAIN MIX Fader: High-precision quality faders to control the output level of the main mix.
39. POWER Switch
Use the POWER switch to turn ON the mixing console. The POWER switch should always be in the "OFF" position when you are about to connect your unit to the mains. To disconnect the unit from the mains, pull out the main cord plug. When installing the product, ensure that the plug is easily accessible.
- FUSE HOLDER / IEC MAINS RECEPTACLE
The console is connected to the mains via the supplied cable, which meets the required safety standards. Blown fuses must only be replaced by the same type and rating. The mains connection is made via cable with IEC mains connector. The appropriate mains cable is supplied with the equipment.
-
AMPLIFIER OUTPUT: Connect with two 4ohm speakers.
-
COOLING FAN: Cools the amplifier to avoid overheat.


12
INSTALLATION TROUBLESHOOTING
Cable Connections
You will need a large amount of cables for the various connections of the console. The image below shows the wiring of these cables. Use only HIGH GRADE cables

Foot Switch Connector
Audio Connections
Use commercial RCA cables to wire the 2-track input and output. You can also connect unbalanced devices to the balanced input/output. Use either mono plugs, or use stereo plugs to link the ring and shaft (or pins 1 & 3 in the case of XLR connectors).
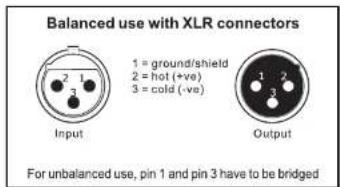
XLR Connections
CAUTION!
NEVER USE unbalanced XLR connectors (PIN 1 and 3 connected) at the MIC input jacks if you want to use the phantom power supply.

6.3: 1/4" Mono Plug
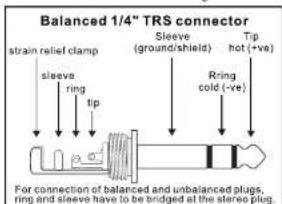
Balanced 1/4" TRS Connector

Insert Send/Return Stereo Plug

1/4" TRS Headphones Connector
If a problem occurs while operating, use this troubleshooting guide to help remedy the problem before requesting repairs. If the problem persists, consult your nearest dealer.
| PROBLEM POSSIBLE CAUSES SOLUTIONS | ||
| Power can't be turned on. | Power Supply cord is not connected or not connected securely. | Securely connect the power supply cord to the mixer DC input and/or the AC power outlet. |
| The power supply cord is defective. | Replace the power supply cord. | |
| The AC power outlet has no power. | Connect the power supply to an AC power outlet with proper power. | |
| The AC power source is from an AC power extension cord. Extension cord power switch is not turned ON. | Turn on the power switch of the AC power extension cord. | |
| No output sound | The power is turned OFF | Turn ON the power |
| The stereo level fader was turned to minimum. | Adjust the stereo level fader to have an optimal output level. | |
| The main output audio cable is missing or defective. | Connect, repair or replace the audio cables. | |
| One channel no sound | The gain control knob to the channel was turned to minimum. | Adjust the gain control knob to that channel to have an optimal output level. |
| The level control knob to the microphone channel was turned to minimum. | Adjust the level control knob to that channel to have an optimal output level. | |
| Microphone no sound | No phantom power to the condenser microphone | Turn on the phantom power. |
| The gain control knob to the microphone channel was turned to minimum. | Adjust the gain control knob to that microphone channel to have an optimal microphone output level. | |
| The level control knob to the microphone channel was turned to minimum. | Adjust the level control knob to that microphone channel to have an optimal microphone output level. | |
| Distorted sound | The amplitude of the input signal is over the threshold. | Adjust the gain control knob to lower the input gain. |
| The amplitude of the main output signal is over the threshold of the connected amplifiers or active speakers. | Adjust the stereo level fader to lower the main output level. | |
PMXU46BT - PMXU67BT - PMXU88BT - PMXU128BT Bluetooth Studio Mixer - DJ Controller Audio Mixing Console System
| PMXU46BT PMXU67BT PMXU8 | 8BT PMXU128BT | MODEL | ||
| Input Mixer Channels | 4-Ch. (+ FX/Headphones) | 6-Ch. (+ FX/Headphones) | 8-Ch. (+ FX/Headphones) | 12-Ch. (+ FX/Headphones) |
| Dimensions (L x W x H) | 13.8"x12.5"x3.66"-inches | 15.2"x12.5"x3.66"-inches | 16.3"x12.5"x3.66"-inches | 21.4"x12.5"x3.66"-inches |
Features:
• DJ & Studio Console Mixer System
• Built-in Bluetooth Wireless Receiver
• FX (Analog Effects) & 16 Bit DSP processor
- Direct-to-Computer Connect & Sound Record Ability
- 7-Band EQ
• 32-Bit Dual Engine DSP
• 24-Bit ADC DAC Converter
• FX Configuration Adjustment Controls
• Rotary Adjustment Knobs & LED Indicator Lights
• MP3 Digital Audio File Compatibility
• USB Flash Drive Reader
• USB Port for Desktop Connection
- Connect & Stream Audio from External Devices
• (2) 1/4" (L/R) MAIN Outputs
• (2) XLR/14" Combo Audio LINE/Microphone Inputs
• 1/4" Mono + Stereo Inputs
• 1/4" Send + Return Inputs
• 1/4" Headphone Jack
- Stereo Level Fader/Slider
• Output Signal Level Indication
• BUS Audio Control, Sound Routing
• PAD Channel Source Input Switch
- Independent Channel Input Audio Configuration
• Gain, High, Mid, Low, FX/Send, Level, Base + Tone Adjustment
• +48V Phantom Power Control
• Power ON/OFF Switch
• Used for Professional Studio Applications & On-Stage Performances
What's in the Box:
- Bluetooth Studio Mixer
• Power Adapter Cable, 3-Pin
Wireless Bluetooth Connectivity:
• Hassle-Free Audio Streaming Ability
- Works with All of Today's Latest Devices (Smartphones, Tablets, Laptops, Computers, etc.)
- Bluetooth Network Name: 'KG-08A'
- Bluetooth Version: 2.0
• Wireless Range: 16.4' ft.
Technical Specs:
• Mic Input: Sensitivity/Impedance: 1.5mV/750 Ohm
- Input Frequency Response: 20Hz-20kHz, +/-3dB
• Input Distortion: 0.03%, 1kHz/150mV Input
• Channel GAIN Adjustment: +20/+64 (-6/+38)
• HIGH Gain: +/-15 dB, 12kHz Frequency Shelving
• MID Gain: +/-15 dB, 2.5kHz Frequency Shelving
- LOW Gain: +/-15 dB, 80kHz Frequency Shelving
• HIGH/MID/LOW Adjustment: -15/+15dB
- Stereo Output Level Meter: 12-segment (+6, +3, 0, -3, -10dB)
• PAD Input Channel Adjustment: 26dB
• Peak CLIP Level: < 3dB
• Phantom Power Voltage: +48V
• Power Supply: 100-240V (+/-15V DC Power Adapter)
• Digital Audio File Compatibility File-Types: MP3, WAV
- Sold as: 1
- PYLE
- Balanced, Unbalanced- What's the Difference?
- Signal Levels and the Decibel
- To EQ or Not to EQ
- Cut for a Cleaner Mix
- Some Frequency Facts
- Boost with Caution
- Ambience
- Reverb and Delay Time
- Reverb Tone
- Reverb Level
- The Modulation Effects:
- Phasing, Chorus, and Flanging
- Compression
- Caution!
- Precautions!
- Contents
- 4/6/8/12/16 Input Channel Mixer, New Multi-Voltage Power Supply for Worldwide Use
- 4/6/8/12/16 Input Channel, Powered Mixer
- MIC Input jacks
- LINE Input Jacks (monaural channels)
- GAIN Control
- Equalizer 3 (HIGH, MID and LOW)
- AUX Control
- FX Control
- PEAK LED
- PAN Control
- M UTE Switch
- PFL Switch
- CHANNEL FADER
- TAPE INPUT/OUTPUT SOCKET
- AUX/RETURN jacks
- SUB Jack Bass Output Jack
- Main IN/OUT (L,R) Jacks
- EFFECTOR DISPLAY: Shows the kind of effector.
- PROGRAM Control
- DSP MUTE SWITCH: Mutes the DSP or effects.
- AFL SWITCH
- MP3 Control
- POWER Switch
- INSTALLATION TROUBLESHOOTING
- Cable Connections
- Audio Connections
- Features:
- What's in the Box:
- Wireless Bluetooth Connectivity:
- Technical Specs:
Brand : Pyle
Model : PMXU67BT
Category : Turntable