
Xperia Ace II - Telephone SONY - Free user manual and instructions
Find the device manual for free Xperia Ace II SONY in PDF.


| Product Type | Smartphone (Mobile Phone) |
| Model | SO-41B (Xperia Ace II) |
| Dimensions | Approx. 140 × 69 × 8.9 mm |
| Weight | Approx. 154 g |
| Display | 5.3 inch HD (1480 × 720) TFT LCD |
| Operating System | Android (with docomo customization) |
| Storage | Internal: 64 GB; microSD support up to 1 TB |
| Battery | Built-in Li-ion, 2800 mAh (typical); charging via USB Type-C |
| Camera | Rear: 13 MP with flash; Front: 5 MP; Modes: Superior Auto, Panorama, Portrait selfie |
| Security | Side-mounted fingerprint sensor, screen lock (PIN/pattern/password) |
| Connectivity | Wi-Fi 802.11 a/b/g/n/ac, Bluetooth 5.0, NFC, FeliCa, GPS |
| Waterproof/Dustproof | IPX5/IPX8 water resistance, IP6X dust resistance (with covers closed) |
| SIM Card | Nano SIM (4FF) |
| Special Features | Side sense one-handed operation, Multi-window split screen, Battery Care, SuguApp |
| Cleaning Instructions | Wipe with dry soft cloth; no alcohol, thinner, or detergent |
| Safety Precautions | Do not disassemble; avoid high temperature, impact, or water ingress; use specified accessories |
| Repair and Service | Contact NTT DOCOMO for repairs; battery replacement at authorized centers |
Frequently Asked Questions - Xperia Ace II SONY
User questions about Xperia Ace II SONY
0 question about this device. Answer the ones you know or ask your own.
Ask a new question about this device
Download the instructions for your Telephone in PDF format for free! Find your manual Xperia Ace II - SONY and take your electronic device back in hand. On this page are published all the documents necessary for the use of your device. Xperia Ace II by SONY.
USER MANUAL Xperia Ace II SONY
Thank you for your purchase of "SO-41B". For proper use of the SO-41B, read this manual carefully before and while you use the SO-41B.
About manuals
● "クイックスタートガイド (Quick Start Guide)" (Supplied accessories)
Part names and functions are explained.
- "Instruction Manual" application (Application of the terminal) (in Japanese only)
Operations and settings of each function are explained.
You can search by free word, open a setting screen or launch an application from a displayed page, etc. Use the terminal more conveniently with this application.
[How to use]
From the Home screen, □▶[Instruction Manual].
- When using for the first time, download and install the application according to the onscreen instructions.
- You can also call up "Instruction Manual" application from "my daiz".
![SONY Xperia Ace II - [How to use] - 1](/content/2026/05/953146/images/e8edd632b4c78f56a58b79dbb9e363143cfb4a5c1d1fc47719451d46c807f3e8.jpg)
"Wi-Fi" no tsukaikata
"Wi-Fi" wo setsumeisho apuri de shirabemasu.
![SONY Xperia Ace II - [How to use] - 2](/content/2026/05/953146/images/95f3b87768f60f99a7a0fb7f9af598ce73efaaaf24f090b282055874532a680e.jpg)
- If you uninstall "Instruction Manual" application, access Google Play from Play Store for installing it again. From the Home screen, tap [Play Store], search "取扱說明書 (Instruction Manual)" application to select, then operate it following the onscreen instructions.
● "Instruction Manual" (PDF file)
Operations and settings of each function are explained. It can be downloaded from NTT DOCOMO website.
Note
- Important information for SO-41B is posted in the following website. Be sure to check before using. https://xperia.sony.jp/support/ (in Japanese only)
Operation descriptions
In this manual, key icons (P.52) are described as ▲, □.
And operations for selecting icons or items in the key operations on the screens are described as follows.
| Description Operation | |
| Press and hold the power key for at least 1 second. | Press and hold the power key on the side of the terminal for at least 1 second. |
| From the Home screen, [Settings] [Display]. | From the Home screen, tap and then tap [on the next screen. |
| From the Home screen, [Settings] [Display]. | From the Home screen, tap and then tap "Settings" on the next screen and "Display" on the following screen. |
| Touch and hold an icon. | Keep touching an icon longer (1-2 seconds). |
Information
- Please note that "SO-41B" is called as "the terminal" in this manual.
-
In this manual, the description is written based on the default state.
-
In this manual, the easier procedure is described for the functions and settings which have multiple operating procedures.
- The terminal may have a software update of the operating system (OS) for the purpose of quality improvement or addition of functions. In that case, operation procedure may change. For the information about addition of functions or change of operation procedure, refer to NTT DOCOMO website And some applications that used in the previous OS version may not be available or some unintended bugs may occur.
- Some applications or services may not be available depending on your contract. For details, refer to NTT DOCOMO website.
- Contact to DOCOMO varies by your contract. For details on Inquiries, refer to the last page.
- In this manual, explanations for "docomo LIVE UX" as Home application are provided (P.74). If you set the other home application, the operations may differ from the descriptions.
- The contents of this manual and written URL are subject to change without prior notice.
- Screens and illustrations used in this manual are just images for explanations and may be different from the actual ones of the product.
- Reproduction or reprint of all or part of this manual without prior permission is prohibited.
Supplied accessories
- SO-41B
natural_image
Blank smartphone outline with rounded corners and a small triangular clip at the top (no text or symbols)You can check or purchase optional devices (optional) compatible with the terminal in the DOCOMO online shop.
https://onlineshop.smt.docomo.ne.jp/options/search.html (in Japanese only)
Contents
■ Supplied accessories.... 1
Precautions 4
About using the terminal....4
Recommended features....6
Safety Precautions (Always follow these directions) 7
Handling precautions....17
Waterproofness/Dustproofness....24
Before using the terminal . . . 30
Part names and functions....30
nano UIM card....31
microSD card 34
Charging....37
FCC ID 40
Turning power on/off......41
Initial settings....42
Security codes for the terminal 44
Basic operations .....47
Basic operations....47
Character entry....56
Notification LED 62
Screen display and the icons 62
Task manager....67
Split screen....68
SuquApp....69
One-handed mode....72
Searching information in the terminal and websites....73
Home screen 74
Switching the home app....74
docomo LIVE UX....74
Xperia Home screen....81
Simple Home screen 84
Application screen 87
Application list....89
Phone/Phonebook.....95
Making/Receiving a call....95
Operations during a call 99
Call history....100
Call settings 103
Accessibility 104
Phonebook 104
Mail/Web browser .....109
docomo mail 109
+Message 109
Gmail....115
Early Warning "Area Mail" 116
Chrome 117
Camera/Photos.....121
Camera 121
Photos....129
Apps 130
Location services....137
Schedule....139
Clock....141
docomo Data Copy 143
Settings 145
Viewing the Settings menu.... 145
Network & internet.... 146
Device connection.... 156
Appearance 157
Apps & notifications 157
Battery....162
Display....163
Sound 165
Storage....167
Privacy....168
Location 169
Security 169
docomo service/cloud.... 174
Accounts....175
Accessibility 176
Digital Wellbeing & parental controls 177
Google 178
System....178
About phone 183
File management ..... 184
Storage structure.... 184
File operations.... 184
Data communication.....186
Bluetooth function.... 186
External device connection. .189
Connecting to PC 189
International roaming .....190
Overview of International roaming
(WORLD WING)....190
Available overseas service 190
Before using overseas 191
Making/Receiving a call in the place you stay 194
International roaming settings.... 196
After returning to Japan 198
Appendix .....199
Troubleshooting.... 199
Software Update 208
Warranty and After Sales Services 211
Main specification 216
Certificate and compliance 218
Specific Absorption Rate of Mobile Phone, etc. 219
END USER LICENSE AGREEMENT.... 223
Export Controls and Regulations 231
Intellectual Property Right 231
SIM unlock 234
Index....235
Precautions
About using the terminal
- The terminal supports LTE, W-CDMA, GSM/GPRS and wireless LAN systems.
- Because the terminal uses radio frequencies, it is not available inside of tunnel, underground, building or other locations where radio waves do not reach, in a place with weak radio waves, or out of LTE service area or FOMA service area. Also, it may not be available on the upper floors of high-rise apartments or buildings, even if there are no obstructions around you. Note that calls may be disconnected even when you stay without moving in areas with strong radio wave condition indicated with the 4-signal icon.
-
Because the terminal uses radio waves to communicate, it is possible that a third party may attempt to tap your calls. However, the LTE, W-CDMA, GSM/GPRS system automatically scrambles all calls through a private call feature. Therefore, even if the third party successfully intercepts your call, they will only hear noise.
-
The terminal operates on radio frequencies by converting voice into digital signals. If a caller moves into an area of poor radio wave condition, the digital signal may not be restored accurately, and the voice received in the call may differ slightly from the actual voice.
- The terminal supports the function which allows "User" or "Guest" to use the terminal. Therefore some services or applications recognize them as the same user even after the user is switched. DOCOMO shall have no liabilities for any damage or troubles of customer or a third party resulting from using the function (P.182).
- Note down the data saved to the terminal in a separate note on a regular basis or save to an external recording medium such as a microSD card or PC. Note that DOCOMO assumes no responsibility for any loss of saved data resulting from malfunction, repair, changing of the model or other handling of the terminal.
-
As with PCs, some user-installed applications or accessed websites may disrupt the stability of the terminal performance, or unexpectedly transmit information via the Internet causing improper use of your location information as well as personal information recorded on the terminal. Therefore, verify the supplier and operating conditions of the applications or websites before using them.
-
The terminal automatically performs communication for synchronizing data, checking the latest software version, and maintaining a connection with the server, and for other purposes. If you transmit a large amount of data, such as when downloading applications or watching video, a packet communication charge becomes high. Subscription to Packet Pack/packet flat-rate service is highly recommended.
- Depending on the applications or service you use, packet communication charge may be applied even in Wi-Fi® communication.
- If available memory in the microSD card or the internal storage is low, running applications may not operate correctly. In that case, delete the saved data.
- Set a password etc. for the screen lock to ensure the security of the terminal in case of loss (P.170).
-
If your terminal is lost, change your each account password to invalidate authentication using a PC to prevent other persons from using Google services such as Gmail or Google Play, or SNS, etc.
-
For using services and applications provided by the third party's including applications provided by Google LLC, confirm the terms and conditions, etc. specified by Google or the providers. DOCOMO assumes no responsibility for any malfunctions resulting from the services and applications.
- When a license agreement screen etc. appears, follow the onscreen instructions.
- Applications and service contents are subject to change without prior notice.
- Providers other than sp-mode, mopera U and Business mopera Internet are not supported.
- For details on usage charge, refer to NTT DOCOMO website.
- Display is manufactured by taking advantage of highly advanced technology but some dots may be always or never lit. Note that, this shows characteristics of the display and not defects in the terminals.
• DOCOMO is not liable to any failures or malfunctions for commercially available optional equipment.
Recommended features
Camera
You can activate the camera from the icon of the "Camera" application or the camera icon on the lock screen.

You can easily shoot beautiful photos just leaving it to the camera with SUPERIOR AUTO which automatically determines the scene and condition to select most suitable setting, Panorama which can frame vast scenery to compose smooth and natural finishes, Portrait selfie which allows you to adjust effects while shooting, etc. P.121
Multi-window
When you want to "post to SNS while seeing a video" or "search for the Internet when writing email", the Multi-window feature is very useful.
The screen can be split in two windows and you can operate applications individually in each window.
Multi-window can be activated from the multi-window menu or the split screen feature. → P.51, P.68
For details on the feature, refer to the Xperia™ website (https://xperia.sony.jp/myxperia/ (in Japanese only)).
Safety Precautions (Always follow these directions)
For safe and proper use of the terminal, please read the "Safety Precautions" prior to use.
■ ALWAYS observe the safety precautions since they intend to prevent personal injury or property damage.
The following symbols indicate the different levels of injury or damage that may result if the guidelines are not observed and the terminal is used improperly.
 DANGER DANGER | Failure to observe these guidelines may "immediately result in death or serious injury(*1)". |
 WARNING WARNING | Failure to observe these guidelines may "result in death or serious injury(*1)". |
 CAUTION CAUTION | Failure to observe these guidelines may result in minor injury(*2) and property damage(*3). |
*1 Serious injury: This refers to loss of sight, injury, burns (high- and low-temperature), electric shock, broken bones, injuries with residual aftereffects from poisoning, etc., and injuries requiring hospital admission for treatment or long-term hospital attendance as an outpatient.
*2 Minor injury: This refers to injuries, burns (high- and low-temperature), electric shock, etc. that do not require hospital admission for treatment or long-term hospital attendance as an outpatient.
*3 Property damage: This refers to extended damage to buildings, furniture, livestock, pets, etc.
■ The following symbols indicate specific directions.
 | Indicates prohibited actions. |
 | Indicates not to disassemble. |
 | Indicates not to use where it could get wet. |
 | Indicates not to handle with wet hands. |
 | Indicates compulsory actions in accordance with instructions. |
 | Indicates to remove the power plug from the outlet. |
1. Handling the terminal, adapter, and nano UIM card (common)

DANGER

Don't
Do not use, store or leave the equipment in locations subject to high temperature or accumulation of heat (e.g. by the fire, near a heater, under a kotatsu or bedding, in direct sunlight, in a car in the hot sun).
Doing so may cause fire, burns, injury, electric shock, etc.

Don't
Do not put the equipment in or place near microwave ovens, cooking appliances such as IH cooking heaters, or high pressure containers such as pressure cookers.
Doing so may cause fire, burns, injury, electric shock, etc.

Don't
Do not splash sand, soil or mud, or do not directly place the equipment on them. Also, do not touch the equipment with hands with sand etc. adhered.
Doing so may cause fire, burns, injury, electric shock, etc.
For waterproofness/dustproofness, see the following.
⇒P.24 "Waterproofness/Dustproofness"

Don't
Do not charge the terminal when it is wet with liquids such as water (drinking water, sweat, seawater, urine of pet animals, etc.). Also, do not charge the terminal in a place where it possibly contacts water such as a bathroom.
Doing so may cause fire, burns, injury, electric shock, etc.
For waterproofness, see the following.
⇒P.24 "Waterproofness/Dustproofness"

Don't
Do not subject the terminal to strong pressure or break the terminal. Especially when the terminal is in a pocket of clothes, do not let it hit against surroundings or put between the objects.
Doing so may cause fire, burns, injury, etc. because of damage of the internal battery.
* The following are examples that you should be careful of:
- Sitting or squatting with the terminal put in a pocket of trousers or skirt
- Letting your outer wear get caught in doors or a door of car when the terminal in the pocket
• Stepping on the terminal on a soft object such as a sofa, bed, or bedding, or on a floor
- Putting the terminal in a seat gap of train, bus, etc.

Don't
Do not attempt to remove the internal battery from the terminal.
Doing so may cause fire, burns, injury, electric shock, etc.

Don't
The back panel of the terminal cannot be removed. Do not attempt to remove it.
Doing so may cause fire, burns, injury, etc.

no disassembly
Do not disassemble or modify the equipment.
Doing so may cause fire, burns, injury, electric shock, etc.

No liquids
Do not let the equipment get wet with liquids such as water (drinking water, sweat, seawater, urine of pet animals, etc.).
Doing so may cause fire, burns, injury, electric shock, etc.
For waterproofness, see the following.
⇒P.24 "Waterproofness/Dustproofness"

No liquids
Do not allow liquids such as water (drinking water, sweat, seawater, urine of pet animals, etc.) to get inside of the charging jack or the external connection jack.
Doing so may cause fire, burns, injury, electric shock, etc.
For waterproofness, see the following. ⇒P.24 "Waterproofness/Dustproofness"

Do
Use optional devices specified by NTT DOCOMO.
Using a device other than specified may cause fire, burns, electric shock, etc.

WARNING

Don't
Do not subject the equipment to strong force, impacts, or vibration such as letting it fail, stomping or throwing it.
Doing so may cause fire, burns, injury, electric shock, etc.

Don't
Do not allow conductive materials (such as metal objects and pencil lead) to come into contact with the charging jack or external connection jack or dust to get inside it.
Doing so may cause fire, burns, injury, electric shock, etc.

Don't
Do not cover or wrap the equipment with a cloth or bedding in use or while charging.
Doing so may cause fire, burns, etc.

Do
If charging does not finish after specified time has elapsed, stop charging.
Failure to do so may cause fire, burns, injury, etc. due to overcharge etc.

Do
Power off the terminal before you step into a place where flammable gas or dust is generated. Stop charging if you charge the battery.
May cause explosion, fire, etc. if the flammable gas, etc. catches fire.

Do
Follow the instructions of facility for use in a gas station, etc.
Do not charge the battery in a gas station, etc. Also, be careful not to drop the terminal when using in a gas station etc. Do not use it during oil feeding.
May cause explosion, fire, etc. if the flammable gas, etc. catches fire.

Do
If you notice anything unusual about the equipment such as an unusual odor, abnormal noise, smoke generation, overheating, discoloration or deformation while using or charging, or during storage, take care of safety and perform the following measures.
- Remove a power plug from a power outlet or accessory socket.
• Power off the terminal.
Failure to do so may cause fire, burns, injury, electric shock, etc. if you do not follow the instructions above.

CAUTION

Don't
Do not use damaged equipment.
Doing so may cause fire, burns, injury, etc.

Don't
Do not place on an unstable or inclined platform. Be careful especially when vibrator is set.
Doing so may cause the device to fall etc. and cause injury.

Don't
Do not use or keep in a place that is very humid, dusty, or subject to high temperature.
Doing so may cause fire, burns, electric shock, etc.
For waterproofness/dustproofness, see the following.
⇒P.24 "Waterproofness/Dustproofness"

Don't
If children use the terminal, parents or guardians should give them the proper instructions for use and do not allow them to use the terminal in the wrong way.
Doing so may cause accidental ingestion, injury, electric shock etc.

Don't
Keep the equipment out of the reach of babies and infants.
Especially be careful about a storage location for small parts such as the nano UIM card/microSD card tray.
Doing so may cause accidental ingestion, injury, electric shock etc.

Do
Be careful when using the terminal continuously for a long time or while charging because the temperature of the terminal may rise. Also, be careful not to touch it unintentionally for a long time when you put the terminal in a pocket of clothes, you fall asleep, etc.
The terminal or adapter may become warm when using applications, calling, performing data communication, watching videos, etc. for a long time or while charging. If you are directly in contact to a high temperature area for a long time, a redness of skin, itch, rash, low-temperature burn etc. may be caused depending on your physical condition.
2. Handling the terminal

DANGER

Don't
Do not throw the terminal into fire or apply heat.
Doing so may cause fire, burns, injury, etc.

Don't
Do not apply excessive force such as sticking a sharp object (nail, etc.) to the terminal, hitting it with a hard object (hammer, etc.), or stepping on it.
Doing so may cause fire, burns, injury, etc.

Do
If the internal substance of the terminal contacts your eyes or mouth, immediately rinse your eyes or mouth with clean water and see a doctor right away.
Failure to do so may cause blindness, medical problem, etc. due to effects of the internal substance of the terminal etc.

WARNING

Don't
Do not turn on or flash the flash/photo light with the luminous part close to the other people's eyes. Keep enough distance away especially from babies and infants.
Doing so may cause blurred vision etc. Or it may dazzle his/her eyes or scare him/her causing an accident such as injury.

Don't
Do not turn on or flash the flash/photo light toward a driver of a car etc.
Doing so may disturb driving and cause an accident etc.
| Don't | Do not watch a repeatedly-blinking screen for a long time.Doing so may cause cramp, loss of consciousness, etc. |
| Don't | Do not allow water or other liquids (drinking water, sweat, seawater, urine of pet animal, etc.), or foreign substance such as a metal parts (blade of cutter, staple, etc.) or flammables to get in the nano UIM card/ microSD card slot of the terminal.Do not insert a nano UIM card or microSD card into wrong slot, or insert it in wrong orientation.Doing so may cause fire, burns, injury, electric shock, etc. |
| Don't | Do not expose the camera lens to direct sunlight for an extended period.Doing so may cause fire, burns, injury, etc. by the light-collecting mechanism of the lens. |
| Do | Power off the terminal or put it in Airplane mode before boarding an airplane.Use of mobile phones on board is restricted.Follow the instructions of each airline.The radio wave from the terminal may adversely affect on-board electronic equipment.Prohibited acts related to mobile phone usage on an airplane may be punished by law. |
| Do | Follow the instructions of each medical facility for the use of mobile phones on their premises.Power off the terminal in a place where the use is prohibited.The radio wave from the terminal may affect electronic equipment and electronic medical equipment. |
| Do | Always keep the terminal away from your ear when you talk with hands-free set, while the ringtone is loudly sounding, or in standby mode.Also, when you play a game, play back a video or music, etc. connecting the earphone/microphone, etc. to the terminal, adjust the volume adequately.Loud sound is emitted from the terminal when calling with hands-free set.Even in standby mode, ringtone or alarm sound may sound suddenly.Listening to loud sound for long hours continuously may cause a disability of ears such as deafness.Moreover, too loud sound makes you barely hear the surrounding sounds and may cause an accident. |
| Do | If you have a weak heart, set the vibrator or ringtone volume carefully. Sudden vibration or ringtone sounding when for incoming call astonishes you and it may affect your heart. |
| Do | If you wear any electronic medical equipment, check with the relevant medical electronic equipment manufacturer or vendor whether the operation may be affected by radio waves.The radio wave from the terminal may affect the electronic medical equipment. |

Do
Power off the terminal when it is near electronic equipment which controls with high precision or handles weak signals.
The radio wave from the terminal may interfere with the operation of electronic devices or equipment.
* The following are some electronic devices or equipment that you should be careful of: Hearing aids, implantable cardiac pacemaker, implantable cardioverter defibrillator, other electronic medical equipment, and other automatically controlled devices or equipment. If you use an implantable cardiac pacemaker, implantable cardioverter defibrillator, or other electronic medical equipment, check with the medical electronic equipment manufacturer or vendor whether the operation can be affected by radio waves.

Do
Be careful about broken glasses or exposed internal part of the terminal if the display, camera lens, etc. is broken.
Touching damaged or exposed area may cause burns, injury, electric shock, etc.

Do
If the substance of the internal battery leaks or gives off a strange smell, immediately remove it from the vicinity of open flames.
The leaking liquid may ignite fire, catch fire, explode etc.

Do
Be careful not to allow a pet etc. to bite the terminal.
Doing so may cause fire, burns, injury, etc. because of damage of the internal battery.
CAUTION

Don't
When using the motion sensor, check the safety around you, hold the terminal firmly, and do not shake it unnecessarily.
Failure to do so may cause accident such as injuries.

Don't
If the internal substance is leaked due to damage of the display, do not allow it to touch your skin such as face, hands, or cloths etc.
Doing so may cause injury etc. on your eyes or skin.
If the internal substance gets into your eyes, mouth, etc. or contacts skin or clothes, immediately rinse the contacted area with clean water.
If the substance gets into your eyes, mouth, etc. immediately see a doctor after rinsing.

Don't
Do not dispose of the terminal together with usual trash.
Doing so may cause fire, burns, injury, etc. Also, it may cause environmental destruction. Bring the unnecessary terminal into a sales outlet such as docomo Shop. If your local municipality has a battery recycling program, dispose of them as provided for.

Don't
If the substance leaks out from the internal battery, do not make it contact with your skin of face or hands, clothes, etc.
Doing so may cause injury etc. on your eyes or skin.
If the internal substance gets into your eyes, mouth, etc. or contacts skin or clothes, immediately rinse the contacted area with clean water.
If the substance gets into your eyes, mouth, etc. immediately see a doctor after rinsing.

Do
To use the terminal in a car, check with automobile manufacturer or dealer to determine how the device is affected by radio waves before using.
In rare cases, the radio wave from the terminal may affect the vehicle's electronic equipment in some vehicle models. In that case, stop using the terminal immediately.

Do
If abnormalities on skin are developed by using the terminal, immediately stop using and take medical treatment.
The use of the terminal may cause itching, rashes, eczema, or other symptoms depending on the your physical condition. For material of each part, see the following. P.16 "Material list"

Do
Make sure not to get metal objects (blade of cutter, staples, etc.) adhered because magnetic parts are used on the earpiece, speaker, vibrator (lower right of the back side) of the terminal.
Such adhered objects may cause injury etc.

Do
Keep the equipment out of the reach of children, people who needs to be supervised, etc.
The terminal contains magnets. If he or she swallows the magnet, suffocation or serious symptom resulting from hurt of bowel etc. may be caused. When he or she swallowed the magnet, consult a doctor immediately.

Do
Do not let it close to medical device.
The magnets used for the terminal may affect medical devices such as a pacemaker, pressure variable shunt for hydrocephalus curing, etc. Do not let the terminal close to persons who use such medical devices. If you are a user of such medical device, consult your doctor before using the terminal.

Do
Watch the display in an adequately bright place taking a certain distance from it.
Watching in a dark place or closely may reduce visual acuity etc.
3. Handling the adapter

WARNING

Don't
Do not use the adapter cord if it gets damaged.
Doing so may cause fire, burns, electric shock, etc.

Don't
DC adapter is only for a negative ground vehicle. Do not use DC adapter for a positive ground vehicle.
Doing so may cause fire, burns, electric shock, etc.

Don't
Do not touch the adapter if you hear thunder.
Doing so may cause electric shock etc.

Don't
Do not short-circuit the charging jack while it is connected to a power outlet or accessory socket. Do not touch the charging jack with your hands, fingers, or any part of your body.
Doing so may cause fire, burns, electric shock, etc.
| Don't | Do not place heavy objects on the adapter cord, or do not apply unnecessary force such as pulling etc.Doing so may cause fire, burns, electric shock, etc. |
| Don't | When you insert/remove a plug of AC adapter to/from power outlet, do not let it to contact with metal objects.Doing so may cause fire, burns, electric shock, etc. |
| Don't | Do not connect the voltage converter (e.g. travel converter for overseas) to AC adapter.Doing so may cause ignition, overheating, electric shock etc. |
| Don't | Do not put an excessive force to the connection part with the adapter connected to the terminal.Doing so may cause fire, burns, injury, electric shock, etc. |
| No wet hands | Do not touch the adapter cord, charging jack or power plug with wet hands.Doing so may cause fire, burns, electric shock, etc. |
| Do | Use the adapter only on the specified power supply and voltage.When charging the terminal overseas, use AC adapter for global use.Using the incorrect power supply and voltage may cause fire, burns, electric shock, etc.AC adapter : 100V AC (Make sure to connect the adapter to a household AC power outlet.)AC adapter for global use : 100V to 240V AC (Make sure to connect the adapter to a household AC power outlet.)DC adapter : 12V or 24V DC (only for a negative-ground vehicle) |
| Do | When replacing a fuse in a DC adapter, make sure to use the specified fuse.Using a fuse other than specified may cause fire, burns, electric shock, etc. For the specified fuse, check a manual that comes with a DC adapter. |
| Do | Wipe dust off from the power plug.Using it with dust adhered may cause fire, burns, electric shock, etc. |
| Do | When you connect the adapter or accessory socket to a power outlet, insert it firmly.Insecure inserting may cause fire, burns, electric shock, etc. |
| Do | When you disconnect the power plug from a power outlet or accessory socket, do not apply excessive force such as pulling the adapter cord. Instead, hold the adapter to disconnect.Pulling the adapter cord may damage the cord and cause fire, burns, electric shock, etc. |
| Do | When plugging/unplugging an adapter into/from the terminal, plug/unplug the adapter straight toward the jack without applying excessive force such as pulling the cord etc.Incorrect plugging/unplugging may cause fire, burns, injury, electric shock, etc. |
| Do | If the charging terminal is deformed such as being bent etc., stop using immediately. Do not use it with the deformation restored.Doing so may cause fire, burns, injury, etc. due to short-circuit of charging terminal. |

Unplug
Always disconnect the power plug from a power outlet or accessory socket when not using equipment.
Keeping with connected to the power plug may cause fire, burns, electric shock, etc.

Unplug
Immediately remove the power plug from a power outlet or accessory socket if liquid such as water (drinking water, sweat, seawater, urine of pet animals, etc.) is adhered.
Failure to do so may cause fire, burns, injury, etc. due to short-circuit from the adhered substance.

Unplug
Before cleaning, remove the power plug from a power outlet or accessory socket.
Failure to do so may cause fire, burns, electric shock, etc.

CAUTION

Don't
Do not touch the adapter successively when it is connected to a power outlet or accessory socket.
Doing so may cause a burn etc.
4. Handling the nano UIM card

CAUTION

Do
Be careful of the cut surface not to hurt your body parts such as fingers when handling a nano UIM card.
The cut surface may be sharp and it may cause injury etc.
5. Handling the terminal near electronic medical equipment

WARNING

Do
If you use an implantable cardiac pacemaker or implantable cardioverter defibrillator, keep the terminal 15 cm or more away from the implant at all times.
The radio wave from the terminal may affect the performance of electronic medical equipment.

Do
If you need to use electronic medical equipment other than implantable cardiac pacemaker or implantable cardioverter defibrillator outside medical facilities when treating at home etc., check with the relevant medical electronic equipment manufacturer whether the operation may be affected by radio waves.
The radio waves from the terminal may affect the performance of electronic medical equipment.

Do
When you get close to other people within 15 cm just like not having enough space to turn around, set the radio wave of the terminal to OFF beforehand (Airplane mode, to Power off, etc.).
A person in close proximity may put on implanted a medical electrical equipment such as pacemakers and ICDs. The radio waves from the terminal may affect the performance of electronic medical equipment.

Do
Follow the instructions of each medical facility for the use of the terminal on their premises.
The radio waves from the terminal may affect the performance of electronic medical equipment.
6. Material list

The terminal
| Part Material | Surface treatment | |
| Exterior case (top part, bottom part, side part, cover of nano UIM card/ microSD card slot) | Polycarbonate resin (with glass fiber) | Coating |
| External case (Volume key/Zoom key, Google Assistant Key, back panel) | Polycarbonate resin | Coating |
| Transparent plate (Display) | Hardened glass | AFP treatment |
| Transparent plate (Camera lens) | Hardened glass | AFP treatment + AR treatment |
| Power key/Fingerprint sensor | Epoxy resin Coating | |
| Earpiece (upper part) mesh | SUS sheet metal | PVD treatment |
| Speaker (lower part) mesh | PET | — |
| Rubber gasket of the cover of nano UIM card/ microSD card slot | Silicon rubber | — |
| Tray of nano UIM card/ microSD card | Polycarbonate resin (with glass fiber) + SUS sheet metal | PVD treatment |
Handling precautions
■ Common precautions
- SO-41B is waterproof/dustproof; however, do not allow liquids such as water (drinking water, sweat, seawater, urine of pet animals, etc.) or foreign objects such as dust to enter inside of the terminal or adhere to optional devices.
The adapter and the nano UIM are not waterproof/dustproof. Do not use in highly humid places such as a bathroom or where it is exposed to rain etc. Or putting them on your body, humidity of sweat may cause internal corrosion and malfunction. Malfunctions which are determined to be caused by water as result of inspections are not covered by the warranty. For repairs, see "Warranty and After Sales Services" (P.211).
- Waterproofness/dustproofness may not be maintained if the terminal has defect in appearance such as damage or deformation. In that case, see "Warranty and After Sales Services" (P.211) and then inquire about it.
- Clean the terminal with a dry soft cloth (such as used for cleaning eyeglasses).
- Rubbing roughly may scratch the display.
- Drops of water or dirt left on the display may cause stains.
- Do not use alcohol, thinner, benzine, cleaning detergent, etc. to clean the terminal. These chemicals may erase the printing on the terminal or cause discoloration.
- Clean the jacks or the fingerprint sensor occasionally and use the terminal in a clean state.
If the jack etc. is dirt, you may not use the terminal normally.
When cleaning, be careful not to damage the jack etc.
- Do not leave the terminal near the air conditioning vent.
Extreme temperature changes may produce condensation and corrode the internal parts of the terminal, causing the terminal to malfunction.
- Make sure to use the terminal without excessive force.
Putting the terminal in a bag full of items or sitting down with the terminal in a pocket of clothes may cause malfunction or damage of the display, internal circuit board, internal battery, etc.
Also, doing so while the external device is connected to the external connection jack may cause malfunction or damage.
- Use the optional devices specified by NTT DOCOMO.
Using a non-specified device may cause malfunction or damage.
- Read the user's manual supplied with each optional device.
- Do not drop the terminal or give a strong impact to the terminal.
Doing so may cause a malfunction or damage.
■ The terminal precautions
- Do not press the display strongly, or not operate with a sharp-pointed objects.
The display may get scratched and it may cause a malfunction or damage.
- Do not use the terminal in extremely hot or cold places.
Use the terminal where the temperature ranges between 5°C and 40°C (limited to the temporary use in a bathroom etc. when temperature is above 36°C) and humidity ranges between 45% and 85%.
- Using the terminal near a household electric appliance (a TV, radio, etc.) may cause interference in such electric appliance.
- Back up data that you saved to the terminal to a microSD card, a PC, or cloud, etc., or note down in a separate note and keep it safely.
NTT DOCOMO is not liable for any loss of data saved in the terminal.
- Do not insert the plug of external device to the external connection jack at a slant when connecting. Or, do not pull the plug when they are connected.
Doing so may cause a malfunction or damage.
- It is not abnormal if the terminal becomes warm while in use or charging. You can continue using the terminal.
- Do not expose the camera lens under direct sunlight.
If you do so, some of the elements may melt or become faded.
- Always keep the cover of nano UIM card/microSD card slot closed during use.
Failure to do so may allow liquids such as water (drinking water, sweat, seawater, urine of pet animals, etc.) or foreign objects such as dust to enter inside and cause a malfunction.
- Do not subject the fingerprint sensor to strong impact or scratch it.
Doing so not only may cause a malfunction of the fingerprint sensor, but authentication may become unavailable.
- While microSD card is being used, do not take the card out and do not turn off the terminal.
Doing so may cause data loss or malfunction.
- Keep off a magnetic card or a magnetic object from the terminal.
The data in cash cards, credit cards, etc. may be erased.
Also, strong magnetic objects may cause a malfunction of the terminal.
- Do not decorate the terminal with a film or stickers.
The functions which use the proximity sensor may not work properly.
For a location of proximity, see the following.
⇒P.30 "Part names and functions"
- The internal battery is out of the warranty due to a consumable part.
The internal battery may become swelled toward the end of battery life depending on usage condition of the internal battery.
Replace the internal battery if the usable time is extremely shortened even in a full charge or when the internal battery is swollen. For replacement of the internal battery, DOCOMO keeps the terminal and accept for a fee. See "Warranty and After Sales Services" (P.211) because we accept as a repair request.
- Charge the battery in an environment with the proper ambient temperature (5°C to 35°C).
- The operating time of the internal battery varies depending on the operating environment and the degradation level of the internal battery.
• To store the terminal, avoid the following conditions so as not to degrade the performance or the battery life of the internal battery.
- The battery is fully charged (immediately after the charging is complete)
- The battery has run out (the terminal cannot power on)
An appropriate battery level for storing is about 40%.
- Type of internal battery for the terminal is as follows.
Display Type of Battery
Li-ion 00 Lithium Ion Battery
■ Precautions for the adapter
- Charge the battery in an environment with the proper ambient temperature (5°C to 35°C).
- Do not charge in the following places.
- Places that are very humid, dusty or exposed to strong vibrations
- Near household electric appliance (a TV, radio, etc.)
- The adapter may become hot during charging. This condition is not abnormal. You can continue using the terminal.
- When using the DC adapter for charging, do not turn off the vehicle engine.
Doing so may cause the exhaustion of vehicle battery.
- When you use a power outlet with a mechanism to prevent the plug from being removed, follow the instructions on the outlet's user's manual.
- Do not subject the equipment to a strong impact. Do not deform the charging jack.
Doing so may cause malfunction.
■ nano UIM card precautions
- Do not apply unnecessary force to insert/remove the nano UIM card.
-
Note that DOCOMO assumes no responsibility for any malfunctions resulting from inserting the nano UIM card into another IC card reader/writer and using it.
-
Clean the IC part occasionally and use it in a clean state.
If the IC is dirt, it may not be used properly.
- Clean the terminal with a dry soft cloth (such as used for cleaning eyeglasses).
- Back up data that you saved to the nano UIM card to a microSD card, a PC, cloud, etc., or note down in a separate note and keep it safely.
NTT DOCOMO is not liable for any loss of data saved in the terminal.
• Take an unnecessary nano UIM card to a sales outlet such as docomo Shop for proper disposal in order to protect the environment.
- Do not carelessly damage, contact, or short-circuit an IC.
Doing so may cause data loss or malfunction.
- Do not drop a nano UIM card or subject it to impact.
Doing so may cause malfunction.
- Do not bend a nano UIM card or place a heavy object on it.
Doing so may cause malfunction.
- Do not insert a nano UIM card into the terminal if a label or seal is attached to the card.
Doing so may cause malfunction.
Bluetooth® function precautions
• To secure the Bluetooth communication, the terminal supports the security function compliant with Bluetooth standards, but the security may not be sufficient depending on the settings, etc. Be aware of security risks when using Bluetooth.
- Please be aware that DOCOMO is not responsible for any data leakage that might occur when communicating data via Bluetooth.
- Frequency band
The frequency band used by the terminal's Bluetooth/wireless LAN function is written as follows:
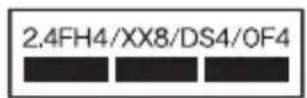
2.4: This radio equipment uses the 2400 MHz band.
FH/XX/DS/OF : Modulation scheme is the FH-SS, other system, DS-SS, or OFDM system.
4: The estimated interference distance is 40 m or less.
8: The estimated interference distance is 80 m or less.
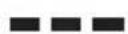
: The full band between 2400 MHz and 2483.5 MHz is used and the band of the mobile identification device can be avoided.
Available channels vary depending on country/region.
For use in an aircraft, contact the airline beforehand.
- Bluetooth cautions
The operating frequency band of the terminal is used by industrial, scientific, consumer and medical equipment including microwave ovens, premises radio stations for identifying mobile units used in the manufacturing lines of plants (radio stations requiring a license), specified low power radio stations (radio stations requiring no license) and amateur radio stations (hereinafter referred to as "another station").
- Before using this equipment, confirm that "another station" is not being operated nearby.
- In the event of the terminal causing harmful radio wave interference with "another station", promptly change the operating frequency or stop radio wave emission by turning off the power, etc.
- If you have any questions, inquire of the contact on the last page.
■ Wireless LAN (WLAN) precautions
- Wireless LAN (WLAN) exchanges information using radio waves, and allows you to freely establish LAN connection if you are within an area where radio waves reach. However, without appropriate security settings, communications may be intercepted or hacked by malicious parties. It is recommended to configure necessary security settings on your own judgment and responsibility.
- Please be aware that DOCOMO is not responsible for any data leakage that might occur when communicating data via wireless LAN function.
- Wireless LAN
Do not use wireless LAN near magnetic devices such as electrical appliances or AV/OA devices, or in radio waves.
- Magnetism or radio waves may increase noises or disable communications (especially when using a microwave oven).
- When used near TV, radio, etc., reception interference may occur, or channels on the TV screen may be disturbed.
- If there are multiple wireless LAN access points nearby and the same channel is used, search may not work correctly.
• 2.4GHz device cautions
The operating frequency band of the WLAN device is used by industrial, scientific, consumer and medical equipment including home electric appliances such as microwave ovens, premises radio stations for identifying mobile units used in the manufacturing lines of plants (radio stations requiring a license), specified low power radio stations (radio stations requiring no license) and amateur radio stations (radio stations requiring a license).
- Before using the device, confirm that premises radio stations for identifying mobile units, specified low power radio stations and amateur radio stations are not being operated nearby.
- If the device causes harmful radio interference to premises radio stations for identifying mobile units, immediately change the frequency band or stop use, and inquire of the contact on the last page for crosstalk avoidance, etc. (e.g. partition setup).
- If the device causes radio interference to specified low power radio stations or amateur radio stations, inquire of the contact on the last page.
- 5GHz device cautions
The terminal can use 3 frequency bands of 5.2GHz band (W52), 5.3GHz band (W53), 5.6 GHz band (W56).
- 5.2GHz band (W52/36, 40, 44, 48 ch)
- 5.3GHz band (W53/52, 56, 60, 64 ch)
- 5.6GHz band (W56/100, 104, 108, 112, 116, 120, 124, 128, 132, 136, 140, 144 ch)
Use of 5.2/5.3 GHz band wireless LAN outdoors is prohibited by the law (except when communicating with an access point of high power data communication system for 5.2 GHz band/relay station).
FeliCa® and NFC reader/writer function precautions
- FeliCa and NFC reader/writer function of the terminal use weak waves requiring no licenses for radio stations.
- They use 13.56 MHz frequency band. When the other FeliCa or NFC reader/writer is used in the surroundings, keep the terminal away sufficiently from them.
Before using, confirm that there are no radio stations using the same frequency band nearby.
- For use in an aircraft, contact the airline beforehand. Some countries/regions may restrict the use of the function.
Check the regulations of the country/region before using it.
Note
- Do not use a remodeled terminal. Using a remodeled terminal violates the Radio Law/Telecommunications Business Act.
The terminal is compliant with rules on the technical standard conformance of specified wireless equipment based on the Radio Law/Telecommunications Business Act, and as a proof of it, the "Technical Compliance Mark" is depicted on the electronic nameplate of the terminal. To check the electronic name plate, from the Home screen, [Settings] [About phone] [Certificates].
If you remove the screws and alter the inside of the terminal, the technical regulations conformity certification becomes invalid.
Do not use the terminal with the certification invalid, as it is a violation of the Radio Law and Telecommunications Business Act.
- Be careful when using the terminal while driving.
Unless required by laws and regulations, gazing at the screen of the terminal or holding the terminal in your hand for calling while driving is subject to penalties.
• To prevent possible hearing damage, do not listen at high volume levels for long periods.
- The FeliCa and the NFC reader/writer functions are compliant with the wireless standards of Japan.
Check the regulations of the country/region beforehand if you try to use the function overseas. - Do not alter the basic software illegally. It is regarded as the software modification and Repairs may be refused.
Waterproofness/Dustproofness
SO-41B provides waterproofness property of IPX5 ^1 , IPX8 ^2 , and dustproofness property of IP6X ^*3 with the cover of nano UIM card/microSD card slot firmly attached.
*1 IPX5 means that a communication device keeps functioning after applying a jet flow of 12.5 L/min. from every direction from a distance of approximately 3 m for at least 3 minutes using water nozzle in 6.3 mm inner diameter.
*2 IPX8 means that a communication device keeps functioning after it is slowly submerged to depth of 1.5 m in static tap water at room temperature, left there for approximately 30 minutes and then taken out.
*3 IP6X indicates a protection degree that a mobile phone has the ability to prevent dust from entering inside even when it has been shaken for 8 hours in an apparatus containing dust particles 75 m or less in diameter.
What you can do with waterproofness/dustproofness of SO-41B
- You can talk without an umbrella in the rain (for rainfall of 20 mm or less per hour).
- Do not open or close the cover of nano UIM card/microSD card slot with wet hands or with water droplets on the terminal.
- You can wash the terminal when it gets dirt or stained with liquid other than tap water.
- Wash the terminal with tap water at normal temperature (5°C-35°C) by weaker water flow (less than 6 L/min.) at distance of approximately 10 cm away from the tap or shower.
- When washing the terminal, hold the cover of nano UIM card/microSD card slot closed, and wash the terminal with your hands, not using a brush or sponge. After washing, drain the terminal before use (P.28).
- You can use at a poolside. Do not throw water from the pool on the terminal, or soak it in pool water.
- You can use the terminal in a bathroom.
-
Do not immerse the terminal into a bathtub. Also, do not use the terminal in hot water. Doing so may cause malfunction. If you should fall the terminal into the bathtub, immediately pick it up to drain water in specified procedure (P.28).
-
Never put the terminal in hot spring water or water containing soap, detergent or bath powder. In case the terminal gets wet with water other than tap water, wash it in the procedure above.
- You can use the terminal within 2 hours in a bathroom where the temperature ranges between 5 and 45°C and humidity ranges between 45 and 99%.
- Sudden change in temperature may cause condensation. In case of bringing the terminal from a cold place to a warm place such as a bathroom, wait until the temperature of the terminal comes to room temperature.
- Do not splash hot water from a faucet or shower.
To ensure waterproofness/dustproofness
To avoid water ingress, be sure to observe the following points.
- Do not throw any liquid other than room temperature tap water on the terminal, or soak it in such liquid.
-
Firmly close the cover of nano UIM card/microSD card slot. Even a fine obstacle (one hair, one grain of sand, tiny fiber, etc.) put between contact surfaces may allow water to enter.
-
Do not poke the earpiece, mouthpiece/microphone, speaker, second microphone, headset jack, USB Type-C™ jack, etc. with a sharp-pointed object.
- Do not let the terminal fall. It may become scratched causing the waterproof/dustproof performance to degrade.
- The rubber gasket on the inner side of the cover of nano UIM card/microSD card slot plays an important role in keeping waterproof/dustproof performance. Do not remove or damage them. Also, prevent dust from adhering to them.
■ Opening the cover of nano UIM card/microSD card slot
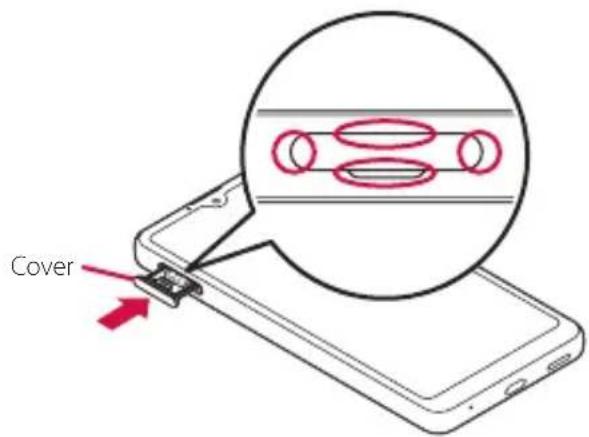
Put your tip of finger (fingernail) into the groove and draw the cover out in the arrow direction.
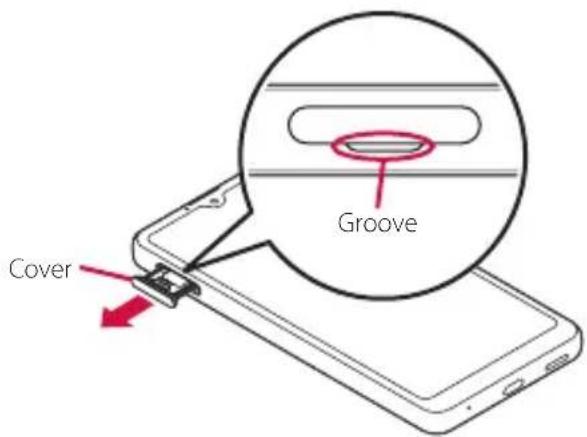
■ Closing the cover of nano UIM card/microSD card slot
Push the tray all the way in the arrow direction and firmly press parts and make sure that there are no gaps between the terminal and the cover.
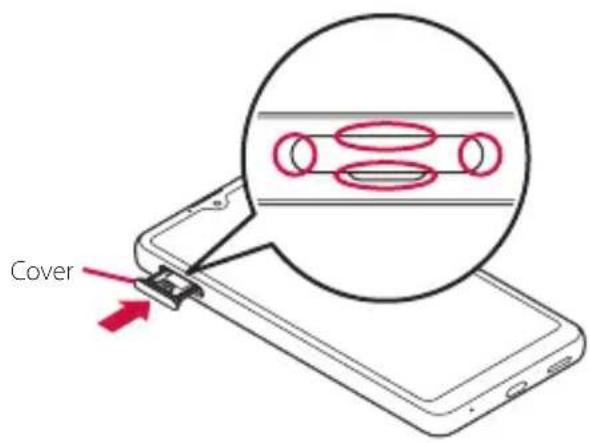
You are recommended to replace the parts for maintaining waterproof/dustproof property once every two years regardless of whether any abnormality is present or not. For replacement of the parts, DOCOMO keeps the terminal at DOCOMO-specified repair office and accept for a fee.
Important precautions
Do not perform actions shown in the illustrations below.

Using Soap/Detergent/Bath powder
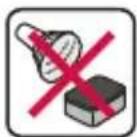
Washing with brush/sponge

Machine-washing

Applying strong water flow
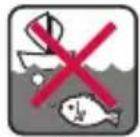
Soaking in ocean water
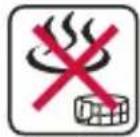
Using in hot spring
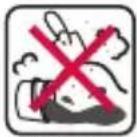
Attaching sand/mud
Observe the following precautions to use the terminal properly.
- Optional devices are not waterproof/dustproof.
- Do not apply water flow stronger than allowed (P.24). SO-41B provides IPX5 waterproofness, but doing so may cause malfunction.
- If the terminal gets wet with salt water, sea water, refreshing beverage or mud or sand adhered, wash it immediately. If they dry out, it is hard to remove the dirt and it may cause damage or malfunction.
-
Do not put the terminal in hot water, use it in a sauna or apply hot airflow (from a hair dryer etc.) to it.
-
Do not move the terminal in water or slam the terminal against the surface of water.
- If you put the terminal in tap water, be sure to have it within 30 minutes.
- When you use the terminal in swimming pool, obey rules of the facility.
• The terminal does not float on water. - Do not leave water on the terminal. In cold region, the terminal freezes up and may cause malfunction.
- Do not leave water droplet on the earpiece, mouthpiece/microphone, speaker, second microphone and headset jack. Such water may cause talking failure.
- If water or other liquid splashes the terminal when the cover of nano UIM card/microSD card slot is open, the liquid may enter inside of the terminal and cause electric shock or malfunction. Do not use the terminal and turn off the power. For handling, inquire of the contact on the last page.
- If the rubber gasket on the inner side of the cover of nano UIM card/microSD card slot is damaged or deformed, replace the part at a DOCOMO-specified repair office. Note that repair may be accepted for a fee depending on the terminal condition.
- Do not connect earphones etc. when the terminal is wet with water. Doing so may cause a malfunction.
DOCOMO does not guarantee actual operations under all states. Malfunctions deemed to be caused by inappropriate operation by the customer are not covered by the warranty.
Draining water from the terminal
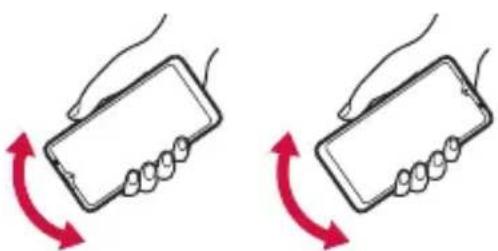
When the terminal is wet, water may flow out after wiping it off; drain the water in the following steps.
① Hold the terminal firmly and wipe off moisture on the terminal surface and back side with dry, clean cloth etc.
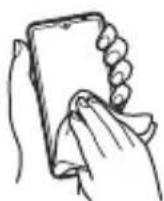
② Shake the terminal about 20 times, firmly holding it, until no more drops of water come out (shown left). Do the same with the terminal upside down (shown right).
natural_image
Illustration of two hands holding a smartphone with red curved arrows indicating rotation (no text or symbols)③ To wipe remained water off from the gaps or the following parts, tap the terminal against a dry, clean cloth or similar material about 10 times.
- Earpiece
- Mouthpiece/microphone
- Speaker
- Second microphone
- Headset jack
-
USB Type-C jack
-
Camera lens transparent plate (around the main camera)
• Power key/Fingerprint sensor
• Volume key/Zoom key - Google Assistant Key
• Cover of nano UIM card/microSD card slot
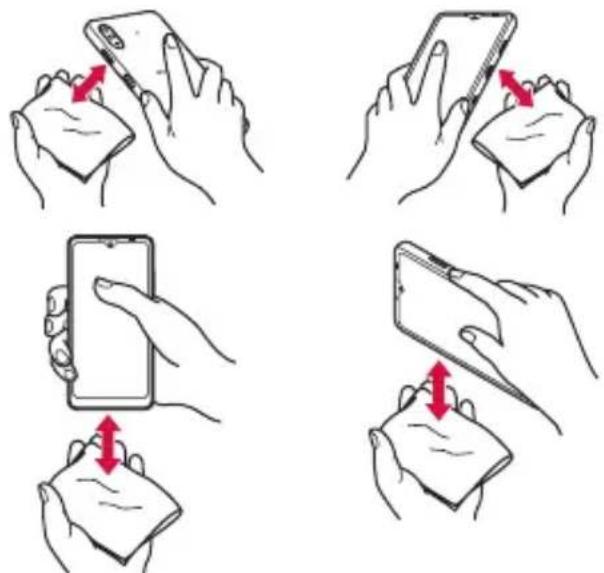
* Turn the terminal up side down to wipe off.
④ Wipe off water drained from the terminal with dry, clean cloth etc., and dry naturally.
- Wipe off water drained from the terminal with dry, clean cloth etc., and dry naturally.
- Do not wipe off water remaining in gaps directly with a cotton swab etc.
- Dry the terminal naturally for about 3 hours at room temperature.
Notes on charging
Check the following before and after charging.
- Check if the terminal is not wet while charging. Never charge the battery if the terminal is wet.
- Optional devices are not waterproof/dustproof.
- When charging the battery when or after the terminal is wet, adequately drain it and wipe off water with a dry, clean cloth etc.
- Do not use the AC adapter in a bathroom, shower room, kitchen, lavatory, or other humid area. Doing so may cause fire or electric shock.
- Do not touch the AC adapter with wet hands. Doing so may cause electric shock.
- Never connect a Type-C plug if the terminal is wet. Although the terminal is waterproof, inserting a Type-C plug when the terminal is wet may cause an electric shock or short circuit due to moisture or foreign matter on the terminal or the Type-C plug. This can cause excessive heat, malfunction, fire, burn injury, electric shock, etc.
Before using the terminal
Part names and functions
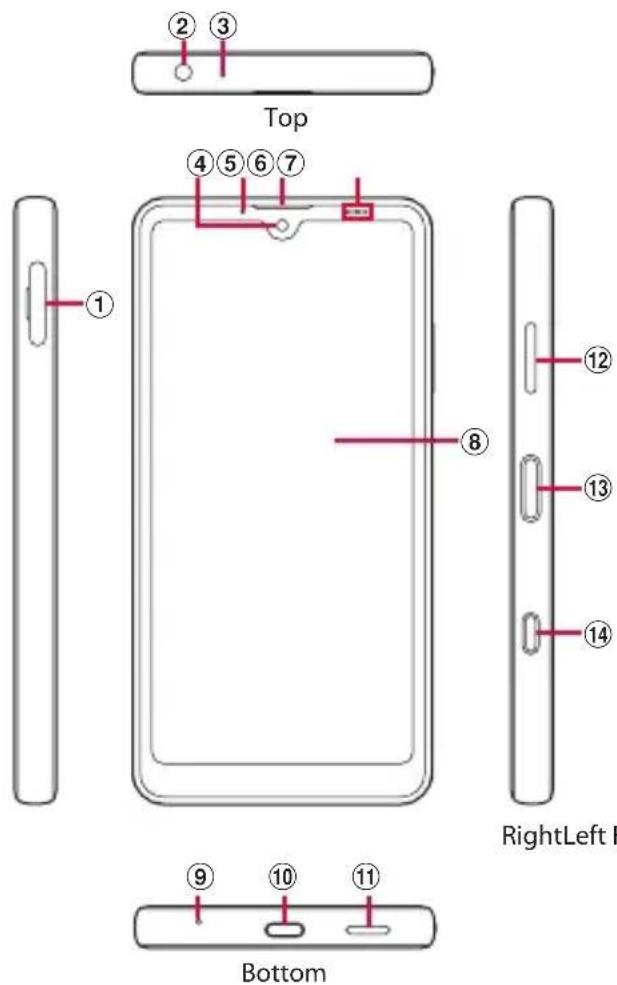
① nano UIM card/microSD card slot
② Headset jack→P216
③ Second microphone: Used for reducing noise when calling.
④ Front camera lens → P.121
⑤ Notification LED→P.62
⑥ Earpiece
⑦ Proximity/light sensor ^*1 : Detects a face approach during a call to prevent misoperation, or used for automatic control of the screen brightness.
⑧ Display (Touch screen)→P47
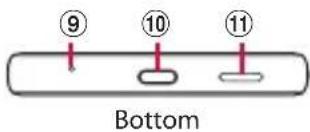
⑨ Mouthpiece/microphone
⑩ USB Type-C jack : Used for charging etc. It supports USB Power Delivery.
⑪ Speaker
⑫ Volume key/Zoom key : Use to adjust each sound volume, shoot with the camera, set silent mode, etc.
⑬ Power key/Fingerprint sensor*1 : Use to turn on/off the power or screen display, or perform fingerprint authentication.
Press and hold this key for at least 1 second to display the menu where you can operate "Emergency",
"Power off", "Restart" or "Force restart guide".→P.41, P.95
⑭ Google Assistant Key
RightLeft Front
① nano UIM card/microSD card slot
② Headset jack→P216
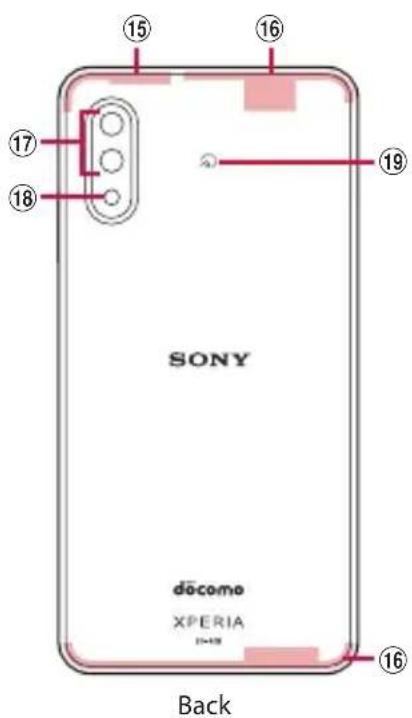
⑮ Wi-Fi/Bluetooth/GPS antenna ^4
⑯ LTE/FOMA antenna *2
⑰ Camera lens→P.121
⑱ Flash/Photo light
⑲ mark→P.132
*1 Do not cover the sensor area with a sticker etc.
*2 It is built into the terminal. Covering this area with your hand may affect the quality of communications.
Note
- The back panel cannot be removed. Attempting to remove the back panel with excessive force may cause damage or a malfunction.
• The battery is built into the terminal and not removal.
nano UIM card
Nano UIM card is an IC card which stores information such as your phone number.
- You can use the terminal with a nano UIM card. If you have a docomo mini UIM card, UIM, or FOMA card, bring it to a docomo Shop to replace it.
- When a nano UIM card is not inserted to the terminal, making calls, packet communication, etc. are not available.
- For details on nano UIM card, refer to NTT DOCOMO website.
- Turn off the terminal before installing/ removing the nano UIM card.
- For opening/closing the cover of nano UIM card/microSD card slot, see "To ensure waterproofness/dustproofness" (P.25).
■ Security codes of nano UIM card
The nano UIM card has the security code of PIN code (P.45).
Information
- Please be careful not to touch or scratch the IC when handling nano UIM cards. Doing so may cause a malfunction or damage.
Installing nano UIM card
1 Draw the cover of nano UIM card/microSD card slot (P.26).
2 Pull out the tray straight from the terminal.
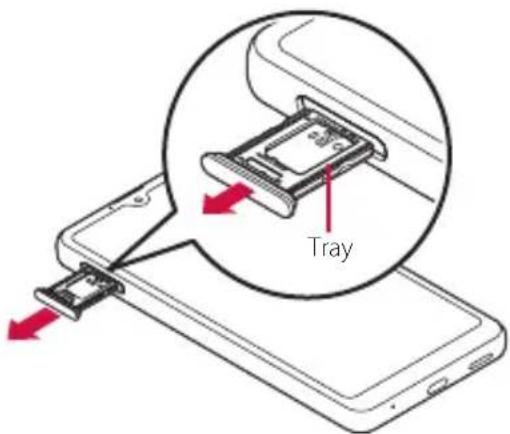
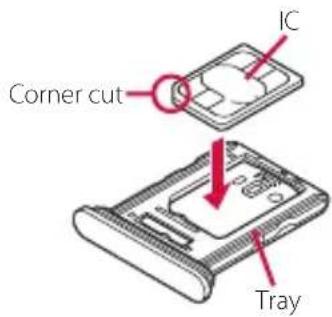
3 Set a nano UIM card in the tray with the IC face up.
• Make sure that the corner cut of the card is oriented properly.
- Be sure to fit the nano UIM card into the tray so that it does not shift.
4 Hold the terminal horizontally, insert the tray with the card into the terminal, and then push it straight.
- Check the orientation of the terminal and the tray.
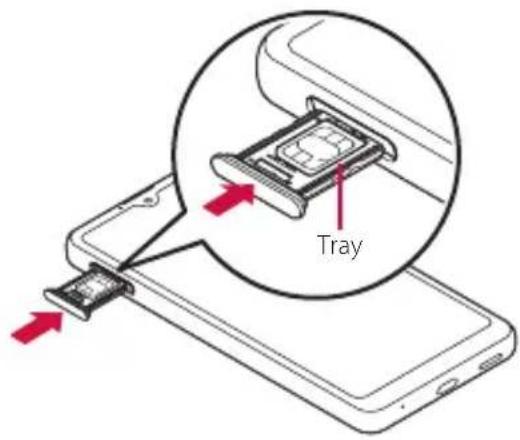
5 Push the tray into the end, firmly press each point indicated with , and then make sure that there are no gaps between the terminal and the cover.
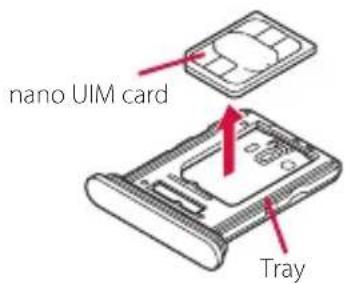
Removing nano UIM card
1 Draw the cover of nano UIM card/microSD card slot (P.26).
2 Pull out the tray straight from the terminal (P.32).
3 Remove the nano UIM card from the tray.
- Put your fingernail to a gap between the nano UIM card and the tray to take out.
4 Hold the terminal horizontally, insert the tray into the terminal, and then push it straight.
- Check the orientation of the terminal and the tray.
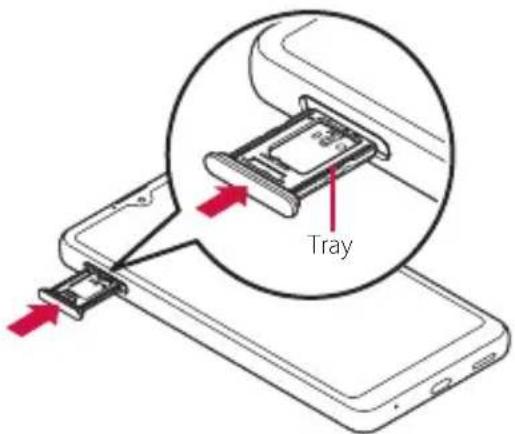
5 Firmly push the tray into the end and make sure that there are no gaps between the terminal and the cover (P.33).
microSD card
You can save the data in the terminal to a microSD card or import data from the microSD card to the terminal.
- The terminal supports microSD card of up to 2GB, and microSDHC card of up to 32GB, microSDXC card of up to 1TB (As of April, 2021).
• DOCOMO does not guarantee operations of any commercially available microSD card. For compatible microSD cards, contact each manufacturer of microSD card. - A microSDXC card can be used only on a SDXC-compatible device. Do not install a microSDXC card to a non-microSDXC-compatible device because doing so may damage or destroy data saved on the microSDXC card.
- If you want to reuse a microSDXC card on which data is destroyed, format microSDXC card (all data will be erased) on an SDXC-compatible device.
-
When copying data to/from a non-SDXC-compatible device, use a card (microSDHC card, microSD card, etc.) complying with standards of device.
-
The terminal supports microSD cards of up to Class 10 and UHS speed class 1. Note that the speed class indicates performance of microSD cards and all the functions may not be performed at the speed class rate.
- Although a microSD card can be used on other compatible device, data which is transferred from the other device may not be viewed/played on the terminal. Also, data saved to the microSD card from the terminal may not be viewed/played on another devices.
- Turn off the terminal before installing/removing the microSD card.
- For opening/closing the cover of nano UIM card/microSD card slot, see "To ensure waterproofness/dustproofness" (P.25).
Installing microSD card
1 Draw the cover of nano UIM card/microSD card slot (P.26).
2 Turn the back side of the terminal up and then pull out the tray straight.
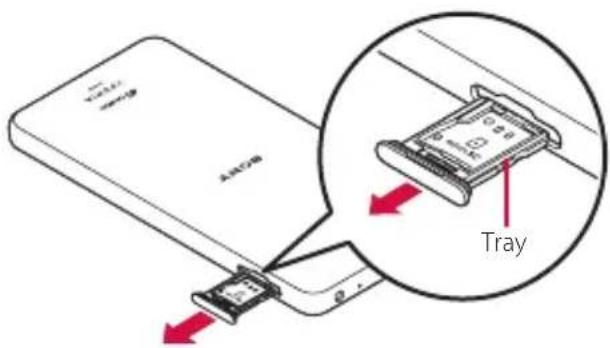
3 Set a microSD card in the tray with the contacts side up.
- Be sure to fit the microSD card into the tray so that it does not shift.
Contact of microSD card
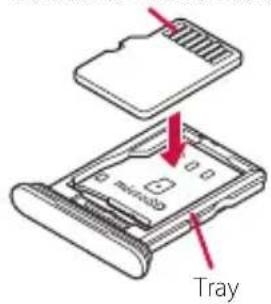
4 Hold the terminal horizontally, insert the tray with the card into the terminal, and then push it straight.
- Check the orientation of the terminal and the tray.
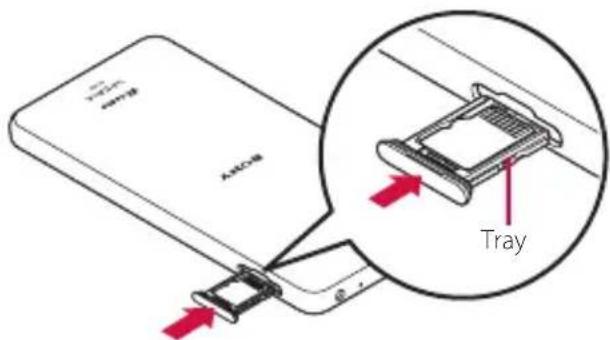
5 Push the tray into the end, firmly press each point indicated with , and then make sure that there are no gaps between the terminal and the cover.
- When the terminal is turned on, 📄 appears on the status bar.
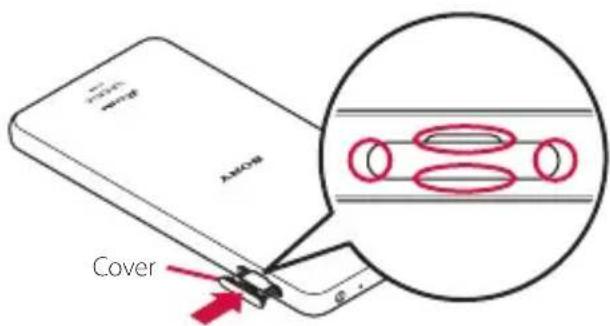
Removing microSD card
1 Draw the cover of nano UIM card/microSD card slot (P.26).
2 Turn the back side of the terminal up and then pull out the tray straight (P.35).
3 Remove the microSD card from the tray.
- Put your fingernail to a gap between the microSD card and the tray to take out.
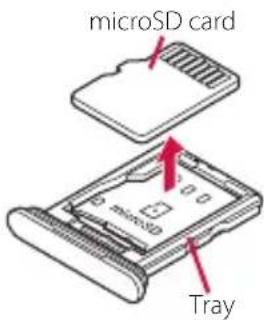
4 Hold the terminal horizontally, insert the tray into the terminal, and then push it straight.
- Check the orientation of the terminal and the tray.
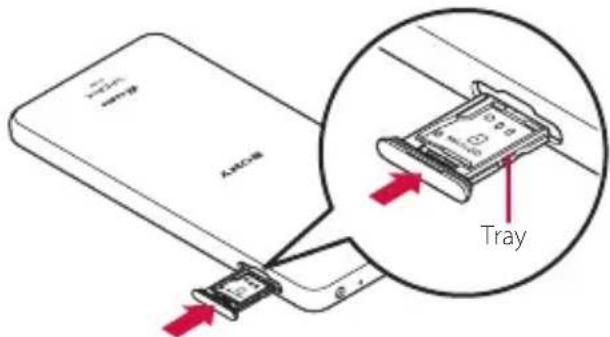
5 Firmly push the tray into the end and make sure that there are no gaps between the terminal and the cover (P.35).
Charging
The internal battery is not fully charged at the time of purchase.
• Estimated charging time (P.216)
Available time on full charge (estimate)
The available time differs depending on operating environment or the internal battery condition.
• Estimated available time (P.216)
Life of the internal battery
- The internal battery is a consumable part. Each time the internal battery is recharged, the battery usage time per one charge gradually decreases.
- When the battery usage time per one charge becomes about half of that at the time of purchased, replacing the internal battery is recommended because the internal battery is near the end of life.
• Using the application or shooting videos for a long time while charging may shorten the lifetime of the internal battery.
- To check performance of the internal battery, from the Home screen, tap [Settings] [About phone] [Battery life].
Before charging
- It is recommended to use the AC Adapter 07 (optional) for charging. For handling the AC Adapter 07, refer to the AC Adapter 07 manual.
- The AC Adapter 07 is compatible with 100V to 240V AC. For using the terminal overseas, a plug adapter that fits the electrical outlets in the place you stay is needed. Do not use an electrical transformer for overseas use to charge the terminal.
- Use a compatible AC adapter or USB cable A to C for charging. If you use a non-compatible charger, charging may fail or the terminal operations may not work properly.
- Insert and pull out an AC adapter or plug of USB cable A to C slowly and evenly without applying excessive force.
- When charging is started, the notification LED of the terminal lights in the color according to the battery level (P.62).
-
You can check the battery level on the status bar at the top of screen, or operate from the Home screen, tap [Settings] [Battery].
-
If you start charging with the terminal powered off, the screen indicating charging status activates although you cannot operate the terminal. Therefore, do not charge the battery in a place where the powering off is required.
- You can check the latest charging equipment compatible with the terminal in the DOCOMO online shop. https://onlineshop.smt.docomo.ne.jp/options/search.html (in Japanese only)
Saving battery life (Battery Care)
Battery Care is a function that learns your charging habit (time zone for connecting to charging equipment long) to adjust charging speed and keep battery performance better so as to extend battery life.
1 From the Home screen, [Settings]▶[Battery]▶[Battery Care].
• The Battery Care screen appears.
2 Tap of "Use Battery Care".
Information
- To turn off Battery Care charging, tap of "Use Battery Care" in Step 2.
- To switching to usual charging during Battery Care charging, drag the status bar down ▶ Open the notification of Battery Care (P.65) ▶ [REGULAR CHARGING].
- To set the time for Battery Care manually, tap [Custom] in the Battery Care screen. Battery Care charging is available when you start charging between the times set in "Start time" and "Target time for full charge".
Note
- It may take 7 days or more to complete learning your habit.
Charging with AC adapter
When using AC Adapter 07 (optional) for charging, do the following procedures.
1 Insert the Type-C plug of the AC adapter horizontally into the USB Type-C jack of the terminal.
2 Unfold the power plug of the AC adapter and insert it into a power outlet.
- When charging is started with the power on, the charging start sound is heard and the notification LED of the terminal turns on (P.62).
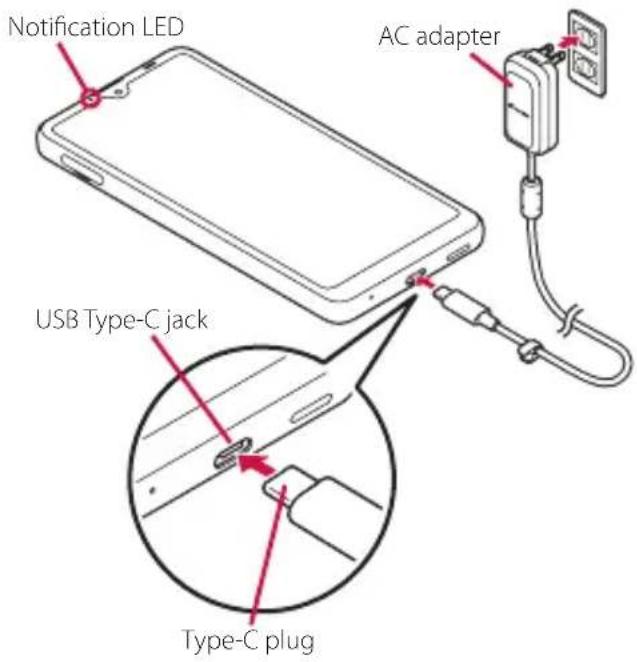
3 When charging is complete, remove the power plug of the AC adapter from the power outlet, and then remove the Type-C plug horizontally from the terminal.
Note
- Do not connect the Type-C plug of the AC adapter forcibly. Wrong connection may cause damage.
Charging with DC adapter
DC Adapter 05 (optional) is an adapter for supplying power from a car accessory socket (12V/24V).
When using DC Adapter 05, USB cable A to C 02 (optional) is required.
For details on handling, refer to the manual of the DC adapter or USB cable A to C.
Charging with a PC
To charge the terminal by connecting to a PC, USB cable A to C 02 (optional) is required.
1 Insert a Type-C plug of the USB cable A to C horizontally into the USB Type-C jack of the terminal.
2 Insert a USB plug of the USB cable A to C to a USB port of PC.
- When charging is started with the power on, the charging start sound is heard and the notification LED of the terminal turns on (P.62).
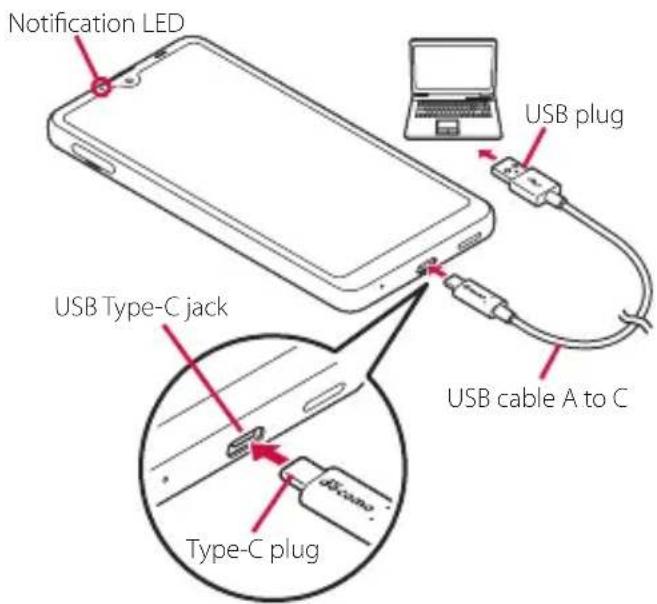
- When a screen for requesting access to the device data appears, tap [DENY].
- If the installation screen for the terminal's driver software appears on your PC, please wait a moment for the installation to complete. - When a confirmation screen of installing software appears on the terminal, tap [SKIP].
3 When charging is complete, remove the USB plug of the USB cable A to C from the USB port of PC and then remove the Type-C plug horizontally from the terminal.
Note
- Do not connect the Type-C plug of the USB cable A to C forcibly. Wrong connection may cause damage.
FCC ID
To view the regulatory compliance mark.
1 Find and tap [Settings]▶[About phone]▶[Certificates].
Regulatory compliance mark such as FCC ID is displayed on the screen.
Turning power on/off
Turning power on
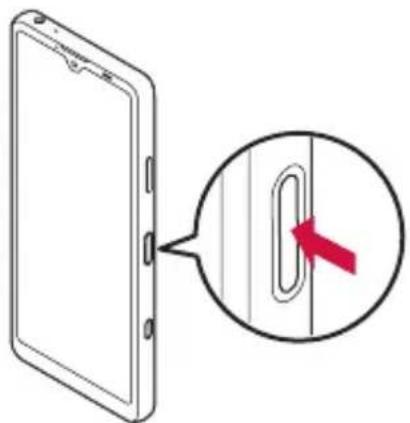
1 Press and hold the power key until the screen turns on.
- The terminal vibrates and the lock screen appears after a while.
- When you first turn on the power and "ようこそ (Welcome)" is displayed, follow the onscreen instructions to make the initial settings (P.42).
natural_image
Diagram showing a device with a red arrow pointing to a curved interface element (no text or symbols present)2 Unlock the screen lock.
• The Home screen appears.
- Unlocking the screen lock (P.42).
Information
- When PIN code (P.46) is set, enter the PIN code on the PIN code entry screen (P.46).
Turning power off
1 Press and hold the power key for at least 1 second.
2 [Power off].
• To restart the terminal, tap [Restart].
Setting sleep mode
Set sleep mode to turn off the screen so that you can avoid unintended operations of the display (touch screen) or the keys, or lock the screen.
1 Press the power key.
- Press the power key again to exit from sleep mode and turn on the screen.
Information
- When the specified time set in "Screen timeout" (P.163) elapses with no operation performed, the screen will turn off automatically and then go into sleep mode.
Unlocking the screen lock
The lock screen appears when you turn on the power or press the power key to exit from sleep mode.
1 On the lock screen, swipe (flick) the screen.
Information
• On the lock screen, swipe (flick)
Google Assistant or the camera.
- You can change the screen lock unlocking method (P.170).
- Once you register your fingerprint in the Fingerprint Manager, you can use fingerprint authentication to unlock the screen (P.172).


Initial settings
When you first turn on the power and "ようこそ (Welcome)" is displayed, follow the onscreen instructions to make initial settings, such as individual functions and services.
1 [GET STARTED].
- Tap [日本語 (Japanese)] to change the language.
- Tap [VISUAL AIDS] to make settings related to the accessibility functions.
- Follow the onscreen instructions to make the following settings.
- Important information setting
- Setting the network connection
- Copy apps & data
- Set your Google account
- Setting the Google Services
- Setting the screen lock
- Setting Google Assistant
- Confirming continuing setup
2 When the docomo initial setting screen appears, confirm the content▶[Next].
- Follow the onscreen instructions to make the following confirmations and settings.
- d ACCOUNT settings
-
Setting functions and services in one operation
-
Setting docomo cloud
- Setting the home app
- Review additional apps
3 When the setup completion screen appears, [FINISH].
Information
- The displayed setting etc. may differ depending on operation of the terminal etc.
- When the screen to select docomo services appears after completion of the initial settings, follow the onscreen instructions to set or confirm.
- Some settings can be changed later (P.43, P.44, P.74, P.147, P.170, P.172, P.176, P.179, P.183).
- When setting the online services, make sure to connect to the network (P.63).
- You can use the terminal without setting up a Google account, however the Google services such as Gmail, Google Play, etc. are not available.
Setting up a Google account
Google account is an ID/password to use Google services. By setting Google account to the terminal, you can use Gmail to send Email, use Google Play to download applications or contents such as games. If you have not set up a Google account in the initial settings or to add other Google account, you can set it up as follows.
1 From the Home screen, [Settings]▶[Accounts]▶[Add account]▶[Google].
• After this step, follow the onscreen instructions.
Information
- Google account can be registered as backup account by turning on the item of backing up data to your Google Drive on the "Google Services" screen when registering (P.178).
- You can use the terminal without setting up a Google account, however the Google services such as Gmail, Google Play, etc. are not available.
- To set ON/OFF of items to auto-sync, from the Home screen,[Settings] [Accounts] Tap the Google account [Account sync].
Setting up d ACCOUNT
d ACCOUNT is an ID/password that is necessary to use the services available with d Account or d points on a smartphone, tablet, or PC.
When you do not set up d ACCOUNT in the initial settings, you can set as follows.
1 From the Home screen, tap [Settings]▶[docomo service/cloud]▶[d ACCOUNT setting].
- If the d ACCOUNT confirmation screen etc. appears, follow the onscreen instructions.
2 [Set your d ACCOUNT]/[Create new d ACCOUNT].
• After this step, follow the onscreen instructions.
Information
- For details on d ACCOUNT, in Step 2, tap≡▶ [Help] to see the Help of d ACCOUNT setting.
Security codes for the terminal
Some functions provided for convenient use of the terminal require the security code to use them. Besides the security code for locking the terminal, the network security code necessary for the network services etc. are available. Make use of the terminal using an appropriate security code according to the purpose.
■ Notes on the security codes
- Do not use a number that is easy to guess, such as "birth date", "part of your phone number", "street address number or room number", "1111", and "1234". Make sure to make a note of the security code you set lest you should forget it.
- Be very careful not to let others know your security code. If your security code is known by anyone else, DOCOMO shall have no liability for any loss due to any unauthorized use of it.
- If you forget your security codes, you must bring your official identification (such as driver's license), the terminal, and nano UIM card with you to a docomo Shop. For details, ask the contact on the last page.
- The PIN Unlocking Key is written on the subscription form (copy for customer) handed when subscribing at a docomo Shop. If you subscribed other than at a docomo Shop, ask the contact on the last page.
■ PIN/Password for screen lock
It is a security code for using the screen lock function of the terminal (P.170).
■ Network security code
The network security code is a 4-digit number necessary for identification or using the docomo network services at reception of your request in docomo Shop, or at docomo Information Center or "お客様サポート (Customer support)". It can be set any number at the subscription and also changed later by yourself.
- For details on network security code, refer to NTT DOCOMO website.
PIN code
The nano UIM card has the security code of PIN code. The code is set to "0000" at subscription, which you can change by yourself (P.46).
PIN code is a 4- to 8-digit security number (code) that must be entered for user confirmation to prevent unauthorized use of nano UIM card by a third party every time you insert the nano UIM card into the terminal or when the terminal is powered on. Entering the PIN code enables making/receiving calls and terminal operation.
- If you use a newly purchased terminal with the nano UIM card you have been using, use the PIN code set on the former terminal. If you did not change the setting, the code is "0000".
- If you enter a wrong PIN code 3 times consecutively, the PIN code is locked and cannot be used anymore. In this case, unlock with "PIN Unlock Key (PUK code)" (P.46).
PIN Unlock Key (PUK code)
The PUK code is an 8-digit number for canceling the locked PIN code. The PUK code cannot be changed by yourself.
- If you failed to enter PUK code 10 times consecutively, the nano UIM card is locked. In that case, ask the contact on the last page.
Setting a PIN code
By entering PIN code when powered on, you can protect from improper use.
1 From the Home screen, [Settings]▶[Security]▶[SIM card lock]▶[Lock SIM card].
2 Enter PIN code▶[OK].
Entering the PIN code when powered on
1 On the PIN code entry screen, enter the PIN code.
2
Information
- When "Use SIM" (P.149) is OFF, the PIN code entry screen appears after "Use SIM" is switched to ON.
Unlocking PIN lock
1 Enter the PUK code▶Tap □.
2 Enter a new PIN code▶Tap
3 Enter the PIN code again▶Tap
Changing the PIN code
- You can change only when you activate the SIM card lock.
1 From the Home screen, [Settings] [Security] [SIM card lock] [Change SIM PIN].
2 Enter the current PIN code▶[OK].
3 Enter a new PIN code▶[OK].
4 Enter the new PIN code again▶ [OK].
Basic operations
Basic operations
Using the display (touch screen)
Precautions on using the display (touch screen)
- The display (touch screen) is designed for being touched lightly with fingers. Do not push the touch screen hard with a finger or press sharp-pointed objects (nail, ballpoint pen, pin, etc.) against the screen.
- Touching the display (touch screen) may not work in the following cases. Note that it may cause a malfunction.
- Operation with a gloved hand
- Operation with tip of fingernail
- Operation with foreign object on the screen
- Operation with protective sheet or seal on the screen
- Operation on the wet display (touch screen)
- Operation with fingers wet with sweat or water
- Operation under water
Operations on the display (touch screen)
Tap
Touch an item such as icon or menu with your finger lightly and release it.
• Double-tap means tapping twice quickly.
■ Touch and hold
Touch and hold an icon or menu item long.
Swipe (flick)
Touch the screen and flick up/down or left/right.
Drag
Touch the screen, drag to the desired position and release the finger.
Slide
When whole content cannot be displayed, while lightly touching the screen, move your finger to desired direction.
Scroll
When whole content cannot be displayed, flick up/down/left/right displayed content to scroll (move) the display position.
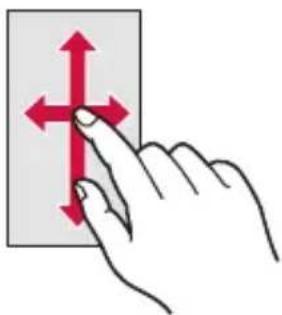
Pinch
Touch the screen with two fingers and widen (pinch-out) or narrow (pinch-in) the fingers' distance to zoom in/out screen display.
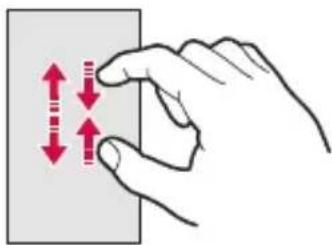
Using Side sense
Side sense is a function that allows you to operate the terminal with one hand and you can use it by operating the side sense bar displayed on the screen.
- You can operate the side sense function on every screen which the side sense bar is displayed.
- Before use of Side sense, from the Home screen, tap [Settings] [Display] [Advanced] [Side sense].
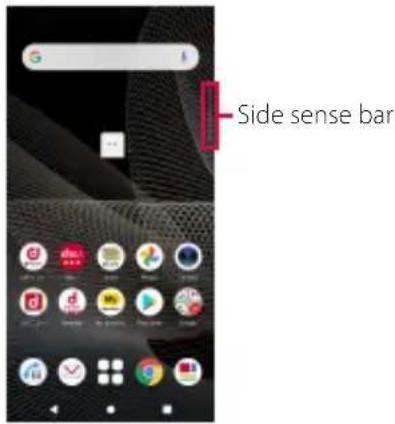
Double-tap the side sense bar to open the side sense menu from which you can activate applications or display the Notification panel. Slide the side sense bar up to display the multi-window menu from which you can activate the Multi-window (split screen). Also, slide the side sense bar down to undo the operation (returning to the previous screen).
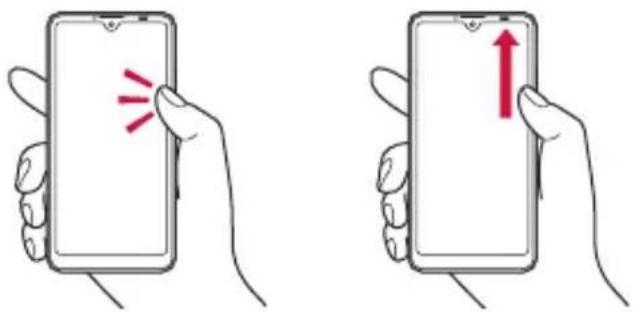
Double-tapSlide up
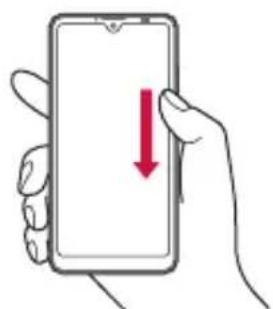
natural_image
Hand holding a smartphone with a red downward arrow indicating compression or download (no text or symbols present)Slide down
Information
- You can change the operation range, sensitivity of the side sense bar, etc. in "Side sense" (P.164). Set as your preference.
- Side sense feature is not available in the following cases.
- Displaying the screen in landscape view
- Call is incoming/dialing/During a call
- Displaying the shooting screen
Moving the side sense bar
1 Touch and hold the side sense bar.
- If the operation is unavailable, once display the side sense menu and then operate again.
2 Drag it to a desired location.
- When you drag it to other than the left-/right-end of the screen, the side sense bar changes to
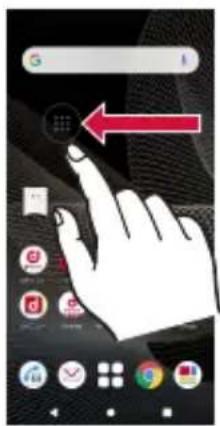
Information
- You can move my touching and holding and then dragging in the desired direction. To restore to the original display, drag it to the left-/right-end of the screen.
Using the Side sense menu
1 Double-tap the side sens bar.
• The Side sense menu appears.
- If the explanation appears, tap [START].
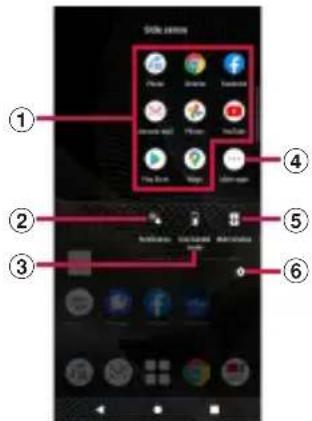
① Application icon list
- Icons of recommended applications which are predicted by your usage condition are displayed.
- You can also set to display favorite application icons (P.164).
② Notifications
- Open the Notification panel (P.64).
③ One-handed mode
- Activate One-handed mode (P.72).
④ More apps
- Display more applications that are not currently shown in the application icon list.
⑤ Multi-window
- Switch to the Multi-window menu (P.51).
⑥ Advanced
- Open the "Side sense" in the Settings menu (P.164).
Information
- You can move the menu position up/down by dragging the screen while the Side sense menu is displayed.
• To end the Side sense menu, perform any of the following operations.
- Tap or
- Tap outside of the Side sense menu
- Double-tap the side sens bar.
Using the Multi-window menu
You can activate Multi-window (split screen) using Side sense.
• Operations in the split screen (P.68)
1 Slide the side sense bar up
• The Multi-window menu appears.
- If the explanation appears, tap [START].
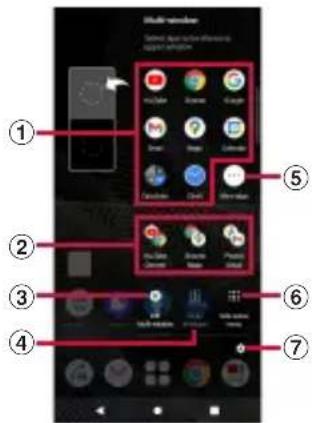
① Application icon list
- Icons of recommended applications which are predicted by your usage condition are displayed.
- Tap the application icon to open the application in the multi-window screen (split screen).
- You can switch applications in the lower part of the screen by tapping any application icon when Multi-window (split screen) is activated. To switch applications in the upper part of the screen, tap the upper part of the window illustration beside the Multi-window menu and then tap any application icon.
② Pairs of applications (Combination)
- Pairs of applications which are predicted by your usage condition are displayed.
- You can also set to display your desired pairs (P.164).
③ Exit Multi-window
- Exit Multi-window (split screen).
④ Swap windows
- Swap applications between the upper part and lower part when Multi-window (split screen) is activated.
⑤ More apps
- Display more applications that are not currently shown in the application icon list.
⑥ Side sense menu
- Switch to the Side sense menu (P.50).
⑦ Advanced
- Opens "Multi-window menu" (P.164) in the Settings menu.
Information
- You can move the menu position up/down by dragging the screen while the Multi-window menu is displayed.
- To exit the Multi-window menu, perform any of the following operations.
- Tap or
- Tap outside of the Multi-window menu
- Slide the side sense bar up
Basic key icon operation
The following operations can be performed by tapping the key icon shown in the bottom of the screen.
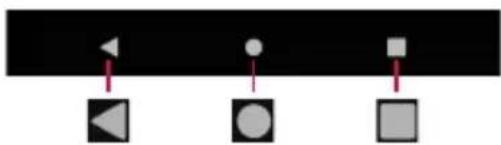
natural_image
Three simple geometric shapes (triangle, circle, square) with red arrows pointing to each, set against a black background (no text or symbols)| Back Go back to the previous screen. Or close the menu, the Notification panel, etc. | |
| Home Go to the Home screen.Touch and hold the icon to open the Google Assistant. | |
| History Use the task manager (P.67).Also, you can use the following functions.• Screenshot (P.53)• Split screen (P.68) |
* In this manual, the key icon operations are described as ◀, ○, and .
Information
- When "One-handed mode" (P.163) is set to ON, you can activate the one-handed mode by double-tapping (P.72).
- The color of key icon may differ depending on displayed screen.
Switching portrait or landscape view automatically
You can set the screen orientation to switch between landscape and portrait view automatically according to the terminal orientation.
1 From the Home screen, [Settings] ▶ [Display].
2 of "Auto-rotate screen".
Information
- You can also switch the landscape/portrait view by tapping 📂 appears when you change the terminal orientation although this feature is set to OFF.
- Some displayed screens are fixed in portrait orientation or landscape orientation.
- Changing orientation of the terminal in nearly horizontal state against the ground may not switch the screen to the portrait view/landscape view automatically.
• You can also set from the Quick settings panel (P.66).
Setting Silent mode
- Even when the silent mode is set, muting of shutter sound, start/end sound for video recording, alarm sound, and audio sound of video, music, etc. is not available.
- If the sound volume is adjusted in "Ring and notification volume" (P.166) in silent mode, the silent mode setting is canceled.
- You can adjust media sound by dragging up/down the slider on the volume control bar which appears when the volume key is pressed. Tap to display the sound setting screen and you can change the volume of call sound, ringtone and notification sound, and alarm sound.
Setting Silent mode (Vibrate)
1 Press the volume up or down key.
• The volume control bar appears.
2
- The icon for the volume control bar changes to 🔍
Setting Silent mode (Mute)
1 Press the volume up or down key.
• The volume control bar appears.
2
- The icon for the volume control bar changes to 🔒
Capturing the displayed screen
You can capture the currently displayed screen as a still image (Take screenshot).
- Capturing may not be available depending on screen display.
1 On a screen you want to capture, press and hold the power key and the volume down key at the same time for at least 1 second.
- A still image is saved, and then its thumbnail and the menu are displayed for a certain period of time in the lower-left of screen.
Information
- You can capture the screen which is shown as a thumbnail on the task manager (P.67) by tapping [Screenshot].
- You can tap the thumbnail or the options to edit still image or send it via Bluetooth or email. Or, you can turn off the display of thumbnail and the menu (still image remains) by tapping on the upper right of thumbnail.
Recording the displayed screen Selecting an application to use
You can record the currently displayed video screen (Screen Record).
- Recording may not be available depending on displayed screen.
1 Drag the status bar down with two fingers.
• The Quick settings panel appears.
2 Swipe (flick) the Quick setting tools left.
3 [Screen Record].
- The confirmation screen for start of recording appears. Set "Record audio" etc. before start of recording.
4 [START].
- Recording starts and and appear on the status bar.
- To stop recording, drag the status bar down and then tap "Screen Recorder" notification.
When you have some options of applications for certain operations such as sending an email or displaying an image, an application selection screen appears.
1 From the Home screen, [docomo phonebook]▶ Select a contact▶ Select a mail address.
• The application selection screen appears.
2 Select the application▶[Just once]/[Always].
- Select "Just once" to view available applications each time, or "Always" to use the same application all the time. If you select "Always", the application selection screen does not appear the next time you perform the same task.
- If you selected "Just once" previously for the same task, the screen with the application selected appears. To use another application, select in the "Use a different app" area.
Information
- Some tasks may require you to select an application each time, with "Just once" or "Always" not displayed on an application selection screen.
- To deselect the application which is set to "Always", from the Home screen, tap ▶[Settings]▶[Apps & notifications]▶[SEE ALL XX APPS]▶Tap an application you want to deselect▶[Advanced]▶[Open by default]▶[CLEAR DEFAULTS].
Setting an application's permissions
When the first time you activate an application or function that accesses the other functions or information of your terminal, the confirmation screen to request permissions to access rights may appear. When you approve these access rights, the corresponding functions and information become available to the application/ function.
1 From the Home screen, ▶[Schedule].
- The explanation screen about permission may appears.
2 [OK].
• The confirmation screen appears.
3 [ALLOW]/[DENY]
- When the other confirmation screen appears, confirm the content and then repeat the operation.
Information
- If permission is not granted, some applications/functions may not work, or use of the functions may be limited.
- To change setting of permissions, from the Home screen, tap ▶ [Settings]▶[Apps & notifications]▶[SEE ALL XX APPS]▶Tap any application you want to change the setting▶[Permissions]▶Tap the permission to change▶[Allow]/[Deny].
- Depending on application/function, the explanation screen about permission may not appear. Also, number of times of the confirmation screen or the display may differ. Check the displayed contents carefully and follow the onscreen instructions.
- In this manual, description of the confirmation screen may be omitted.
Character entry
Enter characters using the software keyboard (On-screen keyboard) which appears when you tap the character input box in a mail, phonebook, etc.
Input method is set to "Gboard" by default.
Information
- To hide software keyboard, tap displayed at the lower left of the screen.
- For details on Gboard, in the character entry screen, tap ⚙▶ : ▶[Help & feedback] and then refer to Support.
- Depending on your usage condition, keyboard display or the operations may be changed.
Switching the input method
You can change to the input method other than Gboard.
- You can operate it when the other input method is installed on the terminal and set it as a use keyboard in "Manage on-screen keyboards" (P.179).
1 While entering characters, tap at the bottom of the screen.
• The input method selection screen appears.
2 Select the input method you want to use.
Information
- When the input method you want to use is not listed in the selection screen, tap of the input method you want to use in "Manage on-screen keyboards" (P.179).
Software keyboard
The default software keyboard is a Japanese keyboard and its layout is "12 keys" when the language is set to Japanese. You can add the following layouts to the Japanese keyboard.
• Character input method (P.57)
| 12 keys | Keyboard with the same key arrangement as a mobile phone. Repeatedly tap a key to select a character (multi-tap input). Flick input is also available. |
| QWERTY | Keyboard with characters allocated in the same arrangement as general PCs. Enter Japanese in Roman character. Flick input is also available. |
| Handwriting | Keyboard for inputting characters by handwriting. |
| GODAN | Keyboard for inputting Japanese with roman characters. |
Adding the layout for Japanese keyboard
To use the layouts other than 12 keys, add them beforehand.
1 In the character entry screen, ⚙▶[Languages].
2 [Japanese 12 keys].
3 Put checkmarks to the layouts▶ [Done].
Information
- Once the layout is added, will be displayed on the software keyboard and the keyboard can be switched every time you tap the icon. Also, touch and hold for to display the keyboard change screen and you can switch the keyboards.
- To add the other language's keyboard, in Step 2, tap [ADD KEYBOARD]▶ Select the language etc.▶ Select the country/region etc. as required▶ Put checkmarks to the layouts▶[Done]. Available layouts vary by language.
- If the layout selection screen appears when you tap the character entry field, you can set the layout for Kana or Alphabet mode.
Character input method
When you tap a key on the software keyboard, candidates list for the entered characters appears. Tap a word to enter from the candidate list, text can be input one after another.
Japanese keyboard in 12 keys and QWERTY layouts is explained in this section.
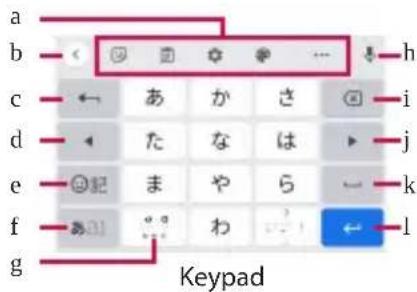
① Tool bar
Displays the tool icon list (P.59).
② < / >
Switches the tool icon to hide/display.
③ Shows characters entered by Multi-tap input (P.60) in the order that is reverse of the regular one. Or undoes character conversion after it is decided.
④

Moves the cursor to the left. Or changes range of character conversion when it is not yet decided. Swipe (Flick) up/down/left/right to move the cursor (the operation may not be available depending on condition).
5

Display the list of emoji/sticker/smiley etc. In QWERTY keyboard, enters a punctuation mark. Touch and hold it to display the icons and you can switch to the one-handed mode, or display the list of emoji etc. or the setting screen.
⑥

Switches the character mode to "Kana" → "Alphabet" → "Number" in order. Touch and hold it to display icons with which you can display the Settings screen or switch to the one-handed mode.
⑦

Puts a sonant mark/p-sound mark, or switches to uppercase/lowercase.

It is appeared when the layout for Japanese keyboard or the keyboard for other language is added. Tap it to switch the keyboard. Touch and hold it to display the keyboard change screen.
⑧

Switch to voice input to enter characters with voice.
⑨

Deletes the character before the cursor.
10

Moves the cursor to the right. Or changes range of character conversion when it is not yet decided. Swipe (Flick) up/down/left/right to move the cursor (the operation may not be available depending on condition).
⑪
Enters a space. Before confirming conversion when entering characters in Kana mode, the display changes to "变换 (Convert)". Tap it to display/switch the conversion candidates. Touch and hold it to display the keyboard change screen (the operation may not be available depending on condition).
12

Enters a line feed. Tap it to decide characters before conversion is decided.
* In some screens, → , , , etc appear.
13

Switches the keyboards each time you tap. Touch and hold it to display the keyboard change screen.
14
Switches entries between lower case letter and first capital letter. Double-tap to change the key to ↑ for entering upper case letter.

nformation
- To enlarge the display area, tap in the candidate list. To display the software keyboard, tap .
Using the tool icon
Tap the tool icon on the tool bar to operate as follows.
| (Sticker) | Display the list of emoji/sticker/ smiley etc. |
| (Clipboard) | Quote characters saved to the clipboard and enter characters. |
| (Settings) | Display the Settings screen. |
| (Theme) | Change software keyboard theme. |
| ... | Display the list of tool icons that are not displayed in the tool bar.• Touch and hold the tool icon and drag to the tool bar to display in the tool bar. |
| (One-handed) | Switches to the software keyboard whose size can be operated with one hand. |
| (Text Editing) | Select, cut, copy, or paste characters. |
| (Share Gboard) | Send information such as the current layout via Bluetooth, email, etc. |
| (Translate) | Translate word, sentence, etc. and enter it. |
| (Floating) | Allow the software keyboard to move to the other position. |
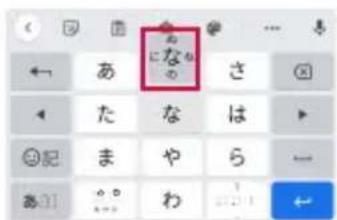
Touch a key of 12 keys to display a character, number, or symbol that are assigned to the key. Flick to the direction of a target character etc. to enter the character.
- On the QWERTY keyboard, flick each key up or down to enter number.
You can enter "な" only by tapping. Flick left for "に", up for "ぬ", right for "ね" and down for "の".
Multi-tap input
On the 12 keys keyboard, tap the same key consecutively to enter a character, number, or symbol that are assigned to the key. To enter characters etc. assigned to the same key consecutively, wait until the color of the cursor indicating the conversion range is changed (approx. 1 second) and then enter the next character. To enter the next character soon, tap to change the color of cursor.
1 Tap "あ" once▶ Wait for approximately 1 second (until the color of cursor is changed).
2 Tap "あ" 5 times.
or
1 Tap "あ" once▶ (immediately).
2 Tap "あ" 5 times.
Editing text
You can cut or copy text in character entry screen or web page and then past it to the other application etc.
1 Touch and hold text.
- The text is selected and the edit menu appears nearby.
• Alternatively, double-tap text.
2 Drag / to up/down/left/right to select range of the text.
3 Tap the item in the edit menu.
| Cut | Cut a selected character string. |
| Copy | Copy a selected character string. |
| Paste | Paste a copied/cut character string. |
| Share | Use the selected text in the other application. |
| Select all | Select all text. |
| Web search | Search for online information related to the selected character string. |
| ⋮ | Display the editing menu that could not be shown. Tap ←to return to the previous editing menu. |
Information
- To paste a copied or cut character string, touch and hold a position to insert▶Tap [Paste]. When text is already entered, tap a position to insert▶▶Tap [Paste].
- On some applications, these functions may not be available or the editing menu may appear different.
Personal dictionary
Add words to Personal dictionary beforehand to have them appeared preferentially in the candidate list when entering characters.
1 In the character entry screen, ⚙▶[Dictionary]▶[Personal dictionary]▶Select a language.
2 +.
3 Follow the onscreen instructions to enter a word and the reading.
4 ←.
Information
- To delete registered words, in Step 2, select the words to delete ▶.
Setting character entry
Set character entry per input method such as Gboard.
1 From the Home screen, [Settings]▶ [System]▶ [Languages & input].
2 [On-screen keyboard]▶ Select the input method.
- Tap an item displayed on the screen to set.
Information
• The items vary depending on the input method.
- For Gboard, alternatively, tap in the character entry screen to display the Settings screen.
- If the input method is not displayed, in Step 2, [On-screen keyboard]▶[Manage on-screen keyboards]▶Tap of the input method you want to use.
Notification LED
Notification LED provides information on the terminal status, incoming calls, mail reception, etc.
| LED color and lighting | Indication |
| Red | Charging (the battery level is 14% or less) |
| Orange | Charging (the battery level is 15% - 89%) |
| Green | Charging (the battery level is 90% or more) |
| Flashing red | The battery level is 14% or less |
| Flashing white* | Notification of missed call, new Gmail, etc. |
* Flashing in sleep mode.
Screen display and the icons
You can check notifications from applications, the terminal status, etc. with the icons on the status bar. Display the Notification panel to check detail information such as notifications appeared in the status bar. Also, you can open the Quick settings panel and set ON/OFF of the functions.
Status bar
In the status bar at the top of screen, the notification icons of new mail, running operation, etc. and the status icons of the signal status, battery level, etc. appear.
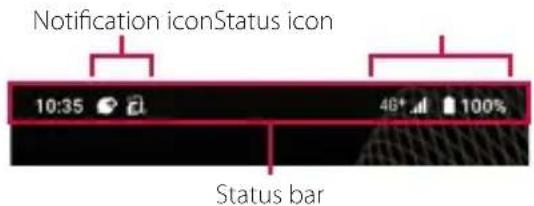
Status icon
The main status icons displayed on the status bar are as follows.
| Signal strength*1 | — | |
| 4G+ | 4G (LTE) available*2 | — |
| H | HSPA available | — |
| 3G | 3G available | — |
| During International roaming | — | |
| Out of service | — | |
| Connected to Wi-Fi*1 | P.147 | |
| Connected to a Wi-Fi network with no access to the Internet. The Wi-Fi signal is poor. | P.147 | |
| Portable hotspot (Wi-Fi tethering) ON | P.153 | |
| Connected to Bluetooth device P.187 | ||
| Airplane mode activated P.152 | ||
| Silent mode (vibrate) ON P.53 | ||
| Silent mode (no vibrate) is set P.53 | ||
| Calling with hands-free (speaker ON) P.100 | ||
| Calling with the mouthpiece/ microphone OFF (mute) | P.99 | |
| Alarm etc. is set P.141 | ||
| Silent mode is set P.161 | ||
| Positioning with GPS P.138 | ||
| Connected to VPN P.155 | ||
| Data Saver is set | P.155 | |
| Recording with Screen Record | P.54 | |
| STAMINA® mode ON | P.162 | |
| Battery status | — |
| The battery is charging | P.37 | |
| Charging is required | — |
*1 appears on the right of the icon during communication.
*2 4G ^-1 ways displayed when the terminal is connected with LTE.
Notification icon
The main notification icons displayed on the status bar are as follows.
| New Gmail message | P.115 | |
| New +Message message | P.109 | |
| Receiving/downloading data | — | |
| Sending/uploading data | — | |
| Notification of data reception etc. via Bluetooth communication | P.188 | |
| microSD card is detected/currently mounted | P.35 | |
| Update notice of application | — | |
| Software update notification | P.208 | |
| Call is incoming/dialing/during a call | P.95 | |
| Call is on hold | P.99 | |
| Missed call | P.101 | |
| Notification from Answering Machine/voicemail | P.98, P.102 | |
| Message is recorded on Answering Machine | P.98, P.102 | |
| Notification from Memo/Schedule | P.91, P.140 | |
| Stopwatch is running* | P.142 | |
| Timer is in use* | P.142 | |
| Alarm is sounding/Alarm is snoozing/ Next alarm exist | P.141 | |
| USB device is connected P.167 | ||
| Wi-Fi open network available P.148 | ||
| Charging with Battery Care P.38 | ||
| Battery is low (15% or less) | — | |
| Notification of error/warning | — | |
| Hidden notifications | — | |
| Omakase Lock is set | — | |
| Notification from docomo Data Copy | P.143 | |
| SuguApp is available P.69 | ||
| Notification for Screen Record P.54 | ||
| Available internal storage is getting low | — | |
| Authentication failed when you set up your d ACCOUNT | P.44 |
* Appears when switched to the Home screen etc.
Notification panel
When the notification icons appear on the status bar, you can open the Notification panel to check the notifications, activate corresponding application, etc.
1 Drag the status bar down.
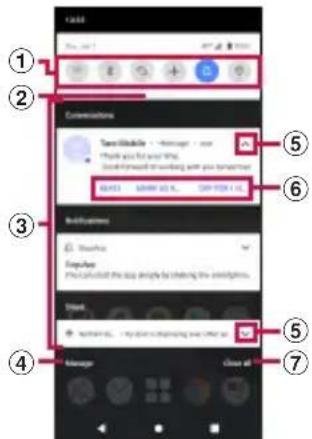
① Quick setting tools
- A part of the quick setting tools (P.66) are displayed.
- Tap it to turn on/off each function.
- Touch and hold it to display the setting screen, etc. depending on function.
② Open the Quick settings panel
- Drag down to open the Quick settings panel (P.66).
③ Notifications
- Notifications are categorized by "Conversations", "Notifications", "Silent", etc. depending on type, setting, etc.
- When you tap notification with while the application that is compatible with the split screen is activated, the application can be displayed in the split screen. Or, while the application that is compatible with the split screen is not activated, it activates in the normal screen.
- Swipe (flick) left or right the notification to clear from the list. However, some notifications may not be cleared.
- To change the notification setting or set "Silent", "Default", etc., drag the notification left or right and tap the displayed or touch and hold the notification. However, the setting may not be available for some notifications.
- If 📋 appears when a notification in Conversations, you can set the floating icon (bubble) to display/hide. The floating icon (bubble) can be displayed even while the other application is running so that you can check arrival notifications of conversation or check/send messages by tapping it.
④ Manage
- Change notification setting (P.160).
- It is shown as "History" when "Notification history" (P.160) is set to ON and you can check the notification history.
⑤ Open/Close the notification
- Tap to open the notification to fully display the content or the operation menu.
- Some notifications may not be displayed or opened by tapping.
⑥ Operation menu
- The operation menu such as "CALL BACK" or "REPLY" may be displayed when a notification is opened.
- For some notifications, operations such as replying a message of +Message may be available by tapping the item of the operation menu on the Notification panel.
⑦ Clear all
- It appears when there are any notifications that can be cleared to clear all notifications. However, some notifications may not be cleared.
Information
- The control panel for Music etc. may be displayed below the quick setting tools depending on operation condition and you can play/pause a song, switch the audio output, etc. with it.
- To hide the floating icon (bubble), touch and hold the floating icon (bubble)▶ Drag it to any direction a little▶ Drag it to ✗ the bottom of the screen.
- To close the Notification panel, tap or drag the Notification panel up.
- Even when the notification icon is not displayed on the status bar, the notification etc. indicating the terminal status may be displayed.
- You can also check the notification by swiping (flicking) down the lock screen to open the Notification panel (New notifications arrived after the screen lock is set and some notifications can be displayed without any operation). You can also set to hide notifications on the lock screen in "Notifications on lockscreen" (P.160) or display them all the time in "Keep notifications" (P.161).
Quick settings panel
Set ON/OFF etc. of each function.
1 Drag the status bar down with two fingers.
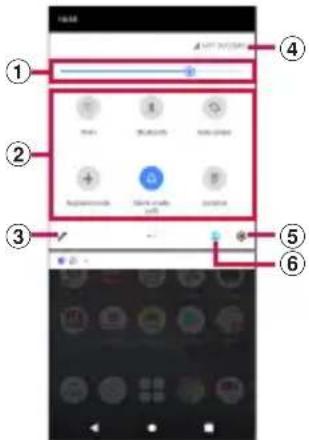
① Brightness level
- Adjust the screen brightness.
② Quick setting tools
- Touch and hold it to display the setting screen, etc. depending on function.
- When the indicator of the number of pages and the current page position appears below the quick setting tools, swipe (flick) the quick setting tools left or right to switch the page.
| Wi-Fi | Set ON/OFF of Wi-Fi function. |
| Bluetooth | Set ON/OFF of Bluetooth function. |
| Auto-rotate | Set whether to switch portrait/ landscape view automatically according to the terminal orientation. |
| Airplane mode | Enable/disable Airplane mode. |
| Silent mode (XXXX)* | Set silent mode. |
| Location | Enable/disable location information. |
| Nearby Share | Share a file with nearby compatible device. |
| Flashlight | Set ON/OFF of the flash/photo light. |
| STAMINA mode | Enable/disable STAMINA mode. |
| Hotspot | Set ON/OFF of portable hotspot function. |
| Screen Record | Record the currently displayed screen (P.54). |
* In "XXXX", the silent mode type appears.
③ Edit
- Display the edit screen to add, delete or rearrange the quick setting tools.
- In the edit screen, ▶[Reset] to restore to the default.
④ Name of network operator
⑤ Settings
• Display the setting menu (P.145).
⑥ Multiple users
- When the icon is not displayed, turn "Multiple users" (P.182) to ON.
- You can switch the user of the terminal, add a user/guest, or remove the guest.
- Tap [Advanced] to display "Multiple users" in the Settings menu (P.182).
Information
- The quick setting tool may be automatically added depending on usage condition.
- You can also open the Quick settings panel by dragging down the Notification panel or dragging down the status bar on the lock screen.
- The control panel for Music etc. may be displayed below the quick setting tools depending on operation condition and you can play/pause a song, switch the audio output, etc. with it.
• To close the Quick settings panel, drag it up.
Task manager
Display recently used applications as thumbnails to confirm, open, switch between, or close them.
1 □.
- Applications are displayed as thumbnails.
- Swipe (flick) left or right to switch the thumbnails.
Information
- Tap a thumbnail to open or switch the application. However, depending on the displayed thumbnails, the application may not be opened.
- Swipe (flick) a thumbnail up to clear the thumbnail and exit the application. Swipe (flick) the left end thumbnail right▶Tap [CLEAR ALL] to clear all thumbnails.
- When "App pinning" (P.170) is set to ON, tap the icon displayed in the upper part of thumbnail▶[Pin]▶[GOT IT] to pin the screen so that you cannot use the other applications except the currently displayed one. To cancel pinning, follow the onscreen instructions.
- Also, tap [Screenshot] to capture an image of the screen which is displayed as a thumbnail.
Split screen
Split the screen to display and operate two applications at the same time.
- Activate the applications to display beforehand.
- Split screen may not be available depending on application.
1 □.
- Applications are displayed as thumbnails.
2 Tap an icon appeared in the top of a thumbnail▶[Split screen].
- For applications which are not available for the split screen, "Split screen" does not appear.
3 Tap the application thumbnail to display from the lower part of the screen.
- If you select the application which is not available in the split screen, the confirmation screen for asking if you end Multi-window (Split screen) and activate the application appears.
- If the application that you want to display is not displayed in a thumbnail, tap to activate the application. However, if you activate the application that is not available in the split screen, it is displayed in the normal screen.
Information
- The application windows of the split screen can be displayed up and down in the portrait view and left and right in the landscape view.
- Drag of the split line displayed in the center of the split screen up or down (in the landscape view, left or right) to change the range of the application display.
- To end the split screen, drag to the top end or bottom end of the screen (left end or right end for the landscape view).
- When the home app is Xperia Home, touch and hold an application icon shortcut in the Home screen, or touch and hold an application icon in the Application screen and then tap [Split screen] or in the shortcut menu to activate the split screen.
SuguApp
Set "SuguApp" which you can activate an application or operate the phone call instantly with intuitive handling just like shaking a smartphone.
1 From the Home screen, tap [Settings]▶[docomo service/cloud]▶[SuguApp].
- When the explanation screen etc. appears, follow the onscreen instructions.
| App 1 | Set an application to activate when the terminal is shaken once. |
| App 2 | Set an application to activate when the terminal is shaken twice. |
| SuguApp Operation Deterrence | Set an application to restrict its activation by SuguApp function. |
| Suguden setting | Set the phone operations (Answer, Disconnect, Call, Mute, Reject) only by motion or voice command (P.69). |
Information
- In the following case, SuguApp does not work properly.
- When making or receiving an additional call during a call
- While lying down
- When you perform vigorous exercise such as running, going up and down stairs, etc.
- By default, "d払い (d Barai)" app is set to "App 1".
- SuguApp function is not available when the screen is OFF, while the lock screen is displayed, or during a call.
- If you put the terminal into a bag or pocket when the screen is ON, an application may activate in rare cases because that is recognized as a motion performance.
- When SuguApp function is available, the notification icon is displayed. You can also confirm notification detail from the Notification panel.
- For details on SuguApp, refer to NTT DOCOMO website.
Suguden setting
Set "Suguden" which allows you to operate phone with the motion and the voice command.
1 From the Home screen, ▶ : .
2 [Settings]▶[Calls]▶[Suguden setting].
- Alternatively, operate from the Home screen, tap [Settings] ▶[docomo service/cloud] ▶[SuguApp] ▶[Suguden setting].
| Answer | Answer calls by placing the terminal to your ear. |
| Disconnect (Motion/Voice command) | End a call by motion or voice command.When the "Motion" is ON, a call can be disconnected by placing the terminal horizontally with the screen faced down or by shaking the terminal twice during a call.When the "Voice command" is ON, calls can be disconnected by saying the disconnect keyword while talking and then detaching your ear from the terminal. |
| Call | Make a call to the other party that is registered in advance by shaking the terminal once with the Home screen displayed and then placing it to your ear. |
| Mute, Reject | Mute the incoming ringtone or reject a call by placing the terminal horizontally with the screen faced down while a call is incoming, or shaking the terminal twice. You can select from "Mute", "Reject", or "Reject and send SMS". |
| Disable Suguden during roaming | Turn off Suguden function automatically overseas. |
Notes on using Suguden
- In the following case, Suguden does not work properly.
- When using speakerphone
-
When using an earphone or headset
-
When the terminal is connected to a Bluetooth device which has calling function (Disconnect (Voice command), Call (Motion))
- When making or receiving an additional call during a call
- While lying down
- When you perform vigorous exercise such as running, going up and down stairs, etc.
- When the display is covered with a book type smartphone case etc.
- If you put the terminal into a bag or pocket while on the incoming screen, the call may be answered or rejected in rare cases because that is recognized as a motion performance.
- The proximity sensor does not respond well to black objects.
When answering a call, if you put the earpiece over your hair, the proximity sensor may have trouble working and may failure to answer a call. In this case, please put the earpiece directly on your ear.
When disconnecting (Motion)/muting or rejecting a call, flipping over the terminal on a black desk, etc. may cause the operation (Disconnect (Motion)/Mute, Reject) to fail. In this case, instead of placing the terminal directly on the surface, flip over the terminal about 1 cm above the desk etc. to operate (Disconnect (Motion)/Mute, Reject).
- When the Suguden function is available, the notification icon appears. You can also confirm notification detail from the Notification panel.
- For details on Suguden, refer to NTT DOCOMO website.
Functions of Suguden
- Disconnect (Motion)
- When the motion is performed, a call will be disconnected even in the following cases.
- When the other party puts the call on hold
- When the Answering Machine is running (playing the answering message/recording a message)
- When disconnecting a call with Suguden motion, it may not react (disconnect) if the speed of motion for placing the terminal facing down is fast. In that case, try the motion slowly to react (disconnect).
- When "Disconnect" is ON, a call may be disconnected if you shake the terminal strongly even just once during the call because the action is recognized as motion performance.
- Disconnect (Voice command)
- When the disconnect keyword is heard, a call will be disconnected even in the following cases.
- When the other party puts the call on hold
- When the Answering Machine is running (playing the answering message/recording a message)
- While calling with Disconnect (Voice command) ON, other application using the mouthpiece/microphone or a voice recording application etc. using the voice sound during a call may not be available. To use those application during a call, turn off the both settings of Disconnect (Voice command) and then start calling.
- When the Answering Machine is running (while playing the answering message/ recording a message), Disconnect (Voice command) function is not available. In the case that you answer a call while recording with the Answering Machine, Disconnect (Voice command) function is available.
-
For calls using "Jspeak", Disconnect (Voice command) function is not available.
-
Although the voice command function of Suguden uses the voice recognition technology and the language processing technology, DOCOMO is not liable for any accuracy of those technologies.
- The voice recognition may fail when the volume of voice is too small during a call or calling under a noisy environment, or depending on the way of utterance.
- Dialing
A Suguden call can be made from the Home screen or the lock screen (only when "Screen lock" (P.170) is set to "Swipe").
● Mute, Reject
When "Mute, Reject" is set to ON, the function set in "Mute, Reject" may be performed when you shake the terminal strongly even just once while a call is incoming because the action is recognized as motion performance.
● Disable Suguden during roaming
Suguden is disabled automatically overseas by default setting. To use Suguden overseas, turn off "Disable Suguden during roaming" in Suguden setting.
One-handed mode
Reduce the screen so that you can easily operate the terminal with one-hand.
- To activate one-handed mode with set in advance from the Home screen, tap [Settings]▶ [Display]▶ [Advanced]▶ [One-handed mode]▶ ▶.
1 Double-tap □.
Information
- Tap [Home button setting] at the top of the screen to display "One-handed mode" of the setting menu (P.163).
- Drag which appears in the top of the reduced screen up or down to move the reduced screen vertically.
- Tap shown left/right of the reduced screen to make the reduced screen to left-aligned/right-aligned.
- Drag □own in the top left of the reduced screen (right-aligned), or □own in the top right (left-aligned) diagonally to change the size of the reduced screen.
- To end one-handed mode, tap outside of the reduced screen, or double-tap
- The one-handed mode may end automatically depending on operation condition, for example, when the screen turns off or the screen is switched to the landscape view, etc.
• Alternatively, tap [One-handed mode] in the side sense menu (P.50).
Searching information in the terminal and websites
Enter a word in the search box to search the information in the terminal or on the Internet.
1 From the Home screen, tap the Google search widget.
2 Enter a keyword to search.
• Character entry (P.56)
• The search candidate list appears.
3 Tap the search suggestion or of the software keyboard.
Information
- Alternatively, from the Home screen, tap [Google] [Google] to open the "Google" application.
- When the search candidates include applications, the applications can be activated by selecting.
- In the search result screen etc., tap [More]▶[Settings] to set for search.
Using Google Voice Search
Enter a search key word by voice.
1 From the Home screen, tap on the Google Search widget.
2 Speak a search key word to the mouthpiece/microphone.
Home screen
Switching the home app
You can switch the home app for the terminal to "docomo LIVE UX", "Xperia Home" or "Simple Home".
• "docomo LIVE UX" (P.74)
• "Xperia Home" (P.81)
- "Simple Home" (P.84)
1 From the Home screen, [Settings]▶[Apps & notifications]▶[Advanced].
2 [Default apps]▶[Home app].
3 Tap any of [docomo LIVE UX]/[Simple Home]/[Xperia Home].
- When you select "Simple Home", confirm the content and tap [OK].
Information
- When the home app is switched, widgets or application icon shortcuts on the screen may not be displayed correctly depending on the home screen layout etc.
docomo LIVE UX
It is a home app that DOCOMO offers you. You can customize the home screen intuitively.
For details on docomo LIVE UX, from the Home screen, tap ➕ ➔ ➔ [Help] to see Help, or refer to the following website.
https://www.nttdocomo.co.jp/service/live_ux/index.html (in Japanese only)
Home screen layout
You can activate applications or use widgets in the Home screen. All of applications are stored in the Application screen and the application icon shortcuts are located in the Home screen.
- Swipe (flick) the Home screen left or right to switch the pages.
- When the application has a notification, a dot or number may appear on the upper right of the icon or folder.
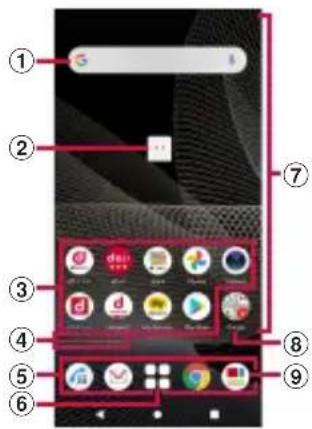
① Widget
- Activate the widget (Google Search).
- If a shortcut menu appears when you touch and hold a widget, you can perform certain operations.
② Machi-Chara
- Tap to ask something you want to know through dialog.
③ Application icon shortcuts
- Tap to activate the application.
- Touch and hold to display the shortcut menu from which you can perform specified operations or check the application information. When is displayed, touch and hold and then drag it to any location to add the shortcut of specified operation to the Home screen.
④ Indicator
- This indicates the current display position of the Home page.
- This is appeared when you swipe (flick) the Home screen left or right.
⑤ Dock
- This is always displayed even when the Home screen page is switched.
⑥ Apps button
- Display all of applications. You can also search applications or use Osusume Apps (P.79).
⑦ Customizing area
- You can locate application icon shortcuts, widgets, folders, etc.
⑧ Folder
- It contains the multiple application icon shortcuts etc.
⑨ My Magazine
• Display My Magazine (P.79).
Information
- If there is any notification which indicates update of application or pause of setup, or any application icon shortcut which is shown in gray in the Notification panel, download the application (P.94).
Managing the Home screen
Moving application icon shortcut etc.
1 In the Home screen, touch and hold an application icon shortcut or widget you want to move.
2 Drag it to a desired position.
• To move it to the next page, drag it to the end of the Home screen.
Adding an application icon shortcut
1 From the Home screen,
2 Touch and hold an application icon you want to add to the Home screen.
• The shortcut menu appears.
3 [Add to Home screen].
- To move an application icon shortcut to the next page in the Home screen, touch and hold and then drag it to the end of the screen.
- It is also possible to add the multiple same application icon shortcuts.
Removing an application icon shortcut from the Home screen
1 In the Home screen, touch and hold an application icon shortcut to remove.
• The shortcut menu appears.
2 Drag it in any direction a little▶ Drag it to "Remove" in the upper part of the screen.
- Although the application icon shortcut is removed from the Home screen, the application itself is not uninstalled.
- When ☒ appears, drag it to .
Removing a widget etc.
1 In the Home screen, touch and hold a widget or folder you want to remove.
2 Drag it to "Remove" in the upper part of the screen.
Uninstalling an application
- Before uninstalling, back up all of the related contents which you want to save including the data saved in the application.
- Some applications cannot be uninstalled.
1 In the Home screen, touch and hold an application icon shortcut you want to uninstall.
• The shortcut menu appears.
- To uninstall an application stored in a folder, tap the folder and then touch and hold the application icon shortcut.
2 Drag it in any direction a little▶ Drag it to 📋 the upper part of the screen.
- For applications that cannot be uninstalled, is not shown.
3 [OK].
- When an application is uninstalled, the application icon is also deleted from the Application screen.
Renaming folder
1 In the Home screen, tap a folder.
2 Tap the folder name or [Edit Name].
3 Enter a folder name.
- When entry is finished, tap on the software keyboard.
Setting the Home screen
1 Touch and hold an area of the Home screen where no icons etc. are displayed▶ [Home settings].
| Notification dots | You can turn on/off the dot which appears when an application has a notification (P.160). |
| Add app icons to Home screen | Select whether to automatically add an application icon shortcut to the Home screen or add only the application icon to the Application screen when a new application is installed.• By default, a shortcut of application is added to the Home screen when it is installed. |
| Add home settings icon | Turn ON/OFF in the Home screen. |
| Wallpapers | You can change the wallpapers of the Home screen and the lock screen. |
| Machi-Chara | Set Machi-Chara ON/OFF, change of character, etc. |
| Osusume Apps settings | Set the display of "Osusume Apps" contents in the Application screen. |
| Display my daiz NOW | Set the display of my daiz NOW which is located in the leftmost page of the Home screen. |
| My Magazine | Turn ON/OFF of flick-up activation of My Magazine. |
| Get started | Check the tutorial of the Home screen. |
| Help | Check how to use the Home screen in detail. |
Application screen
It is appeared when 📁s tapped in the Home screen. In the Application screen, you can find applications sorted in the order of use or installation, or search them by application name. Also, you can check the selected applications which are recommended to you now.
• Application screen (P.89)
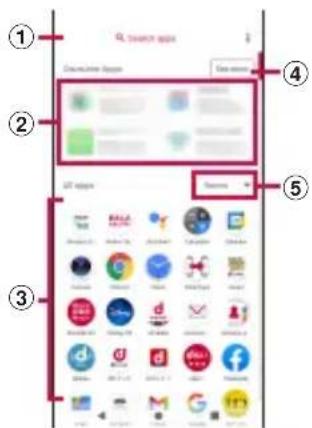
① Search apps bar
- Tap to enter characters to search applications.
② Osusume Apps
- Up to 4 selected applications or services from Osusume Apps are displayed.
③ All apps
- All applications installed to the terminal are displayed. Tap to activate the application.
④ More apps
• Display the Osusume Apps screen (P.79).
⑤ Pull-down menu
- You can sort all the applications in the Application screen by "Recent", "Name" or "Installed".
Using Osusume Apps
Applications or services are recommended according to your usage condition.
1 From the Home screen,
2 [Osusume Apps].
- When using it for the first time, the confirmation screen for use appears. Tap [ENABLE] to display the explanation screen. In the explanation screen, tap [おすすめアプリ覧へ (To Osusume Apps list)] to display the Osusume Apps screen and enable the notifications from Osusume Apps.
3 Select an application or service.
- A screen for introducing the application or a service page appears.
Information
- In the Osusume Apps screen, Tap of each setting to switch it to ON/OFF.
- When you have agreed the terms of use of Osusume Apps, tap on the Home screen to display the selection content of Osusume Apps. To display the Osusume Apps screen, tap [See More].
My Magazine is a search service to view articles from categories you selected. With tendency of articles you read and your profile information, the more you use, the more it comes close to your preference. Also, you can set to enable notifications, or use customization of My Magazine by using location information, your docomo service subscriptions, etc.
Viewing articles
1 From the Home screen,

- If the screen for startup of My Magazine appears, follow the onscreen instructions.
- The list screen of articles per category is displayed.
• Alternatively, swipe (flick) the Home screen up to open the list of articles per category. - Swipe (flick) left or right to switch categories.
2 Tap an article you want to read.
- You can change the settings of My Magazine or check the help by tapping
- Tap to refresh the information.

Setting the display category
1 From the Home screen,
- Marked categories will be displayed on My Magazine.
- Tap at the upper right of the screen to sort the categories.
my daiz NOW
my daiz NOW is a service which delivers convenient information according to your preference or behavior. You can readily check information which is convenient for daily life such as weather, traffic, or gourmet.
Displaying my daiz NOW
1 In the leftmost page of the Home screen, swipe (flick) right.
- Swipe (flick) up or down to switch cards to be displayed.
- Swipe (flick) left to return to the Home screen.
- If the confirmation screen for use appears, tap [my daiz を使ってみる (I'll try "my daiz")] and follow the onscreen instructions.
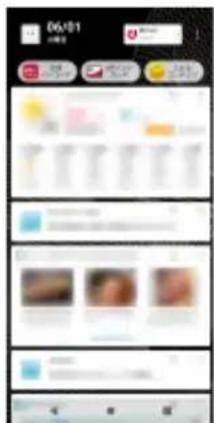
2 Tap a card you want to read.
- Tap a card to view the detail information.
- Tap my daiz (character) appeared in the upper left of screen to ask something you want to know through dialog.
Setting the display
Set to show/hide my daiz NOW.
1 Touch and hold an area of the Home screen where no icons etc. are displayed▶[Home settings].
2 Tap of "Display my daiz NOW".
• my daiz NOW disappears.
• To display it again, tap of "Display my daiz NOW".
Home app information
You can check the version information etc. of docomo LIVE UX.
1 From the Home screen, □▶ : .
2 [About].
- If the update of docomo LIVE UX is available, "Update now" is displayed in the application information screen. Tap it to update docomo LIVE UX.
Xperia Home screen
This section describes the Home screen displayed when the home app is set to "Xperia Home".
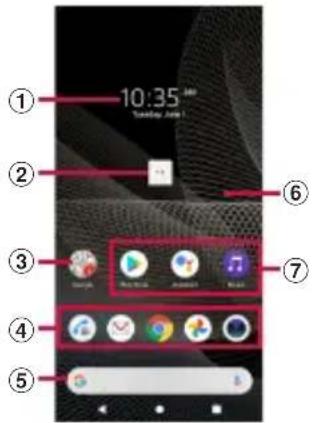
① Widget: Clock widget
② Machi-chara
- Tap to ask something you want to know through dialog.
③ Folder
- It contains the multiple application icon shortcuts etc.
④ Dock
- Locate application icon shortcuts or folders. They are always displayed even if the page of the Home screen is switched.
⑤ Widget : Google Search
⑥ Wallpaper
⑦ Application icon shortcuts
- Touch and hold to display the shortcut menu where you can perform specified operations or check the application information. When is displayed, touch and hold and then drag it to any location to add a shortcut of specified operation to the Home screen.
Information
- Swipe (flick) the Home screen up to open the Application screen.
- In the Home screen, swipe (flick) the part above the dock left or right to switch the pages and the indicator of the current location appears above the dock.
- Touch and hold an application icon shortcut etc. and drag it to the left end/right end of the screen to move to the next page. Also, drag the rightmost page to the right end of the screen to add a home screen page.
- You can add widgets, change the wallpaper, etc. by touching and holding an area of the Home screen where no icons, etc. are displayed.
- Swipe (flick) the Home screen down to open the Notification panel.
- If there is any notification which indicates update of application or pause of setup, or any application icon shortcut which is shown in gray in the Notification panel, download the application (P.94).
- A dot or number may appear on the application icon shortcut or folder when the application has a notification.
Adding folders on the Home screen
You can store application icon shortcuts etc. added to the Home screen to a folder to organize them.
1 From the Home screen, touch and hold an icon▶Drag it over another icon.
Information
- To store an icon into a folder, touch and hold an icon in the Home screen▶Drag it over a folder.
- To rename a folder, tap a folder. Tap the folder name or [Edit Name].
- To delete a folder, touch and hold the folder in the Home screen▶Drag it to "Remove" which appears in the upper part of the screen. The application icon shortcuts etc. in the folder are also deleted.
Adding a widget to the Home screen
Widget is an application which can be added to the Home screen to use. Use a widget to start an application easily.
1 Touch and hold an area of the Home screen where no icons, etc. are displayed.
2 [Widgets]▶ Touch and hold a widget to add.
- When the Home screen appears, drag it to anywhere.
- If the settings screen etc. appears, follow the onscreen instructions.
Information
- If a frame is displayed when a widget added to the Home screen is touched and held, you can drag the frame to resize the widget.
- To remove a widget, in the Home screen, touch and hold the widget▶Drag it to "Remove" in the upper part of the screen.
Changing wallpaper
You can change the wallpaper of the Home screen and the lock screen.
1 Touch and hold an area of the Home screen where no icons, etc. are displayed.
2 [Wallpapers].
3 Tap an image to set as wallpaper.
- When you tap [My photos] at the left end of the screen, select an image and then follow the onscreen instructions.
4 Follow the onscreen instructions to set wallpaper.
Setting Home screen
1 Touch and hold an area of the Home screen where no icons, etc. are displayed.
2 [Home settings].
| Show GoogleTM App | Set whether to display the "Google" app screen in the Home screen. Swipe (flick) the first page right to display it. |
| Notification dots | P.160 |
| Add app icons to Home screen | Set whether to add an application icon shortcut in the Home screen when the application is installed. |
| Allow Home screen rotation | Set whether to allow the Home screen or the Application screen to rotate. |
| Show quick search box | Set whether to display the Google Search widget in the Home screen. |
Simple Home screen
This section describes the Home screen displayed when the home app is set to "Simple Home". Set Simple Home to use the home screen and the setting menu that are limited to the basic functions.
1 From the Home screen, [Settings]▶ [Apps & notifications] ▶ [Advanced].
2 [Default apps]▶[Home app]▶[Simple Home].
3 [OK]. To not change the font size, unmark "Set font size to Largest".
■ Applications on Simple Home
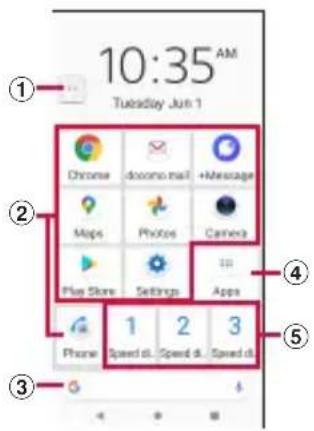
① Machi-chara
- Tap to ask something you want to know through dialog.
② Application icon - Tap to activate an application.
③ Google Search
④ Apps - Applications that are not displayed in the Simple Home screen are displayed in a list.
⑤ Speed dial
• Use the speed dial (P.85).
Information
- To change to the standard Home screen, from the Simple Home screen, tap [Settings]▶[Exit Simple Home]▶[OK]▶[docomo LIVE UX]/[Xperia Home].
- A dot or number may appear on the application icon, folder, etc. when there is a notification from the application.
Using Speed dial
Register frequently used contacts to "Speed dial 1" - "Speed dial 3" to make calls or send emails easily.
Saving contacts
Register a frequently used contact to "docomo phonebook" application in advance.
1 On the Simple Home screen, tap any of [Speed dial 1]/[Speed dial 2]/[Speed dial 3]▶[OK].
2 Select a contact to save.
- Display of "Speed dial 1"/"Speed dial 2"/"Speed dial 3" changes to the name in the registered contact.
Information
- To change/delete/edit contact saved in the speed dial, from the Simple Home screen, select the speed dia▶[MENU]▶Tap any of [Edit entry]/[Delete entry]/[Edit contact].
Making a call
1 On the Simple Home screen, select the speed dial▶[Call].
• Operation during a call (P.99)
Sending a message of +Message/email
1 On the Simple Home screen, select the speed dial▶[Send message]/[Send email].
• How to send a message via +Message (P.111)
• How to send Gmail (P.115)
Using Settings
1 On the Simple Home screen, [Settings].
| Phone number | Your own phone number is displayed. | |
| Display Brightness | Adjust the screen brightness. | |
| Adaptive brightness | ||
| Auto-rotate screen | ||
| Font size | ||
| Sleep | ||
| Screen lock | ||
| Sound Silent/Vibrate mode | Set silent mode. |
| Ringtone | Set ringtone. |
| Vibrate on touch | Set whether to vibrate the terminal when the key icon is tapped. |
| Touch sounds | Set whether to emit sound when selecting menu etc. |
| Vibrate when ringing | Set whether to vibrate the terminal while receiving a call. |
| Customize Home | P87 |
| More settings | Display the setting menu on the standard Home screen (P.145). |
| Exit Simple Home | Change to the standard Home screen. |
Changing applications on the Simple Home screen
1 On the Simple Home screen, [Settings]▶ [Customize Home].
2 [Change apps]/[Reorder apps].
3 Select the application▶ Select the application to newly display/select the location to move to.
- When "Change apps" is selected, "Settings" and "Apps" cannot be changed.
4 [OK].
Information
- In Step 2, tap [Reset]▶[OK] to restore the defaults. Note that contacts registered to the speed dials cannot be reset.
Application screen
When the home app is set to "Xperia Home", all applications are displayed in the Application screen.
- Switching Home app (P.74)
1 Swipe (flick) the Home screen up.
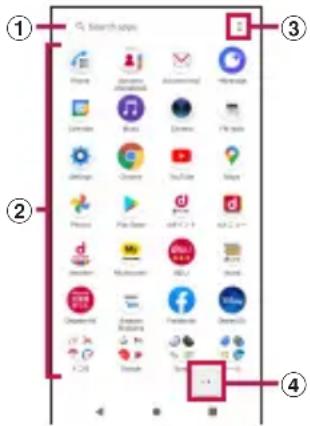
① Search bar
- Search applications.
② Application icon list
- Touch and hold an application icon to display the shortcut menu where you can perform specified operations or check the application information. When is displayed, touch and hold and then drag it to any location to add a shortcut of specified operation to the Home screen.
③ Menu
- Set the order of application icons, or edit the Application screen.
④ Machi-chara
- Tap to ask something you want to know through dialog.
Information
- A dot or number may appear on the application icon or folder when there is a notification from the application.
Adding an application to the Home screen
Add shortcuts of application to the Home screen.
1 In the Application screen, touch and hold an application icon.
- The shortcut menu appears.
- To add applications from a folder, tap the folder and then touch and hold an application icon.
2 Drag it a little in any direction.
- When the Home screen appears, drag it to anywhere.
Information
- Touch and hold the folder in the Application screen to add the folder with the application icon shortcuts to the Home screen.
- To remove an application icon shortcut, touch and hold the application icon shortcut in the Home screen▶Drag it a little in any direction▶Drag it to "Remove" in the upper part of the screen. When "Uninstall" appears in the upper part of the screen, drag it to "Uninstall" to uninstall the application.
Uninstalling an application
- Before uninstalling application, back up contents related to the application that you want to save including data saved in the application.
- Some applications may not be uninstalled.
1 In the Application screen, touch and hold the icon of application you want to uninstall.
- The shortcut menu appears.
- To uninstall applications in a folder, tap the folder and then touch and hold an application icon.
2 [App info].
- The application information screen appears.
- If "App info" is not displayed, tap ⓘ
3 [UNINSTALL].
- For applications that cannot be uninstalled, "UNINSTALL" is not shown. When "DISABLE" is displayed, you can disable the application (P.159).
4 [OK].
Editing the Application screen
When the order of application icons is set to "Own order" in the menu (P.87), you can rearrange the application icons as you like, or organize them by storing them to folders.
1 In the Application screen, : ▶[Rearrange].
- The rearrange screen appears.
2 Touch and hold an application icon.
3 Drag it to a desired location.
- Drag it over a folder to store an application icon to the folder.
- Drag it over another application icon to add a folder.
Information
- To close the rearrange screen, ▶ [Exit], or tap
- To take out an application icon from a folder, tap the folder▶Touch and hold the application icon▶Drag it to a place you want to locate.
- To rename a folder, tap a folder. Tap the folder name or [Edit Name]. You can also rename a folder with the same operation in the Application screen.
Application list
Preinstalled applications are as follows. The descriptions when the home app is set to "docomo LIVE UX" are explained here.
- For usage of some applications, separate subscription (Charged) is required.
- For some applications, you can check functions or operation steps from the help.
- Design of application icon may vary depending on the home app or usage condition.
- Preinstalled applications or layout of applications may differ depending on the initial setting condition etc.
Assistant
Activate Google Assistant.
Anshin Security
An application which allows you to use the security measurement against virus, unsafe sites or Wi-Fi, nuisance calls, etc.
An application for using "あんしん遠隔サポート (Anshin Enkaku Support)". "あんしん遠隔サポート (Anshin Enkaku Support)" is a service that allows staff of the Call center to support the terminal operations by remote-checking the display of your terminal. → P214
Osaifu-Keitai
An application that allows you to check your Osaifu-Keitai compatible services in a list. You can register recommended services or check balance of each service you have registered or points.→P.132
Osusume Apps\*1
An application that allows you to check or install applications or services that DOCOMO recommends according to your usage condition.→P.79
Camera
Shoot photos or videos.→P.121
Calendar
Register and manage your plans and reminders etc.
Disaster Kit
An application for using Disaster Message Board, Disaster Voice Messaging Service and Early Warning "Area Mail" (P.116).
Schedule
An application for creating/managing schedule whose data is shared with Memo application. →P.139
Sheets
Create, edit and share spreadsheets, as well as view, edit and save Excel files.
Slides
Create, edit and share slide show presentations, as well as view, edit and save PowerPoint files.
Settings
Configure settings for the terminal.→P.145
地図アプリ (Map application)
An application which supports your outings totally according to multiple means of transportation as a car, walk, train. To use a part of features such as navigation, subscription to the charged service is separately required.
Data Copy
An application that allows you to transfer data when changing model, back up to/restore from a microSD card. P.143
An application for using Data Storage BOX. Data Storage BOX is a service which allows you to upload files to easily manage them in the cloud.
Calculator
Perform basic arithmetic operations and other various calculations.
Phone
An application which allows you to use call or check call history, or make the various settings. → P.95
Docs
Create, edit and share documents, as well as view, edit and save Word files.
Clock
Use alarm, world clock, timer, stopwatch or bedtime.→P.141
docomo phonebook
It is a phonebook application provided by DOCOMO. You can manage phonebook data of your docomo account in the cloud.→P.104
docomo mail
Send/receive mails using DOCOMO mail address (@docomo.ne.jp).
Your d ACCOUNT allows you to use the same email address to send, receive, and view email on several devices, such as tablets and computers. → P.109
Drive
View/manage/share files stored in Google Drive.
Instruction Manual
Display the terminal instruction manual. You can directly call up functions from the explanation (in Japanese only).
* See "About manuals" in "Introduction".
News
Read a collection of the latest news and topics of interest.
Jspeak
An application for translating spoken words into the listener's native language. Use Face-to-face translation/Phone translation/Image translation/Common phrase to enjoy communication with the other party who speaks different language.
Photos
You can playback photos or videos. You can back them up to your Google account.→P.129
My Magazine is a safe and secure news application that allows you to check new information and have surprises free of cost every day.→P.79
マクドナルド (McDonald's)
An official application of McDonald's. You can search nearby McDonald's with the shop search function, or obtain good value coupons that can be used in the shop or the latest information. You can save or use the points in a single operation if you log in with your d ACCOUNT etc.
Maps
Use Google Maps services, such as viewing the current location, finding another location and searching the routes. P.138
Music
Play music. → P.136
Memo
An application for creating/managing memos whose data is shared with Schedule application.
Amazon Shopping
An official application of Amazon which allows you to conveniently shop with good prices in Amazon online.

Chrome
Browse web pages in Chrome.→P.117

d払い(d Barai)
An application for use "d払い (d Barai)", the payment service provided by DOCOMO. You can do your shopping simply, convenient and with good bargain just by showing a barcode displayed on the application in the target stores.

dphoto
A service for backing up photos or videos up to 5GB to cloud free of charge, then accessing the backup data from smartphones, tablets or PCs. Also, there is a service option that creates a photobook using the photos in the cloud or the terminal (To use, separate subscription to the charged service is required).

d ポイント (d POINT)
An application that allows you to check, accumulate, and use your d POINT.

dmarket
dmarket provides a variety of services, offering digital content, such as music, videos, and books, and giving you access to a shopping site, travel booking site, and other e-commerce sites. →P.130

dメニュー(dmenu)
An application shortcut for "dmenu". In dmenu, you can easily access sites recommended by DOCOMO, as well as convenient applications.
→P.130

dcard
An application for checking usage details of d card, saved d points, entries of good value information easily. Also, you can set up "iD" offered by DOCOMO.

Disney DX
Disney DX is an application to enjoy much of the Disney's official streaming service "Disney Plus" with a lot of exclusive movies and limited privileges.

Duo
An application that allows you to make video calls.

Facebook allows you to build closer relationships with your friends, family, colleagues, or classmates and to know what is going on in the world.

Files
You can search data such as still images, videos, music, or downloaded files. P.184

FM radio
You can listen to FM radio.
* To use FM radio, connect a headset (optional) to the Headset jack.

Gmail
You can use the email services provided by Google and major Internet service providers. → P.115

Search information in the terminal and websites by keywords. → P.73

Google One
An application to use Google One services such as managing storage plan, auto backup of data, using various offers.

Google Pay
An application for managing electronic money or point cards collectively.

Google Movies & TV
Rent or purchase movies, etc. from Google Play.

An application for using "iD", electronic money offered by DOCOMO. Once you have set up "iD" on your Osaifu-Keitai, you can hover the terminal over an IC card reader at various shops to make your shopping easier and more comfortable. P.135

Kindle
An e-books reader application for reading books purchased on Amazon.

An SNS application with a lot of features which supports your business.

my daiz
It is a service with which you can search information readily just by speak to the terminal or receive necessary information at an optimum timing.
In addition to weather forecast or transfer route search, you can add useful tie-up services such as a recipe search, home delivery, etc.

My docomo
You can check your data usage, usage fee, d points, etc. or establish various procedures or applications online.

Play Store
Download or purchase various applications, games, etc. from Google Play.→P.131

Podcasts
You can register your favorite programs and play them, or search featured programs.

PS App
An application that allows you to check the latest information about games in PlayStation®Store or exchange information among the game players.

Reader by Sony
An application that allows you to read e-books purchased in Sony's eBooks store "Reader Store".

Video & TV SideView
Play videos. In addition, view the TV program guide or use your terminal as a remote for Sony televisions or other devices.
Display Xperia使いこなしガイド (Xperia use guide) to read explanation of the functions or check how to use them.
You can check the product information of dedicated cover or purchase the favorite cover at Xperiaカバーストア (Xperia cover store).
Xperia Lounge Japan
An application which introduces Sony products or campaign information.
Xperia Transfer 2
You can transfer photos, videos, contacts, etc. from your smartphone (including iPhone) to Xperia.
YouTube
Play YouTube videos.
YT Music
You can playback music or music videos with YouTube Music.
+Message
You can send/receive text message to/from a mobile phone number as a recipient. You can also send images, videos, stamps, etc. other than texts. → P.109
*1 Appeared when the home app other than docomo LIVE UX is set.
Information
- When there is a notification which indicates update of application or pause of setup is displayed in the Notification panel, or there is any application icon which is shown in gray, downloading of the application is not complete. You can download in the following procedures.
- Connect Wi-Fi (downloading starts automatically)
- Drag the status bar down ▶ Open a notification which indicates update of application ▶ Follow the onscreen instructions to configure Wi-Fi, etc.
- When you download via mobile network, drag down the status bar▶Open the notification which indicates pause of setup (P.65)▶Tap [USE DATA].
- To download the application via mobile network individually, tap the application icon displayed in gray▶Follow the onscreen instructions.
- Some preinstalled applications can be uninstalled. Or, some uninstalled applications may be downloaded from "Play Store" (P.131) etc. again.
• Some applications may require downloading and installation.
- If you activate multiple applications, the available time may become short due to increase of battery consumption. You are recommended to exit the applications which are not in use using the task manager (P.67).
Phone/Phonebook
Making/Receiving a call
Making a call
1 From the Home screen,
2 Enter a phone number▶.
- Tap to delete the number.
3 When the call is finished,
Information
- In Step 2, tap without entering a phone number to enter the phone number registered as the latest call in the call history.
- In Step 2, when a phone number is entered, the menu appears in the upper screen and you can create a new contact or send a message. When a contact matching to the entered phone number appears, you can make a call by tapping it.
- With VoLTE, you can make high-quality voice call. To use VoLTE, both parties must meet the following requirements.
- Both terminals support VoLTE
- Within the area where VoLTE is available
- "Preferred network type" of Mobile network setting (P.192) is set to "4G/3G/GSM" or "4G/3G", and "4G Calling" (P.193) is also set to ON.
- In DOCOMO LTE service area, when "4G Calling" is OFF, data communication is also 3G.
- Voice communication and data communication may not change to LTE from 3G right after change of "4G Calling" to ON from OFF.
Emergency call
| Emergency call Phone | number |
| Police call | 110 |
| Fire and emergency rescue | 119 |
| Coast guard | 118 |
Note
- This terminal supports "Emergency call location information". If you use the terminal to place a call to 110, 119, or 118, the emergency numbers, the information of a location where you are calling from (location information) is automatically notified to the Emergency call acceptance organization such as the Police Station.
However, the Emergency call acceptance organization may not be able to figure out your exact location depending on the location where you place a call or radio wave condition.
When you dial with "184" added or make a call with your caller ID hidden, your location information and phone number are not reported. However, when the Emergency call acceptance organization deems it necessary for lifesaving purposes, etc., they may decide to obtain your phone number and accurate location information from the GPS, regardless of your settings.
Note that the areas/time for which the "Emergency call location information" is ready to be used vary depending on the preparatory state of each Emergency call acceptance organization.
- When calling 110, 119 or 118 from the terminal, tell that you are calling from a mobile phone, and give your phone number and your current location precisely for checking callback from the Emergency call acceptance organization such as police. Also, make a point to call in a stationary position to prevent the call from being dropped. Do not power off the terminal for at least 10 minutes after the emergency call just in case the Police or Fire/ Ambulance may have to get in contact with you.
- Note that you may not connect to the local Fire Department or Police Station depending on where you are calling from.
Information
- If a nano UIM card is not inserted to the terminal, emergency calls (110, 119, 118) cannot be made in Japan.
- You can make an emergency call by tapping [EMERGENCY] on the screen asking for entry of screen lock unlocking method.
- When you make an emergency call with Call Blocking set to ON, the setting of the Call Blocking is disabled automatically so as to receive calls from the Emergency call acceptance organization.
To enable Call Blocking, from the Home screen, tap
[RE-ENABLE NOW]. The setting of Call Blocking is kept disabled unless the operation is performed. - Emergency calls may not be available on some networks.




Entering pause (,) / (;) to send
For using services requiring entry of number during a call such as check of the balance of a bank account, reservation of tickets, etc., enter an additional number to a phone number beforehand and make a call.
■ Using 2-second pause (,)
Added number will automatically be sent approximately 2 seconds after a call is accepted.
1 From the Home screen,
2 Enter a phone number▶ : ▶[Add 2-sec pause]▶Enter an additional number▶.
3 When the call is finished,
Using a wait (;)
Sending is automatically on standby when the call is made and a confirmation screen asking if you send the additional number appears.
1 From the Home screen,
2 Enter a phone number▶ : ▶[Add wait]▶Enter an additional number ▶.
3 On the confirmation screen, [YES].
4 When the call is finished,
Making an international call (WORLD CALL)
WORLD CALL is a service for making international calls, which is available from DOCOMO's mobile phones in Japan. For details on WORLD CALL, refer to NTT DOCOMO website.
1 From the Home screen,
2 Dial + (touch and hold [0])▶ Enter Country code, Area code (City code), recipient number in the order▶.
3 When the call is finished,
Information
- If the area code begins with "0", omit "0". However, "0" may be required to dial to some countries/regions such as Italy.
Receiving a call
When a call comes in, the incoming call screen appears.
- If the screen is on (except on the lock screen) or an application is running, the notification appears at the top of the screen (P.99).
1 Swipe (flick) [up] on the incoming screen.
2 When the call is finished,
■ Voice call incoming screen
① Photo/image set in a contact
② Call icon
- Swipe (flick) up to answer, or swipe (flick) down to reject a call.
③ Send a message (P.98)
④ Name/phone number of the other party
Information
- When "Answer" of "Suguden setting" (P.69) is ON, you can answer calls just by placing the terminal to your ear.
- When "Disconnect (Motion/Voice command)" of "Suguden setting" (P.69) is ON, you can disconnect a call by the motion or voice command during a call.
Answering calls with Answering Machine
Even when Answering Machine is not set, you can activate Answering Machine manually.
1 On the incoming call screen, drag the status bar down▶ [Answering Machine].
Information
- When you have any recorded messages, and are displayed on the status bar. Drag the status bar down▶Tap the notification of the Answering Machine to display the Messages screen and you can check the recorded messages.
Muting the ringtone for an incoming call
1 While receiving a call, press the volume key or the power key.
Information
- You can stop vibration by pressing the volume key or the power key when silent mode (Vibrate) is set.
- To adjust the volume of ringtone or listening volume, press the volume up/down key with the Home screen, etc. displayed and then tap
Declining a call
1 On the incoming call screen, swipe (flick) 📞.
Rejecting an incoming call and sending a message
If you are not available to answer a phone, you can decline the call and send a message. Messages for sending are pre-registered, and you can edit them if necessary.
1 On the incoming call screen, swipe (flick) ☐.
2 Tap a message to send.
- Tap [Write new message] to create and send a message.
Information
- To edit a message beforehand, from the Home screen, tap ▶: ▶[Settings]▶[Calls]▶[Reject call with message]▶Select a message and edit it▶[OK].
Receiving a call when an application is running
If the screen is turned on (except on the lock screen) or an application is running when a call comes in, the notification appears in the upper screen.
1 [ANSWER].
• You can start a voice conversation.
• To decline a call, tap [DECLINE].
- Tap the upper part of displayed notification to open the incoming call screen.
2 When the call is finished,
Operations during a call
On the Calling screen, you can set voice output or mute, or enter a phone number to make a call to another party.
Screen displayed during a voice call
① Photo/image set in a contact
② Name, phone number, etc. of the other party
③ Sound quality of VoLTE call
- HD (high sound quality) is displayed during a call with VoLTE (HD).
④ Mute: Set to turn on/off the mouthpiece/microphone.
⑤ Dial key: Send a push signal while on a call.
⑥ Add call
- Add voice call.
⑦ Hold call: Hold/resume voice call.
⑧ End a call
⑨ Call duration time
⑩ Speaker: Set ON/OFF of speakerphone.
- Other party's voice can be heard from the speaker and handsfree call can be made.
- When the terminal is connected to Bluetooth device etc., tap it to switch audio output.
Note
- Do not bring the terminal close to your ear with the speakerphone on to avoid from hearing damage.
Information
- To hold/add a call, "Call waiting" subscription is required (P.103).
- The notification icon appears on the status bar while dialing, incoming, calling or holding. Even if you have switched to the other screen such as the Home screen, returning to the calling screen is available by dragging the status bar down and then tap the calling notification.
Adjusting the listening volume
1 During a call, press the volume up or down key.
Call history
Incoming calls and outgoing calls are displayed by chronological order in the call history screen.
Displaying the call history
1 From the Home screen, 📄▶Tap "Call History" tab
Call History screen
① Search contacts
② Phone number/name
- Tap to open the menu of "Create new contact", "Add to a contact", "Send a message", "Block number", and "Call details".
- Touch and hold to display the menu of "Copy number", "Edit number before call", "Block number" and "Delete" below a phone number in the call history.
③ An image set to a contact etc.
- Tap to display the profile screen of the Contacts.
④ History
- The call type (outgoing call/incoming call/missed call), number of calls, how long ago, etc. are shown.
⑤ Switching tabs
- You can switch each tab of Top Contacts, Call History, and Contacts.
⑥ Menu
⑦ Make a voice call
- Tap to make a voice call to the corresponding phone number in the call log.
⑧ Display the dialpad
Adding a phone number from the call history to the phonebook
1 From the Home screen, ▶ Tap "Call History" tab.
2 Tap a phone number▶[Create new contact]/[Add to a contact].
- Alternatively, touch and hold a phone number▶[Edit number before call]▶[Create new contact]/[Add to a contact].
- When you tap [Add to a contact], select a contact to add.
3 On the profile edit screen, enter necessary information such as name.
• To add items, tap [More fields].
4 [SAVE].
Deleting a call history
1 From the Home screen, ▶Tap "Call History" tab.
2 Touch and hold outgoing history/incoming history▶[Delete].
Information
- To delete all the call history, in the call history screen, tap : ▶[Call history] ▶ [Clear call history] ▶ [OK].
Displaying missed calls
When you have missed calls, 📋 appears in the status bar.
1 Drag the status bar down.
2 [Missed call].
Information
- You can make a call or send message to the caller of the missed call from "CALL BACK"/"MESSAGE" below "Missed call" in the Notification panel.
- When a missed call notification appears on the lock screen, double-tap and unlock the screen lock to open the call history.
Answering Machine
When Answering Machine is set, the answering message is played when you cannot answer an incoming call and message from the caller can be recorded even if you are not subscriber of Voice Mail Service.
• Time and number of items that can be recorded to Answering Machine (P.217)
1 From the Home screen, ▶ : .
2 [Settings]▶[Calls]▶[Answering Machine].
| Answering Machine | Set whether to use Answering Machine. |
| Pick up after | Set a ringing time for answering. |
| Use while roaming | Set whether to use Answering Machine when you stay abroad. |
| Greetings | Switch the answering message language to Japanese or English. |
| Messages | Check recorded messages. |
Information
- When a message of Answering Machine, the icon in the list of Messages changes from to.
- To delete message in the Answering Machine, touch and hold a message in the message list▶ [Delete]/[Delete all]▶[OK].
Checking the Answering Machine message in the status bar
When you have any recorded messages, displayed in the status bar.
1 Drag the status bar down▶Tap notification from Answering Machine.
• A list of Messages in Answering Machine is displayed.
• To play a message of Answering Machine, tap the message.
Information
- When a notification of Answering Machine appears on the lock screen, double-tap and unlock the screen lock to open the list of Answering Machine message.
Call settings
You can set the network services, set call rejection, or edit Reject call with message.
1 From the Home screen, ▶ : .
2 [Settings]▶[Calls].
| Network service/ roaming settings | Set network services, roaming settings or transmission of user information. • Network service settings (P.103) • Roaming settings (P.196). |
| International dial assist | P.197 |
| Answering Machine | P.102 |
| Call Blocking | Set whether to reject incoming calls from the phone numbers not in the phonebook or without the caller ID, or from a pay phone or unknown numbers. Also, you can reject incoming calls and messages from the registered phone numbers. |
| Reject call with message | Edit a message to be sent when rejecting an incoming call (P.98). |
| Suguden setting | P69 |
| Contact docomo* | Call to General Inquiries etc. of DOCOMO. |
| Calling accounts | Set Internet phone (SIP) account. |
* Not displayed if a nano UIM card is not inserted.
Network service settings
1 From the Home screen, ▶ : .
2 [Settings]▶[Calls].
3 [Network service/roaming settings].
- If the confirmation screen of Transmission of User Information appears, confirm the content and then follow the onscreen instructions.
4 [Network service].
| Voicemail service | Record caller's message when you cannot answer an incoming call. |
| Call forwarding service | Forward a call when you cannot answer an incoming call. |
| Call waiting | Put the current call on hold and answering an incoming call or making a call to another party. |
| Caller ID notification | Set whether to notify your caller ID when making a call. |
| Nuisance call blocking service | Register phone numbers of nuisance call to reject. |
| Caller ID display request service | Answer calls without phone numbers with a guidance of caller ID display request. |
| Call notification | Notify incoming calls by message while the power is off or you are out of service area. |
| English guidance | Switch the voice guidance to English or Japanese. |
| Remote operation settings | Set to operate Voice Mail Service or Call forwarding Service using land-line phone, public phone or DOCOMO mobile phone, etc. |
| Public mode (power OFF) settings | While the terminal is OFF or in Airplane mode, a guidance message indicating that the receiver cannot answer the call is heard on the caller's terminal and then the call ends. |
Accessibility
1 From the Home screen, ▶ : . 2 [Settings]▶ [Accessibility].
| Hearing aids | Set whether to enable hearing aid compatibility. |
| Noise Reduction | Set whether to suppress ambient noise during a call. |
Phonebook
In the phonebook, you can enter various information for contacts, for example, phone numbers, mail addresses and various service accounts.
Displaying phonebook
1 From the Home screen, [docomo phonebook]
• The Contacts list screen appears.
Information
- To use cloud service for the phonebook, "docomo phonebook" application is needed. When you use the "docomo phonebook" for the first time (including after resetting the application) or log in to cloud from the "docomo phonebook", the "Use of Cloud" screen appears and you can start using cloud.
- Cloud service for docomo phonebook is not available when user is switched to the other than the owner.
- Use docomo Data Copy application to back up/ restore the phonebook data to/from a microSD card (P.143).
Contacts screen
On the Contacts screen, you can view names of contacts etc. You can set a photo or image to a contact, and display contacts by group.
① Menu
② Photo/image set in a contact
③ Search
④ Name registered in a contact
• Tap to display the profile screen.
⑤ Register
Managing phonebook
Adding a new contact
1 From the Home screen, ▶▶[docomo phonebook]▶+
- When you have set up Google account etc., select the account to save to.
2 On the profile edit screen, enter necessary information such as name.
• To add items, tap [More fields].
3 [SAVE].
Information
- The contacts are listed in alphabetical order of the first names and then order of Japanese syllabary of the phonetic last names. Japanese Kanji or Kana names without registration of phonetic last names and phonetic first names are listed in "他 (Others)" field.
- Although Japanese name is displayed in order of the first name - last name in the Edit profile screen, it is displayed in order of the last name - first name in the Contacts screen.
Making a call from the phonebook
1 From the Home screen, [docomo phonebook]▶ Select a contact.
2 On the profile screen, tap the phone number.
Editing a contact
1 From the Home screen, [docomo phonebook]▶ Select a contact to edit.
2 On the profile screen, ☐ When you join the contacts, select a contact to edit.
3 Select a required item and edit. 4 [SAVE].
Adding a contact to Top Contacts
1 From the Home screen, [docomo phonebook]▶ Select a contact you want to add to Top Contacts.
2 On the profile screen, tap to change to
Information
- Contacts that you registered to Top Contacts are displayed in field in the Contacts screen. Alternatively, tap "Top Contacts" tab in the call history screen etc.
Using menu
1 From the Home screen, [docomo phonebook] [Settings].
- On the Contacts screen, select a contact▶On the profile screen, tap to display the menu of the profile screen.
Contacts screen
| My info | Display your own profile and you can edit it (P.107). |
| Cloud menu* | Display cloud menu. |
| d ACCOUNT setting | P.44 |
| International use setting | Set whether to use the functions which allow communication such as synchronizing to cloud or setting when docomo phonebook is used overseas. |
| Service quality improvement | Set whether to send service quality improvement to DOCOMO.• It turns on when use of the cloud is started. |
| Accounts | P.175 |
| Default account for new contacts | Set which account a contact is saved to. You can also change the account by tapping [Saving to] when you create a contact. |
| Contacts to display | Set contacts to display in the Contacts screen. |
| Sort by | Set the sort method to "First name"/"Last name". |
| Name format | Set the name format to "First name first"/"Last name first". |
| Phonetic name | Set display of phonetic name in a contact. |
| Import | Import contacts (P.108). |
| Export | Export contacts (P.108). |
| Specified number rejection | Set call rejection (P.103). |
* Signing in to cloud is required.
Profile screen
| Join/View joined contacts | Join/separate displayed contact. |
| Delete | Delete a displayed contact. |
| Share | Send a displayed contact via Bluetooth function, Email, etc. |
| Create shortcut | Add shortcut of displayed contact to the Home screen. |
| Set ringtone | Set a ringtone for displayed contact. |
Setting label (group) to contacts
1 From the Home screen, [docomo phonebook]
2 [Create label].
- When you have already created labels, select a label and proceed to Step 4.
- When you have set up Google account etc., select an account to create a label (group).
3 Set a name of label (group)▶[OK].
4 ▶ Tap a contact to set the label (group).
Information
- When the contacts are registered to a label (group), you can send email to the contacts, delete the contacts, rename the label (group), or delete the label (group) by tapping in Step 4.
Checking my profile and editing the information
1 From the Home screen, [docomo phonebook] [Settings] [My info].
2 ▶ Enter required items such as name.
3 [SAVE].
- If you logged in to the cloud, follow the onscreen instructions.
Importing/Exporting/Sharing phonebook entries
Phonebook entries can be imported from a microSD card or nano UIM card, or exported to a microSD card. This is useful, for example, when you want to move the contact information to another phone. Also, sending all phonebook data via Bluetooth function, Email, etc. is available.
- You can also use an online synchronization service to synchronize your contacts (P.175).
- For exporting to/importing from a microSD card, insert a microSD card in advance (P.35).
1 From the Home screen, [docomo phonebook] [Settings] [Export]/[Import].
2 Select the option for export or import▶Select the item.
- To export after selecting [Share all contacts], confirm the displayed content and drag the status bar down
▶Tap notification from docomo phonebook and then select the application for sending.
• After this step, follow the onscreen instructions.
Mail/Web browser
docomo mail
Send/receive mails using DOCOMO mail address (@docomo.ne.jp).
Data can be easily transferred when changing models or restored when you have lost the terminal since sent and received mails are saved on the docomo mail server.
Also, your d ACCOUNT allows you to use the same email address to send, receive, and view email on several devices, such as tablets and computers.
For details of docomo mail, refer to NTT DOCOMO website.
https://www.nttdocomo.co.jp/service/docomo_mail/ (in Japanese only)
1 From the Home screen,
• After this step, follow the onscreen instructions.
+Message
You can send/receive images, videos, stamps, etc. as well as text message in chat format using a mobile phone number as a recipient.
Also, you can exchange messages not only on one-to-one, but also among multiple people as group messages.
If the other party is not a +Message user, you can use the short message service (SMS) instead via "+Message" application to send/receive messages.
In addition, you can exchange messages between you and enterprises using their official accounts.
For details on +Message, from the Home screen, [+Message]▶[MyPage]▶[How to use]
▶[Use guide] to refer to use guide, or refer to the following NTT DOCOMO website.
https://www.nttdocomo.co.jp/service/ plus_message/ (in Japanese only)
1 From the Home screen, [+Message].
- To display the contacts or the message list screen, tap [Contacts] or [Message] respectively from the bottom menu.
Contact list screen
Message list screen
① Switching tabs
- Tap to switch between displaying all contacts and only +Message users (contact with icon) to display.
② My profile
- Your own contact is displayed. Tap to display/edit my profile.
③ Official Account
- Tap to display official accounts.
④ Favorite contact
- The contacts set to Favorites are displayed in the upper part of contact list, below "Official Account".
⑤ : It is the icon indicating he/she is a user of +Message.
- You can exchange group messages, photos, stamps, etc. among the contacts with this icon displayed.
⑥ Contacts
- Tap to check detail of contact.
⑦ + : Add by QR code/new contact
⑧ Profile image
- The other party's profile image is displayed. The image that the other party registered to his/her own profile takes precedence over the image you registered to the contact.
⑨ Message: Open the message screen
⑩ Official Account
- Accounts run by enterprise. The icons are shown in square shape () framed by circle.
⑪ : Display the submenu
- Read all : Change all unread messages to read messages.
- Sort messages : Sort messages.
⑫ : Approval mark indicating that it is passed the DOCOMO examination.
⑬ : Create a new message and new group message.
Sending a message
1 From the Home screen, [+Message].
2 From the bottom menu, [Message] ▶+▶[New message]/[New group message].
- Group message is a function which allows multiple +Message users (icon displayed in the contact) to exchange messages among them.
3 Select a recipient.
• To send a recipient who is not registered to Contacts, tap [Enter name and phone number] and input a phone number directly.
- For group message, select multiple recipients and then tap [OK].
4 Enter a message in the message field▶ (Send).
- If the recipient is a +Message user, sending photos, videos, or stamps is available.
Message screen
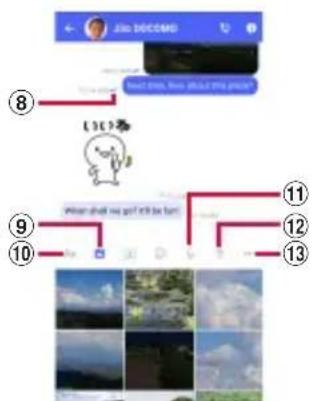
① : Activate "Phone" application and make a call
② i : Display the submenu
- You can register contacts, change the call settings, etc.
③ : Activate camera
- Touch and hold to shoot a photo and then you can send it consecutively.
④ : Display a sharing menu to send photos, stamps, location information, etc.
- While the sharing menu is displayed, you can use functions such as sending images or recording voice.
⑤ Message entry field
- You can enter a message.
⑥ : Switch to the stamp selection screen
⑦ : Send an entered message.
⑧ Message delivery status
- √: The recipient has checked the message. It is available only when the settings of "Use message read function" of both sender and recipient are ON.
• √ : Message is received on the recipient device
• (No icon) : Message is sent to the sever
• X : Sending message failed
⑨ : Switch to the image selection screen
⑩ Aa : Switch to the text entry screen
⑪ : Switch to the voice recording screen
⑫ : Switch to the map screen
⑬ : Select contacts/Sketch/file sharing
Short Message Service (SMS) information
- You can send/receive text messages to/from customers using overseas network operators. Refer to NTT DOCOMO website for the countries/regions, overseas network operators that provide this service.
- To send SMS to users of overseas network operators, enter "+" , "Country code" and then "the recipient mobile phone number". Enter the phone number without a leading "0", if any. Alternatively, enter "010", "Country code" then "the recipient mobile phone number" in order.
- You cannot send SMS messages if "#" or "* is included to a recipient address.
- You cannot send an SMS message with 184/186 prefixed to a recipient phone number.
+Message information
- To use "+Message" application via international roaming, set Enable +Message service while roaming to ON (it is set to OFF by default). Also, Turn on "Data roaming" of the terminal setting.
- Before receiving messages, activate "+Message" application and agree with the +Message terms of use, etc. even if you were a +Message user of the previous terminal before model change or MNP transfer.
Reading a message
Sent/received messages are displayed in thread by recipient/sender.
1 From the Home screen, [+Message].
2 From the bottom menu, [Message] ▶ Select a thread you want to read.
• Functions used for replying to messages (P.111)
Forwarding a message
1 From the Home screen, [+Message].
2 From the bottom menu, [Message] ▶ Select a thread.
3 Touch and hold a message▶.
4 Select a recipient and enter a message▶(Send).
Deleting a message
1 From the Home screen, [+Message].
2 From the bottom menu, [Message] ▶ Select a thread.
3 Touch and hold a message▶ [Delete].
- Only messages on the terminal can be deleted. You cannot delete messages on the recipient device. Note that deleted messages cannot be restored.
- may not appear when an image is selected, etc. In that case, ▶[Delete] ▶[Delete]
Deleting a thread
1 From the Home screen, [+Message].
2 From the bottom menu, [Message] ▶ Select a thread you want to delete.
3 ▶[Delete].
- If you delete a thread of group message, you will be left from the group.
Changing the settings of +Message
1 From the Home screen, [+Message].
2 From the bottom menu, [MyPage] ▶[Settings].
| Message | Set for messages, back up/restore, etc. |
| Official Account | Set the notification sound for official accounts. |
| Photos and videos | Set for file attachment, etc. such as photos or videos when sending/receiving. |
| Screen display | Set the theme color, or background of message screen. |
| Notification | Set notifications. |
| Privacy | Set a passcode, block list, etc. |
| Others | Set Transfer user information, Initialize +Message service, etc. |
Using the Official Account feature
1 From the Home screen, [+Message].
2 From the bottom menu, [Official Account].
3 In the Official account store screen, tap the account you want to use.
4 Mark "I have read and accepted the Terms and conditions and will use this Official Account".
5 [Start].
Gmail
You can use the email services provided by Google or by general providers.
- Set up your Google account (P.43) or email account by following the onscreen instructions, if you have not already done so.
Information - For details on Gmail, from the Home screen, tap [Google]▶[Gmail]▶≡▶[Help & feedback] to see Gmail Help.
Sending Gmail
1 From the Home screen, [Google]▶ [Gmail].
2 [Compose].
3 Enter the email address of recipient.
- Tap to add Cc or Bcc recipients.
4 Enter a subject and message.
5 ▷ (Send).
Information
- To attach a file, tap while creating a Gmail and follow the onscreen instructions to select files.
Refreshing Gmail
1 From the Home screen, [Google]▶ [Gmail].
2 In the Inbox, swipe (flick) the screen down.
• This refreshes the Inbox.
Early Warning "Area Mail"
Area Mail is a service which allows you to receive earthquake early warning or tsunami warning, emergency warning related to weather etc. delivered by the Meteorological Agency, and disaster/evacuation information delivered by the national government or local governments without being influenced by congestion.
- Area Mail is a free service for which subscription is not required.
- Area Mail cannot be received in the following case.
- When the power is off
- During International roaming
- In Airplane mode
- When software is being updated
- While PIN code entry screen is displayed
- During a voice call (except for VoLTE voice calls)
- If the permission of phone calls & SMS is OFF on the main-user (owner) settings, sub-user cannot receive disaster/evacuation information.
- Area Mail may not be received when available memory of the terminal is low or tethering is set in 3G area, or while using packet communication.
Receiving Early Warning "Area Mail"
When Area Mail is received, a notification content screen appears and you are notified by dedicated buzzer sound or dedicated ringtone and vibration.
- The buzzer sound and the ringtone cannot be changed.
1 Receive Area Mail automatically.
2 The buzzer or the ringtone sounds.
• 🚠️ appears on the status bar.
3 A message of Area Mail appears.
Checking received Area Mail later
1 From the Home screen, □▶[Disaster kit].
2 [Early Warning "Area Mail"]▶[Area Mail].
3 Select an Area Mail from the Area Mail list.
Deleting Area Mail
Deleted Area Mail messages cannot be restored.
1 From the Home screen, □▶[Disaster kit].
2 [Early Warning "Area Mail"]▶ [Area Mail].
3 From the Area Mail list, touch and hold any Area Mail▶[Delete]▶[DELETE].
Chrome
Use "Chrome" application to view websites like on a PC.
You can use "Chrome" application via packet communication and Wi-Fi network with the terminal.
Viewing websites
1 From the Home screen, tap
2 Tap the address entry field at the top of the screen.
- When the address entry field is not displayed, swipe (flick) down the screen to display.
3 Enter a website address or keyword to search.
- While appears in the address entry field, tap to enter a search word in voice sound.
- As you enter an address or characters, retrieved website list appears.
4 Select a candidate or tap on the software keyboard.
- To zoom-in/-out web pages, pinch-out/-in on the screen.
• To go back to the previous page, tap

Information
- To copy text in a web page, touch and hold a text - Drag or to select a range of text - Tap [Copy].
Adding a new tab
Open multiple tabs and view websites.
1 From the Home screen, [New tab].
2 View website.
- A number in the icon next to the address entry field indicates the number of tabs that are opened.
Opening incognito tab
You can view websites without recording history and search history.
1 From the Home screen, [New incognito tab].
2 View website.
Information
- Around address entry field is displayed in gray with incognito tab.
• To close an incognito tab, see "Closing a tab" (P.118). - Websites viewed with the incognito tab are not displayed in History. When the tab is closed, record of Cookie etc. is erased. Downloaded files or bookmarked websites can be saved with the incognito tab.
Changing tabs
1 2.
- Currently opened tabs are displayed with thumbnails in a list.
2 Tap the tab.
Information
- A number in the icon explained in Step 1 varies by the number of tabs that are opened.
Closing a tab
1 Tap of tab you want to close.
• Alternatively, swipe (flick) a tab left or right to close it.
Information
- A number in the icon explained in Step 1 varies by the number of tabs that are opened.
Searching text in a web page
1 From the Home screen, [Find in page].
2 Enter a search word.
- Tap ↗ to move the highlight to the next/previous item.
Information
- Tap ✗ to close the search bar.
Changing Chrome settings
1 From the Home screen, tap
2 : ▶[Settings].
| Sync and Google services | Make the sync setting or Google services. |
| Search engine | Set the search engine. |
| Passwords | Set whether to save the passwords entered to websites. |
| Payment methods | Set whether to use autofill of payment method, or set a credit card information for using autofill. |
| Address and more | Set whether to use autofill of information such as an address, or save information such as an address, name, phone number, email address to use autofill. |
| Privacy and security | Set to access payment methods, pre-load web pages, etc. or delete browsing history data. |
| Safety check | Check whether your device is protected from data intrusion or threats from unsafe websites or not. |
| Notifications | Set notification method for Chrome. |
| Theme | Set the theme for Chrome. |
| Homepage | Set a page which appeared when is tapped. |
| Accessibility | Set the font size, zooming, etc. |
| Site settings | Set Cookie, JavaScript, or other settings related to website. |
| Languages | Show text of websites in set language.• In some websites, the text may not be shown in the set language. |
| Lite mode | Set whether to accelerate loading pages by reducing data usage. |
| Downloads | Set a saving location etc. for downloading. |
| About Chrome | Check the versions of Chrome etc. |
Operating links
Touch and hold a link or an image in a web page to copy the URL or download the image.
Information
- In some website, downloading of files etc. may not be available.
Managing bookmarks and history
You can check history, save bookmarks, etc.
Bookmarking a website
1 From the Home screen, ▶
Display a website to bookmark.
2 : ▶ ☆ ·
Opening a bookmark
1 From the Home screen, [Bookmarks].
2 Tap the bookmark you want to open.
Information
- You can edit or delete a bookmark, move to folder, etc. by tapping in the bookmark list, or touching and holding the bookmark.
Checking history
1 From the Home screen, [History].
2 Tap a history to check.
Information
• To delete history, tap of history.
- To delete all history, [Clear browsing data...] Select the period to clear the data▶Confirm that "Browsing history" is marked, then tap [Clear data]. If the confirmation screen appears, follow the onscreen instructions.
Camera/Photos
Camera
- All still pictures or videos that you capture on the terminal are stored into the internal storage or a microSD card.
- To save still pictures and videos to a microSD card, insert one and specify it as the destination where you want to save them, before using the camera (P.127).
- When the terminal temperature becomes high, the camera may not activate or may stop.
■ About the Copyright and Portrait rights
Movies, still images, and sounds recorded on the terminal are prohibited by the copyright law from use without consent of the copyright holders, unless intended for personal use or any other purpose permitted by law. Also, using or transformation of other person's portrait or name without his or her permission may violate the portrait right. When you post recorded images etc. on the Internet web pages etc., make sure to be aware of the copyright and portrait right. Note that some performances, shows, and exhibitions may be restricted to record even for personal use. Transmission of images related to copyright or beyond the scope provided in the copyright law is not available.
Shooting/sending images
Please be considerate of the privacy of individuals around you when taking and sending photos using camera-equipped mobile phones.
If you cause the public any trouble using the terminal, you may be punished under law or regulations (for example, nuisance prevention ordinance).
Activating the camera
1 From the Home screen, [Camera].
• A shooting screen appears.
Information
- Alternatively, swipe (flick) on the lock screen to activate the camera quickly.
- The camera ends when a certain time has elapsed with no operations on the shooting screen.
Shooting screen
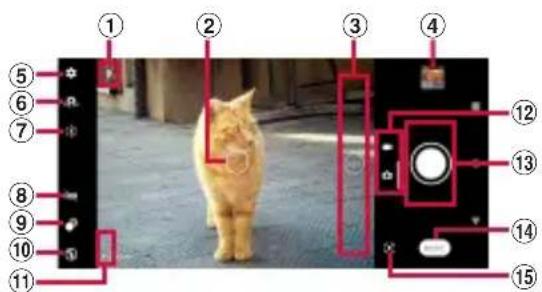
① Display area for status icons
- The icon etc. for Save location (Geo-tag) ON is displayed here.
② Auto focus frame
• Appeared when the screen is tapped.
③ Zooming magnification
- When you operate zoom, the zoom indicator appears and the icon indicating the set magnification appears.
④ Thumbnail
- Tap to display the play screen of shot photo or the preview screen of video. To return to the shooting screen, swipe (flick) the screen right.
⑤ Menu
⑥ Switch to Front camera
⑦ Adjust brightness/shade of color (P.127)
⑧ HDR setting (P.127)
⑨ Set bokeh effect (P.128)
⑩ Flash setting (P.128)
⑪ Scenes/Conditions
- In "PHOTO" mode, the camera determines and detects the scene and displays the icon. Also, the icon appears when the camera is moving the camera is stabilized or an object is moving (
- Scene/condition does not appear if you tap of brightness/color tone (P.127) to turn to
⑫ Switch PHOTO/VIDEO
- Switch capturing mode between "PHOTO" and "VIDEO". Swipe (flick) up or down in landscape view, or right or left in portrait view.
⑬ Shutter (photo)
Start/stop/pause recording (video)
- Depending on setting, an icon of Self-timer or Touch capture icon is displayed.
⑭ Change the capturing mode (P.123)
⑮ Shortcut of capturing mode
- The icon of recently used capturing mode is displayed. You can switch to the capturing mode immediately by tapping this icon.
Information
- The display and operations differ depending on the capturing mode etc.
• To adjust magnification in detail, do as follows. - Set "Use Volume key as" (P.127) to "Zoom" and operate with the Volume key
- Pinch-in/-out the screen
- Drag the zoom indicator up or down (for portrait view, left or right)
- The zoom is not available when shooting with the front camera or depending on the capturing mode.
- By default setting, an auto-focusing frame appears when the shooting screen is tapped in "PHOTO" mode, and focus and brightness will be adjusted at the position where you tapped.
- The scene mode may not be recognized correctly depending on shooting conditions.
Capturing mode
Shooting in "PHOTO", "VIDEO" mode
1 From the Home screen, [Camera].
2 Swipe (flick) the screen to display the shooting screen in "PHOTO"/"VIDEO" mode.
- Shooting method (P.124, P.125)
Changing the capturing mode
You can use the capturing mode such as "Portrait selfie", "Panorama", etc. other than "PHOTO" and "VIDEO" to shoot various photos or videos.
1 From the Home screen, [Camera].
2 On the shooting screen, [MODE]▶ Select a capturing mode.
- When is displayed on the shooting screen in each mode, tap it to return to "PHOTO" mode.
■ Main capturing mode and Still image size/Video size
| Capturing mode | Still image size/Video size | |
| PHOTO | Camera :4:3 (13MP)16:9 (9MP)1:1 (10MP)19:9 (7MP) | Front camera :4:3 (8MP)16:9 (5MP)1:1 (6MP)19:9 (4MP) |
| VIDEO | Video camera :Full HDHD (19:9)HD (16:9)VGA | Front video camera :Full HDHD (19:9)HD (16:9)VGA |
Notes on shooting with Panorama
- The following cases are not suitable for shooting with Panorama.
- Shooting a moving object
- Shooting the main object that is too close to the camera
- Shooting an object with repetition of the same pattern such as a sky, beach, grass, etc.
- Shooting a big object
- Shooting an object with constantly changing pattern such as a wave, waterfall, etc.
- Because two or more images are joined together, joints may not be recorded smoothly.
-
Images may be blurred or may not be taken in a dark scene.
-
Under the flickering light source such as a fluorescent light, you may not be able to shoot properly since brightness or color balance of joined image may be unstable.
- If the brightness, color balance, focus point of whole image, etc. are extremely different between the entire angle view of Panorama shot and the focused angle view, the image may not be shot properly.
Shooting photos
■ Shooting with the shutter icon
1 From the Home screen, [Camera].
2 Swipe (flick) the screen to display "PHOTO" mode shooting screen.
3 Tap the shutter icon (1).
- You can shoot continuously (up to 100) while is kept touching.
■ Shooting with the volume key
- Set "Use Volume key as" (P.127) to "Shutter" in advance.
1 From the Home screen, [Camera].
2 Swipe (flick) the screen to display "PHOTO" mode shooting screen.
3 Press the volume key.
- While the volume key is kept pressing, you can shoot continuously (up to 100).
Information
- Continuous shooting is available in "PHOTO" mode. However, the front camera does not support continuous shooting. You may not use continuous shooting in a dark place.
- Continuous shot data is saved to the internal storage even if the saving location is set to "SD card".
- When the auto focus frame does not appear, focusing may be failed.
- When an object face is detected, a yellow frame appears on the face which is automatically focused.
- When you connect a commercially available earphone or Bluetooth device, shutter sound may be softer than usual.
Shooting videos
■ Shooting with the start/stop icon
1 From the Home screen, [Camera].
2 Swipe (flick) the screen to display the shooting screen in "VIDEO" mode.
3 Tap the start shooting icon (1)
4 Tap the stop icon (D)
- Tap the pause/start shooting icon (1) to pause/resume shooting.
■ Shooting with the volume key
- Set "Use Volume key as" (P.127) to "Shutter" in advance.
1 From the Home screen, [Camera].
2 Swipe (flick) the screen to display the shooting screen in "VIDEO" mode.
3 Press the volume key.
- Press the volume key again to stop shooting.
Information
- Do not cover the mouthpiece/microphone with fingers etc. when recording videos.
-
When you connect a commercially available earphone or Bluetooth device, shooting start/stop sound may be softer than usual.
-
When the shutter icon (i) is displayed while shooting video, tap to shoot photos.
- The shutter sound does not emit when photos are taken while shooting a video.
Changing settings when shooting
Changing from the menu
- The displayed icons or operations vary by the capturing mode, or camera/front camera.
• Some settings cannot be used in combination with one another.
1 From the Home screen, [Camera].
2 ▶ Select a setting item.
- For some capturing modes, tap in the shooting screen to set.
3 Change the setting.
i
You can check the introduction to features of the camera.
■ Self-timer : "PHOTO" mode\*
Set the number of seconds for the self-timer. The shutter icon changes into a timer icon. Tap it to shoot after set period of time (seconds) elapses.
Use the self-timer to take a self-portrait or group photo. You are recommended to use the self-timer for avoiding camera shake.
Still image size : "PHOTO" mode Set still image size. The larger Still image size is, the larger the photo data volume is.
■ Video size : "VIDEO" mode Set video size. The larger the size of a video, the larger its data size.
■ Video stabilization : "VIDEO" mode Set whether to decrease blur by hand shake when shooting.
■ Soft skin effect : "PHOTO" mode Set whether to shoot applying smooth skin correction.
QR Code reader : "PHOTO" mode* Set whether to scan QR codes.
Save location
Set whether to tag photos/videos location information (Geo-tag) for the shooting spot.
- Location information is added when shooting if appeared on the shooting screen.
- appears while acquiring location information. While acquiring location information, geo-tags cannot be added when shooting photos.
Grid lines
Set whether to show a gridline on the shooting screen as a guide.
Use Volume key as
Select the function from "Zoom" or "Shutter" to assign to the Volume key for shooting.
Data storage
Set the saving location for shot photos/videos.
* Only available for shooting with the back camera
Changing settings using icons
Tap the icon displayed on the shooting screen to change the setting.
- The displayed icons or operations vary by the capturing mode or camera/front camera.
- Some settings cannot be used in combination with one another.
Brightness/shade of color : "PHOTO", "VIDEO" mode
Tap ✦ adjust brightness and shade of color. To make adjustments, drag the marker on the bar that appears on the shooting screen.
Tap 📄 to ride the adjusting bar and reset the setting.
- When the brightness adjusting bar appears when tapping the shooting screen in "PHOTO" mode, consecutively tap 📊 or portrait view, ) t 📌 display the color shade adjusting bar.
HDR : "PHOTO" mode
Set whether to shoot photos having natural impression in a state closer to that seen with the eye even when there is contrast in brightness.
■ Bokeh : "PHOTO" mode
Shoot photos with bokeh effect.
Drag the marker to set.
■ Self-timer : "PHOTO", "Portrait selfie" mode
Set the number of seconds for the self-timer.
The shutter icon changes into a timer icon.
Tap it to shoot after set period of time (seconds) elapses.
Use the self-timer to take a self-portrait or group photo. You are recommended to use the self-timer for avoiding camera shake.
10 sec.
3 sec.
Off
Flash : "PHOTO" mode
Auto
Fill flash/On
Off
Flashlight
HDR: "VIDEO" mode
Set whether to use flash when shooting video in a backlight or dark scene.
On
Off
■ Portrait selfie advanced setting :
"Portrait selfie" mode
Set Slender face, Bokeh, etc.
Mirror
Set whether to save mirror image.
On
Off
Touch capture
Set whether to use touch capture.
On
Off
Aspect ratio
Set aspect ratio of photo to shoot. Still image size varies by the setting.
4:3 4:3
16:9 16:9
1:1 1:1
19:9 19:9
Slender face
To set profile correction etc., tap the icon
Tap the bar, or drag the marker.
Eye enlargement
Skin brightness
Soft skin
Bokeh
Photos
View, playback, or manage photos or videos.
Displaying photos or videos
1 From the Home screen, [Photos].
2 Tap the image or video.
• The photo or video is played.
- Touch and hold a file in the file list screen to display the menu such as Share or Delete. You can also select multiple files by tapping the other file successively.
Information
- For details on "Photos" application, open the Google account menu in the Photo screen▶Tap [Help & feedback] to see Support.
Deleting files (photo, video)
1 From the Home screen, [Photos].
2 Touch and hold a file to delete.
- You can also select multiple files by touching and holding a file and then tapping the other file successively.
3 ▶[Move to trash].
- Files moved to the trash will be cleared from the Google account and its synced device (the terminal) after a certain period of time.
• To clear them only from the device (the terminal) but keep in the Google account, confirm that they are backed up to the Google account and then tap
▶[Delete from device]▶[Delete from device].
Apps
dメニュー (dmenu)
In dmenu, you can easily access sites recommended by DOCOMO or convenient applications.
1 From the Home screen, [dメニュー (dmenu)].
- Browser is activated, "dメニュー (dmenu)" appears.
Information
- To use dmenu, make sure that the terminal is connected to the network (P.63).
- For connecting dmenu and downloading applications introduced in dmenu, packet communication charge is applied separately. Some applications automatically perform packet communications.
- Paid applications are included to the applications introduced in dmenu.
dmarket
dmarket provides a variety of services, offering digital content, such as music, videos, and books, and giving you access to a shopping site, travel booking site, and other sites.
1 From the Home screen, [dmarket].
Information
- For details on dmarket, refer to the following website. https://d.dmkt-sp.jp/common/about/index.html (in Japanese only)
Play Store
Use Google Play to install useful applications or fun games to the terminal.
• To use Google Play, you need to set up a Google account (P.43).
- For details on purchasing applications, returning your purchases, or requesting a refund, see Google Play Help.
- Once you accept the installation of an application, you will be held responsible for its use. Be careful especially about applications which access many functions or large amount of data.
• Make sure the security of application, then install it at your own risk. The terminal may be infected with a virus and the data may be damaged.
- NTT DOCOMO is not liable for any malfunctions or disadvantage brought to you or any third party due to application which you installed and provided by a third party including Google LLC.
- For the application which you installed from Play Store and provided by the third party including Google LLC, contact each provider.
Installing an application
1 From the Home screen, [Play Store].
2 Search applications▶Tap an application to install.
- Check the displayed contents carefully and follow the onscreen instructions.
Information
- Some applications automatically perform packet communication. Packet communication is kept active unless you disconnect it or the time-out error occurs. To disconnect packet communication manually, from the Home screen, tap [Settings] ▶[Network & internet] ▶[Mobile network] ▶ of "Mobile data".
• Some applications may be updated automatically.
Uninstalling an application
1 From the Home screen, [Play Store].
2 Open the Google account menu.
3 [My apps & games]▶ "Installed" tab.
4 Tap the applications to uninstall▶[Uninstall]▶[Uninstall].
• To uninstall a charged application, follow the onscreen instructions. For details, see Google Play Help.
Osaifu-Keitai
This function allows you to use "おサイフケータイ対応サービス (Osaifu-Keitai compatible service)" by which you can pay money or use as a point card.
You can save electronic money, points, etc. to the IC card of the terminal to check the balance or points on the screen. Also, you can prevent from being abused in case of theft or loss by locking Osaifu-Keitai function.
For details on Osaifu-Keitai, see NTT DOCOMO website.
- Make settings from the dedicated website or application to use Osaifu-Keitai compatible services.
-
The data in the IC card* may be lost or altered because of the malfunction of the terminal (when we repair your terminal etc., as we cannot keep it with data remained, you are required to erase the data by yourself). For support such as reissuance, restoration, temporary preservation or transfer of data, contact each Osaifu-Keitai compatible service provider. To keep your important data, be sure to use Osaifu-Keitai compatible services with backup services.
-
If the data in the IC card is lost, altered or damaged by any means such as malfunction or model change, DOCOMO assumes no responsibility for the loss related to Osaifu-Keitai compatible services.
- If the terminal is stolen or lost, immediately contact DOCOMO and the Osaifu-Keitai compatible service provider to inquire about suspension of use etc.
- NFC/Osaifu-Keitai function is not available when the terminal is turned off while charging. To use it while charging, turn on the terminal.
* Data saved in the IC card installed in the Osaifu-Keitai compatible terminal
Notes on hovering over the device
Please note the following when hovering the terminal over an IC card reader or NFC module equipped device.
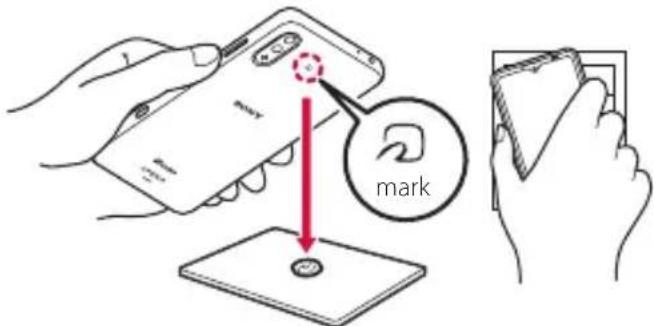
- Bring mark close to the device slowly without hitting it strongly.
- Hover mark over the center of the device in parallel. If scanning fails even with it hovered over the center of the scanner, slightly lift up the terminal, or move it backwards/forwards or to the left/right.
- If there is any metal object between mark and the other device, scanning may fail. Putting the terminal into a case or cover may affect communication. In that case, remove the case or cover.
Enabling the NFC/Osaifu-Keitai function
1 From the Home screen, [Settings]▶[Device connection]▶[Connection preferences].
2 [NFC/Osaifu-Keitai]▶ of "NFC/Osaifu-Keitai".
- The NFC/Osaifu-Keitai function is enabled. When the NFC/Osaifu-Keitai function is enabled, all of the Osaifu-Keitai compatible services are available.
Information
- While the camera is activated, the NFC/Osaifu-Keitai function is not available.
Using "Osaifu-Keitai compatible service"
To use the Osaifu-Keitai compatible service, set services in the Osaifu-Keitai app.
- Enable NFC/Osaifu-Keitai function in advance (P.133).
1 From the Home screen, □▶ [Osaifu-Keitai].
- If the initial settings are not complete, the initial setting screen appears. Follow the onscreen instructions.
2 Select a service.
3 Set the service.
- Set it from the service application or the website.
4 Hold mark of the terminal over an IC card reader.
Information
- You can use the service by hovering over an IC card reader without activating Osaifu-Keitai compatible application.
-
These services are available even when the terminal is off. However, they may not be available if the terminal has been off for a long time, the battery is too low, or while certain period of time after the powering on the terminal.
-
Packet communication charge may incur because the Osaifu-Keitai compatible application performs communication which is necessary for providing the Osaifu-Keitai service in the background regardless of "STAMINA mode" (P.162) or the setting of "Data Saver" (P.155).
- After the power of the terminal is turned on, the terminal is restarted, or the software is updated, unlock the screen lock and then hover over the reader to use the Osaifu-Keitai compatible service.
- Note that some functions may not be available via communication other than sp-mode depending on Osaifu-Keitai compatible services which you use. Note that ahamo plan does not support sp-mode.
Locking the Osaifu-Keitai function
You can restrict the use of Osaifu-Keitai function and related services by locking Osaifu-Keitai.
Setting "NFC/Osaifu-Keitai lock ON/OFF"
Restrict the function used by hovering the terminal in sleep mode.
- If you set "Screen lock" (P.170) or "Fingerprint Manager" (P.173), cancel it and then use the function.
1 From the Home screen, [Settings]▶[Device connection]▶[Connection preferences].
2 [NFC/Osaifu-Keitai]▶ of "NFC/Osaifu-Keitai lock ON/OFF".
NFC
NFC is an abbreviation for Near Field Communication and a short range wireless communication method of international standard defined by ISO (International Organization for Standardization). You can use a contactless IC card function, Reader/Writer function and others.
Using the contactless payments
- Enable NFC/Osaifu-Keitai function in advance (P.133).
1 From the Home screen, [Settings]▶[Device connection]▶[Connection preferences].
2 [NFC/Osaifu-Keitai]▶[Contactless payments].
3 [Payment default]▶Select an application▶[OK].
4 [Use default]▶[Expect when another payment app is open]/[Always].
5 Hover mark of the terminal over an IC card reader which has the contactless payments mark.
"iD" refers to electronic money offered by DOCOMO. Once you have set up "iD" on your Osaifu-Keitai, you can make shopping easier and more comfortable just hovering the terminal over an IC card reader at various shops. Card information for more than two cards can be registered and you can choose them depending on privilege, etc.
- To use iD with your Osaifu-Keitai, you need to set up the iD application.
- The charges required for iD service (including the annual charge) vary by card issuer.
- Setting up the iD application or checking its information overseas will incur packet communication charges that are different from those in Japan.
- For details on iD, refer to iD website. https://id-credit.com/ (in Japanese only)
Music
Use Music to play back music stored in the internal storage or a microSD card.
• Available codec of data that can be played (P.217)
Playing music data
Do not unmount a microSD card (disable reading/writing) (P.167) while playing music.
1 From the Home screen, [Music].
2 ▶ Select the category ▶ Select a song to play.
Information
- Tap to return to the Home screen with a song played in background. From the Home screen, [Music] to display the Music screen. Also, drag the status bar down and tap the name of song that is currently played to open the playback screen.
- When displayed at the upper right of screen, music can be played with Google Cast devices. Tap and then follow the onscreen instructions to connect. To play music data on a Google Cast device, connect the terminal to the same Wi-Fi network as the one the Google Cast device connected in advance (P.147).
Sharing music
Send music data via Bluetooth or mail attachment.
1 On the music list▶Touch and hold a song to send▶ [Share].
2 Select the application.
• After this step, operations vary by selected application.
Information
- For some DRM protected contents or transfer applications, sharing may be limited.
Location services
Your current location can be positioned using GPS, Wi-Fi, or mobile network.
GPS function
The terminal has a GPS receiver that uses satellite signals to calculate your location. Some GPS features use the Internet. Data rates and charges may apply. When you use GPS function to find your location, make sure you have a clear view of the sky. If GPS does not find your location after several minutes, move to another location. To help the search, stand still and do not cover the GPS antenna section (P.31). The first time you use the GPS, it may take a few minutes to find your location.
- Use the GPS system with great care. DOCOMO is not liable for any damage caused by abnormality of the system.
-
Note that DOCOMO shall have no liabilities for any purely economic loss including those due to missing a chance to check the measurement (communication) results because of external factors (including the running out of the battery), such as a failure, malfunction, or any other problems of the terminal or the power failure.
-
You cannot use the terminal as a navigation device for an aircraft, vehicle, and person.
Note that DOCOMO shall have no liabilities whatsoever even if you suffer damage or loss while performing a navigation using the location information. - You cannot use the terminal as a high-accuracy measurement GPS. Note that DOCOMO shall have no liabilities whatsoever even if you suffer damage or loss due to a deviation of the location information.
- Global Positioning System (GPS) is created and managed by U.S. Department of Defense. And the department is in charge of controlling the accuracy and maintenance of the system. Therefore, some changes made by U.S. Department of Defense might affect accuracy or functions of GPS system.
- Some wireless communication products (mobile phone, data detectors and some others) block satellite signals and also causes instability of signal reception.
- Some map displays based on location information (latitude/longitude information) may be not accurate due to some countries'/regions' regulations.
■ Where radio waves are difficult to receive
Note that radio waves may not be received or it may be difficult to receive radio waves in the following conditions, since GPS uses radio waves from a satellite.
• Inside or immediately under a building
- Inside a bag or box
• Inside or under a thick covering of trees
• In a car, inside a train compartment
- When there are obstructions (people or objects) near the terminal
• Inside a basement or tunnel, and below the ground or water
• In buildings-clustered or residential area
- Near a high-voltage cable
• Bad weather such as heavy rain or snow
Note
- If you cannot use a part of or entire GPS function, check that the use of Internet is included in your subscription and Wi-Fi (P.146) and Mobile data (P.150) is enabled.
- NTT DOCOMO is not liable for navigation services or for the accuracy of location services.
Activating GPS/Location services
You can position your current location using GPS, Wi-Fi, and information sent from mobile network base stations.
1 From the Home screen, [Settings]▶[Location].
2 of "Use location".
3 Read the notes on location information and tap [AGREE].
Information
- Your location information is sent to Google without specifying who you are. Your location information may be sent even when the application is not running.
Using Google Maps
The Google Maps application allows you to view your current location, find other locations and search routes.
- To use Google Maps, make sure that the terminal is connected to the network (P.63).
- Google Maps does not cover the whole world.
- For details on Google Maps application, open the Google account menu▶[Help & feedback]▶[Help] to see Support.
Finding the current location on the map
You can detect your current location using location information service.
- To detect current location, enable "Use location" (P.138) beforehand.
1 From the Home screen, [Google] ▶[Maps].
Current location is shown by blue mark.
- To show the current location when it is not shown, tap ◆
Schedule
Displaying schedule
1 From the Home screen, [Schedule].
2 ▶[Monthly]/[Week]/[Daily].
- Swipe (flick) the calendar left or right to display the next or previous month/week/day.
Information
• To move the cursor to the current date, in Step 2, tap
▶[Jump to]▶[TODAY].
To move the cursor to the desired date, in Step 2,
▶[Jump to]▶ Swipe (flick) the calendar left or right to select month and then tap a day▶[JUMP].
- To display all registered schedules in a list, in Step 2, ▶[Schedule list].
- To switch to the "Memo" application screen, in Step 2, ▶ [Memo list].
- In monthly view, tap at the bottom of the screen in Step 2 to display the event list for the day which the cursor is located.
Creating schedule event
1 From the Home screen, [Schedule].
2 ▶ Enter the item.
- For setting alarms, tap [Display input option].
3 [Save].
Information
- When an alarm of event is set, it appears on the status bar at the set time. Drag the status bar down Tap [It's time] to display details of the event.
Displaying events of Schedule
1 From the Home screen, [Schedule]▶ Display a date/time including events.
- In Monthly view or Week view, tap a day accompanied by schedule item.
2 Tap an event to view description.
• To edit an event, tap [Edit].
Information
- To delete an event, touch and hold an event in Step 2 ▶Tap [Delete one]▶ [DELETE].
- To delete all events, from the Home screen, tap [Schedule] ▶ [Delete] ▶ [Select all] ▶ [Delete] ▶ [DELETE].
Setting display conditions in Schedule
When a search criteria is set, specified data can be displayed.
1 From the Home screen, [Schedule].
2 ▶[Conditions].
3 Select the display condition▶[OK]▶◀.
Information
- To search the contents entered in "title", "text" and "Where?", in Step 3, [Free word search]▶ Enter a search word▶[OK]▶[OK]▶
Clock
Use alarm, world clock, stopwatch, timer or bedtime.
- For details on Clock, see the Support from the current Clock screen, [Help].
Setting an alarm
1 From the Home screen, [Clock]▶"Alarm" tab.
2 +▶Set a time▶[OK].
- Set alarm details as required.
- Tap to close the settings screen.
Information
- In the alarm screen, tap [Settings] to set the time to mute or the alarm volume.
• To edit an alarm time, in the alarm screen, tap the time. - To delete an alarm time, in the alarm screen, tap ▼▶[Delete].
Enabling/Disabling alarm
1 From the Home screen, [Clock]▶"Alarm" tab.
2 / of the alarm to turn on or off.
Stopping alarm
1 While alarm is sounding, swipe (flick) 🔺 right.
Information
- When you swipe (flick) it left, the alarm sounds again when the set time has passed (snooze).
• Alternatively, you can operate by tapping the notification at the top of the screen when the display is on (except on the lock screen).
Using World clock
Display the date and time, time difference from the home city, etc. in cities around the world.
1 From the Home screen, [Clock] "Clock" tab.
2 Enter a city name▶Select a city from the list.
• To add a city, repeat tapping.
Information
- To delete an added city, touch and hold the city
Drag to 📂
• Time difference during summer time may differ from the displayed one.
Using Timer
1 From the Home screen, [Clock] "Timer" tab.
2 Tap numbers to set a time.
3
4 To stop the timer sound, tap
Information
- To stop the timer sound when the screen is locked, tap ■.
- You can set Timer sound, etc., in the timer screen, tap [Settings].
Using Stopwatch
1 From the Home screen, [Clock]▶"Stopwatch" tab.
2
3 00.
• To resume it, tap .
- Tap [Reset] to delete the measurement result.
Using Bedtime
Set operations of the terminal while sleeping or when waking up, play of pleasant sound before sleeping, or others for supporting your comfortable sleep.
1 From the Home screen, [Clock]▶"Bedtime" tab.
2 Tap BEDTIME and WAKE-UP time in the "Schedule" card to set the time.
- You can set reminder of the bedtime, operations in bedtime mode, and operations when waking up.
- In the "See recent bedtime activity" card, you can check the condition of the terminal operations recorded in bedtime mode.
- In the "Listen to sleep sounds" card, you can play pleasant sound.
- In the "See your upcoming events" card, you can check the next day schedule registered to the Calendar application.
docomo Data Copy
docomo Data Copy application allows you to copy the data saved to the terminal to the other terminal or back up/restore the data. Use this application for transferring the data when changing the model or for the regular backup of important data.
- Data may not be copied, backed up, or restored correctly depending on model, OS or file type.
• Phonebook entries that can be backed up are the ones registered to the docomo account. - When the battery level is low, copy, backup or restoration may be failed.
- For details on docomo Data Copy, refer to NTT DOCOMO website.
Data transfer
You can copy the phonebook entries, images, etc. directly to the destination device using the one-to-one direct communication which does not use the Internet.
Activate "Data Copy" applications on both a data sending terminal and a copy destination terminal, then align the two terminals.
1 From the Home screen, 🕐▶ [Data Copy]▶ [Data transfer].
• After this step, follow the onscreen instructions.
- This application is needed for both a data sending terminal and a copy destination terminal. If it is not installed, download from NTT DOCOMO website.
Backing up/Restoring
You can transfer or back up/restore the data such as phonebook contacts or images using a microSD card.
- Do not remove the microSD card or turn off the terminal during backup or restoring. The data may be damaged.
- Contacts without name registration cannot be backed up.
- If the terminal or microSD card is low on memory, backing up/restoration may be failed.
- You can back up only the data such as still images and movies stored in the internal storage with this application. The data stored in a microSD card cannot be backed up.
- The periodical backup cannot be executed at specified time if the screen is locked or "STAMINA mode" (P.162) is activated at that time. Instead, it will be executed the next time when the backup activation is possible.
Backup
Back up the data such as phonebook entries or media files to a microSD card.
1 From the Home screen, 📋▶[Data Copy]▶[Backup & Restore].
2 [Backup].
3 [Start backup]▶[BACKUP].
- The selected data can be saved to the microSD card.
4 [Back to top].
Restore
Restore the data such as phonebook entries or media files backed up to the microSD card to the terminal.
1 From the Home screen, 📋▶[Data Copy]▶[Backup & Restore].
- The selected data is restored to the terminal.
3 [Back to top].
- When the periodical backup schedule is not set, "Set a backup schedule" appears. Follow the onscreen instructions.
Copying phonebook entries to docomo account
Copy contacts registered to your Google account to the docomo account.
1 From the Home screen, ➕ [Data Copy]▶ [Backup & Restore].
2 [Phonebook account copy]▶ [Select] of contacts to copy▶ [OVERWRITE] or [ADD].
- The copied contacts are saved to your docomo account.
3 [OK].
Settings
Viewing the Settings menu
1 From the Home screen, [Settings].
| Network & internet | P.146 |
| Device connection | P.156 |
| Appearance | P.157 |
| Apps & notifications | P.157 |
| Battery | P.162 |
| Display | P.163 |
| Sound | P.165 |
| Storage | P.167 |
| Privacy | P.168 |
| Location | P.169 |
| Security | P.169 |
| docomo service/cloud | P.174 |
| Accounts | P.175 |
| Accessibility | P.176 |
| Digital Wellbeing & parental controls | P.177 |
| P.178 | |
| System | P.178 |
| About phone | P.183 |
Information
- A recommended setting item may be displayed above the "Network & internet" depending on the condition of usage of the terminal.
- You can search the setting item etc. by entering a key word in the "Search settings" field at the top of screen. Alternatively, tap in each setting screen.
- Displayed items or the layout may differ depending on the setting condition etc.
Network & internet
1 From the Home screen, [Settings]▶ [Network & internet].
| Wi-Fi | P.146 |
| Mobile network | P.149 |
| Airplane mode | P.152 |
| Hotspot & tethering | P.152 |
| Data Saver | P.155 |
| VPN* | P.155 |
| Private DNS* | Set whether to encrypt communication when the terminal is connected to the compatible DNS server. Also, you can register your private DNS. |
* Appeared when [Advanced] is tapped.
Wi-Fi
With Wi-Fi function, you can connect to an access point for your home, company network or public wireless LAN services to use mail and Internet.
■ Reception interference caused by Bluetooth devices
Wireless LAN (IEEE802.11b/g/n) and Bluetooth devices use the same frequency band (2.4GHz). If you use the terminal near Bluetooth devices, reception interference may occur or the communications speed may deteriorate. Also, you may hear noise or have a connection problem.
Communication may be interrupted or sound may be disturbed when playing streaming data etc. In these cases, do the following:
- Keep the terminal approximately 10 m or more away from the Bluetooth device.
- For using within approximately 10 m, turn off the Bluetooth device.
Turning on Wi-Fi
1 From the Home screen, [Settings]▶[Network & internet].
2 of "Wi-Fi".
- It may take a few seconds to turn on the Wi-Fi.
Information
- Even when Wi-Fi is on, packet communication is available. When a Wi-Fi network is disconnected, the connection is automatically switched to the mobile network. Note that packet communication charge may be applied if the network connection is kept switched.
- Turn the Wi-Fi function to off when you do not use Wi-Fi to cut battery power consumption.
- For using Wi-Fi, make sure to receive sufficient signal strength.
Connecting to a Wi-Fi network
1 From the Home screen, [Settings]▶[Network & internet]▶[Wi-Fi].
2 Select a Wi-Fi network to connect.
- To connect to a protected Wi-Fi network, enter the password ▶ [CONNECT].
Information
- Depending on your usage environment, the connection speed may be decreased, or Wi-Fi may not be available.
- When the terminal is connected to Wi-Fi network successfully, "Connected" appears. If a different message is displayed, make sure of the password (security key).
When the connection is not established even if you enter a correct password (security key), the correct IP address may not have been acquired. Check the signal status and reconnect. It may take 5 minutes or more to display the connection result after the operation of the connecting to Wi-Fi network. - If you connect to an access point that is not connected to the Internet, 📄 appears and communication may be performed via mobile network, not via Wi-Fi. To perform Wi-Fi communication via such access point, tap the notification indicating that Internet access is unavailable appeared when connecting to the access point, and then follow the onscreen instructions.
- To use docomo services via Wi-Fi, you need to set up your d ACCOUNT (P.44).
Deleting connecting Wi-Fi network setting
1 From the Home screen, [Settings]▶ [Network & internet]▶ [Wi-Fi].
2 Tap the Wi-Fi network that is connected.
3 [FORGET].
- Tap [DISCONNECT] to disconnect the Wi-Fi network.
Adding a Wi-Fi network manually
- Turn Wi-Fi on beforehand (P.146).
1 From the Home screen, [Settings]▶ [Network & internet]▶ [Wi-Fi].
2 [Add network].
- Tap and scan the QR code for Wi-Fi password to connect to the Wi-Fi network.
3 Enter the name (SSID) of Wi-Fi network you want to add.
4 Tap "Security" setting item▶Tap a security type of the Wi-Fi network.
5 If required, enter security information for the Wi-Fi network.
6 [SAVE].
Information
- To add hidden Wi-Fi network whose stealth setting is enabled, in Step 5, tap [Advanced options]▶[No] of "Hidden network"▶[Yes].
Setting up Wi-Fi
1 From the Home screen, [Settings]▶ [Network & internet]▶ [Wi-Fi]▶ [Wi-Fi preferences].
| Turn on Wi-Fi automatically*1 | Set whether to automatically turn on Wi-Fi when the terminal detects a saved high quality Wi-Fi network, and connect to it. |
| Notify for public networks | Set whether to notify you when any high quality Wi-Fi open network is detected. |
| Install certificates*2 | Install certificates. |
| Network rating provider*1*2 | Set the function to connect a preferable Wi-Fi network by rating Wi-Fi network condition, etc. |
| Wi-Fi Direct*1*2 | P.149 |
*1 You can set this item when Location (P.169) is ON.
*2 Appeared when [Advanced] is tapped.
Information
- To check/delete saved Wi-Fi networks, set autoconnection, or share the Wi-Fi, from the Home screen,[Settings][Network & internet][Wi-Fi][Saved networks].
- To check your Wi-Fi data usage, from the Home screen, tap [Settings] [Network & internet] [Wi-Fi] [Wi-Fi data usage].
Using the Wi-Fi Direct function
You can connect among the devices compatible with Wi-Fi Direct® via Wi-Fi even without configuring access point.
- Turn on Wi-Fi and Location beforehand (P.146, P.169).
1 From the Home screen, [Settings]▶ [Network & internet]▶ [Wi-Fi].
2 [Wi-Fi preferences]▶[Advanced]▶[Wi-Fi Direct].
3 Select a Wi-Fi Direct compatible device name to connect.
- Tap :▶[Searching...] to refresh the list of detected devices.
- To change your terminal's name displayed on the detected Wi-Fi Direct compatible device, tap : [Rename device].
Information
- Wi-Fi Direct function becomes available when you install a compatible application.
Mobile network
1 From the Home screen, [Settings]▶[Network & internet]▶[Mobile network].
| Use SIM | Set whether to use the nano UIM card which is installed to the terminal. |
| XXX used | Mobile-data usage amount, set data warning value, etc. are displayed. |
| Mobile data | P.150 |
| Data roaming | P.192 |
| App data usage | Check mobile data usage per each application for the period which is specified in "Mobile data usage cycle" (P.150), or set Data warning & limit by tapping (P.150).To set restriction of background mobile data communication, etc. of each application, select an application displayed below the graph. |
| Data warning & limit | P.150 |
| MMS messages*1 | Appeared when "Mobile data" is OFF. However, MMS is not available for the terminal. |
| 4G Calling | P.193 |
| Preferred network type*2 | P.192 |
| Automatically select network*2 | P.192 |
| Choose network*2 | Search available networks when "Automatically select network" is set to OFF. |
| Access Point Names*2 | P.151 |
*1 The display may differ depending on usage condition.
*2 Appeared when [Advanced] is tapped. However, they may be displayed without tapping [Advanced] depending on your operation condition.
Information
- When "Use SIM" is OFF, functions such as calling or packet communication are not available. Also, some setting menu items may disappear or some functions may become unavailable.
Enabling/Disabling mobile data communication
1 From the Home screen, [Settings]▶ [Network & internet]▶ [Mobile network].
2 / of "Mobile data".
Setting Data warning & limit
You can set a usage cycle (measuring period) for mobile data usage, or a warning level or data limit of mobile data usage.
1 From the Home screen, [Settings]▶[Network & internet]▶[Mobile network]▶[Data warning & limit].
| Mobile data usage cycle | Set the usage cycle (measuring period) for mobile data usage. |
| Set data warning | Set whether to display the notification when the mobile data usage reaches to the set warning volume. |
| Data warning | Set a warning value of mobile data usage. |
| Set data limit | Set whether to temporarily suspend the mobile data communication when the mobile data usage reaches to the limit value. |
| Data limit | Set the limit value of mobile data usage. |
Information
- Displayed mobile data usage amount is an estimate and it may be different from the actual one.
- For subscriber of other than ahamo plan You can check your mobile data usage on My docomo.
- For subscriber of ahamo plan You can check your mobile data usage on ahamo website.
- Note that the mobile data communication will suspend when the mobile data usage reaches to the specified limit value.
To resume the mobile data communication, on the suspension notification screen, tap [RESUME]. If the suspension notification screen does not appear, drag the status bar down▶[Mobile data limit reached] ▶ Tap [RESUME].
Setting an access point
An access point for connecting to the Internet (spmode.ne.jp) is already registered. You can add or change it if necessary. For details on sp-mode, refer to NTT DOCOMO website. https://www.nttdocomo.co.jp/service/spmode/ (in Japanese only) For using mopera U and Business mopera Internet, add an access point manually. For details on mopera U, refer to the mopera U website. https://www.mopera.net/ (in Japanese only)
- Checking the access point in use
1 From the Home screen, [Settings]▶[Network & internet]▶[Mobile network]▶[Advanced]▶[Access Point Names].
- The radio button on the right of current access point is marked.
Setting an access point additionally
1 From the Home screen, [Settings]▶[Network & internet]▶[Mobile network]▶[Advanced]▶[Access Point Names].
2 +.
• To edit the access point, tap the access point.
3 [Name]▶ Enter any name▶[OK].
4 [APN]▶ Enter an access point name ▶[OK].
5 Tap and enter all other information required by your network operator.
6 :▶[Save].
Information
- Do not change the MCC/MNC. If you change them to the values other than the default (440/10), the access point will not be displayed on the APN screen. If the set access point is not displayed, in Step 2 ▶ Tap [Reset to default], or tap and then set the access point again.
- It is recommended that you use the access point that is registered by default as it is.
■ Initializing an access point
1 From the Home screen, [Settings]▶ [Network & internet]▶ [Mobile network]▶ [Advanced]▶ [Access Point Names].
2 : ▶[Reset to default].
Airplane mode
In this mode, the functions of using radio wave transmissions such as calling, accessing to the Internet (including sending/receiving mails), etc. are disabled.
1 From the Home screen, [Settings]▶[Network & internet].
2 of "Airplane mode". • appears on the status bar.
Information
- Even if Airplane mode is ON, Wi-Fi, Bluetooth function and NFC/Osaifu-Keitai function can be turned on. Do not turn on these functions in a place where the use of radio wave is prohibited.
- Depending on Bluetooth device that is currently connected, communication may be maintained even if Airplane mode is ON.
Using tethering function
Use tethering function which allows wireless LAN devices, USB devices, or Bluetooth devices to access the Internet via the terminal as a modem.
Information
- If you want to use the tethering, use of Packet Pack/packet flat-rate service is highly recommended.
- Tethering function cannot be used when neither Wi-Fi nor mobile data communication is not available on the terminal.
- Up to 15 (portable hotspot (Wi-Fi tethering) : 10, USB tethering : 1, Bluetooth tethering : 4) can be connected at the same time.
- When Data Saver (P.155) is ON, tethering function is not available.
Enabling Portable hotspot
You can use the terminal as a Wi-Fi access point to connect up to 10 wireless LAN devices to the Internet simultaneously.
1 From the Home screen, [Settings]▶ [Network & internet]▶ [Hotspot & tethering].
2 [Portable hotspot]▶.
Information
- When you start using the portable hotspot during Wi-Fi network connection, Wi-Fi connection is disconnected. When using the portable hotspot is ended, the terminal is automatically connected to Wi-Fi network.
- To display the QR code for password of Wi-Fi access point, in Step 2, tap [Portable hotspot]▶ for "Hotspot name".
Changing the portable hotspot settings
You can change the default network name (SSID), security setting, or password.
1 From the Home screen, [Settings]▶[Network & internet]▶[Hotspot & tethering]▶[Portable hotspot].
2 [Hostpot name]▶Enter the network name (SSID) of the Wi-Fi hotspot name▶[OK].
- The device name of the terminal is set by default.
3 [Security]▶ Tap a security type you want to set.
4 Tap [Hotspot password]▶Enter a password▶[OK] as required.
- By default, a password is set in a random manner.
Information
- Tapping of "Turn off hotspot automatically" in Step 2 sets to automatically turn off the portable hotspot when the terminal keeps no connection to wireless LAN device.
Enabling USB tethering
1 Connect the terminal to a PC with USB cable A to C 02 (optional) etc. (P.40).
- When a screen for requesting access to the device data appears, tap [DENY].
- When a screen for installing driver software appears, wait for a while until the installation is complete.
- When a confirmation screen of installing software appears on the terminal, tap [SKIP].
2 From the Home screen, [Settings]▶ [Network & internet]▶ [Hotspot & tethering].
3 of "USB tethering".
- If the installation screen for the terminal's driver software appears on your PC, please wait a moment for the installation to complete.
Information
- System requirements (OS) for USB tethering are as follows.
- Microsoft Windows 10
- Microsoft Windows 8.1
- In USB tethering, you cannot access your terminal's internal storage or microSD card from the PC.
Enabling Bluetooth tethering
Up to 4 Bluetooth devices can be connected to the Internet.
1 From the Home screen, [Settings]▶[Network & internet]▶[Hotspot & tethering].
2 of "Bluetooth tethering".
Information
- To connect the terminal from a Bluetooth device, perform pairing (P.186) and then set the connection method for connecting the terminal. For operation on a Bluetooth device, refer to the manuals of the Bluetooth device.
Data Saver
Restrict the mobile data communication performed by applications in the background to reduce the data usage.
1 From the Home screen, [Settings]▶ [Network & internet]▶ [Data Saver].
2 for "Use Data Saver".
Information
- To set applications whose mobile data communication cannot be restricted by the Data Saver, in Step 2, [Unrestricted data] Tap each of the application you want to set.
- When Data Saver is ON, tethering function is not available.
Connecting to a VPN (Virtual Private Network)
Use Virtual Private Network (VPN) to connect to the information in a protected local network such as companies, schools or other facilities from outside.
Adding a VPN
1 From the Home screen, [Settings]▶[Network & internet]▶[Advanced]▶[VPN].
2 +.
3 Follow the instruction of the network administrator to enter/set required items of VPN settings.
4 [SAVE].
Information
- To edit VPN, taps of VPN in Step 2 ▶ Enter or set each item▶[SAVE].
• To delete VPN, tap of VPN in Step 2 ▶ [FORGET].
Connecting to a VPN
1 From the Home screen, [Settings]▶[Network & internet]▶[Advanced]▶[VPN].
2 Tap a VPN to connect to.
3 [CONNECT].
- When you are connected to a VPN, appears in the status bar.
- If the username or the password is not entered when the VPN is added, enter the necessary information▶Tap [CONNECT].
Information
- To disconnect VPN, in Step 2, tap a connected VPN ▶[FORGET].
Device connection
1 From the Home screen, [Settings]▶ [Device connection].
| Pair new device | P.186 |
| Connection preferences | P.156 |
Information
- When the terminal is connected to a device, the device information may be displayed above "Pair new device". Tap the item or to change the connection method, cancel connection, etc.
- When any Bluetooth device is paired, the "PREVIOUSLY CONNECTED DEVICES" field appears below "Pair new device" and you can check the paired Bluetooth devices.
Setting Connection preferences
1 From the Home screen, [Settings]▶[Device connection]▶[Connection preferences].
| Bluetooth | Turn On/Off of Bluetooth device, or pair with a Bluetooth device. |
| Files received via Bluetooth | P.188 |
| Chromebook | Link the terminal with Chromebook. |
| Nearby Share | Share a file with nearby compatible device. |
| Android Auto | Connect Android Auto devices or set operation when connected. ·When the application update screen appears, follow the onscreen instructions. | |
| Cast | Display the screens of the terminal on a device that is compatible with Google Cast etc. | |
| NFC/Osaifu-Keitai | P.133, P.134, P.135 | |
| USB Connectivity | Install software | Set whether to display a confirmation screen for installing software which allows to manage the contents of the terminal when the terminal is connected to a PC. |
| Printing | Install print service applications. | |
Appearance
1 From the Home screen, [Settings]▶[Appearance].
| Wallpaper | P.77, P.83 |
| Clocks | Set a clock for the lock screen. |
Apps & notifications
1 From the Home screen, [Settings]▶[Apps & notifications].
| Recently opened apps*1 | Display the recently activated applications. Tap an application to display the app info. |
| SEE ALL XX APPS*1 | P.158 |
| Conversations | The conversations etc. messaging applications whose notification is set to "Default" (P.65) and you can check change the settings. |
| Configure notifications | P.160 |
| Screen time | Check usage time per application, or set a timer for each application to restrict usage time of a day. |
| Default apps*2 | Check/change the default application. |
| Permission manager*2 | Check/change the app permissions. |
| Wireless emergency alerts*2 | Set "Early Warning "Area Mail"". |
| Special app access*2 | Check/change the applications, etc. which can access the functions or information of the terminal. |
*1 The display may differ depending on usage condition.
*2 Appeared when [Advanced] is tapped.
App info
Manage and uninstall installed applications. Also, change the settings of notification or permission for each application, or delete the data or cache.
Managing applications
1 From the Home screen, [Settings]▶[Apps & notifications]▶[SEE ALL XX APPS].
- Tap :▶[Show system] to show all applications.
2 Tap an application.
| OPEN | Activate the application. |
| UNINSTALL/DISABLE | P.159 |
| FORCE STOP | P.158 |
| Notifications | Change notification setting. |
| Permissions | Check/change the app permissions. |
| Storage & cache | Clear data or cache. |
| Mobile data & Wi-Fi | Check the data communication status or set the restriction of mobile data communication in background etc. |
| Screen time* | Check usage time for the application, or set a timer to restrict usage time of a day. |
| Battery* | Check the battery status from the last full-charge or set the use restriction in background etc. |
| Open by default* | Clear the setting of default applications used for certain operations. |
| version* | Display the application's version. |
* Appeared when [Advanced] is tapped.
Information
- The displayed items may differ or the item may not be selected depending on application or usage condition.
Force-stopping an application
1 From the Home screen, [Settings]▶[Apps & notifications]▶[SEE ALL XX APPS].
- Tap :▶[Show system] to show all applications.
2 Tap the application to force-stop.
3 [FORCE STOP]▶ Confirm the content of the screen and then [OK].
Uninstalling applications
- Before uninstalling application, back up contents you want to save including data saved in the application.
1 From the Home screen, [Settings]▶[Apps & notifications]▶[SEE ALL XX APPS].
2 Tap the application to uninstall. 3 [UNINSTALL]▶[OK].
Information
- Some pre-installed applications may not be uninstalled. You can disable some applications or services which cannot be uninstalled (P.159).
- Applications downloaded from Google Play are recommended to be uninstalled from the Google Play screen (P.131).
- When in Step 3, ▶[UNINSTALL UPDATES] is displayed, tap it to restore the application to the default.
Disabling application
You can disable some applications or services, that cannot be uninstalled.
- Disabled applications are not displayed on the Home screen, etc. and you cannot execute them, but they are not uninstalled.
1 From the Home screen, [Settings]▶[Apps & notifications]▶[SEE ALL XX APPS].
- Tap :▶[Show system] to show all applications.
2 Tap the application to disable.
3 [DISABLE]▶ Confirm the content of the screen and then [DISABLE APP].
Information
- When you disabled an application, some other applications linked to the disabled application may not be operated correctly. Enable the disabled application again to operate them correctly.
Resetting application setting
You can reset the disabled applications (P.159), default apps settings (P.158), restriction of background data (P.158), app permissions (P.55), etc.
1 From the Home screen, [Settings]▶ [Apps & notifications] ▶ [SEE ALL XX APPS].
2 : ▶ [Reset app preferences]. 3 [RESET APPS].
Configure notifications
Check notification history or set ON/OFF of the notification display. Also, you can change the operation of the notification LED or the setting of notifications for the lock screen.
1 From the Home screen, [Settings]▶[Apps & notifications]▶[Configure notifications].
| Notification history | Set whether to display notification history or check the notification history. |
| Bubbles | Set whether to permit the display of floating icon (bubble) (P.65). |
| RECENTLY SENT | Display the applications whose notifications are recently displayed to set the notification to ON/OFF. |
| See all from last 7 days | A list of applications whose notifications are displayed for last 7 days is displayed and you can set ON/OFF of each notification setting. |
| Notifications on lockscreen | Set the notification type to be displayed on the lock screen. |
| Sensitive notifications^*1 | Set whether to display confidential information on the lock screen. |
| Keep notifications | Set whether to keep the notification content displayed on the lock screen when you have any notifications. |
| Hide silent notifications in status bar ^2 | Set whether to display the notification icons which are set to "Silent" (P.65) on the status bar. |
| Allow notification snoozing ^2 | Set whether to allow notifications to snooze to display them again at specified time. To set snooze, drag the notification left or right in the Notification panel and tap ② . |
| Suggested actions and replies ^2 | Set whether to automatically display the operation or reply candidate in the notification. |
| Notification dot on app icon ^2 | Set whether to show dots on the application icons for notifications. |
| Use LED light to show incoming notifications ^2 | Set whether to notify new mail, etc. with blinking notification LED (P.62). |
| Notification sound ^2 | P.166 |
| Do Not Disturb*2 | TURN ON NOW/TURN OFF NOW | Set Do Not Disturb to ON/OFF manually. |
| People | Set the rule to allow conversation, the incoming call, +Message notifications to interrupt when Do Not Disturb is ON. | |
| Apps | Set applications and the rule to allow the notifications to interrupt when Do Not Disturb is ON. | |
| Alarms & other interruptions | Set functions to allow the notifications to interrupt when Do Not Disturb is ON. | |
| Schedules | Set the schedule to turn on Do Not Disturb automatically. | |
| Duration for Quick Settings*2 | Set the timing for turning off the function when Do Not Disturb is manually set to ON. | |
| Display options for hidden notifications*2 | Set the notification operations when Do Not Disturb is ON. |
*1 Appeared when "Screen lock" (P.170) is set to "Pattern"/"PIN"/"Password".
*2 Appeared when [Advanced] is tapped.
Battery
1 From the Home screen, [Settings]▶[Battery].
| XX% Should last until about XX* | The battery level and available time (estimate) are displayed. |
| Apps are running normally* | Battery usage condition, etc. is displayed. |
| STAMINA mode | Restrict the operations and a part of functions of the terminal to save the battery power.When "Set a schedule" is set to "Based on percentage", STAMINA mode turns on automatically when the battery level becomes to the specified level.When set "Turn off when charged" is ON, STAMINA mode becomes automatically OFF when the battery level reaches to 90% while charging.Tap [TURN ON NOW]/[TURN OFF NOW] to turn on/off STAMINA mode manually.To set the STAMINA level, tap [STAMINA level]. |
| Battery Care | P38 |
| Adaptive Battery | Restrict use of battery for applications whose usage frequency is low to reduce the battery consumption. |
| Battery percentage | Set whether to display battery level (%) on the status bar. |
| Last full charge | Display the elapsed time from the last full charge to the present time. |
| Screen usage since full charge | Display the time used by the screen from the last full charge to the present time. |
* The display may differ depending on usage condition.
Information
- Power-saving function restricts the battery usage in background to reduce the battery consumption. If you want to avoid the effect of the power-saving function to applications, set them as exception. To set as an exception app, from the Home screen, [Settings] ▶[Apps & notifications] ▶[Advanced] ▶[Special app access] ▶[Power-saving feature] ▶[NOT OPTIMIZED] ▶[All apps] ▶Tap the application you want to set ▶[Don't optimize] ▶[DONE].
- You can check the applications which used the battery after full charge or set restriction of use in background per application, from the Home screen, tap [Settings] [Battery] [Battery usage].
• Information of battery consumption per application will be reset when the terminal is fully charged.
Display
1 From the Home screen, [Settings]▶[Display].
| Brightness level | P.163 |
| Adaptive brightness | Adjust the screen brightness automatically according to the ambient brightness, etc. based on the setting of "Brightness level". |
| Screen timeout | Set a time for turning off of screen. |
| Font size | Set font size. |
| Display size | Enlarge/reduce of the size of the icon etc. displayed in the screen. |
| Dark theme | Apply the dark theme to the corresponding screen or display. You can also set schedule to ON/OFF automatically. |
| Auto-rotate screen | P52 |
| Lock screen | P.164 |
| Side sense* | P.164 |
| One-handed mode* | P.72 |
| Night Light* | Set the screen in yellowish tone so that you can easily see the screen even in low light. You can also set schedule to ON/OFF automatically. |
| Screen saver* | Set the screen saver. |
| White balance* | P.165 |
| Disable notch* | Change the background of the status bar to black to hide the notch (notch part where the front camera is positioned). |
* Appeared when [Advanced] is tapped.
Adjusting the screen brightness
1 From the Home screen, [Settings]▶[Display]▶[Brightness level].
2 Tap the slider at a position you want to set, or drag it left or right.
Setting the lock screen
1 From the Home screen, [Settings]▶ [Display]▶ [Lock screen].
| Clocks | Set a clock on the lock screen. |
| Show lockdown option*1 | Display "Lockdown" option to the menu which is displayed when the power key is pressed for at least 1 second. You can disable unlock by Smart Lock or fingerprint authentication, or hide notifications when the screen lock is set by tapping "Lockdown". |
| Add users from lock screen*1*2 | Set whether to enable to add a guest or user from the Quick settings panel (P.66) on the lock screen. |
| Add text on lock screen | Enter a text to be displayed on the lock screen. |
| Show notifications | Set whether to show notification details on the lock screen.*3 |
| Keep notifications | Set whether to keep the notification content displayed on the lock screen when you have any notifications. |
*1 Appeared when "Screen lock" (P.170) is set to "Pattern"/"PIN"/"Password".
*2 Appeared when "Multiple users" (P.182) is set to ON.
*3 Displayed items vary depending on the settings of "Screen lock".
Setting Side sense
Make settings for using Side sense feature (P.48).
1 From the Home screen, [Settings]▶[Display]▶[Advanced]▶[Side sense].
2
| Side sense menu | Set applications to be displayed in the Side sense menu. |
| Multi-window menu | Set pairs of applications to display in the Multi-window menu. |
| Configure Side sense bar | Set display of the side sense bar. |
| Side sense bar sensitivity | Set speed of double-tapping to allow the Side sense bar to recognize or length of slide operation. |
| Gestures* | Assign operations (Gesture operation) to double-tapping/ sliding up/sliding down of the Side sense bar. |
| Select apps that work with gestures | Set whether to allow use of Side sense for each application. |
| Improve prediction accuracy | Set whether to allow Xperia Intelligence engine to use location information for improving the application predictability in Side sense. |
* If selecting of the item is not available, once display the Side sense menu and then operate again.
Adjusting the white balance
1 From the Home screen, [Settings] ▶ [Display] ▶ [Advanced] ▶ [White balance].
2 Tap each slider of "R"/"G"/"B" to set.
- Tap to [DEFAULT VALUES] to restore the default state.
3 [DONE].
Sound
1 From the Home screen, [Settings]▶[Sound].
| Media volume | P.166 |
| In-call volume | |
| Ring and notification volume | |
| Alarm volume | |
| Vibrate for calls | Set vibration for incoming calls. |
| Do Not Disturb | P.161 |
| Media | Set whether to hide the player panel for Music etc. in the Quick settings panel when you hide the one appears below the quick setting tool. |
| Phone ringtone | P.166 |
| Notification sound | |
| Default alarm ringtone | |
| Dial pad tones* | Set whether to emit sound when tapping the dialpad. |
| Screen locking sound* | Set whether to emit sound when pressing the power key to lock the screen, or unlocking the screen lock. |
| Charging sounds and vibration* | Set whether to notify of start of charging with sound and vibration. |
| Touch sounds* | Set whether to emit sound when selecting menu etc. |
| Touch vibration * | Set whether to vibrate the terminal when the key icon is tapped. |
* Appeared when [Advanced] is tapped.
Information
- For silent mode, see "Setting Silent mode" (P.52).
Adjusting each sound volume
Adjust the media play volume, in-call volume, ring and notification volume, or alarm volume.
1 From the Home screen, [Settings]▶[Sound].
2 Tap the slider of "Media volume"/"In-call volume"/"Ring and notification volume"/"Alarm volume" at a position you want to set, or drag it left or right.
Information
- You can also adjust the media volume by pressing the volume key. Or, you can adjust In-call volume by pressing the volume key during a call.
- Pressing the volume key or the power key mutes ringtone for incoming calls.
Setting the ringtone/ notification sound/alarm ringtone
1 From the Home screen, [Settings] [Sound].
2 Tap any one of [Phone ringtone]/[Notification sound]/[Default alarm ringtone].
3 Select a sound option▶[OK].
Information
- To set a ringtone other than ringtone, notification sound, or alarm ringtone preset by default, tap any of [Add ringtone]/[Add notification]/[Add alarm] in Step 3.
- The phone ringtone, notification sound or alarm ringtone selected in Step 3 is emitted in the volume level set in "Ring and notification volume" or "Alarm volume". However, it does not sound when the sound setting is mute.
Storage
Check available memory of the internal storage, microSD card or USB storage, or initialize (format) the USB storage or microSD card.
1 From the Home screen, [Settings] [Storage].
| XX.XXGB(Total used of 64.00 GB)* | Used memory and total memory of the internal storage is displayed. |
| Internal shared storage* | Used memory/total memory of the internal storage is displayed. |
| SD card* | Used memory/total memory of the microSD card is displayed. |
| USB drive* | Used memory/total memory of the USB storage is displayed. |
* Displayed items vary depending on recognition condition of microSD card or USB storage.
Information
- To increase available memory of the internal storage by selecting files to delete, tap [Internal shared storage]▶[MANAGE STORAGE].
- Tap [Internal shared storage]▶[Files], or tap [USB drive]/[SD card]▶Select "Files by Google" on the application selection screen to check the data or copy/move/delete/share the data (P.184).
- To release the recognition of microSD card/USB storage, tap of "SD card"/"USB drive". To recognize again, tap [SD card]/[USB drive] [MOUNT].
- To format a microSD card/USB storage, tap [SD card]/[USB drive]▶Select "Files" on the application selection screen▶ : ▶[Storage settings] ▶[Format] ▶[FORMAT USB DRIVE]/[FORMAT SD CARD]. Be aware that formatting will erase all their data.
Privacy
1 From the Home screen, [Settings]▶[Privacy].
| Accessibility usage*1 | Check or set applications whose full-access to the terminal are allowed. |
| Permission manager | Check/change the app permissions. |
| Show passwords | Set whether to show the input character before "●" appears on the PIN/password etc. entry screen. |
| Show notifications | Set whether to show notification details on the lock screen.*2 |
| Autofill service from Google*3 | Check the saved information or change the setting. |
| Google location history*3 | Set whether to use the Google location history or manage the saved activities. |
| Activity controls*3 | Set whether to enable the activities or select the activities and the information to allow Google to save them. |
| Ads*3 | Reset the advertising ID or set to not use the advertising ID. |
| Usage & diagnostics*3 | Set whether to send your usage condition to Google. |
*1 The display may differ depending on usage condition.
*2 Displayed items vary depending on the settings of "Screen lock".
*3 Appeared when [Advanced] is tapped. However, they may be displayed without tapping [Advanced] depending on your operation condition.
Location
1 From the Home screen, [Settings]▶[Location].
2 of "Use location".
3 Read the attention on location information and tap [AGREE].
| RECENT LOCATION REQUESTS | Display applications or services which use the recent location information data. |
| See all | Display all applications and services which use the recent location information data. |
| App access to location | Check/change the app permission using location information. |
| Wi-Fi and Bluetooth scanning | Set whether to allow scanning of Wi-Fi network or Bluetooth devices even when Wi-Fi or Bluetooth is OFF. |
| Emergency Location Service* | Set whether to use the Emergency Location Service (ELS). |
| Google Location Accuracy* | Set whether to improve the accuracy of location information using Wi-Fi, mobile network, etc. |
| Google Location History* | Set whether to use the Google location history or manage the saved activities. |
| Google Location Sharing* | Use the current location sharing function. |
* Appeared when [Advanced] is tapped.
Security
1 From the Home screen, [Settings] [Security].
| Google Play Protect*1 | Set whether to scan the terminal regularly and check security threats. |
| Find My Device *1 | Set ON/OFF of "Find My Device", or check a method of finding the terminal. |
| Security update*1 | Check availability of Software update (P.208). |
| Google Play system update*1 | Check availability of system update. |
| Screen lock | P.170 |
| Fingerprint Manager | P.172 |
| Smart Lock | Set the conditions to unlock the screen lock automatically when the screen lock unlocking method is set to "Pattern"/"PIN"/"Password". |
| Device admin apps | Set whether to enable device administrator application. |
| SIM card lock*2 | P.46 |
| Encryption & credentials*3 | Encrypt phone | The internal storage is encrypted by default. |
| Storage type | Display the type of credential storage*4. | |
| Trusted credentials | Display trusted CA credentials. | |
| User credentials | Manage the user credentials saved in the terminal. | |
| Install a certificate | Install certificates. | |
| Clear credentials | Clear all certificates or credential information stored in the credential storage.*5 | |
| Trust agents *3 | Set whether to enable Trust agent when the screen lock unlocking method is set to "Pattern"/"PIN"/"Password". | |
| App pinning*3 | Set whether to enable app pinning. When it is set to ON, "Pin" is displayed when the icon at the top of thumbnail in Task manager (P.67) is tapped. | |
*1 The display may differ depending on usage condition.
*2 Not displayed if a nano UIM card is not inserted.
*3 Appeared when [Advanced] is tapped. However, they may be displayed without tapping [Advanced] depending on your operation condition.
*4 Save certificates and credential information in the credential storage.
*5 VPN settings are also cleared.
Setting screen unlock method
Set to enter the screen unlock method (pattern/PIN/password) when powering on the terminal or canceling the sleep mode.
1 From the Home screen, [Settings]▶[Security]▶[Screen lock].
2 Tap any one of [Pattern]/[PIN]/[Password].
3 Follow the onscreen instructions to set.
- When the setting is complete, "Security" in the settings menu screen reappears.
- If you select "PIN", enter 4- to 16-digit of numeric characters. If you select "Password", enter 4- to 16-alphanumeric characters/symbols.
4 Tap of "Screen lock" as required.
| Make pattern visible* | Set whether to show pattern when entering pattern. |
| Lock after screen timeout | Set the time from when the screen turns off to when the screen is locked automatically. |
| Power button instantly locks | Set whether to instantly lock the screen when the screen is turned off by pressing the power key. |
* Appeared only when the "Pattern" is set.
Locking the screen
Screen lock is activated when you press the power key to put the terminal into sleep mode after the screen lock unlocking method (P.170) is set, or when the time set in "Lock after screen timeout" has elapsed after the screen backlight turns off.
To unlock the screen
1 While the screen is locked, press the power key to turn on the screen▶Swipe (flick) up the screen ▶Enter the screen lock unlocking method.
■ To turn off the screen lock
1 From the Home screen, [Settings]▶[Security]▶[Screen lock]▶Enter the set unlock pattern/PIN/password▶[None]▶[YES, REMOVE].
Information
- Entering incorrect pattern/PIN/password 5 times consecutively disables unlocking the screen lock. Wait for approximately 30 seconds and then operate the canceling of screen lock again.
- If you forget set pattern/PIN/Password, contact a docomo Shop.
Setting up fingerprint authentication
The terminal has a fingerprint sensor (P.30) and you can unlock the screen lock with the fingerprint authentication, touching it with the registered finger.
Notes on using fingerprint authentication
- Your terminal recognizes a fingerprint based on its unique characteristics. For this reason, some users may not be able to use fingerprint authentication if their fingerprints are not sufficiently unique.
- Authentication performance-how successfully your fingerprint can be recognized when you touch the fingerprint sensor properly-varies depending on the condition of your fingers. Fingerprint registration may fail or the authentication performance may decrease if your fingers have any of the conditions listed below. Note that you may be able to improve the authentication performance by wiping or washing your hands, using a different finger for authentication, etc.
- Your fingers are: Wrinkled or wet (for example, after you take a bath)
- Sweaty or greasy (with hand cream etc.)
-
Dirty with mud, oil, or other contamination
-
Rough or injured (for example, cut or inflamed)
- Extremely dry
- Different in size than before, so that the fingerprint has changed
- Worn so much that the fingerprint is unclear
- Totally different in texture than when you registered your fingerprint
- Fingerprint authentication technology does not guarantee completely accurate personal authentication or identification. Please note that DOCOMO assumes no responsibility for any damages resulting from using the terminal by the third party, or inability to use the terminal.
Precautions for using the fingerprint sensor
- Do not hit the fingerprint sensor against anything or subject it to any strong impact. Also, do not scratch its surface or poke it with a pointed object. Doing so may damage the sensor or cause it to fail.
- Do not put a sticker on the fingerprint sensor or paint it with ink or something similar.
- When the fingerprint sensor is soiled, fingerprint recognition or authentication performance may be degraded. Occasionally clean the surface of the fingerprint sensor.
Registering your fingerprint
1 From the Home screen, [Settings]▶[Security]▶[Fingerprint Manager].
- If you have already registered fingerprint, the entry screen for unlocking the screen lock appears. Enter the unlocking method to display the Fingerprint Manager screen.
2 Select the screen lock unlocking method.
• After this step, follow the onscreen instructions. When the registration is complete, the screen indicating addition of the fingerprint appears. Tap [Done] to end the registration or tap [Add another] to register the other fingerprint.
- Use the screen lock unlocking method when the fingerprint authentication is unavailable.
- When the entry screen for unlocking the screen lock appears, enter the set unlock method and then follow onscreen instructions.
Information
- In the Fingerprint Manager screen, you can perform the following actions:
- To rename a fingerprint, tap a registered fingerprint▶Enter a name▶Tap [OK].
- To delete a fingerprint data, tap of registered fingerprint▶[YES, REMOVE].
- To register the other fingerprint, tap [Add fingerprint].
Using your fingerprint for authentication
1 When the lock screen is displayed, touch the fingerprint sensor with the registered finger.
- Swipe (flick) up the lock screen to display a screen for entering the screen lock unlocking method you set.
Information
- If fingerprint authentication failed 5 times consecutively, the fingerprint authentication is disabled. Wait for a while and then perform fingerprint authentication, or swipe (flick) the screen up and then enter the screen lock unlocking method that you set.
- If fingerprint authentication failed 20 times consecutively, the fingerprint sensor is disabled. Swipe (flick) the screen up and then enter the screen lock unlocking method that you set.
docomo service/cloud
1 From the Home screen, [Settings]▶[docomo service/cloud].
| d ACCOUNT setting | Set up your d ACCOUNT to use docomo applications (P.44). You can also use your biological information (fingerprint) registered on the terminal to set up your d ACCOUNT. |
| docomo Application Data Backup | Set whether to use the function of automatic back up/restore data of docomo apps, or check the list of apps whose backup data stored. |
| docomo apps management | Manage the docomo apps, or set the notifications or auto-update. |
| Osusume Apps | Set for Osusume Apps, or check received notifications. |
| Osusume hint | Set whether to display Osusume hint, check hints displayed in the past, etc. |
| SuguApp | You can quickly activate an application or perform a phone operation with intuitive operations sch as shaking a smartphone (P.69). |
| docomo location information | Set location information function for imadoco search, imadoco kantan search and Keitai-Osagashi Service. |
| Send device information | Set whether to send device information to the server which is managed by DOCOMO. |
| Member/profile settings | Check or change your membership information/profile information used for docomo services. |
| docomo initial settings | P42 |
| Switch USB debugging | Make the settings for using the dedicated terminal at a docomo Shop etc. |
| Open source licenses | View open source licenses. |
Information
- You can disable applications displayed in docomo service/cloud. Disabled applications may not be displayed in the list of docomo service/cloud. Also, if you newly download an application provided by DOCOMO, the item may be added in the list of docomo service/cloud.
Accounts
1 From the Home screen, [Settings]▶[Accounts].
| Add account | P.175 |
| Automatically sync app data | P.175 |
Adding accounts
Add or remove online service accounts.
- Set up your Google account (P.43)
• Auto-sync data (P.175)
1 From the Home screen, [Settings]▶ [Accounts]▶ [Add account].
2 Tap the account type.
• After this step, follow the onscreen instructions.
Information
• docomo account is set by default.
Removing an account
1 From the Home screen, [Settings]▶ [Accounts]▶ Select the account you want to remove.
2 [REMOVE ACCOUNT]▶[REMOVE ACCOUNT].
Information
• You cannot remove the docomo account.
Setting auto-sync of accounts
The information of online service can be synchronized with the terminal automatically. You can display and edit information on the terminal or a PC.
- Setting Auto-sync data, communication occurs to synchronize and a packet communication charge may be applied.
1 From the Home screen, [Settings] [Accounts].
2 / of "Automatically sync app data"▶[OK].
Synchronizing manually
When the auto-sync function is off, you can sync your registered account(s) manually.
- That may not be able to operate depending on account type.
1 From the Home screen, [Settings] [Accounts].
2 Select the account▶[Account sync]▶Select items to sync.
Accessibility
1 From the Home screen, [Settings]▶[Accessibility].
| Osusume hint | Set whether to use Osusume hint service.• Use setting is required in advance (P.174). |
| Text-to-speech output | P.177 |
| Font size | Set font size. |
| Display size | Enlarge/reduce of the size of the icon etc. displayed in the screen. |
| Dark theme | Apply the dark theme to the corresponding screen or display. |
| Magnification | Set whether to enable magnification. |
| Color correction | Correct color when distinguishing colors is difficult. |
| Color inversion | Set whether to invert color of screen. |
| Large mouse pointer | Set whether to enlarge the pointer when using a mouse (commercially available) etc. |
| Remove animations | Set whether to turn off the animation effect of screen display. |
| Click after mouse pointer stops moving | Set whether to perform click operation when the pointer stops when using a mouse (commercially available) etc. |
| Power button ends call*1 | Set whether to end calls by pressing the power key. |
| Auto-rotate screen | P52 |
| Touch & hold delay | Set response time for operation of touching and holding the screen. |
| Time to take action (Accessibility timeout) | Set the display time for the notification message etc. which appears in the upper part of the screen accompanying the operation menu.· This function may not be operated depending on application or function. |
| Vibration & haptic strength | Set whether to vibrate the terminal when you have an incoming call or notification, or tap the key icon.· The terminal may vibrate even when this setting is off depending on application or function. |
| System navigation | Change the key icon operation to Gesture navigation. |
| Mono audio | Set whether to play sound with monaural. |
| Audio balance | Set the audio balance. |
| Caption preferences | Set whether to display captions or set font size, style, etc. for the captions. |
| High contrast text | Set whether to show characters clearly against the background color. |
| Shortcut from lock screen*2 | Set whether to use the Volume key shortcut from the lock screen. |
*1 If the terminal goes into sleep mode during a call with "Power button ends call" is ON, you can end the call by pressing the power key to wake the terminal and then pressing the power key again.
*2 Appeared when [Advanced] is tapped.
Setting Text-to-speech output
1 From the Home screen, [Settings] ▶ [Accessibility] ▶ [Text-to-speech output].
| Preferred engine | Select and set the engine for Text-to-speech output. |
| Language | Set language for Text-to-speech output. |
| Speech rate | Set speed at reading out text. |
| Pitch | Set the pitch of voice to read out text. |
| PLAY | Playback reading sample. |
| RESET | Reset setting of "Speech rate" and "Pitch" to the default. |
Information
- To reading out the text with this function, download the corresponding Text-to-speech output application.
Digital Wellbeing & parental controls
You can prevent from overusing the terminal by checking your usage habits of the terminal, managing the usage time with the tool such as the app timer. Also, you can set the use restriction by guardian.
1 From the Home screen, [Settings]▶[Digital Wellbeing & parental controls].
2 Check and set each item.
Google System
Check, change, or delete information or settings related to your Google account and the services.
1 From the Home screen, [Settings]▶[Google].
2 Set each item.
Information
- To search by voice using a Bluetooth device, in Step 2, tap [Account services]▶ [Search, Assistant & Voice]▶[Voice]▶ of "Bluetooth audio recording".
1 From the Home screen, [Settings] ▶ [System].
| Languages & input | P.179 | |
| Gestures | P.180 | |
| Date & time | P.180 | |
| Backup Back up to Google Drive | Set whether to back up data of applications, settings of the terminal, etc. to Google Drive. | |
| Reset options*2 | Reset network settings | Reset the network settings. |
| Reset app preferences | P.160 | |
| Erase all data (factory reset) | P.181 | |
| Multiple users*2 | P.182 | |
| System update*2 | P.208 | |
| Application update*2 | Check application updates or set the auto update. | |
*1 The display may differ depending on usage condition.
*2 Appeared when [Advanced] is tapped.
Languages & input
1 From the Home screen, [Settings]► [System]► [Languages & input].
| Languages | P.179 | |
| On-screen keyboard | Gboard | P.61 |
| Google voice typing | ||
| Manage on-screen keyboards | Set the input method to be switched when entering characters. | |
| Physical keyboard | Show on-screen keyboard | Set whether to display the software keyboard on the terminal when entering characters with a peripheral keyboard connected to the terminal. |
| Keyboard shortcuts | Display the available shortcuts that can be used on the peripheral keyboard connected to the terminal. | |
| Spell checker* | Set whether to run the spell checker. | |
| Autofill service* | Select autofill services or make the settings. | |
| Personal dictionary* | Add words to use for spell checker applications etc. (P.61). | |
| Pointer speed* | Set speed of the pointer when using a mouse (commercially available) etc. |
| Text-to-speech output* | P.177 |
* Appeared when [Advanced] is tapped.
Changing the phone language
1 From the Home screen, [Settings]▶[System]▶[Languages & input]▶[Languages].
2 [Add a language]▶Select the language▶Select the country or region as required.
3 Drag of the language to the top layer ("1" position).
Information
- If you choose the wrong language and cannot read the menu texts, see the FAQ of the following website. https://xperia.sony.jp/support/
Gestures
1 From the Home screen, [Settings]▶[System]▶[Gestures].
| Side sense | P.164 |
| One-handed mode | P.72 |
| System navigation | Change the key icon operation to Gesture navigation. |
| Power key behavior | Set an application/function to be activated by pressing the power key twice. |
| Power menu | Set whether to display a controller of smart home devices (commercially available) etc. which are connected to the terminal in the menu appeared when the power key is pressed at least 1 second. |
Date & time
- To set date, time, time zone or 24-hour format manually, turn off "Use network-provided time", "Use network-provided time zone", or "Use locale default".
1 From the Home screen, [Settings]▶[System]▶[Date & time].
| Use network-provided time | Adjust date and time automatically by using network-provided information. |
| Date | Set date manually. |
| Time | Set time manually. |
| Use network-provided time zone | Adjust time zone automatically by using network-provided information. |
| Time zone | Set time zone manually. |
| Use locale default | Set whether to use 24-hours format according to the setting of "Languages" (P.179). |
| Use 24-hour format | Set 24-hour format manually. |
Information
- Correction of the time differences may not be performed correctly depending on the overseas network operator. In that case, set time zone manually.
Resetting the terminal
Resetting the terminal deletes all data and accounts, and resets the terminal back to the initial (default) state.
- The downloaded applications and data in the internal storage (music, images, etc.) are included to the data to be deleted.
• Make sure to back up the important data you have on the terminal before resetting. - Reset the terminal while charging the battery, or when the battery is sufficiently charged.
- Initial settings (P.42).
1 From the Home screen, [Settings]▶[System]▶[Advanced]▶[Reset options]▶[Erase all data (factory reset)].
2 [Erase all data].
- Enter the screen lock unlocking method ("Pattern"/"PIN"/"Password") as required.
- Enter the screen lock unlocking method ("Pattern"/"PIN"/"Password") as required.
3 [Erase all data].
Information
- Some preinstalled contents can be re-downloaded. To download, from the Home screen, tap [Xperia Lounge Japan]▶[サポート (ブラウザで開きます) (Support (Open the window by the browser))▶[スマートフォン/タブレット関連 (プリインストールコンテンツなどの再ダウンロード) (For smartphone/tablet (For re-downloading preinstalled contents))▶[ドコモ (DOCOMO)] (in Japanese only) and then select the terminal on the displayed screen.
Multiple users
Add users to share the terminal with multiple users (function that allows users and guests to use the terminal).
1 From the Home screen, [Settings] ▶ [System] ▶ [Advanced] ▶ [Multiple users].
2
| You (Owner)*1 | Check or edit profile information.·When someone who is not an owner uses the terminal, "Owner" *1 is displayed and you can switch to the owner by tapping it. |
| Add guest | Add a guest. When a guest is added and someone who is not a guest uses the terminal, "Guest" is displayed.·Tap [Guest] while the owner uses the terminal to switch guests, set call function, or remove guests.·When a "guest" is using the terminal, "Remove guest" is displayed. You can tap it to delete the applications and data that the guest has used. |
| Add user | Select this to add users. When switching to an added user for the first time, the initial setting is needed. Follow the onscreen instructions.For users who completed and not completed the initial settings, "(Google account name)" or "New user" is displayed respectively.By tapping the user whom an owner added when using, switching to the user, setting use permission of calling and +Message, and removing the user are available.Tap a user who currently uses the terminal to check or edit the profile. |
| Add users from lock screen*2 | Set whether to enable to add a guest or user from the Quick settings panel (P.66) on the lock screen. |
*1 The display may differ depending on usage condition.
*2 Appeared when "Screen lock" (P.170) is set to "Pattern"/"PIN"/"Password" and the owner uses the terminal.
Information
- You can add up to 5 users including an owner and a guest.
- When using the terminal by User/Guest, displayed functions are different, or use of applications or functions are restricted.
About phone
1 From the Home screen, [Settings]▶ [About phone].
| Device name | Register a name of the terminal. |
| Phone number | Your own phone number is displayed. |
| Emergency information | Register your blood type or the other information that can be useful for initial response in emergency or the contacts for emergency. |
| Legal information | Check third party's licenses or Google terms of use, etc. |
| Certificates | P218 |
| Detailed Diagnostics | Set whether to send detailed diagnostics data of the terminal. |
| SIM status | Check the version, various numbers, status of nano UIM card, battery life, etc. |
| Model | |
| IMEI | |
| Show IMEI barcode | |
| Android version | |
| Battery life | |
| IP address | |
| Wi-Fi MAC address | |
| Device Wi-Fi MAC address | |
| Bluetooth address | |
| Up time | |
| Build number |
File management
Storage structure
Phone (Internal shared storage)
Store applications or data which is used by each application, media files such as screenshot images.
microSD card (External storage)
You can save the data in the terminal to a microSD card or import data from a microSD card to the terminal.
• For installing a microSD card (P.35)
File operations
Use "Files" application to operate the data saved in the internal storage or microSD card.
1 From the Home screen, [Files].
- Recently used files, categories, collection, or storage device are displayed.
2 [Internal storage] of "STORAGE DEVICES".
- The internal storage of the terminal is displayed.
- When a microSD card is installed, "SD card" is displayed for "STORAGE DEVICES".
3 Tap the folder as required.
4 Tap a file.
• Data appears on the status bar.
Information
- To search data, tap in Step 2 and enter a file name, then tap of the software keyboard.
Creating a folder
1 From the Home screen, [Files].
2 Tap the storage.
3 Tap the folder as required.
4 :▶[Add new folder].
5 Enter a folder name▶[Create Folder].
■ Renaming a folder or file
1 From the Home screen, [Files].
2 Tap the storage.
3 Tap the folder as required.
4 Touch and hold a folder or file you want to rename.
5 ▶ [Rename]▶ Enter a name▶ [OK].
- Deleting a folder or file
1 From the Home screen, [Files].
2 Tap the storage.
3 Tap the folder as required.
4 Touch and hold a folder or file you want to delete.
5 [Delete].
■ Copying/Moving a folder or file
1 From the Home screen, [Files].
2 Tap the storage.
3 Tap the folder as required.
4 Touch and hold a folder or file you want to copy/move.
5 [Copy to]/[Move to].
6 Tap the storage to copy/move to.
7 In any location, tap [Copy here]/[Move here].
Data communication
Bluetooth function
Bluetooth function is a technology which enables to connect with Bluetooth device such as PC, handsfree headset wirelessly.
- The terminal does not connect wirelessly with all types of Bluetooth devices.
• Supported Bluetooth profiles (P.216)
Information
- On/OFF setting of the Bluetooth function is kept even if you turn off the power.
- When you do not use Bluetooth function, turn it off to save the battery.
- To switch ON/OFF of Bluetooth function, from the Home screen, tap [Settings] [Device connection] [Connection preferences] [Bluetooth]

■ Reception interference caused by wireless LAN devices
The terminal's Bluetooth function and wireless LAN devices use the same frequency band (2.4GHz). If you use the terminal near a wireless LAN device, reception interference may occur or the communications speed may lower. Also, you may hear noise or have a connection problem. In these cases, do the following:
- Keep the Bluetooth device approximately 10 m or more away from a wireless LAN device.
- Within approximately 10 m, turn off either the Bluetooth device or the wireless LAN device.
Making the terminal detectable
1 From the Home screen, [Settings]▶[Device connection].
2 [Pair new device].
- Tap [Device name] to change the name of the terminal when displayed on the other Bluetooth device.
Making pair setting for the terminal and Bluetooth device
To connect the terminal and Bluetooth device, pair them first.
- Once paired, the setting with the Bluetooth device is saved.
- For make pair setting, entering passcode (PIN) may be required. Passcode (PIN) of the terminal is "0000". If you cannot make pair setting when you enter "0000", see the documentation of your Bluetooth device.
• Make sure that the Bluetooth function and Bluetooth detection function of the target device are on in advance.
1 From the Home screen, [Settings]▶[Device connection]▶[Pair new device].
- Detected Bluetooth device names are displayed in "Available devices".
2 Tap a name of Bluetooth device for pairing.
3 Confirm the Bluetooth pairing code (pass code) on the confirmation screen▶[PAIR].
- Paired Bluetooth device names are displayed.
■ When pairing request is sent from a Bluetooth device
Confirm the Bluetooth pairing code (pass code) on the confirmation screen and then tap [PAIR].
Information
- To change the other party's Bluetooth device name or specify the use purpose to the device, tap on the right of paired Bluetooth device name.
- To unpair, tap on the right of the Bluetooth device you want to unpair▶[FORGET]▶[FORGET DEVICE].
Connecting the terminal with a Bluetooth device
1 From the Home screen, [Settings]▶[Device connection].
2 [See all]▶Tap the name of Bluetooth device you want to connect.
Disconnecting a Bluetooth device
1 From the Home screen, [Settings]▶[Device connection].
2 Tap a name of connected Bluetooth device.
- When is displayed on the right of a name of the Bluetooth device, tap
3 [FORGET].
- To reconnect, tap [CONNECT].
Sending/Receiving data via Bluetooth function
Turn on Bluetooth function in advance, then pair with a target Bluetooth device.
Sending data via Bluetooth function
1 [Bluetooth] from the sharing menu of each application.
2 Tap the other Bluetooth device.
Receiving data
1 Send data from the other Bluetooth device.
• appears on the status bar.
2 Drag the status bar down▶ [Incoming file]▶ [ACCEPT].
Information
- To view received data, from the Home screen, tap [Settings] [Device connection] [Connection preferences] [Files received via Bluetooth].
External device connection
Connecting to PC
Connect to a PC to exchange data between the internal storage or the microSD card and a PC.
Information
- Appeared screen may vary depending on the operating system (OS) of a PC.
- You may not be able to operate copyrighted data of images, music, etc.
Connecting to PC with USB cable A to C
- The following operating systems (OS) are supported.
- Microsoft Windows 10
- Microsoft Windows 8.1
1 Connect the terminal to a PC with USB cable A to C 02 (optional) etc. (P.40).
- When a screen for installing driver software appears, wait for a while until the installation is complete.
- When a confirmation screen of installing software appears on the terminal, tap [SKIP].
2 [ALLOW].
- The terminal is displayed on the PC screen as a portable device and you can access the internal storage and a microSD card in the terminal.
- Tap [DENY] to only charge the terminal.
Information
- To change the USB connection mode, drag the status bar down▶Tap the notification of USB connection mode and then select a USB connection mode.
Removing USB cable A to C safely
- Do not remove the USB cable A to C during while transferring data. Data may be damaged.
1 Confirm that it is not transferring data, remove the USB cable A to C from the terminal and a PC.
International roaming
With the international roaming (WORLD WING), you can use the terminal without changing phone number or mail address in the service area of the overseas network operator affiliated with DOCOMO. You do not need to change the settings of call and SMS. For details of International Roaming Service (WORLD WING), refer to NTT DOCOMO website. https://www.nttdocomo.co.jp/english/service/world/roaming/
■ Supporting networks
You can use the terminal in the service area for the LTE network, 3G network and GSM/GPRS networks. Services are also available in countries and areas supporting 3G 850MHz/GSM 850MHz.
Information
- For Country codes, International call access numbers, Universal number international prefix, supported countries/areas and network operators, refer to NTT DOCOMO website.
| Main communication services | LTE 3G 3G850 | GSM (GPRS) | ||
| Phone | ○ | ○ | ○ | ○ |
| SMS | ○ | ○ | ○ | ○ |
| Packet communication* | ○ | ○ | ○ | ○ |
* To use packet communication during roaming, setting "Data roaming" to ON in Mobile network is required (P.192).
Information
- To use +Message application overseas, setting on +Message application is required (P.112).
- Some services are not available depending on the overseas network operator or network.
- You can check the name of the connected network operator in "Quick settings panel" (P.66).
Before using overseas
Before leaving Japan
To use the terminal overseas, check the following in Japan.
Subscription
- Check if you subscribe to WORLD WING. For details, ask the contact on the last page.
- To use with ahamo plan, WORLD WING is not needed to apply but cannot be abolished.
Charging
- For charging, refer to NTT DOCOMO website.
■ Usage charge
• Overseas usage charges (call and packet communication) differ from those in Japan. For details, refer to NTT DOCOMO website. And before using with ahamo plan, make sure to confirm the details on the ahamo website.
- Some applications perform communication automatically. Packet communication charge may be higher. For operations for each application, ask the application provider.
Advance preparation
Network service settings
If you subscribe to network services, you can use network services such as Voice Mail Service, Call Forwarding Service, Caller ID Display Request Service, etc., even overseas. However, some network services cannot be used.
- To use network services overseas, you need to set "Remote operation settings" (P.104) to "Activate service". You can set Remote operation settings in a traveling destination (P.197).
- Even if the setting/canceling operation is available, some network services cannot be used depending on overseas network operators.
After arriving overseas
When you arrive overseas and turn on the terminal, the terminal connects an available network automatically.
Connectivity
When "Automatically select network" (P.192) is set to ON, the most suitable network will be selected automatically.
Settings for overseas use
Setting data roaming
To perform packet communication overseas, setting "Data roaming" to ON in Mobile network is required.
1 From the Home screen, [Settings]▶ [Network & internet]▶ [Mobile network].
2 of "Data roaming"▶Read the notes and tap [OK].
Setting network
By default, the terminal automatically searches available network and connect to it. To switch network manually, set as follows.
1 From the Home screen, [Settings]▶[Network & internet]▶[Mobile network]▶[Advanced].
2 of "Automatically select network".
- If the note appears, tap [OK].
• Perform network search.
3 Tap a network from available networks.
Information
- If you set a network manually, the terminal is not reconnected to another network automatically even if you move out of the network area.
- To set "Automatically select network" to ON, in Step 2, tap of "Automatically select network".
Setting the preferred network type
1 From the Home screen, [Settings]▶[Network & internet].
2 [Mobile network]▶[Preferred network type].
3 Select the preferred network type to set.
- Select "4G/3G/GSM" to switch available network type automatically.
Using VoLTE during international roaming
Set to enable VoLTE when VoLTE is available during international roaming.
1 From the Home screen, [Settings]▶[Network & internet].
2 [Mobile network]▶ of "4G Calling".
Date & time settings
When "Use network-provided time", "Use network-provided time zone" in "Date & time" are ON, the date, time and time differences of the terminal clock are corrected by receiving the information related to time and time differences from the network of overseas network operator you connect to.
- Correction of the time/time differences may not be performed correctly depending on the network of overseas network operator. In that case, set time zone manually.
- Timing of correction varies by the overseas network operator.
- Setting Date & time (P.180)
About inquiries
- For loss or theft of the terminal or nano UIM card, immediately contact DOCOMO from the spot to take the necessary steps for suspending the use. For inquiries, refer to the last page. You can also suspend the use from My docomo. Note that you are still liable for the call and communication charge incurred after the loss or theft occurred.
- For using from land-line phone, entering "International call access number" or "Universal number international prefix" for the place you stay is needed.
- For ahamo plan users, inquire via the ahamo website.
Making/Receiving a call in the place you stay
When you arrive overseas and turn on the terminal, an available network is automatically set.
- Check that the battery and signal levels are high enough.
- Depending on the network operator, even if the Caller ID notification is active, the caller ID may not be notified or appear properly. In this case, calls cannot be made from the call history.
• Refer to NTT DOCOMO website for the information about available countries/regions and the overseas network operators.
Making a call to outside the place you stay (including Japan)
You can make calls from the place you stay to the other countries/regions using the international roaming service.
- You can easily make international calls from the place you stay to Japan or to other countries/regions by entering prefix "+ " and then the country code and phone number.
1 From the Home screen,
2 Dial + (touch and hold [0])▶ Enter Country code, Area code (City code), a phone number in the order.
- If the area code (city code) begins with "0", omit "0". However, "0" may be required to dial to some countries/regions such as Italy.
• To call an overseas "WORLD WING" user, enter "81" (Japan) for the country code.
3
4 When the call is finished,
Making an international call using International dial assist
You can make international calls from the place you stay to the other countries/regions with simple operation by using International dial assist.
- Set "Auto conversion" (P.197) of International dial assist to ON in advance.
- A leading "0" of an area will be converted to a country code which is set in advance.
1 From the Home screen,
2 Enter the area code (city code) and other party's phone number.
3

- When the International dial assist screen is displayed, tap [CALL].
4
When the call is finished,
Making a call within the place you stay
You can make a call by entering the phone number of the other party's land-line phone or mobile phone in the same way you do in Japan.
1 From the Home screen,
2 Enter a phone number.
• To make a call to land-line phone, enter the area code (city code), other party's phone number in order.
3

- When the International dial assist screen is displayed, tap [CALL ORIGINAL].
4
When the call is finished,
Making a call to WORLD WING user overseas
When the other party uses international roaming service, make a call as an international call to Japan even when you stay in the same country/region as the other party.
- Since it is communication via Japan regardless of the place you stay, dial in the same way as international call to Japan. + (Touch and hold [0]) - 81 (Country code of Japan) - Phone number without a leading "0".
Receiving a call in the place you stay
You can receive calls with the same operation as that in Japan even when you stay overseas.
Information
- When you received a call during international roaming, regardless of which country/region the call is from, it is forwarded internationally from Japan. A caller is charged for communication to Japan, and the receiver is charged for reception.
Making a call from the other party
■ Having someone make a call from Japan to the place you stay
To have the other party make a call from a land-line phone or mobile phone in Japan to the terminal in the place you stay, the other party only needs to dial the phone number as in Japan.
Having someone make a call from other than Japan to the place you stay You have to receive a call through Japan no matter where you are; therefore, the other party needs to enter the international call access number of the place to call from and "81" (Country code of Japan).
International access number of the place to call from - 81 - 90 (or 80, 70) - XXXX - XXXX
International roaming settings
Make settings for using international roaming services.
- For some overseas network operators, settings may not be made.
1 From the Home screen, ▶ : .
2 [Settings]▶[Calls].
3 [Network service/roaming settings].
- If the confirmation screen of Transmission of User Information appears, confirm the content and then follow the onscreen instructions.
4 [Roaming settings].
| Incoming call restriction while roaming | Set to restrict incoming calls during international roaming. |
| Incoming call notification while roaming | Set to notify via SMS if you cannot receive calls because of out of service etc. during international roaming. |
| Roaming guidance | Set to notify a caller of international roaming with a guidance indicating it is a call during international roaming. |
| Network service | P.197 |
Setting International dialing assist
1 From the Home screen, ▶ : .
2 [Settings]▶[Calls].
3 [International dial assist].
| Auto conversion | Set whether to automatically add the country code set in "Country code". |
| Country code | Select a country code used for auto conversion. |
Setting Network service (overseas)
Set network service such as voice mail from overseas.
- You need to set "Remote operation settings" (P.104) to "Activate service" in advance.
- If you make the settings overseas, you are charged a call fee to Japan from the place you stay.
- For some overseas network operators, settings may not be made.
1 From the Home screen, 📞▶ : .
2 [Settings]▶ [Calls].
3 [Network service/roaming settings].
- If the confirmation screen of Transmission of User Information appears, confirm the content and then follow the onscreen instructions.
4 [Roaming settings]▶ [Network service].
| Remote operation (charges apply) | Set whether to start Remote operation. |
| Caller ID notification request service (charges apply) | Play a guidance asking for notifying caller ID when there is an incoming call without caller ID. |
| Incoming call notification while roaming (charges apply) | P.196 |
| Roaming guidance (charges apply) | P.196 |
| Voicemail service (charges apply) | Take messages from callers when you are in a place the radio wave does not reach or turn off the terminal.Separate subscription is required. |
| Call forwarding service (charges apply) | Forward incoming calls to another mobile phone etc. that is registered in advance.Separate subscription is required. |
5 Follow the onscreen instructions to operate.
6 Operate according to the voice guidance.
After returning to Japan
After returning to Japan, restore to the settings which are made before you traveled.
■ When using packet communication overseas
Turn off "Data roaming" (P.192).
If you cannot connect to DOCOMO network automatically after returning to Japan
- Set "Preferred network type" (P.192) to "4G/3G/GSM".
- Turn on "Automatically select network" (P.192).
Appendix
Troubleshooting
Troubleshooting
- When you have a vague idea of malfunctioning, you can perform diagnosis by yourself.
For details, refer to NTT DOCOMO website. - Check if the software update is necessary for the terminal. If necessary, perform the software update (P.208).
- If your problem persists even if you check the troubleshooting concerning your phenomenon, feel free to ask us. For inquiries, refer to the last page.
Power supply
| Phenomenon | Cause and handling |
| Cannot power on the terminal | Check if the battery is not run out. → P.37 |
| Screen is frozen, or the power cannot be turned off | When the screen freezes or the power cannot be turned off, press and hold the power key and the volume up key at the same time for approximately 20 seconds and press and hold it for approximately 5 seconds after the terminal vibrates once, and then release your fingers when the terminal vibrates 3 times consecutively to force stop.* Note that some data and settings may be erased due to force-quit operation. |
Charging
| Phenomenon | Cause and handling |
| Cannot charge (The notification LED does not turn on, or the icon does not indicate charging status) | Check if the adapter's power plug is correctly inserted to a power outlet or accessory socket.Check if the adapter and the terminal are set correctly.→P39When using an AC adapter (optional), check if the Type-C plug of the AC adapter is connected to the terminal correctly.→P39When using the USB cable A to C 02 (optional), check if a PC is turned on.If you execute calls, communications or other function operations for a long time while charging, the terminal may become hot and the notification LED turns off (charging stops) or battery level may become low. In this case, wait until the temperature of the terminal drops and charge again. |
| The notification LED blinks in red and the terminal cannot be operated | When the battery level is low, charge the battery.→P37 |
| Phenomenon | Cause and handling |
| Battery Care charging does not start | For setting of Auto, Battery Care charging does not start unless the learning is complete from finding regularity in your charging habit. When Custom is set, charging can be started at the specified time zone. → P.38 |
| Cannot charge fully | If you remove charging equipment during Battery Care charging, the terminal may not be fully charged. To charge fully, switch to regular charging. → P.38 |
Terminal operation
| Phenomenon | Cause and handling |
| Become hot while operating/ charging | While calling, depending on the radio wave condition or call duration time, the terminal may become hot around the earpiece. This is not abnormal.While operating or charging, or if you use applications, record videos, etc. for a long time while charging the battery, the terminal, internal battery or adapter may become hot. It is not a problem for operation. You can continue to use the terminal.When the temperature of the terminal is raised, a message appears on the Notification panel and some applications or services may become unavailable. In this case, wait until the temperature of the terminal drops and use again. |
| Phenomenon | Cause and handling |
| The operation time provided by the battery is short | Is the terminal left for a long time under the state of out of service area? Out of service area, a lot of power is consumed to search available radio waves. If you are out of service area for a long time, power off the terminal or set Airplane mode.→P.41, P.152The operating time of the battery varies depending on the operating environment and the degradation level of the internal battery.→P.216The internal battery is a consumable part. Each time the internal battery is recharged, the battery usage time per one charge gradually decreases. It is a time to replace the internal battery if the usable time becomes extremely short comparing with when you purchased the terminal even if it is fully charged.For replacement of the internal battery, DOCOMO keeps the terminal and accept for a fee. See "Warranty and After Sales Services" (P.211) because we accept as a repair request.Check if multiple applications are activated.Exit unused applications.→P.67When the Wi-Fi function or Bluetooth function is not used, turn off the setting.→P.146, P.186When STAMINA mode is set, the operations and a part of functions of the terminal are restricted so that the consumption of the battery power can be reduced.→P.162 |
| Operations are not possible when tapping or pressing keys | Check if the power is turned off.→P41Check if you activate the screen lock.→P.170 |
| The screen reacts slowly when you tap or press the keys | When large amount of data is saved in the terminal or transferring large-size data between the terminal and microSD card, the reactions on the screen may be delayed. |
| The nano UIM card is not recognized | Check if the nano UIM card is inserted in the right direction.→P32 |
| The clock is not on time | The clock time may become wrong when the power is turned on for a long time. Check that "Use network-provided time", "Use network-provided time zone", or "Use locale default" is ON and then turn on the power of the terminal again in a place with good signal condition.→P41, P.180 |
| Phenomenon | Cause and handling |
| The terminal operation is unstable | Instability may be caused by applications that you installed after purchasing the terminal. If the symptom is improved when you boot the terminal in safe mode (near default state), uninstalling the installed application may improve the symptom.To boot the terminal in safe mode, from the power OFF status, press and hold the power key until the screen turns on, and then when the docomo logo appears, press and hold the volume down key long.When the power is turned on, press and hold the power key for at least 1 second▶Touch and hold [Power off] ▶Tap [OK] to restart the terminal in Safe mode.When safe mode is booted, "Safe mode" is displayed at the lower left of the screen.To exit the safe mode, turn power OFF and then ON.* Back up necessary data before using safe mode.* Some applications or widgets may not be shown.* Safe mode is not a normal active state. To use ordinarily, exit from the safe mode. |
| Applications cannot be operated properly (applications cannot be activated, or errors occur frequently) | Are there any applications being disabled? Enable disabled applications, then retry.→P.159Are the permissions for the application granted?→P.55, P.158 |
Phone call
| Phenomenon | Cause and handling |
| Cannot make a call even if you tap | Check if you activate Airplane mode.→P.152 |
| The ringtone does not sound | • Is "Ring and notification volume" set to mute? → P.166• Check if the following functions are activated.-Silent mode → P.52-Airplane mode → P.152• Is the ring time for Voicemail service or Call forwarding service "0 sec"→P.103• Check if Pick up after in Answering Machine is set to "0 seconds".→P.102• Check if you set Call Blocking.→P.103 |
| Phenomenon Cause and handling | |
| Cannot call (Even when moving, [IMAGE] does not disappear, or although radio waves are enough, making/receiving calls is unavailable.) | Turn the power OFF and ON, or remove and reinsert nano UIM card.→P.32, P.41Due to the nature of radio waves, making/receiving calls may be unavailable even when "not out of service area" or "appears on the display for the radio wave condition". Move to the other place and call again.Check if you set Call Blocking.→P.103Due to the crossing of radio waves, at the crowded public places, calls/ mails are crossed and the connection status may not be good. Move to other place or call again at other time. |
■ Display
| Phenomenon | Cause and handling |
| The display is dim | Check if "Screen timeout" is set to short time period. →P.163Check if the brightness of screen is changed. →P.163When "Adaptive brightness" is ON, screen brightness is changed according to the ambient brightness. →P.163Check if you cover the Proximity/ Light sensor with a sticker etc. →P.30When the temperature of the terminal becomes high while using, the display may become darker. It is not abnormal. |
Sound
| Phenomenon | Cause and handling |
| During a voice call, I cannot hear the other party's voice clearly, or the other party's voice is heard too loud | Check if the listening volume is changed.→P.100, P.166 |
Camera
| Phenomenon | Cause and handling |
| Photos and videos taken with the camera are blurred | Check if clouds, dirt or film attach to the lens of camera.For video shooting, set "Video stabilization" and then shoot.→P.126 |
| Photo or video shot with flash is whitish | If there is your finger or cover around the camera lens, flash light may reflect and affect photo or video shooting. |
Osaifu-Keitai
| Phenomenon | Cause and handling |
| Osaifu-Keitai function is unavailable | Note that setting Omakase Lock disables the Osaifu-Keitai function regardless of the NFC/Osaifu-Keitai lock ON/OFF setting.Check if NFC/Osaifu-Keitai lock ON/OFF is set.→P.134Check if "NFC/Osaifu-Keitai" is OFF.→P.133Check if you hover mark over an IC card reader.→P.133 |
International roaming
| Phenomenon | Cause and handling |
| Cannot use the terminal overseas (when displayed) | Do you subscribe to WORLD WING? Check if you subscribe to WORLD WING. is |
| Cannot use the terminal overseas (when displayed) | Check if you are out of the international roaming service area or in an area with poor radio waves. is Check if the service area and network operator are available or not, refer to NTT DOCOMO website.Change the network settings or overseas network operator settings.- Set "Preferred network type" to "4G/3G/GSM".→P.192-Turn on "Automatically select network".→P.192Turning the power off and on may solve the problem.→P.41 |
| Cannot perform data communication overseas | Turn on "Data roaming".→P.192 |
| The terminal suddenly became unavailable while using overseas | Check if usage amount exceeds the limit of maximum charges for use. For use of "International roaming (WORLD WING)", the limit of maximum charges for use is set in advance. If the limit of maximum charges for use is exceeded, pay the charges. |
| Phenomenon | Cause and handling |
| Cannot receive calls overseas | Is "Incoming call restriction while roaming" set to "Activate restriction"? →P.196 |
| No caller ID is notified/A notified caller ID is different from that of the caller/Functions for using contents saved in phonebook or those for using Caller ID notification do not operate | Even if a caller notifies its caller ID, it is not displayed on the terminal unless the network or network operator notifies it. And a different caller ID may be notified depending on the network or network operator you use. |
Data management
| Phenomenon | Cause and handling |
| Data transfer is not performed | Check if USB hub is used. If you use USB hub, operations may not be performed correctly. |
| Data saved in microSD card is not displayed | Remove and install the microSD card.→P35 |
| Images are not shown correctly. | When image data is broken, it cannot be displayed correctly, for example, a black screen appears. |
Bluetooth function
| Phenomenon | Cause and handling |
| The terminal cannot be connected to a Bluetooth device/A Bluetooth device cannot be found by search | Allow Bluetooth device (commercially available) to be detectable and then make pairing with the device on the terminal. If you want to cancel a paired device and then make the pair setting again, cancel the pair settings on both the terminal and the Bluetooth device (commercially available).→P.186 |
| Calls cannot be made from the terminal when it is connected to an external device such as car navigation or handsfree device | If calls are made several times when the other party does not answer or is out of service, the call to this number may be disabled. In this case, turn terminal off and on. |
External device connection
| Phenomenon | Cause and handling |
| An external device which is connected via USB cable A to C cable etc. is not recognized | Reconnect the external device. However, some devices may not be detected.When moisture is detected on the USB Type-C jack, automatic detection of USB device is disabled and an external device cannot be recognized.Check that any water droplet is not on the USB Type-C jack, connect the USB device, and then tap the displayed message. |
Error messages
| Error messages Cause and handling | |
| No service | The terminal is out of service area, or radio wave does not reach. Move to a location where radio wave can be reached.The nano UIM card is not working properly.Removing and inserting the nano UIM card again may improve the problem.If the problem persists, ask the contact on the last page to consult. |
| Mobile network not available | Install a nano UIM card correctly (P.32) and move to a location where radio waves can reach. |
| Normal calls restricted by access control | Appears when normal voice call service is hard to receive because communication lines are busy. |
| Calls restricted by access control | Appears when normal/emergency voice call service is hard to receive because communication lines are busy. |
| No voice service Appears when normal voice call service is not available. | |
| No voice service or emergency calling | Appears when normal/emergency voice call service is not available. |
| No mobile data service | Appears when the data service is not available. |
| SIM card is locked Enter your PIN code (P.45) correctly. | |
| Error messages Cause and handling | |
| SIM card is PUK-locked | Enter your PUK (PIN Unlock Key) (P.46) correctly. |
| PIN lock disable code is locked. | PIN Unlock Key is locked. Please contact a docomo Shop. |
| Storage space running out | Available memory of the internal storage is getting low If you continue to use the terminal, some functions or applications may not work. Uninstall (P.159) unnecessary applications. |
| Memory full There is no memory space in the internal storage or microSD card. Delete unnecessary data (P.185) to save the memory space. | |
Software Update
Software Update
Software update* is a function which updates the software so as to use the terminal safer and more comfortable. The followings are included. Be sure to update the software to the latest one.
There are the following 4 types' updates for Software update.
* On the terminal, it is displayed as System update.
- Android OS version upgrade
Upgrade Android OS and the version of the pre-installed applications to improve the function/operability/quality resulting in using the terminal more comfortable and safer.
- Adding new functions
Update the preinstalled applications or functions of the terminal to improve the function/operability resulting in using the terminal more comfortable.
- Improving quality
Update the preinstalled applications or functions of the terminal to improve the quality resulting in using the terminal more comfortable.
- Security patch update Update the security patch so that the software for dealing with the vulnerability can be applied. You can use the terminal more safely if it is applied.
For detail of the updates which provided to the terminal and the period, refer to NTT DOCOMO website.
Terms of use
- To use packet communication via Xi/FOMA, set the access point in Mobile network setting to spmode.ne.jp or mopera.
- For using packet communication via Xi/FOMA, the communication fee for downloading is not applied.
- To execute the software update overseas, Wi-Fi connection is required.
- When the software is modified, update is not available.
Updating the software
Starting the update
To start updating, perform the either operation in the following.
• From the update notification
From the status bar of the terminal, tap the notification to start updating.
- From the screen which appears on a regular basis
When updating the terminal is available, the confirmation screen may appear.
Select the operation in the confirmation screen to proceed with the update.
- From the Settings menu
From the Home screen, [Settings]
[System]▶[Advanced]▶[System update] to start updating.
If the update is not needed, "Your system is up to date" appears.
Flow of updating
Updating can be executed as follows. For detail operation steps, follow the onscreen instructions on the terminal.
1 Download an update file and install.
- Depending on update type, downloading an update file and installing will be executed automatically.
- The notification or confirmation screen may appear before downloading and installing the update file. When either screen appears, follow the onscreen instructions to proceed the system update.
* Although a message indicating that the communication fee is incurred may appear, the communication fee is NOT incurred when you set to spmode.ne.jp or mopera.
2 Restart.
- Whenever the update is prepared, the notification or confirmation screen appears.
Tap [Restart Now] to restart the terminal soon.
Tap [Restart after 02:00] to automatically restart in the nighttime.
* The confirmation screen appears just before the restart. To stop restarting, tap [Not now] within a certain time.
3 Notification of update completion.
- When the update is complete, the completion screen appears on the terminal.
• After the Android OS version upgrade, check if there are updates of the applications that you have installed personally. Without updating them, operations may become unstable or functions may not work properly.
Notes
- Once the software update is complete, you cannot restore the previous software.
- While the software is updating, the unique information of the terminal (model, serial number, etc.) is sent to the server of DOCOMO. DOCOMO does not use the sent information for purposes except software update.
- While the software is updating, each function may not be available temporarily.
- By executing software update, some settings may be initialized. Make the settings again.
-
If PIN code is set, PIN code entry screen appears while the terminal is restarting after the rewriting process. Enter PIN code.
-
If the software update failed and all the operations are disabled, please contact us. For inquiries, refer to the last page.
- Although the software update can be done with data saved to the terminal; the data may not be always safe depending on the conditions of your terminal (such as malfunction, damage, or water leak). DOCOMO recommends backing up necessary data in advance. Availability of data backup for each application varies by application. For procedure of data backup for each application, contact the developer of application.
- Software update is unavailable in the following cases. Solve the phenomenon and then retry.
- During a call
- When date and time are not set correctly
- When the remaining battery is not sufficient
- When the available memory is not sufficient in the internal storage
- During International roaming
- Do not turn off the terminal while updating the software.
- Stay in a place with good radio wave condition when downloading the update file. The update may be canceled if the radio wave condition is not good enough.
Connecting to a PC to update
To update by connecting a PC, install the software (Xperia Companion) to execute "software update" on the PC.
Connect the terminal and a PC via USB cable A to C 02 (optional) and then follow the onscreen instructions to install.
Warranty and After Sales Services
Warranty
- The terminal comes with a year's warranty starting from the date of purchase.
- The specifications and the outer appearance of the terminal are subject to change for improvement without prior notice.
- Data saved in the Contacts etc. may be changed/lost due to the trouble/repairs or handling of the terminal. DOCOMO recommends making a copy of the Phonebook data etc., in case.
* You can save Phonebook data in a microSD card inserted to the terminal.
* Data such as phonebook entries can be backed up by using docomo cloud.
* Some applications or services may not be available depending on your contract. For details, refer to NTT DOCOMO website.
Free repair service provisions
① In case the product has a malfunction under normal-use conditions in line with the directions given in the instruction manual etc., it will be repaired free of charge on the condition that the warranty period has not expired. (In some cases, the product may be replaced with the substitute.)
② Even if the warranty period has not expired, a fee will be charged for repair under the following circumstances.
1. The malfunction or damage is due to modification (including alteration of software) of the product.
2. The malfunction or damage is due to damage of the terminal body, display, external connection jack, etc. caused by being dropped or subjected to an external pressure, or the malfunction or damage is due to breakdown or deformation of the internal circuit board of the terminal.
3. The malfunction or damage is due to fire, pollution, abnormal voltage, earthquake, thunder, wind and flood damage or other natural disaster, etc.
4. The malfunction or damage is due to connected devices other than specified or consumable items.
5. The malfunction or damage is due to water infiltration, wetting is detected by wetting detectable sticker of the terminal, signs of submergence or water stain is found, or corrosion by condensation is found.
6. The product has been repaired by other than a repair office specified by DOCOMO.
③ This warranty is valid only in Japan.
④ This warranty guarantees repair free of charge during the period and under the conditions specified on this warranty card. Thus this warranty does not limit the legal rights of the owner.
⑤ If several malfunctions are detected on the collected terminal, all of malfunctions will be repaired because the quality of the product cannot be guaranteed by a partial repair. In that case, repair may be out of the warranty of free charge repair.
⑥ The software of the collected terminal may be updated to the latest version due to operation test even if the repair is not executed.
⑦ Please find repaired part and repair date on the repair report that is handed over upon completion of repair.
NTT DOCOMO, INC.
11-1, Nagata-cho 2-chome, Chiyoda-ku, Tokyo
After Sales Services
If you have problems with the terminal
Before requesting repair, see "Troubleshooting" (P.199) in this manual to check the problem.
For repair
We accept repair request at a DOCOMO-specified repair office (shop or website). For inquiries, refer to the last page. Note that repair may take some days depending on trouble condition.
If the warranty period expires
We will repair the terminal at the owner's expense.
Parts stock period
The functional parts necessary to repair the terminal will be basically available for a minimum of 4 years after the manufacture is discontinued.
For repair reception, refer to NTT DOCOMO website.
However, depending on the trouble part, repair may not be possible due to shortage of repair parts. For details, contact a DOCOMO-specified repair office. For inquiries, refer to the last page.
Precautions
- Never modify the terminal.
- Doing so may result in fire, injuries or malfunctions.
- The modified terminal may be repaired only if the owner agrees on that all the modified parts are restored to the original conditions.
However, repairs may be refused depending on the modifications.
The following cases may be considered as modifications.
- Put a seal etc. on the display or key part
- Glued decorations on the terminal using adhesion bond, etc.
- Change the parts such as exterior to other than DOCOMO standard parts
- Malfunction and damage due to modifications will be repaired at the owner's expense, even if the warranty period is still effective.
Note that the settings and other information may be reset (cleared) as a result of malfunction, repair or other handling. In this case, make the settings again. In that case, packet communication charge may incur depending on the settings.
● After the repair, Wi-Fi MAC address or Bluetooth address may be changed regardless of the repaired parts.
Take care not to let an object that is easily affected by magnetism, such as a cash card near the terminal because the card may become unavailable.
- The terminal is waterproof, However, if inside of the terminal gets wet or moist, you are recommended to turn the power off the terminal immediately and bring it to a DOCOMO-specified repair office as soon as possible. Note that repair may not be possible depending on the condition of the terminal.
Created data and download information
Note that data you created, or retrieved or downloaded from sources other than your terminal may be changed, lost, etc. when you change the terminal model or ask repairs. DOCOMO shall have no liability for any change or loss. DOCOMO shall have no liability for packet communication charge for re-downloading data. Under some circumstances, DOCOMO may replace your terminal with its equivalent instead of repairing it. In that case, such data cannot be transferred to the replaced product except for a part.
By sharing screens of your terminal with an operator of Anshin Enkaku Support center, you can receive technical support to make settings, use applications, or connect peripheral devices such as PC. (in Japanese only)
- This service is not available when a nano UIM card is not inserted, during international roaming, or in Airplane mode.
- Anshin Enkaku Support is a paid service requiring subscription.
- Some operations and settings are not supported.
- For details on Anshin Enkaku Support, refer to NTT DOCOMO website.
You can inquire of the operator via the Q&A site for Anshin Enkaku Support subscribers, LINE, or +Message.
- The screen-sharing service is not available when inquiring via LINE or +Message.
Sharing screens with the operator (for inquiries on phone)
From land-line phones
0120-783-360
Business hours: 9:00 a.m. to 8:00 p.m., open all year round
- To make a call to the Anshin Enkaku Support center from the terminal, from the Home screen, [遠隔サポート (Enkaku support)]▶[電話をかける (Call)]▶.
2 From the Home screen, [遠隔サポート (Enkaku support)].
3 [接続画面に進む (Go to the connection screen)]▶[同意する (Agree)].
4 Enter the connection number notified by DOCOMO▶[開始(Start)].
5 Enkaku support starts when you are connected.
Checking in Q & A site
1 From the Home screen, [遠隔サポート (Enkaku support)].
Changes may occur because of software update, etc. For the latest information, refer to NTT DOCOMO website.
The terminal
| Product name | SO-41B | |
| Size | Height : Approx. 140mm, Width : Approx. 69mm, Thickness : Approx. 8.9mm (Thickest part : Approx. 8.9mm) | |
| Weight | Approx. 159g | |
| Display Size | Approx. 5.5 inches | |
| Type | TFT | |
| Resolution (pixel, width × length) | HD+ (720×1496) | |
| Internal memory | RAM : 4GB ROM : 64GB*1 | |
| Battery capacity | Battery capacity | 4500mAh |
| Watt-hour rating | 17Wh | |
| Continuous stand-by time (stationary)*2*3 | 4G (LTE) | Approx. 810 hours |
| Continuous call time*3*4 | 4G (LTE) | LTE (VoLTE) : Approx. 1,510 min. |
| Charging time | AC Adapter 07 : Approx. 150 min. | |
| Wireless LAN Standards | Compliant with IEEE802.11a/b/g/n/ac (Corresponding frequency band to IEEE802.11n : 2.4GHz/5GHz) | |
| Bluetooth Version | 5.0*5 | |
| Earphone-microphone jack | Diameter for connector | 3.5 Φ earphone jack |
| Number of poles*7 | 4-pole | |
| Camera | |||
| Image pickup device | Type | Camera 1: Back-side illumination CMOS Camera 2: Front-side illumination CMOS Front camera: Back-side illumination CMOS | |
| Size | Camera 1: 1/3.0 inches Camera 2: 1/5.0 inches Front camera: 1/4.0 inches | ||
| Effective pixels | Camera 1: Approx. 13 million pixels Camera 2: Approx. 2 million pixels Front camera: Approx. 8 million pixels | ||
| Recording file format | Video | MP4 | |
| Still image | JPEG | ||
| Maximum recording time per one video | Approx. 360 min.*8 | ||
| Zoom (digital) | Video | Camera: Up to approx. 5.0 x Front camera: — | |
| Still image | Camera: Up to approx. 5.0 x Front camera: — | ||
| Video play | Compatible codec | H.263, H.264, H.265, MPEG-2 Video, MPEG-4 Video, VP8, VP9, AV1 | |
| Music play | Compatible codec | AAC-LC, AAC+, eAAC+, AAC-ELD, AMR-NB, AMR-WB, FLAC, MP3, MIDI, Vorbis, PCM, Opus, ALAC |
| Answering Machine | Savable number | No limit *9 |
| Maximum recordable time per one | Up to 60 sec. |
*1 You cannot use all of the space of memory for saving data such as shot videos and still images, downloaded applications or data, etc. For available memory, see "Storage" (P.167).
*2 Continuous stand-by time is the estimated average operation time when the terminal is in stationary state with normal radio wave reception. Continuous stand-by time varies greatly according to the terminal settings, usage environment, use frequency of calling/mail/camera, etc.
*3 When the use frequency of each function is high, actual usage time may be less than half.
*4 Continuous call time varies greatly according to the terminal settings, usage environment, use frequency of calling/mail/camera, etc.
*5 However, procedures may differ or data transfer may not be possible depending on the Bluetooth device's characteristics or specifications.
*6 Bluetooth standards for Bluetooth device connection procedure according to the product's applications.
*7 The terminal supports quadrupole headsets that are compliant with the CTIA standard.
*8 Time of recording with Video size of 1920 ×1080 (Full HD).
*9 The number of messages that can be stored depends on the amount of available memory on your terminal.
■ Display language
Catalan language/Czech/Danish/German/ Estonian/English/Spanish/Filipino/French/ Croatian/Indonesian/Italian/Latvian/ Lithuanian/Hungarian/Malaysian/Dutch/ Norwegian (language for books)/Polish/ Portuguese/Romanian/Slovakian/ Slovenian/Serbian/Finnish/Swedish/ Vietnamese/Turkish/Greek/Bulgarian/ Kazakh/Russian/Ukrainian/Hebrew/Arabic/ Persian (Dari language)/Hindi/Bengali/Thai/ Korean/Japanese/Chinese (Simplified)/ Chinese (Traditional)
Entry language
For available languages, refer to the following website. https://goo.gl/fMQ85U
Certificate and compliance
You can check details of certificate and compliance mark specific to the terminal (including certificate number/compliance number).
1 From the Home screen, [Settings]▶[About phone].
2 [Certificates]
VCCI
The terminal complies with a technical standards based on VCCI RULES FOR VOLUNTARY CONTROL MEASURES and the mark of conformity is depicted electronically on the screen.
Specific Absorption Rate of Mobile Phone, etc.
Specific Absorption Rate (SAR) Information of Mobile Phones
This model SO-41B mobile phone complies with the Japanese technical regulations and the international guidelines regarding human exposure to radio waves.
This mobile phone was designed in observance of the Japanese technical regulations regarding exposure to radio waves ^(*1) and the limits of exposure recommended in the international guidelines, which are equivalent to each other. The international guidelines were set out by the International Commission on Non-Ionizing Radiation Protection (ICNIRP), which is in collaboration with the World Health Organization (WHO), and the permissible limits include substantial safety margins designed to assure the safety of all persons, regardless of age and health conditions. The technical regulations and the international guidelines set out the limits of exposure to radio waves as the Specific Absorption Rate, or SAR, which is the value of absorbed energy in any 10 grams of human tissue over a 6-minute period. The SAR limit for mobile phones is 2.0 W/kg.
The highest SAR value for this mobile phone when tested for use near the head is 1.47 W/kg ^(2) , and that when worn on the body is 0.78 W/kg ^(3) . There may be slight differences of the SAR values in individual product, but they all satisfy the limit.
The actual value of SAR of this mobile phone while operating can be well below the indicated above. This is due to automatic changes in the power level of the device to ensure it only uses the minimum power required to access the network.
This mobile phone can be used in positions other than against your head. By using accessories such as a belt clip holster that maintains a 1.5cm separation with no metal (parts) between it and the body, this mobile phone is certified the compliance with the Japanese technical regulations and the international guidelines.
The World Health Organization has stated that "a large number of studies have been performed over the last two decades to assess whether mobile phones pose a potential health risk. To date, no adverse health effects have been established as being caused by mobile phone use."
Please refer to the WHO website if you would like more detailed information.
https://www.who.int/peh-emf/publications/factsheets/en/
Please refer to the websites listed below if you would like more detailed information regarding SAR.
Ministry of Internal Affairs and
Communications Website:
https://www.tele.soumu.go.jp/e/sys/ele/index.htm
Association of Radio Industries and Businesses Website:
https://www.arib-emf.org/01denpa/denpa02-02.html (in Japanese only)
NTT DOCOMO, INC. Website:
https://www.nttdocomo.co.jp/english/product/sar/
Support page on Xperia official website:
https://xperia.sony.jp/product/SAR/ (in Japanese only)
*1 The technical regulations are provided in Article 14-2 of Radio Equipment Regulations, a Ministerial Ordinance of the Radio Act.
*2 Including other radio systems that can be simultaneously used with LTE/FOMA.
*3 Including other radio systems that can be simultaneously used with LTE/FOMA.
Radio Wave Exposure and Specific Absorption Rate (SAR) Information
Important Information United States
THIS PHONE MODEL HAS BEEN CERTIFIED IN COMPLIANCE WITH THE GOVERNMENT'S REQUIREMENTS FOR EXPOSURE TO RADIO WAVES.
This mobile phone model SO-41B has been designed to comply with applicable safety requirements for exposure to radio waves. Your wireless phone is a radio transmitter and receiver. It is designed to not exceed the limits* of exposure to radio frequency (RF) energy set by governmental authorities.
These limits establish permitted levels of RF energy for the general population. The guidelines are based on standards that were developed by international scientific organizations through periodic and thorough evaluation of scientific studies.
The standards include a safety margin designed to assure the safety of all individuals, regardless of age and health. The radio wave exposure guidelines employ a unit of measurement known as the Specific Absorption Rate (SAR). Tests for SAR are conducted using standardized methods with the phone transmitting at its highest certified
power level in all used frequency bands. While there may be differences between the SAR levels of various phone models, they are all designed to meet the relevant guidelines for exposure to radio waves.
The highest SAR value as reported to the authorities for this phone model when tested for use by the ear is 0.67 W/kg*, when worn on the body is 0.50 W/kg* and when WiFi hotspot mode is 0.94 W/kg. For body-worn operation, this phone has been tested and meets the FCC RF exposure guidelines. Please use an accessory designated for this product or an accessory which contains no metal and which positions the handset a minimum of 15 mm from the body.
For devices which include "WiFi hotspot" functionality, SAR measurements for the device operating in WiFi hotspot mode were taken using a separation distance of 10 mm. Use of third-party accessories may result in different SAR levels than those reported.
** Before a phone model is available for sale to the public in the US, it must be tested and certified by the Federal Communications Commission (FCC) that it does not exceed the limit established by the government-adopted requirement for safe exposure*. The tests are performed in positions and locations (i.e., by the ear and worn on the body) as required by the FCC for each model. The FCC has granted an Equipment Authorization for this phone model with all reported SAR levels evaluated as in compliance with the FCC RF exposure guidelines. While there may be differences between the SAR levels of various phones, all mobile phones granted an FCC equipment authorization meet the government requirement for safe exposure. SAR information on this phone model is on file at the FCC and can be found under the Display Grant section of https://www.fcc.gov/oet/ea/fccid after searching on FCC ID PY7-10933K. Additional SAR-related information can also be found on the Mobile and Wireless Forum at https://www.mwfai.org/.
* In the United States, the SAR limit for mobile phones used by the public is 1.6 watts/kilogram (W/kg) averaged over one gram of tissue. The standard incorporates a margin of safety to give additional protection for the public and to account for any variations in measurements.
**This paragraph is only applicable to authorities and customers in the United States.
Europe
This mobile phone model SO-41B has been designed to comply with applicable safety requirements for exposure to radio waves. These requirements are based on scientific guidelines that include safety margins designed to assure the safety of all persons, regardless of age and health. The radio wave exposure guidelines employ a unit of measurement known as the Specific Absorption Rate, or SAR. Tests for SAR are conducted using standardized methods with the phone transmitting at its highest certified power level in all used frequency bands. While there may be differences between the SAR levels of various phone models, they are all designed to meet the relevant guidelines for exposure to radio waves.
SAR data information for residents in countries/regions that have adopted the SAR limit recommended by the International Commission on Non-Ionizing Radiation Protection (ICNIRP), which is 2 W/kg averaged over ten (10) gram of tissue (for example European Union, Japan, Brazil and New Zealand):
For body worn operation, this phone has been tested and meets RF exposure guidelines when used with an accessory that contains no metal and that positions the handset a minimum of 5 mm from the body. Use of other accessories may not ensure compliance with RF exposure guidelines. The highest SAR value for this model phone when tested by Sony for use at the ear is 0.78 W/kg (10g). In the case where the phone is worn on the body, the highest tested SAR value is 0.93 W/kg (10g).
FCC Statement for the USA
This device complies with Part 15 of the FCC rules. Operation is subject to the following two conditions:
(1) This device may not cause harmful interference.
(2) This device must accept any interference received, including interference that may cause undesired operation.
Any change or modification not expressly approved by Sony may void the user's authority to operate the equipment. This equipment has been tested and found to comply with the limits for a Class B digital device, pursuant to Part 15 of the FCC Rules. These limits are designed to provide reasonable protection against harmful interference in a residential installation. This equipment generates, uses and can radiate radio frequency energy and if not installed and used in accordance with the instructions, may cause harmful interference to radio
communications. However, there is no guarantee that interference will not occur in a particular installation.
If this equipment does cause harmful interference to radio or television reception, which can be determined by turning the equipment off and on, the user is encouraged to try to correct the interference by one or more of the following measures:
- Reorient or relocate the receiving antenna.
- Increase the separation between the equipment and receiver.
- Connect the equipment into an outlet on a circuit different from that to which the receiver is connected.
- Consult the dealer or an experienced radio/TV technician for help.
END USER LICENSE AGREEMENT
IMPORTANT:
BEFORE USING THE SOFTWARE, PLEASE READ THIS END USER LICENSE AGREEMENT ("EULA") CAREFULLY. BY USING THE SOFTWARE YOU ARE ACCEPTING THE TERMS OF THIS EULA. IF YOU DO NOT ACCEPT THE TERMS OF THIS EULA, YOU MAY NOT USE THE SOFTWARE.
This EULA is a legal agreement between you and Sony Corporation ("SONY"). This EULA governs your rights and obligations regarding the software which is embedded in or bundle with your SONY-branded smartphone or applications or software which is downloadable onto the DEVICE (defined in "GRANT OF LICENSE"), of SONY and/or its third party licensors (including SONY's affiliates) and their respective affiliates (collectively, the "THIRD-PARTY SUPPLIERS"), together with any updates/ upgrades, any printed, on-line or other electronic documentation for such software and any data files, each provided by SONY or the THIRD-PARTY SUPPLIERS, or created by operation of such software (collectively, the "SOFTWARE").
Notwithstanding the foregoing, any software in the SOFTWARE having a separate end user license agreement (including, but not limited to, GNU General Public license and Lesser/Library General Public License) shall be covered by such applicable separate end user license agreement in lieu of the terms of this EULA to the extent required by such separate end user license agreement ("EXCLUDED SOFTWARE").
SOFTWARE LICENSE
The SOFTWARE is licensed, not sold. The SOFTWARE is protected by copyright and other intellectual property laws and international treaties.
COPYRIGHT
All right and title in and to the SOFTWARE (including, but not limited to, any images, photographs, animation, video, audio, music, text and “applets” and other content incorporated into the SOFTWARE) is owned by SONY or one or more of the THIRD-PARTY SUPPLIERS.
GRANT OF LICENSE
SONY grants you a limited, non-exclusive, personal, non-transferable license to use the SOFTWARE solely in connection with your compatible device (including, but not limited to, SONY's products which the SOFTWARE is embedded in or bundled with) ("DEVICE") solely in accordance with this EULA and the usage instructions as may be made available to you by SONY or the THIRD-PARTY SUPPLIERS. SONY and the THIRD-PARTY SUPPLIERS expressly reserve all rights, title and interest (including, but not limited to, all intellectual property rights) in and to the SOFTWARE that this EULA does not specifically grant to you.
REQUIREMENTS AND LIMITATIONS
You may not copy, publish, adapt, redistribute, attempt to derive source code, modify, reverse engineer, decompile, or disassemble any of the SOFTWARE, whether in whole or in part, or create any derivative works from or of the SOFTWARE unless such derivative works are intentionally facilitated by the SOFTWARE. You may not modify or tamper with any digital rights management functionality of the SOFTWARE. You may not bypass, modify, defeat or circumvent any of the functions or protections of the SOFTWARE or any mechanisms operatively linked to the SOFTWARE. You may not separate any individual component of the SOFTWARE for use on more than one DEVICE unless expressly authorized to do so by SONY. You may not remove, alter, cover or deface
any trademarks or notices on the SOFTWARE. You may not share, distribute, rent, lease, sublicense, assign, transfer or sell the SOFTWARE. You may not use the SOFTWARE in connection with violation of laws, regulations, court decisions or other legally binding dispositions by a public authority or public policy, or infringement of the rights or legally protected interests (including, but not limited to, intellectual and other property rights, rights to trade secrets, honors, privacy and publicity) of SONY, each of the THIRD-PARTY SUPPLIERS or any third parties. The software, network services or other products other than the SOFTWARE upon which the SOFTWARE'S performance depends might be modified, interrupted or discontinued at the discretion of the suppliers (software suppliers, service suppliers, or SONY). SONY and such suppliers do not warrant that the SOFTWARE, network services, contents or other products will continue to be available, or will operate without interruption or modification.
EXCLUDED SOFTWARE AND OPEN SOURCE COMPONENTS
Notwithstanding the foregoing limited license grant, you acknowledge that the SOFTWARE may include EXCLUDED SOFTWARE. Certain EXCLUDED SOFTWARE may be covered by open source software licenses ("Open Source Components"), which means any software licenses approved as open source licenses by the Open Source Initiative or any substantially similar licenses, including but not limited to any license that, as a condition of distribution of the software licensed under such license, requires that the distributor make the software available in source code format. If and to the extent disclosure is required, please visit https://developer.sony.com/develop/open-devices/downloads/open-source-archives or other SONY-designated web site for a list of applicable Open Source Components included in the SOFTWARE from time to time, and the applicable terms and conditions governing its use. Such terms and conditions may be changed by the applicable third party at any time without liability to you. To the extent required by the licenses covering EXCLUDED SOFTWARE, the terms of such licenses will apply in lieu of the terms of this EULA. To the extent the terms of the licenses applicable to EXCLUDED SOFTWARE prohibit any of the restrictions in this EULA with respect to such EXCLUDED SOFTWARE, such restrictions will not apply to such EXCLUDED SOFTWARE. To the extent the terms of the licenses applicable to Open Source Components require SONY to make an offer
to provide source code in connection with the SOFTWARE, such offer is hereby made.
USE OF SOFTWARE WITH COPYRIGHTED MATERIALS
The SOFTWARE may be capable of being used by you to view, store, process and/or use content created by you and/or third parties. Such content may be protected by copyright, other intellectual property laws, and/or agreements. You agree to use the SOFTWARE only in compliance with all such laws and agreements that apply to such content. You acknowledge and agree that SONY may take appropriate measures to protect content stored, processed or used by the SOFTWARE. Such measures include, but are not limited to, refusal to accept your request to enable backup and restoration of content through certain SOFTWARE features, and termination of this EULA in the event of your illegitimate use of the SOFTWARE.
CONTENT SERVICE
PLEASE ALSO NOTE THAT THE SOFTWARE MAY BE DESIGNED TO BE USED WITH CONTENT AVAILABLE THROUGH ONE OR MORE CONTENT SERVICES ("CONTENT SERVICE"). USE OF THE SERVICE AND THAT CONTENT IS SUBJECT TO THE TERMS OF SERVICE OF THAT CONTENT SERVICE. IF YOU DECLINE TO ACCEPT THOSE TERMS, YOUR USE OF THE SOFTWARE WILL BE LIMITED. YOU ACKNOWLEDGE AND AGREE THAT CERTAIN CONTENT AND SERVICES AVAILABLE THROUGH THE SOFTWARE MAY BE PROVIDED BY THIRD PARTIES OVER WHICH SONY HAS NO CONTROL. USE OF THE CONTENT SERVICE REQUIRES AN INTERNET CONNECTION. THE CONTENT SERVICE MAY BE MODIFIED OR DISCONTINUED AT ANY TIME.
NETWORK CONNECTIVITY AND THIRD PARTY SERVICES
You acknowledge and agree that access to certain SOFTWARE features may require an Internet connection or any other network connection (collectively, "Network") for which you are solely responsible. Further, you are solely responsible for payment of any fees associated with your Network connection, including but not limited to Internet service provider or airtime charges. Operation of the SOFTWARE may be limited or restricted depending on the capabilities, bandwidth or technical limitations of your Network connection and service. The provision, quality and security of such Network connectivity are your responsibility or that of the third party providing such service.
EXPORT AND OTHER REGULATIONS
You agree to comply with all applicable export and re-export restrictions and regulations of the area or country in which you reside or use the SOFTWARE, and not to transfer, or authorize the transfer, of the SOFTWARE to a prohibited country or otherwise in violation of any such restrictions or regulations.
HIGH RISK ACTIVITIES
The SOFTWARE is not fault-tolerant and is not designed, manufactured or intended for use or resale as on-line control equipment in hazardous environments requiring fail-safe performance, such as in the operation of nuclear facilities, aircraft navigation or communication systems, air traffic control, direct life support machines, or weapons systems, in which the failure of the SOFTWARE could lead to death, personal injury, or severe physical or environmental damage ("HIGH RISK ACTIVITIES"). SONY, each of the THIRD-PARTY SUPPLIERS, and each of their respective affiliates specifically disclaim any express or implied warranty, duty or condition of fitness for HIGH RISK ACTIVITIES.
EXCLUSION OF WARRANTY ON SOFTWARE
You acknowledge and agree that use of the SOFTWARE is at your sole risk and that you are responsible for use of the SOFTWARE. The SOFTWARE is provided "AS IS," without warranty, duty or condition of any kind.
SONY AND EACH OF THE THIRD-PARTY SUPPLIERS (for purposes of this Section, SONY and each of the THIRD-PARTY SUPPLIERS shall be collectively referred to as "SONY") EXPRESSLY DISCLAIM ALL WARRANTIES, DUTIES OR CONDITIONS, EXPRESS OR IMPLIED, INCLUDING, BUT NOT LIMITED TO, THE IMPLIED WARRANTIES OF MERCHANTABILITY, QUALITY, FITNESS FOR A PARTICULAR PURPOSE, ACCURACY, TITLE AND NONINFRINGEMENT. WITHOUT LIMITING THE GENERALITY OF THE FOREGOING, SONY DOES NOT WARRANT OR MAKE ANY CONDITIONS OR REPRESENTATIONS (A) THAT THE FUNCTIONS CONTAINED IN ANY OF THE SOFTWARE WILL MEET YOUR REQUIREMENTS OR THAT THEY WILL BE UPDATED, (B) THAT THE OPERATION OF ANY OF THE SOFTWARE WILL BE CORRECT OR ERROR-FREE OR THAT ANY DEFECTS WILL BE CORRECTED, (C) THAT THE SOFTWARE WILL NOT DAMAGE ANY OTHER SOFTWARE, HARDWARE OR DATA, (D) THAT ANY SOFTWARE, NETWORK SERVICES (INCLUDING THE INTERNET) OR PRODUCTS (OTHER THAN THE SOFTWARE) UPON WHICH THE SOFTWARE'S PERFORMANCE DEPENDS WILL
CONTINUE TO BE AVAILABLE, UNINTERRUPTED OR UNMODIFIED, AND (E) REGARDING THE USE OR THE RESULTS OF THE USE OF THE SOFTWARE IN TERMS OF ITS CORRECTNESS, ACCURACY, RELIABILITY, OR OTHERWISE.
NO ORAL OR WRITTEN INFORMATION OR ADVICE GIVEN BY SONY OR AN AUTHORIZED REPRESENTATIVE OF SONY SHALL CREATE A WARRANTY, DUTY OR CONDITION OR IN ANY WAY INCREASE THE SCOPE OF THIS WARRANTY. SHOULD THE SOFTWARE PROVE DEFECTIVE YOU ASSUME THE ENTIRE COST OF ALL NECESSARY SERVICING, REPAIR OR CORRECTION. SOME JURISDICTIONS DO NOT ALLOW THE EXCLUSION OF IMPLIED WARRANTIES, SO THESE EXCLUSIONS MAY NOT APPLY TO YOU TO THE EXTENT THEY ARE CONTRARY TO APPLICABLE LAW OF YOUR JURISDICTION.
LIMITATION OF LIABILITY SONY AND EACH OF THE THIRD-PARTY SUPPLIERS (for purposes of this Section, SONY and each of the THIRD-PARTY SUPPLIERS shall be collectively referred to as "SONY") SHALL NOT BE LIABLE FOR ANY INCIDENTAL, INDIRECT, SPECIAL OR CONSEQUENTIAL LOSS OR DAMAGES FOR BREACH OF ANY EXPRESS OR IMPLIED
WARRANTY, BREACH OF CONTRACT, NEGLIGENCE, STRICT LIABILITY OR UNDER ANY OTHER LEGAL THEORY RELATED TO THE SOFTWARE, INCLUDING, BUT NOT LIMITED TO, ANY DAMAGES ARISING OUT OF LOSS OF PROFITS, LOSS OF REVENUE, LOSS OF DATA, LOSS OF USE OF THE SOFTWARE OR ANY ASSOCIATED HARDWARE, DOWN TIME AND USER'S TIME, EVEN IF ANY OF THEM HAVE BEEN ADVISED OF THE POSSIBILITY OF SUCH LOSSES OR DAMAGES. IN ANY CASE, EACH AND ALL OF THEIR AGGREGATE LIABILITY UNDER ANY PROVISION OF THIS EULA SHALL BE LIMITED TO THE AMOUNT ACTUALLY PAID FOR THE SOFTWARE, SONY'S PRODUCT WHICH THE SOFTWARE IS EMBEDDED IN OR BUNDLED WITH AND/OR SONY'S SERVICE TO WHICH THE SOFTWARE IS DEDICATED. SOME JURISDICTIONS DO NOT ALLOW SUCH EXCLUSIONS OR LIMITATIONS OF LIABILITY, SO THE ABOVE EXCLUSIONS OR LIMITATIONS MAY NOT APPLY TO YOU TO THE EXTENT THEY ARE CONTRARY TO APPLICABLE LAW OF YOUR JURISDICTION.
AUTOMATIC UPDATE FEATURE From time to time, SONY or the THIRD-PARTY SUPPLIERS may automatically update or otherwise modify the SOFTWARE, including, but not limited to, for purposes of enhancement of security functions, error
correction and improvement of functions, at such time as you interact with SONY's or third parties' servers, or otherwise. Such updates or modifications may delete or change the nature of features or other aspects of the SOFTWARE, including, but not limited to, functions you may rely upon. You acknowledge and agree that such activities may occur at SONY's sole discretion and that SONY may condition continued use of the SOFTWARE upon your complete installation or acceptance of such update or modifications. Any updates/modifications shall be deemed to be, and shall constitute part of, the SOFTWARE for purposes of this EULA. By acceptance of this EULA, you consent to such update/modification.
ENTIRE AGREEMENT, WAIVER, SEVERABILITY This EULA (and SONY's applicable privacy policy separately presented to you, if any), as amended and modified from time to time, constitute the entire agreement(s) between you and SONY with respect to the SOFTWARE. The failure of SONY to exercise or enforce any right or provision of this EULA shall not constitute a waiver of such right or provision. If any part of this EULA is held invalid, illegal, or unenforceable, that provision shall be enforced to the maximum extent permissible so as to maintain the intent of this EULA, and the other parts will remain in full force and effect.
GOVERNING LAW AND JURISDICTION The United Nations Convention on Contracts for the International Sale of Goods shall not apply to this EULA. This EULA shall be governed by the laws of Japan, without regards to conflict of laws provisions. Any dispute arising out of this EULA shall be subject to the exclusive venue of the Tokyo District Court in Japan, and the parties hereby consent to the venue and jurisdiction of such courts. The foregoing does not apply to you to the extent applicable law of your jurisdiction restricts or prohibits such agreements.
EQUITABLE REMEDIES
Notwithstanding anything contained in this EULA to the contrary, you acknowledge and agree that any violation of or non-compliance with this EULA by you will cause irreparable harm to SONY, for which monetary damages would be inadequate, and you consent to SONY obtaining any injunctive or equitable relief that SONY deems necessary or appropriate in such circumstances. SONY may also take any legal and technical remedies to prevent violation of and/or to enforce this EULA, including, but
not limited to, immediate termination of your use of the SOFTWARE, if SONY believes in its sole discretion that you are violating or intend to violate this EULA. These remedies are in addition to any other remedies SONY may have at law, in equity or under contract.
TERMINATION
Without prejudice to any of its other rights, SONY may terminate this EULA if you fail to comply with any of its terms. In case of such termination, you must: (i) cease all use, and destroy any copies, of the SOFTWARE; (ii) comply with the requirements in the section below entitled "Your Account Responsibilities".
AMENDMENT
SONY RESERVES THE RIGHT TO AMEND ANY OF THE TERMS OF THIS EULA AT ITS SOLE DISCRETION BY POSTING NOTICE ON A SONY DESIGNATED WEB SITE, BY EMAIL NOTIFICATION TO AN EMAIL ADDRESS PROVIDED BY YOU, BY PROVIDING NOTICE AS PART OF THE PROCESS IN WHICH YOU OBTAIN UPGRADES/UPDATES OR BY ANY OTHER LEGALLY RECOGNIZABLE FORM OF NOTICE. If you do not agree to the amendment, you should promptly contact SONY for instructions. Your continued use of the SOFTWARE after the effective date of any such notice shall be deemed your agreement to be bound by such amendment.
THIRD-PARTY BENEFICIARIES
Each THIRD-PARTY SUPPLIER is an express intended third-party beneficiary of, and shall have the right to enforce, each provision of this EULA with respect to the software of such party.
YOUR ACCOUNT RESPONSIBILITIES
Should you return your DEVICE to its place of purchase, sell or otherwise transfer your DEVICE, or if this EULA is terminated, you are responsible for and must, if reasonably possible, uninstall the SOFTWARE from the DEVICE and delete any and all accounts you may have established on DEVICE or are accessible through the SOFTWARE. You are solely responsible for maintaining the confidentiality of any accounts you have with SONY or third parties and any usernames and passwords associated with your use of the DEVICE.
Should you have any questions concerning this EULA, you may contact SONY by writing to SONY at the applicable contact address for each area or country.
Export Controls and Regulations
This product and its accessories may be covered and controlled by Japans export control regulations ("Foreign Exchange and Foreign Trade Law" and related laws and regulations) And, they are also under coverage of Export Administration Regulations of the U.S. When exporting and reexporting this product and its accessories, take necessary procedures on your responsibility and expense. For details, contact Ministry of Economy, Trade and Industry of Japan or US Department of Commerce.
Intellectual Property Right
About the Copyright and Portrait rights
Copyrighted contents you recorded or obtained from sites or Internet home pages using this product by downloading or other means, such as documents, images, music data, software, are prohibited from reproduction, transformation and transmission over public lines without consent of the copyright holders, unless intended for personal use or any other purpose permitted by law.
Note that some performances, shows, and exhibitions may not allow photography, movie shooting, or sound recording even for personal use.
You should also refrain from taking a picture of other people and disclosing it by such means as posting it on a site on the Internet without their consent because of possible infringement of their right of portrait.
Trademarks
- "FOMA", "sp-mode", "mopera", "mopera U", "WORLD WING", "WORLD CALL", "iD", "Xi", "my daiz", "LIVE UX", logo of "Osaifu-Keitai", logo of "iD", logo of "d CARD", logo of "dmenu", logo of "dmarket", logo of "dphoto", logo of "d Barai", logo of "Jspeak", logo of "Voice Mail Service", logo of "docomo phonebook", logo of "docomo Data Copy", and logo of "Data Storage BOX" are trademarks or registered trademarks of NTT DOCOMO, INC.
- "Bluetooth" is a registered trademark of Bluetooth SIG, Inc. and any use of such marks by Sony Group Corporation is under license.

Bluetooth
- Wi-Fi® and Wi-Fi Direct® are trademarks or registered trademarks of Wi-Fi Alliance.
- "Catch Phone (Call waiting service)" is a registered trademark of Nippon Telegraph and Telephone Corporation.
- PlayStation is a trademark or registered trademark or Sony Interactive Entertainment Inc.
- microSD logo, microSDHC logo and microSDXC logo are trademarks of SD-3C, LLC.



- USB Type- C^TM is a trademark of USB Implementers Forum.
• is a registered trademark of FeliCa Networks, Inc. - "Google" and "Google" logo, "Android", "Google Play" and "Google Play" logo, "Gmail" and "Gmail" logo, "Google Maps" and "Google Maps" logo, "Google Calendar" and "Google Calendar" logo, "YouTube" and "YouTube" logo, "Google Docs" and "Google Docs" logo, "Google Chrome" and "Google Chrome" logo, "Google Cast", "Google Assistant" and "Google Assistant" logo are trademarks or registered trademarks of Google LLC.
- Disney DX appli that Walt Disney Company (Japan) Ltd., its parent or their affiliates (collectively, "Disney") own, co-own or license copyright and other intellectual property rights. Please read the Disney+ Terms of Use before use.
• Facebook and Facebook logo are trademarks or registered trademarks of Facebook, Inc. - "Amazon", "Amazon.co.jp" and their logos are trademarks of Amazon.com, Inc. and its affiliates.
-
"Microsoft", "Windows", "Microsoft Excel" and "Microsoft PowerPoint" are trademarks or registered trademarks of Microsoft Corporation in the United States and other countries.
-
"Microsoft Word" is a product name of Microsoft Corporation in the United States.
- This product contains technology subject to certain intellectual property rights of Microsoft. Use or distribution of this technology outside of this product is prohibited without the appropriate license(s) from Microsoft.
- QR code is a registered trademark of Denso Wave Inc.
- iPhone is a trademark of Apple Inc., registered in the U.S. and other countries. The iPhone trademark is used under license from AiPhone Co., Ltd.
- This product is licensed under the MPEG-4 visual and AVC patent portfolio license for the personal and non-commercial use of a consumer for (i) encoding video in compliance with the MPEG-4 visual standard ("MPEG-4 video") or the AVC standard ("AVC video") and/or (ii) decoding MPEG-4 or AVC video that was encoded by a consumer engaged in a personal and non-commercial activity and/or was obtained from a video provider licensed by MPEG LA to provide MPEG-4 and/or AVC video. No license is granted or shall be implied for any other use. Additional information including that relating to promotional, internal and commercial uses and licensing may be obtained MPEG LA, L.L.C. (See https://www.mpegla.com). MPEG
Layer-3 audio decoding technology licensed from Fraunhofer IIS and Thomson.
- "Sony", "SONY" logo and any other product names, service names or logo marks used in this document are registered trademarks or trademarks of Sony or its affiliates. Other product names, service names, company names or logo marks are trademarked and copyrighted properties of their respective owners and/or licensors.
- FeliCa is a contactless IC card technology developed by Sony Corporation.
- Other product and company names mentioned herein may be the trademarks of their respective owners. In context, TM and ® mark are omitted.
- Any rights not expressly granted herein are reserved. All other trademarks are property of their respective owners.
SIM unlock
This terminal supports SIM unlock. If you release SIM lock, you can use SIM by a carrier other than NTT DOCOMO.
• Available services and functions may be limited. DOCOMO is not liable to any failures or malfunctions.
- For details of SIM unlock procedure, refer to NTT DOCOMO website.
1 Insert SIM card provided by other company.
2 Power on the terminal.
3 Enter the SIM unlock code▶ [UNLOCK].
Index
A
About phone 183
Access point Initializing 152
Setting 151
Accessibility 176
Accounts 175
Add account 175
Adjusting sound volume 166
Airplane mode 152
Alarm 141
Alarm ringtone 166
Alarm volume 166
Amazon Shopping 91
Anshin Security 89
Answering Machine 102
App info 158
App permissions 55
Appearance 157
Application Adding to the Home screen (docomo LIVE UX) 76
Adding to the Home screen (Xperia Home) 88
docomo LIVE UX 78
List 89
Resetting 160
Search (docomo LIVE UX) 78
Search (Xperia Home) 87
Uninstalling (docomo LIVE UX) 77
Uninstalling (Play Store) 131
Uninstalling (Xperia Home) 88
Xperia Home 87
Application screen docomo LIVE UX 78
Simple Home 84
Xperia Home 87
Application selection screen 54
Apps & notifications 157
Area Mail 116
Assistant 89
Automatically sync app data 175
Auto-rotate screen 52
B
Battery 162
Battery Care 38
Battery level 37
Bedtime 142
Bluetooth 186
Changing device name 186
Pair setting 186
Receiving 188
Sending 188
Bookmarks 120
Brightness level 163
C
Calculator 90
Calendar 90
Call 95
Answering with Answering Machine 98
Audio output 100
Calling screen 99
Declining a call 98
Ending 99
Hold call 99
Incoming screen 97
Making a call 95
Mute 99
Receiving 97
Speaker 100
Call Blocking 103
Call forwarding service 103
Call history 100
Adding to the phonebook 101
Deleting 101
Call History screen 100
Call notification 104
Call settings 103
Call waiting 103
Caller ID display request service 103
Caller ID notification 103
Camera 121
Activating 121
Capturing mode 123
Portrait selfie 128
Settings 126
Shooting photos 124
Shooting screen 122
Shooting videos 125
Still image size 124
Video size 124
Character entry 56
Editing 60
Input method 57
Settings 61
Tool icon 59
Charging 37
Using a PC 40
Using AC adapter 39
Using DC adapter 39
Chrome 117
Adding tab 118
Bookmarks 120
History 120
Incognito tab 118
Link 119
Searching text 118
Settings 119
Clock 141
Cloud menu 106
Configure notifications 160
Connection preferences 156
Contact docomo 103
Contactless payments 135
Contacts screen 105
D
d ACCOUNT 44
d Barai 92
d POINT 92
Data Copy 143
Data Saver 155
Data Storage BOX 90
Date & time 180
dcard 92
Device connection 156
Digital Wellbeing & parental controls ······ 177
Disaster Kit 90
Disney DX 92
Display 163
Display (touch screen) 47
Drag 47
Flick 47
Pinch 48
Scroll 48
Slide 47
Swipe 47
Tap 47
Touch and hold 47
dmarket 130
dmenu 130
docomo Data Copy 143
docomo mail 109
docomo service/cloud 174
Docs 90
dphoto 92
Drive 91
Duo 92
E
Early Warning "Area Mail" 116
Emergency call 95
English guidance 104
Enkaku support 214
F
Facebook 92
Files 184
Fingerprint authentication······ 172
Authentication 173
Registration 173
Flick input 59
FM radio 92
Function that allows users and a guest to use the terminal 182
G
Gboard 61
Gestures 180
Gmail 115
Google 178
Google account 43
Google Maps 138
Current location 139
Google One 93
Google Pay 93
Google Play Movies & TV 93
Google Search 73
Google Voice Search 73
GPS
Activate 138
GPS function 137
H
Home app
docomo LIVE UX 74
Simple Home 84
Switching 74
Xperia Home 81
Home screen 74
docomo LIVE UX 75
Folder (Xperia Home) 82
Settings (docomo LIVE UX) 77
Simple Home 84
Wallpaper (docomo LIVE UX) 77
Wallpaper (Xperia Home) 83
Widget (Xperia Home) 82
Xperia Home 81 Home Settings (Xperia Home) 83
|
iD application 135 In-call volume Setting 166 Initial settings 42 International call Making a call from Japan 97 Making a call in the place you stay 194 International roaming 190
J
Jspeak 91
K
Key icons 52 Kindle 93
L
Landscape view 52
Languages & input 179
LinkedIn 93
Listening volume 100
Location 169
Location services 137
Activate 138
Lock screen 164
M
Map application 90 McDonald's 91
Media volume 166
Memo 91
microSD card 34
Formatting 167
Unmounting 167
Missed call 101
Mobile network 149
Multiple users 182
Multi-tap input 60
Music 136
Playing 136
my daiz 93
my daiz NOW 80
My docomo 93
My Magazine 79
My profile 107
N
nano UIM card 31 Precautions 20 Network service 103 Network services (overseas) 197 Network & internet 146 News 91 NFC 132 Notification icon 63 Notification LED 62 Notification panel 64 Notification sound 166 Notification volume 166 Nuisance call blocking service 103
0
One-handed mode 72
Osaifu-Keitai 132
Lock 134
Osaifu-Keitai compatible service 134
Settings 133
Osusume Apps 79
P
Personal dictionary 61
Phone
Accessibility 104
Ringtone volume 98
When an application is running 99
Phonebook 104
Adding a new contact 105
Editing a contact 106
Exporting 108
Importing 108
Label (Group) setting 107
Making a call 106
My profile (editing) 107
Sharing 108
Top Contacts 106
Photos 129
PIN code 45
PIN Unlock Key (PUK code) 46
Play Store 131
Installing 131
Uninstalling 131
Podcasts 93
Portrait view 52
Power-saving function 162
Preferred network type 192
Privacy 168
Proximity/light sensor 30
PS App 93
Public mode (power OFF) settings 104
Q
Quick settings panel 66
QWERTY 57
R
Reader by Sony 93
Reject call with message 98
Remote operation settings 104
Remove account 175
Reset 181
Ring volume 166
Ringtone 166
Roaming settings 196
S
Schedule
Creating 140
Display 139
Screen lock 171
Setting 170
Unlocking 42
Screen Record 54
Searching 73
Security 169
Security code
Network security code 45
PIN code 45
PIN Unlock Key (PUK code) 46
Setting menu 145
Sheets 90
Shooting photos 124
Shooting videos 125
Side sense 48
Moving the side sense bar 49
Multi-window menu 51
Setting 164
Side sense menu 50
Silent mode 52
SIM card lock 46
SIM unlock 234
Simple Home 84
Sleep mode 41
Slides 90
SMS 112
Software keyboard 56
Software Update 208
Sound 165
Specific Absorption Rate (SAR) 219
Specification 216
Split screen 68
STAMINA mode 162
Status bar 62
Status icon 63
Stopwatch 142
Storage 167
Internal shared storage 184
microSD card 34
SuguApp 69
Suguden setting 69
System 178
T
Take screenshot 53
Task manager 67
Tethering 152
Bluetooth tethering 154
Portable hotspot 153
USB tethering 154
Text editing 60
Text-to-speech output 177
Timer 142
Troubleshooting 199
Turning power on/off 41
U
USB connection 189
USB Storage 167
V
Vibration
Silent mode 53
Sound 165
Video & TV SideView 93
Voice search 73
Voicemail service 103
VPN 155
W
Wallpaper
docomo LIVE UX 77
Xperia Home 83
Waterproofness/Dustproofness 24
White balance 165
Wi-Fi 146
Wi-Fi Direct 149
WORLD CALL 97
World clock 141
WORLD WING 190
X
Xperia cover 94
Xperia guide 94
Xperia Lounge Japan 94
Xperia Transfer 2....94
Y
YouTube 94
YT Music 94
Symbols
+Message 109
Deleting a message 113
Deleting a thread 113
Forwarding 113
Official Account 114
Receiving 113
Sending 111
Setting 114
Numerics
12 keys 57
4G calling 193
Check usage charge, usage status, subscription information, or make various application online
The terminal: d メニュー (dmenu) ▶ [My docomo]
PC: My docomo (https://www.nttdocomo.co.jp/mydocomo/) (in Japanese only)
* There are cases where the site may not be available due to system maintenance, etc.
*To use "My docomo", "Network security code" and "ID/password of d ACCOUNT" are required.
Don't forget your mobile phone ... or your manners!
Remember to be courteous to others when you use your terminal.
Turn the power off when you are:
In places where use is prohibited Follow the instructions of each airline or medical facility for the use of mobile phones on their premises. Power off the terminal in a place where the use is prohibited.
Always set to public mode in case below
- Driving Be careful about using the terminal while driving a car etc. Unless required by laws and regulations, gazing at the screen of the terminal or holding the terminal in your hand for calling while driving is subject to penalties.
In public spaces such as theaters, cinemas, art galleries, or libraries Using the terminal in a public place, where you need to be quiet, annoys people around you.
Keep your voice and ring tone down
- Keep your voice down in quiet places like restaurants and hotel lobbies.
If you are in an outdoor public place, make sure you do not disturb others.
Respect privacy
Please be considerate of the privacy of individuals around you when taking and sending photos using camera-equipped terminals.
Do not use smartphone while walking
It is very dangerous to look at a display of smartphone or mobile phone while walking. That extremely narrows your field of view, and may lead an accident possibly involving surrounding people.
- Stop and stay in a safe place and then use smartphone.
Have good manners
【Silent mode】(P.52)
Silent mode mutes the sounds of the terminal such as the operation sounds and the ringtone.
* Shutter sound cannot be muted.
【Public mode (power OFF)】(P.104)
Tells the caller via a guidance message that receiver need to turn the power off, and the call ends automatically.
[Vibrate] (P.165)
Vibrates when there is an incoming call.
【Answering Machine】(P.102)
When you cannot answer a call, the terminal records a message from the caller.
You can also use optional services such as the Voice Mail Service (P.103) and Call Forwarding Service (P.103).
We collect old phones, etc. regardless of brands and manufacturers. Bring them to your nearest docomo Shop.
* Items to be collected: mobile phones, PHS, battery packs, chargers, desktop holders (regardless of brands and manufacturers)
General Inquiries

0120-005-250 (toll free)
*Service available in: English, Portuguese, Chinese, Spanish.
*Unavailable from part of IP phones.
(Business hours: 9:00 a.m. to 8:00 p.m.)
■From DOCOMO mobile phones (In Japanese only)

(No prefix) 151 (toll free)
*Unavailable from land-line phones, etc.
■From land-line phones (In Japanese only)

0120-800-000 (toll free)
*Unavailable from part of IP phones.
(Business hours: 9:00 a.m. to 8:00 p.m. (open all year round))
●Please confirm the phone number before you dial.
●For Applications or Repairs and After-Sales Service, please contact the above-mentioned information center or the docomo Shop etc. near you on the NTT DOCOMO website.
●For Online Repair Acceptance Service (in Japanese only), refer to NTT DOCOMO website.
NTT DOCOMO website https://www.nttdocomo.co.jp/english/
Repairs (Inquiries/Request)
■From DOCOMO mobile phones (In Japanese only)
(No prefix) 113 (toll free)
*Unavailable from land-line phones, etc.
■From land-line phones (In Japanese only)
0120-800-000 (toll free)
*Unavailable from part of IP phones.
(Business hours: 24 hours (open all year round))
Inquiries while overseas (For loss, theft, phone malfunctions, etc.)
From DOCOMO mobile phones (In Japanese only)
Display "+" -81-3-6832-6600 (toll free)
(Touch and hold "0" to enter "+".)
*You can also call using the international call access number instead of using "+".
(Business hours: 24 hours (open all year round)) (Business hours: 24 hours (open all year round))
●Please confirm the phone number before you dial.
●If you lose your terminal or have it stolen, immediately take the steps necessary for suspending the use of the terminal.
●If the terminal you purchased is damaged, bring your terminal to a repair counter specified by DOCOMO after returning to Japan.
For subscriber of ahamo plan
■Inquiries about repairs etc.
ahamo website
https://ahamo.com/
SONY®
From land-line phones
International call access number of your country of stay -81-3-6832-6600 (charges apply)
*Voice communication charges to Japan apply.
*For international call access number, refer to DOCOMO website.

危険です、歩きスマホ。

キケン! 水ぬれ充電

あぶない! 電池への衝撃

Sales: NTT DOCOMO, INC.
Manufacturer: Sony Corporation
21.4 (Edition 1.1) F-553-100-11(1)
- About manuals
- [How to use]
- Note
- Operation descriptions
- Information
- Supplied accessories
- Contents
- ■ Supplied accessories.... 1
- Precautions 4
- Before using the terminal . . . 30
- Basic operations .....47
- Home screen 74
- Phone/Phonebook.....95
- Mail/Web browser .....109
- Camera/Photos.....121
- Apps 130
- Settings 145
- File management ..... 184
- Data communication.....186
- External device connection. .189
- International roaming .....190
- Appendix .....199
- Index....235
- Precautions
- About using the terminal
- Recommended features
- Camera
- Multi-window
- Safety Precautions (Always follow these directions)
- Handling the terminal, adapter, and nano UIM card (common)
- DANGER
- WARNING
- CAUTION
- Handling the terminal
- Handling the adapter
- Handling the nano UIM card
- Handling the terminal near electronic medical equipment
- Material list
- Handling precautions
- ■ Common precautions
- ■ The terminal precautions
- ■ Precautions for the adapter
- ■ nano UIM card precautions
- Bluetooth® function precautions
- - Frequency band
- - Bluetooth cautions
- ■ Wireless LAN (WLAN) precautions
- - Wireless LAN
- • 2.4GHz device cautions
- - 5GHz device cautions
- FeliCa® and NFC reader/writer function precautions
- Waterproofness/Dustproofness
- What you can do with waterproofness/dustproofness of SO-41B
- To ensure waterproofness/dustproofness
- ■ Opening the cover of nano UIM card/microSD card slot
- ■ Closing the cover of nano UIM card/microSD card slot
- Important precautions
- Observe the following precautions to use the terminal properly.
- Draining water from the terminal
- Notes on charging
- Check the following before and after charging.
- Before using the terminal
- Part names and functions
- nano UIM card
- Nano UIM card is an IC card which stores information such as your phone number.
- ■ Security codes of nano UIM card
- Installing nano UIM card
- Removing nano UIM card
- microSD card
- You can save the data in the terminal to a microSD card or import data from the microSD card to the terminal.
- Installing microSD card
- Removing microSD card
- Charging
- Available time on full charge (estimate)
- Life of the internal battery
- Before charging
- Saving battery life (Battery Care)
- Charging with AC adapter
- Charging with DC adapter
- Charging with a PC
- FCC ID
- Turning power on/off
- Turning power on
- Press and hold the power key until the screen turns on.
- Unlock the screen lock.
- Turning power off
- Press and hold the power key for at least 1 second.
- [Power off].
- Setting sleep mode
- Press the power key.
- Unlocking the screen lock
- On the lock screen, swipe (flick) the screen.
- Initial settings
- [GET STARTED].
- When the docomo initial setting screen appears, confirm the content▶[Next].
- When the setup completion screen appears, [FINISH].
- Setting up a Google account
- From the Home screen, [Settings]▶[Accounts]▶[Add account]▶[Google].
- Setting up d ACCOUNT
- From the Home screen, tap [Settings]▶[docomo service/cloud]▶[d ACCOUNT setting].
- [Set your d ACCOUNT]/[Create new d ACCOUNT].
- Security codes for the terminal
- ■ Notes on the security codes
- ■ PIN/Password for screen lock
- ■ Network security code
- PIN code
- PIN Unlock Key (PUK code)
- Setting a PIN code
- Unlocking PIN lock
- Changing the PIN code
- Basic operations
- Using the display (touch screen)
- Precautions on using the display (touch screen)
- Operations on the display (touch screen)
- Scroll
- Pinch
- Using Side sense
- Moving the side sense bar
- Touch and hold the side sense bar.
- Drag it to a desired location.
- Using the Side sense menu
- Double-tap the side sens bar.
- Using the Multi-window menu
- Slide the side sense bar up
- Basic key icon operation
- Switching portrait or landscape view automatically
- Setting Silent mode
- Setting Silent mode (Vibrate)
- Setting Silent mode (Mute)
- Capturing the displayed screen
- Recording the displayed screen Selecting an application to use
- Setting an application's permissions
- From the Home screen, ▶[Schedule].
- [OK].
- [ALLOW]/[DENY]
- Character entry
- Switching the input method
- While entering characters, tap at the bottom of the screen.
- Select the input method you want to use.
- Software keyboard
- Adding the layout for Japanese keyboard
- Character input method
- nformation
- Using the tool icon
- Multi-tap input
- Editing text
- Touch and hold text.
- Drag / to up/down/left/right to select range of the text.
- Tap the item in the edit menu.
- Personal dictionary
- Setting character entry
- Notification LED
- Screen display and the icons
- Status bar
- Status icon
- Notification icon
- Notification panel
- Drag the status bar down.
- Quick settings panel
- Drag the status bar down with two fingers.
- Task manager
- □.
- Split screen
- SuguApp
- From the Home screen, tap [Settings]▶[docomo service/cloud]▶[SuguApp].
- Suguden setting
- From the Home screen, ▶ : .
- [Settings]▶[Calls]▶[Suguden setting].
- Notes on using Suguden
- Functions of Suguden
- - Disconnect (Motion)
- - Disconnect (Voice command)
- - Dialing
- ● Mute, Reject
- ● Disable Suguden during roaming
- One-handed mode
- Reduce the screen so that you can easily operate the terminal with one-hand.
- Double-tap □.
- Searching information in the terminal and websites
- Using Google Voice Search
- Home screen
- Switching the home app
- docomo LIVE UX
- Home screen layout
- Managing the Home screen
- Moving application icon shortcut etc.
- Adding an application icon shortcut
- Removing an application icon shortcut from the Home screen
- Removing a widget etc.
- Uninstalling an application
- Renaming folder
- Setting the Home screen
- Application screen
- Using Osusume Apps
- From the Home screen,
- [Osusume Apps].
- Select an application or service.
- Viewing articles
- Tap an article you want to read.
- Setting the display category
- my daiz NOW
- Displaying my daiz NOW
- In the leftmost page of the Home screen, swipe (flick) right.
- Tap a card you want to read.
- Setting the display
- Home app information
- Xperia Home screen
- Adding folders on the Home screen
- From the Home screen, touch and hold an icon▶Drag it over another icon.
- Adding a widget to the Home screen
- Touch and hold an area of the Home screen where no icons, etc. are displayed.
- [Widgets]▶ Touch and hold a widget to add.
- Changing wallpaper
- Setting Home screen
- [Home settings].
- Simple Home screen
- Using Speed dial
- Saving contacts
- Making a call
- Sending a message of +Message/email
- Using Settings
- Changing applications on the Simple Home screen
- Adding an application to the Home screen
- In the Application screen, touch and hold an application icon.
- Drag it a little in any direction.
- In the Application screen, touch and hold the icon of application you want to uninstall.
- [App info].
- [UNINSTALL].
- [OK].
- Editing the Application screen
- Application list
- Osaifu-Keitai
- Osusume Apps\*1
- Calendar
- Disaster Kit
- Schedule
- Sheets
- Slides
- Settings
- 地図アプリ (Map application)
- Data Copy
- Calculator
- Phone
- Docs
- Clock
- docomo phonebook
- docomo mail
- Drive
- Instruction Manual
- News
- Jspeak
- Photos
- マクドナルド (McDonald's)
- Maps
- Music
- Memo
- Amazon Shopping
- Chrome
- d払い(d Barai)
- dphoto
- d ポイント (d POINT)
- dmarket
- dメニュー(dmenu)
- dcard
- Disney DX
- Duo
- Files
- FM radio
- Gmail
- Google One
- Google Pay
- Google Movies & TV
- Kindle
- my daiz
- My docomo
- Play Store
- Podcasts
- PS App
- Reader by Sony
- Video & TV SideView
- Xperia Lounge Japan
- Xperia Transfer 2
- YouTube
- YT Music
- +Message
- Phone/Phonebook
- Making/Receiving a call
- Entering pause (,) / (;) to send
- Making an international call (WORLD CALL)
- Receiving a call
- Answering calls with Answering Machine
- On the incoming call screen, drag the status bar down▶ [Answering Machine].
- Muting the ringtone for an incoming call
- While receiving a call, press the volume key or the power key.
- Declining a call
- On the incoming call screen, swipe (flick) 📞.
- Rejecting an incoming call and sending a message
- On the incoming call screen, swipe (flick) ☐.
- Tap a message to send.
- Receiving a call when an application is running
- [ANSWER].
- When the call is finished,
- Operations during a call
- Adjusting the listening volume
- During a call, press the volume up or down key.
- Call history
- Displaying the call history
- From the Home screen, 📄▶Tap "Call History" tab
- Call History screen
- Adding a phone number from the call history to the phonebook
- Deleting a call history
- Displaying missed calls
- Answering Machine
- Checking the Answering Machine message in the status bar
- Drag the status bar down▶Tap notification from Answering Machine.
- Call settings
- Network service settings
- Accessibility
- From the Home screen, ▶ : . 2 [Settings]▶ [Accessibility].
- Phonebook
- Displaying phonebook
- From the Home screen, [docomo phonebook]
- Contacts screen
- Managing phonebook
- Adding a new contact
- From the Home screen, ▶▶[docomo phonebook]▶+
- On the profile edit screen, enter necessary information such as name.
- [SAVE].
- Making a call from the phonebook
- Editing a contact
- Adding a contact to Top Contacts
- Using menu
- Setting label (group) to contacts
- [Create label].
- Set a name of label (group)▶[OK].
- ▶ Tap a contact to set the label (group).
- Checking my profile and editing the information
- Importing/Exporting/Sharing phonebook entries
- From the Home screen, [docomo phonebook] [Settings] [Export]/[Import].
- Select the option for export or import▶Select the item.
- Mail/Web browser
- From the Home screen, [+Message].
- Contact list screen
- Message list screen
- Sending a message
- Short Message Service (SMS) information
- +Message information
- Reading a message
- Forwarding a message
- Deleting a message
- Deleting a thread
- Changing the settings of +Message
- Using the Official Account feature
- Sending Gmail
- Refreshing Gmail
- Early Warning "Area Mail"
- Receiving Early Warning "Area Mail"
- Checking received Area Mail later
- Deleting Area Mail
- Viewing websites
- Adding a new tab
- Opening incognito tab
- Changing tabs
- Closing a tab
- Searching text in a web page
- Changing Chrome settings
- From the Home screen, tap
- : ▶[Settings].
- Operating links
- Managing bookmarks and history
- Bookmarking a website
- Opening a bookmark
- Checking history
- Camera/Photos
- ■ About the Copyright and Portrait rights
- Activating the camera
- From the Home screen, [Camera].
- Shooting screen
- Capturing mode
- Shooting in "PHOTO", "VIDEO" mode
- Changing the capturing mode
- ■ Main capturing mode and Still image size/Video size
- Notes on shooting with Panorama
- Shooting photos
- ■ Shooting with the shutter icon
- ■ Shooting with the volume key
- Swipe (flick) the screen to display "PHOTO" mode shooting screen.
- Press the volume key.
- Shooting videos
- ■ Shooting with the start/stop icon
- Swipe (flick) the screen to display the shooting screen in "VIDEO" mode.
- Tap the start shooting icon (1)
- Tap the stop icon (D)
- Changing settings when shooting
- Changing from the menu
- ▶ Select a setting item.
- Change the setting.
- i
- ■ Self-timer : "PHOTO" mode\*
- Save location
- Grid lines
- Use Volume key as
- Data storage
- Changing settings using icons
- Tap the icon displayed on the shooting screen to change the setting.
- Brightness/shade of color : "PHOTO", "VIDEO" mode
- HDR : "PHOTO" mode
- Displaying photos or videos
- From the Home screen, [Photos].
- Tap the image or video.
- Deleting files (photo, video)
- Touch and hold a file to delete.
- ▶[Move to trash].
- Apps
- dメニュー (dmenu)
- From the Home screen, [dメニュー (dmenu)].
- From the Home screen, [dmarket].
- Installing an application
- Notes on hovering over the device
- Enabling the NFC/Osaifu-Keitai function
- Using "Osaifu-Keitai compatible service"
- Locking the Osaifu-Keitai function
- Setting "NFC/Osaifu-Keitai lock ON/OFF"
- [NFC/Osaifu-Keitai]▶ of "NFC/Osaifu-Keitai lock ON/OFF".
- NFC
- Using the contactless payments
- Playing music data
- Sharing music
- Location services
- GPS function
- ■ Where radio waves are difficult to receive
- Activating GPS/Location services
- Using Google Maps
- Finding the current location on the map
- From the Home screen, [Google] ▶[Maps].
- Displaying schedule
- Creating schedule event
- Displaying events of Schedule
- Setting display conditions in Schedule
- Setting an alarm
- Enabling/Disabling alarm
- Stopping alarm
- Using World clock
- Using Timer
- Using Stopwatch
- Using Bedtime
- docomo Data Copy
- Data transfer
- From the Home screen, 🕐▶ [Data Copy]▶ [Data transfer].
- Backing up/Restoring
- Backup
- Restore
- Copying phonebook entries to docomo account
- Viewing the Settings menu
- Network & internet
- Wi-Fi
- ■ Reception interference caused by Bluetooth devices
- Turning on Wi-Fi
- From the Home screen, [Settings]▶[Network & internet].
- of "Wi-Fi".
- Connecting to a Wi-Fi network
- Deleting connecting Wi-Fi network setting
- [FORGET].
- Adding a Wi-Fi network manually
- Setting up Wi-Fi
- Using the Wi-Fi Direct function
- Mobile network
- Enabling/Disabling mobile data communication
- Setting Data warning & limit
- Setting an access point
- - Checking the access point in use
- ■ Initializing an access point
- Airplane mode
- Using tethering function
- Enabling Portable hotspot
- Changing the portable hotspot settings
- Enabling USB tethering
- Connect the terminal to a PC with USB cable A to C 02 (optional) etc. (P.40).
- From the Home screen, [Settings]▶ [Network & internet]▶ [Hotspot & tethering].
- of "USB tethering".
- Enabling Bluetooth tethering
- From the Home screen, [Settings]▶[Network & internet]▶[Hotspot & tethering].
- of "Bluetooth tethering".
- Data Saver
- Connecting to a VPN (Virtual Private Network)
- Adding a VPN
- Connecting to a VPN
- Device connection
- From the Home screen, [Settings]▶ [Device connection].
- Setting Connection preferences
- From the Home screen, [Settings]▶[Device connection]▶[Connection preferences].
- Appearance
- Apps & notifications
- App info
- Managing applications
- From the Home screen, [Settings]▶[Apps & notifications]▶[SEE ALL XX APPS].
- Tap an application.
- Force-stopping an application
- Tap the application to force-stop.
- [FORCE STOP]▶ Confirm the content of the screen and then [OK].
- Uninstalling applications
- Disabling application
- Resetting application setting
- Configure notifications
- Battery
- Display
- Adjusting the screen brightness
- Setting the lock screen
- From the Home screen, [Settings]▶ [Display]▶ [Lock screen].
- Setting Side sense
- From the Home screen, [Settings]▶[Display]▶[Advanced]▶[Side sense].
- 2
- Adjusting the white balance
- Sound
- Adjusting each sound volume
- Setting the ringtone/ notification sound/alarm ringtone
- Storage
- Privacy
- Location
- Security
- Setting screen unlock method
- Locking the screen
- Setting up fingerprint authentication
- Notes on using fingerprint authentication
- Precautions for using the fingerprint sensor
- Registering your fingerprint
- From the Home screen, [Settings]▶[Security]▶[Fingerprint Manager].
- Select the screen lock unlocking method.
- Using your fingerprint for authentication
- When the lock screen is displayed, touch the fingerprint sensor with the registered finger.
- docomo service/cloud
- From the Home screen, [Settings]▶[docomo service/cloud].
- Accounts
- Adding accounts
- Removing an account
- Setting auto-sync of accounts
- Synchronizing manually
- Setting Text-to-speech output
- From the Home screen, [Settings] ▶ [Accessibility] ▶ [Text-to-speech output].
- Digital Wellbeing & parental controls
- Google System
- From the Home screen, [Settings]▶[Google].
- Set each item.
- Languages & input
- From the Home screen, [Settings]► [System]► [Languages & input].
- Changing the phone language
- Gestures
- Date & time
- Resetting the terminal
- Multiple users
- About phone
- File management
- Storage structure
- Phone (Internal shared storage)
- microSD card (External storage)
- File operations
- From the Home screen, [Files].
- [Internal storage] of "STORAGE DEVICES".
- Tap the folder as required.
- Tap a file.
- Creating a folder
- ■ Renaming a folder or file
- - Deleting a folder or file
- ■ Copying/Moving a folder or file
- Data communication
- Bluetooth function
- ■ Reception interference caused by wireless LAN devices
- Making the terminal detectable
- From the Home screen, [Settings]▶[Device connection].
- [Pair new device].
- Making pair setting for the terminal and Bluetooth device
- Connecting the terminal with a Bluetooth device
- Disconnecting a Bluetooth device
- Sending/Receiving data via Bluetooth function
- Sending data via Bluetooth function
- Receiving data
- External device connection
- Connecting to PC
- Connecting to PC with USB cable A to C
- [ALLOW].
- Removing USB cable A to C safely
- Confirm that it is not transferring data, remove the USB cable A to C from the terminal and a PC.
- International roaming
- ■ Supporting networks
- Before using overseas
- Before leaving Japan
- Subscription
- ■ Usage charge
- Advance preparation
- After arriving overseas
- Connectivity
- Settings for overseas use
- Setting data roaming
- Setting network
- Setting the preferred network type
- Select the preferred network type to set.
- Using VoLTE during international roaming
- Date & time settings
- About inquiries
- Making/Receiving a call in the place you stay
- Making a call to outside the place you stay (including Japan)
- Making an international call using International dial assist
- 3
- 4
- Making a call within the place you stay
- Making a call to WORLD WING user overseas
- Receiving a call in the place you stay
- Making a call from the other party
- International roaming settings
- Setting International dialing assist
- Setting Network service (overseas)
- [Network service/roaming settings].
- [Roaming settings]▶ [Network service].
- After returning to Japan
- Appendix
- Troubleshooting
- Software Update
- Terms of use
- Updating the software
- Starting the update
- Flow of updating
- Download an update file and install.
- Restart.
- Notification of update completion.
- Notes
- Connecting to a PC to update
- Warranty and After Sales Services
- Warranty
- Free repair service provisions
- After Sales Services
- If you have problems with the terminal
- For repair
- Created data and download information
- Sharing screens with the operator (for inquiries on phone)
- From the Home screen, [遠隔サポート (Enkaku support)].
- [接続画面に進む (Go to the connection screen)]▶[同意する (Agree)].
- Enter the connection number notified by DOCOMO▶[開始(Start)].
- Enkaku support starts when you are connected.
- Checking in Q & A site
- ■ Display language
- Entry language
- Certificate and compliance
- VCCI
- Specific Absorption Rate of Mobile Phone, etc.
- Specific Absorption Rate (SAR) Information of Mobile Phones
- Radio Wave Exposure and Specific Absorption Rate (SAR) Information
- Important Information United States
- Europe
- FCC Statement for the USA
- END USER LICENSE AGREEMENT
- SOFTWARE LICENSE
- COPYRIGHT
- GRANT OF LICENSE
- REQUIREMENTS AND LIMITATIONS
- EXCLUDED SOFTWARE AND OPEN SOURCE COMPONENTS
- USE OF SOFTWARE WITH COPYRIGHTED MATERIALS
- CONTENT SERVICE
- NETWORK CONNECTIVITY AND THIRD PARTY SERVICES
- EXPORT AND OTHER REGULATIONS
- HIGH RISK ACTIVITIES
- EXCLUSION OF WARRANTY ON SOFTWARE
- EQUITABLE REMEDIES
- TERMINATION
- AMENDMENT
- THIRD-PARTY BENEFICIARIES
- YOUR ACCOUNT RESPONSIBILITIES
- Export Controls and Regulations
- Intellectual Property Right
- About the Copyright and Portrait rights
- Trademarks
- SIM unlock
- Index
- A
- B
- C
- D
- E
- F
- G
- H
- |
- J
- K
- L
- M
- N
- 0
- P
- Q
- R
- S
- T
- U
- V
- W
- X
- Y
- Symbols
- Numerics
- Check usage charge, usage status, subscription information, or make various application online
- Don't forget your mobile phone ... or your manners!
- Remember to be courteous to others when you use your terminal.
- Turn the power off when you are:
- Always set to public mode in case below
- Keep your voice and ring tone down
- Respect privacy
- Do not use smartphone while walking
- Have good manners
- General Inquiries
- Repairs (Inquiries/Request)
- Inquiries while overseas (For loss, theft, phone malfunctions, etc.)
- From land-line phones
Brand : SONY
Model : Xperia Ace II
Category : Telephone