
EWF1141SEWA - Washing machine ELECTROLUX - Free user manual and instructions
Find the device manual for free EWF1141SEWA ELECTROLUX in PDF.


| Product Type | Freestanding Washing Machine |
| Energy Class | A+++ |
| Capacity (kg) | 11 kg |
| Spin Speed | 1400 rpm |
| Dimensions (HxWxD) mm | 850 x 600 x 620 mm |
| Weight | 75 kg |
| Power Supply | 220-240 V ~ 50 Hz |
| Water Consumption per Cycle | 52 L |
| Annual Energy Consumption | 195 kWh |
| Noise Level Wash/Spin | 49 dB / 76 dB |
| Programs | Cotton, Synthetics, Delicates, Wool, Quick 30', Steam, etc. |
| Display | LED Digital Display |
| Safety Features | Child Lock, Overflow Protection, Unbalanced Load Control |
| Drum Material | Stainless Steel |
| Door Hinge | Left |
| Controls | Electronic with Rotary Knob and Touch Buttons |
| Delay Start | Up to 24 hours |
| Self Cleaning | Drum Clean Program |
| Spare Parts Availability | Minimum 10 years |
Frequently Asked Questions - EWF1141SEWA ELECTROLUX
User questions about EWF1141SEWA ELECTROLUX
0 question about this device. Answer the ones you know or ask your own.
Ask a new question about this device
Download the instructions for your Washing machine in PDF format for free! Find your manual EWF1141SEWA - ELECTROLUX and take your electronic device back in hand. On this page are published all the documents necessary for the use of your device. EWF1141SEWA by ELECTROLUX.
USER MANUAL EWF1141SEWA ELECTROLUX
WI-FI CONNECTIVITY SETUP 48
WI-FI CONNECTIVITY SETUP 97
WI-FI CONNECTIVITY SETUP 145
EASY WAY TO REGISTER YOUR
PRODUCT WITH YOUR SMARTPHONE
Photograph the camera icon located on your product's serial tag, including the 4 dots (©).


Send it in via Line, Facebook Messenger or go online.
@eluxreg eluxreg eluxreg.com
Enjoy many privileges.*
*Terms and conditions apply.

Electrolux
IMPORTANT INFORMATION THAT MAY IMPACT YOUR MANUFACTURER'S WARRANTY
Adherence to the directions for use in this manual is extremely important for health and safety. Failure to strictly adhere to the requirements in this manual may result in personal injury, property damage and affect your ability to make a claim under the Electrolux manufacturer's warranty provided with your product. Products must be used, installed and operated in accordance with this manual. You may not be able to claim on the Electrolux manufacturer's warranty in the event that your product fault is due to failure to adhere to this manual.
WE'RE THINKING OF YOU
Thank you for purchasing an Electrolux appliance. You've chosen a product that brings with it decades of professional experience and innovation. Ingenious and stylish, it has been designed with you in mind. So whenever you use it, you can be safe in the knowledge that you'll get great results every time. Welcome to Electrolux.
Visit our website to:

Get usage advice, brochures, trouble shooter, service information, buy accessories & spare parts, online product registration : www.electrolux.com
CUSTOMER CARE AND SERVICE
We recommend the use of original spare parts. When contacting Service, ensure that you have the following data available. The information can be found on the rating plate. Model, PNC, Serial Number.
⚠ Warning / Caution-Safety information.
i General information and tips
Environmental information.
Subject to change without notice.
CONTENTS
1. SAFETY INFORMATION ...... 4
1.1 Conditions Of Use 4 1.2 Child Safety 5 1.3 General Safety 5 1.4 Installation 6 1.5 Use....6
2. PRODUCT DESCRIPTION ..... 7
2.1 Parts....7 2.2 Accessories 8 2.3 Load Sensor....9 2.4 The Autodose Technology (Autodosing)....10
3. CONTROL PANEL....11
3.1 Control Panel Description ..... 11 3.2 Program Chart......12 3.3 Program Options Compatibility 14 3.4 Options....14 3.5 Settings 17 3.6 Start/Pause (▷∥) and Add Clothes ( )Touchpad ... 18
4. BEFORE FIRST USE 18
5. DAILY USE 19
5.1 Loading The Laundry 19 5.2 Detergent Dispenser With Autodose Tanks And Manual Compartments....19 5.3 Options Setting......25 5.4 Starting A Cycle (▷) ..... 26 5.5 Interruption Of A Program ..... 26 5.6 Changing A Program 26 5.7 Changing The Options 26 5.8 Opening The Door....26 5.9 At The End Of The Program....27 5.10 When The Washing Program Is Completed, But There Is Water In The Drum....27 5.11 AUTO Off Mode 27
6. WASHING HINTS......28
6.1 Sorting The Laundry......28 6.2 Temperatures 28 6.3 Before Loading The Laundry...28 6.4 Maximum Loads 28 6.5 Removing Stains 28 6.6 Detergents Type And Quantity Of Detergent....29
7. INTERNATIONAL WASH CODE SYMBOLS 30
- CARE AND CLEANING......31 8.1 External Cleaning....31 8.2 Descaling 31 8.3 After Each Wash....31 8.4 Maintenance Wash With "Tub Clean" Program....31 8.5 Cleaning The Detergent Dispenser And The Autodose Tanks....31 8.6 Cleaning The Pump......33 8.7 Cleaning The Water Inlet Filter.35 8.8 Frost Precautions 37
- TROUBLESHOOTING 38 9.1 Possible Failures 38 9.2 Emergency Door Opening......41
10. TECHNICAL DATA 42
- INSTALLATION....42 11.1 Unpacking......42 11.2 Positioning 44 11.3 Water Inlet 45 11.4 Water Drainage 45 11.5 Electrical Connection......47
- ENVIRONMENT CONCERNS .... 47 12.1 Packaging Materials......47 12.2 Old Machine 47 12.3 Ecological Hints......47
- Wi-Fi CONNECTIVITY SETUP 48 13.1 Installing and configuring "Electrolux Life" App. 48 13.2 Remote Start 49
1. SAFETY INFORMATION
1.1 Conditions Of Use
This appliance is intended to be used in household and similar applications such as:
- staff kitchen areas in shops, offices and other working environment;
- farm houses;
- by clients in hotels, motels, and other residential type environments; • bed and breakfast type environments;
- areas for communal use in blocks of flats or in launderettes.
WARNING! The appliance must not be supplied through an external switching device, such as timer, or connected to a circuit that is regularly switched on and off by utility.
In the interest of your safety and to ensure the correct use, before installing and first using the appliance, read this user manual carefully, including its hints and warnings.
To avoid unnecessary mistakes and accidents, it is important to ensure that all people using the appliance are thoroughly familiar with its operation and safety features.
Save these instructions and make sure that they remain with the appliance if it is moved or sold, so that everyone using it through its life will be properly informed on appliance use and safety.
1.2 Child Safety
- This washing machine is not intended for use by young children or infirm persons without supervision.
- Young children should be supervised to ensure that they do not play with the appliance.
- The packaging components (e.g. plastic film, polystyrene) can be dangerous to children - danger of suffocation! Keep them out of children's reach.
- Keep all detergents in a safe place out of children's reach.
- Make sure that children or pets do not climb into the drum.
- This machine is provided with child safety lock option (☐) to prevent children playing with the control panel. (see page 17)
1.3 General Safety
- It is dangerous to alter the specifications or attempt to modify this product in any way.
- During high temperature wash program the door glass may get hot. Do not touch it!
- Make sure that small pets do not climb into the drum. To avoid this, please check inside the drum before using the appliance.
- Any objects such as coins, safety pins, nails, screws, stones or any other hard, sharp material can cause extensive damage and must not be placed into the machine.
- Wash small items such as socks, laces, washable belts etc in a washing bag or pillow case as it is possible for such items to slip down between the tub and the inner drum.
- Only use manufacturer's recommended quantities of fabric softener and detergent. Damage to the fabric or appliance can occur if you exceed the recommended amount.
- Do not use your washing machine to wash articles with whalebones, material without hems or torn material.
- Always unplug the appliance and turn off the water supply after use, cleaning, and maintenance.
- This appliance is not intended for use by persons (including children) with reduced physical, sensory, or mental capabilities, or lack of experience and knowledge, unless they have been given supervision or instruction concerning use of the appliance by a person responsible for their safety.
- Under no circumstances should you attempt to repair the machine yourself. Repairs carried out by inexperienced persons may cause injury or serious malfunctioning. Contact your local Service Centre. Always insist on genuine spare parts.
For safety reasons, do not use double adaptors, extension cords, or multi-plug adapters.

1.4 Installation 1.5 Use
- This appliance is heavy. Care should be taken when moving it.
- When unpacking the appliance, check that it is not damaged. If in doubt, do not use it and contact the Service Centre.
- All packing and transit bolts must be removed before use. Serious damage can occur to the product and to property if this is not adhered to. See the relevant section in the user manual.
- After having installed the appliance, check that it is not standing on the inlet and drain hose and that the worktop is not pressing the electrical supply cable.
- If the appliance is installed on a carpeted floor, please adjust the feet in order to allow air to circulate freely.
- Always be sure that there is no water leakage from hoses and their connections after installation.
- Any plumbing work required to install this appliance should be carried out by a qualified plumber.
- Any electrical work required to install this appliance should be carried out by a qualified electrician.
May cause electric shock if the machine is not connected to an earthed/grounded system. DO NOT touch wet clothes and metal parts.
- Only wash fabrics which are designed to be machine washed. Follow the instructions on each garment label.
- Do not overload the appliance. See the relevant section in the user manual.
- Before washing, ensure that all pockets are empty and buttons and zips are fastened. Avoid washing frayed or torn articles and treat stains such as paint, ink, rust, and grass before washing.
- Garments which have been in contact with volatile petroleum products should not be machine washed. If volatile cleaning fluids are used, care should be taken to ensure that the fluid is removed from the garment before placing in the machine.
- Never pull the power supply cable to remove the plug from the socket; always take hold of the plug itself.
- Never use the washing machine if the power supply cable, the control panel, the working surface or the base are damaged so that the inside of the washing machine is accessible.
2. PRODUCT DESCRIPTION
2.1 Parts


Detergent dispenser with AutoDose tanks and manual compartments

Door (when open) For more information, see page 19

Drain Pump Filter (when open)

Level Adjustment Feet
Transit Bolt (when removed)


Transit bolts must be removed before using the appliance.
2.2 Accessories
Plastic Caps
To close the holes on the rear side of the cabinet after the removal of the transit bolts.

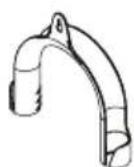
Plastic Hose Guide
To connect the drain hose on the edge of a sink.
2.3 Load Sensor
This machine has a “Load Sensing Device” which shows how much load you put in the machine and the maximum load recommended for the selected wash program.

The display shows these indicators when the door is open.

The weight shown on the display is an approximate weight only.

For correct operation of the load sensor, activate the appliance and set a wash program BEFORE loading the laundry in the drum.
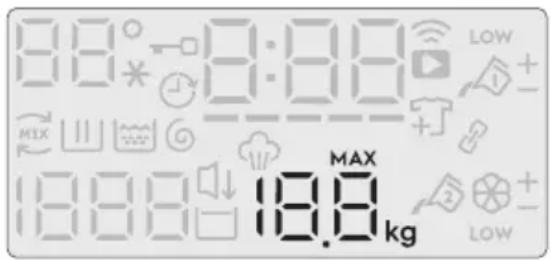
- The display will show "MAX" when the max limit is reached for the selected program.
- On the display, the weight of the laundry updates in 0.5 kg steps.
- The weight is a general indication that changes with the type of the laundry.
- If you exceed the max weight limit of a program, the symbol "MAX" will start flashing if the load in the drum is more than the recommended load, even after the door is closed.
2.4 The Autodose Technology (Autodosing)
Introduction
Using the right amount of detergent and fabric softener not only improves the wash performance of your machine, it is also beneficial for your clothes and the environment by avoiding excessive detergent usage.
This appliance is equipped with an automatic dosing system that enables the machine to automatically dispense the right amount of detergent and fabric softener for the selected wash cycle, based on the laundry weight.


AutoDose detergent tank.

AutoDose fabric softener tank.
The appliance is pre-set by the factory to suit most users' habits.
When either of the AutoDose features is selected, the relevant symbols 📋 or ⚙ are shown on the display. If one or both options are not shown on the display, detergent and softener should be added manually.

Note: AutoDose is not available for some wash programs, as some garments require special detergents and treatments.

AutoDose detergent is available for the following wash programs:
- Cottons
- Mixed
- Bedding
- Energy Saver
- Baby Care
- Quick 15 • Daily 60
- Delicates

AutoDose Fabric Softener; programs available are:
- Cottons
- Mixed
- Bedding
- Energy Saver
- Rinse + Spin
- Baby Care
- Quick 15 • Daily 60
- Wool
- Delicates

When Auto dosing is disabled, use manual detergent and fabric softener compartments.

For more information, refer to pages 19 to 25.
3. CONTROL PANEL
3.1 Control Panel Description
1 Program Selector Knob 2 Spin Selection Touchpad 3 Temperature Selection Touchpad 4 Display 5 AutoDose Softener Touchpad 6 AutoDose Detergent Touchpad 7 Start/Pause and Add Clothes Touchpad 8 Remote Touchpad
9 Delay End Touchpad 10 Extra Rinse Touchpad 11 Stain Touchpad 12 Prewash Touchpad 13 On/Off Button 14 Vapour Touchpad 15 Save Favourite Program Option 16 Child Lock Option
Display
A) Spin Speed Extra Silent Icon, Rinse Hold Icon B) Program Phase Indication Icon MIX Ultramix phase, LWash phase, Rinse phase, Spin phase, Vapour phase
C) Delay End Icon D) Temperature ( * represents Cold water) E) Door Lock Icon F) Program Duration / Delay End Time / Alarm Code G) Remote Icon (Wi-Fi connection indicator, Remote connection indicator.) H) Add Clothes Icon I) AutoDose Icon J) Maximum Load Capacity of Selected Program / Load Weight
3.2 Program Chart
| Program; Temperature range | Spin Speed | Max. Load (Dry Clothes) | Type of load and soil level Max. |
| Cottons; Cold to 90°C | 1400 rpm | 11 kg | White and coloured cotton. |
| Mixed; Cold to 60°C | 1200 rpm | 4 kg | Synthetic or mixed fabric items. |
| Bedding; Special p800gram for one synthetic blanket, cold to 60°C | rpm | duvet, bedspread and so on. | |
| Energy Saver; 40°C and 60°C1) | 1400 rpm | 11 kg | White and colourfast cotton. Set this program to have a good washing results and decrease the energy consumption. The time of the washing program is extended. |
| Vapour Refresh | - | 1 | This cycle removes odours and helps to dewrinkle the laundry. Do not add detergent. Do not add detergent. |
| Tub Clean; 60°C | - | - | For cleaning the tub. |
| □ App Program | - | - | You can send any additional program from Mobile Application to store at this program position and can recall to using it everytime when you rotate program knob to this position. This can be done through the App. Program “Outdoor” is the default stored program from factory. Program “Outdoor” is the default stored program from factory. |
| Spin | 1400 rpm | 11 kg | To spin the laundry and drain the water in the drum. |
| Rinse + Spin To rim and spin the laundry. | |||
| Baby Care; Cold to 40°C | 1200 rpm | 4 kg | Baby cotton clothes and delicate knitting items with normal soil. |
| Quick 15; 30°C | 800 rpm | 1.5 kg | Lightly soiled synthetics or mixed fabrics. |
| Daily 60; 30°C to 60°C | 1400 rpm | 5.5 kg | Coloured cotton e.g. shirts, blouses, towels and undergarments with normal level of soil. |
| Wool ; Cold to 40°C | 1200 rpm | 2 kg | Specially tested program for woollen garments bearing the “Pure new woollen, non-shrink, machine washable” label. |
| Delicates; Cold to 40°C | 1200 rpm | 4 kg | Delicate fabrics such as acrylics, viscose, polyester items. |
| Favourite Recall you favourite program. | |||
1) Energy Saver Program with Temperature 60°C, Spin speed 1400rpm, Off AutoDose Detergent, Off Autodose Softener options selected is recommended for a full load of normally soiled cotton.
Woolmark Apparel Care - Blue

The wool wash cycle of this machine has been approved by The Woolmark Company for the washing of wool garments labelled as “hand wash” provided that the garments are washed according to the instructions issued by the manufacturer of this washing machine. Follow the garment care label for drying and other laundry instructions. M1361
The Woolmark symbol is a Certification mark in many countries.
3.3 Program Options Compatibility
1) "Vapour" option can be combined with temperature 40 to 90°C only. 2) "Stain" option can be combined with temperature 40 to 90°C only.
3.4 Options
Temperature Touchpad
Press this touchpad repeatedly to increase or decrease the wash temperature if you want your laundry to be washed at a temperature different from the one proposed by the washing machine.
Spin Selection Touchpad
Press this touchpad repeatedly to increase or decrease the spin speed or select Rinse Hold, if you want your laundry to be spun at a speed different from the one proposed by the washing machine.
- No Spin (---)
No spin option eliminates all the spin phases and increases the number of rinses.
- Rinse Hold (☐)
By selecting this option, the water of the last rinse is not emptied out and the drum turns regularly to prevent the laundry from creasing.
The door is still locked to indicate that the water must be emptied out.

The door stays locked with the water in the drum. To continue the cycle, you must press ▷∥ (Start/Pause).
- Extra Silent (↓)
By selecting this option, the machine will not drain the water of the last rinse to avoid wrinkling the laundry. All spinning phases are suppressed (intermediate spin and final spin). This washing cycle is very quiet and can be selected at night or other appropriate times.

The door stays locked with the water in the drum. To continue the cycle, you must press ▷II (Start/Pause).
AutoDose Liquid Detergent Touchpad

For activating and deactivating the automatic detergent dosing, refer to "5.2 Detergent dispenser with AutoDose tanks and manual compartments" on page 19.
AutoDose Fabric Softener Touchpad

For activating and deactivating the automatic fabric softener loading, refer to "5.2 Detergent dispenser with AutoDose tanks and manual compartments" on page 19.
Remote ( 📋 ) Touchpad
This option allows you to connect the washing machine to a Wi-Fi network and to link it to your smartphone.
By this functionality you can receive notifications, control and monitor your washing machine from your mobile devices.
To connect the washing machine with your smart phone you need:
- Wireless network at home with internet connection enabled.
- Smart Phone connected to wireless network.
WI-FI specification requirements:
| Frequency | 2.4 GHz according to local country regulation |
| Protocol | IEEE 802.11b/g/n |
| Max Power | According to local country regulation |

When the door is open, remote functions are disabled.
Connection setting and other suggestions please refer to attached leaflet of this user manual.
Delay End (💡) Touchpad
Before you start the program, this option makes it possible to define the end of the washing program from minimum of 1 hour to maximum of 20 hours.

If program duration is longer than 3 hours, minimum Delay End option starts from 4 hours.
Press the Delay End touchpad to choose the end time as you wish. The display shows the number of hours and the indicator beside the touchpad is on.

This option must be selected after choosing the wash program, and before pressing the "Start/Pause" touchpad.
For example, if the program duration of your selected program is 3.20 hours and you define the "Delay End" time to 6 hours. This means your wash program will finish in 6 hours. (See diagram)
![graph LR A["Pressed Start/Pause"] --> B["Start the Program"] B --> C["End of Cycle"] D[""Delay End" Time : 6 hrs."] --> E["Countdown"] E --> F["Working Cycle 3.20 hrs.2.40 hrs."]](/content/2026/05/953136/images/72bf60953ca3144225255187b314eae8ddd31d0ac83463fcd40f44a0633ed850.jpg)
After selecting Delay End time, press Start/Pause touchpad to start the program. Machine will then countdown and update time on the display every hours until it reaches the starting point of the wash cycle.
If you wish to modify or cancel Delay End option after starting the program, follow the steps below:
- Set the washing machine to PAUSE by pressing the "Start/Pause" touchpad;
- Deselect this option by pressing the "Delay End" touchpad; the display will show delay time "0h";
- Press the "Start/Pause" to start the program.
Extra Rinse Touchpad
This option is recommended for people who are allergic to detergents, and in areas where the water is very soft. Use this option to add two rinse phases to a program.
Stain Touchpad
Press this touchpad to add the stain phase to a program. The indicator of this option comes on.
Use this function for laundry with hard-to-remove stains.
You have 2 choices for adding stain remover:
- If AutoDose Detergent is Off, when you set this function,
- Put the powder stain remover into the compartment "Manual" (powder) together with powder detergent, or
- Put the liquid stain remover into the compartment "Manual" (liquid) together with liquid detergent.

- If AutoDose Detergent is On, the detergent is dispensed from the AutoDose compartment. You can put stain remover into the compartment "Manual" (powder) or (liquid).
This function increases the program duration. The Stain option can be combined with temperatures from 40 to 90 °C only. If you press the AutoDose button while the Stain option is active, the AutoDose function is switched off, but the Stain option still remains active in manual mode.
Prewash Touchpad
Select this option if you wish your laundry to be pre-washed before the main wash.
Use this option for heavy soil, especially if containing sand, dust, mud and other solid particles.
This option increases the program duration.
You have 2 options for adding prewash detergent:
- If AutoDose Detergent is Off, put the detergent for the Main wash phase into the compartment "Manual" (for powder) or I (for liquid) and pour detergent for the Prewash phase directly into the drum.

- If AutoDose Detergent is On, detergent is dispensed from the AutoDose compartment during the Prewash phase. So, you do not need to add more detergent.
Vapour ( Touchpad
Select this option to add approximately 30 minutes of tumbling in vapour during the wash cycle. Vapour helps open fabric fibers up to allow laundry additives to release tough stains. The indicator of this option will be on.
- Vapour may not necessarily be visible inside the drum during a vapour wash cycle. Vapour is created below the drum and allowed to naturally rise into the clothes. • Vapour may not be present during the entire vapour wash cycle.
- Vapour function is more effective with half load.
- At the end of the Vapour cycle, the clothes will be warmer, softer and detached from the drum.

If Vapour option is selected, rinse temperatures will be elevated.
During a vapour cycle, you may notice vapour exiting from the drain hose of the washing machine, this is normal and there is no cause for alarm.
3.5 Settings
Save Favourite (☆ Program)
Program settings that are frequently used can be saved (e.g., Cotton, 60°C, 1200 rpm, with Prewash and Vapour).
To program/re-program Favourite with your own selections and save them, proceed as follows:
- Put machine in Stand-By mode.
- Select your desired wash settings.
- To save favourite program, press and hold "Stain" touchpad about 2 seconds and you will hear "Bip, Bip" sound and "Favourite" LED is flashing.
To recall the favourite wash program, turn selector knob to "Favourite ☆" program. You will get acknowledgement on the screen when the Favourite program is loaded.

App Program cycle cannot be saved as a Favourite on the appliance.
Child Safety Lock (☐) Option
Your appliance is provided with CHILD SAFETY LOCK which permits you to leave the appliance unsupervised with the door closed without having to worry that children might be injured by or cause damage to the appliance.

Set this option after pressing the Start/Pause touchpad.
To set "Child Lock" option:
- To activate the function, press and hold "Extra Rinse" touchpad about 2 seconds until the display shows the icon "LOC".

If you press any touchpad while Child Lock is activated, the icon "LOC" will flash on display 3 times along with buzzer sound.

The touchpads are locked (except for the On/Off button).
- To deactivate the function, press and hold "Extra Rinse" touchpad about 2 seconds until the display shows the icon "unl".

This function remains enabled even after the appliance is switched off.
Enabling/Disabling End-Of-Wash Buzzer
This setting permits you to either enable or disable the buzzer at the end of the program. As an example, you might wish to disable this buzzer when you start a wash when going to bed, so that when the wash finished approximately 1 hour later, it will not disturb you through the night.

Error warning beeps such as critical faults are not disabled.
- To disable the buzzer sound, press "Prewash" and "Stain" touchpads at the same time about 3 seconds, the icon "bOF" will show on display along with buzzer sound.
- To return to default configuration press these 2 touchpads at the same time about 3 seconds, the icon "bOn" will show on display along with buzzer sound.
3.6 Start/Pause ( ▷) and Add Clothes ( ✉) Touchpad
This touchpad has 2 functions:
Start/Pause ( ▷∥ )1.
After you have selected the desired program and options, press this touchpad to start the machine. If you have selected a "Delay End" option, the countdown will begin and will be shown on the display.
To interrupt a program which is running, press this touchpad to pause the machine, the Start/Pause pilot light flashes.
To restart the program from the point at which it was interrupted, press this touchpad again, the Start/Pause pilot light will stop flashing.
Add Clothes ( )2.

You can only add clothes when the icon “☐” shown on the display.
To add clothes:
- Press the "Start/Pause" touchpad to pause the program.
- Wait for the machine to come to a complete stop before opening the door (wait for door lock "→" icon to turn off).
- Add clothing and close the door.
- Resume the program by pressing "Start/Pause" touchpad again.
4. BEFORE FIRST USE

NOTE
During installation or before first use you may observe some water in the machine. This is a residual water left in the machine after a full functional test in the factory to ensure the machine is delivered to customers in perfect working order and is no cause for concern.
- Make sure that all transit bolts have been removed from the appliance.
- Ensure that the electrical and water connections comply with the installation instructions.
- Make sure to fill with liquid detergent and fabric softener the tanks marked by 📋 | ⚙️. Refer to “Basic Setting” paragraph in “The AutoDose technology” chapter.
- Put 2 litres of water in the detergent compartment for washing phase. This activates the drain system.
- Set and start a program for Cotton at the highest temperature without any laundry in the drum (turn off AutoDose system). This removes all possible dirt from the drum and the tub.

5. DAILY USE
5.1 Loading The Laundry 5.2 Detergent Dispenser With
- Turn the water tap on.
- Connect the main plug to the main socket.
- Press the On/Off button to turn on the washing machine. Turn the knob to set a program. The washing machine will propose a temperature and automatically select the spin value provided for the program you have chosen.
The selector knob can be turned either clockwise or counter-clockwise.
- Check and remove objects (if there are any) that could be trapped in the fold.

- Place the laundry in the drum, one item at a time, shaking them out as much as possible. (Refer to page 28 "WASHING HINTS")
- Close the door.

Make sure that no laundry remains between the seal and the door.

Autodose Tanks And Manual Compartments

NOTE
When using detergent and any other treatments, always follow the instructions that you find on the packaging of the detergent products.
We recommend not to exceed the maximum indicated level in each compartment (Max).
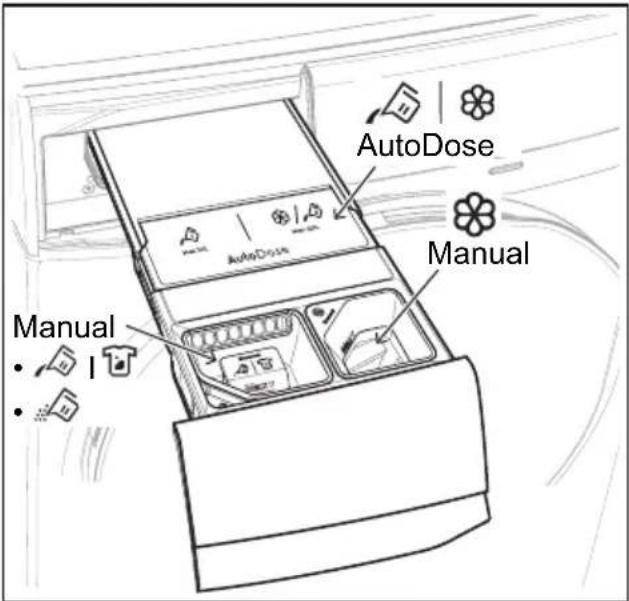
If both AutoDose options are enabled for selected program, detergent and fabric softener are automatically loaded.
If one or both AutoDose options are disabled, manually add detergents to the relevant manual compartments.

WARNING!
Do not put POWDER detergent in the AutoDose compartment.

Read this chapter carefully.
• Auto-dosing tanks are for liquid detergent and fabric softener only. - Manual compartment for powder detergent. - Manual compartment for liquid detergent.

When using liquid detergent (Manual compartment), make sure that the special container for liquid detergent is inserted. Refer to the “Manual filling the detergent and additives” paragraph in this chapter.


- Manual compartment for liquid additives (fabric softener, fabric conditioner, starch).

MAX Maximum level for detergent/additives quantity.
AutoDose
The AutoDose system has 3 modes:
- Standard Mode - Allows you to store liquid detergent and softener in the AutoDose compartments, and to toggle on/off auto dosing of detergent and/or softener. 2.* Dual-Detergent Mode - Allows you to store 2 different types of liquid detergents in the 2 AutoDose compartments, and toggle on/off or switch between them. 3.* Link Detergent Mode - Allows you to store 1 type of liquid detergent in both AutoDose compartments, and toggle on/off auto dosing of the liquid detergent.

(*) By factory default, the appliance operates in basic Standard Mode.
To change configuration to Dual-Detergent Mode or Link Detergent Mode, you need to complete the setup on the mobile application "Electrolux Life".
Advanced functions like fine-tuning can be enabled on the app to make them available on the control panel.
** Apps and services are subject to change without notice.
The pre-set dosages are 50ml for detergent tank and 40ml for fabric softener tank: the optimal configuration to meet majority of use conditions.
However, under extreme conditions (very soft or very hard water) and particular types of detergent (such as super concentrated), we recommend adjusting the pre-set dosage by following the instructions given on detergent and fabric softener containers: e.g., when using super concentrated detergent, you may need to reduce the pre-set dosage considerably.
If the washing results are not satisfactory or there is too much foam during washing, you may need to change this setting.
Check the detergent product instructions to identify the right dosage considering a normal laundry soil level, the actual water hardness, and the additional dosage suggested for larger loads.
- Identifying the water hardness level: Hard water can reduce the effectiveness of the detergent, for this reason detergent manufacturers recommend adjusting the dosage based on water hardness level. Check the water hardness level in your area. The levels are generally indicated as: soft, medium, and hard. If necessary, please contact your local water authority to check the water hardness in your area.
- Identifying the customized detergent dosage: Check the label on the detergent/fabric softener container suggesting the quantity to use. This suggestion is measured combining three different factors:
• Water hardness level; - Normal soil level; - Rated capacity of the appliance (e.g., maximum load capacity 9 kg). If the rated capacity on the product container refers to lower capacity appliances, the customized dosage should be increased.
Filling the detergent and additives on AutoDose system

Please read "Detergents Type And Quantity Of Detergent" on page 29.

We recommend that you do not exceed the maximum indicated level (MAX).
- Open the detergent dispenser.
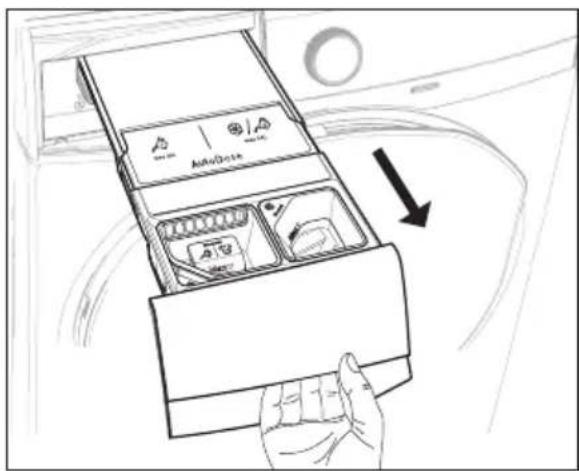
- Lift up the AutoDose cover lid.

- Gently pour only liquid detergent into the AutoDose detergent tank. Fill up to the maximum indicated level (MAX).

- Gently pour only liquid softener into the AutoDose fabric softener tank. Fill up to the maximum indicated level (MAX).

- Close the AutoDose cover lid.
- Gently close the detergent dispenser by pushing it all the way in.

1. Standard Mode
In Standard Mode, you can toggle on/off auto dosing of detergent and softener.
By default, both AutoDose detergent and softener are enabled the first time the appliance is powered on.
To Activate/Deactivate AutoDose Detergent (√)
Press the AutoDose touchpad to toggle on and off; the relevant symbols will show on the display if enabled.
To Activate/Deactivate AutoDose Softener (⚙)
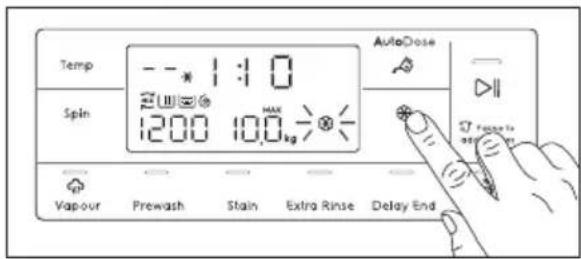
Press the AutoDose softener touchpad to toggle on and off; the relevant symbols will show on the display if enabled.
AutoDose configuration mode

Enter the AutoDose configuration mode before proceeding with any program setting. The configuration mode may cancel temporary settings.
- Press the On/Off button for a few seconds to activate the appliance.
- Wait about 10 seconds for appliance internal check.
- To enter configuration mode, touch and hold the "Temp" and "Spin" touchpads simultaneously for a few seconds until SET appears on the display.

- Press the Detergent touchpad to select configuring detergent dosage. Touch the "Temp" touchpad repeatedly to increase and the "Spin" touchpad to reduce. Minimum step is 1 ml (you can press and hold the touchpad to increase the increment to 10 ml/step).

- Press the Softener touchpad to select configuring softener dosage. Touch the "Temp" touchpad repeatedly to increase and the "Spin" touchpad to reduce. Minimum step is 1 ml (you can press and hold the touchpad to increase the increment to 10 ml/step).
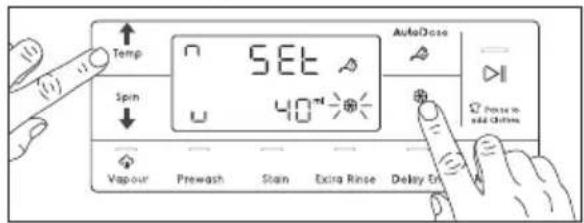
- To save and exit configuration mode, press and hold the "Temp" and "Spin" touchpads combination again for 3 seconds or turn the knob to any position.
AutoDose low level indication

Do not refill the AutoDose tanks unless the appliance indicates that one or both tanks are empty.
When the activated tank reaches a low level of detergent, the LOW indicator blinks slowly and continuously on the display.
It will stop blinking when the compartment is refilled.
If the tank is not refilled, once a program has started, the indicator will stop blinking and stay steadily lit. Once the program is finished, it will start blinking again.
If the detergent level is low in both tanks, both indicators blink, but only the set dosage for detergent will be displayed.

If the tanks are filled before the appliance is powered on for the first time, the AutoDose indicator will not blink.

Refill the tanks with the same detergent and fabric softener as before. If changing either of the liquid detergents, clean the tanks before refilling (see section 8.5 for instructions on how to clean the tanks).
Drawer open indication
When a program is running, the detergent drawer must always be closed.
A sensor in the drawer detects if the drawer is open (or not properly closed) while the program is running. In such a case, the appliance will immediately be paused.
If you press the Start/Pause ▷ touchpad, an error sound is generated and everything in the display will turn off except the AutoDose symbols ( 🔊 and ⚙ ) remain lit for a few seconds. Then the display returns to the previous paused state. This will happen even if AutoDose is turned off.

To restart the program, ensure the drawer is properly closed and press the Start/Pause ▷|| touchpad.
Manual filling of detergent and additives
You may need to use a different detergent or fabric softener than the ones used in the AutoDose tanks. First, make sure that the AutoDose tanks are disabled and then pour the detergent, fabric softener, or other treatments into the manual compartments.

We recommend that you do not exceed the maximum indicated level (MAX).
Manual filling of powder detergent
- Open the detergent dispenser.
- Lift out the special container for liquid detergent.

- Put the powder detergent into the compartment.

- Gently close the detergent dispenser by pushing it all the way in.
Manual filling of liquid detergent
- Insert the special container for liquid detergent.

- Pour the liquid detergent into the manual compartment.

- If desired, pour the fabric softener into the manual compartment.

- Gently close the detergent dispenser by pushing it all the way in.
If the machine has not been used for more than 4 weeks with full tanks, detergent/softener can become viscous or dry out. It is recommended to clean the drawer as indicated in the “Care and Cleaning” chapter (see page 31).
2. Setting AutoDose using the "Electrolux Life" app*
Using the Electrolux Life app, you can adjust the amounts of detergent in Standard Mode and change the configuration to Dual-Detergent Mode or Link Detergent Mode.
* Apps and services are subject to change without notice.
• To Adjust Detergent Amounts in Standard Mode
The fine-tuning feature can be enabled by adding the appliance to the Electrolux Life app. Pressing the AutoDose Detergent ( ) touchpad will toggle through the following options:
- Normal dosage (default)
- A little more detergent
- A little less detergent
Fine-tuning settings are not "permanent" and will return to normal dose after the cycle ends.
• To Adjust Softener Amounts in Standard Mode
The fine-tuning feature can be enabled by adding the appliance to the Electrolux Life app. Pressing the AutoDose Softener ( ✉ ) touchpad will toggle through the following options:
- Normal dosage (default)
- A little more softener. Fine-tuning settings are not "permanent" and will return to normal dose after the cycle ends.
• Dual-Detergent Mode

In Dual-Detergent Mode, you can select which of the 2 different detergents that are stored in the AutoDose compartments to be activated (For example, you can store compartment 1 with detergent for adult and compartment 2 with detergent for baby).

AutoDose Softener (✿) touchpad is disabled in this mode, the display will show "---" when touched.
To Activate/Deactivate Detergent
Touch AutoDose Detergent 📋 touchpad to toggle through the following options:
- using main compartment

- using secondary compartment

To Adjust Detergent Amounts
Fine-tuning feature can be enabled by adding the appliance into the Electrolux Life App. Pressing on the AutoDose Detergent ( 🔺 ) touchpad will toggle through the following options:
- Detergent 1 - Main compartment, normal dosage (default)
- Detergent 1 - Main compartment, a little more detergent
- Detergent 1 - Main compartment, a little less detergent
- Detergent 2 - Secondary compartment, normal dosage
- Detergent 2 - Secondary compartment, a little more detergent
- Detergent 2 - Secondary compartment, a little less detergent

Fine-tuning settings are not "permanent" and will return to normal dose after the cycle ends.
Link Mode

In Link Mode, both compartments are filled with the same detergent. You can toggle On/Off dosing of AutoDose detergent.


AutoDose Softener touchpad is disabled in this mode; the display will show "---" when touched.
To Activate/Deactivate Detergent
Touch the AutoDose Detergent touchpad to toggle on/off both detergent tanks.
Detergent 1 and Detergent 2 symbols will link together with the Link symbols shown in the picture below.

To Adjust Detergent Amounts
Fine-tuning feature can be enabled by adding the appliance to the Electrolux Life App. Pressing the AutoDose Detergent (🔺) touchpad will toggle through the following options:


Fine-tuning settings are not "permanent" and will return to normal dose after the cycle ends.
5.3 Options Setting
- If you want your laundry to be spun or use a temperature different from the one proposed by the washing machine, press "Spin" and "Temp" touchpads repeatedly to change the spin speed and temperature. Press the option touchpads, if you want your laundry to be washed with special functions.

NOTE
- Different functions can be combined, depending on the program selected. - If an option is not compatible with the wash program selected, the symbol “— — —” will flash on the display along with a buzzer sound.
- If you want to define the end of the washing program, press the "Delay End" touchpad repeatedly to choose your washing machine working time.
5.4 Starting A Cycle (▷) 5.7 Changing The Options
To start a program, press the Start/Pause touchpad. The corresponding pilot light will stop flashing and a default program duration will be displayed on the screen.
After approx. 15 minutes from the start of a program:
- The appliance will automatically adjust the selected program duration according to the type and size of the load.
- The display will show the adjusted program duration.

NOTE
If you press any touchpad while a program is operating, the symbol “- - -” will flash on the display along with a buzzer sound. (except Start/Pause touchpad and On/Off button)
5.5 Interruption Of A Program
- To pause, press Start/Pause. The indicator will start flashing.
- Press the Start/Pause again. The program will continue.
5.6 Changing A Program
Changing a running program is possible only by switching off the appliance.
- Press the "On/Off" button to cancel the program and to turn off the appliance.
- Press the "On/Off" button again to start the appliance.
Now you can set a new wash program and change any available options. Press Start/Pause to start the new program.

NOTE
The appliance will not drain the water (except programs; Vapour Refresh, Spin, Rinse + Spin, Tub Clean).
It may be possible to change some of the options after a wash program has started.
- Press the touchpad Start/Pause. The indicator will start flashing.
- If available change the options that you wish.
- Press Start/Pause again. The program will continue.
5.8 Opening The Door
While a program or the Delay End is operating, the appliance door is locked and the display shows the indicator “→0”. First, set the machine to PAUSE by pressing the “Start/Pause” touchpad. Wait until the door lock indicator goes off, then the door can be opened.
If the door lock indicator “☐” does not disappear, this means that the machine is already heating and the water level is above the bottom edge of the door or the drum is turning. In this case the door CAN NOT be opened. If you need to open it, you must drain the water to open the door.
In case of Remote ( ☑ ) function is activated, when program cycle end and anticrease phase is complete. The door will remain locked for 5 minutes, if you want to open the door at that time, press any touchpads once to turned off function then the door is unlocked.

In case of emergency please refer to “Emergency door opening” on page 41.
5.9 At The End Of The Program
- The appliance stops automatically.
- The acoustic signal will operate.
- The display will show "End".
- The indicator of the touchpad Start/Pause goes off.
- The door lock indicator “→” goes off.
- Remove the laundry from the appliance. Make sure that the drum is empty.
- Keep the door partly open, to prevent the mildew and odours.
- Turn off the water tap.

NOTE
At the end of the program, the time remaining can suddenly decrease from 7 minutes or less to 0 due to the overestimated total program time during the load sensing phase. In some cases (with perfectly balanced load) the program time can be shorter than the time estimated after the load sensing phase is completed. This is a normal behavior of the machine and not a cause for concern as it does not compromise its performance.
5.10 When The Washing Program Is Completed, But There Is Water In The Drum
(Option "Rinse Hold □" or "Extra Silent ↓" is used)
- The drum turns regularly to prevent the creases in the laundry.
- The indicator "Start/Pause" flashes to remind you to drain the water.
- The door lock indicator "→" is on. The door stays locked.

You must drain the water to open the door.
To drain the water:
- Press the "Start/Pause ▷" touchpad. The appliance drains the water and spins with the maximum spin speed for the selected program.
Alternatively, before pressing the "Start/Pause" touchpad, you can press the "Spin" touchpad to change the spin speed. You can select "No Spin (---)" if you want the machine to only drain the water.
- When the program is completed and the door lock indicator "→" goes off, you can open the door.
- Press the "On/Off" button to deactivate the appliance.

NOTE
After approximately 18 hours, if you do not press the Start/Pause touchpad, the appliance will drain and spin automatically (except for the "Wool" program).
5.11 AUTO Off Mode
The AUTO Off mode automatically deactivates the appliance to decrease energy consumption when:
- You do not press any buttons for 5 minutes before you press "Start/Pause".
- Press the "On/Off" button to activate the appliance again.
• After 5 minutes from the end of the washing program.
- Press the "On/Off" button to reactivate the appliance. The display will show the end of the last wash.
- Press any touchpad again to show the last wash program.
6. WASHING HINTS
6.1 Sorting The Laundry
Follow the wash code symbols on each garment label and the manufacturer's washing instructions. Sort the laundry as follows: whites, coloureds, synthetics, delicates, woollens.
6.2 Temperatures
| Temp Soil level | |
| 90°C | For normally soiled white cottons and linen (e.g. teacloths, towels, tablecloths, sheets...). |
| 60°C50°C | For normally soiled, colourfast garments (e.g. shirts, night dresses, pajamas...) in linen, cotton or synthetic fibres and for lightly soiled white cotton (e.g. underwear). |
| 40°C30°C Cold | For delicate items (e.g. net curtains), mixed laundry including synthetic fibres and woollens bearing the label pure new wool, machine washable, non-shrink. |
6.3 Before Loading The Laundry
• Make sure that no metal objects are left in the laundry (e.g. coin, hair clips, safety pins, pins).


- Button up pillowcases, close zip fasteners, hooks and poppers. Tie any belts or long tapes.

- Wash bras, pantyhose and other delicates in a mesh laundry bag, which you can purchase from your supermarket.

- Make sure that you wash lint collectors separately from lint producers.
- Never wash whites and coloured fabrics together. Whites may lose their "whiteness" in the wash.
- New coloured items may run in the first wash; they should therefore be washed separately the first time.
- Remove persistent stains before washing.
- Rub particularly soiled areas with a special detergent or detergent paste. Treat curtains with special care. Remove hooks or tie them up in a bag or a net.
6.4 Maximum Loads
Recommended loads are indicated in the program charts on page 12.
General rules:
| Clothes Load | Q uantity |
| Cotton, linen | drum full but not too tightly packed; |
| Synthetics | drum no more than half full; |
| Delicate fabrics and woollens | drum no more than one third full. |
Washing a maximum load makes the most efficient use of water and energy. For heavily soiled laundry, reduce the load size.
6.5 Removing Stains

WARNING!
Pre-treatment sprays and stain remover can damage plastic components on your washing machine.
If you use pre-treatment sprays or stain removers, apply them to the clothing well away from your washing machine.
Stubborn stains may not be removed by just water and detergent. It is therefore advisable to treat them prior to washing.
Blood: treat fresh stains with cold water. For dried stains, soak overnight in water with a special detergent then rub in the soap and water.
Oil based paint: moisten with benzine stain remover, lay the garment on a soft cloth and dab the stain; treat several times.
Dried grease stains: moisten with turpentine, lay the garment on a soft surface and dab the stain with the fingertips and a cotton cloth.
Rust: oxalic acid dissolved in hot water or a rust removing product used in cold water. Be careful with rust stains which are not recent since the cellulose structure will already have been damaged and the fabric tends to hole.
Mould stains: treat with bleach, rinse well (whites and fast coloureds only).
Grass: soap lightly and treat with bleach (whites and fast coloureds only).
Ball point pen and glue: moisten with acetone (*), lay the garment on a soft cloth and dab the stain.
Lipstick: moisten with acetone (*) as above, then treat stains with methylated spirits. Remove any residual marks from white fabrics with bleach.
Red wine: soak in water and detergent, rinse and treat with acetic or citric acid, then rinse. Treat any residual marks with bleach.
Ink: depending on the type of ink, moisten the fabric first with acetone (*), then with acetic acid; treat any residual marks on white fabrics with bleach and then rinse thoroughly.
Tar stains: first treat with stain remover, methylated spirits or benzine, then rub with detergent paste.
(*) do not use acetone on artificial silk.
6.6 Detergents Type And Quantity Of Detergent
Low sudsing detergent is required for this washing machine to prevent oversudsing problems, unsatisfactory washing result and harm to the machine.
Low sudsing detergents designed for front load washing machines are labelled "Front Loading", "high efficiency", "HE", such as Cold Power for Front Loaders or "Matic".
Do not use wrong types of detergent, such as Top Loading, Handwash detergent or Soap-Based products in your frontload washing machine. This can result in excessive suds, longer cycle time, low spin speeds, poor rinsing and overloading of the motor.
Quantity of detergent to be used
The choice of detergent and use of correct quantities not only affects your wash performance, but also helps to avoid waste and protect the environment.
Although biodegradable detergents contain substances which in large quantities can upset the delicate balance of nature.
The choice and quantity of detergent will depend on ;
- type of fabric (delicates, woollens, cottons, etc.); • the colour of clothes ;
- size of the load ;
- degree of soil ;
- wash temperature; and
- hardness of the water used.
Water hardness is classified by so-called "degrees" of hardness.
Information on hardness of the water in your area can be obtained from the relevant water supply company, or from your local authority.
You may have to try using the detergent quantity as per manufacturers' instructions then compare the wash result to the list below and adjust the amount of detergent for your future washes accordingly.
Not enough detergent causes:
• the washload to turn grey, - greasy clothes.
Too much detergent causes:
- oversudsing, • reduced washing effect,
- inadequate rinsing.
Use less detergent if:
• you are washing a small load, • the laundry is lightly soiled, • large amounts of foam during washing.
7. INTERNATIONAL WASH CODE SYMBOLS

These symbols appear on fabric labels, in order to help you choose the best way to treat your laundry.
 Energetic wash Energetic wash Delicate wash Delicate wash |  Max. wash temperature 95 °C Max. wash temperature 95 °C |  Max. wash temperature 60 °C Max. wash temperature 60 °C |  Max. wash temperature 40 °C[467H7] Max. wash temperature 40 °C[467H7] |  Max. wash temperature 30 °C Max. wash temperature 30 °C |  Hand wash Hand wash |  DO NOT wash at all DO NOT wash at all | |||
| [IMAGE] | [BDHK]Bleach in cold water DO NOT bleach |  | |||||||
 |  Hot iron max. 200 °C Hot iron max. 200 °C |  Warm iron max. 150 °C Warm iron max. 150 °C |  Lukewarm iron max. 110 °C Lukewarm iron max. 110 °C |  DO NOT iron DO NOT iron | |||||
 Dry cleaning Dry cleaning |  Dry cleaning in all solvents Dry cleaning in all solvents |  Dry cleaning in perchlorethylene, petrol, pure alcohol, R 111 & R 113 Dry cleaning in perchlorethylene, petrol, pure alcohol, R 111 & R 113 |  Dry cleaning in petrol, pure alcohol and R 113 Dry cleaning in petrol, pure alcohol and R 113 |  DO NOT dry clean DO NOT dry clean | |||||
 Drying Drying |  Flat Tumble Flat Tumble |  Dry dust Dry dust |  On clothes hanger On clothes hanger | [γKWS] High temperatureLow temperature High temperatureLow temperature |  tumble dry tumble dry | ||||
8. CARE AND CLEANING

WARNING!
You must DISCONNECT the appliance from the electricity supply, before you can carry out any cleaning or maintenance work.
8.1 External Cleaning
Clean the appliance only with soap and warm water. Fully dry all the surfaces.

CAUTION!
Do not use alcohol, solvents or chemical products.
8.2 Descaling
The water we use normally contains lime. It is a good idea to periodically use a water softening powder in the machine.
Do this separately from any laundry washing, and according to the softening powder manufacturer's instructions.
This will help to prevent the formation of lime deposits.
8.3 After Each Wash
Leave the door open for a while. This helps to prevent mould and stagnant smells forming inside the appliance.
Keeping the door open after a wash will also help to preserve the door seal.
8.4 Maintenance Wash With "Tub Clean" Program
With the use of low temperature washes it is possible to get a build up of residues inside the drum.
We recommend to use "Tub Clean" program to clean the drum regularly to remove any residue.
To run a maintenance wash:
• The drum should be empty of laundry. - Select the "Tub Clean" program. - Press Start/Pause to start the program.
8.5 Cleaning The Detergent Dispenser And The Autodose Tanks

Before cleaning, make sure that the all compartments are empty.
To prevent possible deposits of dried detergent, clotted fabric softener, formation of mould in the detergent dispenser and/or clotted liquid additives in the AutoDose tanks, once in a while carry out the following cleaning procedure:

Cleaning procedure is also suggested when brand or type of detergent, fabric softener or additives are changed inside the tanks.
- Open the detergent dispenser. Press the catch as indicated in the picture and pull the detergent dispenser out.

- Remove the insert for the softener and, if inserted, the special container for liquid detergent.


- Open the drain plugs of each tank and empty them into a sink.

- Press the catch on the back as indicated in the picture and lift up the top cover to remove it.

- Wash the drawer and all inserts under running water.
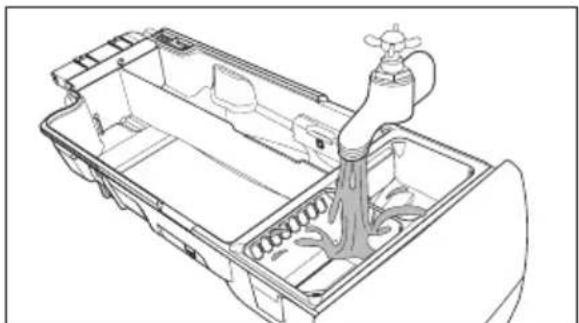
CAUTION!
Do not use sharp or metal brushes and sponges.
- Turn the dispenser upside down and open the bottom cover as indicated in the picture.
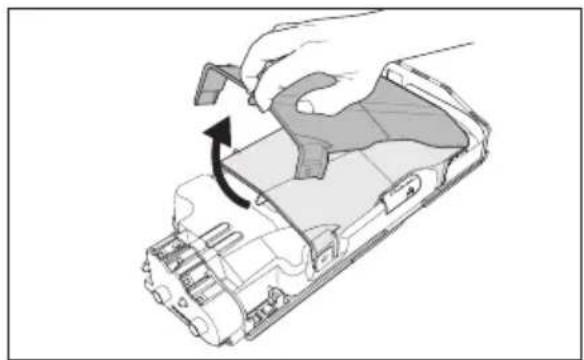
- Make sure that all detergent residue is removed from the conveyor. Use only a soft damp cloth.
- Put the bottom cover back in its position by aligning its holes on the drawer hooks as indicated in the picture. Close it until a "click" sound is heard.

WARNING!
Do not clean with any sharp or metal brushes or any tools to avoid damaging pumps and sensors located at the back of the detergent drawer. If necessary, use only a soft damp cloth.

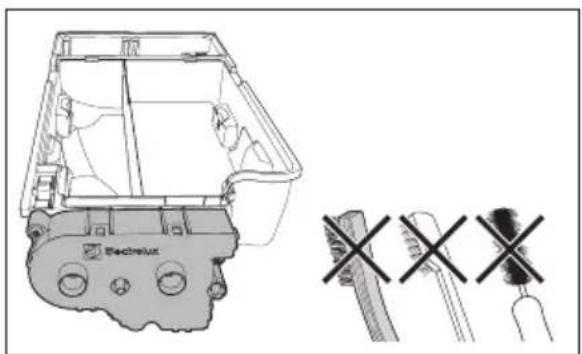

WARNING!
If some residues remain on the back area of the tanks, soak the detergent drawer in warm water. Do not use tools to clean it. Before soaking, remove the handle by pressing the button and sliding the handle as indicated in the picture.
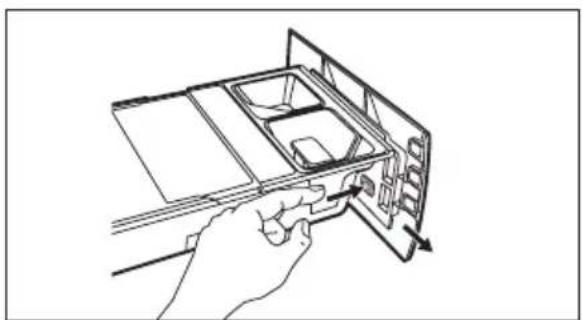
- Make sure that all detergent residue is removed from the upper and lower part of the recess. Use a small brush to clean the recess.

- Reassemble the drawer as follows:
a. Place the handle if it was removed. b. Place the bottom cover and press until a "click" sound is heard. c. Place the top cover on the tanks compartment and press until a "click" sound is heard. d. Replace components in the manual compartment.
- Insert the detergent dispenser into the guide rails and gently close it until a "click" sound is heard. Run the Quick 15 program without any clothes in the drum.


To restore functionality, refill the tanks with detergent and softener. If you place wrong additives in the tanks, you can easily recover them by using the drain plugs on both sides of the drawer. Before opening the drain plugs, ensure to place a container below the drawer to collect the liquid. Ensure to properly close the plugs before refilling.

8.6 Cleaning The Pump

Regularly examine the drain pump and make sure that it is clean.
Clean the pump if:
- The appliance does not drain the water. • The drum cannot turn.
- The appliance makes an unusual noise because of the blockage of the drain pump.
- The display shows an alarm code because of the problem with water drain.

WARNING!
- Disconnect the mains plug from the mains socket.
- Do not remove the filter while the appliance is operating. Do not clean the drain pump if the water in the appliance is hot. The water must be cold before you clean the drain pump.
To clean the drain pump:
- Open the drain pump door.

- Place a suitable water container below the recess of the drain pump to collect the water that flows out.
Press the two levers and pull forward the drainage duct to let the water flow out.

- When the container is full of water, put the drainage duct back again and empty the container. Do step 2, 3 again and again until no more water flows out from the drain pump.

- Push back the drainage duct and turn the filter counter-clockwise to remove it.

- Remove fluff and objects from the pump (if there are any).

- Make sure that the impeller of the pump can turn. If this does not occur, contact the service centre.

- Clean the filter under the water tap.

- Put the filter back into the housing with exposed section facing up. Make sure that you correctly tighten the filter to prevent leakages.
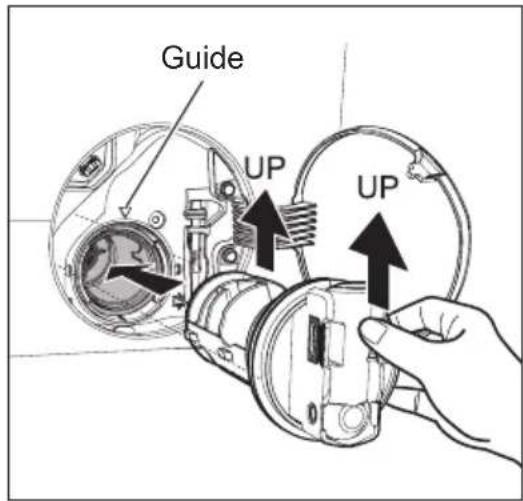

- Close the drain pump door.
8.7 Cleaning The Water Inlet Filter
If your water is very hard or contains traces of lime deposit, the water inlet filter may become clogged. It is therefore a good idea to clean it from time to time.
To clean the water inlet filters:
- Close the water tap.
- Remove the water inlet hose from the water tap.
- Clean the filter in the inlet hose with a stiff brush.

- Remove the inlet hose behind the appliance.

- Use a suitable tool pulling filter from the valve (eg. long nose pliers) as picture.

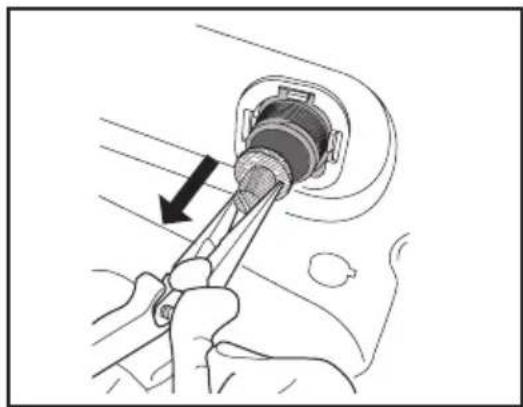
Clean the filter under the water tap.

Install the valve filter back to the housing.

- Install the inlet hose again. Make sure that the couplings are tight to prevent leakages.
- Open the water tap.
8.8 Frost Precautions
If the appliance is installed in an area where the temperature can be less than 0 °C, remove the remaining water from the inlet hose and the drain pump.
Emergency Drain
- Disconnect the main plug from the main socket. Turn off the water tap.
- Remove the water inlet hose.
- Remove the drain hose from the rear support and unhook it from sink or spigot.

- Put the end of the drain and inlet hose in a container. Let the water flow out of the hoses.

- When no more water flows, install the inlet hose and the drain hose again.
NOTE Make
Make sure that the temperature is more than 0 °C before you use the appliance again.
9. TROUBLESHOOTING
9.1 Possible Failures
Certain problems are due to lack of simple maintenance or oversights, which can be solved easily without calling out an engineer. Before contacting your local Service Centre, please check troubleshooting.
Once the problem has been eliminated, press the Start/Pause button to restart the program. If after all checks, the problem persists, contact your local Service Centre.
WARNING! Deactivate the appliance before you do the checks.
| Malfunction | Alarm Code | Possible cause Solution | |
| Machine does not start: | The door has not been closed. | E41 | Close the door firmly. |
| The plug is not properly inserted into the power socket. | Insert the plug into the power socket. | ||
| There is no power at the socket. | Please check your domestic electrical installation. | ||
| The Start/Pause touchpad has not been pressed. | Press the Start/Pause touchpad. | ||
| The “Delay End” has been selected. | If the laundry are to be washed immediately, cancel the “Delay End”. | ||
| The Main supply is unstable. | EH1EH2EH3 | Wait until the main supply is stable. Appliance will start automatically. | |
| Sensing circuit of Autodosing faulty. Switch off and switch on again. If still have the problem Call Service. | |||
| Machine does not fill the water: | The water tap is closed. | E11 | Open the water tap. |
| The inlet hose is squashed or kinked. | E11 | Check the inlet hose connection. | |
| The filter in the inlet hose is blocked. | E11 | Clean the water inlet hose filter. | |
| The door is not properly closed. Closed the door closely the door firmly. | |||
| Machine fills then empties immediately: | The end of the drain hose is too low. | E11 | Refer to relevant paragraph in “water drainage” section. |
| Machine does not empty and/or does not spin: | The drain hose is squashed or kinked. | E21 | Check the drain hose connection. |
| The drain pump is clogged. | E21 | Clean the drain pump filter. | |
| The option “Rinse Hold” has been selected. | Press Start/Pause touchpad to drain the water or select spin program. | ||
| The laundry is not evenly distributed in the drum. | Pause the machine and redistribute laundry manually. | ||
| Malfunction | Alarm CodePossible cause Solution | ||
| There is water on the floor: | Water leaks from inlet hose fittings. | Check the water inlet hose connection. | |
| The drain hose is damaged. Call Service. | |||
| Too much detergent or unsuitable detergent (creates too much foam). | Reset machine by switch off and switch on and select program “Rinse&Spin” to rinse foam. Next cycle should reduce detergent quantity (Adjust AutoDose page 22) and use correct type of detergent. (refer page 29) | ||
| Water leaks inside the machine. | Disconnect the main plug from the main socket. Close the water tab. Call Service. | ||
| Unsatisfactory washing results: | Too little detergent or unsuitable detergent has been used. | Increase detergent quantity (Adjust AutoDose page 22) or use different detergent. (refer page 29) | |
| Stubborn stains have not been treated prior to washing. | Use commercial products to treat the stubborn stains. | ||
| The correct temperature was not selected. | Check if you have selected the correct temperature. | ||
| Excessive laundry load. Reduce load. | |||
| The door will not open: | The program is still running. Wait until the end of cycle. | ||
| There is water in the drum. | You must drain the water to open the door (refer “Opening The Door” on page 26. | ||
| This problem may be caused by a failure of the appliance. | Contact Service. If you need to open the door, please read carefully “Emergency door opening” on page 41. | ||
| Machine vibrates or is noisy: | The transit bolts and packing have not been removed. | Check the correct installation of the appliance. | |
| The support feet have not been adjusted. | Check the correct levelling of the appliance. | ||
| The laundry is not evenly distributed in the drum. | Pause the machine and redistribute laundry manually. | ||
| There is very little laundry in the drum. | Load more laundry or reduce spin speed. | ||
| Unstable floors eg. wooden floors. Refer to relevant paragraph in “Positioning” section. | |||
| There is water on the floor: | Detergent over dose. | Reduce the detergent quantity (Adjust AutoDose page 22) or use different detergent (Refer page 29 “Detergents Type And Quantity Of Detergent”). | |
| Machine unbalance. Redistribute laundry manually in the drum and start the spin phase again. | |||
| The cycle is shorter than the time displayed. | The appliance calculated a new time according to the laundry load. | ||
| Spinning starts late or machine does not spin: | The electronic unbalance detection device has cut in because the laundry is not evenly distributed in the drum. The laundry is redistributed by reverse rotation of the drum.This may happen several times before the unbalance disappears and normal spinning can resume. If, after 10 minutes, the laundry is still not evenly distributed in the drum, the machine will not spin. In this case, redistribute the load manually and select the spin program. | Pause the machine and redistribute laundry manually. | |
| Machine makes an unusual noise: | Machine not installed properly. Make sure the levelling of the appliance is correct. Refer to “Installation”. | ||
| Transit bolts or packaging not removed. | Make sure that the packaging and/or the transit bolts are removed. Refer to “Unpacking”. | ||
| The load may be too small. Add more laundry in the drum or reduce spin speed. | |||
| No water is visible in the drum: | Machines based on modern technology operate very economically using very little water without affecting performance. | ||
| Remote function does not work: | Registration Data lost or damaged. Restart machine by turn Off and turn On again. If problem not solved, please contact Service Centre. | ||

If you are unable to identify or solve the problem, contact our service centre.
Before calling service centre, make a note of the model, serial number and purchase date of your machine: the Service Centre will require this information.
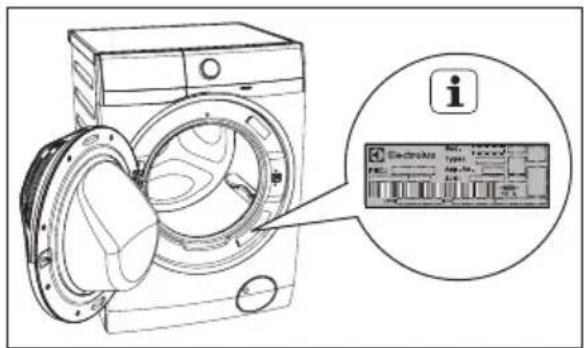
9.2 Emergency Door Opening
In case of power failure or appliance failure, the appliance door remains locked. The wash program continues when power is restored. If the door remains locked in case of failure, it is possible to open it using the emergency unlock feature.
Before opening the door:

WARNING!
Make sure that the water temperature and the laundry are not hot. Wait until they cool down if necessary.
Make sure that the water level inside the drum is not too high. If necessary, perform an Emergency Drain. (see page 37)
Make sure that the drum is not rotating. Wait until the drum stops rotating if necessary.
To open the door proceed as follows:
- Press the On/Off button to switch the appliance off.
- Disconnect the mains plug from the mains socket.
- Open the filter cover.
- Without touching the door. Insert a small flathead screwdriver into the slot on the emergency unlock strap (red strap) and pull down twice, then pull the door open. Repeat if unsuccessful.
Note: Do not pull down the emergency strap too hard.

- Take out the laundry.
- Close the filter flap.

If you are unable to identify or solve the problem, contact our service centre.
Before calling service centre, make a note of the model, serial number and purchase date of your machine: the Service Centre will require this information.
10. TECHNICAL DATA
| Dimensions (Height / Width / Depth) | 85 X 60 X 65.9 cm | |
| Power supply (Voltage / Frequency) | 220-240 V~ / 50 Hz | |
| Total power absorbed | 2100 W | |
| Water supply pressure (Maximum / Minimum) | 0.8 MPa / 0.05 MPa | |
| Maximum dry clothes capacity | Program Max. Capacity | |
| Cottons | 11 kg | |
| Mixed | 4 kg | |
| Bedding | 3 kg | |
| Energy Saver | 11 kg | |
| Vapour Refresh | 1.5 kg | |
| Tub Clean | - | |
| App Program | - | |
| Spin | 11 kg | |
| Rinse + Spin | 11 kg | |
| Baby Care | 4 kg | |
| Quick 15 | 1.5 kg | |
| Daily 60 | 5.5 kg | |
| Wool 📋. | 2 kg | |
| Delicates | 4 kg | |
| Favourite | - | |
| Spin speed (Maximum / Minimum) 1400 rpm / 400 rpm | ||
11. INSTALLATION
11.1 Unpacking

CAUTION!
All transit bolts and packing must be removed before using the appliance.
You are advised to keep all transit devices so that they can be refitted if the machine ever has to be transported again.
- Use gloves. Cut and remove four cut out straps as shown.
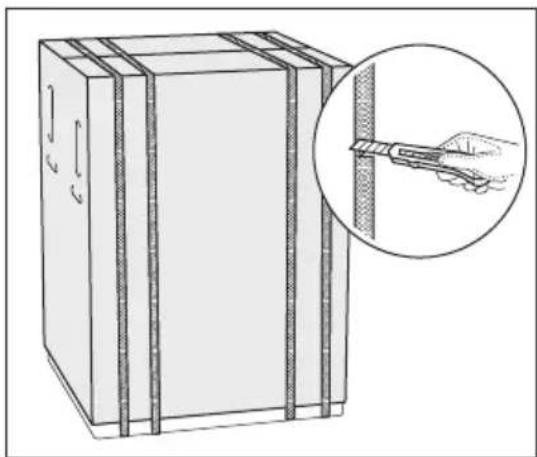
- Remove the carton box. Remove the polystyrene packaging materials.
Remove the plastic bag which cover the machine.

- Open the door. Remove the polystyrene piece from the door seal and all the items from the drum.
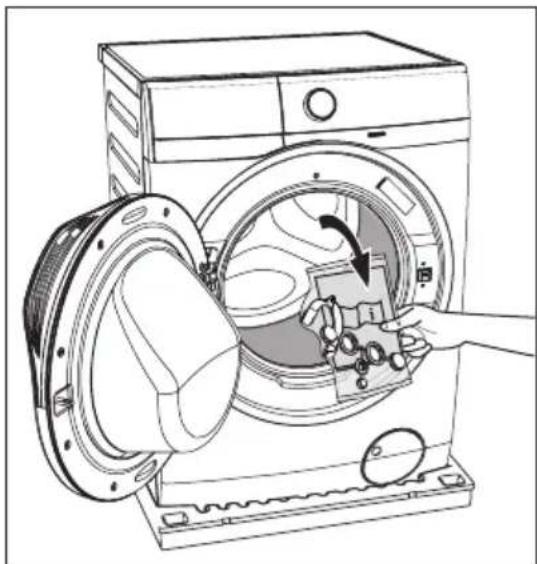
- Put one of the polystyrene packaging elements on the floor behind the appliance. Carefully put down the appliance with the rear side on it. Make sure not to damage the hoses.

- Remove the polystyrene base.

- Pull up the appliance in vertical position.
- Remove the power supply cable and the drain and inlet hoses from the hose holders (A) on the rear of the appliance.

- Remove the three transit bolts.
- Pull out the plastic spacers.
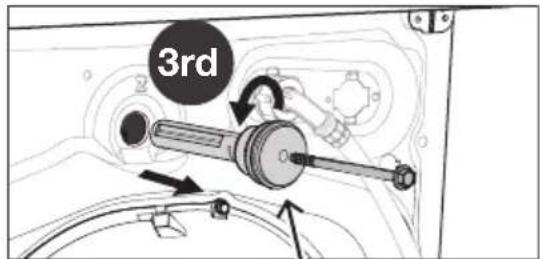
![graph TD A["1st"] --> B["2nd"] style A fill:#f9f,stroke:#333 style B fill:#bbf,stroke:#333](/content/2026/05/953136/images/924bd54b0f6d38a2b6002904546f6ab724555d14e67396d833a6127ef8a05eaf.jpg)
- Put the plastic caps in the holes (X3). You can find these caps in the user manual bag.

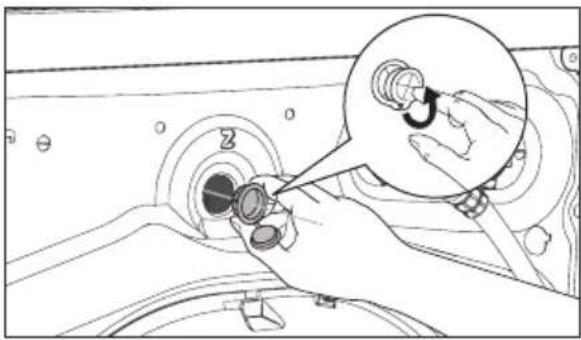
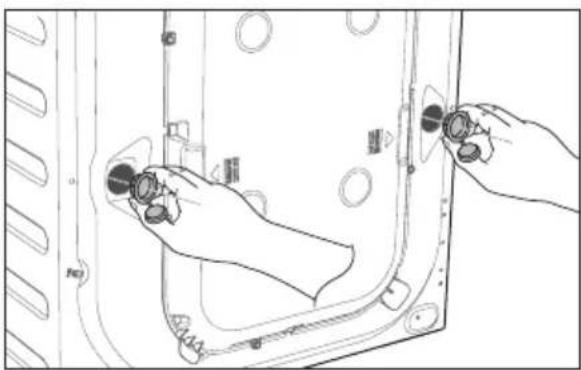
11.2 Positioning
It is important that your washing machine stands firm and leveled on the floor to ensure correct operation. The appliance must not be installed behind a lockable door, a sliding door or a door with a hinge on the opposite side to avoid restricting the washing machine door.
Use a spirit level on the top and side of the washing machine to check the levels.

If you do not have a spirit level, as a guide use the edge of a door frame, cupboard or bench to check that the washing machine is leveled.
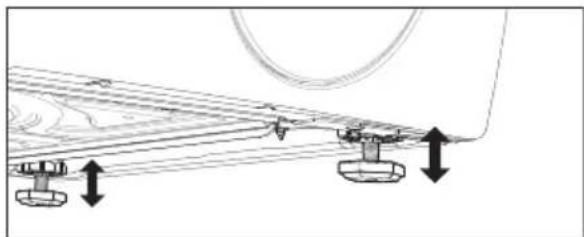
Loosen or tighten the feet to adjust the level. A correct adjustment of the appliance level prevents vibration, noise and the movement of the appliance when in operation.


When the washing machine is levelled, try to rock it from corner to corner. If it does rock, adjust the legs again until it is levelled and does not rock.

Never place cardboard, wood or similar materials under the machine to compensate for any unevenness in the floor. Install the machine on a flat hard floor. Make sure that air circulation around the machine is not impeded by carpets, rugs etc.
Check that the machine does not touch the wall or cupboard units.
11.3 Water Inlet
Connect the water inlet hose to a tap with 3/4" BSP thread.
Use the hose supplied with the washing machine. DO NOT USE OLD HOSES.

The inlet hose must not be lengthened. If it is too short and you do not wish to move the tap, you will have to purchase a new, longer hose specially designed for this type of use.
Loosen the ring nut to angle the hose to the left or right depending on the position of your water tap. Do not place the inlet hose downwards. After positioning the inlet hose, be sure to tighten the ring nut again to prevent leaks.

11.4 Water Drainage
The end of the drain hose can be positioned in three ways:
- Hooked over the edge of a sink, using the plastic hose guide supplied with the machine.
Fitting Hose Guide


In this case, make sure the end cannot come unhooked when the machine will be emptied. This could be done by tying it to the tap with a piece of string or attaching it to the wall.
• In a sink, drain pipe branch.
This branch must be above the trap so that the bend is at least 60 cm above the ground.
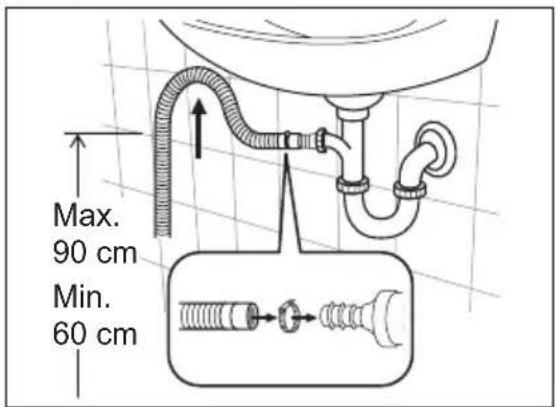
Push the drain hose onto the spigot and secure with a clamp, ensure a loop is formed in the drain hose to prevent waste from the sink entering the appliance.
- Directly into a drain pipe, at a height of not less than 60 cm and not more than 90 cm.

The end of the drain hose must always be ventilated, i.e. the inside diameter of the drain pipe must be larger than the outside diameter of the drain hose.
The drain hose must not be twisted or curled. Run it along the floor; only the part near the drainage point must be raised.
For the correct functioning of the machine, the drain hose must remain hooked on the proper support piece situated on the top part of back side of the appliance.
11.5 Electrical Connection
This machine is designed to operate on a 220-240 V, single-phase, 50 Hz supply.
An incorrect power supply may void your warranty.
Check that your domestic electrical installation can take the maximum load required (2.1 kW), also taking into account any other appliances in use.

Should the appliance power supply cable need to be replaced, this shall be carried out by our Service Centre.
When the appliance is installed, the power supply cable must be easily accessible.

CAUTION!
Connect the machine to an earthed socket outlet.

The manufacturer declines any responsibility for damage or injury through failure to comply with the above safety precaution.
12. ENVIRONMENT CONCERNS
12.1 Packaging Materials

The materials marked with the symbol 🌐 are recyclable.
PE<=polyethylene
PS<=polystyrene
PP<=polypropylene
This means that they can be recycled by disposing them properly in appropriate collection containers.
12.2 Old Machine
Use authorized disposal sites for your old appliance. Help to keep your country tidy!
The symbol 📋 on the product or on its packaging indicates that this product may not be treated as household waste.
Instead it shall be handed over to the applicable collection point for the recycling of electrical and electronic equipment. By ensuring this product is disposed of correctly, you will help prevent potential negative consequences for the environment and human health, which could otherwise be caused by inappropriate waste handling of this product.
For more detailed information about recycling of this product, please contact your local city office, your household waste disposal service or the shop where you purchased the product.
12.3 Ecological Hints
To save water, energy and to help protect the environment, we recommend that you follow these tips:
- Normally soiled laundry may be washed without prewashing in order to save detergent, water and time (the environment is protected too!).
- The machine works more economically if it is fully loaded.
- With adequate pre-treatment, stains and limited soiling can be removed; the laundry can then be washed at a lower temperature.
- Measure out detergent according to the water hardness, the degree of soiling and the quantity of laundry being washed.
13. WI-FI CONNECTIVITY SETUP
This chapter describes how to connect the smart appliance to the Wi-Fi network and to link it to a mobile devices.
By this functionality you can monitor and control your laundry appliance from your mobile devices.
To connect the appliance and enjoy the full range of features and services, you need:
- A wireless network at home with internet connection enabled.
- A mobile device connected to the wireless network.
| Frequency | 2.4 GHz according to local country regulation |
| Protocol | IEEE 802.11b/g/n |
| Max Power | According to local country regulation |
13.1 Installing and configuring the "Electrolux Life" App.
Make sure that your smart device is connected to the 2.4 GHz wireless network.
- Go to the App Store/Play Store on your smart device.
- Download and install the "Electrolux Life" App.
* Minimum requirements: iPhone6/iOS 9.3/Android 5.1 and above. You will need to install the Electrolux Life App, create an Electrolux account, and accept the Terms and Conditions and Electrolux's Privacy Policy in the App to use the connected features of the laundry appliance. Internet and Wi-Fi connections are required to use the full features of the App and the laundry appliance. Minimum requirements, Apps, and services are subject to change without notice.
- Create an Electrolux account. You can only create one Electrolux account per product. This account can be shared across multiple devices.
- Setting up your washing machine. Make sure your machine is plugged in and operating normally, and stand near it with your smart device. Tap on "Appliances" at the bottom of the home screen.
Tap on "Add Appliance" and follow the prompts on the screen.
* Setup will take several minutes depending on your network speed.
- Turning on your washing machine's Wi-Fi. Initially, your machine creates its own Wi-Fi network to assist in setting up. After setup, this network disappears, and your machine will connect to your home Wi-Fi network.
Press and hold Remote touch button for 3 seconds.
The text ☐ pops up for about 5 seconds and the icon ⚙ starts flashing and the wireless module begins starting up. It may take about 45 seconds before it is ready. When the wireless module is ready, the text RP (Access Point) is on to inform you that the access point will be open for about 3 minutes.
The washing machine is now creating a temporary network for the next step.
- Connect your washing machine:
iOS
Tap the home button to exit the app. Go to "Settings" on your phone and select "Wi-Fi".
Select your washing machine's Wi-Fi network. It is the one that begins with "AJ-" – (it may take a few moments to appear).
Tap the home button to exit your phone settings and then return to the Electrolux Life App.
Wait for confirmation of connection which may take up to a minute before proceeding to the next step.
Android
For Android devices, select your washing machine's Wi-Fi network from the drop-down box.
- Connect your washing machine to your home Wi-Fi.
You'll need to select your Wi-Fi network name and input your password.
For iOS devices, you will then be prompted to go to "SETTINGS" on your phone and select your Home Wi-Fi, then return to the Electrolux Life App.
If the connectivity is configured, the RP (Access Point) symbol is off and the icon ⏻ will stop blinking and light steadily to confirm that the configuration was successful.
Every time you switch the washing machine on, the machine takes 45 seconds to connect to the network automatically. When the 📞 indicator stops blinking, the connection is ready.
Connection successful!
Please proceed to the next screen to register the washing machine.
- Product registration: Simply add your washing machine's name and the purchase date.
Congratulations!
Now you're all set up. You can start exploring the Electrolux Life App.
To switch the wireless connection off, press and hold the 🔒 Remote touch button for 3 seconds until the first acoustic signal: OFF appears on the display.
If you switch the machine off and on again, the wireless connection is automatically off.
To remove the wireless credentials, press and hold the 🔒 Remote touch button for 10 seconds until the second acoustic signal: — — — appears on the display.
13.2 Remote Start
When the App is installed and the wireless connection is complete, you can start and stop a program remotely by activating remote start.
The Remote Control activates automatically when you press the Start/Pause button to start the program, but it is also possible to start a program.
Activate Remote Start
- Press the Remote button and the indicator ▶ appears on the display.
- Press the Start/Pause button to activate the Remote Start.
Now it is possible to start the program remotely.
Deactivate Remote Start
Press the Remote touch button.
The ▶ icon is off and the remote start is deactivated.
If the door is unlocked, the Remote Start is deactivated.
IMPORTANT INFORMATION THAT MAY AFFECT YOUR MANUFACTURER'S WARRANTY
2. PRODUCT DESCRIPTION....55
2.1 Parts 55 2.2 Accessories....56 2.3 Load Sensor (Weight Sensor) ... 57 2.4 AutoDos Technology (Automatic Dosing).... 58
3. CONTROL PANEL....59
3.1 Control Panel Description....59 3.2 Program Chart....60 3.3 Program Compatibility Options....62 3.4 Options....62 3.5 Settings....65 3.6 Start/Pause Touchpad ( ▷) and Add Garment ( ) 66
4. BEFORE FIRST USE 66
5. DAILY USE 67
5.1 Loading Laundry 67 5.2 Detergent Dispenser with AutoDos Tank and Manual Compartment.... 67
5.3 Option Settings 74
5.4 Starting a Program ( ▷∥ ) ...... 74
5.5 Program Faults....74
5.6 Changing a Program 74
5.7 Changing Options....74
5.8 Opening the Door 75
5.9 At the End of the Program......75
5.10 When the Wash Program Has Finished, but There Is Water in the Drum 75
5.11 Auto Off Mode 76
6. WASHING TIPS....77
6.1 Sorting Laundry......77 6.2 Temperature....77 6.3 Before Loading Laundry ..... 77 6.4 Maximum Load....77 6.5 Removing Stains....77 6.6 Type of Detergent and Quantity of Detergent ...... 78
7. INTERNATIONAL WASH CODE SYMBOLS....79
- CARE AND CLEANING 80 8.1 External Cleaning 80 8.2 Removing Limescale...80 8.3 After Each Wash......80 8.4 Maintenance Wash with the "Tub Clean" Program. 80 8.5 Cleaning the Detergent Dispenser and AutoDos Tank.80 8.6 Cleaning the Pump 82 8.7 Cleaning the Water Inlet Filter....84 8.8 Frost Precautions ..... 86
- TROUBLESHOOTING......87 9.1 Possible Failures ..... 87 9.2 Opening the Machine Door in an Emergency 90
- TECHNICAL DATA 91
- INSTALLATION 91 11.1 Unpacking....91 11.2 Positioning the Machine....93 11.3 Water Inlet Drain....94 11.4 Water Drainage 94 11.5 Electrical Connection 96
- ENVIRONMENTAL CONCERNS 96 12.1 Packaging Materials......96 12.2 Old Machine....96 12.3 Ecological Tips 96
- PREPARATION WI-FI CONNECTION......97
Transport bolts (when removed)

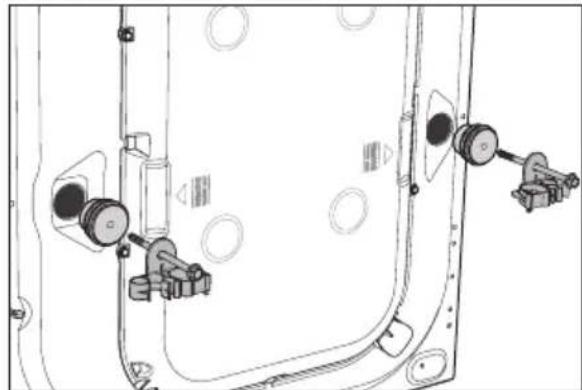


AutoDos detergent tank.

AutoDos fabric softener tank.
AutoDose Fabric Softener Touch Pad ✿
To activate and deactivate automatic fabric softener loading, refer to "5.2 Detergent Dispenser with AutoDos Tanks and Manual Compartment" on page 67.
Remote Control Touch Pad ( ▶ )
5. DAILY USE
5.1 Loading the Laundry
5.2 Detergent Dispenser with AutoDos Tank and Manual Compartment

CAUTION
1. Standard Mode
- Place powder detergent into the compartment ⚫. If using liquid detergent, make sure the special container is inserted.

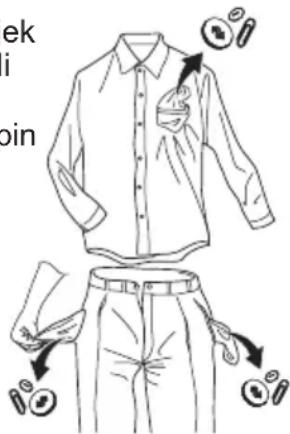


BEWARE!

WARNING!


WARNING!
8.6 Cleaning the Pump

- Remove the water inlet hose at the back of the appliance.
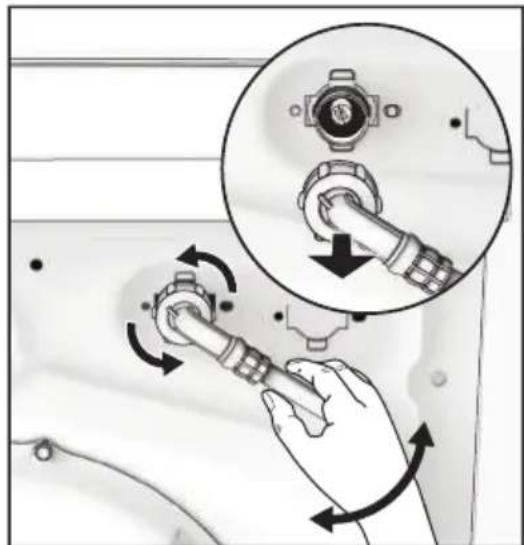

- Reconnect the water inlet hose. Make sure the connection is tight to prevent leaks.
- Open the water tap.
8.8 Frost Precautions
9.2 Opening the Machine Door in an Emergency
- Remove the polystyrene base.


PE<=polyethylene PS<=polystyrene PP<=polypropylene
1.5 Use
Transport bolts

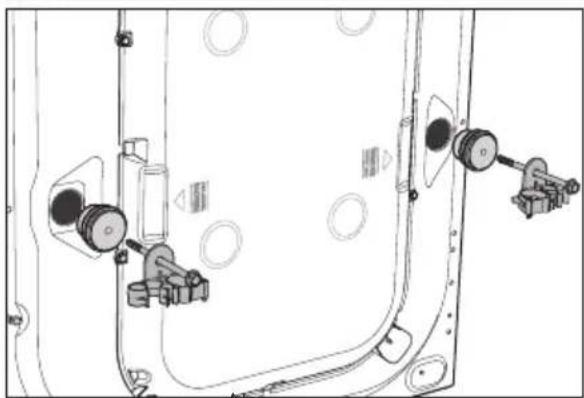
Use

Automatic detergent dispenser drawer.

Automatic softener dispenser drawer.
A) Spin speed
Ultra-quiet delayed spin
B) Washing phase icons:
Ultramix phase, wash
Rinse, spin,
Steam wash phase
5. Daily use
5.1 Loading laundry
5.2 Detergent dispenser with automatic liquid tank and manual detergent drawer
i Note
1. Standard mode
- Push the detergent drawer gently forward to close it.
Adding liquid detergent manually
- Insert the special container for liquid detergent.

- Pour liquid detergent into the compartment.

- If needed, pour fabric softener into the compartment.

- Push the detergent drawer gently forward to close it.

- Fasten pillowcases, zip up zippers, and fasten hooks and snaps. Tie all belts or long straps.


- Open the drain channel for each detergent compartment.

Caution!
Do not use sharp metal brushes or sponges.
Warning!

Warning!
- Reassemble the dispenser box according to the following instructions:
8.6 Cleaning the drain pump
Check the drain pump regularly to ensure it is clean.
Clean the drain pump in the following situations:


- Remove any lint and dirt from the pump (if any).

- Rinse the filter under the tap.

- Push the flap back into place, then close the drain pump door.
8.7 Cleaning the inlet hose filter
- Remove the inlet hose from the back of the machine.
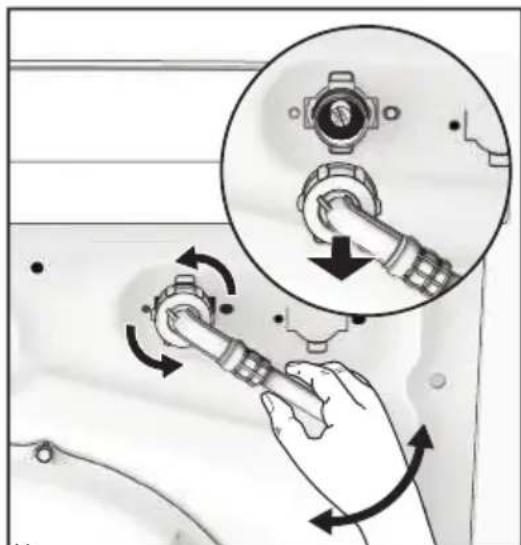

Clean the filter with clean water.
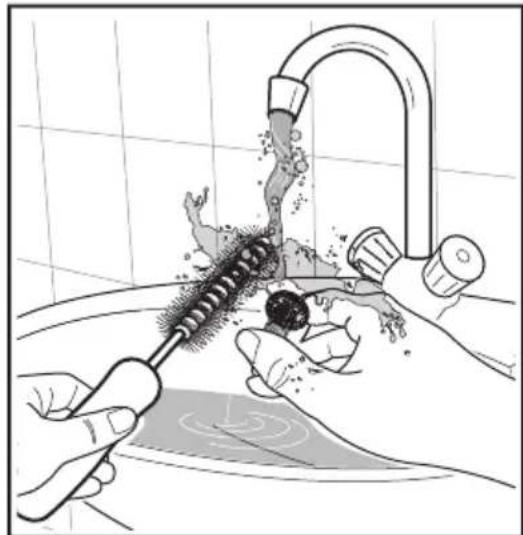
Install the valve filter back into the housing.

9.2 Emergency door opening
- Remove the laundry.
- Close the filter door.
10. Technical specifications
| 尺寸(高/宽/深) | 85 X 60 X 65.9 cm | |
| 电源(电压/频率) | 220-240 V~ / 50 Hz | |
| 功吸收的总率 | 2100 W | |
| 供水压力(最大/最小) | 0.8 MPa / 0.05 MPa | |
| 最大衣物量(晾衣服) | 程序 | 最大。 容量 |
| Cottons (棉质) | 11 kg | |
| Mixed (混合) | 4 kg | |
| Bedding (床上用品) | 3 kg | |
| Energy Saver(节能洗) | 11 kg | |
| Vapour Refresh (蒸汽 清新) | 1.5 kg | |
| Tub Clean (桶清洗) | - | |
| App Program (应用程序) | - | |
| Spin (脱水) | 11 kg | |
| Rinse + Spin (漂洗 + 脱水) | 11 kg | |
| Baby Care (婴儿) | 4 kg | |
| Quick 15(速洗 15 分钟) | 1.5 kg | |
| Daily 60 (日常 60) | 5.5 kg | |
| Wool (羊毛) | 2 kg | |
| Delicates (纤纺织物) | 4 kg | |
| Favourite (我最喜欢的) | - | |
| 脱水速度(最快/最慢) | 1400 rpm / 400 rpm | |
11. Installation
11.1 Unpacking

Caution:
- Remove the polystyrene foam base.

- Remove the three transport bolts.
- Pull out the plastic spacers.


11.2 Positioning the washing machine
Adjust the length to fit the recess.


PE<=polyethylene
PS<=polystyrene
PP<=polypropylene
- EASY WAY TO REGISTER YOUR
- PRODUCT WITH YOUR SMARTPHONE
- IMPORTANT INFORMATION THAT MAY IMPACT YOUR MANUFACTURER'S WARRANTY
- WE'RE THINKING OF YOU
- VISIT OUR WEBSITE TO
- CUSTOMER CARE AND SERVICE
- CONTENTS
- SAFETY INFORMATION
- PRODUCT DESCRIPTION
- CONTROL PANEL
- BEFORE FIRST USE
- DAILY USE
- WASHING HINTS
- INTERNATIONAL WASH CODE SYMBOLS
- TECHNICAL DATA
- CONDITIONS OF USE
- CHILD SAFETY
- GENERAL SAFETY
- FOR SAFETY REASONS, DO NOT USE DOUBLE ADAPTORS, EXTENSION CORDS, OR MULTI-PLUG ADAPTERS
- INSTALLATION 1.5 USE
- MAY CAUSE ELECTRIC SHOCK IF THE MACHINE IS NOT CONNECTED TO AN EARTHED/GROUNDED SYSTEM. DO NOT TOUCH WET CLOTHES AND METAL PARTS
- PARTS
- ACCESSORIES
- PLASTIC CAPS
- PLASTIC HOSE GUIDE
- LOAD SENSOR
- THE AUTODOSE TECHNOLOGY (AUTODOSING)
- INTRODUCTION
- WOOLMARK APPAREL CARE - BLUE
- PROGRAM OPTIONS COMPATIBILITY
- OPTIONS
- TEMPERATURE TOUCHPAD
- SPIN SELECTION TOUCHPAD
- NO SPIN (---)
- RINSE HOLD (☐)
- EXTRA SILENT (↓)
- AUTODOSE LIQUID DETERGENT TOUCHPAD
- AUTODOSE FABRIC SOFTENER TOUCHPAD
- REMOTE ( 📋 ) TOUCHPAD
- DELAY END (💡) TOUCHPAD
- EXTRA RINSE TOUCHPAD
- STAIN TOUCHPAD
- PREWASH TOUCHPAD
- YOU HAVE 2 OPTIONS FOR ADDING PREWASH DETERGENT
- VAPOUR ( TOUCHPAD
- SETTINGS
- SAVE FAVOURITE (☆ PROGRAM)
- CHILD SAFETY LOCK (☐) OPTION
- TO SET "CHILD LOCK" OPTION
- ENABLING/DISABLING END-OF-WASH BUZZER
- START/PAUSE ( ▷) AND ADD CLOTHES ( ✉) TOUCHPAD
- START/PAUSE ( ▷∥ )
- ADD CLOTHES ( )
- NOTE
- LOADING THE LAUNDRY 5.2 DETERGENT DISPENSER WITH
- WARNING
- READ THIS CHAPTER CAREFULLY
- AUTODOSE
- THE AUTODOSE SYSTEM HAS 3 MODES
- THE PRE-SET DOSAGES ARE 50ML FOR DETERGENT TANK AND 40ML FOR FABRIC SOFTENER TANK: THE OPTIMAL CONFIGURATION TO MEET MAJORITY OF USE CONDITIONS
- FILLING THE DETERGENT AND ADDITIVES ON AUTODOSE SYSTEM
- STANDARD MODE
- TO ACTIVATE/DEACTIVATE AUTODOSE SOFTENER (⚙)
- AUTODOSE CONFIGURATION MODE
- AUTODOSE LOW LEVEL INDICATION
- DRAWER OPEN INDICATION
- MANUAL FILLING OF DETERGENT AND ADDITIVES
- MANUAL FILLING OF POWDER DETERGENT
- MANUAL FILLING OF LIQUID DETERGENT
- SETTING AUTODOSE USING THE "ELECTROLUX LIFE" APP
- TO ADJUST DETERGENT AMOUNTS IN STANDARD MODE
- TO ADJUST SOFTENER AMOUNTS IN STANDARD MODE
- DUAL-DETERGENT MODE
- TO ACTIVATE/DEACTIVATE DETERGENT
- TO ADJUST DETERGENT AMOUNTS
- LINK MODE
- OPTIONS SETTING
- STARTING A CYCLE (▷) 5.7 CHANGING THE OPTIONS
- INTERRUPTION OF A PROGRAM
- CHANGING A PROGRAM
- OPENING THE DOOR
- AT THE END OF THE PROGRAM
- WHEN THE WASHING PROGRAM IS COMPLETED, BUT THERE IS WATER IN THE DRUM
- TO DRAIN THE WATER
- AUTO OFF MODE
- SORTING THE LAUNDRY
- TEMPERATURES
- BEFORE LOADING THE LAUNDRY
- MAXIMUM LOADS
- REMOVING STAINS
- DETERGENTS TYPE AND QUANTITY OF DETERGENT
- QUANTITY OF DETERGENT TO BE USED
- NOT ENOUGH DETERGENT CAUSES
- TOO MUCH DETERGENT CAUSES
- USE LESS DETERGENT IF
- CARE AND CLEANING
- EXTERNAL CLEANING
- CAUTION
- DESCALING
- AFTER EACH WASH
- MAINTENANCE WASH WITH "TUB CLEAN" PROGRAM
- TO RUN A MAINTENANCE WASH
- CLEANING THE DETERGENT DISPENSER AND THE AUTODOSE TANKS
- CLEANING THE PUMP
- CLEAN THE PUMP IF
- TO CLEAN THE DRAIN PUMP
- CLEANING THE WATER INLET FILTER
- TO CLEAN THE WATER INLET FILTERS
- FROST PRECAUTIONS
- EMERGENCY DRAIN
- NOTE MAKE
- TROUBLESHOOTING
- POSSIBLE FAILURES
- EMERGENCY DOOR OPENING
- BEFORE OPENING THE DOOR
- TO OPEN THE DOOR PROCEED AS FOLLOWS
- INSTALLATION
- UNPACKING
- POSITIONING
- WATER INLET
- WATER DRAINAGE
- FITTING HOSE GUIDE
- ELECTRICAL CONNECTION
- ENVIRONMENT CONCERNS
- PACKAGING MATERIALS
- OLD MACHINE
- ECOLOGICAL HINTS
- WI-FI CONNECTIVITY SETUP
- INSTALLING AND CONFIGURING THE "ELECTROLUX LIFE" APP
- IOS
- ANDROID
- CONNECTION SUCCESSFUL
- CONGRATULATIONS
- REMOTE START
- ACTIVATE REMOTE START
- DEACTIVATE REMOTE START
- IMPORTANT INFORMATION THAT MAY AFFECT YOUR MANUFACTURER'S WARRANTY
- WASHING TIPS
- AUTODOSE FABRIC SOFTENER TOUCH PAD ✿
- REMOTE CONTROL TOUCH PAD ( ▶ )
- LOADING THE LAUNDRY
- DETERGENT DISPENSER WITH AUTODOS TANK AND MANUAL COMPARTMENT
- BEWARE
- OPENING THE MACHINE DOOR IN AN EMERGENCY
- USE
- LOADING LAUNDRY
- DETERGENT DISPENSER WITH AUTOMATIC LIQUID TANK AND MANUAL DETERGENT DRAWER
- I NOTE
- ADDING LIQUID DETERGENT MANUALLY
- CLEANING THE DRAIN PUMP
- CHECK THE DRAIN PUMP REGULARLY TO ENSURE IT IS CLEAN
- CLEANING THE INLET HOSE FILTER
- TECHNICAL SPECIFICATIONS
- POSITIONING THE WASHING MACHINE
Brand : ELECTROLUX
Model : EWF1141SEWA
Category : Washing machine