
Streamstar KIT HD-SDI - Camera JVC - Free user manual and instructions
Find the device manual for free Streamstar KIT HD-SDI JVC in PDF.


| Product Type | Professional HD-SDI Camera Kit |
| Brand | JVC |
| Model | Streamstar KIT HD-SDI |
| Dimensions (Camera Body) | Approx. 170 x 180 x 340 mm |
| Weight (Camera Body) | Approx. 2.2 kg |
| Power Supply | DC 12V (AC adapter included) or optional battery pack |
| Power Consumption | Approx. 15 W |
| Sensor Type | 1/3-inch Progressive Scan CMOS |
| Effective Pixels | 2.07 Megapixels |
| Video Output | HD-SDI (BNC), HDMI |
| Video Format | 1080p 60/50/30/25, 720p 60/50 |
| Frame Rate | Up to 60 fps |
| Lens Mount | Fixed zoom lens (12x optical zoom) |
| Focus Control | Auto / Manual |
| White Balance | Auto / Manual / Presets |
| Audio Input | 3.5mm stereo jack, XLR (via optional adapter) |
| Storage Media | SD/SDHC/SDXC card (up to 64GB) |
| Recording Format | MP4 (H.264) |
| Network Connectivity | Streaming via Ethernet (RTMP) |
| Maintenance and Cleaning | Clean lens and body with dry soft cloth; avoid liquids |
| Safety Precautions | Do not expose to moisture or extreme temperatures |
| Spare Parts and Repairability | Contact authorized service center for replacements |
| General Information | All-in-one live production solution with HD-SDI output |
Frequently Asked Questions - Streamstar KIT HD-SDI JVC
User questions about Streamstar KIT HD-SDI JVC
0 question about this device. Answer the ones you know or ask your own.
Ask a new question about this device
Download the instructions for your Camera in PDF format for free! Find your manual Streamstar KIT HD-SDI - JVC and take your electronic device back in hand. On this page are published all the documents necessary for the use of your device. Streamstar KIT HD-SDI by JVC.
USER MANUAL Streamstar KIT HD-SDI JVC
LIVE PRODUCTION & STREAMING STUDIO FIRST STEPS MANUAL

natural_image
Abstract red geometric shape resembling a partial letter C (no text or symbols)All information in this document is subject to change without notice.
© STREAMSTAR a. s., 2017, All rights reserved.
WELCOME
streamstar
Congratulations!
You have successfully completed the installation of the Streamstar Live Production & Streaming Studio application.
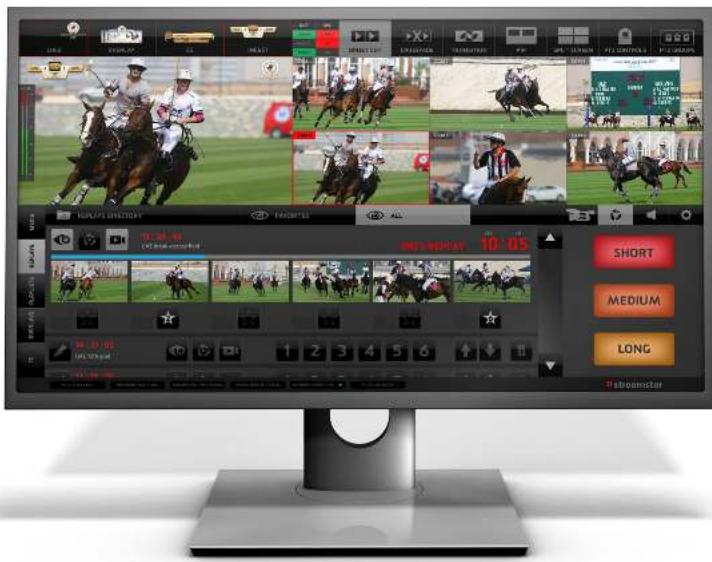
The purpose of this document is to provide basic information about the initial setup and operation of your new software to get you started working with the application.
The intuitive design of its user interface will enable you to achieve results smarter, faster and easier.
Thank You for choosing Streamstar.
ENTERING THE LICENSE KEY

streamstar
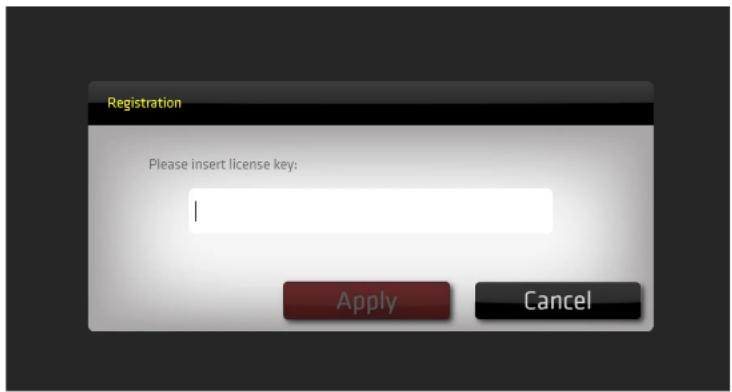
At first run of the software you will be asked to enter the license key.
NOTE: Make sure you are connected to the internet to allow the license key validation process to complete successfully.
Where to find the license key:
- if you purchased the Streamstar Live Production Studio Software Voucher product or one of the Streamstar KITs, the license key is on the Voucher Scratch Coupon.
- if you purchased the Streamstar Case or any X series product the license key will be preinstalled - no need to enter it.
- if you purchased the software online or downloaded a trial version the license key was be provided to you at the end of the registration process as well as it was included in the registration confirmation email you received.
At first run of the software this dialog box will appear. Enter the license key and hit the "APPLY" button.
USER INTERFACE CONCEPT EXPLAINED
streamstar
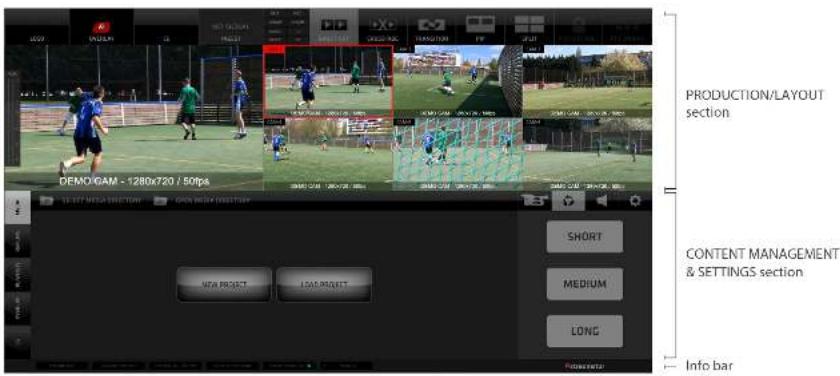
The Streamstar Live Production Studio has a modern, intuitive, touch screen user interface. All features can be operated by touch or mouse click when using a non-touch display.
The GUI is designed to support fast operation, processes and workflows in the most logical and practical way.
The GUI layout is divided into 2 main, horizontal sections containing logically related, operational elements.
- PRODUCTION/LAYOUT section,
- CONTENT MANAGEMENT / SETTINGS section
At the very bottom of the screen is an additional info bar displaying helpful info about the status of the system.
Streamstar Live Production Studio intuitive touch screen user interface
LOADING or CREATING A PROJECT
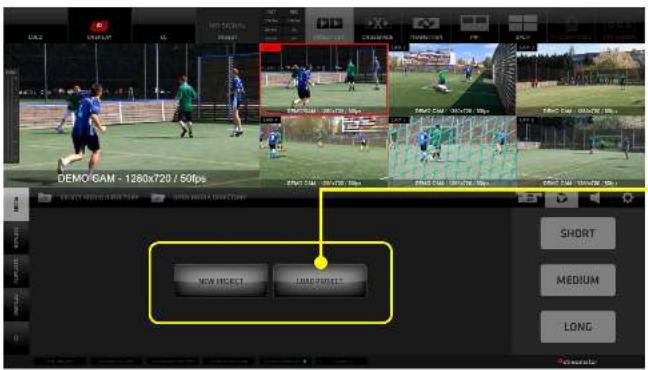
Load an existing project or create a new one by tapping one of the respective buttons in the CONTENT MANAGEMENT/SETTINGS section.
For speed of operation the NEW PROJECT button creates a new project instantly. It will be saved automatically as "Unnamed" and can be renamed later.
Choose the LOAD PROJECT button to open a dialog with a list of all saved projects. Tap a project name to load.
Here a new project with a specific name can also be created - type a project name in the input text field and click CREATE. Then select it to load.
streamstar
Tap on the name to load an existing project
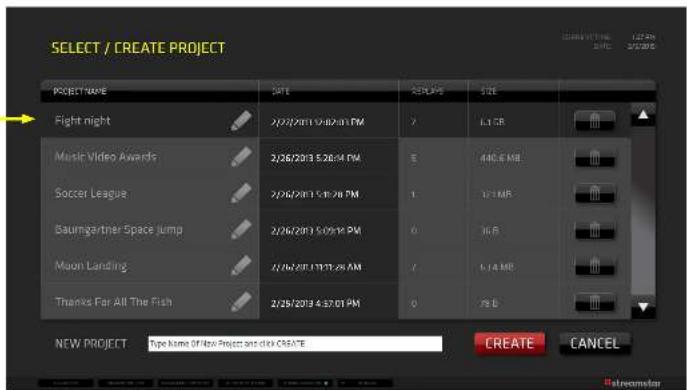
Tap the PENCIL icon besides the name of a project to edit the name of the project
Tap the TRASH icon at end of the line to delete a project
To create a new project type its name into the text input field and tap the "CREATE" button
PROJECT DIRECTORIES PATHS

streamstar
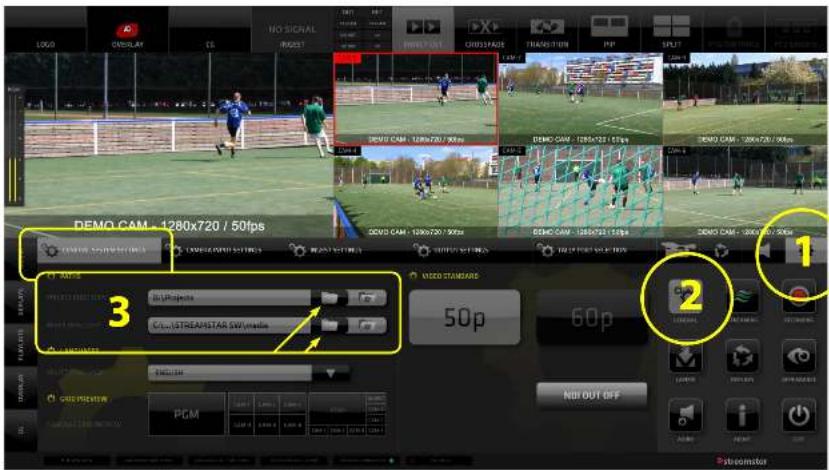
- Tap the SETTINGS icon to activate the Settings Buttons grid display (outlined and numbered yellow in the image)
- Tap the "GENERAL" settings icon to display the general settings in the Content Management Area
- Tap the DIRECTORY icon to change the path to project directories of your choice.
By default the directories are setup as shown and there is no need to change them, however as you get more experience you will be setting the paths to your project directories more frequently.
GENERAL SYSTEM SETTINGS TAB in General settings activated (outlined yellow)
CAMERA INPUTS SETUP

streamstar
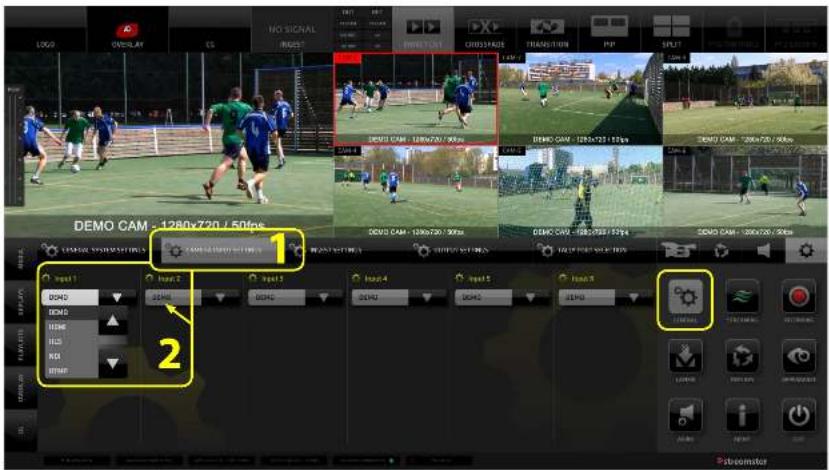
- Tap the CAMERA INPUT SETTINGS in General settings to reveal the camera inputs setup for each camera. (outlined and numbered yellow in the image)
- Tap the dropdown menu and select the input type for each camera individually.
By default the cameras are set to DEMO, which means that a demo video file is used to provide a signal instead of a camera. This is a great way of learning to operate the software without the need for camera signals.
GENERAL SYSTEM SETTINGS TAB in General settings activated (outlined yellow)
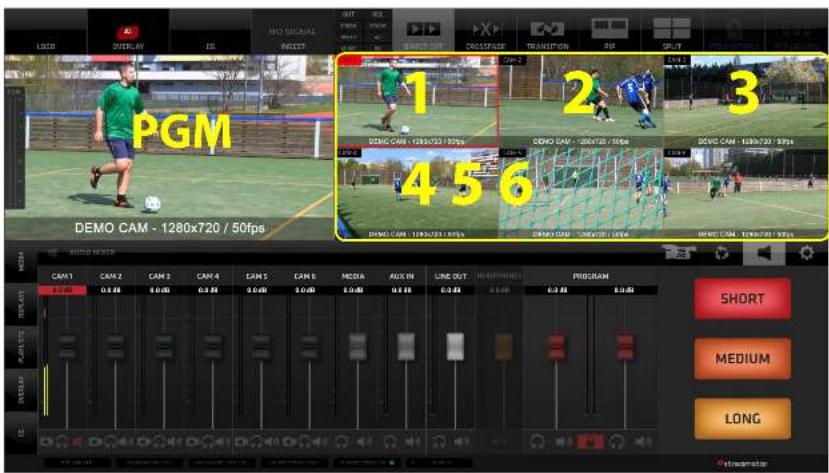
Switch cameras by tapping/ clicking on the camera monitors (marked 1 - 6) (outlined yellow).
At first run prerecorded video loops are provided instead of having to hook up cameras to get a signal. This is a great way to instantly experience switching and to learn to operate the system right after startup.
The PGM player shows the result = Program output.
A preview player of a camera presently switched live to PGM is outlined red in the GUI to give visual information about it's live status. (CAM -1)
Camera switching section (outlined yellow)
MIXING MODES - DIRECT CUT
streamstar
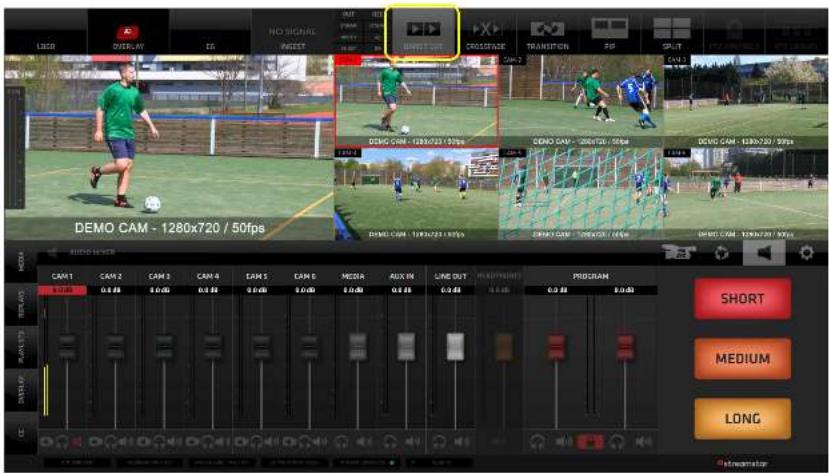
In the MIXING MODE section select one of the 3 available modes:
-
DIRECT CUT
-
CROSSFADE
-
TRANSITION
In the image example a DIRECT CUT mixing mode is activated, thus the software will perform a direct cut when switching cameras or other sources.
For a detailed description refer to the Software User's manual.
DIRECT CUT activated (outlined yellow)
MIXING MODES - CROSSFADE
streamstar
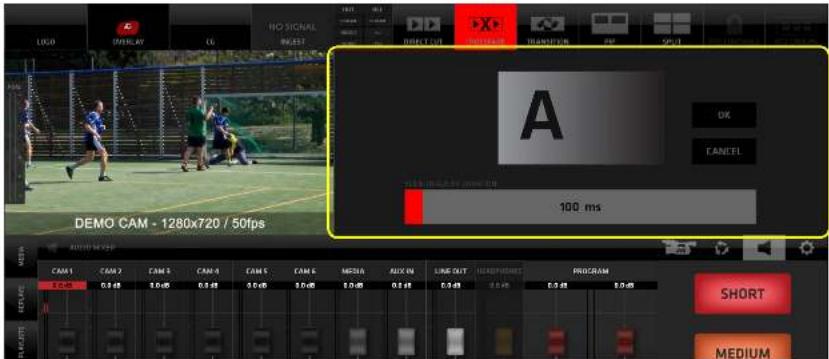
Tap the CROSSFADE button to use the CROSSFADE mixing mode.
CROSSFADE DURATION ADJUSTMENT
PRESS and HOLD the Crosfade button for 1 second.
The CROSSFADE DURATION SETUP pane opens.
Tap or slide the DURATION ADJUSTMENT BAR to adjust the CROSSFADE DURATION time.
A CROSSFADE PREVIEW displays the adjusted croassfade duration for visual control.
Click OK to set the new DURATION time or CANCEL to cancel the adjustment.
The software will now perform crossfades of the specified duration when switching cameras or other sources.
For a detailed description refer to the Software User's manual.
CROSSFADE mixing mode activated (outlined yellow)

CROSSFADE DURATION ADJUSTMENT activated (outlined yellow)
MIXING MODES - TRANSITION
streamstar
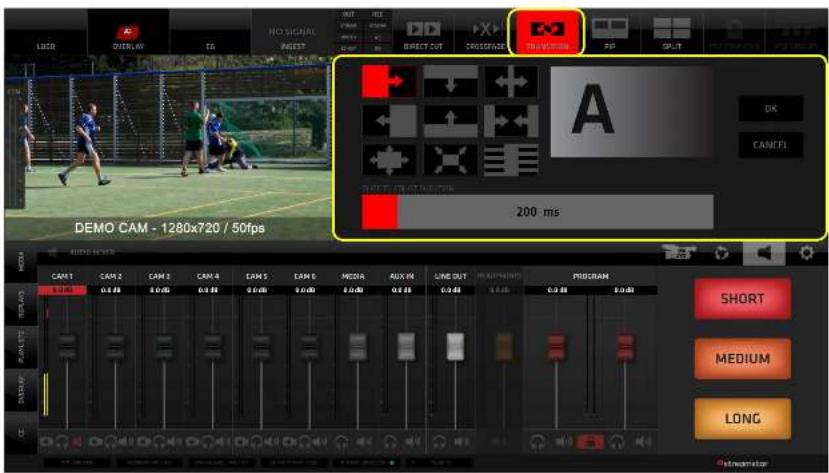
Select the TRANSITION button to use the TRANSITION mixing mode.
PRES and HOLD the TRANSITION button to access the TRANSITION SELECTOR / DURATION ADJUSTMENT pane.
Select one of the provided transitions and use the DURATION ADJUSTMENTBAR to set the desired duration of the transition.
The software will perform a selected transition of a specified duration when switching cameras or other sources.
TRANSITION mode with TRANSITION SELECTOR and DURATION BAR activated (outlined yellow)
For a detailed description refer to the Software User's manual.
MEDIA PLAYBACK
streamstar
The software is capable to use any video in the media directory in the production.
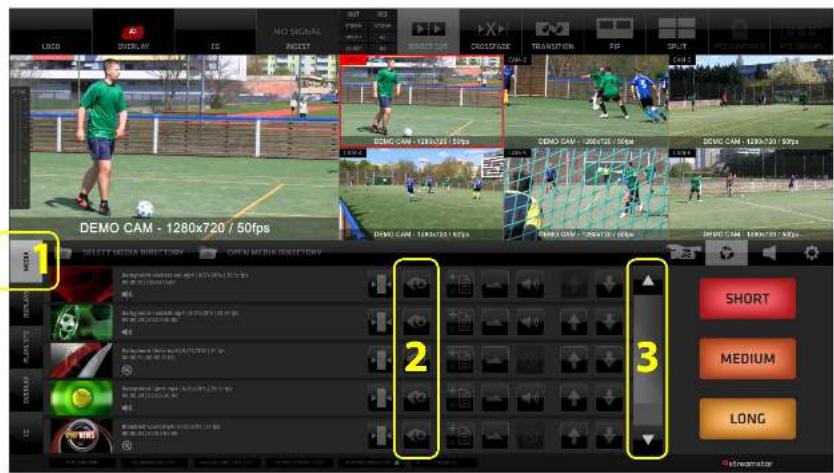
- Select the MEDIA TAB in the left side menu of the Content Management Section. (outlined yellow)
A list of media files present in the media directory with all relevant controls / information is displayed.
-
Use the PREVIEW icons for each media file to preview the media file.
-
Use the scroll bar to scroll through the list of media. ...continued on next page
MEDIA TAB in the left side menu activated (outlined yellow)
MEDIA PLAYBACK - continued
streamstar
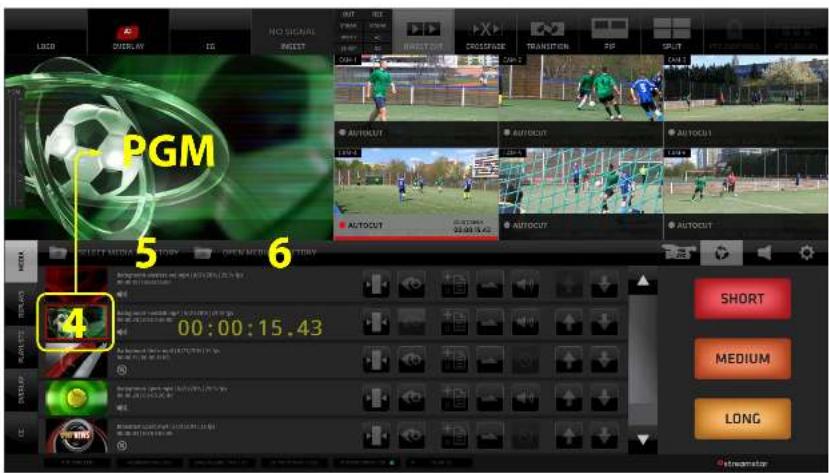
- Insert the media file into the production by tapping on it's preview player - same as when switching a camera.
A media file being played is outlined red in the GUI and a playhead position indicator is moving across the preview to give visual reference of the status of the media being played back. - Tap the SELECT MEDIA DORECTORY TAB to change the path for the media directory - to load a different set of media files into the software media library.
- Tap the OPEN MEDIA DORECTORY TAB to manage the content of the media directory in Windows OS.
For a detailed description refer to the Software User's manual.
Media file inserted in Live PGM SELECT MEDIA DIRECTORY TAB (outlined yellow)
STREAMING SETTINGS - DESTINATIONS
streamstar
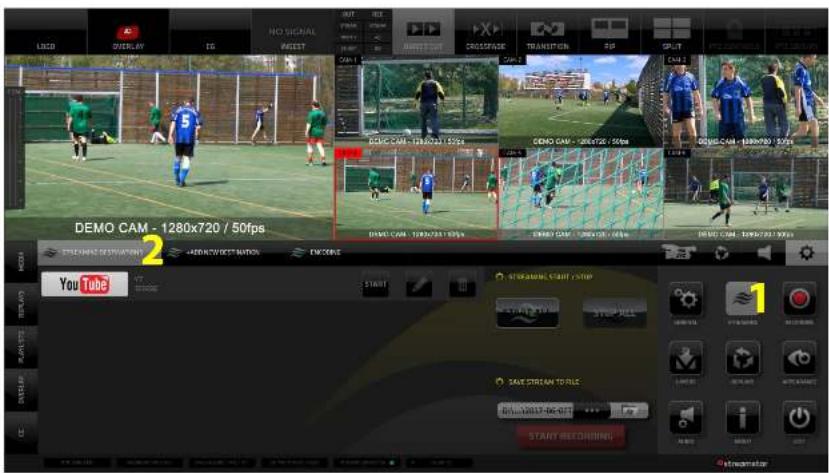
- To access the streaming settings tap on the STREAMING icon in the SETTINGS section to reveal the streaming settings in the Content Management Area.
- Under the STREAMING DESTINATIONS TAB there will be a LIST of your streaming destination you have setup.
To start streaming to each destination individually - hit the START button in the destinations list.
To start streaming to all destinations at once hit the START ALL button - MULTICASTING.
At 1st run the destinations list will be empty and you will need to set your streaming destinations.
...continue to next page for the procedure
For a detailed description refer to the Software User's manual.
STREAMING DESTINATIONS TAB in Streaming settings activated
STREAMING DESTINATIONS - continued
streamstar
-
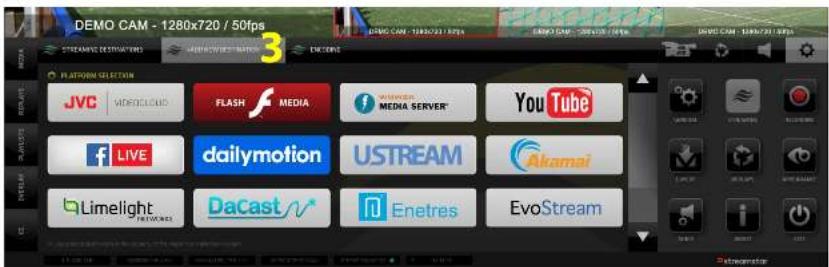
Tap on the ADD NED DESTINATION Tab A choice of supported platforms and CDNs is provided and ready to be selected.
-
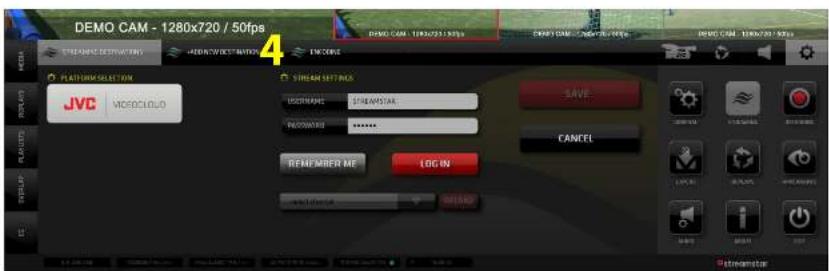
Click/tap to select one - the respective settings will become available. Fill out the required info and hit SAVE.
That will add the destination and bring you back to the STREAMING DESTINATIONS TAB with all your streaming destinations list.
Continue to next page to set the ENCODING SETTINGS.
For a detailed description refer to the Software User's manual.
ADD DESTINATION TAB in Streaming settings activated (outlined yellow)
STREAMING SETTINGS - ENCODING
streamstar
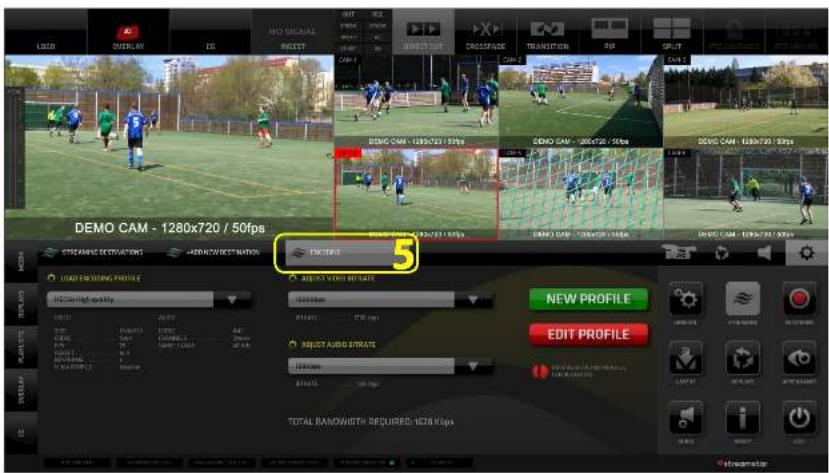
- Under the ENCODING TAB there are all necessary settings to set your encoding parameters:
Video and Audio bitrates, Resolution, Profile... all settings can be saved as Encoding Profiles for later use.
A choice of preset encoding profiles is available in the dropdown menu "LOAD ENCODING PROFILE".
Encoding parameters can be modified only when the system is not streaming. STOP STREAMING before making any changes to your encoding settings.
This concludes the Streaming setup. GO BACK to the STREAMING DESTINATIONS Tab and START STREAMING.
For a detailed description refer to the Software User's manual.
ENCODING TAB in Streaming Settings activated (outlined yellow)
streamstar
Thank You and enjoy your new Streamstar!
For more information please refer to the Software User's manual.
For support please contact: support@streamstar.com
All information in this document is subject to change without notice. © STREAMSTAR a.s., 2017, All rights reserved.
www.streamstar.com support@streamstar.com

natural_image
Abstract red geometric shape resembling a stylized letter 'C' with a white circular cutout (no text or symbols)- WELCOME
- streamstar
- ENTERING THE LICENSE KEY
- Where to find the license key:
- USER INTERFACE CONCEPT EXPLAINED
- LOADING or CREATING A PROJECT
- PROJECT DIRECTORIES PATHS
- CAMERA INPUTS SETUP
- MIXING MODES - DIRECT CUT
- MIXING MODES - CROSSFADE
- CROSSFADE DURATION ADJUSTMENT
- MIXING MODES - TRANSITION
- MEDIA PLAYBACK
- MEDIA PLAYBACK - continued
- STREAMING SETTINGS - DESTINATIONS
- STREAMING DESTINATIONS - continued
- STREAMING SETTINGS - ENCODING
Brand : JVC
Model : Streamstar KIT HD-SDI
Category : Camera