SSD7104 - Controller Highpoint - Free user manual and instructions
Find the device manual for free SSD7104 Highpoint in PDF.


| Product Type | RAID Controller |
| Model | SSD7104 |
| Brand | Highpoint |
| Interface | PCIe 3.0 x16 |
| Supported Drives | 4x M.2 NVMe (PCIe 3.0 x4 per lane) |
| RAID Levels | 0, 1, 10, 5, 6, JBOD |
| Form Factor | Low-profile half-length PCIe card |
| Dimensions (L x W x H) | 167.65 mm x 68.9 mm x 17.5 mm (approx) |
| Weight | Approximately 200 g (7.1 oz) |
| Power Consumption | Up to 25 W (via PCIe slot) |
| Operating Temperature | 0°C to 40°C (32°F to 104°F) |
| Storage Temperature | -20°C to 70°C (-4°F to 158°F) |
| Relative Humidity | 10% to 90% non-condensing |
| Key Features | Hardware RAID acceleration, TRIM support, SMART pass-through, UEFI option ROM, WebGUI management |
| Maintenance | Clean with compressed air; avoid liquid cleaners. Ensure proper ventilation. |
| Safety Precautions | Use anti-static wrist strap. Install in a grounded computer case. Do not insert/remove drives while card is powered. |
| Spare Parts / Repairability | Not user-serviceable. Contact Highpoint Technologies for RMA or replacement. |
| Warranty | 3-year limited warranty (typical) |
Frequently Asked Questions - SSD7104 Highpoint
User questions about SSD7104 Highpoint
0 question about this device. Answer the ones you know or ask your own.
Ask a new question about this device
Download the instructions for your Controller in PDF format for free! Find your manual SSD7104 - Highpoint and take your electronic device back in hand. On this page are published all the documents necessary for the use of your device. SSD7104 by Highpoint.
USER MANUAL SSD7104 Highpoint
SSD7000 RAID Management Guide
Version 1.07
Copyright © 2021 HighPoint Technologies, Inc. All rights reserved
Table of Contents
HighPoint RAID Management Software....4
Using the HighPoint RAID Management (WebGUI) Software....5
Starting the WebGUI....5
How to login WebGUI in Windows/Mac....5
How to login WebGUI in Linux....6
Verify the Controller Status....6
Creating an Array....9
Single controller to create an array....9
Using the Cross-Sync feature to create an array....12
Array Type....15
Adding Spare Disks....19
Obtaining Logical Device Information....21
Array Information & Maintenance Options: Normal Status.... 22
Array Information & Maintenance Options: Critical Status....23
Array Information & Maintenance Options: Disabled Status.... 24
Physical Device Information.... 25
System Setting....26
System Setting.... 27
Password Settings....28
Email Setting....28
Email Precautions....30
Event Tab....34
SHI (Storage Health Inspector)....34
How to Enable SMART Monitoring.... 35
How to Use the Health Inspector Scheduler....37
How to Create a New Verify Task....38
Log collecting....39
Diagnostic view....39
Log saving....40
Using the HighPoint Command Line Interface (CLI)....40
How to use the CLI in Windows.... 40
How to use the CLI in a Linux system.... 41
CLI Command Reference....41
Query Commands....42
query controllers....42
query enclosures....42
query devices....45
query devices {device_id}....48
query arrays....49
query arrays {arrays_id}....50
Init Commands....51
init {device_id}....51
init {array_id} {start|stop}.51
Create Commands....52
Delete Command....54
Unplug Command....55
Rebuild Commands....56
rebuild {array_id} {device_id}. 56
rebuild {array_id} {start|stop}....57
Verify Command....57
Rescan Command....58
Lscard Command....59
Events Commands....59
events....59
events save {file name}....60
Mail Commands....60
mail recipient....60
mail recipient add {recipient name} {mail address} [Inf|War|Err].... 61
mail recipient delete {recipient_name}.... 61
mail recipient test {recipient_name}.... 61
mail recipient set {recipient_name} {Inf|War|Err}.... 62
mail server....62
mail server set {server_address} {port} {ssl} {status} {from_address} [username]
[password]....62
mail server set {a|p|s|m|u|t} {value}....63
Task Commands....64
task....65
task rebuild {array_id} {name=}{once|daily|weekly|monthly={day} interval={interval}
start=mm/dd/yyyy end=mm/dd/yyyy time=hh:mm:ss.... 65
task verify....67
task delete {task_id}....67
task enable {task_id}....68
task disable {task_id}....68
Set Commands....69
set....69
Diag Commands....72
Help Commands....72
help....73
help {command}....73
Exit Command....74
Clear Commands....74
Troubleshooting....75
Table 1. WebGUI Icon Guide....76
Table 2. RAID Level Reference Guide....78
HighPoint Recommended List of NVMe SSDs and Motherboards.... 79
Contacting Technical Support....82
HighPoint RAID Management Software
Your Choice - Graphical or Text-only interfaces
HighPoint understands that one size doesn't fit all - when it comes to maintaining critical storage configurations, each customer has specific needs and preferences. We have developed both graphical and text-based management interfaces for the SSD7101A-1 / 7103 / 7120 / 7202 / 7204 / 7104 / 6540 / 6540M / 7184 / 7180 / 7505 / 7140 / 7540 / 7580/ 7502 NVMe RAID Controllers. To simplify installation and upgrade procedures both interfaces are packaged into a single download, and are available for each operating system platform.
Both management interfaces share universal layouts across all major operating systems, and can be administered locally or remotely via an internet connection. – if you are comfortable with the Windows release, you will have no problem managing NVMe RAID configurations installed for a Linux distribution.
The Web RAID Management Interface (WebGUI), is a simple, and intuitive web-based management tool available for Windows and Linux operating systems. It is an ideal interface for customers unfamiliar with RAID technology. The Wizard-like Quick Configuration menu allows even the most novice user to get everything up and running with a few simple clicks. Experienced users can fine tune configurations for specific applications using the Advanced Options menu.
The CLI (command line interface) is a powerful, text-only management interface designed for advanced users and professional administrators. The universal command lines work with any platform, and are shared across our entire product line. Comprehensive user guides are available for the CLI, and are included with the most recent product updates available from the SSD7101A-1 / 7120 / 7103/7202 / 7204 / 6540 / 6540M / 7184 / 7104 / 7505 / 7140 / 7540 / 7580 / 7502 Software Updates webpage.
Using the HighPoint RAID Management (WebGUI) Software
This guide provides an overview of the Web-RAID Management graphical user interface, also known as the WebGUI. The WebGUI is an intuitive, yet comprehensive management tool designed for users of any experience level.
Starting the WebGUI
How to login WebGUI in Windows/Mac
Double click the Desktop ICON to start the software using the system's default web browser. It will automatically log-in to the WebGUI.
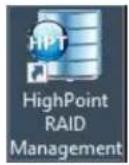
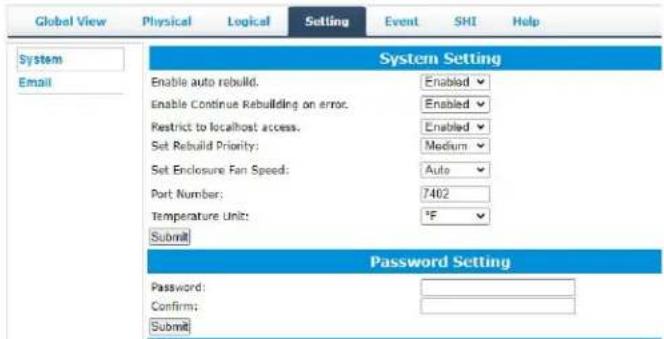
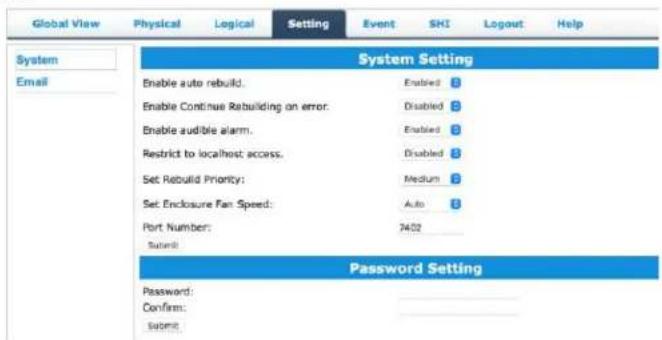
The password can be set after the first log-in. To change the password, select Setting>Security from the menu bar (see page 25 for more information).
Windows:
Mac:
How to login WebGUI in Linux
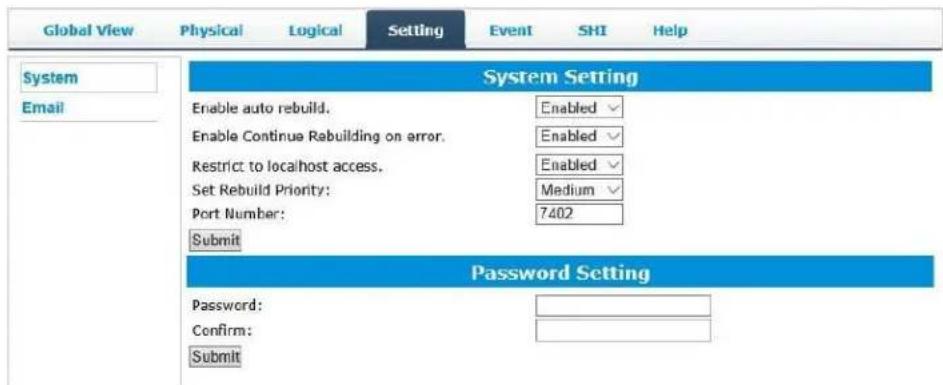
Enter http://127.0.0.1:7402 into the browser to log into the WebGUI, 7402 is the WebGUI's Port Number, which can be modified.
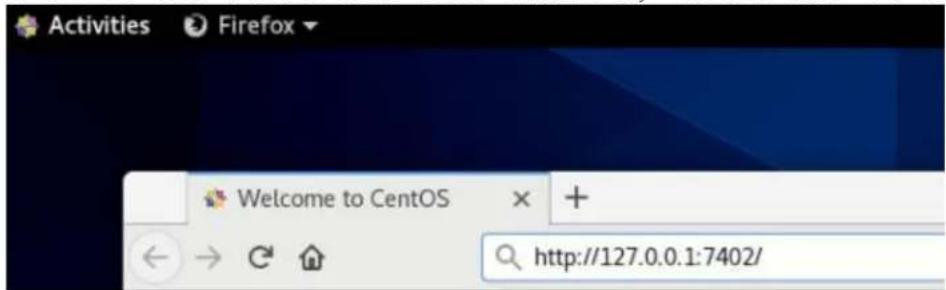
The password can be set after the first log-in. To change the password, select Setting>Security from the menu bar (see page 25 for more information).
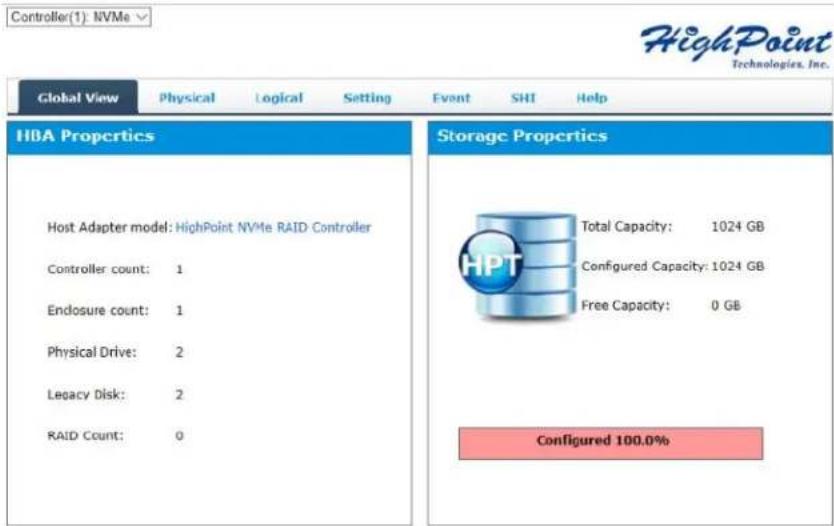
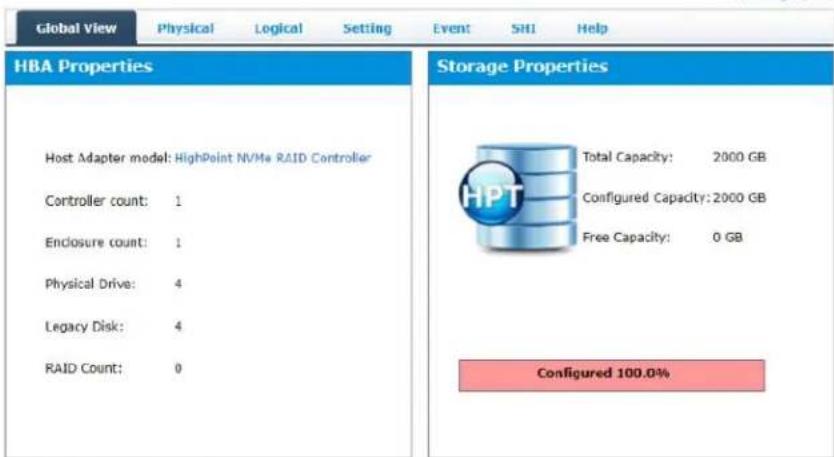
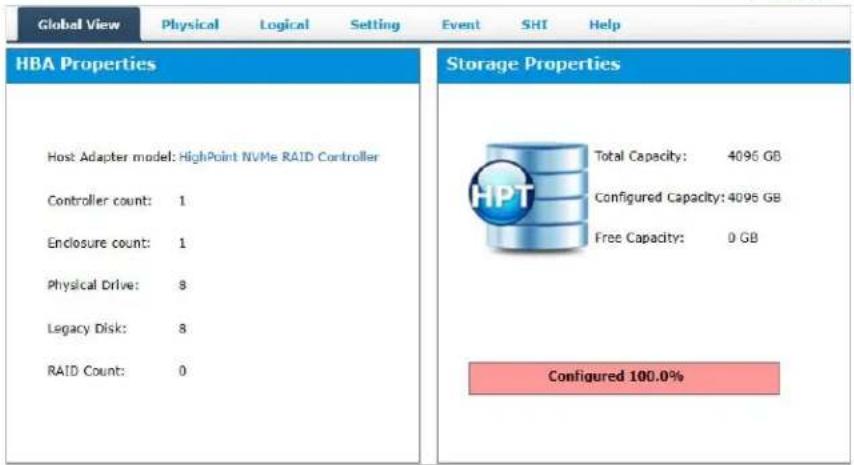
Verify the Controller Status
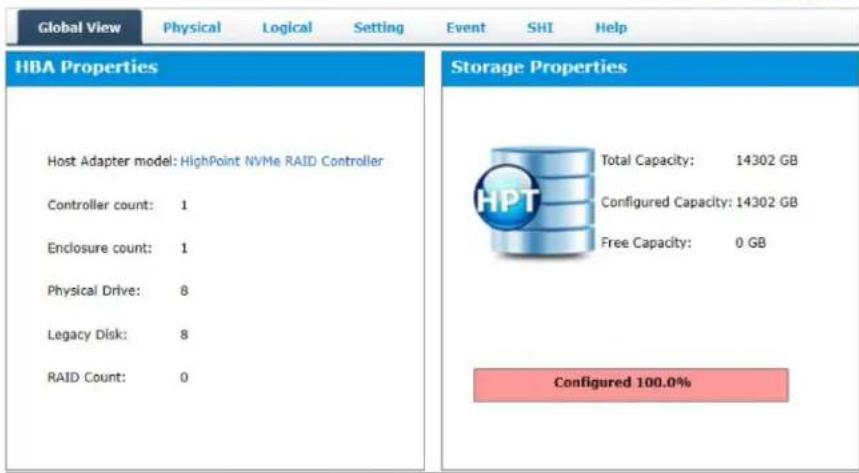
a) The Global View Tab will display the overall status of the controller.
b) RAID configurations are listed under Logical Device Information.
c) The individual M.2 SSDs are listed under Physical Device Information.
SSD7202/7502:
HighPoint RAID Management 2.13.3
Copyright (c) 2018 HighPoint Technologies, Inc. All Rights Reserved
Controller(1). NVMe
SSD7101A/7120/7103/7204/7104/6540/6540M/7505:

Technologies, Inc.
HighPoint RAID Management 2.13.3
Copyright (c) 2018 HighPoint Technologies, Inc. All Rights Reserved
SSD7540/7580:
Controller(1) NVMe
HighPoint
HighPoint RAID Management 2.13.3
Copyright (c) 2018 HighPoint Technologies, Inc. All Rights Reserved
SSD7184/7180/7140:
Controller(1): NVMe
HighPoint Technologies, Inc.
HighPoint RAID Management 2.13.3
Copyright (c) 2018 HighPoint Technologies, Inc. All Rights Reserved
Creating an Array
Single controller to create an array
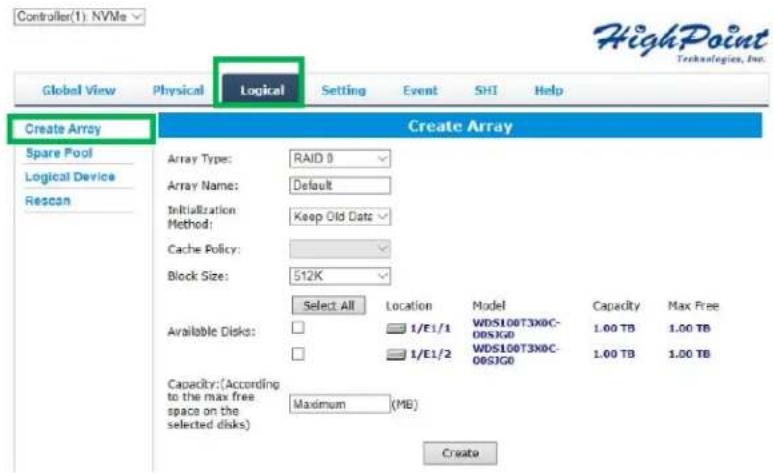
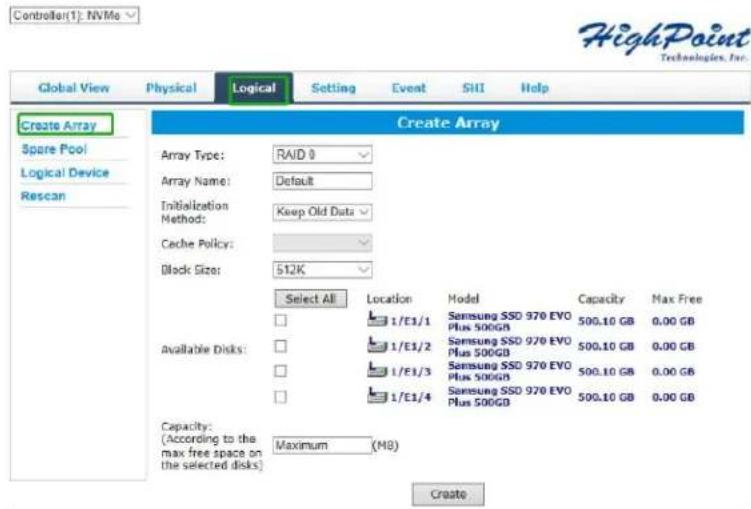
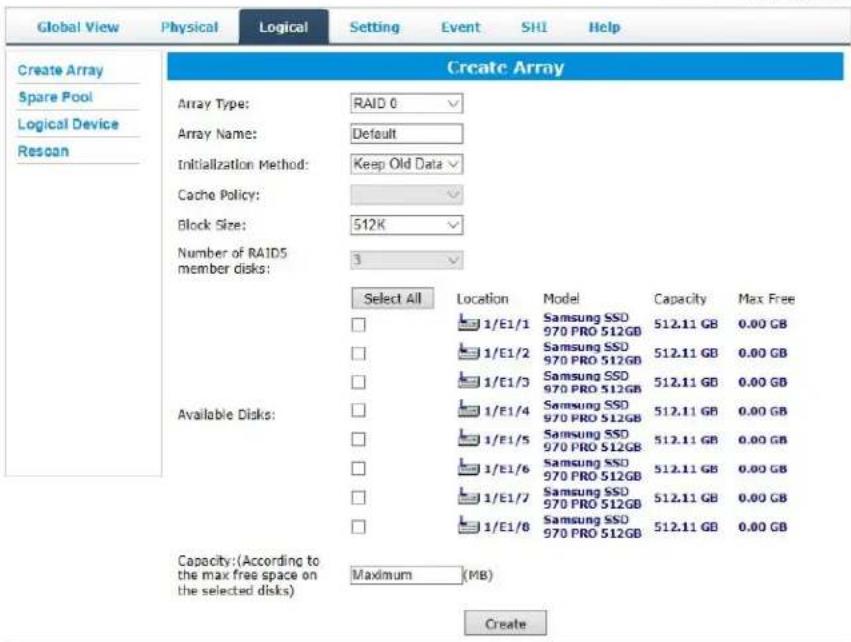
- Open the WebGUI
- Select the proper controller from the drop down on the top left
- Click the Logical tab
- Click Create Array
SSD7202 /7502:
SSD7101A/7103/7204/7104/6540M/7505:
HighPoint RAID Management 2.13.3
Copyright (c) 2018 HighPoint Technologies, Inc. All Rights Reserved
SSD7540:
Controller(1): NVMe
HighPoint Technologies, Inc.
HighPoint RAID Management 2.13.3
Copyright (c) 2018 HighPoint Technologies, Inc. All Rights Reserved
SSD7184/7180/7580:
Controller(1) NVMe
HighPoint Technologies, Inc.
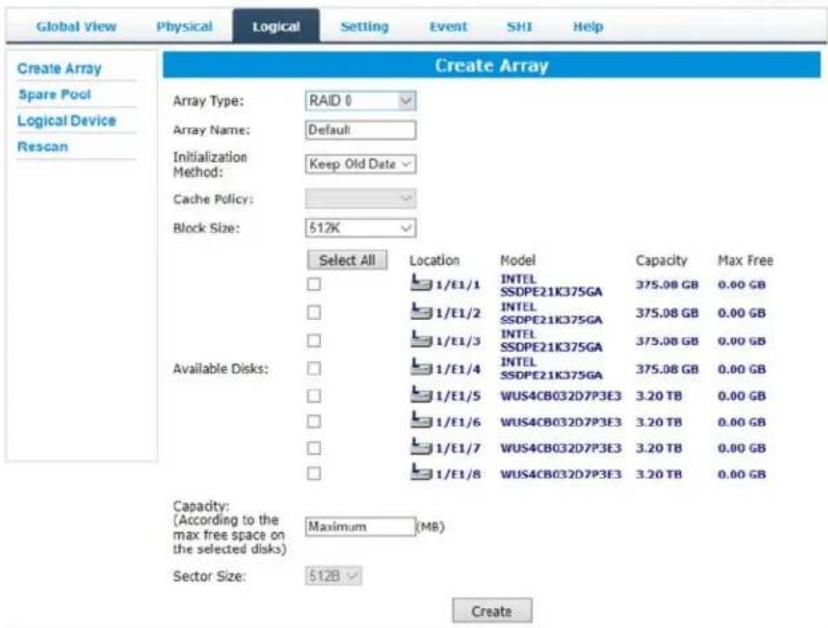
HighPoint RAID Management 2.13.3
Copyright (c) 2018 HighPoint Technologies, Inc. All Rights Reserved
SSD7140:
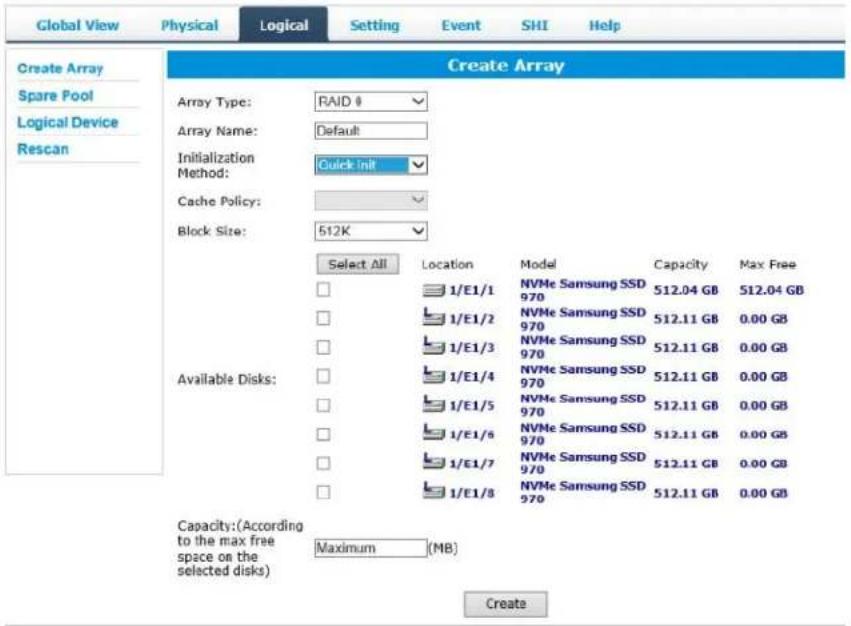
Using the Cross-Sync feature to create an array
Note: This function is only supported by SSD,71SSD-7104,
SSD7103, SSD7120, SSD7202, SSD7505 controllers
For more information about Cross-Sync, please submit a Support Ticket via our Online Support Portal, or contact sales@highpoint-tech.com
- Open the WebGUI
- Select the appropriate controller using the drop-down menu found in the upper left-hand corner of the interface
- Click the Logical tab
- Click Create Array - it should recognize the SSD's attached to both cards.
SD7101A-1/7104/7103:
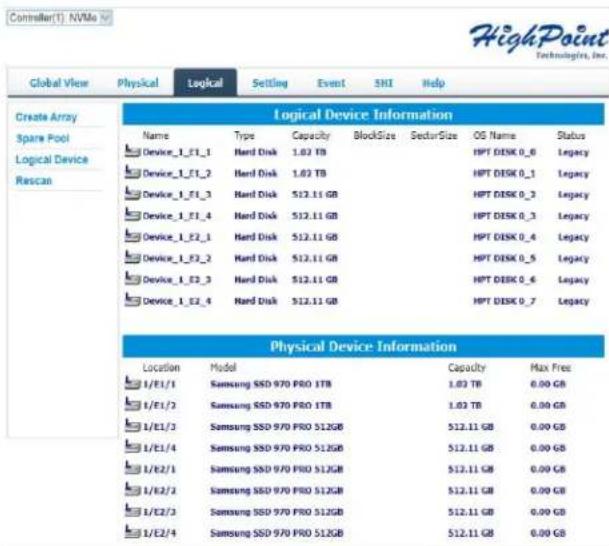
HighPoint RAID Management 2.13.3 Copyright (c) 2018 HighPoint Technologies, Inc. All Rights Reserved
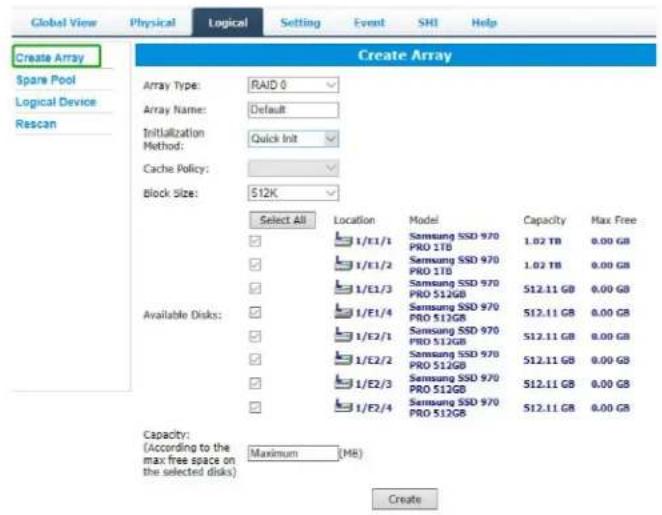
SSD7120:
Controller(1): NVMe
HighPoint Technologies, Inc.
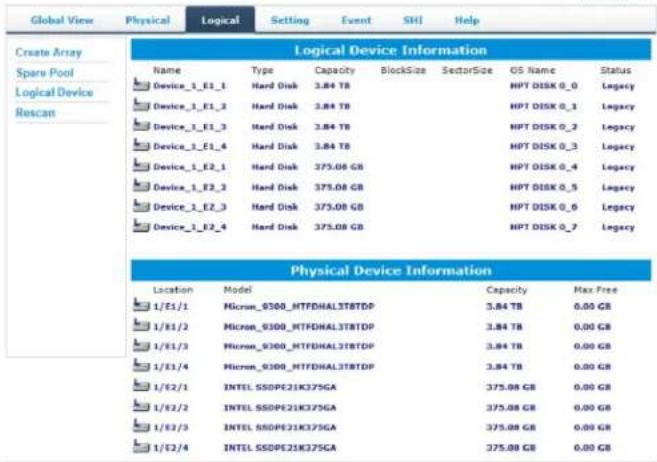
HighPoint RAID Management 2.13.3 Copyright (c) 2018 HighPoint Technologies, Inc. All Rights Reserved Controller(1): NVMe
HighPoint Technologies, Inc.
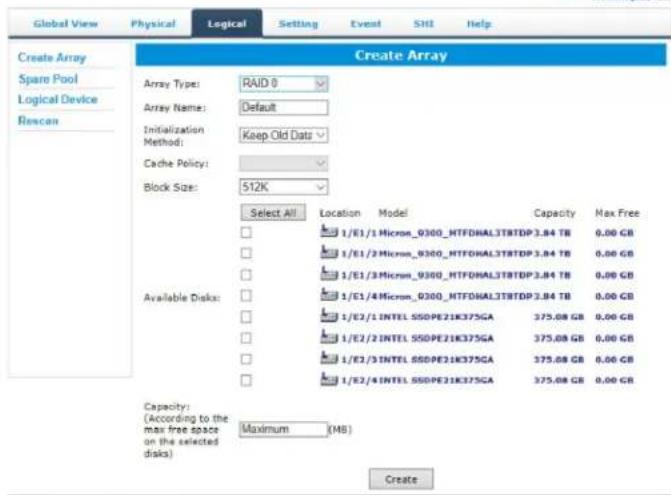
HighPoint RAID Management 2.13.3 Copyright (c) 2018 HighPoint Technologies, Inc. All Rights Reserved
SSD7202:
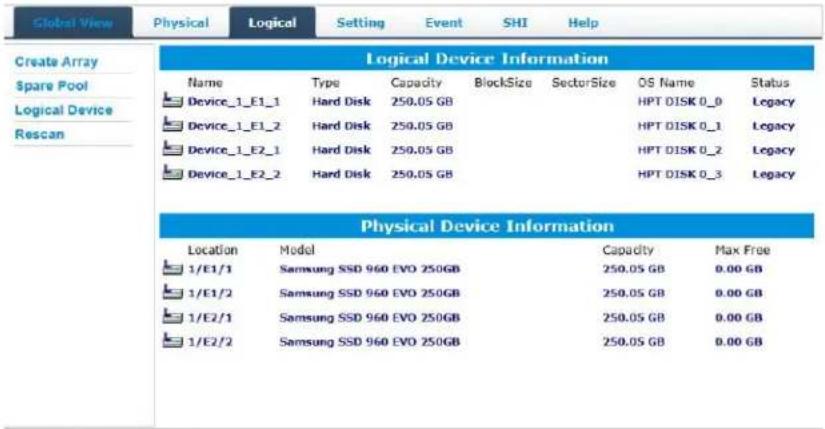
HighPoint RAID Management 2.13.3
Copyright (c) 2018 HighPoint Technologies, Inc. All Rights Reserved
SSD7505:
| Global View Physical Logical Setting Event SHI Help | ||||||
| Create Array Spare Pool Logical Device Rescan | Logical Device Information | |||||
| Name | Type | Capacity | BlockSize | SectorSize | OS Name Status | |
| Device_1_E1_1 | Hard Disk | 1.02 TB | HPT DISK 0_0 Legacy | |||
| Device_1_E1_2 | Hard Disk | 1.02 TB | HPT DISK 0_1 Legacy | |||
| Device_1_E1_3 | Hard Disk | 512.11 GB | HPT DISK 0_2 Legacy | |||
| Device_1_E1_4 | Hard Disk | 512.11 GB | HPT DISK 0_3 Legacy | |||
| Device_1_E2_1 | Hard Disk | 512.11 GB | HPT DISK 0_4 Legacy | |||
| Device_1_E2_2 | Hard Disk | 512.11 GB | HPT DISK 0_5 Legacy | |||
| Device_1_E2_3 | Hard Disk | 512.11 GB | HPT DISK 0_6 Legacy | |||
| Device_1_E2_4 | Hard Disk | 512.11 GB | HPT DISK 0_7 Legacy | |||
| Physical Device Information | ||||||
| Location | Model | Capacity | Max Free | |||
| 1/E1/1 | Samsung SSD 970 PRO 1TB | 1.02 TB | 0.00 GB | |||
| 1/E1/2 | Samsung SSD 970 PRO 1TB | 1.02 TB | 0.00 GB | |||
| 1/E1/3 | Samsung SSD 970 PRO 512GB | 512.11 GB | 0.00 GB | |||
| 1/E1/4 | Samsung SSD 970 PRO 512GB | 512.11 GB | 0.00 GB | |||
| 1/E2/1 | Samsung SSD 970 PRO 512GB | 512.11 GB | 0.00 GB | |||
| 1/E2/2 | Samsung SSD 970 PRO 512GB | 512.11 GB | 0.00 GB | |||
| 1/E2/3 | Samsung SSD 970 PRO 512GB | 512.11 GB | 0.00 GB | |||
| 1/E2/4 | Samsung SSD 970 PRO 512GB | 512.11 GB | 0.00 GB | |||
HighPoint RAID Management 2.13.3
Copyright (c) 2018 HighPoint Technologies, Inc. All Rights Reserved
- You can view information about both controllers using the Physical tab. Note, the interface will refer to the controllers as “Enclosure 1” and “Enclosure 2”.
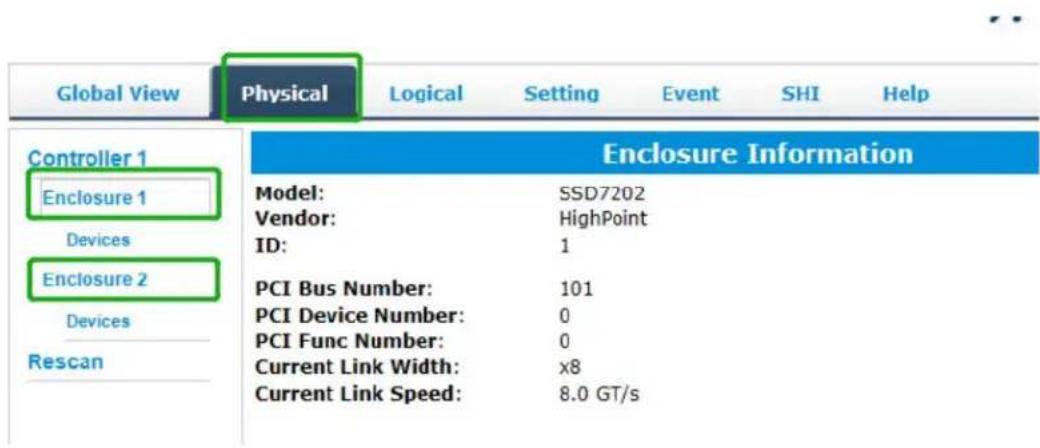
Array Type
This drop-down menu allows you to specify the RAID level. An array is a collection of physical disks that will be one virtual drive by your Operating System (OS).
The SSD7202 /7502 is capable of creating the following types of arrays:
- RAID 0 — Striping
• RAID 1 — Mirroring
The SSD7101A-1, SSD7103, SSD7120, SSD6540, SSD6540M, SSD7104, SSD7204, SSD7184, SSD7505, SSD7140, SSD7540 and SSD7580 controllers can create the following types of arrays:
- RAID 0 — Striping
• RAID 1 — Mirroring
• RAID10 — Striping Mirrored array
Each RAID level has its pros and cons based on the application you use it for (Note: Refer to RAID level Quick Reference)
Array Name: the name that will be displayed in Logical Device Information (Default: RAID_
Initialization Method:
Initialization of a disk sets all data bits to 0, essentially clearing all the data on the drive. It is important to initialize disks as previous data physically stored on the drive may interfere with new data.
- Keep Old Data: This option skips the initialization process and all data on each physical disk of the array will be untouched.
- Quick Init: This option grants immediate access to the RAID array by skipping the initialization process, but it will delete all data. Note: Skipping initialization is generally not recommended as residual data on disks may interfere with new data in the future.
- Foreground: The array initialization process will be set at high priority. During this time array is not accessible, but the initialization process will complete much faster.
- Background: The array initialization process will have a lower priority. During this time the array will be accessible, but the initialization process will take much longer to complete.
Note: Using a Samsung 970 EVO Plus 500GB as an example; RAID 1 Initialization (Foreground) time is approximately 10 minutes.
Initialization using the Background option would take 12 minutes to complete.
Background and Foreground Initialization
Foreground initializing the array will completely zero out the data on the disks, meaning the disk will be completely wiped and every bit on the disk will be set to 0. Background initialization means the array will still be created, and you can still write new data onto the array. But when your array requires rebuilding, residual data left behind may interfere with the process.
Block Size (default: 512K)
Windows:
SSD7103/7202/7502/7505/7540/7580: [supported block sizes:
64K/128K/256K/512K]
SSD7101A-1/SSD7120/7104/6540/6540M/7204/7184/7180/7140:
[supported block sizes: 16K/32K/64K/128K/256K/512K/1024K]
Mac:
SSD7103/7502/7505/7540/7101A-1/7120/7104/6540/
6540M/7204/7184/7180/7140: [supported block sizes: 16K/32K/
64K/128K/256K/512K/1024K]
Linux:
SSD7103/7502/7202/7505/7540/7101A-1/7120/7104/6540/
6540M/7204/7184/7180/7140/7580: [supported block sizes:
64K/128K/256K/512K]
Adjusting the block size towards your disk usage can result in some performance gain.
In a typical RAID configuration, data of the virtual drive is striped (or spread across) the physical drives. Having a smaller array block size will increase the likelihood of accessing all physical drives when processing large I/O requests. Multiple physical drives working in parallel increases the throughput, meaning better performance.
For smaller I/O requests (512 bytes to 4 kilobytes), it is better to have each individual disk handle their own I/O request, improving the IOPS (I/O per second), rather than having one tiny I/O request being handled by multiple disks.
Capacity (Default: Maximum)
This section allows you to set the total amount of space you want the RAID array to use. When creating RAID levels, disk capacities are limited by the smallest disk.
An example of how disk capacities are limited by smallest disk:
- You have 2 drives connected to the enclosure.
- The first drive is 6 TB, the second is 4 TB
- After creating a RAID level 1 using both drives and maximum capacity, the first drive will have 2 TB, the second 0 TB of free capacity
- The free capacity on the second drive can be used to create a separate array with other drives.
Adding Spare Disks
Note: This function is only supported by SSD7101A-1, SSD7103, SSD7505, SSD6540, SSD6540M, SSD7120, SSD7184, SSD7180, SSD7104, SSD7204, SSD7140, SSD7540 and SSD7580 RAID controllers.
Spare disks are physical disks that will immediately replace critical disks in an array.
SSD7103:
| Global View | Physical | Logical | Setting | Event | SHI | Help |
| Create Array | Spare Pool | |||||
| Spare Pool | Remove Spare | |||||
| Logical Device | Available Disks | |||||
| Rescan | Device_1_E1_1 | Samsung SSD 970 EVO Plus 500GB | 500.02 GB | |||
| Device_1_E1_2 | Samsung SSD 970 EVO Plus 500GB | 500.02 GB | ||||
| Device_1_E1_3 | Samsung SSD 970 EVO Plus 500GB | 500.02 GB | ||||
| Device_1_E1_4 | Samsung SSD 970 EVO Plus 500GB | 500.02 GB | ||||
| Add Spare | ||||||
SSD7540:
| Global View | Physical | Logical | Setting | Event | SHI | Help |
| Create Array | Spare Pool | |||||
| Spare Pool | Remove Spare | |||||
| Logical Device | Available Disks | |||||
| Rescan | Device_1_E1_1 | Samsung SSD 970 PRO 512GB | 512.11 GB | |||
| Device_1_E1_2 | Samsung SSD 970 PRO 512GB | 512.11 GB | ||||
| Device_1_E1_3 | Samsung SSD 970 PRO 512GB | 512.11 GB | ||||
| Device_1_E1_4 | Samsung SSD 970 PRO 512GB | 512.11 GB | ||||
| Device_1_E1_5 | Samsung SSD 970 PRO 512GB | 512.11 GB | ||||
| Device_1_E1_6 | Samsung SSD 970 PRO 512GB | 512.11 GB | ||||
| Device_1_E1_7 | Samsung SSD 970 PRO 512GB | 512.11 GB | ||||
| Device_1_E1_8 | Samsung SSD 970 PRO 512GB | 512.11 GB | ||||
| Add Spare | ||||||
To add spare disks:
- Open the WebGUI
- Click Logical
- Click Spare Pool:
SSD7103:
| Global View | Physical | Logical | Setting | Event | SHI | Help | |
| Create Array | Spare Pool | ||||||
| Spare Pool Logical Device Rescan | Device_1_E1_1 Remove Spare | Samsung SSD 970 EVO Plus 500GB | 500.02 GB | ||||
| Available Disks | |||||||
| Device_1_E1_2 Device_1_E1_3 Device_1_E1_4 Add Spare | Samsung SSD 970 EVO Plus 500GB Samsung SSD 970 EVO Plus 500GB Samsung SSD 970 EVO Plus 500GB | 500.02 GB 500.02 GB 500.02 GB | |||||
SSD7540:
| Global View Physical Logical Setting Event SHI Help | |||
| Create Array | Spare Pool | ||
| Spare Pool | Device_1_E1_1 | Samsung SSD 970 PRO 512GB | 512.04 GB |
| Logical Device | Remove Spare | ||
| Rescan | Available Disks | ||
| Device_1_E1_2 | Samsung SSD 970 PRO 512GB | 512.11 GB | |
| Device_1_E1_3 | Samsung SSD 970 PRO 512GB | 512.11 GB | |
| Device_1_E1_4 | Samsung SSD 970 PRO 512GB | 512.11 GB | |
| Device_1_E1_5 | Samsung SSD 970 PRO 512GB | 512.11 GB | |
| Device_1_E1_6 | Samsung SSD 970 PRO 512GB | 512.11 GB | |
| Device_1_E1_7 | Samsung SSD 970 PRO 512GB | 512.11 GB | |
| Device_1_E1_8 | Samsung SSD 970 PRO 512GB | 512.11 GB | |
| Add Spare | |||
- Check the box for the disk you want as a spare under Available Disks
- Click Add Spare, and confirm by selecting OK from the pop-up window:
This site says...
1 disk(s) will be added to spare pool. Do you want to continue?
OK
Cancel
- The disk has now been assigned as a spare. Click OK to confirm:
This site says...
Disk 'Device_1_E1_1' (Location: 1/E1/1) has been put into spare pool successfully.

Don't let this page create more messages
OK
Disks added to the spare pool will be displayed under Spare Pool and can be removed by checking the box before the target drive, then click the Remove Spare button.
Physical drives marked as a spare will automatically be added to an array whenever there is a disk failure. This feature minimizes the chances of a data loss by reducing the time an array is in the critical status.
Obtaining Logical Device Information
The Logical device tab is the default page after clicking the Logical tab of the HRM. This page contains information about your RAID arrays and the individual disks your system detects.
Logical Device Information
Arrays you create and the properties associated with them will appear here.
Maintenance
Once an array has been created, the Maintenance menu provides options to maintain or edit it. To access the Maintenance menu, click the Maintenance button towards the right-hand side of the array name.
| Global View | Physical | Logical | Setting | Event | SHI | Help | |
| Create Array | Logical Device Information | ||||||
| Spare Pool | Name | Type | Capacity | BlockSize | SectorSize | OS Name | Status |
| Logical Device | RAID_0_0 | RAID 0 | 1.00 TB | 512k | 512B | HPT DISK 0_2 | Normal Maintenance |
| Rescan | |||||||
Array Information
Clicking on the Maintenance button will show you the Array information box. Different array statuses (Normal, critical, disabled) will have different maintenance options.
Array Information & Maintenance Options: Normal Status
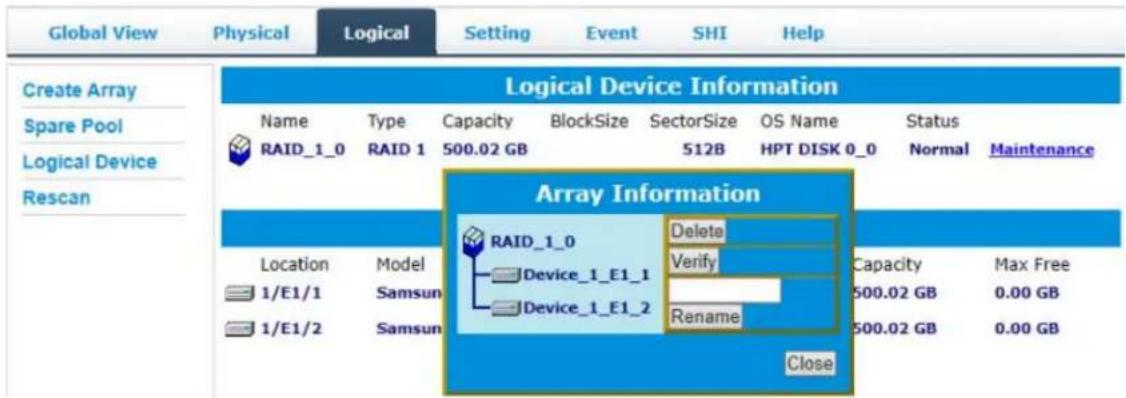
Arrays with the Normal status are healthy and functioning properly, and have the following options:
Delete - deletes the selected RAID array
Verify - verifies the integrity of the RAID array
Rename - renames the RAID array.
Array Information & Maintenance Options: Critical Status
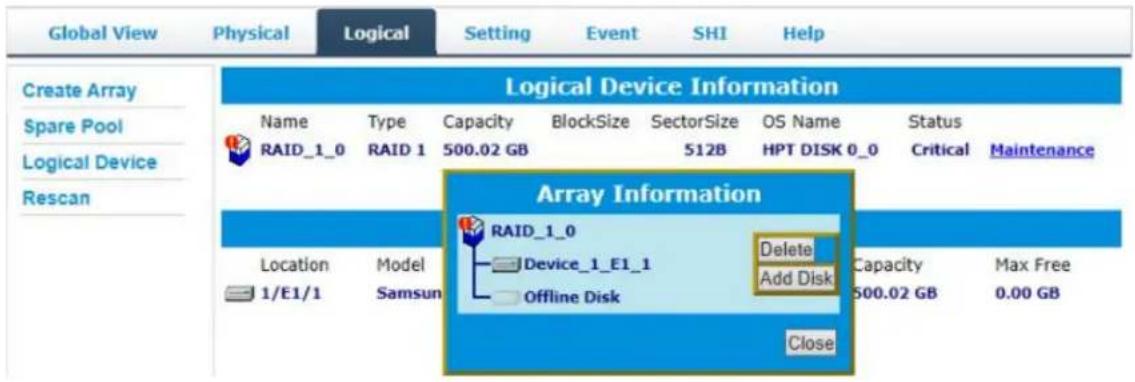
Arrays in the Critical status can be accessed and utilized, but are no longer fault tolerant. A Critical array should be rebuilt as soon as possible to restore redundancy.
A critical status array has all the normal status options except the following:
- The Array can no longer be renamed
- Add Disk replaces the Verify Disk option
Once the array status changes to critical, the faulty disk will be taken offline and you can either:
• Reinsert the same disk
- Insert a new disk
Reinserting the same disk should trigger the rebuilding status, since data on the disk would be recognized.
If you insert a new disk, clicking Add Disk will give you the option to select that disk and add it to the array.
Array Information & Maintenance Options: Disabled Status
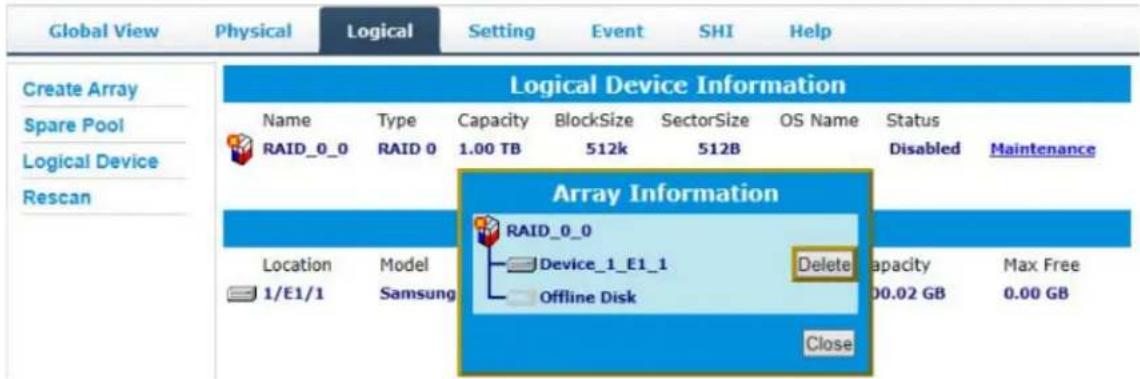
An array with the Disabled status means that the RAID level does not have enough disks to function.
- Your data will be inaccessible
- Rebuilding will not trigger, since the RAID array does not have enough parity data to rebuild.
Your options in Maintenance are:
- Delete
Delete - will delete the array
Physical Device Information
| Global View Physical Logical Setting Event SHI Help | |||||
| Controller 1 Enclosure 1 Devices Rescan | Physical Devices Information | ||||
| Device 1 E1 1 Model | Samsung SSD 970 EVO Plus 500GB | Capacity | 500.02 GB | ||
| Revision | 2B2QEXM7 | PCIe Width | x4 | ||
| Location | 1/E1/1 | PCIe Speed | Gen 3 | ||
| Max Free | 0.00 GB | ||||
| Status | Normal | ||||
| Serial Num | S4EVNF0MA42420T | ||||
- Model — model number of the drive connected
- Revision — revised version of drive
- Location — which controller and port the drive is in
- Max Free — total capacity that is not configured
• Status — Current state of drive - Serial Num — Serial number of the drive
• Capacity — total capacity of the drive - PCIe Width — PCIe width occupied by the driver
- PCIe Speed — Rate of current bandwidth
Rescan
Clicking Rescan will ask the driver to recheck and report the array status.
When Rescan is initiated by the WebGUI; the driver will immediately check and see whether the status of any disk has changed. If there are any changes, the status of the disks and RAID array will be updated to reflect this.
- Disk Status – if any disks were added or removed, or if a disk is no longer responding, the status will change.
- RAID status – the RAID array's status may change depending on the status of the disks.
System Setting
Note: The temperature unit function is only supported by windows and mac
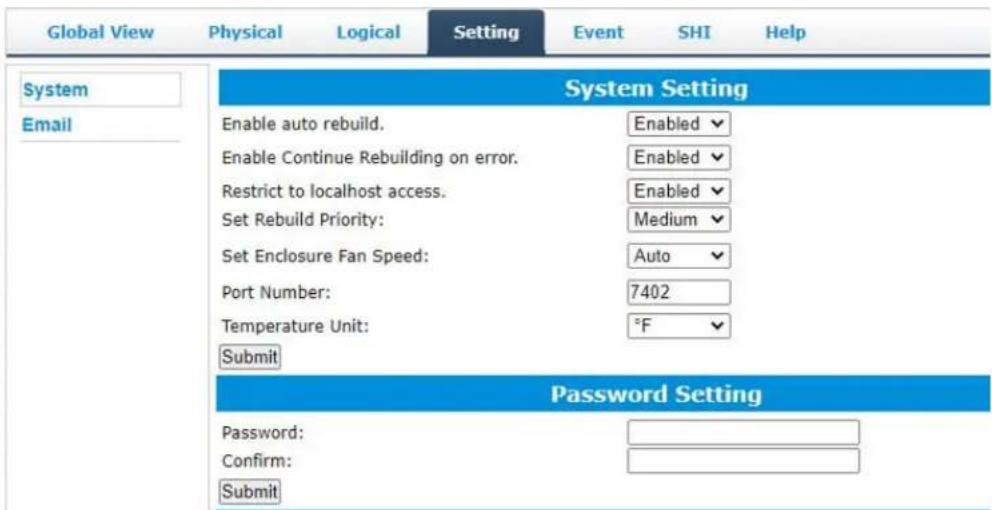
Using this tab, you can change the following:
- Enable auto-rebuilding
- Enable rebuilding on error
- Restrict to localhost
- Set rebuild priority
- Set Enclosure Fan Speed
- Change port number
- Change Temperature Unit
- Change HRM password
System Setting
Enable auto rebuild (default: Enabled)
When a physical drive fails, the controller will take the drive offline. Once you re-insert or replace the disk, the controller will not automatically rebuild the array unless this option is enabled.
Enable continue rebuilding on error (default: Enabled)
When enabled, the rebuilding process will ignore bad disk sectors and continue rebuilding until completion. When the rebuild is finished, the data may be accessible but may also be inconsistent, due to any bad sectors that were ignored during the procedure. If this option is enabled, HighPoint recommends checking the event log periodically for bad sectors warnings.
Restrict to localhost access (default: Enabled)
Remote access to the controller will be restricted when enabled; other users in your network will be unable to remotely log in to the HRM.
Rebuild Priority (default: Medium)
You can specify the amount of system resources you want to dedicate to rebuilding the array. There are 5 levels of priority [Lowest, Low, Medium, High, Highest]
Fan Speed (default: Auto)
The default fan speed is Auto, you can adjust the speed of the fan, There are 5 levels [Auto, Off, Low, Medium, High]
Port Number (default: 7402)
The default port that the HighPoint HRM listens on is 7402. You may change it to any open port.
Temperature Unit(default: °F)
The default temperature unit is Fahrenheit, you can change it to Celsius.
Password Settings
Changing your HRM password
Under Password Setting, type your new password, confirm it, then click Submit.
Recovering your HRM password
If you forget your password, you can delete the file hptuser.dat. Then, restart the computer and open the WEBGUI to set a new password.
For Windows Users:
- Open File Explorer
- Navigate to C:/Windows/
- Delete hptuser.dat
- Reboot
Email Setting
The following topics are covered under email:
SMTP Setting
Adding Recipients
You can instruct the controller to send an email out to the recipients of your choosing when certain events trigger (for more information, see Event Tab).
SMTP settings
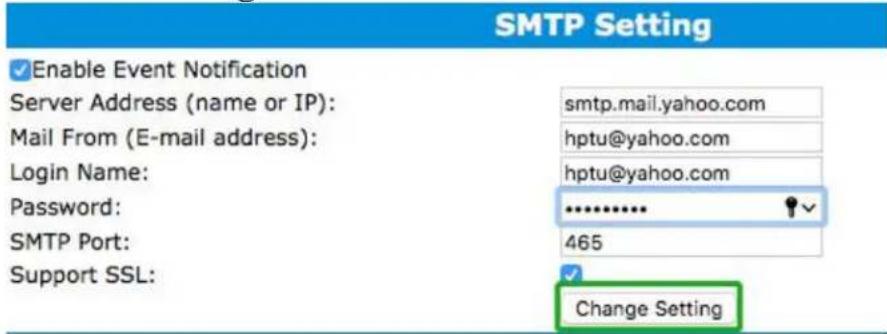
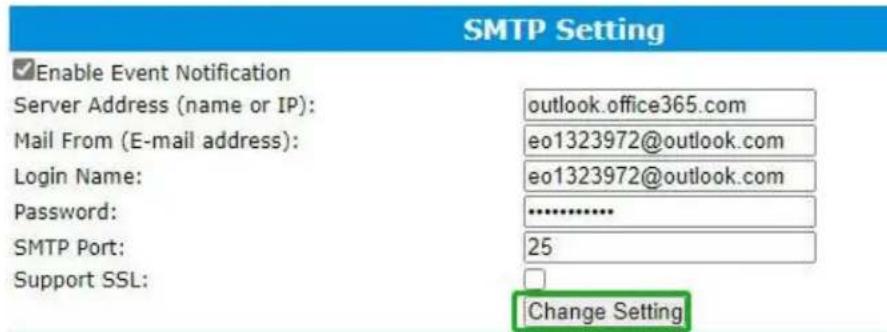
Note: After you click Change Setting, the password field will be reset.
To set up email alerts:
Using a Yahoo Mail account as an example:
- Check the Enable Event Notification box.
- Enter the ISP server address name or SMTP name
For example: smtp.mail.yahoo.com
- Type in the email address of the sender (email account that is going to send the alert)
For example: hptu@yahoo.com
- Type in the account name and password of the sender
-
Type in the SMTP port (default: 25)
-
Check the support SSL box if SSL is supported by your ISP (note the port value will change to 465).
Email Precautions
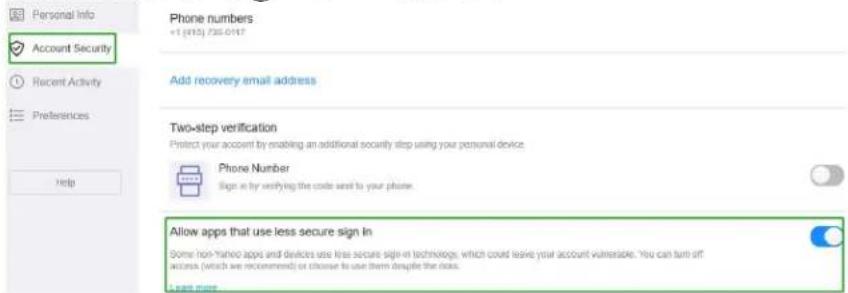
If you want to receive notification mail using a Webmail account, you may need to modify the mailbox's permissions. The following example is for a Yahoo and outlook webmail account.
Yahoo Setting:
To change permission settings, please refer to the following link: https://help.yahoo.com/kb/account/SLN27791.html?impressions=true
Step1.Log in to yahoo email; click "Sign in" to log in: https://www.yahoo.com

Step2. After a successful login, click "Account Info" under the user name:

Step3. Go to the "Account Info" page, click "Account Security". On the "Account Security" page, click the "Allow apps that use less secure sign in" button:
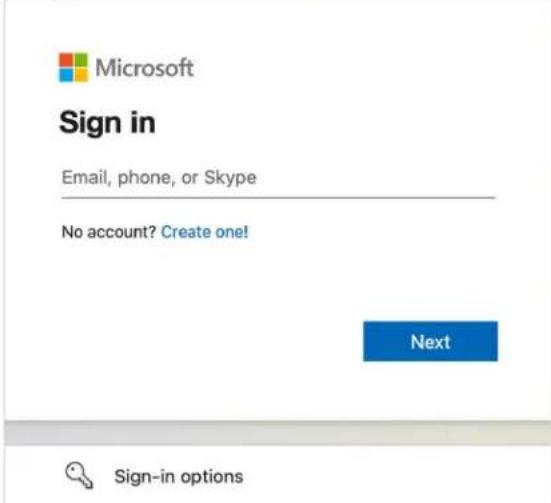
Outlook Setting:
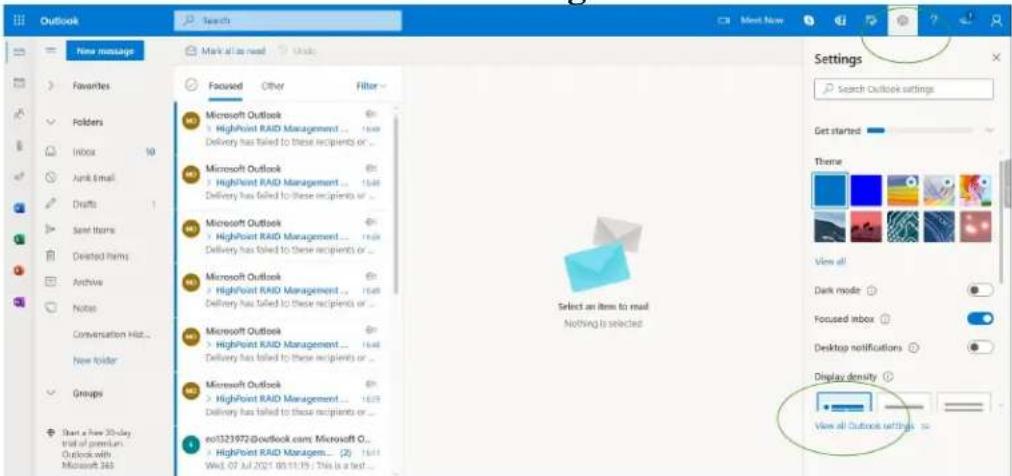
Step1.Sign in to mail and set it up, Login email address link: https://outlook.live.com/mail/inbox
Step2.Click Settings in the upper right corner, select the lower left corner: View all outlook settings
Step3.Enter the redirect page, select mail, then click Sync email
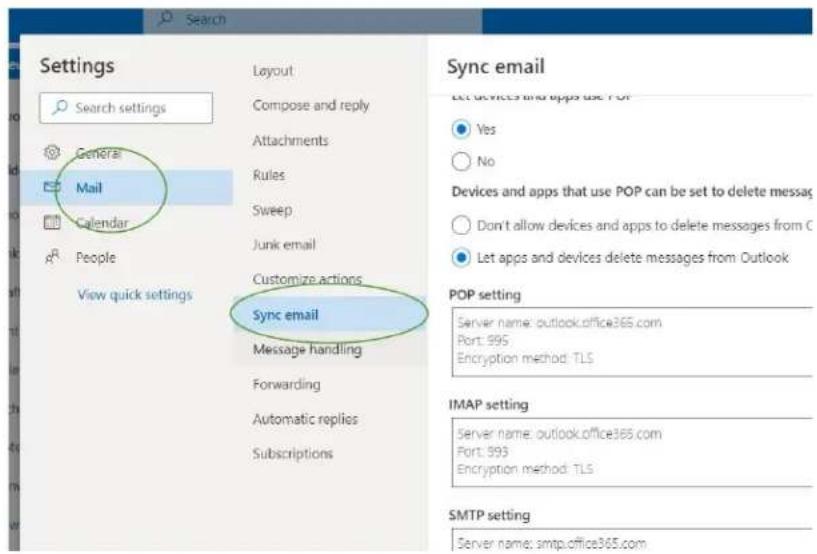
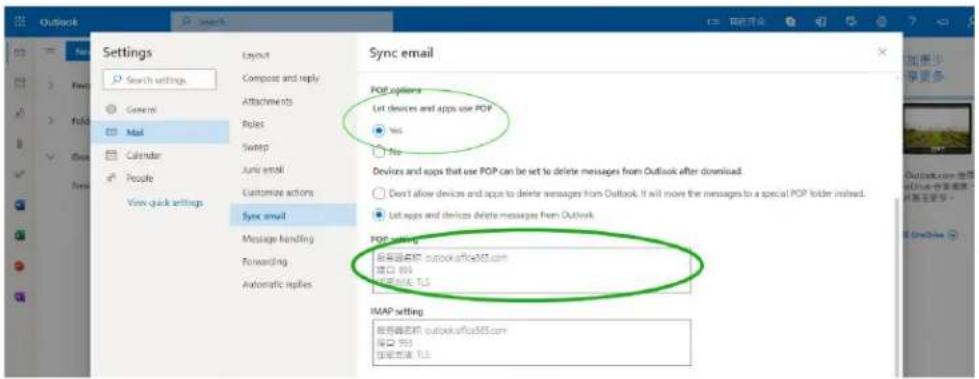
Step4. Let devices and apps use pop select 'yes'
Step5.choose 'Let app and devices delete messages from Outlook'
Note: The screenshot below can be used as a reference. The POP setting is the mailbox server.
Note: If you are having trouble configuring notification for your Email account, please contact our Technical Support Department
How to Add Recipients
You can add multiple email addresses as receivers of a notice.
- Type the email of the recipient in the E-mail text box
- Type the name of the recipient in the Name text box
- Set which type(s) of events will trigger an email using the respective Event Level check boxes.
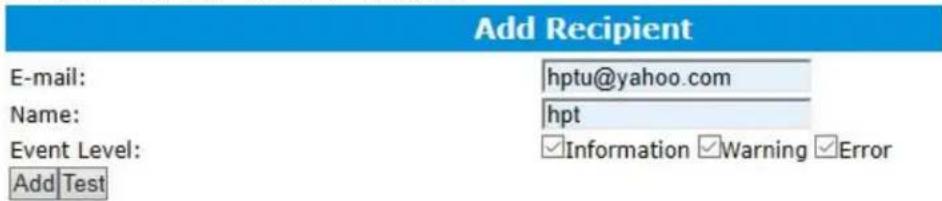
- (Optional) Click test to confirm the settings are correct by sending out a test email
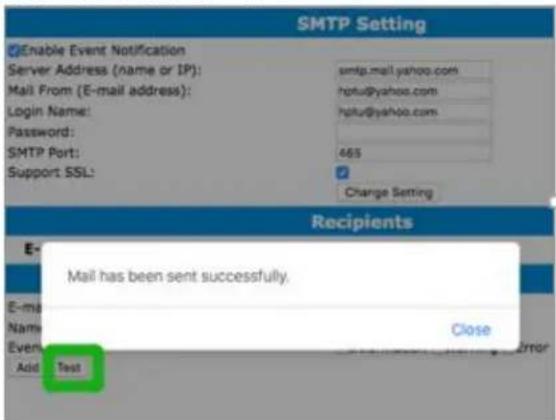
- Click add to add the recipient to recipient list
- The added recipient will display in under Recipients
| Recipients | ||
| Name | Event Level | |
| □hptu@yahoo.com Delete | hpt | Information, Warning, Error |
The email will include the output recorded in the event log.
Example email message:
![HighPoint RAID Management Software Mail Notification hptu@yahoo.com 发给 hpt 2020-05-08 17:12 详细信息 Fri, 08 May 2020 17:12:54 : [hptnvme]: RAID 0 Array 'RAID_0_0' has been created successfully (Disk 1:Samsung SSD 970 EVO Plus 500GB, 1/E1/1; Disk 2:Samsung SSD 970 EVO Plus 500GB, 1/E1/2).](/content/2026/05/952838/images/ba8dc172ec8527c6138803e9d8dde3833544067f297fa56c628c71c3b2ba8aa5.jpg)
Figure 1. Example event log email
Event Tab
In the event tab, you can see log entries associated with the HighPoint device. The event log provides useful information when troubleshooting your set up.
In the event tab, there are four options available:
Download - Save the log file on your computer
Prev - View previous log page
Next - View next log page
SHI (Storage Health Inspector)
• S.M.A.R.T Attributes
- Schedule a task (Task list and Health Inspector Scheduler)
SHI outputs information collected using SMART (Self-Monitoring Analysis and Reporting Technology) Hard Drive Technology. The data provided on this tab helps you to anticipate any disk failures based on a variety of monitored hard disk properties.
How to Enable SMART Monitoring
To access the SMART attributes of an individual disk:
- Log in to the WebGUI
- Select the proper controller using the drop-down menu on the top left
- Click the SHI tab
- Click Detail on the desired disk:
Note: The current NVMe Temperature threshold is default set to 65°C (149°F).
| Storage Health Inspector(SHI) | ||||||
| Controller ID | Location# | Device Serial Number | RAID | °F | Total Bytes Written | S.M.A.R.T |
| 1 | E1_1 | S463NFOK409595F | None | 89 | 1023.90 TB | Detail |
| 1 | E1_2 | S5JYNS0N602754T | None | 96 | 75.45 TB | Detail |
| Device Name | Device_1_E1_2 | |||||
| Model Number | Samsung SSD 970 PRO 512GB | |||||
| Temperature | 96°F | |||||
| Warning Composite Temperature Threshold | 177°F | |||||
| Critical Composite Temperature Threshold | 177°F | |||||
| NVME S.M.A.R.T Attributes | |
| Name | Value |
| Critical Warning | 0x0 |
| Composite Temperature (C) | 36 |
| Evaliable Spare | 100% |
| Evaluable Spare Threshold | 10% |
| Precentage Used | 4% |
| Data Units Read | 0xe417cbf |
| Data Units Written | 0x9a82fe1 |
| Host Read Commands | 0xaa84aad4 |
| Host Write Commands | 0x896c4c53 |
| Controller Busy Time | 0x94d |
| Power Cycles | 0xec0 |
| Power On Hours | 0x1bf |
| Unsafe Shutdowns | 0xd0e |
| Media and Data Integrity Errors | 0x0 |
| Number of Error Information Log Entries | 0x742 |
| Warning Temperature Time | 0x0 |
| Critical Composite Temperature Time | 0x0 |
| Temperature Sensor 1 (C) | 36 |
| Temperature Sensor 2 (C) | 51 |
| Temperature Sensor 3 (C) | 0 |
| Temperature Sensor 4 (C) | 0 |
| Temperature Sensor 5 (C) | 0 |
| Temperature Sensor 6 (C) | 0 |
| Temperature Sensor 7 (C) | 0 |
| Temperature Sensor 8 (C) | 0 |
| HDD Temperature Threshold | |
| Set harddisk temperature threshold : 149 | PF Set |
If the temperature exceeds 65^ C (149°F it will display "Red".
| Global View | Physical | Logical | Setting | Event | SHI | Help | |
| Schedule | |||||||
| Storage Health Inspector(SHI) | |||||||
| Controller ID | Location# | Device Serial Number | RAID | °F | Total Bytes Written | S.M.A.R.T | |
| 1 | E1_1 | S463NF0K409595F | None | 150 | 1023.91 TB | Detail | |
| 1 | E1_2 | S5JYNS0N602754T | None | 111 | 75.45 TB | Detail | |
| HDD Temperature Threshold | |||||||
| Set harddisk temperature threshold : 149 °F Set | |||||||
The TBW (Total Bytes Written) information can be used to monitor the lifespan of the NVMe drives.

How to Use the Health Inspector Scheduler
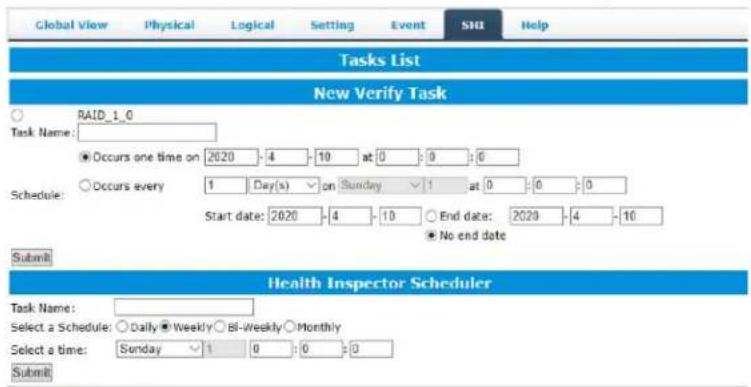
HighPoint RAID Management 2.13.3 Copyright (c) 2018 HighPoint Technologies, Inc. All Rights Reserved
The Health Inspector Scheduler (HIS) enables you to schedule disk/array checkups to ensure disks/array are functioning optimally.
If you want to check the disk status on a daily, weekly, or monthly basis, you can enable this using the HIS function.
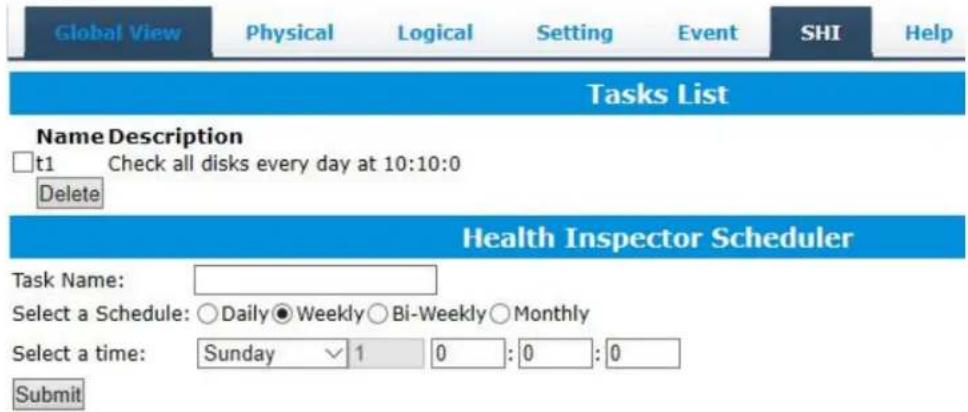
For example:
- Set the 'Task Name' to 't1', select the schedule as 'Daily', and set the time to 10:10
- After clicking "Submit", the task you created will be shown under the "Task List".
When the operating temperature of the disk exceeds 60^ , a “Warning” event will appear in “Events”:

How to Create a New Verify Task
All Redundant RAID arrays (RAID 1) will appear under New Verify Task
- Log into the WebGUI
- Select the proper controller from the top left drop down
- Click SHI
- Click Schedule
- Select the array you want to schedule the verify task
- Type the name in Task Name entry box
- Choose whether you want to schedule
- One time verify task on specific date (YYYY-MM-DD) at (HH:MM:SS, 24-hr clock)
- Or a specific schedule you can adjust based on Daily, Weekly, or Monthly options
10.Click Submit
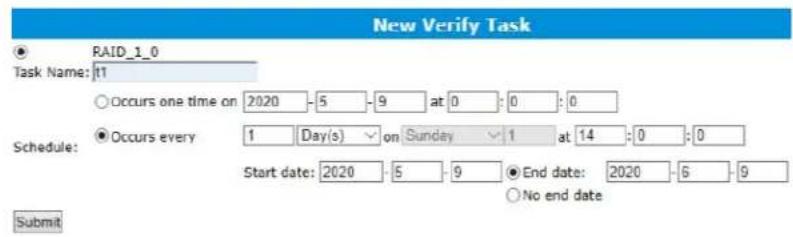
11. Your entry will appear under Tasks List
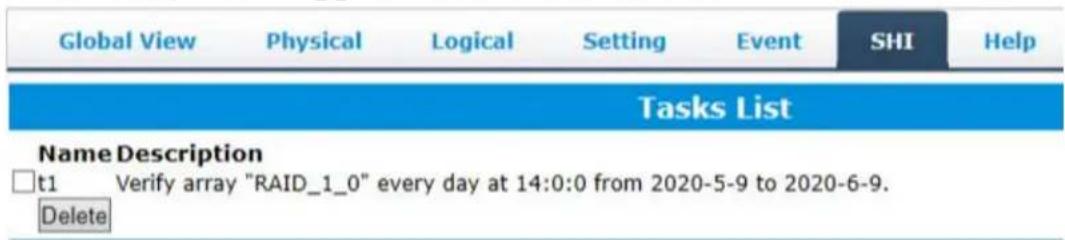
Note: New Verify Task box only appears if you have normal status arrays. If you have a critical array, New Rebuild Task will replace New Verify Task.
Log collecting
Note: This function is only supported by Linux.
Diagnostic view
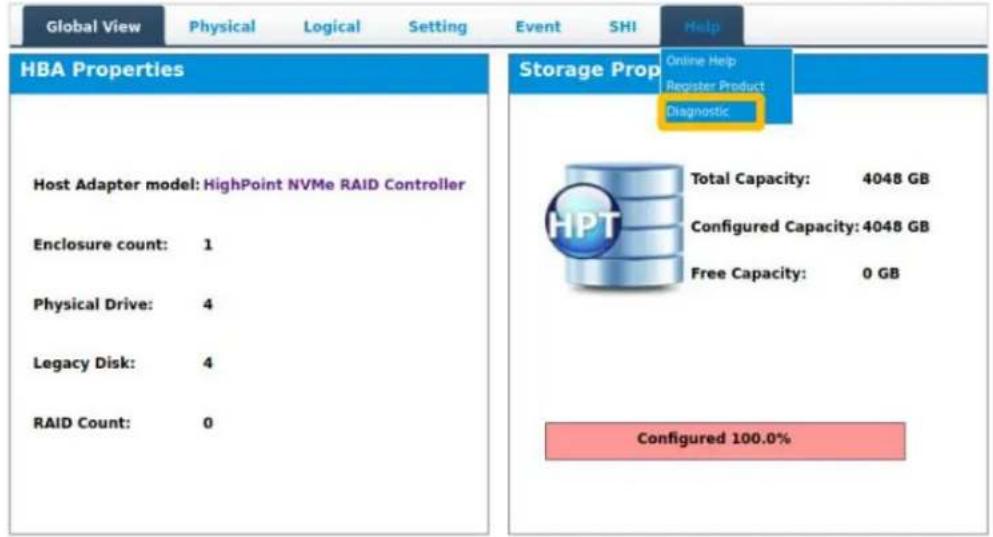
- Start the WEBGUI, Diagnostic view will appear when Driver or HPT card does not effect, you can see the system information and HPT Product information in this view.
![Global View Physical Logical Setting Event SHI Help Diagnostic View System OS: Ubuntu 20.10 x86_64 Kernel: 5.8.0-49-generic CPU: AMD Ryzen 9 3900X 12-Core Processor MotherBoard: Gigabyte Technology Co., Ltd. X570 AORUS MASTER x.x BIOS: American Megatrends Inc. F21 07/31/2020 5.17 Disk: INTEL SSDSC28W12 Chipset: Advanced Micro Devices, Inc. [AMD] Starship/Matisse Root Complex Product Controller: No controller detected! Driver Name: hptnvme Driver Version: v1.2.26 Logs Location: Logs have not been saved Save Logs](/content/2026/05/952838/images/f22192fbf1ff67765fa5fb5362f889d37ed3491524ce4f7e0758144774d49068.jpg)
- You can also click 'Help'→'Diagnostic' to enter the diagnostic view.
Log saving
Enter the Diagnostic view, click 'Save Logs', your log information will be collected. 'Logs Location' will display the location of the saving path.
| Diagnostic View | |||
| System | Product | ||
| OS: Ubuntu 20.10 x86_64 | Controller: HighPoint NVMe RAID Controller | ||
| Kernel: 5.8.0-49-generic | Driver Name: hptnvme | ||
| CPU: AMD Ryzen 9 3900X 12-Core Processor MotherBoard: Gigabyte Technology Co., Ltd. X570 AORUS MASTER x.x | Driver Version: v1.2.26 | ||
| BIOS: American Megatrends Inc. F21 07/31/2020 5.17 | |||
| Disk: INTEL SSDSC2BW12 | |||
| Chipset: Advanced Micro Devices, Inc. [AMD] Starship/Matisse Root Complex | |||
| 2 | 1 | ||
| Logs Location: /usr/share/hpt/HighPoint_hptnvme_v1.2.26_2021.04.25.tar.gz Save Logs | |||
If you have problems in use, please submit the log to our online service (https://www.highpoint-tech.com/websupport/).
Using the HighPoint Command Line Interface (CLI)
How to use the CLI in Windows
Method1: Run ‘Command Prompt’ as Administrator and enter hptraidconf and press Enter
![Administrator: Command Prompt Microsoft Windows [Version 10.0.18363.778] (c) 2019 Microsoft Corporation. All rights reserved. C:\Windows\system32>hptraidconf hptraidconf HPT CLI >](/content/2026/05/952838/images/90aaa46bd7dcfc2715d1475b3e3d4eadd4b64370891e5e79828f29be9e8b941c.jpg)
Method2: Click 'Start' to find the HighPoint RAID Management folder, and click on hptraidconf
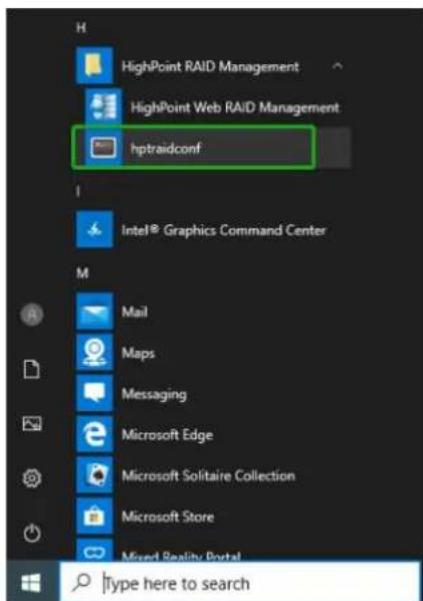
How to use the CLI in a Linux system
Open ‘Terminal’ and enter root permissions, then execute the command ‘hptraidconf’ to enter the CLI
![File Edit View Search Terminal Help test@test-System-Product-Name:~$ sudo su [sudo] password for test: root@test-System-Product-Name:/home/test# hptraidconf](/content/2026/05/952838/images/42530b88749b597fd4d8083ddd2e10bf96ec43dd837ea4198f05bc7c064cebf2.jpg)
CLI Command Reference
This chapter discusses the various HighPoint CLI commands: Query, Create, Delete, OCE/ORLM, Rebuild, Verify, Unplug, Switch, Lscard, Rescan, Init, Events, Mail, Task, Set, Clear, Diag, Help and Exit.
Warning: using Create/Delete commands may destroy data stored in the disks, and this lost data can never be recovered. Please be cautious v
executing these commands. The CLI utility will not prompt you before each command is executed.
The following example is for a Windows system:
Query Commands
Syntax:
query controllers | query devices | query devices {devices_id} | query arrays | query arrays {array_id}
query controllers
This command reports controller information
Single card:
SSD7202/7502:

SSD7101A-1/6540/6540M/7120/7103/7204/7104/7505:

SSD7184/7180/7140/7540/7580:

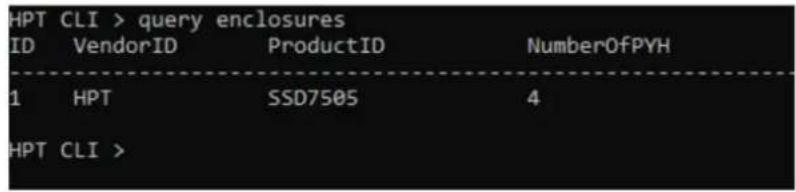
query enclosures
This command reports Product ID information.
Single card:
SSD7101A-1:
| HPT CLI > query enclosures | |||
| ID | VendorID | ProductID | NumberOfPYH |
| 1 | HPT | SSD7101A-1 | 4 |
SSD7104:
| HPT CLI > query enclosures | |||
| ID | VendorID | ProductID | NumberOfPYH |
| 1 | HPT | SSD7104 | 4 |
SSD7120:
| HPT CLI > query enclosures | |||
| ID | VendorID | ProductID | NumberOfPYH |
| 1 | HPT | SSD7120 | 4 |
SSD7103:
| HPT ID | CLI > query enclosures | ||
| VendorID | ProductID | NumberOfPYH | |
| 1 | HPT | SSD7103 | 4 |
SSD7202:
| HPT CLI > query enclosures | |||
| ID | VendorID | ProductID | NumberOfPYH |
| 1 | HPT | SSD7202 | 2 |
SSD7204:
| HPT ID | CLI > query enclosures | ||
| VendorID | ProductID | NumberOfPYH | |
| 1 | HPT | SSD7204 | 4 |
SSD6540/SSD6540M:
| HPT CLI > query enclosures | |||
| ID | VendorID | ProductID | NumberOfPYH |
| 1 | HPT | SSD6540 | 4 |
SSD7184:
| HPT CLI > query enclosures | |||
| ID | VendorID | ProductID | NumberOfPYH |
| 1 | HPT | SSD7184 | 8 |
SSD7180:

SSD7505:
SSD7140:
| HPT CLI > query enclosures | |||
| ID | VendorID | ProductID | NumberOfPYH |
| 1 | HPT | SSD7140 | 8 |
| HPT CLI > | |||
SSD7540:
| HPT CLI > query enclosures | |||
| ID | VendorID | ProductID | NumberOfPYH |
| 1 | HPT | SSD7540 | 8 |
SSD7580:

Cross-Sync:
Note: This function is only supported by SSD7101A-1, SSD7104, SSD7103, SSD71SSD7202 and SSD7505
SSD7101A-1:
| HPT CLI > query enclosures | |||
| ID | VendorID | ProductID | NumberOfPYH |
| 1 | HPT | SSD7101A-1 | 4 |
| 2 | HPT | SSD7101A-1 | 4 |
SSD7103
| HPT CLI > query enclosures | |||
| ID | VendorID | ProductID | NumberOfPYH |
| 1 | HPT | SSD7103 | 4 |
| 2 | HPT | SSD7103 | 4 |
| HPT CLI > | |||
SSD7104
| HPT CLI > query enclosures | |||
| ID | VendorID | ProductID | NumberOfPYH |
| 1 | HPT | SSD7104 | 4 |
| 2 | HPT | SRD7104 | 4 |
| HPT CLI > | |||
SSD7505
| HPT CLI > query enclosures | |||
| ID | VendorID | ProductID | NumberOfPYH |
| 1 | HPT | SSD7505 | 4 |
| 2 | HPT | SSD7505 | 4 |
| HPT CLI > | |||
SSD7120:
| HPT CLI > query enclosures | |||
| ID | VendorID | ProductID | NumberOfPYH |
| 1 | HPT | SSD7120 | 4 |
| 2 | HPT | SSD7120 | 4 |
SSD7202:
| HPT ID | CLI > query enclosures | ||
| VendorID | ProductID | NumberOfPYH | |
| 1 | HPT | SSD7202 | 2 |
| 2 | HPT | SSD7202 | 2 |
query devices
This command will provide the status of each physical device hosted by the controller. It provides a list of device ID's, capacity, model numbers, status, and array attributes. Each device's status will be
listed as one of the following: NORMAL, DISABLED, SPARE, RAID and BOOT.
Attributes:
ID:
A device ID is a string used to represent a disk. It is in the format “controller/channel/device” for NVMe controllers. E.g. 1/E1/1 represents the disk on controller 1 port 1;
Capacity:
The capacity of the disk in GB.
MaxFree:
The Maximum sequence free space on a disk which can be used by creating array.
Flag:
Shows whether the disk is single or has been created RAID.
Status:
This will display the disk status (1 of 4 possible states):
• NORMAL: The disk's status is normal.
- DISABLED: The disk cannot be used. (May be related to disk failure or removal)
- RAID: The disk is a member of a RAID array.
- SPARE: The disk has been set as a spare disk
ModelNumber:
The disk's model number.
Example:
Single card:
SSD7202/7502:
| HPT CLI > query devices | ||||||
| ID | Capacity | MaxFree | Flag | Status | ModelNumber | |
| 1/E1/1 | 500.03 | 0 | RAID | NORMAL | Samsung SSD 970 EVO Plus 500GB | |
| 1/E1/2 | 500.03 | 0 | RAID | NORMAL | Samsung SSD 970 EVO Plus 500GB | |
SSD7101A-1/7103/7120/7204/7104/7505:
| HPT CLI > query devices | ||||||
| ID | Capacity | MaxFree | Flag | Status | ModelNumber | |
| 1/E1/1 | 500.03 | 500.03 | SINGLE | NORMAL | Samsung SSD 970 EVO Plus 500GB | |
| 1/E1/2 | 500.03 | 500.03 | SINGLE | NORMAL | Samsung SSD 970 EVO Plus 500GB | |
| 1/E1/3 | 500.03 | 500.03 | SINGLE | NORMAL | Samsung SSD 970 EVO Plus 500GB | |
| 1/E1/4 | 500.03 | 500.03 | SINGLE | NORMAL | Samsung SSD 970 EVO Plus 500GB | |
SSD7184/7180/7580:
| HPT CLI > query devices | |||||
| ID | Capacity | MaxFree | Flag | Status | ModelNumber |
| 1/E1/1 | 3200.63 | 0 | SINGLE | LEGACY | NVMe WUS4CB032D7P3E3 |
| 1/E1/2 | 3200.63 | 0 | SINGLE | LEGACY | NVMe WUS4CB032D7P3E3 |
| 1/E1/3 | 3200.63 | 0 | SINGLE | LEGACY | NVMe WUS4CB032D7P3E3 |
| 1/E1/4 | 3200.63 | 0 | SINGLE | LEGACY | NVMe WUS4CB032D7P3E3 |
| 1/E1/5 | 3200.63 | 0 | SINGLE | LEGACY | NVMe WUS4CB032D7P3E3 |
| 1/E1/6 | 3200.63 | 0 | SINGLE | LEGACY | NVMe WUS4CB032D7P3E3 |
| 1/E1/7 | 3200.63 | 0 | SINGLE | LEGACY | NVMe WUS4CB032D7P3E3 |
| 1/E1/8 | 3200.63 | 0 | SINGLE | LEGACY | NVMe WUS4CB032D7P3E3 |
SSD7140:
| HPT CLI > query devices | |||||||
| ID | Capacity | MaxFree | Flag | Status | ModelNumber | ||
| 1/E1/1 | 512.04 | 512.04 | SINGLE | NORMAL | NVMe | Samsung | SSD 970 |
| 1/E1/2 | 512.04 | 512.04 | SINGLE | NORMAL | NVMe | Samsung | SSD 970 |
| 1/E1/3 | 512.04 | 512.04 | SINGLE | NORMAL | NVMe | Samsung | SSD 970 |
| 1/E1/4 | 512.04 | 512.04 | SINGLE | NORMAL | NVMe | Samsung | SSD 970 |
| 1/E1/5 | 512.04 | 512.04 | SINGLE | NORMAL | NVMe | Samsung | SSD 970 |
| 1/E1/6 | 512.04 | 512.04 | SINGLE | NORMAL | NVMe | Samsung | SSD 970 |
| 1/E1/7 | 512.04 | 512.04 | SINGLE | NORMAL | NVMe | Samsung | SSD 970 |
| 1/E1/8 | 512.04 | 512.04 | SINGLE | NORMAL | NVMe | Samsung | SSD 970 |
SSD7540:
| HPT CLI > query devices | |||||||
| ID | Capacity | MaxFree | Flag | Status | ModelNumber | ||
| 1/E1/1 | 512.04 | 0 | SINGLE | NORMAL | Samsung SSD 970 PRO 512GB | ||
| 1/E1/2 | 512.11 | 0 | SINGLE | LEGACY | Samsung SSD 970 PRO 512GB | ||
| 1/E1/3 | 512.11 | 0 | SINGLE | LEGACY | Samsung SSD 970 PRO 512GB | ||
| 1/E1/4 | 512.11 | 0 | SINGLE | LEGACY | Samsung SSD 970 PRO 512GB | ||
| 1/E1/5 | 512.11 | 0 | SINGLE | LEGACY | Samsung SSD 970 PRO 512GB | ||
| 1/E1/6 | 512.11 | 0 | SINGLE | LEGACY | Samsung SSD 970 PRO 512GB | ||
| 1/E1/7 | 512.11 | 0 | SINGLE | LEGACY | Samsung SSD 970 PRO 512GB | ||
| 1/E1/8 | 512.11 | 0 | SINGLE | LEGACY | Samsung SSD 970 PRO 512GB | ||
SSD7101A-1/7120/7103/7104/7505 Cross-Sync:
| HPT CLI > query devices | ||||||
| ID | Capacity | MaxFree | Flag | Status | ModelNumber | |
| I/E1/1 | 512.11 | 0 | SINGLE | LEGACY | Samsung SSD 970 PRO 512GB | |
| I/E1/2 | 512.11 | 0 | SINGLE | LEGACY | Samsung SSD 970 PRO 512GB | |
| I/E1/3 | 512.11 | 0 | SINGLE | LEGACY | Samsung SSD 970 PRO 512GB | |
| I/E1/4 | 512.11 | 0 | SINGLE | LEGACY | Samsung SSD 970 PRO 512GB | |
| I/E2/1 | 1000.20 | 0 | SINGLE | LEGACY | WDS100T3X0C-00SJGO | |
| I/E2/2 | 1000.20 | 0 | SINGLE | LEGACY | WDS100T3X0C-00SJGO | |
| I/E2/3 | 1000.20 | 0 | SINGLE | LEGACY | WDS100T3X0C-00SJGO | |
| I/E2/4 | 1000.20 | 0 | SINGLE | LEGACY | WDS100T3X0C-00SJGO | |
query devices {device\_id}
This command presents information for the specified device.
Attributes:
Mode Number:
The disk's model number.
Serial Number:
The disk's Serial number.
Firmware Version:
The disk's Firmware version.
Capacity:
The disk's capacity.
Status:
The disk's status.
Read Ahead/Write Cache/TCQ/NCQ Status:
Disk's Read Ahead/Write Cache/TCQ/NCQ status could be enabled/disabled/--(not support)
Pcie width:
The disk's Pcie width.
Temperature:
The disk's temperature and setting temperature threshold.
S.M.A.R.T Attributes:
S.M.A.R.T Attributes detailed information reported by hard disk.
Example:
| HPT CLI > query devices 1/E1/1 | |
| Mode Number: Samsung SSD 970 EVO Plus 500GB | |
| Serial Number: S4EVNMFN502918J | |
| Firmware Version: 2B2QEXM7 | |
| Capacity(GB): 500.03 TotalFree(GB): 500.03 | |
| Status: SINGLE Flag: NORMAL | |
| PCIe Width: x4 PCIe Speed: Gen 3 | |
| Temperature (C): 47 | |
| Warning Composite Temperature Threshold (C): 85 | |
| Critical Composite Temperature Threshold (C): 85 | |
| S.M.A.R.T Attributes | |
| S.M.A.R.T Status OK. | |
| Name Value | |
| Critical Warning : 0x0 | |
| Composite Temperature (C) : 47 | |
| Available Spare : 100% | |
| Available Spare Threshold : 10% | |
| Percentage Used : 7% | |
| Data Units Read : 0x7da5bdd | |
| Data Units Written : 0x6b05bb1 | |
| Host Read Commands : 0x8cb661dc | |
| Host Write Commands : 0x6a64a263 | |
| Controller Busy Time : 0x61f | |
| Power Cycles : 0xd8c | |
| Power On Hours : 0x1cb | |
| Unsafe Shutdowns : 0xa6f | |
| Media and Data Integrity Errors : 0x0 | |
| Number of Error Information Log Entries : 0x9d5 | |
| Warning Temperature Time : 0x0 | |
| Critical Composite Temperature Time : 0x0 | |
| Temperature Sensor 1 (C) : 47 | |
| Temperature Sensor 2 (C) : 56 | |
| Temperature Sensor 3 (C) : 0 | |
| Temperature Sensor 4 (C) : 0 | |
| Temperature Sensor 5 (C) : 0 | |
| Temperature Sensor 6 (C) : 0 | |
| Temperature Sensor 7 (C) : 0 | |
| Temperature Sensor 8 (C) : 0 |
query arrays
This command lists information for all configured arrays. It will list each array's ID, capacity, RAID level, and status information.
Note: An array ID is generally represented by number or set of numbers.
Attributes:
Type:
SSD7202/7502: The array's type. (RAID0, RAID1)
SSD7101A-1/7103/7120/7204/7104/6540/6540M/7505/
7184/7180/7140/7540/7580:
The array's type. (RAID0, RAID1, RAID10)
Status:
• NORMAL: Array status is normal
• DISABLED: Array is disabled.
• REBUILDING: Array is being rebuilt
• VERIFYING: Array is verifying
- INIT(F): Initializing an array using Foreground mode
- INIT(B): Initializing an array using Background mode
- UNINITIALIZED: Array is not initialized
• CRITICAL: Array is in a degraded status (no data redundancy)
Block:
Array Block size.
Sector:
Bytes per sector.
Cache:
Array Cache Policy
WT: Write Through
WB: Write Back
NONE: No Cache policy enabled
Example:

query arrays {arrays\_id}
This command will present information of each disk of a specified array.
Example:
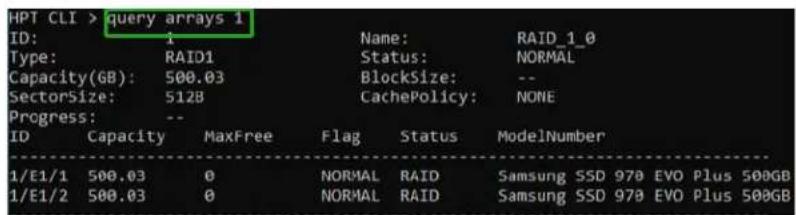
Init Commands
You can use init commands to initialize disks or arrays. A drive must be initialized first before being used to create arrays.
Syntax:
init {device_id} | init {array_id} {start|stop}
init {device\_id}
This command initializes a disk for first use or a legacy disk on the controller.
Example:
After entering the CLI, enter the command: 'query devices' to view the current NVMe status is 'LEGACY', enter 'init 1/E1/1', NVMe status is 'NORMAL'.
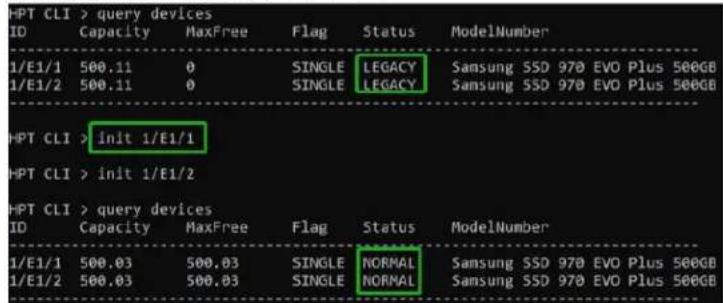
Note: This command instructs the controller to initialize the disk of controller 1 channel 1. All data on the disk will be destroyed.
init {array\_id} {start|stop}
This command starts/stops the initialization process of a redundant RAID array (RAID 1)
Example:
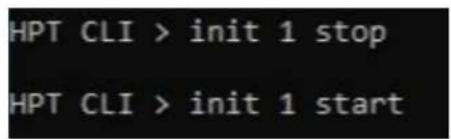
This command instructs the controller to stop/start initialization process on array 1. Take Samsung 970 EVO PLUS as an example, create RAID1 init time is about 10 minutes.
Create Commands
This command allows you to create a new RAID array, add a spare disk, or expand/migrate an existing array.
Note: A drive must be initialized first before being used to create arrays.
Syntax:
create {RAID0|RAID1|RAID10 spare} [create-options]
Parameters
You can specify one or more create options for this command, separated by a space. The options can be typed in any order.
disks= specifies member disks which will compose a new array, e.g., disks=1/E1/1,1/E1/2, disks=*. The character * means all available drives.
NOTE: When you enter a complete command with parameters disks=* at the shell prompt, the correct writing is disks="*".
For example:
hptraidconf -u RAID -p hpt create RAID0 disks="*".
init= specifies the initialization option (foreground, background, quickinit, keep old data). The default option is create-only. The create-only option is applicable for all the RAID types, which is to create an array without any initialization process. Initialization is needed for redundant arrays to provide data redundancy.
foreground: Initialize an array using foreground mode. This is the recommended method when creating redundant RAID arrays.
background: Initialize an array using background mode. The array is accessible during array initialization.
Quickinit: Do a quick init.
keep old data: This option will create the RAID array but keep existing data on RAID array. This option should be selected when trying to recover a RAID array.
name= specifies the name for the array being created.
If the option is omitted, the utility will assign a default name for the array.
src= specifies an existing array to be expanded/migrated. All data on the source array will be redistributed online to the target array. If this parameter is omitted, a new array is created.
capacity= specifies the capacity, in size of MB, for the target array. Maximum capacity is default.
bs= specifies the block size, in KB, for the target array. This option is only valid for stripped RAID levels. Default is 64KB.
sector= specifies the logical sector size, in B/KB, for the target array. This option is only valid for stripped RAID levels. The default is 512 Bytes.
Examples:
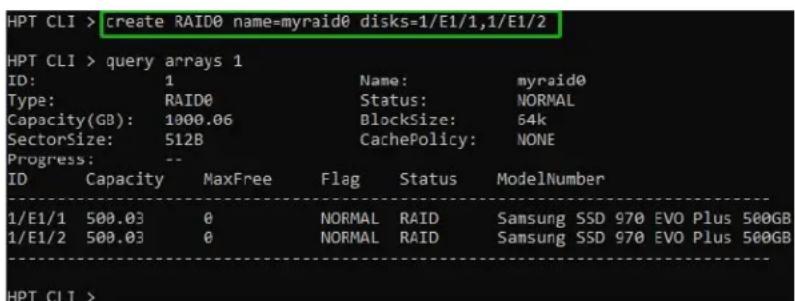
This command instructs the system to create a RAID0 array using
the disks attached to controller 1 channels 1 and 2, and name it myraid0.
| HPT CLI > create RAID0 disks=* capacity=* init=quickinit bs=512k | |||||
| HPT CLI > query arrays 1 | |||||
| ID: | 1 | Name: | RAID0_0 | ||
| Type: | RAID0 | Status: | NORMAL | ||
| Capacity(GB): | 4096.33 | BlockSize: | 512k | ||
| SectorSize: | 512B | CachePolicy: | NONE | ||
| Progress: | -- | ||||
| ID | Capacity | MaxFree | Flag | Status | ModelNumber |
| 1/E1/1 | 512.04 | 0 | NORMAL | RAID | Samsung SSD 970 PRO 512GB |
| 1/E1/2 | 512.04 | 0 | NORMAL | RAID | Samsung SSD 970 PRO 512GB |
| 1/E1/3 | 512.04 | 0 | NORMAL | RAID | Samsung SSD 970 PRO 512GB |
| 1/E1/4 | 512.04 | 0 | NORMAL | RAID | Samsung SSD 970 PRO 512GB |
| 1/E2/1 | 1000.12 | 488.08 | NORMAL | RAID | WDS100T3X0C-00SJGO |
| 1/E2/2 | 1000.12 | 488.08 | NORMAL | RAID | WDS100T3X0C-00SJGO |
| 1/E2/3 | 1000.12 | 488.08 | NORMAL | RAID | WDS100T3X0C-00SJGO |
| 1/E2/4 | 1000.12 | 488.08 | NORMAL | RAID | WDS100T3X0C-00SJGO |
This command instructs the system to create a RAID0 array using the disks attached to controller 1 channels 1/2/3/4, and controller 2 channels 1/2/3/4; capacity is maximum, Block Size is 512KB.
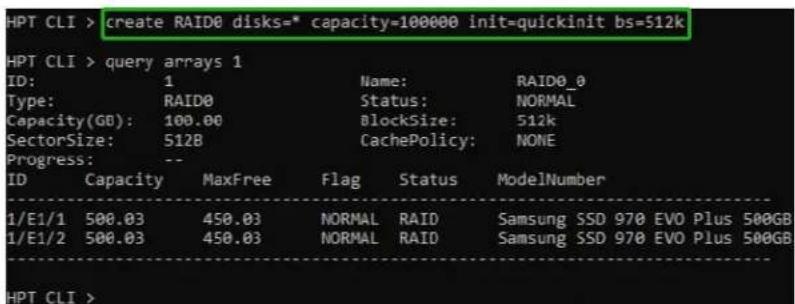
This command instructs the system to create a RAID0 array using the disks attached to controller 1 channels 1 and 2; capacity is 100GB, Block Size is 512KB.
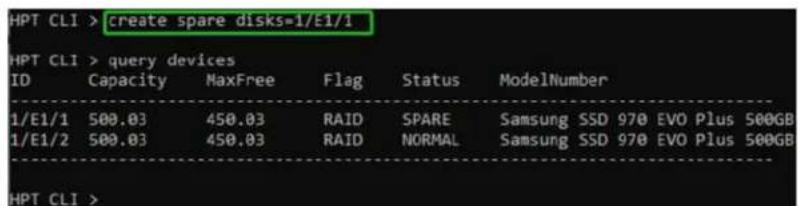
This command instructs the system to set the disk on controller 1 channel 1 to function as a spare disk.
Delete Command
This command allows you to delete an existing RAID array or remove a spare disk. After deletion, the original array and all data on
it will be lost. All the member disks will be listed as available single disks.
Note: If you want to use a single disk after deleting the RAID, please restart the system after deleting the RAID. When the single disk status shows the Legacy status in WEBGUI or CLI, it can be used normally.
Syntax
delete {array_or_spare_ID}
Examples
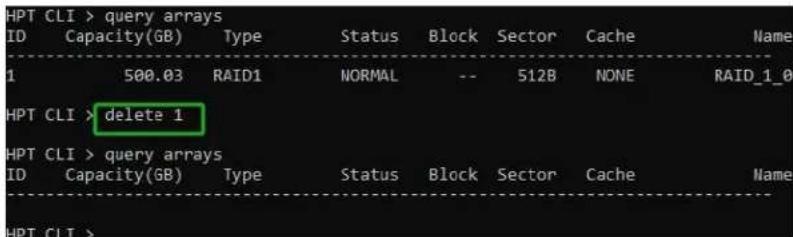
This command instructs the system to delete the array whose id is "1". You can query the array ID before the deletion.
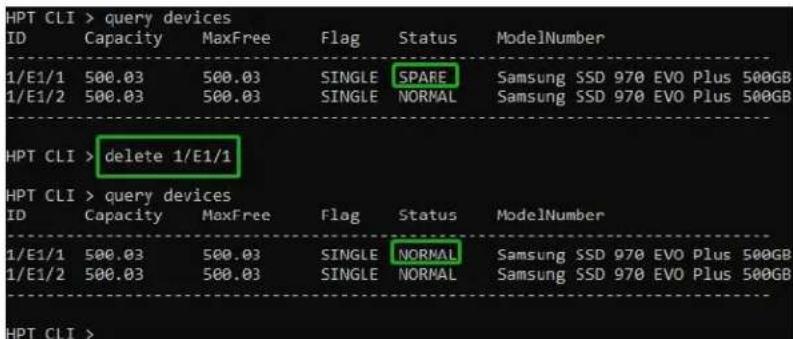
This command is used to remove the spare disk on controller 1 channel 1.
Unplug Command
This command allows you to remove an array or disk from a running system without shutting down. It is only supported on SSD7120.
Syntax
unplug {array _id or device _id}
Examples
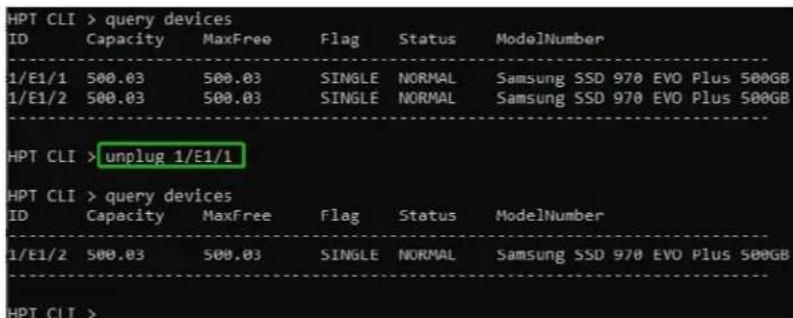
This command allows you to remove a disk from a running system without shutting down.
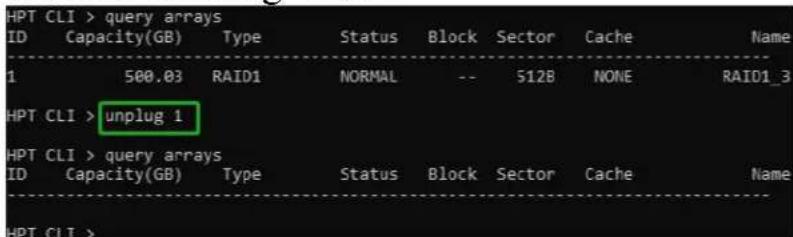
This command instructs the controller to disconnect the array "1"; you can then disconnect the drives safely.
Rebuild Commands
You can use rebuild commands to rebuild a RAID1 array when it is critical or broken.
Syntax
rebuild {array_id} {device_id} rebuild {array_id} {start|stop}
rebuild {array\_id} {device\_id}
This command allows you to add the specified disk to a broken array and rebuild it.
Example
HPT CLI> rebuild 1 1/E1/1

This command instructs the controller to add the disk “1/E1/1” to rebuild the array “1”. You can use the query commands first to verify the device ID and the array ID information before the rebuild command.
rebuild {array\_id} {start|stop}
This command allows you to start or stop the rebuilding process on the specified array. After you stopped a rebuilding process, you can resume it at a later time by the rebuild start command.
Examples
HPT CLI> rebuild 1 start

This command starts the rebuilding process on the array "1".
HPT CLI> rebuild 1 stop

This command stops the rebuilding process on the array "1".
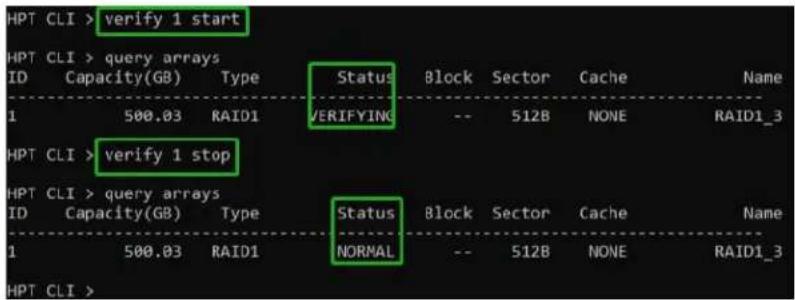
Verify Command
Syntax
verify {array_id} {start|stop}
This command starts or stops the verify process on the specified array.
Examples
HPT CLI> verify 1 start
This command starts to verify the array "1".
HPT CLI> verify 1 stop
This command stops the verify process on the array "1".
Rescan Command
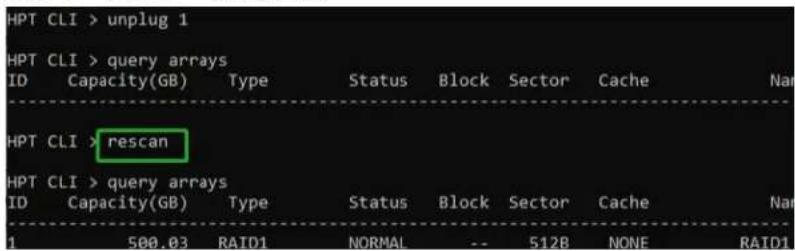
This command will rescan all of the physical devices attached to the RAID controller.
Syntax
rescan
Example
HPT CLI> rescan
Lscard Command
The lscard command is used to list multiple RAID controllers.
Syntax
lscard
Example
HPT CLI> lscard
| HPT CLI > lscard | ||
| CARD_ID | NAME | ACTIVED |
| 0 | Controller(1): NVMe | Active |
| HPT CLI > | ||
Events Commands
The CLI system will automatically record three types of events: Information (shortened to “Inf”), Warning (shortened to “War”), and Error (shortened to “Err”) on the screen output. These commands allow you to query, save, or clear the logged events.
Syntax
events | events clear | events save {file_name}
events
This command will display a list of all the logged events.
Example
HPT CLI> events
![APT CLI > events 3 Inf [05/11/2020 13:22:45] RAID 0 Array 'RAID_0_0' has been created successfully (Disk 1:WD5100T3X8C-00S30, 1/E1/1; Disk 2: Samsung SSD 970 EVO Plus 500GB, 1/E1/2). 2 Inf [05/11/2020 13:22:41] Array 'RAID_1_0' has been deleted successfully. 3 Inf [05/11/2020 13:22:33] RAID 1 Array 'RAID_1_0' has been created successfully (Disk 1:WD5100T3X8C-00S30, 1/E1/1; Disk 2: Samsung SSD 970 EVO Plus 500GB, 1/E1/2). 4 Inf [05/11/2020 13:22:78] Array 'RAID1_3' has been deleted successfully.](/content/2026/05/952838/images/08d042407580ff8f3c91789f53933f5c9dd64bee260c1cd957596430b73071d9.jpg)
events save {file\_name}
This command will save all the logged events as a plain text file.
Example
HPT CLI> events save C:/raidlog.txt
HPT CLI > events save C:/raidlog.txt
The event log C:/raidlog.txt has been saved.
This command will save all the events to C:/raidlog.txt.
Mail Commands
Syntax
mail recipient
mail recipient add {recipient_name} {mail_address} [Inf|War|Err]
mail recipient delete {recipient_name}
mail recipient test {recipient_name}
mail recipient set {recipient_name} {Inf|War|Err}
mail server
mail server set {server_address} {port} {status} {from_address}
[username] [password]
mail server set {a|p|s|m|u|t} {value}
mail recipient
--- List all of the mail recipients
Example
HPT CLI> mail recipient

mail recipient add {recipient\_name} {mail\_address} [Inf|War|Err]
--- Add a new recipient
Example
HPT CLI> mail recipient add admin admin@somecompany.com Inf War Err

This command will setup the RAID system to send mail to admin@somecompany.com for any logged events.
mail recipient delete {recipient\_name}
--- Delete an existing recipient.
Example
HPT CLI> mail recipient delete hpt
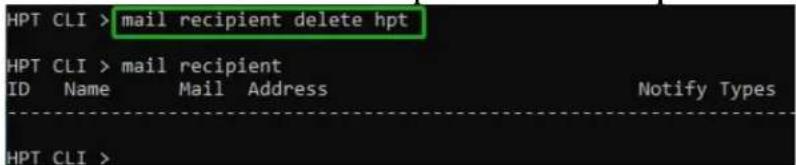
mail recipient test {recipient\_name}
--- Send a test email to a specified recipient.
Example
HPT CLI> mail recipient test hpt
HPT CLI > mail recipient test hpt
HPT CLI >
You will receive a test email.
Mon, 11 May 2020 07:52:30 :
This is a test mail.
mail recipient set {recipient\_name} {Inf|War|Err}
--- Set the notification type for a recipient.
Example
HPT CLI> mail recipient set admin War Err
mail server
--- display the SMTP server information
Example
HPT CLI> mail server
HPT CLI > mail server
ServerAddress Port ssl Status Mail From User Name
secure.emailsrvr.com465 1 Enabled yzhang@highpoint-tech.comyzhang@highpoint-tech.com
mail server set {server\_address} {port} {ssl} {status} {from\_address} [username] [password]
--- Use this command to configure mail server settings.
{server_address} - SMTP server address
{port} - port, generally 25
{ssl} - used ssl, '1' for enable and port need 465, '0' for disable
{status} - status, 'e' for enable or 'd' for disable
{from_address} - mail from address
{username} -mail username
{password} - the user's password
Examples:
HPT CLI> mail server set secure.emailsrvr.com 465 1 e name@somecompany.com name@somecompany.com password

HPT CLI> mail server set mail.somecompany.com 25 0 e admin@somecompany.com password

mail server set {a|p|s|m|u|t} {value}
--- Use this to separate set your mail server value
Parameters
a - SMTP server address
p - port, generally 25
s - status, 'e' for enable or 'd' for disable
m - mail from address
u - username
t - user's password
Examples:
HPT CLI> mail server set a smtp.somecompany.com --- Change the server address
HPT CLI> mail server set p 465
--- Change the port

HPT CLI> mail server set s d --- Disable mail notification

HPT CLI> mail server set s e --- Enable mail notification

Task Commands
When an array requires regular verification or rebuilding, you can use the task commands to automate this process in the background. If you have the appropriate privileges, you can add new tasks, and modify or delete existing tasks.
Syntax
task
task rebuild {array_id} {name=} {once|daily|monthly|weekly}={day}
interval={interval} start=mm/dd/yyyy end=mm/dd/yyyy
time=hh:mm:ss
task verify {array_id} {name=} {once|daily|monthly|weekly}={day interval={interval} start=mm/dd/yyyy end=mm/dd/yyyy time=hh:mm:ss
task delete {task_id}
task enable {task_id}
task disable {task_id}
task
This command displays detailed information about all scheduled tasks.
Example
HPT CLI> task
This command displays the current background tasks.
task rebuild
{array_id}{name=}{once|daily|weekly|monthly={day}
interval={interval} start=mm/dd/yyyy end=mm/dd/yyyy
time=hh:mm:ss
This command allows you to schedule the frequency as once, daily, weekly or monthly, and the detailed time range to rebuild a specified array. The first mm/dd/yyyy specifies the task start date, while the second mm/dd/yyyy specifies the task end date.
Note:
When you add a task to rebuild a selected array once, the para{day} should be omitted.
Examples
HPT CLI> task rebuild 1 name=test once start=5/11/2020 time=17:03:35

This command adds a task schedule named test to rebuild the array "1" at 17:03:35 on 5/11/2020. The rebuild frequency is set to once.
HPT CLI> task rebuild 4 name=myraid4 daily=2 start=2/8/2020 end=2/22/2020 time=13:49:58
This command adds a task schedule named myraid4 to rebuild the array "4" at 13:49:58 every 2 days from 2/8/2005 to 2/22/2020.
HPT CLI> task rebuild 3 name=myraid3 weekly=2 interval=3 start=2/8/2020 end=2/22/2020 time=13:49:58
This command adds a task schedule named myraid3 to rebuild the array "3" at 13:49:58 on Monday (the 2nd day in a week) every 3 weeks from 2/8/2020 to 2/22/2020.
HPT CLI> task rebuild 2 name=myraid2 monthly=3 interval=4 start=2/8/2020 end=2/8/2020 time=12:30:33
This command adds a task schedule named myraid3 to rebuild the array "2" at 12:30:33 on the 3rd day of a month every 4 months from 2/8/2020 to 2/8/2020.
task verify
{array_id} {name=} {once|daily|weekly|monthly}={day} interval={interval} start=mm/dd/yyyy end=mm/dd/yyyy time=hh:mm:ss
This command allows you to schedule a verify task. The usage of this command is the same as adding a rebuild task schedule.
example
HPT CLI> task verify 1 name=test once start=5/11/2020 time=17:12:33

task delete {task\_id}
This command allows you to delete a scheduled task. You can query the task ID by task command.
Example
HPT CLI> task delete 1
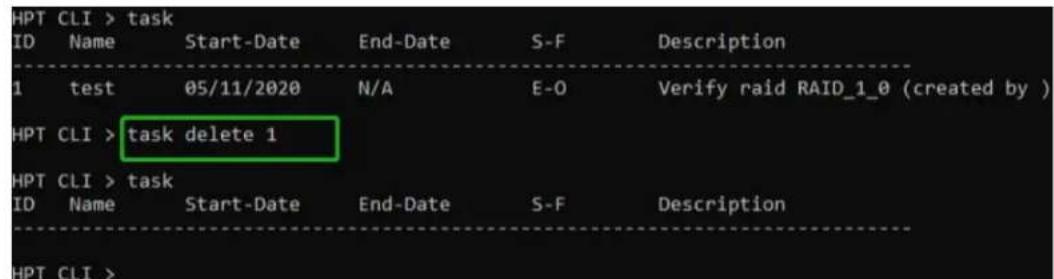
This command will delete the task "1".
task enable {task\_id}
This command will enable a disabled task.
Example
HPT CLI> task enable 1

This command will enable the disabled task "1".
task disable {task\_id}
This command will disable a scheduled task manually.
Example
HPT CLI> task disable 1

This command will disable the scheduled task"1".
Set Commands
Syntax
set | set [name] = {value}
set
Show the system settable parameters.
![HPT CLI > set Show the system setable parameters. [AR] Auto Rebuild Enable [CE] Continue Rebuild On Error Enable [AA] Audible Alarm Enable [RP] Rebuild Priority Medium [SD] Spindown Idle Disk (minutes) Disable [BP] Beeper Enable [FS] Eclosure Fan Speed Auto [TT] Temperature threshold 149 [TU] Temperature unit F [PS] Password -- HPT CLI >](/content/2026/05/952838/images/2f2bd054d4d8d935d4c6a5113964420ed1632080fa397a29153afe2cda089789.jpg)
- set AR={y|n}
Set enable or disable to the [Auto Rebuild] parameter.
Example
HPT CLI> set AR=y
- set CE={y|n}
Set enable or disable to the [Continue Rebuilding On Error] parameter.
Example
HPT CLI> set CE=y
- set AA={y|n}
Enable or Disable the [Audible Alarm] parameter.
Example
HPT CLI> set AA=y
- set RP={0-100}
Change rebuilding priority. If a controller is not specified, this command will set the global rebuilding priority.
Note:
[0-12] Lowest
[13-37] Low
[38-67] Medium
[68-87] High
[>88] Highest
Example
HPT CLI> set RP=50
- set SD={minutes}
Set value of [Spindown Idle Disk]
[1-10] 10
[11-20] 20
[21-30] 30
[31-60] 60
[61-120] 120
[121-180] 180
[181-240] 240
Example
HPT CLI> set SD=10
- set BP={y|n}
Set enable or disable beeper.
Example
HPT CLI> set BP=y
- set FS={Auto|Off|Low|Medium|High}
Change Enclosure Fan Speed.
Example
HPT CLI> set FS=Medium
- set TT={value}, default=149F
Set temperature threshold.
Example
HPT CLI> set TT=135
- set TU={C|F}
Set temperature unit to Celsius equals or Fahrenheit equals.
Example
HPT CLI> set TU=C
- set PS
Set or change your password and confirm it.
Example
HPT CLI> set PS
HPT CLI > set PS
Password :*****
Confirm :*****
Password has been changed, please login with your new password.
HighPoint Windows CLI, Please Input
Password:
Diag Commands
Note: This function is only supported by Linux.
This command allows you to collect the diagnostic information.
Example
HPT CLI> diag
HPT CLI>diag
The diagnostic information has been saved in /usr/share/hpt/HighPoint_2021.04.07.tar.gz
HPT CLI>
The saving path will be displayed after entering this command.
Help Commands
If you input an unknown or error command, you will be told that the command is unknown, you can use help commands to find correct commands.
HPT CLI > raid
ERROR: Unknown command raid .
You can input 'help' for more commands
HPT CLI >
Syntax
help | help {command}
help
Show generic help about this utility.
Example
HPT CLI> help
HPT CLI > help
help [query|create|delete|OCE/ORLM|rebuild|verify|unplug|switch|lscardrescan|init|events|mail|task|set|clear|help|exit]
help {command}
Show help about a specific command.
Example
HPT CLI> help create
HPT CLI > help create
Create Command
This command allows you to create a new RAID array or add a spare disk.
Syntax:
create {RAID0|RAID1|RAID3|RAID5|RAID6|RAID10|RAID50|JBOD|spare} [create-options]
create-option:
disks-1/2,1/3... or disks-* Specify the disks used to create array.
name=array name
Specify the name of the array which will be created.
src=source array ID
If src argument is specified, OCE/ORLM will be started.
cp=WB, WT or NONE
Cache Policy option (WB: write back, WT: write through).
init-{foreground|background|keepdata|quickinit}
Specifies array initialization option.
foreground:
Zero out all data on the array. The array is not
accessible by the operating system until initialization is completed
background:
Allow instant access to the array. Parity blocks
will be generated in background.
keepdata:
Setup array information blocks on the drives only.
Use this option for array recovery.
quickinit:
Setup array information blocks and zero out MBR data on the array.
capacity=array capacity
Specify the capacity (xxM,xxG) of the target array.
matrix-n*m
When create RAID50 to specify the matrix options.
n : number of subarray's disk, m: number of subarray.
For example: When create a RAID50 the option matrix
can be matrix-3*2. That means 2 RAID5s each with 3 disks to form a RAID50
bs-size
Specify the block size (16k,32k,64k,128k,256k,512k,1024k)
sector=size
Specify the sector size (512B,1k,2k,4k)
Exit Command
Syntax
exit
Exit from the interactive mode and close the window.
Clear Commands
Syntax
clear/cls/clr
This command is used to clear screen.
Troubleshooting
Debugging an Abnormal RAID status
Please submit a support ticket using our online service at https://www.highpoint-tech.com/websupport/
Table 1. WebGUI Icon Guide
| Critical – missing diskA disk is missing from the array bringing it to ‘critical’ status.The array is still accessible but another disk failure could result in data loss. | |
| VerifyingThe array is currently running a disk integrity check. | |
| RebuildingThe array is currently rebuilding meaning you replaced a failed disk or added a new disk to a ‘critical’ state array. | |
| Critical – rebuild requiredThe array has all disks, but one disk requires rebuilding. | |
| DisabledThe icon represents a disabled array, meaning more than one disk failed and the array is no longer accessible | |
| InitializingThe array is initializing. The two types of initialization areForeground and Background. (See Initialization) | |
| UninitializedThe array initialization process has been interrupted, and the process is incomplete. | |
| Not InitializedDisk is not initialized yet, and needs to be initialized before use | |
| LegacyAn existing file system has been detected on the disk. These disks are classified as legacy drives. | |
| NormalThe array status is normal | |
| InitializingThe array is initializing, either foreground or background initialization | |
| Initialization StoppedThe initialization has been stopped. Current status is uninitialized. | |
| Critical – InconsistencyData in the array is inconsistent and needs to be rebuilt. | |
| Critical – missing diskA disk has been removed or experienced failure, and user needs to reinsert disk or add a new disk. | |
| RebuildingThe array is currently rebuilding. | |
| VerifyingThe array is performing a data consistency check. Array status will show ‘verifying’. | |
| DisabledThe array does not have enough disks to maintain the RAID level. A disabled array is not accessible. |
Table 2. RAID Level Reference Guide
| Type | Description | Min. disks | Usable space | Advantage | Disadvantage | Application |
| RAID 0 | Disk Striping | 4 | 100% | Offers the highest performance | No fault tolerance - failure of drive results in complete data lo | Temporary file, performance driven application. |
| RAID 1 | Disk Mirroring | 2 | 50% | Provides convenient low-cost data redundancy for smaller systems and servers | Useable storage space is 50% of total available capacity. Can handle 1 disk failure. | Operating system, backup, and transaction database. |
| RAID10 | Striping with Mirroring | 4 | 50% | High read performance and medium write performance with data protection for up to 2-drive failures | Useable storage capacity equals total capacity of all drives in th array minus two | Fast database and application servers which need performance and data protection |
HighPoint Recommended List of NVMe SSDs and Motherboards
HighPoint maintains a list of NVMe SSD's and motherboards suitable for use with the
SSD7101A/SSD7103/SSD7202/SSD7502/SSD7204/SSD7104/SSD7184
/SSD7180/SSD7140/SSD7120/SSD6540/SSD6540M/SSD7580
/SSD7540.
This document is routinely updated, and is available from the SSD7101A/SSD7103/SSD7202/SSD7502/SSD7204/SSD7104/SSD7184
/SSD7180/SSD7140/SSD7120/SSD6540/SSD6540M/SSD7580/
SSD7540 resources webpage:
SSD7101A:
https://www.highpoint-tech.com/PDF/NVMe/SSD7101A-
1/SSD7101A Compatibility List V1.08 21 6 25.pdf
SSD7103:
https://highpoint-
tech.com/PDF/NVMe/SSD7103/SSD7103 Compatibility List v1.09
21 6 25.pdf
SSD7202:
https://highpoint-
tech.com/PDF/NVMe/SSD7202/SSD7202 Compatibility List v1.07
21 6 25.pdf
SSD7502:
https://highpoint-
tech.com/PDF/NVMe/SSD7500/SSD7502/SSD7502 Compatibility L
tech.com/PDF/NVMe/SSD7104/SSD7104 Compatibility List V1.05 21 6 25.pdf
SSD6540:
https://highpoint-
tech.com/PDF/NVMe/SSD6540/SSD6540 Compatibility List v1.05 21 6 25.pdf
SSD6540M:
https://highpoint-
tech.com/PDF/Compatibility_List/SSD6540M_Compatibility_List.pdf
SSD7120:
https://www.highpoint-
tech.com/PDF/NVMe/SSD7120/SSD7120_Compatibility_List_V1.08 21 7 1.pdf
SSD7184:
https://www.highpoint-
tech.com/PDF/NVMe/SSD718x/SSD7184_Compatibility_List_V1.1021 7 1.pdf
SSD7180:
https://www.highpoint-
tech.com/PDF/NVMe/SSD718x/SSD7180 Compatibility List V1.10 21 7 1.pdf
SSD7140:
https://highpoint-
tech.com/PDF/NVMe/SSD7140/SSD7140_Compatibility_List_V1.05_21_6_25.pdf
SSD7505:
https://highpoint-tech.com/PDF/NVMe/SSD7500/SSD7505/SSD7505 Compatibility List V1.08 21 6 25.pdf
SSD7540:
https://highpoint-tech.com/PDF/NVMe/SSD7500/SSD7540/SSD7540 Compatibility List V1.06 21 6 25.pdf
SSD7580:
https://highpoint-tech.com/PDF/NVMe/SSD7580/SSD7580_Compatibility_List_V1.06_21_6_25.pdf
Contacting Technical Support
FAQ's, technical articles, and trouble-shooting tips are available from our Support web page
https://highpoint-tech.com/USA_new/support.htm
If you require technical Support, please submit a support ticket using our online service at
https://www.highpoint-tech.com/websupport/.
- SSD7000 RAID Management Guide
- Table of Contents
- HighPoint RAID Management Software....4
- Using the HighPoint RAID Management (WebGUI) Software....5
- System Setting....26
- Event Tab....34
- SHI (Storage Health Inspector)....34
- Log collecting....39
- Using the HighPoint Command Line Interface (CLI)....40
- HighPoint RAID Management Software
- Using the HighPoint RAID Management (WebGUI) Software
- Starting the WebGUI
- How to login WebGUI in Windows/Mac
- How to login WebGUI in Linux
- Verify the Controller Status
- SSD7184/7180/7140:
- Creating an Array
- Single controller to create an array
- Using the Cross-Sync feature to create an array
- SSD7120:
- Array Type
- Initialization Method:
- Background and Foreground Initialization
- Mac:
- Linux:
- Capacity (Default: Maximum)
- Adding Spare Disks
- To add spare disks:
- Obtaining Logical Device Information
- Logical Device Information
- Maintenance
- Array Information
- Array Information & Maintenance Options: Critical Status
- Physical Device Information
- Rescan
- System Setting
- Enable auto rebuild (default: Enabled)
- Enable continue rebuilding on error (default: Enabled)
- Restrict to localhost access (default: Enabled)
- Rebuild Priority (default: Medium)
- Fan Speed (default: Auto)
- Port Number (default: 7402)
- Temperature Unit(default: °F)
- Password Settings
- Changing your HRM password
- Recovering your HRM password
- For Windows Users:
- Email Setting
- SMTP settings
- To set up email alerts:
- Email Precautions
- Yahoo Setting:
- Outlook Setting:
- How to Add Recipients
- Event Tab
- SHI (Storage Health Inspector)
- How to Enable SMART Monitoring
- How to Use the Health Inspector Scheduler
- For example:
- How to Create a New Verify Task
- 10.Click Submit
- Your entry will appear under Tasks List
- Log collecting
- Diagnostic view
- Log saving
- Using the HighPoint Command Line Interface (CLI)
- How to use the CLI in Windows
- How to use the CLI in a Linux system
- CLI Command Reference
- Query Commands
- Syntax:
- query controllers
- Single card:
- query enclosures
- Cross-Sync:
- query devices
- Attributes:
- ID:
- Capacity:
- MaxFree:
- Flag:
- Status:
- ModelNumber:
- Example:
- query devices {device\_id}
- Mode Number:
- Serial Number:
- Firmware Version:
- Read Ahead/Write Cache/TCQ/NCQ Status:
- Pcie width:
- Temperature:
- S.M.A.R.T Attributes:
- query arrays
- Type:
- Block:
- Sector:
- Cache:
- query arrays {arrays\_id}
- Init Commands
- init {device\_id}
- init {array\_id} {start|stop}
- Create Commands
- Parameters
- Examples:
- Delete Command
- Syntax
- Examples
- Unplug Command
- Rebuild Commands
- rebuild {array\_id} {device\_id}
- Example
- rebuild {array\_id} {start|stop}
- Verify Command
- Rescan Command
- Lscard Command
- Events Commands
- events
- events save {file\_name}
- Mail Commands
- mail recipient
- mail recipient add {recipient\_name} {mail\_address} [Inf|War|Err]
- mail recipient delete {recipient\_name}
- mail recipient test {recipient\_name}
- mail recipient set {recipient\_name} {Inf|War|Err}
- mail server
- mail server set {server\_address} {port} {ssl} {status} {from\_address} [username] [password]
- mail server set {a|p|s|m|u|t} {value}
- Task Commands
- task
- task rebuild
- task verify
- task delete {task\_id}
- task enable {task\_id}
- task disable {task\_id}
- Set Commands
- set
- - set RP={0-100}
- - set SD={minutes}
- Diag Commands
- Help Commands
- help
- help {command}
- Exit Command
- Clear Commands
- Troubleshooting
- HighPoint Recommended List of NVMe SSDs and Motherboards
- SSD6540:
- SSD6540M:
- SSD7184:
- SSD7180:
- SSD7140:
- SSD7505:
- SSD7540:
- SSD7580:
- Contacting Technical Support
Brand : Highpoint
Model : SSD7104
Category : Controller