
Sense FDHK32V1A - DVD player Furrion - Free user manual and instructions
Find the device manual for free Sense FDHK32V1A Furrion in PDF.


| Product Type | DVD Player |
| Brand | Furrion |
| Model | Sense FDHK32V1A |
| Dimensions (W x D x H) | 10.2 x 7.5 x 2.4 inches |
| Weight | 2.2 lbs |
| Power Supply | AC 100-240V, 50/60Hz; DC 12V |
| Power Consumption | ≤ 15W |
| Disc Compatibility | DVD, DVD±R/RW, CD, CD-R/RW, MP3, JPEG |
| Video Output | HDMI, Composite (RCA), Component |
| Audio Output | Digital Optical, Analog Stereo (RCA) |
| USB Port | 1x USB 2.0 (supports MP3, JPEG, DivX) |
| Remote Control | Included (IR) |
| Region Code | Region 1 (adjustable) |
| Playback Functions | Repeat, Shuffle, Zoom, Slow Motion, Search |
| Parental Control | Supported (ratings) |
| Maintenance | Clean with soft, dry cloth; avoid liquids |
| Safety | Keep away from moisture and heat; use in ventilated area |
| Spare Parts Available | Remote control, power adapter, AV cables |
| Repairability | User-replaceable fuse; professional repair recommended |
| Warranty | 1 year limited |
Frequently Asked Questions - Sense FDHK32V1A Furrion
User questions about Sense FDHK32V1A Furrion
0 question about this device. Answer the ones you know or ask your own.
Ask a new question about this device
Download the instructions for your DVD player in PDF format for free! Find your manual Sense FDHK32V1A - Furrion and take your electronic device back in hand. On this page are published all the documents necessary for the use of your device. Sense FDHK32V1A by Furrion.
USER MANUAL Sense FDHK32V1A Furrion
32" Furrion Sense™ HD DLED All-In-One Entertainment System
Instruction Manual

*Product picture is for reference only.
Welcome
Thank you for purchasing this 32" Furrion Sense™ HD DLED All-In-One Entertainment System. Before operating your new product, please read these instructions carefully. This instruction manual contains information for safe use, installation and maintenance of the product.
The manufacturer does not accept responsibility for any damages due to not observing these instructions. If you have any questions regarding our products, please contact us at support@furrion.com
Supplier's Declaration of Conformity
47 CFR § 2.1077 Compliance Information
Unique Identifier
Trade Name: Furrion
Model No.: FDHK32V1A
Responsible Party – U.S. Contact Information
Furrion Innovation Center & Institute of Technology
52567 Independence Ct., Elkhart, IN 46514, USA
Toll free:1-888-354-5792; Email: support@furrion.com
FCC Compliance Statement
This device complies with Part 15 of the FCC Rules. Operation is subject to the following two conditions: (1) This device may not cause harmful interference, and (2) this device must accept any interference received, including interference that may cause undesired operation.
Contents
Welcome....2
Contents....3
Safety Warnings....4
Compliance 7
Safety Precautions....8
Input & Output ports 9
Front Panel 10
Remote Control 13
About Your TV 15
Features....15
Power Source....15
Before Operation 16
What's in the box....16
Prepare your Remote Control....16
Getting Started....17
TV Settings....18
Setup Settings....18
Picture Settings....20
Audio Settings....21
Time Settings....22
Lock Settings....23
Channel Settings....26
USB Mode 27
Soundbar Operation 28
Specification 30
Troubleshooting.... 33
Safety Warnings

CAUTION
RISK OF ELECTRIC SHOCK DO NOT OPEN

CAUTION: TO REDUCE THE RISK OF ELECTRIC SHOCK, DO NOT REMOVE COVER (OR BACK). NO USER-SERVICEABLE PARTS INSIDE. REFER SERVICING TO QUALIFIED SERVICE PERSONNEL.

This ‘bolt of lightning’ indicates uninsulated material within your unit which may cause an electric
shock. For the safety of everyone in your household, please do not remove product covering.

The ‘exclamation mark’ calls attention to features within the enclosed literature to prevent
operating and maintenance problems.

This equipment is a Class II or double insulated electrical appliance. It has been designed in such a way that it
does not require a safety connection to electrical earth.
WARNING: To reduce the risk of fire or electric shock, this apparatus should not be exposed to rain / moisture or placed in the vicinity of objects filled with liquids (such as vases).
CAUTION: To prevent electric shock, fully insert the plug. For regions with polarized plugs: Please match wide blade to wide slot.
Important Safety Instructions
- Read these instructions.
- Keep these instructions.
- Heed all warnings.
- Follow all instructions.
- Do not use this apparatus near water.
-
Clean only with a dry cloth.
-
Do not block any of the ventilation openings. Install in accordance with the manufacturer's instructions.
- Do not install near any heat sources such as radiators, heat registers, stoves or other apparatus (including amplifiers) that produce heat.
- Do not defeat the safety purpose of the polarized or grounding-type plug. A polarized plug has two blades with one wider than the other. A grounding type plug has two blades and a third grounding prong. The wide blade or the third prong are provided for your safety. When the provided plug does not fit into your outlet, consult an electrician for replacement of the obsolete outlet.
- Protect the power cord from being walked on or pinched, particularly at plugs, convenience receptacles and the point where they exit from the apparatus.
- Only use attachments/accessories specified by the manufacturer.
- Use only with a cart, stand, tripod, bracket
or table specified by the manufacturer or sold with the apparatus. When a cart is used, use caution when
moving the cart/apparatus to avoid injury from tip-over. - Unplug this apparatus during lightning storms or when unused for long periods of time.
- Refer all servicing to qualified service personnel. Servicing is required when the apparatus has been damaged in any way, such as if the power-supply cord or plug is damaged, liquid has been spilled or objects have fallen into the apparatus, or when the apparatus has been exposed to rain or moisture, does not operate normally, or has been dropped.
- Apparatus should not be exposed to dripping or splashing, and objects filled with liquids, such as vases, should not be placed on the apparatus.

Safety Warnings
- An outside antenna system should not be located in the vicinity of overhead power lines or other electric light or power circuits, or where it can fall into such power lines or circuits. When installing an outside antenna system, extreme care should be taken to eliminate touching power lines or circuits as contact might be fatal.
- Do not overload wall outlets, extension cords, or integral convenience receptacles as this can result in a risk of fire or electric shock.
- Never push objects of any kind into this product through openings as they may touch short-out parts or dangerous voltage points that could result in a fire or electric shock. Never spill liquid of any kind on the product.
- If an outside antenna is connected to the television equipment, be sure the antenna system is grounded so as to provide some protection against voltage surges and built up static charges. Section 810 of the National Electrical Code provides information with respect to proper grounding of the mast and supporting structure, grounding of the lead-in wire to an antenna discharge unit, size of grounding conductors, location of antenna discharge unit, connection to grounding electrodes, and requirements for the grounding electrodes.
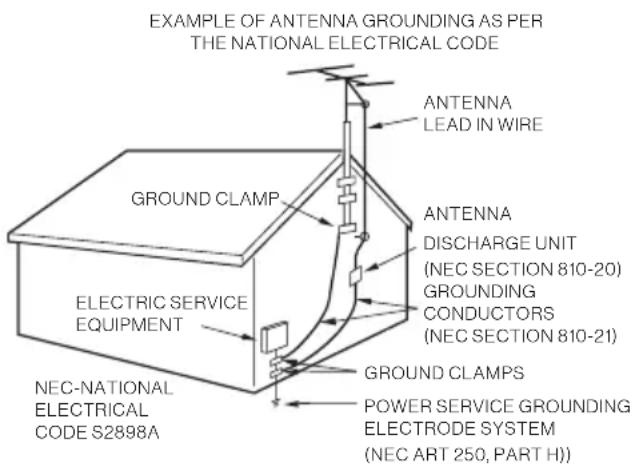
- NOTE TO CABLE/TV INSTALLER: This reminder is provided to call the CATV system installer's attention to Article 820-40 of the National Electric Code (U.S.A.). The code provides guidelines for proper grounding and, in particular, specifies that the cable ground shall be connected to the grounding system of the building, as close to the point of the cable entry as practical.
- When replacement parts are required, be sure the service technician uses replacement parts specified by the manufacturer or those that have the same characteristics as the original part. Unauthorized substitutions may result in fire, electric shock or other hazards.
- Upon completion of any service or repairs to this unit, ask the service technician to perform safety checks to determine that the unit is in proper operating condition.
- When you connect the product to other equipment, turn off the power and unplug from the wall outlet. Failure to do so may cause an electric shock and serious personal injury. Read the owner's manual of the other equipment carefully and follow the instructions when making any connections.
- Sudden high volume may cause hearing or speaker damage. When you use headphones (if the unit is equipped with a headphone jack), keep the volume at a moderate level. If you use headphones continuously with high volume, you may suffer hearing damage.
- Any severe physical impact on the product may cause certain components to fallout of place within and break, which may cause fire or electric shock. In such event, do not operate the product. Contact the manufacturer for support.
- In case of product malfunction or unusual events such as electrical burning smell, smoke, or loss of content signals on built-in Soundbar due to internal overheating,
Safety Warnings
immediately turn off and unplug the power and contact the manufacturer.
- Do not mount this product near a motor or transformer where strong magnetism is generated.
- Do not allow the product to output distorted sound for extended periods of time. This may cause speaker overheating and fire.
- The socket-outlet must be installed near the unit and easily accessible.
- The mains plug is used as the disconnect and shall remain readily operable.
- Batteries (battery pack or installed batteries) should not be exposed to excessive heat such as direct sunlight, fire or other heat sources.
CONDENSATION
Moisture will form in the operating section of the unit if the unit is brought from cool surroundings into a warm room or if the temperature of the room rises suddenly.
When this happens the unit's performance will be impaired. To prevent this, let the unit stand in its new surroundings for about an hour before switching on, or make sure the room temperature rises gradually.
Condensation may also form during the summer if the unit is exposed to the breeze from an air conditioner. In such cases, change the location of the unit.
HOW TO HANDLE THE LED PANEL
- Do not press hard or jolt the LED panel. It may cause the LED panel glass to break and injury may occur.
- If the LED panel is broken, make absolutely sure you do not touch the liquid in the panel. This may cause skin inflammation.
- If the liquid gets in your mouth, immediately rinse and consult with your doctor. Also, if the liquid gets in your eyes or touches your skin, consult your doctor after rinsing for at least 15 minutes in clean water.
Possible Adverse Effects on LED Panel:
If a fixed (non-moving) pattern remains on the LED panel for long periods of time, the image can become permanently engrained and cause subtle but permanent ghost images.
This type of damage is NOT COVERED BY YOUR WARRANTY. Never leave your LED panel on for long periods of time while it is displaying the following formats or images:
- Fixed images, such as stock tickers, video game patterns, TV station logos and websites.
- Special formats that do not use the entire screen. For example, viewing letterbox style (16:9) media on a normal (4:3) display (black bars at top and bottom of screen); or viewing normal style (4:3) media on a wide screen (16:9) display (black bars on left and right sides of screen).
The following symptoms are not signs of malfunction but technical limitation.
Therefore we disclaim any responsibility for these symptoms.
- LED panels are manufactured using an extremely high level of precision technology, however sometimes parts of the screen may be missing picture elements or have luminous spots. This is not a sign of a malfunction.
- Do not install the LED panel near electronic equipment that produces electromagnetic waves. Some equipment placed too close to LED may cause interference.
- Effect on infrared devices – there may be interference while using infrared devices such as infrared cordless headphones.
POWER SOURCE
NOTE: Please make sure to insert the cord securely at both the Furrion Sense™ TV and 12V outlet.
Safety Warnings
WARNING:
- Do not connect this unit to the power using any device other than the supplied 12V cigarette adapter. Or else it may cause fire, electric shock, or damage.
- Do not use with a voltage other than the power voltage specified. Or else it may cause fire, electric shock, or damage.
- This product is used on RVs under the RVIA code. These RVs contain fuses required by RVIA. And, this product has been tested by LANSON AFM15 fuse.
CAUTION:
- When the unit is not being used for extended periods of time(e.g., away on a trip), in the interest of safety, be sure to unplug it from the outlet.
- Do not plug/unplug the 12V cigarette adapter (included) or AC power adapter (not included) when your hands are wet. Doing this may cause electric shock.
- If you need to replace the supplied 12V cigarette adapter or purchase a AC power adapter (not included), the specified one is recommended. Contact your dealer to purchase a factory replacement.
Compliance
FCC Statement
Note: This equipment has been tested and found to comply with the limits for a Class B digital device, pursuant to Part 15 of the FCC Rules. These limits are designed to provide reasonable protection against harmful interference in a residential installation. This equipment generates, uses and can radiate radio frequency energy and, if not installed and used in accordance with the instructions, may cause harmful interference to radio communications. However, there is no guarantee that interference will not occur in a particular installation. If this equipment does cause harmful interference to radio or television reception, which can be determined by turning the equipment off and on, the user is encouraged to try to correct the interference by one or more of the following measures:
- Reorient or relocate the receiving antenna.
– Increase the separation between the equipment and receiver. - Connect the equipment into an outlet on a circuit different from that to which the receiver is connected.
- Consult the dealer or an experienced radio/TV technician for help.
WARNING: Changes or modifications to this unit not expressly approved by the party responsible for compliance could void the user's authority to operate this equipment under FCC Rules.
This device complies with part 15 of the FCC Rules. Operation is subject to the following two conditions:
- This device may not cause harmful interference.
- This device must accept any interference received, including interference that may cause undesired operation.
IC Statement
This device contains licence-exempt transmitter(s)/receiver(s) that comply with Innovation, Science and Economic Development Canada's licence-exempt RSS(s). Operation is subject to the following two conditions:
(1) This device may not cause interference.
(2) This device must accept any interference, including interference that may cause undesired operation of the device.
Safety Warnings
Safety Precautions
WARNING: Never place a television set in an unstable location. A television set may fall, causing serious personal injury or death. Many injuries, particularly to children, can be avoided by taking simple precautions such as:
- Using cabinets or stands recommended by the manufacturer of the television set.
- Only using furniture that can safely support the television set.
- Ensuring the television set is not overhanging the edge of the supporting furniture.
- Not placing the television set on tall furniture (for example, cupboards or bookcases) without anchoring both the furniture and the television set to a suitable support.
- Not placing the television set on cloth or other materials that may be located between the television set and supporting furniture.
– Educating children about the dangers of climbing on furniture to reach the television set or its controls.
If your existing television set is being retained and relocated, the same considerations as above should be applied.
The unit emits heat when in operation. Do not place any covers or blankets on the unit, this may cause overheating. Do not block ventilation holes, or set up near radiators. Do not place in direct sunlight. When placing on a shelf, leave 4 inches (10 cm) free space around the entire unit.

Notes when mounting the LED TV on the wall
If the unit is to be mounted on the wall, contact the retailer where you purchased the LED TV for advice, and have the equipment professionally installed. Incomplete or improper installation may cause injury to you and/or damage to the LED TV.
WARNING:
- Do not use this TV with wall mounts that allow the TV to tilt vertically. Vertical tilting wall mounts may cause structural damage to the TV.
- Use ONLY fixed or horizontal swiveling wall mounts with this TV.
Function Overview
Input & Output ports

* The configuration of the connection ports may vary from model to model.
| Item | Input/Output Function | |
| 1 | AM/FM ANTENNA | Connect to the AM/FM antenna. |
| 2 | IR EXT | Connect to the IR EXT port of another Furrion SenseTM TV. |
| 3 | ZONE 2 OUT | Connect to Zone 2 Speaker. |
| 4 | L-AUDIO IN-R | Connect to the COMPOSITE AUDIO OUT ports of a DVD Player, Cable Box or other compatible devices. |
| 5 | YVIDEO IN | Connect to the COMPONENT VIDEO OUT ports of a DVD Player, Cable Box or other compatible devices. |
| Pb | ||
| Pr | ||
| 6 | L-AUDIO OUT-R | Connect to the AUDIO IN ports of an audio device. |
| 7 | HDMI 1 (ARC) IN | Connect to the HDMI OUT port of a DVD Player, Games Console, Cable Box or other HDMI device.• ARC (Audio Return Channel) When connected with a HDMI 1.4 cable to an ARC compatible audio system, the TV links with the device to give extra audio functionality. |
| HDMI 2 IN | ||
| 8 | RF IN | Connect to TV ANTENNA, CABLE, or CABLE BOX. |
| 9 | OPTICAL OUT | Connect to the OPTICAL AUDIO IN port of an audio device. |
| 10 | USB (5V/1000mA) | Rear USB Port: Provide power supply only for Google dongle / Roku etc. |
| 11 | AUX | Front Aux In port: Connect to the 3.5mm audio output socket on an auxiliary device. |
| 12 | USB | Front USB port: Connect a USB storage device. |
| 13 | HDMI | Front HDMI In port: Connect to the HDMI output socket on an AV device. |
Function Overview
Front Panel
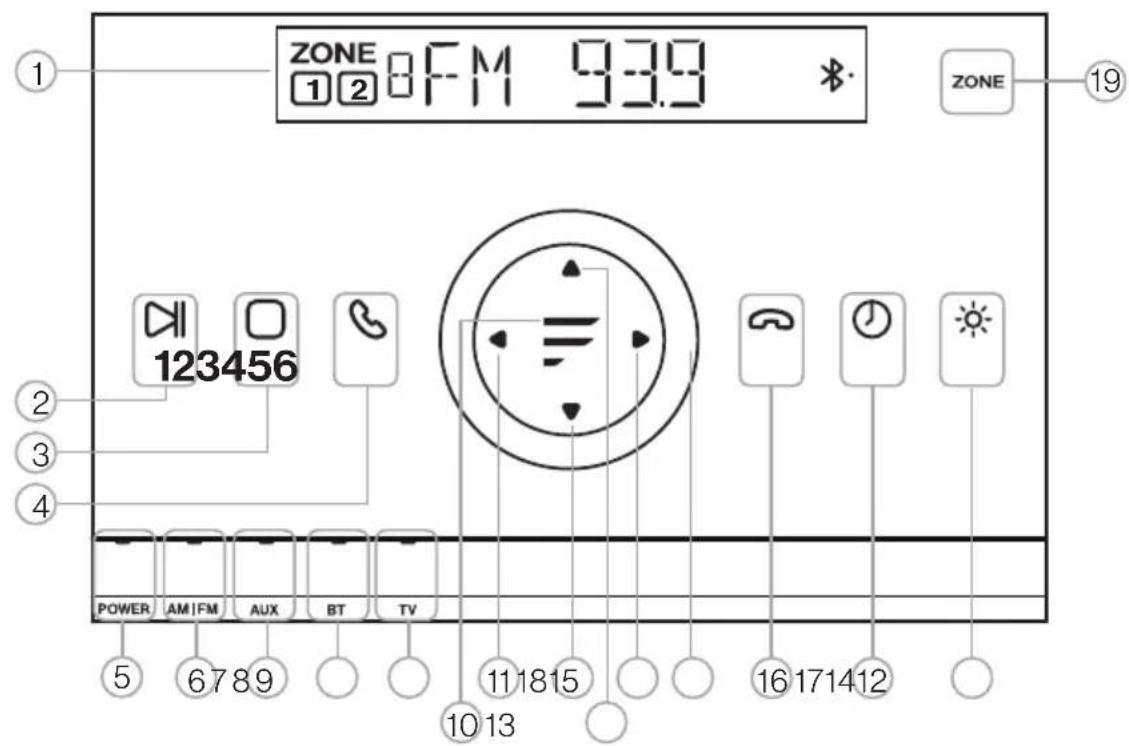
| Item Description | ||
| 1 | LCD screen | Display the audio source, mode or status. |
| 2 | 1 | In radio mode, press and hold this button to store the current frequency as the preset station No.1. Press it briefly to recall the preset station 1.In BT/USB mode, press this button to play or pause the current playback. |
| 3 | 2 | In radio mode, press and hold this button to store the current frequency as the preset station No.2. Press it briefly to recall the preset station 2.In BT/USB mode, press this button to stop playback.In non-radio mode, press and hold this button to select the alarm source input AL AUX, AL BT, AL TV or AL RADIO.The corresponding source will display on the front panel LCD. |
| Item Description | ||
| 4 | 3 | In radio mode, press and hold this button to store the current frequency as the preset station No.3. Press it briefly to recall the preset station 3.In BT mode for an incoming call, press this button to answer.In BT mode, press this button directly to dial out the last called number. |
| 5 | POWER | Press it to turn the whole unit on/off. |
| 6 | AM|FM | Press it to select AM|FM source when the TV is off: press it to select AM1, AM2, FM1, FM2 or FM3.Press and hold it to select the radio region USA1, USA2, EUROPE or AUSTRALIA. |
| 7 | AUX | Press it to select AUX source when the TV is off. |
Function Overview
| Item Description | ||
| 8 | BT | Press BT to select Bluetooth source. It will automatically launch connection with connecting the device paired last time. (BT name: Furrion Sense 32" TV).Press and hold it for 6 seconds to disconnect the Bluetooth and clear the pairing information. |
| 9 | TV | In TV mode, press this button to display TV input source; press and hold it to enter TV setting menu.In non-TV mode, press this button to select TV source for Zone 1. |
| 10 | Touch key:In TV mode, press briefly to confirm your setting within a menu.Press and hold it to mute both zones. The indicator on the key lights up. Press and hold it again to unmute. | |
| 11 | During playback with BT or USB (with a USB storage device connected), press this touching key to skip to the previous track.In radio mode, press this touching key to move down the radio frequency one step at a time. Press and hold this key to automatically search the radio stations downwards.In TV mode, press this touching key to move the cursor left within a TV menu. | |
| 12 | In TV mode:Select TV channel downward;Move the cursor down within a TV menu. | |
| 13 | In TV mode:Select TV channel upward.Move the cursor up within a TV menu. | |
| Item Description | ||
| 14 | During playback with BT or USB (with a USB device connected), press this touching key to skip to the next track.In radio mode, press this touching key to move up the radio frequency one step at a time. Press and hold this touching key to automatically search the radio stations upwards.In TV mode, move the cursor right within a TV menu. | |
| 15 | Volume knob | Rotate the knob clockwise or counterclockwise to increase or decrease volume. |
| 16 | 4 | In radio mode, press and hold this button to store the current frequency as the preset station No.4. Press it briefly to recall this stored frequency.In BT mode, press this button to hang up an incoming call. |
| 17 | 5 | In non-radio mode, press and hold it to enter clock setting mode. When the hour or minute digits flash, tap the touch key to switch between hour and minute setting and rotate the volume knob to set the hour or minute. The time is set automatically after a few seconds of inactivity.In clock setting mode with alarm off (default), press and hold it to enter ALARM ON setting mode (on shown). Then repeat the hour and minute setting operation in clock setting mode. When the set alarm is on, the icon will stay on the front panel LCD in standby mode.In clock setting mode with alarm on, press briefly to enter ALARM ON setting mode or vice versa.In clock setting mode with alarm on or in ALARM ON setting mode, press and hold it to turn off the set alarm (ALARM OFF shown briefly).In radio mode, press and hold it to store the station as preset number 5. Press it briefly to recall the preset station 5. |
Function Overview
| Item Description | ||
| 18 | 6 | In radio mode, press and hold this button to store the current frequency as the preset station No.6. Press it briefly to recall the preset station 6.In non-radio mode, press and hold it to select BL LOW, BL MID or BL HIGH to adjust the brightness. |
| 19 | ZONE | Press briefly to switch between ZONE 1 and ZONE 2.By default, ZONE 1 is on while ZONE 2 is off. You can press ZONE briefly to turn on ZONE 2 and play the same source as ZONE 1.When the selected zone is displayed on the front panel LCD, you can change source or adjust volume of the zone specifically. Press and hold it to turn off the current zone.When the current zone is off (OFF displayed on the front panel LCD), source input (AM/FM, AUX, BT, TV) and volume controls for the zone will be invalid. |
Function Overview
Remote Control

| Item Button Function | ||
| 1 | ZONE | Press briefly to switch between ZONE 1 and ZONE 2. Press and hold it to turn off the current zone. |
| 2 | Turn on/off the whole unit. | |
| 3 | NUMBER BUTTONS | Enter numbers or select channels. |
| 4 | -/-PTY | Switch between single and double digit input. |
| 5 | S.MODE | Select a sound mode. |
| 6 | P.MODE | Select a picture mode. |
| 7 | INFO/OSD | In TV mode, press to display information on the selected TV channel. |
| 8 | F.LIST | Display favorite list. |
| 9 | EPG | Display the program guide. |
| 10 | Select the input sources. | |
| 11 | NAVIGATION BUTTONS/OK | Navigate within a menu;Press OK to confirm your selection. |
| 12 | VOL+/- | Increase/decrease volume. |
| 13 | No function for this Sense TV. | |
| 14 | Return to the previous track/chapter during playback. Press and hold it to fast backward. Automatic or manual tuning in radio mode. | |
| 15 | STEP | Dial or accept a call (when the system is connected to a cell phone via BT). |
| 16 | AUX | Select AUX mode. |
| 17 | AM/FM | Select AM/FM/WB radio mode. |
Function Overview
English
| Item | Button Function | |
| 18 | SLEEP/CLOCK | In TV mode, press it to set the sleep timer; In non-TV mode, press and hold it to select Clock, ALARM ON or ALARM OFF setting. |
| 19 | MTS/AUDIO | Cycle through MTS sound modes. |
| 20 | RDM | No function for this Sense TV. |
| 21 | RPT | No function for this Sense TV. |
| 22 | LOC* | In FM mode, select LOC (local) on /off to search radio stations with strong reception strength. |
| 23 | SEL | Select a feature from Volume, Bass, Treble and Balance. |
| 24 | Turn on/off the Fireplace. | |
| 25 | Adjust the flame of the fireplace. | |
| 26 | Adjust the temperature of the fireplace. | |
| 27 | Adjust the time of the fireplace. | |
| 28 | EQ | Select the preset sound mode MUSIC or MOVIE. |
| 29 | ST# | In FM mode, select Stereo or Mono sound. |
| 30 | PROG | No function for this Sense TV. |
| 31 | A-B | No function for this Sense TV. |
| 32 | SETUP | No function for this Sense TV. |
| 33 | CC | Switch Closed Captions On and Off. |
| Item Button Function | ||
| 34 | TV | Switch to TV mode. |
| 35 | BT | Select the Bluetooth mode. |
| 36 | APS | Scan radio stations:Press it to search each stored station. Press and hold it to scan and store the 6 strongest stations;End or reject a call when the system is connected to a cell phone via BT. |
| 37 | » | During playback, press it to select the next track/ chapter. Press and hold it to fast forward. In radio mode, tune it automatically or manually. |
| 38 | ☐ | Stop playback. |
| 39 | CH+/- | Channel Up/Down. |
| 40 | Mute /Unmute the sound. | |
| 41 | EXIT | Exit the current menu. |
| 42 | FAV | Press to add the channel to favorite list. |
| 43 | C.LIST | Display the channel list. |
| 44 | AUTO | No function for this Sense TV. |
| 45 | DISPLAY | Display the selected source. |
| 46 | ASPECT | Display available aspect ratios. |
| 47 | Switch between the current and previous channel. | |
| 48 | IR-EXT | Control another Furrion SenseTM TV when IR external cable connected. |
| 49 | Start, Pause or restart playback. | |
| 50 | MENU | Enter the main menu. |
About Your TV
Features
TV with integrated Soundbar system - You can operate the TV from the sources of HDMI, DTV/ATV, USB (audio & pictures only) or CVBS with the decoded audio being present on the build-in speakers (stereo); You can enjoy the audio sources of AM/FM, Bluetooth or Line-in even when the TV screen is turned off.
Speaker drivers mounted with a suspension system and facing towards the user - This will reduce vibrations / acoustic feedback to ensure the high quality sound.
Front-facing control buttons and LCD on the bottom of the TV panel - It allows to press the keys easily from the front for basic operation. The LCD displays the source mode and basic information
Front USB in/ HDMI in/ Aux in port - It allows to connect with an external USB device / AV device / Auxiliary device from the front of the TV.
Power Source
NOTE:
- Please make sure to insert the cord securely at both the LED TV and the wall outlet.
WARNING:
- DO NOT CONNECT THIS UNIT TO THE POWER USING ANY DEVICE OTHER THAN THE SUPPLIED 12V CIGARETTE ADAPTER. DOING SO MAY CAUSE FIRE, ELECTRIC SHOCK, OR DAMAGE. - DO NOT USE WITH A VOLTAGE OTHER THAN THE POWER VOLTAGE SPECIFIED. DOING SO MAY CAUSE FIRE, ELECTRIC SHOCK, OR DAMAGE.
CAUTION:
- WHEN THE UNIT IS NOT BEING USED FOR EXTENDED PERIODS OF TIME (E.G., AWAY ON A TRIP), IN THE INTEREST OF SAFETY, BE SURE TO UNPLUG IT FROM THE OUTLET. - DO NOT PLUG/UNPLUG THE 12V CIGARETTE ADAPTER (INCLUDED) OR AC POWER ADAPTER (EXCLUDED) WHEN YOUR HANDS ARE WET. DOING SO MAY CAUSE ELECTRIC SHOCK. - IF YOU NEED TO REPLACE THE SUPPLIED 12V CIGARETTE ADAPTER OR AC POWER ADAPTER (EXCLUDED), THE SPECIFIED ONE IS RECOMMENDED. CONTACT YOUR DEALER TO PURCHASE A FACTORY REPLACEMENT.
Before Operation
What's in the box
Thanks for purchasing this Furrion Sense™ HD LED TV. This manual will help you set up and begin using your TV.
First, check the contents of your box with the parts checklist below:
• TV
- Remote control
- AAA battery × 2
• Wall-mount screws
- Quick Start Guide
- Warranty Manual
- Warning Card
Now you can get started!
Prepare your Remote Control
BATTERY INSTALLATION
- Open battery compartment cover.
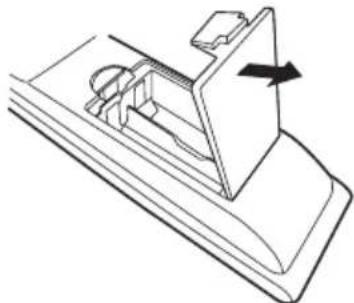
- Install two AAA batteries.

- Close the cover of the battery compartment.
NOTE: Use two "AAA" size batteries. The batteries may last approximately one year depending on usage. For best performance, it is recommended the batteries should be replaced on a yearly basis, or when the remote operation becomes erratic. Do not mix old and new batteries or different types.
BATTERY PRECAUTIONS
These precautions should be followed when using batteries in this device:
- Use only the size and type of batteries specified.
- Be sure to follow the correct polarity when installing the batteries as indicated in the battery compartment. Reversed batteries may cause damage to the device.
- Do not mix different types of batteries together (e.g. Alkaline and Carbon-zinc) or old batteries with fresh ones.
- If the device is not to be used for a long period of time, remove the batteries to prevent damage or injury from possible battery leakage.
- Do not try to recharge batteries not intended to be recharged; they can overheat and rupture. (Follow battery manufacturer's directions.)
- Please use caution when inserting batteries to avoid battery damage. If the spring terminal in the remote control remains in contact with a side of a damaged battery it can cause a short circuit. Never use damaged batteries as they can become very hot and are dangerous.
Getting Started
The Setup Wizard window appears the first time you turned on the TV. It will assist you to configure the TV and scan for available channels.
IMPORTANT: Make sure the antenna is correctly connected with the cables of TV system.
- Press the button on the remote control (or press POWER button at the bottom of TV front panel) to turn on the TV. The Setup Wizard window appears on the screen.
NOTE: It may take a few seconds before the Setup Wizard window appears on the screen.
- Use ▲ on the remote control to highlight TV Location, then press ◀ or ▶ to select Home Mode or Store Mode.
NOTE: When you select Store Mode it will remind you that Store Mode consumes more energy. Select Yes to enter or No to cancel.
Press ▲r to highlight Go to next step, press OK or ▶to go to the next step.

- Use ▲ on the remote control to highlight Menu Language, then press ◀ or ▶ to select the desired language.
Press ▲r to highlight Go to next step, press OK or ▶to go to the next step.

- Use ▲ on the remote control to highlight Time Zone, then press ◀ or ▶ to select desired time zone. Use ▲r to highlight Daylight Saving Time, then press ◀ or ▶ to select On/Off. Use ▲r to highlight Time Format, then press ◀ or ▶ to select 12-hour or 24-hour. Use ▲r to highlight Go to next step, then press OK or ▶ to go to the next step.

- Use ▲ on the remote control to highlight Air/Cable, then press ◀ or ▶ to select Air or Cable base on your connection. Use ▲r to highlight Go to next step, press OK or ▶ to start the auto scan.
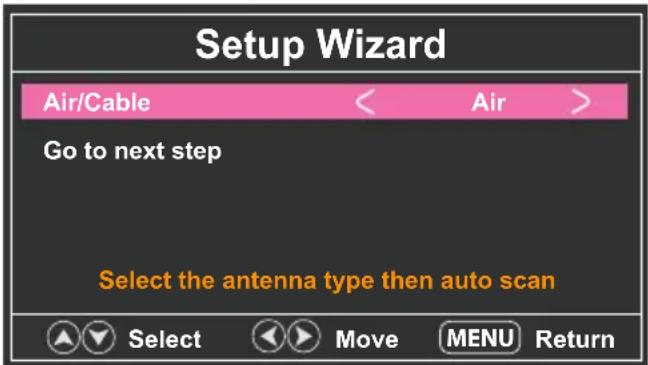
The Setup Wizard will scan for available channels automatically. The scanning may take some time.
TV Settings
Setup Settings
- Press MENU button on the remote control to display the main menu.
- Use ▶ highlight Setup mode.
- Use ▲ to highlight the item you would like to reset, then press ◀ or ▶ to select the settings.
- Press MENU to return to the previous menu or press EXIT at any time to exit the setting.
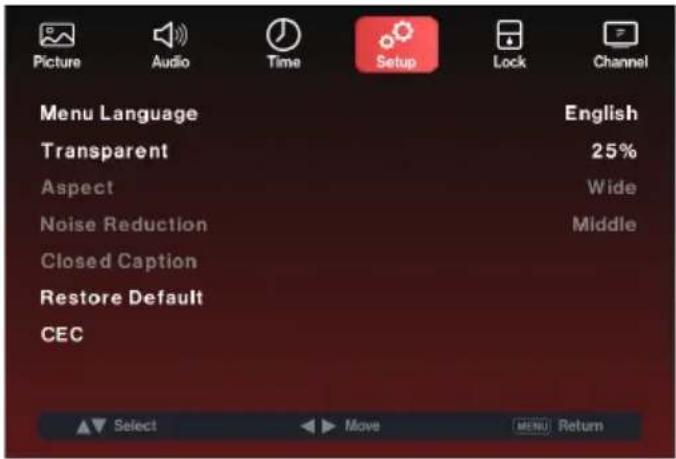
| Setup Menu | ||||
| Menu Language | Select the menu language | Pressorto select English, Français or Español. | ||
| Transparent | Control the transparency level of the menu | Pressorto select 0%/25%/50%/75%/100%. | ||
| Aspect | Set the aspect ratio of an image | Pressorto select Wide, Normal, Zoom, Cinema or Point-to-Point. | ||
| Noise Reduction | Set the desired noise reduction option for the image | Pressorto select Middle, High, Off or Low. | ||
| Closed Caption | Set the closed caption functions | CC Mode | Pressorto select CC On, CC Off or CC On Mute. | |
| Analog CC | Pressorto select CC1, CC2, CC3, CC4, Text 1, Text 2, Text 3 or Text 4. | |||
| Digital CC | Pressorto select Off, Service1, Service 2, Service 3, Service 4, Service 5 or Service 6. | |||
| Option*Press OK or to enter the sub menu. | Mode | Pressorto select Default or Custom. | ||
| Font Style | Pressorto select Default, Font 0, Font 1, Font 2, Font 3, Font 4, Font 5, Font 6 or Font 7. | |||
| Font Size | Pressorto select Default, Normal, Large or Small. | |||
| Font Edge Style | Pressorto select Default, None, Raised, Depressed, Uniform, Left Shadow or Right Shadow. | |||
| Font Edge Color | Pressorto select Default, Black, White, Red, Green, Blue, Yellow, Magenta or Cyan. | |||
| FG Color | Pressorto select Default, White, Red, Green, Blue, Yellow, Magenta or Cyan. | |||
| BG Color | Pressorto select Default, Black, Red, Green, Blue, Yellow, Magenta or Cyan. | |||
| FG Opacity | Pressorto select Default, Solid, Flashing, Translucent or Transparent. | |||
| BG Opacity | Pressorto select Default, Solid, Flashing, Translucent or Transparent. | |||
TV Settings
| Setup Menu | |||
| Restore Default | Reset the unit to factory defaults | Pressorto selectYesorNo. | |
| CEC | Set CEC functions | CEC Control | Pressorto selectOfforOn. |
| Device Auto Power Off | Pressorto selectOfforOn.* If On, when the TV is turned off, all HDMI CEC connected devices will enter standby mode. | ||
| TV Auto Power On | Pressorto selectOfforOn.* If On, when a HDMI CEC connected device is enabled, the TV will turn on and switch to the source connected with the CEC device. | ||
| Audio Receiver | Pressorto selectOfforOn.* If On, the TV will output audio to an ARC compatible connected device.Note: The volume output of ARC is fixed. Please use the external connected device to adjust the volume if you need. | ||
| Device Lists | List all connected CEC devices. | ||
| Connect | Connect to a device from the CEC devices. | ||
| Root Menu | Show the root menu of connected devices. | ||
TV Settings
Picture Settings
- Press MENU button on the remote control to display the main menu.
- Use to highlight Picture mode.
- Use ▲ to highlight the item you would like to reset, then press ◀ or ▶ to select the settings.
- Press MENU to return to the previous menu or press EXIT at any time to exit the setting.
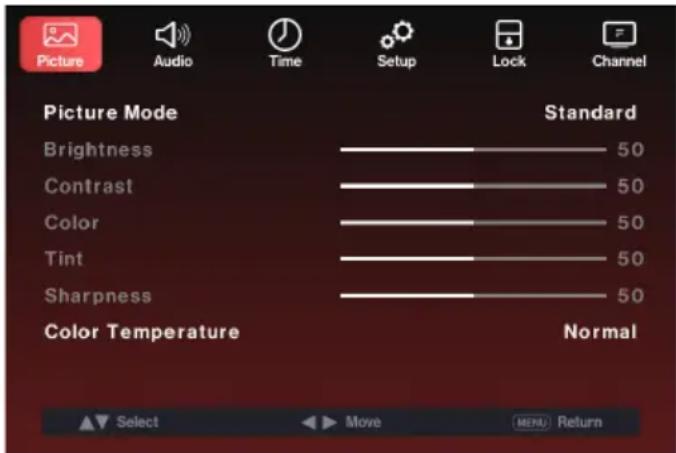
Picture Menu
| Picture Mode | Select the display mode | Press◀ to select the display mode from Standard / Dynamic / Soft / User. |
| Brightness | Control the picture brightness | Press◀ to adjust the brightness.* Only adjustable when Picture Mode is User. |
| Contrast | Control the picture contrast | Press◀ to adjust the contrast.* Only adjustable when Picture Mode is User. |
| Color | Control the color level of the picture | Press◀ to adjust the color.* Only adjustable when Picture Mode is User. |
| Tint | Control the picture tint | Press◀ to adjust the tint.* Only available under NTSC mode. |
| Sharpness | Control the sharpness of the picture | Press◀ to change the sharpness to desired level.* Only adjustable when Picture Mode is User. |
| Color Temperature | Select the color mode | Press◀ or ▶ to select Normal, Warm or Cool. |
TV Settings
Audio Settings
- Press MENU button on the remote control to display the main menu.
- Use ◀ or ▶ to highlight Audio mode.
- Use ▲ to highlight the item you would like to reset, then press ◀ or ▶ to select the settings.
- Press MENU to return to the previous menu or press EXIT at any time to exit the setting.
NOTE: The display menu may vary while different input source was selected.

| Audio Menu | |||
| Equalizer | Select the EQ mode | Press◀or▶to select Standard, Music, Movie, Sports or User mode. | |
| User | Press ▲ or ▼ to select 200 Hz, 500 Hz, 1.5K Hz, 5K Hz, 10K Hz or Balance. | ||
| Audio Language | Select the audio language | Press◀or▶to select English, French or Spanish. | |
| Digital Audio Output | Select the Digital Audio Output mode | Press◀or▶to select RAW, PCM or Off. | |
| AVL | Automatic Volume Level: adjust the TV volume to a fixed level | Press◀or▶to select On or Off. | |
| Voice Guidance | Control the Voice Guide functions | Voice Guidance | Press◀or▶to select On or Off. |
| Volume | Press◀r to select Low, Middle or High.* Only available after Voice Guidance was set as On mode. | ||
| Speed | Press◀r to select Slow, Normal or Fast.* Only available after Voice Guidance was set as On mode. | ||
| Pitch | Press◀r to select Low, Middle or High.* Only available after Voice Guidance was set as On mode. | ||
| Video Description | Control the video description function | Press◀or▶to select On or Off. | |
TV Settings
Time Settings
- Press MENU button on the remote control to display the main menu.
- Use ◀ or ▶ to highlight Time mode.
- Use ▲ to highlight the item you would like to reset, then press ◀ or ▶ to select the settings.
- Press MENU to return to the previous menu or press EXIT at any time to exit the setting.

| Time Menu | ||
| Sleep Timer | Set the time to automatically switch off the TV | Press◀ to select Off, 5min, 10min, 15min, 30min, 60min, 90min, 120min, 180min or 240min. |
| Time Zone | Set the time zone | Press◀ to select Pacific, Alaska,Hawaii, Samoa, Newfoundland, Atlantic, Eastern, Central or Mountain. |
| Daylight Saving Time | Switch to daylight saving | Press◀ or ▶ to set as On or Off.* Only available under TV channel |
TV Settings
Lock Settings
- Press MENU button on the remote control to display the main menu.
- Use of to highlight Lock mode.
- Use ▲ or ▼ to highlight "Enter Password" and input "0000" to enter the setup window.
- Use ▲ to highlight the item you would like to reset, then press or ▶ select the settings.
- Press MENU to return to the previous menu or press EXIT at any time to exit the setting.


TV Settings
| Lock Menu | |||
| Enter Password | Input the password to access the Lock menu | Use the Number Buttons (0-9) to enter the password, then the Lock menu will appear.* Default password is 0000.* If you forgot the password, use 8888 to enter any locked menu. | |
| Change Password | Change the user password | Enter New Password | Use Number buttons (0-9) to enter a new password. |
| Confirm Password | Repeat the password to confirm. | ||
| System Lock | Set the parental controls status | Pressorto set asOn or Off. | |
| Input Block | Use the password to lock inputs | TV | Pressorto set asBlock or Unblock. |
| AV | |||
| Component | |||
| HDMI 1 | |||
| HDMI 2 | |||
| Front-HDMI | |||
| USB | |||
| US Rating | Set up parental locks based on US rating system* Only available when System Lock is set as On mode | TV | Pressto enter the TV Ratings menu and useA/ Vto select your TV rating preference.(Refer to the following tables of Age and Genre.) |
| MPAA | Pressbuttons to select your movie rating preference based on US Rating System. | ||
| Canada Rating | Set up parental locks based on Canadian rating system* Only available when System Lock is set as On mode | Canada English | Usebuttons to select your ratings preference based on Canadian Rating System (English). |
| Canada French | Usebuttons to select your ratings preference based on Canadian Rating System(French). | ||
| RRT Setting | Set parental lock based on Canadian rating system* Only available when the DTV code RRT traffic detected by the system | Humor Level See Canadian Rating System table. | |
| Intelligence level | See Canadian Rating System table. | ||
| Erotic level 20CHARS | See Canadian Rating System table. | ||
| Reset RRT | Restore to default RRT settings | Press OK or to enter the sub menu, then press on to select Yes or No. | |
TV Settings
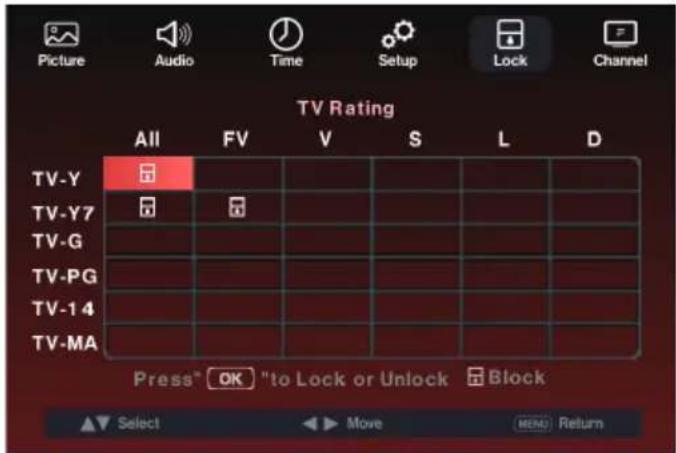
| Age | |
| TV-Y | All Children |
| TV-Y7 | Suitable for 7 years old or above |
| TV-G | General Audience |
| TV-PG | Parental Guidance |
| TV-14 | Suitable for 14 years old or above |
| TV-MA | Suitable for 17 years old or above |
| US Rating System | |
| N/A | All Ages |
| G | General Audience |
| PG | Parental Guidance |
| PG-13 | Parental Guidance below 13 years |
| R | Parental Guidance below 17 years |
| NC-17 | Suitable for 17 years old or above |
| X | Adults Only |
| Genre | |
| ALL | All |
| FV | Fantasy Violence |
| V | Violence |
| S | Sex |
| L | Language |
| D | Dialogue |
| Canadian Rating System (English) | |
| E | Exempt from the ratings (All ages) |
| C | Suitable for children age of 0–7 years |
| C8+ | Suitable for children age over 8 years |
| G | General Audience |
| PG | Parental Guidance |
| 14+ | Suitable for viewers age over 14 years |
| 18+ | Suitable for adults over 18 years |
| Canadian Rating System (French) | |
| E | Exempt from the ratings (All ages) |
| G | General Audience |
| 8 ans+ | Suitable for children ages over 8 years |
| 13 ans+ | Suitable for children ages over 13 years |
| 16 ans+ | Suitable for viewers ages over 16 years |
| 18 ans+ | Suitable for adults over 18 years |
TV Settings
Channel Settings
- Press MENU button on the remote control to display the main menu.
- Use to highlight Channel mode.
- Use ▲ to highlight the item you would like to reset, then press ◀ or ▶ to select the settings.
- Press OK to confirm your selections or settings and enter the sub menus.
- Press MENU to return to the previous menu or press EXIT at any time to exit the setting.

| Channel Menu | ||
| Air/Cable | Set the reception type | Press ◀ or ▶ to select Air or Cable. |
| Auto Scan | Automatically scan for available channels | Press ▶ or OK to select Cable System or Start to Scan. |
| Favorite | Add the channel to the favorite list | Press ▲ or ▼ to select a channel, then press OK to add or delete in the favorite list. |
| Show/Hide | Select the channel number to show or hide | Press ▲ or ▼ to select a channel, then press OK to show or hide the channel. |
| Channel Number | Select the channel number for labeling | Press ◀ to select a channel. |
| Channel Label | Label the selected channels | Press ▲ to ▼ select a character, press or te navigate the characters (Maximum of 7 characters). |
| DTV signal | Display the current DTV signal status | |
TV Settings
USB Mode
- After connecting a USB storage device to front USB port, press button on the remote control and select USB as the input source. Press OK or ▶to enter.
- Use ◀ or ▶ to select Photo or Music. Press OK or ▶ to confirm the selection.
- Use ▲ to▼navigate the files or folders stored on a USB device.
- Press MENU to return to the previous menu or press EXIT at any time to exit the setting.


For photos, you can use the tools on the photo viewer to control slide show, view photos and show file information.

* The photo viewer supports the JPG format files.
For music, you can use the tools of the music player to control playback and display file information.

* The music player supports the MP3 audio format files.
Soundbar Operation
* The built-in Soundbar could be operated separately even when the TV is turned off.
| General Operation | |
| Power On/Off | Press POWER button at the bottom of the TV front panel or button on the remote control to turn on/off the whole unit.When the whole unit is powered on, ZONE 1 is on while ZONE 2 is off by default. |
| MUTE | Press briefly to mute or unmute the current zone.Press and hold it to mute or unmute both zones. |
| Select a Source | Press the button AM|FM, AUX, BT or TV at the bottom of front panel to select Radio, AUX, BT or TV source. |
| Adjust Volume | Rotate Volume Knob on the front panel to adjust volume. |
| Select Audio Feature | Press SEL on the remote control to select VOL, BAS (without EQ preset), TRE (without EQ preset) or BAL.Rotate Volume Knob on the front panel to adjust audio feature. |
| Preset EQ | Press EQ button on the remote control to select the sound mode MUSIC or MOVIE. |
| Select Speakers | ZONE 1 represents built-in speakers of the TV, which will be activated by default when the TV is turned on.Press ZONE 2 on the remote control or the front panel to select or turn on/off ZONE 1/ZONE 2. The corresponding zone number will appear on the front panel LCD once it is selected. |
| Reset | Enter TV main menu “Setup” in TV mode. Select “Restore Default” to reset both the TV and Soundbar to factory defaults. Then TV and Soundbar enter standby mode. |
| IR-EXT | Press IR-EXT on the remote control, then you can use the remote control to control another TV connected through an IR-EXT cable. The IR-EXT icon will flash on the front panel LCD. |
| Radio Operation | |
| Select Radio Region | Press and hold AM|FM to select the radio region USA1, USA2, EUROPE or AUSTRALIA. |
| Manual Tuning | Pressorbutton on the front panel to move radio frequency down or up one step at a time. |
| Automatic Tuning | Press and holdorbutton to search for the next strongest station automatically. |
| Select Band | Press AM|FM button on the front panel to select FM1, FM2, FM3, AM1, AM2. |
| Store and Recall Preset Station | Press and hold any one of the six preset buttons (1-6) on the front panel to store the current frequency.Press the corresponding preset button again to recall the frequency stored. |
| Store Stations Automatically | Press and hold APS button on the remote control to automatically store the six strongest stations in the current band. (Up to 18 FM stations and 12 AM stations can be stored.) |
| Scan Tuning | Press APS button on the remote control to scan preset station 1-6 in the current band. |
| LOC | Press LOC on the remote control repeatedly to set the LOC ON or LOC OFF. |
| Stereo/Mono | In FM mode, press ST button on the remote control to select ST ON or ST OFF. |
Soundbar Operation
| USB Operation | |
| Backward and Fast Forward | Press << or >> button on the remote control to fast forward or backwards. |
| Pause Playback | Press ⚡1 on the front panel to temporarily stop playback.Press ⚡1 again to resume playback. |
| Stop Playback | Press ⚡2 on the front panel or ⚡on the remote control to stop playback, then press OK on the remote control to start playback from the beginning of the first chapter/track. |
| Repeat | During playback, select the repeat icon from the player tools on screen bottom and set Repeat 1, Repeat ALL or Repeat NONE. |
| Bluetooth Operation | |
| Connect or Disconnect BT | Press the buttonBTon the bottom of front panel to automatically connect with the last paired device.(BT name: Furrion Sense 32" TV)Press and hold the buttonBTon the bottom of front panel for 6 seconds to disconnect bluetooth and clear the pairing information. |
| Dial or accept call | Press the button3on the front panel to accept an incoming call or dial out the last called number directly. |
| Reject or End call | Press the button4on the front panel to reject or end a call.Press to reject or end a call. |
Specification

MODEL, DIMENSION & RESOLUTION
| TV Model | Dimension without Stand (L*H*W) | Max Resolution |
| FDHK32V1A | 29" x 21 13 / 16 " x 4 5 / 16 " (736.7 x 554.2 x 109.4 mm) | 1280 x 720 @ 60Hz HD |
INPUT & OUTPUT CONNECTIONS
| TV Model | HDMI In | AM/FM ANTENNA | Audio In | Optical Out | USB | Audio Out | Zone 2 Out | IR EXT | Component YPbPr In | Aux In | RF In |
| FDHK32V1A | 3 | 1 | 1 x Right (Red)1 x Left (White) | 12 | 1 x Right (Red)1 x Left (White) | 1 | 1 | 1 x Yellow/ Green1 x Blue1 x Red | 1 | 1 |
Specification

| VESA MOUNTING PATTERN | ||||
| Model Width (mm) Height (mm) Screw Size Screw Quantity | ||||
| FDHK32V1A | 400 200 M 6 * 12mm 4 | |||
| FURRION MOUNTING PATTERN | ||||
| Model Width (mm) Height (mm) Screw Size Screw Quantity | ||||
| FDHK32V1A | 160 125 M 6 * 12mm 4 | |||
Specification
| Category Item General Specification | ||
| PANEL DISPLAY | Panel Size 32" | |
| Resolution / Display Type 1366 × 768 / FWXGA / D-LED | ||
| Refresh Rate 60Hz | ||
| Contrast Ratio (CR ≥ 10) 3000 (min.: 2100): 1 | ||
| View Angle H:178°, V:178° | ||
| Aspect Ratio 16:9 | ||
| Brightness ≥ 180cd/m2 (Typ. 200cd/m2) | ||
| AUDIO OUTPUT | L / R output (CVBS) 1VRMS (with 1kHz 0dB input); SNR: ≥ 80dB | |
| VIDEO INPUT | TV (via RF-input) ATV(NTSC) / DTV(ATSC) | |
| CVBS (video) | Video System NTSCVideo level 1.0V PP ±10% | |
| Component YPbPr (video) 480i, 480p, 720p, 1080i, 1080p | ||
| HDMI | 480i, 480p, 720p, 1080i, 1080pCEC (including remote control pass-through) HDCP Version 1.4b | |
| CVBS (audio) | L/R RCA input 0.2 - 2.0VRMS | |
| Component YPbPr (audio) | ||
| USB Playback | Output voltage / current 5V, 500 mA | |
| USB standard / Class USB V2.0 / Mass storage Class 0 | ||
| File system format FAT, FAT32; single partition | ||
| Media playback MP3, WMA | ||
| Photo display / playback | JPEG | |
| USB Port | USB (for Google dongle) | 5V/1000mA |
| Power supply requirement | DC 12V | |
| Current Consumption | 12A | |
| Total Speaker Out Power | 4 X20W RMS | |
| Number of channels | Independent 2 Channels STEREO | |
| Radio | FM Frequency range | 87.5 - 107.9 MHz (USA)87.5 - 108.0 MHz (Europe)87.5 - 108.0 MHz (Australia) |
Troubleshooting
| Problem Solution/Issue | |
| TV does not operate | Make sure the power cord is plugged in.Try another DC outlet.Power is off, check fuse or circuit breaker.Unplug unit for an hour, then plug it back in.Make sure the whole unit source is selected as "TV" mode. |
| Normal picture,but no sound | Check the volume settings.Sound muted? Press MUTE button.Try another channel.Check audio cable connections. |
| The remote control does not work | Make sure the remote control is in range with no obstructions.Check the batteries.Correct operating mode set: TV, VCR etc. |
| Poor sound or no sound | Station or Cable TV experiencing problems, tune to another station.Check sound adjustments (Volume or Mute).Check for sources of possible interference. |
| Poor picture or no picture | Station or Cable TV experiencing problems, tune to another station.Make sure channels are set into memory.Check antenna or Cable TV connections, adjust antenna.Check for sources of possible interference.Check picture control adjustments. |
| Poor TV reception | Ensure the antenna amplifier is turned on for Antenna TV.Adjust the antenna position to a stronger signal receiving angle.Check if the Antenna connection is tight to the TV.Check if there is power supplied to the Antenna distribution box.Ensure your incoming cable is connected to the correct cable / antenna wall connection inside the RV.Ensure the internal RV coax jump cable is connected to the correct port. |
| Poor Cable /Satellite TV Reception | Ensure antenna amp is turned off for cable signal.Check if incoming Cable is connected correctly to RV.Ensure cable splitter box has power.Ensure the incoming cable is connected to the correct cable / Satellite wall connection inside your RV.Ensure the internal RV coax jump cable is connected to the correct port.Check if Dish has no obstruction. |
| TV shuts off | Sleep Timer is set.Power interrupted. |
| Black and white image from the connected AV device | Check video connections on both the TV and connected AV device. Ensure the colors match between the connectors and sockets: green (Y), blue (Pb/Cb) and red (Pr/Cr) for component connection, and yellow (VIDEO) for composite connection.Ensure all video cables are connected firmly. |
FURRION
Furrion Innovation Center & Institute of Technology
• 52567 Independence Ct., Elkhart, IN 46514, USA • Toll free:1-888-354-5792
- Email: support@furrion.com
©2007-2019 Furrion Ltd. Furrion® and the Furrion logo are trademarks licensed for use by
Furrion Ltd. and registered in the U.S. and other countries.
FURRION.COM
- 32" FURRION SENSE™ HD DLED ALL-IN-ONE ENTERTAINMENT SYSTEM
- WELCOME
- SUPPLIER'S DECLARATION OF CONFORMITY
- 47 CFR § 2.1077 COMPLIANCE INFORMATION
- UNIQUE IDENTIFIER
- RESPONSIBLE PARTY – U.S. CONTACT INFORMATION
- FCC COMPLIANCE STATEMENT
- CONTENTS
- WELCOME....2
- CONTENTS....3
- SAFETY WARNINGS....4
- ABOUT YOUR TV 15
- BEFORE OPERATION 16
- GETTING STARTED....17
- TV SETTINGS....18
- SOUNDBAR OPERATION 28
- SPECIFICATION 30
- TROUBLESHOOTING.... 33
- SAFETY WARNINGS
- CAUTION
- IMPORTANT SAFETY INSTRUCTIONS
- CONDENSATION
- HOW TO HANDLE THE LED PANEL
- POSSIBLE ADVERSE EFFECTS ON LED PANEL
- POWER SOURCE
- WARNING
- COMPLIANCE
- FCC STATEMENT
- IC STATEMENT
- SAFETY PRECAUTIONS
- NOTES WHEN MOUNTING THE LED TV ON THE WALL
- FUNCTION OVERVIEW
- INPUT & OUTPUT PORTS
- FRONT PANEL
- REMOTE CONTROL
- ABOUT YOUR TV
- FEATURES
- NOTE
- BEFORE OPERATION
- WHAT'S IN THE BOX
- PREPARE YOUR REMOTE CONTROL
- BATTERY INSTALLATION
- BATTERY PRECAUTIONS
- GETTING STARTED
- TV SETTINGS
- SETUP SETTINGS
- PICTURE SETTINGS
- AUDIO SETTINGS
- TIME SETTINGS
- LOCK SETTINGS
- CHANNEL SETTINGS
- USB MODE
- SOUNDBAR OPERATION
- SPECIFICATION
- TROUBLESHOOTING
- FURRION
- FURRION INNOVATION CENTER & INSTITUTE OF TECHNOLOGY
Brand : Furrion
Model : Sense FDHK32V1A
Category : DVD player