
BV775B - DVD player BOSS - Free user manual and instructions
Find the device manual for free BV775B BOSS in PDF.


| Product Type | Car Multimedia Player / DVD Receiver |
| Power Requirement | DC 12 Volts, negative ground |
| Maximum Power Output | 80 watts x 4 channels |
| Load Impedance | 4 Ohms |
| Disc Playback | DVD±R/RW, VCD, CD-R/RW, MP3, WMA, JPEG |
| Bluetooth Version | V4.2 with A2DP and hands-free |
| Bluetooth Range | Up to 5 meters |
| Screen Type | TFT LCD touchscreen |
| Screen Resolution | 800 x 480 pixels |
| Radio Bands | FM (87.5-107.9 MHz America / 87.5-108 MHz Europe), AM (530-1710 KHz America / 522-1620 KHz Europe) |
| Frequency Response | 20 Hz - 20 KHz |
| Signal-to-Noise Ratio | 85 dB |
| Channel Separation | 80 dB |
| Video System | PAL / NTSC |
| Aspect Ratio | 16:9 / 4:3 |
| Operating Temperature | -20°C to +60°C |
| Dimensions (Approx.) | 178 mm (W) x 50 mm (H) x 160 mm (D) |
| Weight (Approx.) | 2.0 kg |
| Accessories Included | Mounting brackets, screws, trim ring, power cables, remote handset |
| Safety Features | Parking brake detection to disable video while driving |
| Installation | Professional installation recommended, only for DC 12V negative ground vehicles |
Frequently Asked Questions - BV775B BOSS
User questions about BV775B BOSS
0 question about this device. Answer the ones you know or ask your own.
Ask a new question about this device
Download the instructions for your DVD player in PDF format for free! Find your manual BV775B - BOSS and take your electronic device back in hand. On this page are published all the documents necessary for the use of your device. BV775B by BOSS.
USER MANUAL BV775B BOSS
To ensure safety while driving and to comply with laws,
drivers should not watch video or
operate the video device while driving.
IMPORTANT NOTICE & PRECAUTIONS
Thank you for using our company multi-media player! To operate the unit correctly, please read the operation manual carefully before using. Keep this operation manual for further reference.
The unit is designed only for DC 12V negative ground operation system. Make sure your vehicle is connected to DC 12V negative ground electrical system. Do not connect it to 24V power supply in trucks or buses, or else it will be damaged. Be sure to connect the speaker (-) leads to the speaker (-) terminal. Never connect the left and right channel speaker wires together or to the vehicle body.
The normal temperature for operation is between -20 and +60 degree Celsius. Do not work in extreme high or low temperature and block vents or radiator panels of the unit, blocking them will cause heat to build up inside the unit and may cause damage or fire.
Do not put the device in a moist environment or water to avoid electric shock, damage and/or fire due to a short circuit.
This unit can play the following discs (12 cm) and media files: DVD±R/RW / WMV / VCD / MP3 / WMA / CD-R/RW / JPEG. Please use genuine discs instead of incompatible discs, or it will damage the device and/or shorten the service life.
INSTALLATION & ACCESSORIES
This unit comes with the following accessories for installation:
2 x mounting brackets / 8 x mounting screws / 1 x mounting stud with boot / 1 x trim ring / 3 power cables
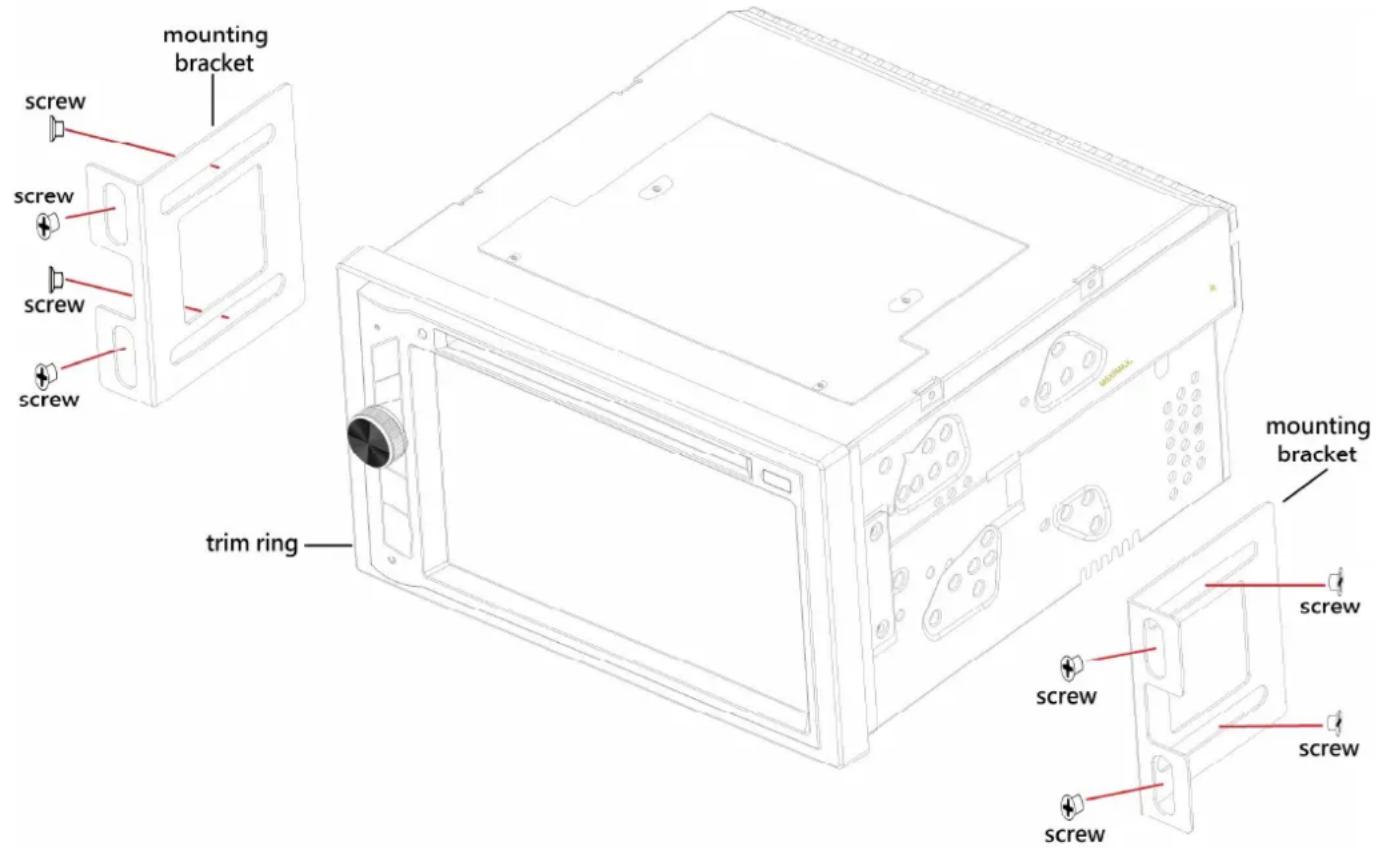
- To ensure safety and operate the device normally, installation of unit by professional technician is strongly recommended.
- Only use the mounting brackets and screws supplied for installation. Installation may vary on type of cars and supplied parts.
BACK OF MAIN UNIT

D
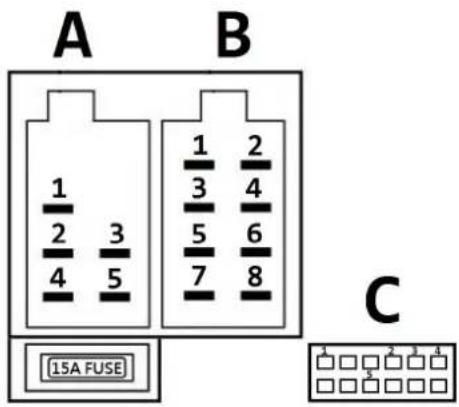
| Socket A (Power) | |
| A1 Yellow Constant | (+12V) |
| A2 Orange Illumination Input (+12V) | |
| A3 Blue Antenna Output (+12V) | |
| A4 Black Ground (B-) | |
| A5 Red Ignition Switch (+12V) | |
| Socket B (Speaker Output) | |
| B1 Purple / Black Rear Right (-) | |
| B2 Purple Rear Right (+) | |
| B3 Grey / Black | Front Right (-) |
| B4 Grey | Front Right (+) |
| B5 White / Black | Front Left (-) |
| B6 White | Front Left (+) |
| B7 Green / Black | Rear Left (-) |
| B8 Green | Rear Left (+) |
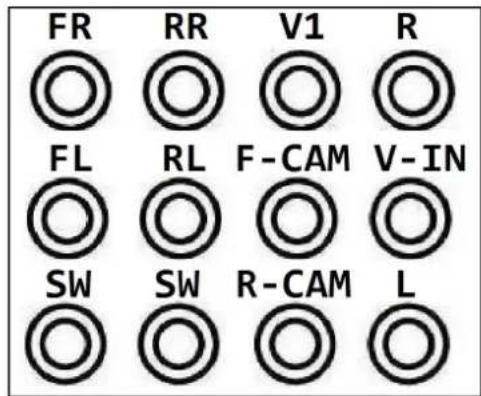
| Socket D (Audio / Video Input & Output) | |
| FL (White) Front Left | Audio Output |
| FR (Red) Front Right | Audio Output |
| RL (White) Rear Left | Audio Output |
| RR (Red) Rear Right | Audio Output |
| SW (Green) 1 Subwoofer Output | |
| SW (Green) 2 Subwoofer Output | |
| F-CAM (Brown) Front Camera Input | |
| R-CAM (Yellow) Rear Camera Input | |
| V1 (Yellow) | Video Output |
| V-IN (Yellow) | Video Input |
| L (White) | Left Audio Input |
| R (Red) | Right Audio Input |
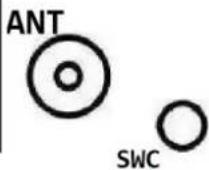
| ANT | Radio Antenna |
| SWC | Steering Wheel Control |
| Socket C (Accessory Control) | |
| C1 Blue / White | Remote Output (+12V, 500mA) |
| C2 Light Green | Parking Brake Input |
| C3 Violet / White | Reverse Input (+12V) |
| C4 Red / Violet | Front Camera Power (+12V, 500mA) |
| C5 Red / White | Rear Camera Power (+12V, 500mA) |
MAIN UNIT OPERATION
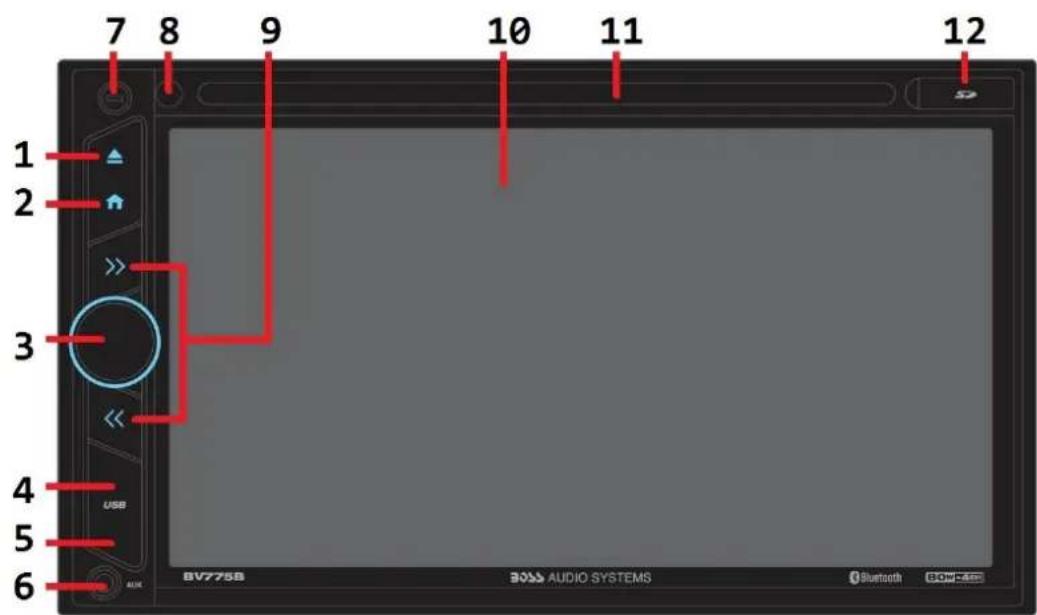
Operations & Controls
- Press to eject disc from the disc slot (when a disc has been inserted).
-
Press to shift screen between MAIN MENU and current operation mode.
-
Power On/Off
When the unit is turned off, press to turn on the unit.
When the unit is turned on, press & hold shortly to turn off the unit.
Volume Control
Rotate to adjust sound output level
Sound Mute
When the unit is turned on, press to turn on or off of sound mute control.
- Open the USB cover and insert USB device to the USB slot for digital files playback.
- Open the USB cover, press with a pointed object (such as a ballpoint) to reset the unit to its initial setting by the factory (default stage).
-
Insert an external device to this jack in order to have sound output of that external device through the unit.
-
Built-in microphone for voice reception under Bluetooth operation.
-
Remote control sensor for signal reception from remote handset.
-
Tuner Mode
Press to tune the radio frequency upward or downward and stop for broadcasting when a radio station received.
Press & hold shortly to shift to manual tuning mode. At this mode, press repeatedly to fine tune the radio frequency upward or downward.
Disc/USB/SD Input Mode / Bluetooth Streaming Mode
Press repeatedly to shift track upward or downward for playback.
Press & hold shortly to activate fast forward/rewind mode. At this mode, press repeatedly to select various fast forward/rewind speeds for playback. (Note: Fast forward/rewind is not available at Bluetooth streaming mode & picture playback mode)
-
It shows the status of operation on the unit. This screen is also a touch display – soft touch the screen for different operations of unit (refer to other parts of this manual for operation details).
-
Insert or remove disc from this disc slot.
-
Open the SD cover and Insert micro SD card to this port for digital files playback.
REMOTE HANDSET – GENERAL OPERATION
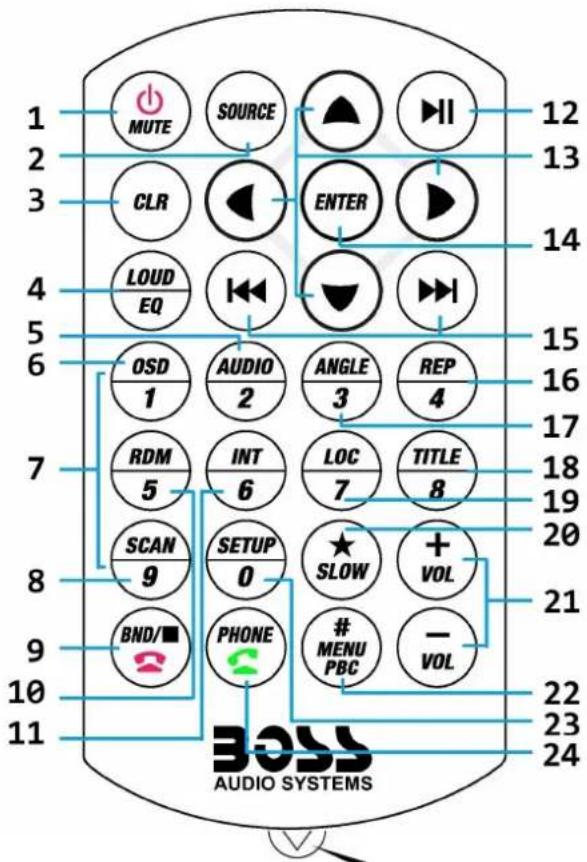
Remove this tab before using the remote handset
BATTERY REPLACEMENT
Refer to the back of remote handset for details on how to replace the battery. Replace the battery only with the same or equivalent type.
Note: If the remote handset will not be used for a long time, please remove the battery from the battery compartment.
- ⏻ When the unit is turn off, press to turn on the unit. When the unit is turn on, press & hold shortly to turn off the unit.
MUTE During unit operation, press to turn on or off of sound mute control
- SOURCE Press repeatedly to select the desired mode for operation
- CLR At Phone (Bluetooth) mode, press to erase the digit input by error.
- LOUD Press & hold shortly to turn on or off of loudness control.
EQ Press repeatedly to select the desired preset equalization mode.
- AUDIO At video playback mode, each time press & hold shortly to select different audio output channels. (Note: Available on input device or media files recorded with different output channels)
- OSD At media playback mode, press & hold shortly to display the playback menu on screen (Note: Not available at music playback mode)
- 1 – 6 Tuner Mode Press any one of the number key 1-6 to select a station that had been stored in the preset memory number key 1-6 for broadcasting. Press & hold shortly the number key 1-6 to store the current broadcasting channel/frequency to the preset memory number key 1-6.
0 – 9 Disc / USB / SD Input Mode Press directly to input the number of track for playback. Phone (Bluetooth) Mode Press directly to input the phone number for dial out.
-
SCAN At tuner mode, press to start scanning the radio frequency upward and stop for broadcasting for a few seconds when a radio station received.
-
BND Tuner Mode
Press repeatedly to select the desired radio band for broadcasting.
When the unit is under other operation mode, press to shift current operation mode to tuner mode for operation (not available at disc / USB / SD playback mode).
Disc / USB / SD Input Mode
At video playback mode under disc input, press to stop playback.
At music / photo playback mode under disc input and playback mode under USB / SD input, press to stop playback and shift to folder / playlist menu for playback selection. Press again to stop playback and shift to tuner mode.
(Note: Depended on the input device & playback media, folder menu may not be available)
Bluetooth Streaming Playback Mode
Press to stop playback and will shift back to tuner operation mode.
Phone (Bluetooth) Mode
Press to hang up or refuse an incoming call.
-
RDM At disc / USB / SD input playback mode, press & hold shortly to turn on or off of random playback of the input device.
-
INT At music playback mode, press & hold shortly to turn on or off of intro
playback of the input device. (Note: Not available at Bluetooth streaming mode)
-
At playback mode under disc / USB / SD input and Bluetooth streaming mode, press to pause, resume or start playback.
-
▲/▼/▶/◀ DVD Mode
At DVD menu/title display mode, press to select the desired setting/setup and press ENT to confirm/enter.
Folder / Playlist Menu Mode
During folder/playlist menu display at media playback mode, press▶/◀ repeatedly to shift page up and down, press ▲/▼repeatedly to select track/folder for playback. Once selected, press ENT to confirm.
Photo Playback Mode
Press to rotate photo position or show up-down, left-right mirror image.
- ENT DVD Mode / Folder/Playlist Mode
At DVD menu/title display mode as well as folder/playlist menu display at media playback mode, press ▲/▼/►/◄ to select the desired setting/setup and press ENT to confirm/enter.
- ▶/◀ Tuner Mode
Press to tune the radio frequency upward or downward and stop for broadcasting when a radio station received.
Press & hold shortly to shift to manual tuning mode. At this mode, press repeatedly to fine tune the radio frequency upward or downward.
Disc / USB / SD Input Mode (Playback Mode)
Press repeatedly to shift track upward or downward for playback.
Press & hold shortly to activate fast forward/rewind mode. At this mode, press repeatedly to select various speeds of fast forward/rewind. (Note:
Fast forward/rewind is not available for operate at photo playback mode) Bluetooth Streaming Mode
Press to shift track upward or downward for playback.
-
REP At playback mode under disc / USB / SD input, each time press & hold shortly to activate various repeat playback setting.
-
ANGLE At video playback mode, each time press & hold shortly to view angle changes in sequential order (available on media files recorded with this feature).
-
TITLE At DVD mode, press & hold shortly to display on screen the menu of the disc and playback will resume after a while.
-
LOC At tuner mode, press to select local setting for reception of strong signal stations and distance setting for reception of weak signal stations. (Note: LOC appears on screen on local setting whereas DX appears on screen on distance setting)
-
SLOW Video Playback Mode Each time press & hold shortly to select different speeds on slow motion playback. Phone (Bluetooth) Conversation Mode Press to input if so required.
-
VOL + / VOL - Press repeatedly or press & hold to adjust sound output level.
-
MENU / PBC DVD Mode Press & hold shortly to display on screen the playback will resume after a while. VCD Mode Press & hold shortly to turn or off of PBC playback.
Phone (Bluetooth) Conversation Mode
Press to input if so required.
-
SETUP During unit operation, press & hold shortly to activate settings menu on screen for various system setup. Press & hold shortly again to return to previous operation mode. (Note: System setup cannot be operated by remote handset)
-
/ PHONE Phone (Bluetooth) Mode During unit operation, press to shift to Phone (Bluetooth) operation. Press to pick up an incoming call; dial out after input a ph redial last contacted number. Phone (Bluetooth) Conversation Mode Press to shift conversation between main unit and mobile phone.
Remarks: Depends on the input devices & playback media files, operation may be varied or not available for operation.
At MAIN MENU, touch the icon of the desired mode on screen and the unit will then enter into the mode that selected for operation.
At MAIN MENU, touch & hold on screen and slide to left or right will shift screen to another MAIN MENU for operation selection.
- Touch to start tuner operation (when the radio antenna connected).
- Touch to start Bluetooth streaming operation (when a mobile phone connected).
- Touch to start disc input operation (when a disc inserted).
- Touch to start phone (Bluetooth) operation (when a mobile phone connected).
- Touch to start USB input operation (when an USB device inserted).
- Touch to start camera input operation (when connected with front and/or rear camera).
- Touch to start various setup of the unit.
- Touch to start auxiliary input operation (when an external device has been connected).
- Touch to start AV input operation (when an external AV device has been connected).
- Touch to start SD card input operation (when a micro SD card inserted).
- Touch to start mobile phone mirror linking operation (when the mobile phone connected to the front USB port).
- Touch to shift to next MAIN MENU.
- Touch to shift to previous MAIN MENU.
- This Bluetooth icon will light up if the unit has connected to a mobile phone. If no connection made, the icon will flash.
- Touch to activate AUDIO MENU for various audio settings.
ON SCREEN – AUDIO SETTING

During unit operation and when this icon appeared on screen, touch to activate AUDIO MENU for various audio setup.
AUDIO MENU (EQUALIZER) AUDIO MENU (POSITION)
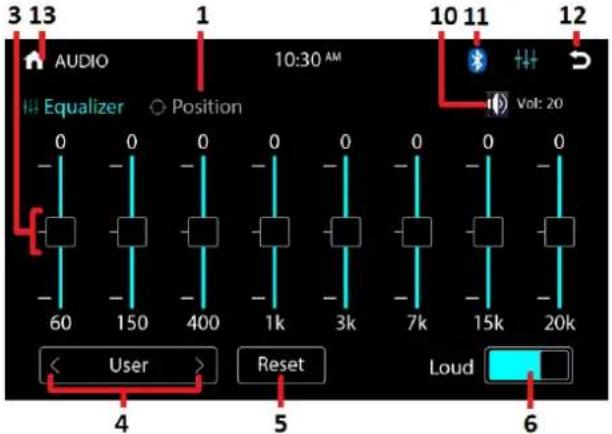
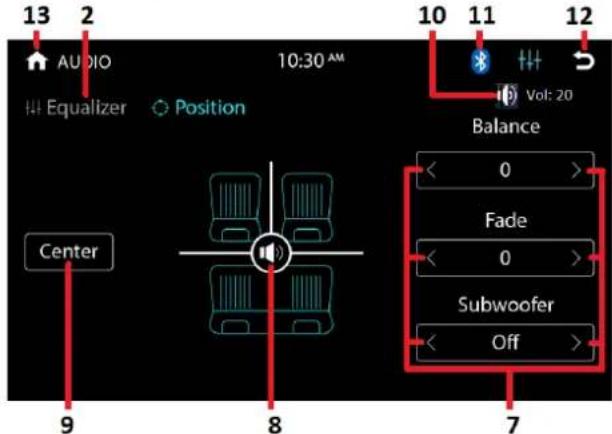
- Touch to shift to AUDIO MENU (POSITION) for various audio output settings.
- Touch to shift to AUDIO MENU (EQUALIZER) for various equalization settings.
- At "User" mode, hold & slide to set for the desired frequency level.
- Touch repeatedly to select the desired preset equalization mode. At "User" mode, the frequencies can be set by the user.
- At "User" mode, touch to reset the frequencies to the default level.
- Touch to turn on or off of loudness.
- Touch repeatedly to set for the desired output level on balance, fader & subwoofer.
- Hold & slide to set for the output level on left / right / front / rear speaker.
- Touch to reset the output level of left / right / front / rear speakers to center position.
- This shows the current volume output level.
- This Bluetooth icon will light up if the unit has connected to a mobile phone. If no connection made, the icon will flash.
- Touch to shift screen to previous menu or operation mode.
- Touch to shift screen to previous menu or operation mode.
VOLUME CONTROL MENU VOLUME CONTROL MENU
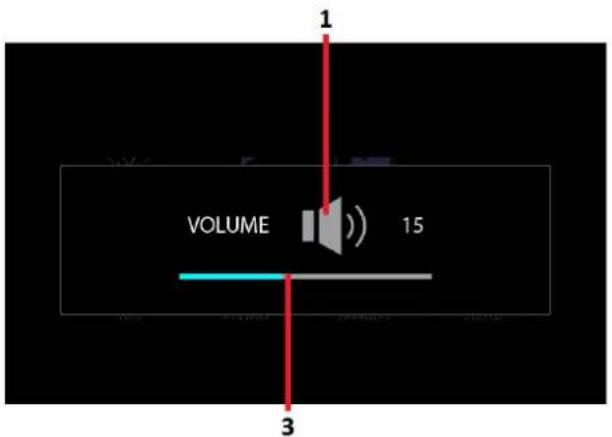
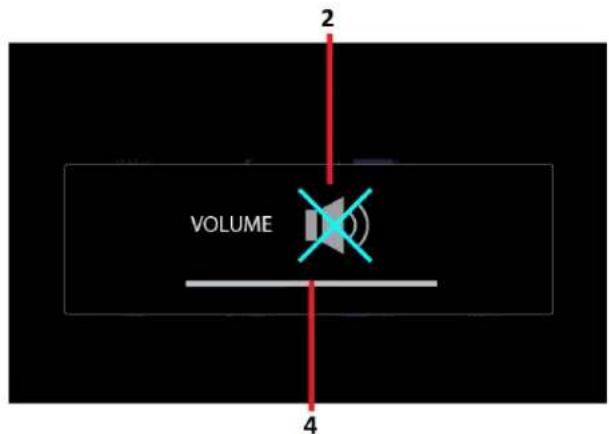
During unit operation and when the above VOLUME CONTROL MENU appeared on screen:
- Touch to turn on sound mute.
- Touch to turn off sound mute.
- Hold & slide to set for the desired sound output level.
- Hold & slide to turn off sound mute and set for the desired sound output level.
At MAIN MENU, touch on screen and shift to SETTINGS MENU for various setup selection of the unit.
SETTING MENU SETTINGS MENU
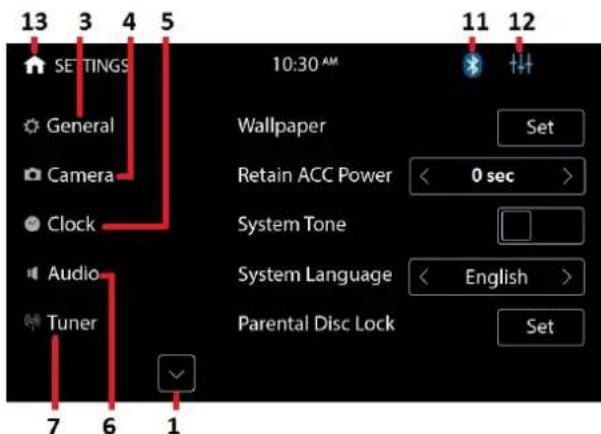
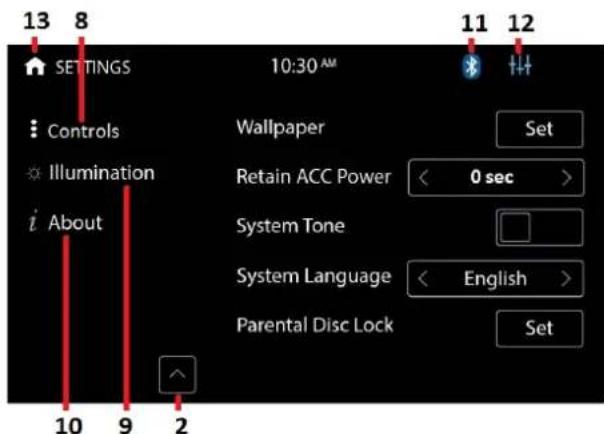
- Touch to shift to next SETTINGS MENU.
- Touch to shift to previous SETTINGS MENU.
- Touch to shift to GENERAL SETTINGS MENU for general settings of the unit.
- Touch to shift to CAMERA SETTINGS MENU for camera settings of the unit.
- Touch to shift to CLOCK SETTINGS MENU for clock settings of the unit.
- Touch to shift to AUDIO SETTINGS MENU for audio settings of the unit.
- Touch to shift to TUNER SETTINGS MENU for radio settings of the unit.
- Touch to shift to CONTROLS (BACKLIGHT) SETTINGS MENU for backlight settings of the unit.
- Touch to shift to ILLUMINATION (VISUAL) SETTINGS MENU for visual settings of the unit.
- Touch to shift to ABOUT (SYSTEM) SETTINGS MENU for system settings of the unit.
- This Bluetooth icon will light up if the unit has connected to a mobile phone. If no connection made, the icon will flash.
- Touch to activate AUDIO MENU for various audio settings.
- Touch to shift to MAIN MENU for operation mode selection.
GENERAL SETTINGS
GENERAL MENU GENERAL MENU
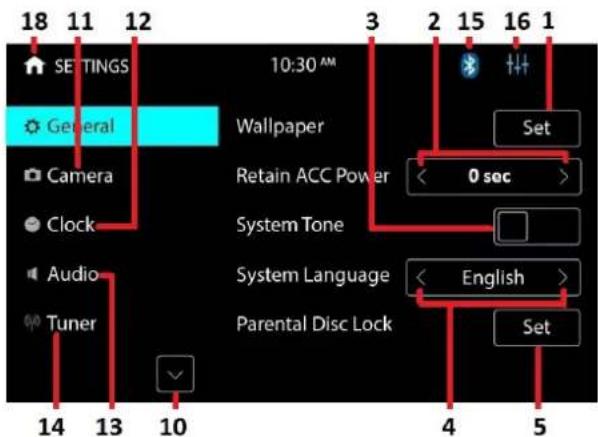
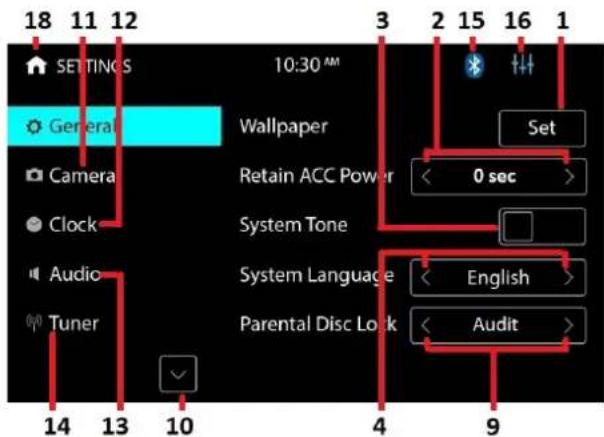
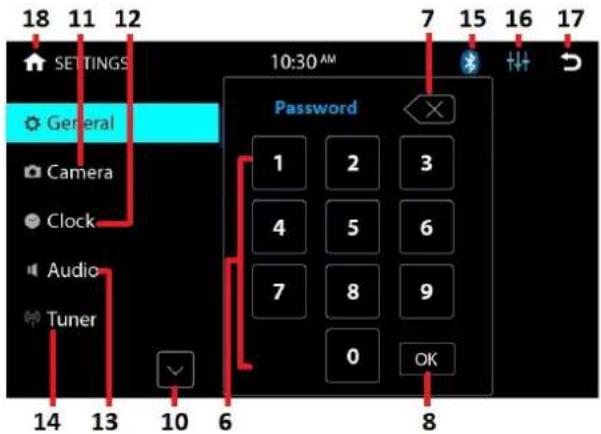
PASSWORD INTERFACE
- Touch to activate WALLPAPER INTERFACE to select the desired wallpaper (background) of the unit.
- Touch repeatedly to select the delay time of ACC power cutoff.
- Touch to turn on or off of beep sound when touching on screen or pressing the control keys on main unit / remote handset for control.
- Touch to select the system language on screen.
- Touch to activate PASSWORD INTERFACE to set the parental lock on DVD. (Note: the default password on parental lock: 0000)
- Touch to input the password.
- Touch to erase the digit input by error.
- Touch to confirm the password.
- When parental password set/input, touch repeatedly to select the desired grade of DVD.
- Touch to show other settings modes of the unit.
- Touch to shift to CAMERA SETTINGS MENU for camera settings of the unit.
- Touch to shift to CLOCK SETTINGS MENU for clock settings of the unit.
- Touch to shift to AUDIO SETTINGS MENU for audio settings of the unit.
- Touch to shift to TUNER SETTINGS MENU for radio settings of the unit.
- This Bluetooth icon will light up if the unit has connected to a mobile phone. If no connection made, the icon will flash.
- Touch to activate AUDIO MENU for various audio settings.
- Touch to shift back to GENERAL SETTINGS MENU for general settings of the unit.
- Touch to shift to MAIN MENU.
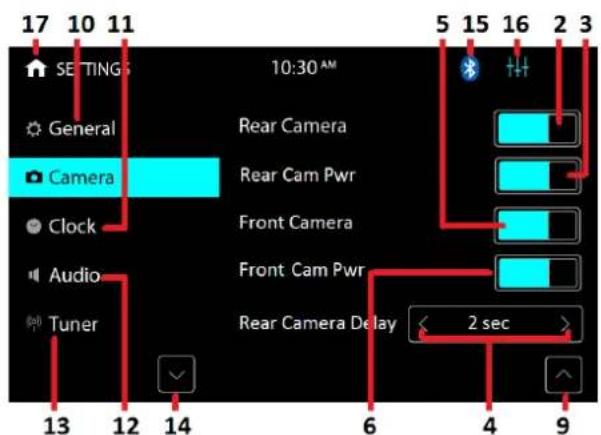
CAMERA MENU
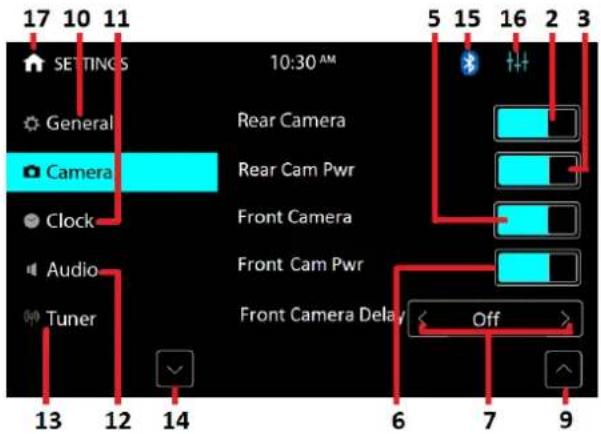
-
Touch repeatedly to select the front or rear camera viewing when the car is shifted from forward mode to backward mode. When "Off" is selected, no camera viewing available at car backward mode.
-
Touch to turn on or off of rear camera input.
-
When rear camera input turn on, touch to turn on or off of +12V power connection to the rear camera (when the red/white wire connected).
-
When rear camera input turn on, touch repeatedly to select the delay time of rear camera input viewing.
-
Touch to turn on or off of front camera input.
-
When front camera input turn on, touch to turn on or off of +12V power connection to the front camera (when the red/violet wire connected).
-
When front camera input turn on, touch repeatedly to select the delay time of front camera input viewing.
-
Touch to shift to next CAMERA SETTINGS MENU.
-
Touch to shift to previous CAMERA SETTINGS MENU.
-
Touch to shift to GENERAL SETTINGS MENU for general settings of the unit.
-
Touch to shift to CLOCK SETTINGS MENU for clock settings of the unit.
-
Touch to shift to AUDIO SETTINGS MENU for audio settings of the unit.
-
Touch to shift to TUNER SETTINGS MENU for radio settings of the unit.
-
Touch to show other setting modes of the unit.
-
This Bluetooth icon will light up if the unit has connected to a mobile phone. If no connection made, the icon will flash.
-
Touch to activate AUDIO MENU for various audio settings.
-
Touch to shift to MAIN MENU.
CLOCK SETTINGS
CLOCK MENU
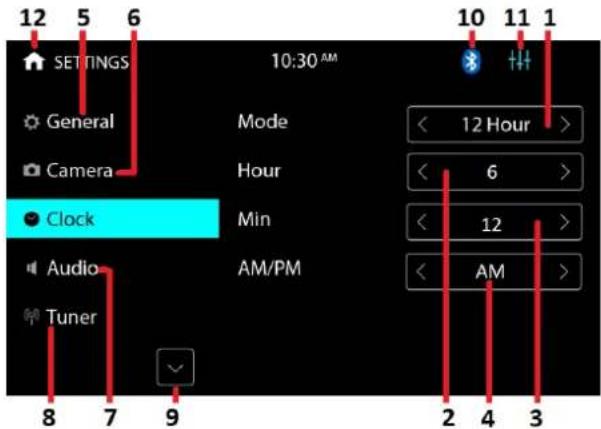
- Touch to select 12 hour or 24 hour display format of clock.
- Touch repeatedly to adjust hour of clock.
- Touch repeatedly to adjust minute of clock.
- At 12 hour display format, touch to select AM / PM display.
- Touch to shift to GENERAL SETTINGS MENU for general settings of the unit.
- Touch to shift to CAMERA SETTINGS MENU for camera settings of the unit.
- Touch to shift to AUDIO SETTINGS MENU for audio settings of the unit.
- Touch to shift to TUNER SETTINGS MENU for radio settings of the unit.
- Touch to show other settings modes of the unit.
- This Bluetooth icon will light up if the unit has connected to a mobile phone. If no connection made, the icon will flash.
- Touch to activate AUDIO MENU for various audio settings.
- Touch to shift to MAIN MENU.
AUDIO SETTINGS
AUDIO SETTING MENU AUDIO SETTING MENU
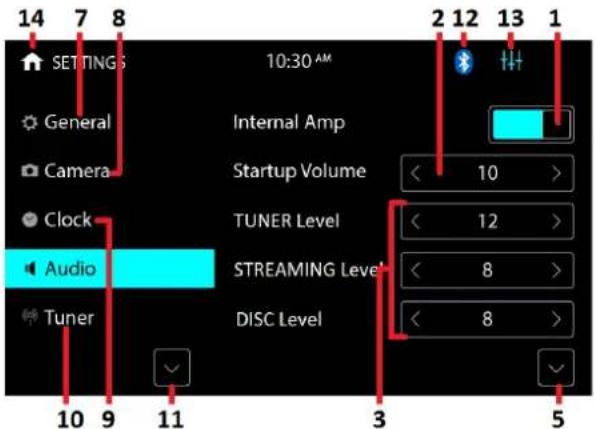
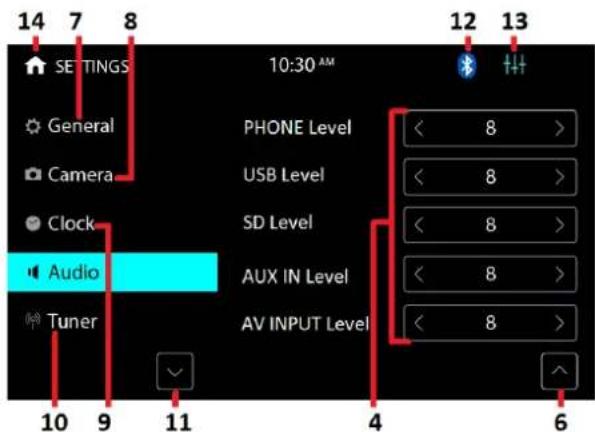
-
Touch to turn on or off of internal amplifier output. When the internal amplifier has been turn off, this is no power output from all the speakers but output from RCA and sub-woofer still remain.
-
Touch repeatedly to select the volume level when ignition of the car turn on.
-
Touch repeatedly to increase or lower the volume level against the current output level under tuner mode, Bluetooth streaming mode and disc input modes.
-
Touch repeatedly to increase or lower the volume level against the current output level under phone (Bluetooth) mode, USB input mode, SD input mode, auxiliary input model and AV input modes.
- Touch to shift to next AUDIO SETTINGS MENU.
- Touch to shift to previous AUDIO SETTINGS MENU.
- Touch to shift to GENERAL SETTINGS MENU for general settings of the unit.
- Touch to shift to CAMERA SETTINGS MENU for camera settings of the unit.
- Touch to shift to CLOCK SETTINGS MENU for clock settings of the unit.
- Touch to shift to TUNER SETTINGS MENU for radio settings of the unit.
- Touch to show other settings modes of the unit.
- This Bluetooth icon will light up if the unit has connected to a mobile phone. If no connection made, the icon will flash.
- Touch to activate AUDIO MENU for various audio settings.
- Touch to shift to MAIN MENU.
TUNER SETTINGS
TUNER SETTINGS MENU
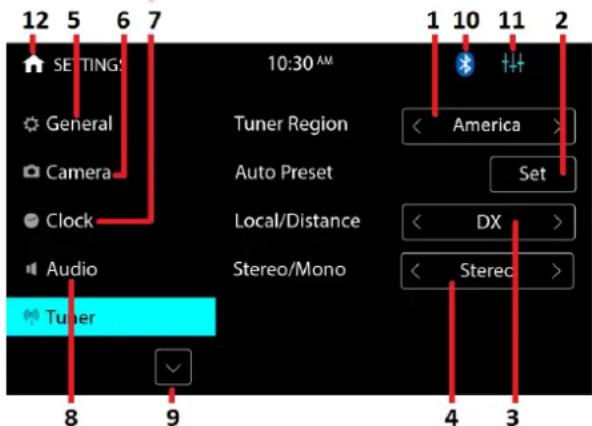
- Touch to select the radio frequency that suits the area located.
- Touch to shift to TUNER MENU and start searching the radio frequency & storing the strongest signal stations into memory. After one cycle searched, the unit starts intro broadcasting of the preset memory stations for a few seconds.
- Touch to select local (Local) setting for reception of strong signal stations or distance (DX) setting for reception of weak stations at FM radio band.
- Touch to select Stereo or Mono mode at FM radio band.
- Touch to shift to GENERAL SETTINGS MENU for general settings of the unit.
- Touch to shift to CAMERA SETTINGS MENU for camera settings of the unit.
- Touch to shift to CLOCK SETTINGS MENU for clock settings of the unit.
- Touch to shift to AUDIO SETTINGS MENU for audio settings of the unit.
- Touch to show other settings modes of the unit.
- This Bluetooth icon will light up if the unit has connected to a mobile phone. If no connection made, the icon will flash.
- Touch to activate AUDIO MENU for various audio settings.
- Touch to shift to MAIN MENU.
CONTROLS (BACKLIGHT) SETTINGS
CONTROLS (BACKLIGHT) SETTINGS MENU
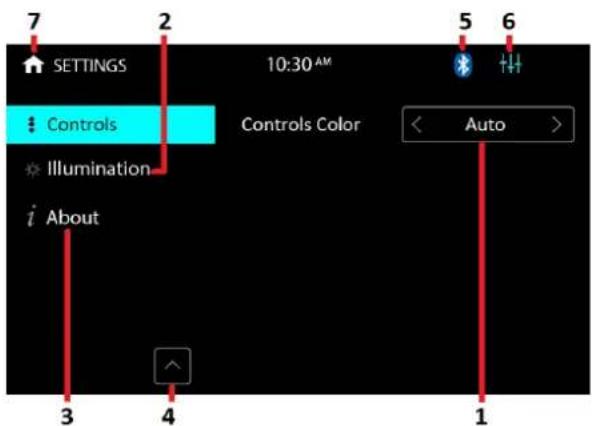
- Touch repeatedly to select the backlight color for illumination. When Auto mode selected, backlight color will have cycle changed automatically.
- Touch to shift to ILLUMINATION (VISUAL) MENU for various visual settings of the unit.
- Touch to shift to ABOUT (SYSTEM) MENU for various system settings of the unit.
- Touch to show other setting modes of the unit.
- This Bluetooth icon will light up if the unit has connected to a mobile phone. If no connection made, the icon will flash.
- Touch to activate AUDIO MENU for various audio settings.
- Touch to shift to MAIN MENU.
ILLUMINATION (VISUAL) SETTINGS
ILLUMINATION (VISUAL) SETTINGS MENU
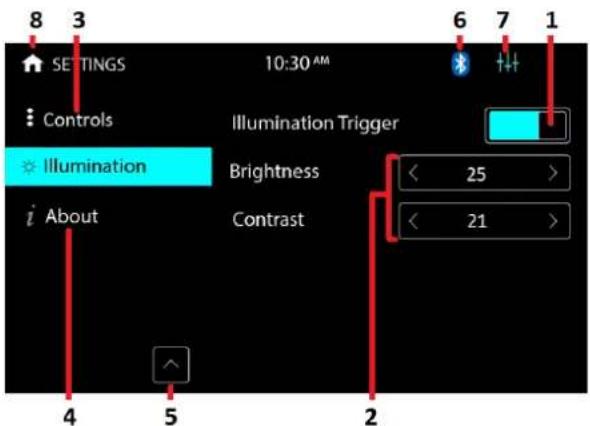
- Touch to turn on or off of headlamp detection of the car.
ON mode: When the headlamp of the car turned on, brightness of the screen will be dimmer.
OFF mode: When the headlamp of the car turned on, brightness of the screen will not be affected
Remark: Headlamp detection will only be activated when the headlamp detection is turn on and the orange wire connected with the on/off of car headlamp
- Touch repeatedly to select the brightness and contrast of the screen.
- Touch to shift to CONTROLS (BACKLIGHT) SETTINGS MENU for backlight color settings of the unit.
-
Touch to shift to ABOUT (SYSTEM) MENU for various system settings of the unit.
-
Touch to show other setting modes of the unit.
- This Bluetooth icon will light up if the unit has connected to a mobile phone. If no connection made, the icon will flash.
- Touch to activate AUDIO MENU for various audio settings.
- Touch to shift to MAIN MENU.
ABOUT (SYSTEM) SETTINGS
ABOUT (SYSTEM)
SETTINGS MENU
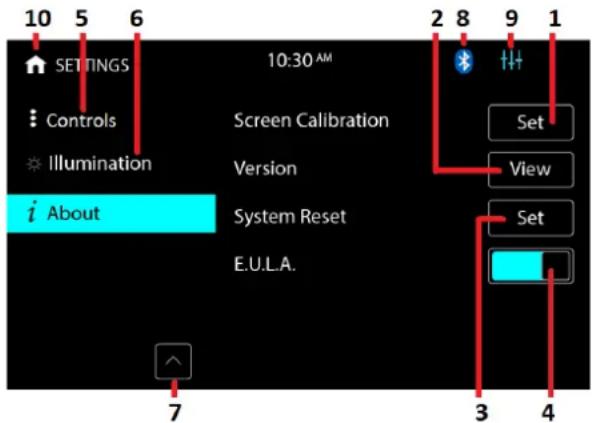
E.U.L.A.
INTERFACE
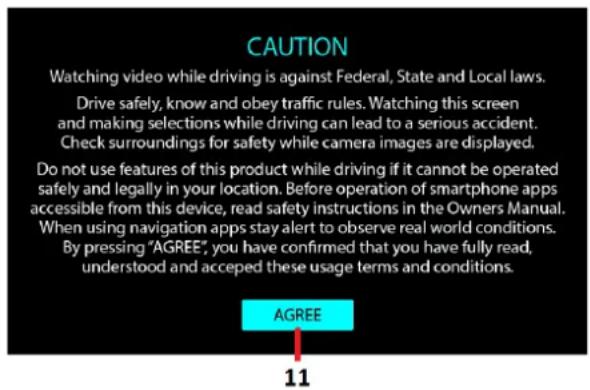
- Touch to activate SCREEN CALIBRATION interface. Follow the 「+」 mark appeared, touch & hold shortly on each 「+」 mark appeared to complete the calibration.
- Touch to activate VERSION INTERFACE to view the software version of the unit.
- Touch to reset the unit to its default stage. After reset, all settings and memories of the unit will be erased.
- Touch to turn on or off of E.U.L.A. INTERFACE on screen when the unit turn on after ignition of the car.
- Touch to shift to CONTROLS (BACKLIGHT) SETTINGS MENU for backlight color settings of the unit.
- Touch to shift to ILLUMINATION (VISUAL) MENU for various visual settings of the unit.
- Touch to show other setting modes of the unit.
- This Bluetooth icon will light up if the unit has connected to a mobile phone. If no connection made, the icon will flash.
- Touch to activate AUDIO MENU for various audio settings.
- Touch to shift to MAIN MENU.
- Touch to agree the End User License Agreement as stated in E.U.L.A. INTERFACE.
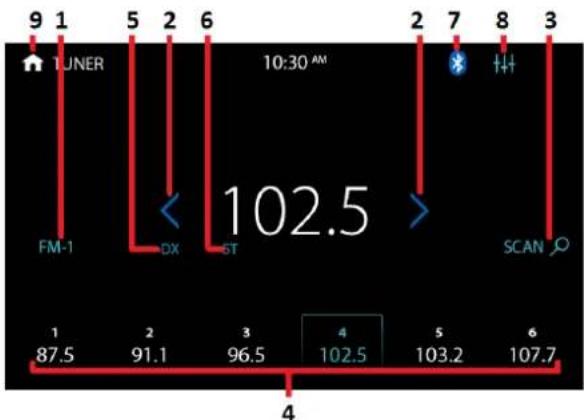
At MAIN MENU, touch on screen and shift to TUNER MENU for radio operation.
TUNER MENU
line
| Time | Signal | |------|--------| | 1 | 87.5 | | 2 | 91.1 | | 3 | 96.5 | | 4 | 102.5 | | 5 | 103.2 | | 6 | 107.7 |- Touch repeatedly to select radio band (FM-1 / FM-2 / FM-3 / AM-1 / AM-2) for broadcasting.
- Touch to turn the radio frequency upward or downward and stop for broadcasting when a station received.
Press & hold shortly to activate manual tuning mode. At this mode, press repeatedly to fine tune the radio frequency upward or downward. - Touch to start scanning the radio frequency upward and stop for broadcasting for a few seconds when a radio station received.
- This shows the radio stations stored in preset memory stations 1-6.
Touch any one of the preset memory station to have broadcasting of relative station.
Touch & hold shortly on any one of the preset memory station, the current broadcasting station/frequency will be stored in the respective preset memory station. - At FM band, this shows:
LOC – local setting for reception of strong signal stations
DX - distance setting for reception of weak signal stations - At FM band and when "Stereo" has been selected, ST indicator will appear on screen when stereo signal received. This is no indication for mono signal received.
- This Bluetooth icon will light up if the unit has connected to a mobile phone. If no connection made, the icon will flash.
- Touch to activate AUDIO MENU for various audio settings.
- Touch to shift to MAIN MENU.
At MAIN MENU, touch on screen and shift to disc / USB / SD input mode for media playback.
At media playback mode and depends on the input device and playback media recorded, touch on screen to show various PLAYBACK MENUS for operation.
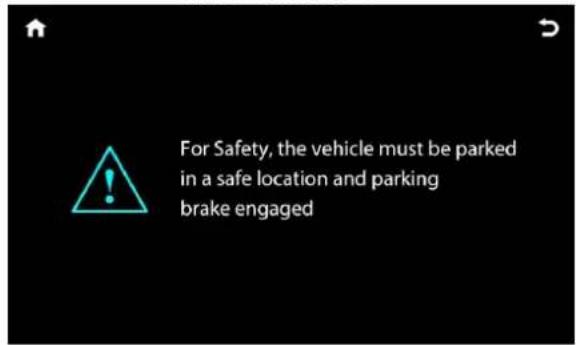
Due to the law of some countries and areas, watching video is not allowed during driving. To allow video playback, parking brake must be engaged (light green wire - parking brake input must be connected).
The PARKING BRAKE WARNING INTERFACE will appear on screen and no video playback start in case the parking brake input has not been connected and engaged.
PARKING BRAKE WARNING INTERFACE
DVD PLAYBACK MENU DVD PLAYBACK MENU
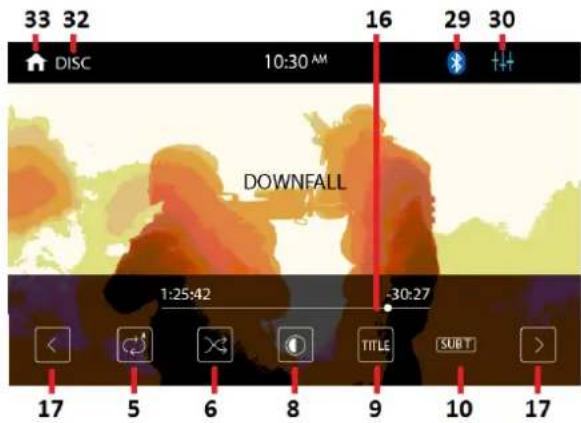
DVD PLAYBACK MENU VCD PLAYBACK MENU
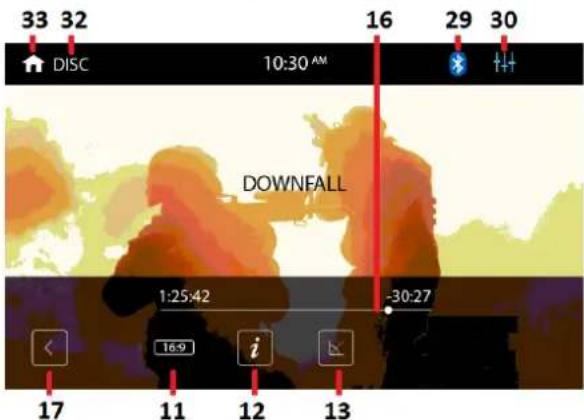
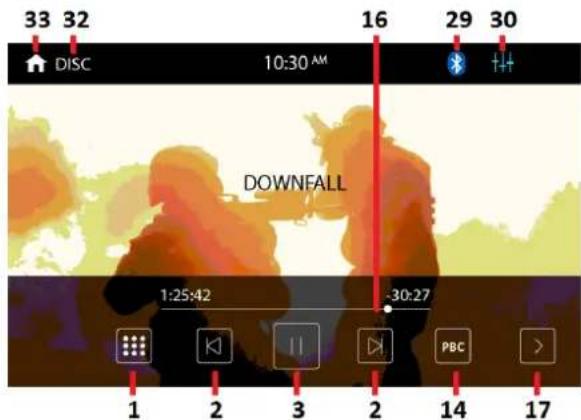
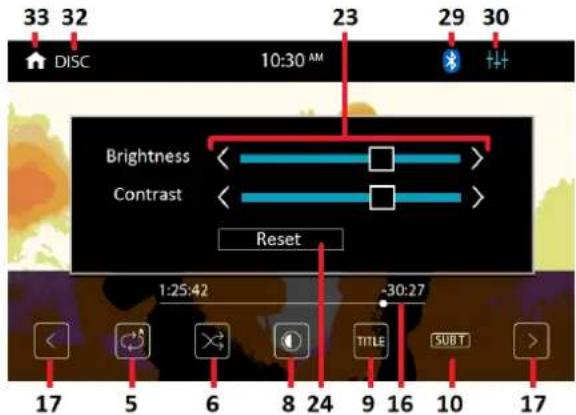
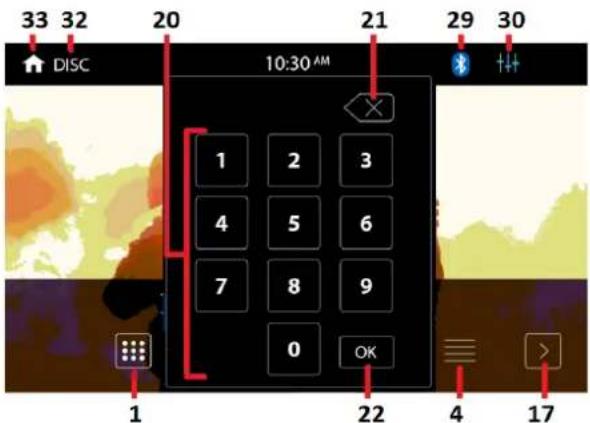
KEYBOARD INTERFACE
-
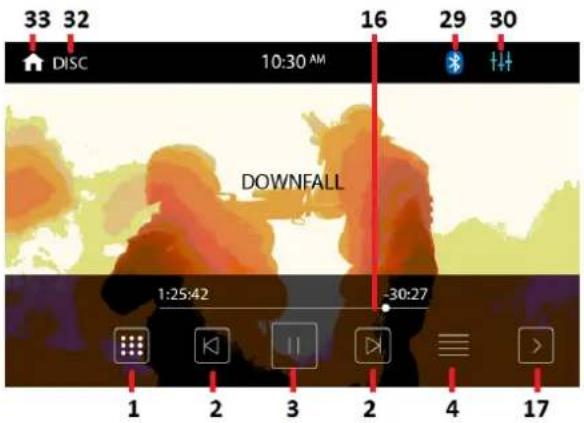
Touch to activate KEYBOARD INTERFACE to input track number directly for playback.
-
Touch to shift to next or previous track for playback.
At DVD / VCD / video / music playback mode, touch & hold shortly to activate fast forward or fast rewind mode. At this mode, touch repeatedly to select various speed on fast forward or fast rewind.
-
Touch to start, pause or resume playback.
-
DVD Mode
Touch to display on screen the menu of the disc & playback will resume after a while. Video / Music / Photo Mode
Touch to shift to FOLDER / PLAYLIST MENU for playback selection. Touch once or twice (as the case may be) on the selected folder / track for playback.
-
Touch repeatedly to select various repeat playback modes of the input device.
-
Touch to turn on or off of random playback mode of the input device.
-
Touch repeatedly to select various repeat and random playback modes of the input device.
-
Touch to activate VISUAL INTERFACE for brightness & contrast setting of the screen.
-
Touch to display on screen the title of the disc & playback will resume after a while. (Note: Depended on the DVD, this function may not be operated)
-
Touch repeatedly to select different sub-titles that recorded in the playback device.
-
Touch repeatedly to select the aspect ratio of screen for viewing.
-
Touch repeatedly to select the audio output channels that recorded in the playback device.
-
Touch repeatedly to view the angle changes in sequential order (available for DVD recorded with multi-angle senses).
-
Touch to turn on or off of PBC mode. At PCB on mode, playback will start at the beginning in sequence order.
-
Touch repeatedly to zoom in and zoom out of screen for viewing.
-
Hold & slide to select the position (time) for playback.
-
Touch to shift to next or previous PLAYBACK MENU.
-
Touch to shift to previous FOLDER / PLAYLIST MENU.
-
Touch to shift page up or down.
-
Touch to input the select number of track for playback
-
Touch to erase the digital input by error.
-
Touch to confirm the playback after inputting the track number.
-
Touch repeatedly or hold & slide to select the brightness & contrast of the screen.
-
Touch to reset brightness & contrast of screen to its default stage.
-
Touch to select music playback mode.
-
Touch to select photo playback mode.
-
Touch to select video playback mode.
-
Touch once or twice (as the case may be) on the select folder / track for playback.
-
This Bluetooth icon will light up if the unit has connected to a mobile phone. If no connection made, the icon will flash.
-
Touch to activate AUDIO MENU for various audio settings.
-
Touch to return to PLAYBACK MENU.
-
This shows the current input device.
-
Touch to shift to MAIN MENU.
At MAIN MENU, touch on screen and shift to PHONE (KEYPAD) MENU for Bluetooth Operation.
LINK UP WITH MOBILE PHONE
To linkup Bluetooth connection with the mobile phone, take your phone and follow the steps:
- set the mobile phone to Bluetooth state
- start to search new device
- after searched, new device (model number of this unit) searched out, confirm the search
- in case of need, input default code "0000" in the mobile phone
- at the same time, Bluetooth icon light up on screen
- connection succeeded and you can start using Bluetooth function
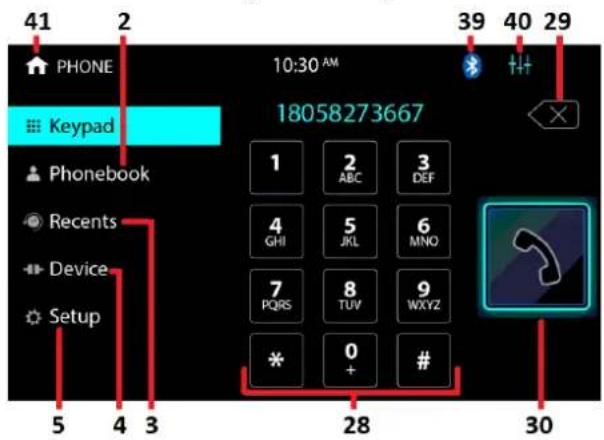
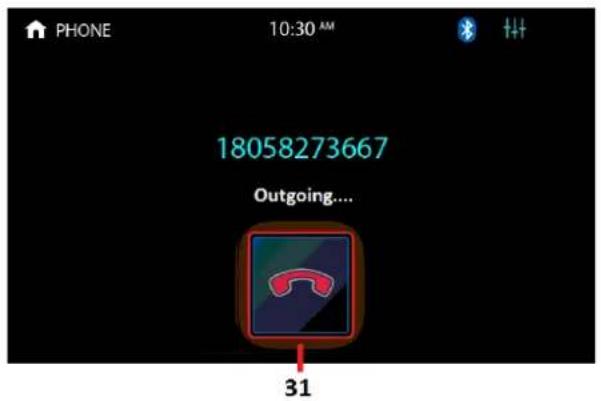
PHONE (KEYPAD) MENU OUTGOING CALL INTERFACE
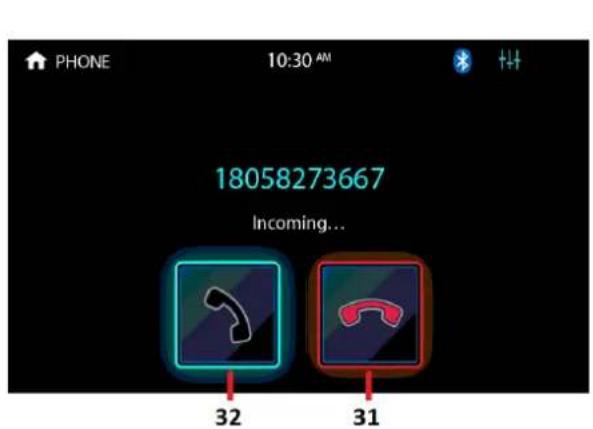
INCOMING CALL INTERFACE CONVERSATION INTERFACE
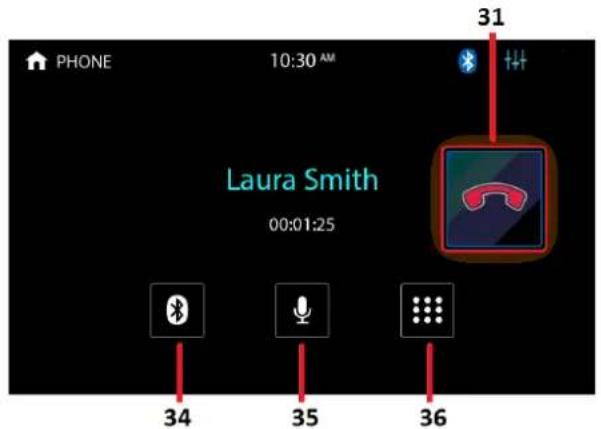
CONVERSATION INTERFACE KEYPAD INTERFACE
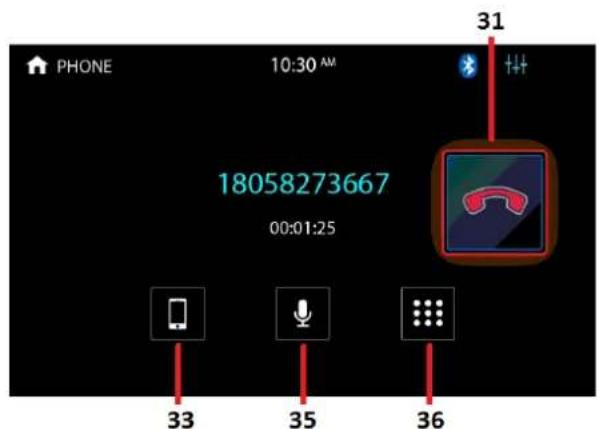
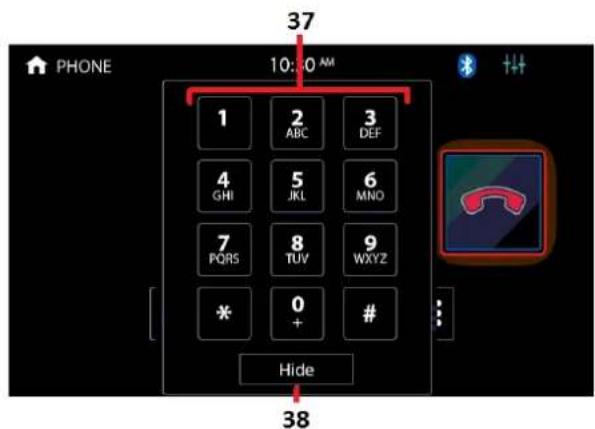
PHONE (SETUP) MENU PHONE (SETUP) MENU
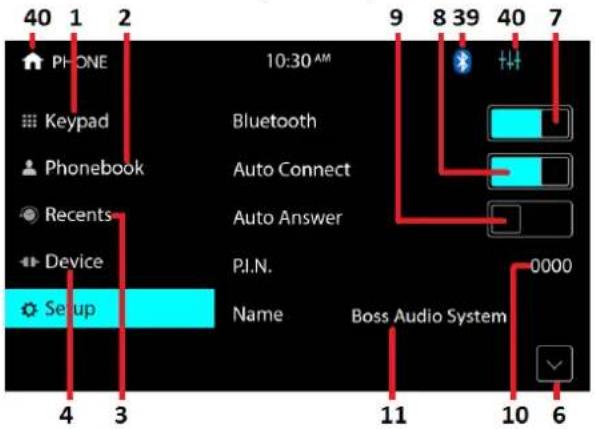
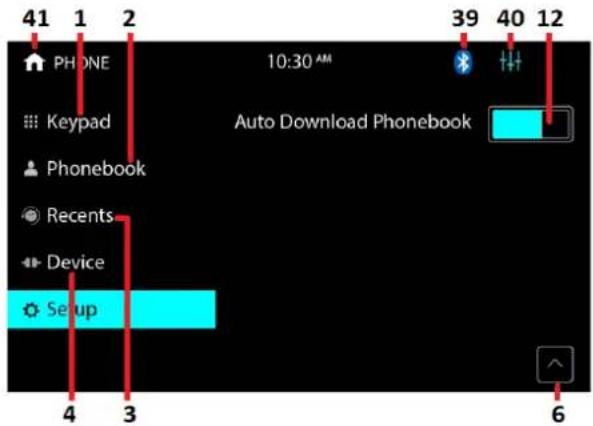
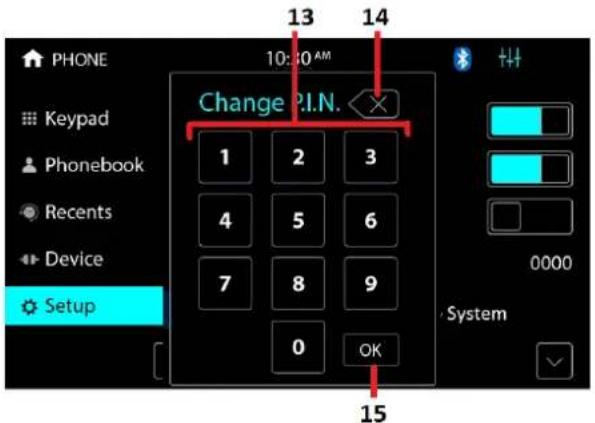
PIN CODE INTERFACE PHONE (DEVICE) MENU
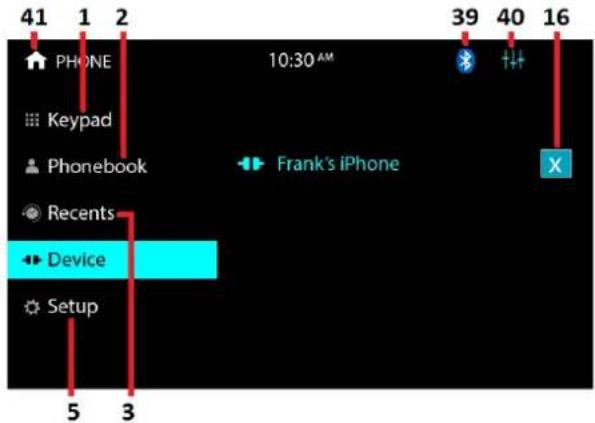
PHONE (RECENT) MENU PHONE (PHONEBOOK) MENU
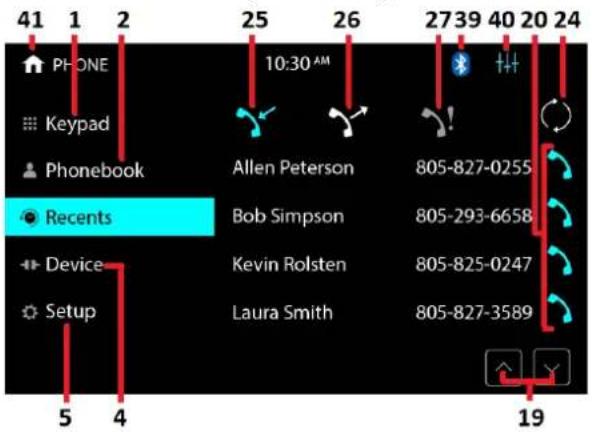
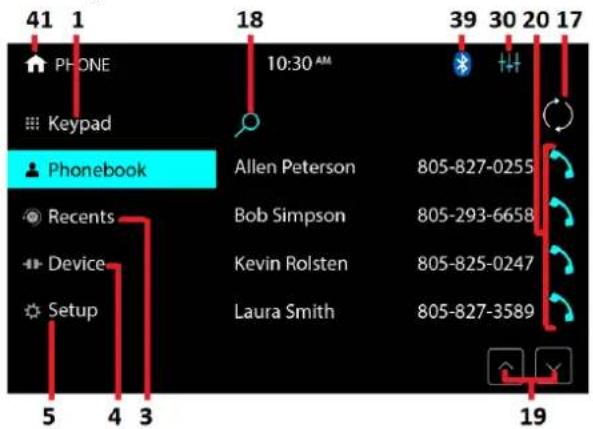
PHONEBOOK SEARCH INTERFACE
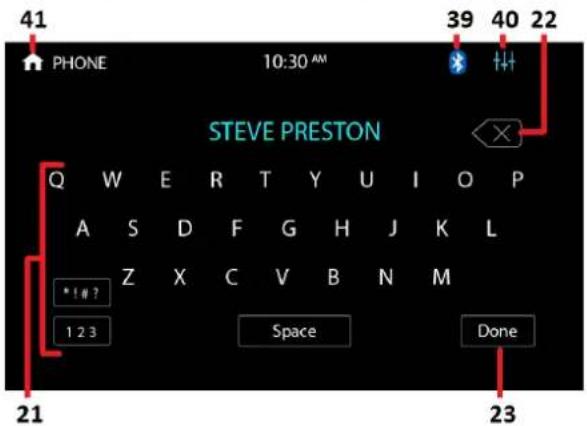
-
Touch to shift to PHONE (KEYPAD) MENU for dial out.
-
Touch to shift to PHONE (PHONEBOOK) MENU to show the phone book of the connected mobile phone.
- Touch to shift to PHONE (RECENT) MENU to show the record on incoming / outgoing / missing calls.
- Touch to shift to PHONE (DEVICE) MENU to show the current status on connection.
- Touch to shift to PHONE (SETUP) MENU for Bluetooth setup.
- Touch to show other setup modes.
- Touch to turn on or off of Bluetooth operation.
- Touch to turn on or off of auto connection with mobile phone. (Note: When auto connect is turn on, the unit will connect to the linked-up mobile phone after ignition of the car)
- Touch to turn on or off of auto answer when an incoming call received.
- Touch to activate PIN CODE INTERFACE for pin code changing.
(Note: Default pin code: 0000) - This shows the name of this Bluetooth device.
- Touch to turn on or off of auto download phonebook once the unit linked-up with the mobile phone.
- Touch to input the new pin code.
- Touch to erase the digit that entered by error.
- Touch to confirm after changing the pin code.
- Touch to cancel the connection with the linked-up phone.
- Touch to start downloading / updating the phonebook of the linked-up phone to the unit.
- Touch to activate PHONEBOOK SEARCH INTERFACE to search for the contact.
- Touch to shift page up or down.
- Touch the desired contact to dial out.
- Touch to input the contact name in order to search the contact details from the phonebook.
- Touch to erase the data that input by error.
- Touch to confirm after data input and searching of contact on phonebook will start.
- Touch to start downloading / updating the call history of the linked-up phone to the unit.
- Touch to show the incoming call history.
- Touch to show the outgoing call history.
- Touch to show the missing call history.
- Touch to input the phone number for dial out.
- Touch to erase the digit that input by error.
- Touch to dial out after input the phone number or redial the last call number when no phone number input.
- Touch to hang up or refuse an incoming call.
- Touch to pick up an incoming call.
- Touch to shift conversation from Bluetooth of the unit to the mobile phone.
- Touch to shift conversation from the mobile phone to Bluetooth of the unit.
- Touch to turn on or off of sound muting of the microphone of the unit.
- Touch to activate KEYPAD INTERFACE for data input during conversation.
-
Touch to input the data.
-
Touch to close KEYPAD INTERFACE.
- This Bluetooth icon will light up if the unit has connected to a mobile phone. If no connection made, the icon will flash.
- Touch to activate AUDIO MENU for various audio settings.
- Touch to shift to MAIN MENU.
At MAIN MENU, touch on screen and shift to STREAMING MENU for Bluetooth streaming operation.
This operation is available when a mobile phone connected to Bluetooth of the unit. Note: For link up with mobile phone, please refer to ON SCREEN – PHONE (BLUETOOTH) OPERATION for details.
STREAMING MENU
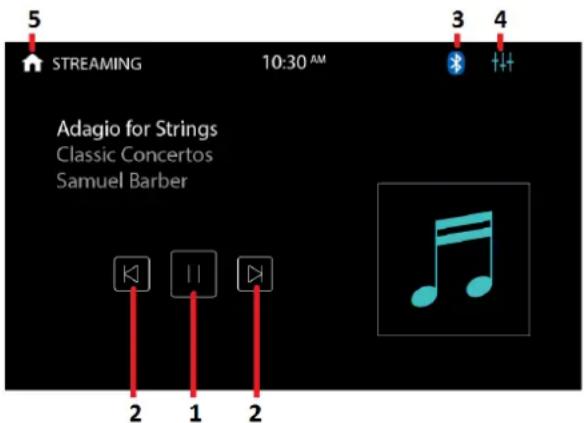
- Touch to start / pause / resume playback transmitted from the mobile phone.
- Touch to shift to previous or next track for playback.
- This Bluetooth icon will light up if the unit has connected to a mobile phone. If no connection made, the icon will flash.
- Touch to activate AUDIO MENU for various audio settings.
- Touch to shift to MAIN MENU.
At MAIN MENU, touch on screen and shift to front / rear camera viewing on screen.
(Note: Front and/or rear camera should be connected)
During camera viewing on screen, touch any portion on screen to activate CAMERA INPUT MENU for camera operation.
CAMERA INPUT MENU
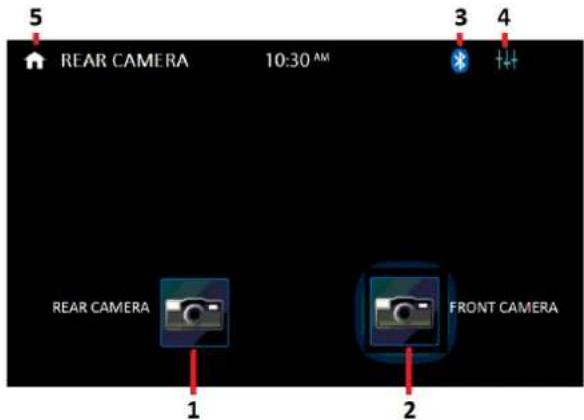
-
Touch to select rear camera viewing.
-
Touch to select front camera viewing.
-
This Bluetooth icon will light up if the unit has connected to a mobile phone. If no connection made, the icon will flash.
-
Touch to activate AUDIO MENU for various audio settings.
-
Touch to shift to MAIN MENU.
At MAIN MENU, touch on screen to shift to AUXILIARY INPUT MENU for auxiliary input operation (provided an auxiliary audio device had been connected).
AUXILIARY INPUT MENU
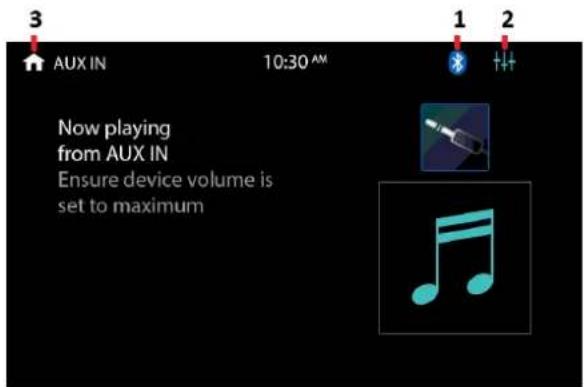
-
This Bluetooth icon will light up if the unit has connected to a mobile phone. If no connection made, the icon will flash.
-
Touch to activate AUDIO MENU for various audio settings.
-
Touch to shift to MAIN MENU.
At MAIN MENU, touch on screen to shift to AV INPUT MENU for audio & video input operation (provided an AV device had been connected).
During AV input operation, touch any portion on screen to activate AV INPUT MENU for AV input operation.
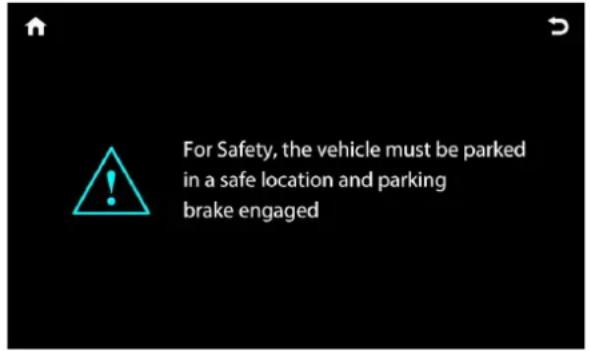
Due to the law of some countries and areas, watching video is not allowed during driving. To allow video playback, parking brake must be engaged (light green wire - parking brake input must be connected).
The PARKING BRAKE WARNING INTERFACE will appear on screen and no video playback start in case the parking brake input has not been connected and engaged.
PARKING BRAKE WARNING INTERFACE
AV INPUT MENU
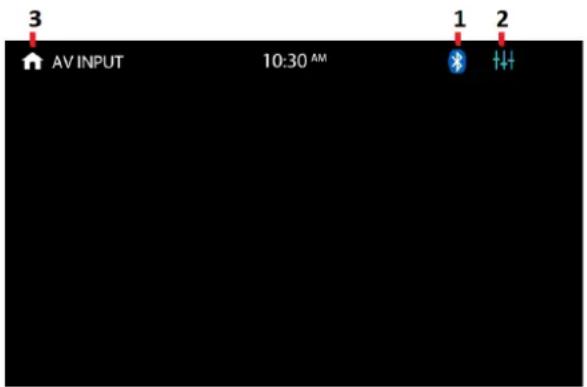
- This Bluetooth icon will light up if the unit has connected to a mobile phone. If no connection made, the icon will flash.
- Touch to activate AUDIO MENU for various audio settings.
- Touch to shift to MAIN MENU.
At MAIN MENU, touch on screen to start mobile phone linking (mirror linking) of the connected mobile phone operation. Follow the instruction as shown on screen for the first time connection.
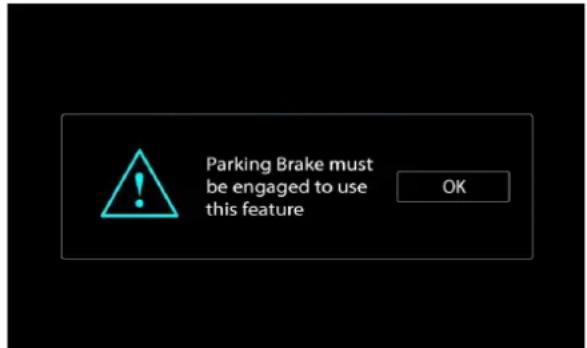
Remark: For A-Link operation, parking brake must be engaged (light green wire – parking brake input must be connected).
The PARKING BRAKE WARNING INTERFACE will appear on screen in case the parking brake input has not been connected and engaged.
PARKING BRAKE WARNING INTERFACE
Procedures for A-Link operation:
- Using USB cable to connect the mobile phone to the front USB slot of the head unit.
- In case of need, touch "A-LINK" operation mode on screen from the MAIN MENU.
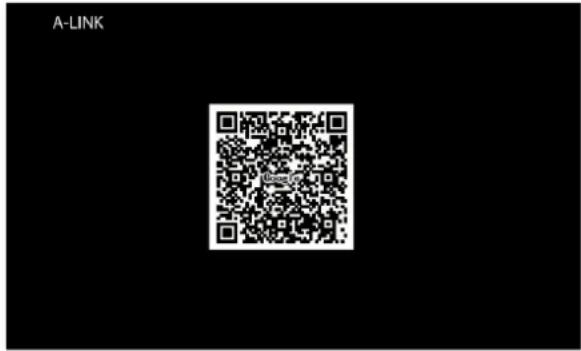
- SETUP MENU appears on screen, scan the QR code by using the connected mobile phone.
-
Download and install Autolink app.
-
After installation, mirror linking of mobile phone will appear on screen and A-Link operation activated.
- Depends on the mobile phone used, it may be necessary to disconnect the mobile phone from the USB slot first and then plug in again in order to start A-Link operation.
SETUP MENU
Important notice on mobile phone linking operation on Android mobile phone:
- This head unit supports Android phone 6.0 or above with USB mirror linking function.
- USB cable should be used to connect the phone to the front USB slot of the head unit.
- In case connection failed, SETUP MENU will remain on screen.
- Phone set up may be varied from different phones and USB debug may be necessary. Refer to the operation method of the mobile phone for details (usually at setting mode → developer options → USB debugging).
- A-Link operation does not support IOS mobile phone.
At A-Link operation mode and when this floating dock icon appeared on screen, touch to activate FLOATING DOCK MENU on screen for various functions and controls of the unit. This menu will be closed when no operation for a while. Touch any blank portion on screen will also close this menu.
FLOATING DOCK MENU
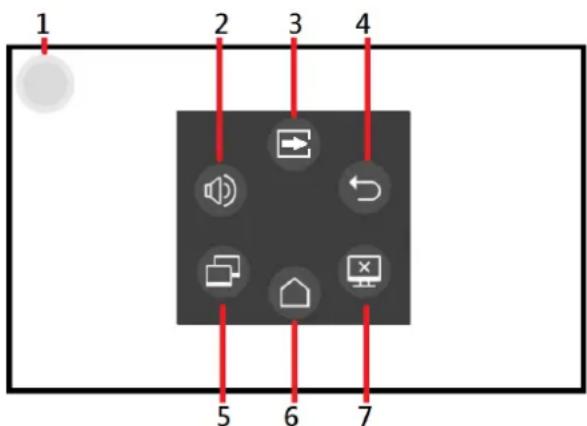
- Touch to activate FLOATING DOCK MENU on screen for various functions and controls of the unit. Hold & slide can move this icon to other desired position on the screen.
- Touch to activate volume & sound mute control of the car unit.
- Touch to shift screen to the MAIN MENU of the car unit.
- Touch to shift screen to previous page of the connected phone.
- Touch to shift horizontal / vertical viewing of the connected phone.
- Touch to shift screen to the main menu of the connected phone.
- Touch to turn off the screen. When the screen turned off, touch any portion of the screen to turn on the screen.
SPECIFICATION
GENERAL
Power Requirement: DC 12 Volts, negative ground
Load Impedance: 4 Ohms
Maximum Power Output: 80 watts x 4
AM RADIO SECTION
Frequency Range 530 – 1710 KHz (America)
522 – 1620 KHz (Europe)
FM RADIO SECTION
Frequency Range 87.5 - 107.9 MHz (America)
87.5 – 108 MHz (Europe)
DISC SECTION
Disc & media Play: DVD / VCD / MP3 / CD / JPEG
Mounting Angle: +/- 30 degree
Aspect Ratio: 16:9 / 4:3
VIDEO SECTION
Video System: PAL / NTSC
TFT Screen: 800*480 pixel
BLUETOOTH SECTION
Communication type: V4.2
Maximum Distance: 5 meters
AUDIO SECTION
Maximum Output Level: 3 Vrms (+/-3 dB)
Frequency Response: 20 Hz to 20 KHz
Signal to Noise Ratio: 85 dB
Channel Separation: 80 dB
Note: Specification and design; functions and features; unit illumination; color and display segment are subject to change without prior notice. Photos and drawings on gift box or operation manual might be varied from the exact unit. Depends on the input devices, operation might be varied or not available from the operation manual described.
SIMPLE TROUBLE SHOOTING
| PROBLEMS, CAUSES & SOLUTIONS |
| No power- Check and make sure the connecting wires are connected correctly- Check whether the fuse is blown. Replace with the proper value fuse if necessary. |
| No sound- Check and make sure the speaker wires are connected correctly. |
| No picture- Check whether the video wire is connected to the video device. |
| Unit hang-up- Press the RESET button to reset the unit to its default stage. |
| No function when pressing the buttons or TFT screen- Press the RESET button to reset the unit to its default stage. |
| Poor effect or unable to receive radio- Check whether the radio antenna is inserted or properly connected.- Antenna may not be the proper length. Make sure the antenna is fully extended.- Antenna may be poorly grounded. Check and make sure the antenna is properly grounded. |
| Stereo cannot be received under radio mode- Tune the radio frequency accurately.- The broadcasting signal is too weak, set the mode to MONO & DX modes. |
| Disc inserted but cannot play- Check whether the disc inserted upside down.- Check whether the disc is dirty or badly cracked.- Lens is dirty. Clean lens by using the lens clean disc. |
| Abnormal moving, skipping or sound during playback- The disc is dirty or damaged. Wipe the disc with a dry soft cloth or replace a new disc. |
| Remote handset does not work- Replace new battery of the remote handset.- Point the remote handset directly at the remote sensor of the main unit.- Clean the surface of the remote sensor. |
| Bluetooth not operated- check the devices are linked up correctly. |
Note
After the above efforts, if the unit still cannot be worked normally, consult your service dealer.
Never attempt to disassemble the unit by yourself. No service part inside the unit.
BOSS Audio Systems
3451 Lunar Court · Oxnard, CA 93030
www.bossaudio.com
805-751-4853 Customer Service
Tech Support: www.bossaudio.com/support



0620
- IMPORTANT NOTICE & PRECAUTIONS
- INSTALLATION & ACCESSORIES
- BACK OF MAIN UNIT
- MAIN UNIT OPERATION
- Operations & Controls
- REMOTE HANDSET – GENERAL OPERATION
- BATTERY REPLACEMENT
- Phone (Bluetooth) Conversation Mode
- ON SCREEN – AUDIO SETTING
- GENERAL SETTINGS
- CLOCK SETTINGS
- AUDIO SETTINGS
- TUNER SETTINGS
- CONTROLS (BACKLIGHT) SETTINGS
- CONTROLS (BACKLIGHT) SETTINGS MENU
- ILLUMINATION (VISUAL) SETTINGS
- ILLUMINATION (VISUAL) SETTINGS MENU
- LINK UP WITH MOBILE PHONE
- Procedures for A-Link operation:
- Important notice on mobile phone linking operation on Android mobile phone:
- SPECIFICATION
- GENERAL
- AM RADIO SECTION
- FM RADIO SECTION
- DISC SECTION
- VIDEO SECTION
- BLUETOOTH SECTION
- AUDIO SECTION
Brand : BOSS
Model : BV775B
Category : DVD player