
99121 - Controller HUNTER - Free user manual and instructions
Find the device manual for free 99121 HUNTER in PDF.


| Product Type | Universal Remote Control Receiver for Ceiling Fans |
| Brand | Hunter |
| Model | 99121 |
| Power Source | 3V CR2032 battery (transmitter) |
| Battery Life | Approximately 1 year under normal use |
| Frequency | RF (Radio Frequency) |
| Number of Channels | Multiple (user-selectable via pairing) |
| Fan Speed Settings | High, Medium, Low |
| Light Control | On/Off and Dimming (auto-detects CFL bulbs) |
| Special Modes | Safe-Exit (30-second delayed light shutoff) |
| Pairing Method | Press Fan Off + High buttons for 4 seconds within 3 minutes of power restoration |
| Range | Up to 20 feet (typical) |
| Dimensions (Receiver) | Approximately 2.5 x 1.5 x 1 inches |
| Weight (Receiver) | Approximately 2 oz |
| Compatibility | Works with most Hunter ceiling fans (requires pull chain set to High) |
| Warranty | 1 year limited warranty |
| FCC Compliance | FCC Part 15 Class B digital device |
| Industry Canada | RSS-210 compliant |
Frequently Asked Questions - 99121 HUNTER
User questions about 99121 HUNTER
0 question about this device. Answer the ones you know or ask your own.
Ask a new question about this device
Download the instructions for your Controller in PDF format for free! Find your manual 99121 - HUNTER and take your electronic device back in hand. On this page are published all the documents necessary for the use of your device. 99121 by HUNTER.
USER MANUAL 99121 HUNTER
Before installing the Universal Remote Control Receiver, use the pull chains to set the fan speed to HIGH and the light to ON. Be sure power is OFF before proceeding with installation.

Remove the canopy. If uncertain how to remove it, reference the fan's owner's manual. With wiring exposed, it may be helpful to note existing wire connections or take a digital photo for reference. Remove the wire connectors that connect the wires from the outlet box to the fan, leaving the grounding wires connected.

OR OR

If you are installing multiple remote-controlled fans on the same circuit breaker,
you may need to perform a few extra steps to prevent interference or faulty operation of your remote controls
Go to www.HunterFan.com/FAQs and click "How do I properly install multiple remote-controlled fans?" for more information.
Choose the hanging system that most closely resembles the one used by your fan and install the receiver as shown and wire as directed.
Note: Some fans may have considerable excess lead wire. For easier canopy installation, cut the excess wire, leaving a minimum of 8" remaining. Re-strip the fan lead wires 1/2". Place remaining excess wire into the ceiling electrical box. The bracket and fan must remain properly grounded.
You may have installation issues if the fan is installed on an angled ceiling. For assistance, call 1-888-830-1326.
Wiring
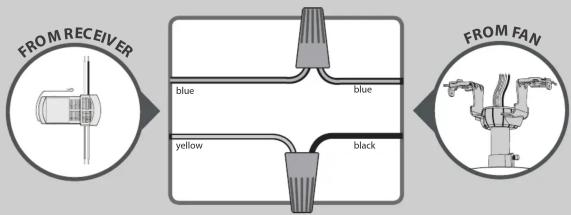
flowchart
graph TD
    A["FROM RECEIVER"] --> B["Blue"]
    A --> C["Yellow"]
    A --> D["Black"]
    E["FROM FAN"] --> F["Blue"]
    E --> G["Yellow"]
    E --> H["Black"]
CONNECT WIRES FROM RECEIVER TO FAN - Using the orange wire connectors, connect the blue wire from the receiver to the blue wire (or possibly black with white stripe wire) from the fan. Connect the yellow wire from the receiver to the black wire from the fan.
If you're uncertain about wire colors or connections, please contact a qualified electrician.
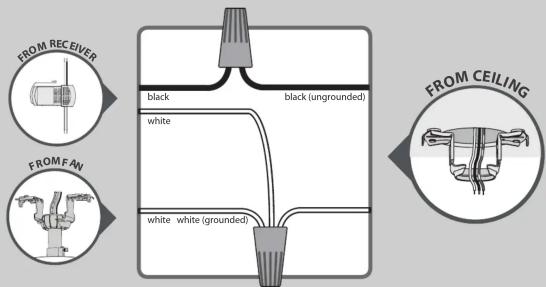
CONNECT WIRES FROM RECEIVER AND FAN TO WIRES FROM OUTLET BOX - Using the orange wire connectors, connect the black wire (ungrounded) from the ceiling to the black wire from the receiver. Connect the white wire (grounded) from the ceiling to both the white wire from the receiver and the white wire from the fan.
AFTER ALL WIRES ARE CONNECTED and secured with wire connectors, re-install the canopy.
To avoid possible electrical shock, before installing or servicing your fan, disconnect the power by turning off the circuit breakers to the outlet box and associated wall switch location. If you cannot lock the circuit breakers in the off position, securely fasten a prominent warning device, such as a tag, to the service panel.

M0059-01 • 01/14/14 • © Hunter Fan Company
Turn the splices upward and push them carefully back through the hanger bracket into the outlet box. Spread the wires apart, with the grounded wires on one side of the outlet box and the ungrounded wires on the other side of the outlet box.

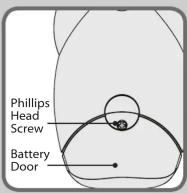
Installing or changing the battery To access the battery compartment remove the small Phillips head screw that secures the battery door to the transmitter assembly. Replace with a CR2032 battery when necessary. The battery should be installed with the positive (+) side up.
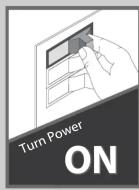
IMPORTANT
Use the pull-chain switch on the fan to set the fan speed to the HIGH position before operation.
Pairing
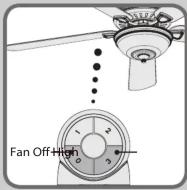
Note: The remote must be paired before the fan will operate. Within 3 minutes of restoring power to the fan, press both the Fan Off button and the High button for at least 4 seconds. Your fan will turn on low to indicate successful syncing. If it does not, turn off power to your fan, wait 1 minute then try again. If using the transmitter with multiple fans, repeat this process for each fan.
Operation Maintenance

The Fan Off button only turns the fan off. To turn the fan on, press one of the fan speed buttons.
3 High
2 Medium
1 Low

Quickly press and release either Light button to turn the lights off and on. Press and hold either light button for more than 1 second to activate the dimming cycle. Release the light button when the desired light level is reached.
Cradle

To install the transmitter cradle, remove the two screws holding your switch cover plate. Do not remove the cover plate. Orient the cradle by lining up the two mounting holes with those on the cover plate. Insert and tighten the screws. Do not over tighten.
TroubleshootingSafe-Exit
The Safe-Exit Program gives you about thirty seconds of light when you turn the lights off to exit the room before the lights go out. To use Safe-Exit:
- Press the Fan Off button for at least three seconds to initiate the Safe-Exit Mode.
• The lights will flash for visual confirmation.
• The lights will stay on 50% brightness for 15 seconds and then begin to dim. After a total of 30 seconds, the lights will be completely off.
Note: For CFL lighting, the lights will stay on 100% brightness for 30 seconds. After a total of 30 seconds, the lights will be completely off.
Fan will not start
• Make sure the power is on at the circuit breaker and the wall switch.
• Make sure the battery is working.
- Make sure that the transmitter and receiver are paired.
- Check wire connections inside of the canopy.
Remote control of fan is erratic • Make sure the battery is installed correctly.
- Install a fresh battery.
Transmitter only works when held at close range
- Change battery.
Lights do not dim
- Check to see if a CFL bulb is installed. The control has a feature that automatically detects CFL bulbs and turns off dimming if a CFL bulb is installed.
CFL bulbs flicker
- Turn the light switch off and back on. Within three minutes, hold down the Fan Off button while pressing the Dim Down button twice. If the problem is not corrected, repeat the process up to three times.
HUNTER FAN COMPANY CONTROL LIMITED WARRANTY
The Hunter Fan Company makes the following limited warranty to the original purchaser of the Control ("Control"): Your Control is warranted to be free from defects in material and workmanship for a period of one year on the date of sale. If the Control malfunctions or falls within the warranty period due to a defect in material, the company will purchase the warranty of its obligations. TAXES TO THE CONTROL THIS WARRANTY AND ANY IMPLIED WARRANTY, INCLUDING BUT NO LIMITED TO ANY IMPLIED WARRANTY OF MERCHANTABILITY OR FITNESS FOR A PARTICULAR PURPOSE, ARE VOIDED. THIS WARRANTY IS IN LIEU OF ALL OTHERS. THIS WARRANTY SHALL NOT BE NOCLOSING THIS WARRANTY, INCLUDING BUT NOT LIMITED TO ANY IMPLIED WARRANTY OF MERCHANTABILITY OR FITNESS FOR A PARTICULAR PURPOSE, IN RESPECT TO ANY CONTROL, IS EXPRESSLY LIMITED TO THE PERIOD OF THE EXPRESS WARRANTY SET FORTH ABOVE FOR SUCH CONTROL. This warranty excludes malfunctions or failures which are not guaranteed by any person who may have a claim of limitation, modifications, or damage to the Control while in your possession, or unreasonable use. This warranty does not apply to batteries or to deterioration or damage to the product caused by the use of faulty batteries. To obtain a replacement, return your Control postage prepaid along with proof of purchase to Hunter Fan Company Service Department at 6:00 PM (17:00) or 9:00 PM (17:00). The Company will pay a higher price for any other person to pay for any other person to pay for any other person to pay for any other person to pay for any other person to pay for any other person to pay for any other person to pay for any other person to pay for any other person to pay for any other person to pay for any other person to pay for any other person to pay for any other person to pay for any other person to pay for any other person to pay for any other person to pay for any other person to pay for any other
If you have problems installing or operating your fan, do not return this product to the dealer. Call our Consumer Affairs Hotline.
1-888-830-1326
Read and Save These Instructions
This product conforms to UL Standard 507.
⚠️ WARNINGS
This device complies with part 15 of the FCC Rules. Operation is subject to the following two conditions: (1) this device may not cause harmful interference, and (2) this device must accept any interference received, including interference that may cause undesired operation.
This device complies with RSS-210 of Industry Canada. Operation is subject to the following two conditions: (1) this device may not cause interference, and (2) this device must accept any interference, including interference that may cause undesired operation of the device.
This equipment has been tested and found to comply with the limits for a Class B digital device, pursuant to Part 15 of the FCC Rules. These limits are designed to provide reasonable protection against harmful interference in a residential installation. This equipment generates, uses and can radiate radio frequency energy and, if not installed and used in accordance with the instructions, may cause harmful interference to radio communications. However there is no guarantee that the interference will not be performed particularly difficult. If it is not necessary because harmful interference to radio or television reception, which can be determined by turning the equipment off and on, the user is encouraged to try to correct the interference by one or more of the following measures: Reorient or relocate the receiving antenna, Increase the separation between the equipment and receiver, Connect the equipment into an outlet on a circuit different from that to which the receiver is connected to consult the dealer or an experienced radio/TV technician for their use. Note: Any modifications to the transmitter or receiver not expressly approved by Hunter Fan Company may void one's authority to operate this remote control.
Brand : HUNTER
Model : 99121
Category : Controller