W1122 - Sewing machine White - Free user manual and instructions
Find the device manual for free W1122 White in PDF.


| Brand | White |
| Model | W1122 |
| Product Type | Sewing Machine |
| Dimensions (approx.) | 40 cm x 18 cm x 30 cm (free arm mode) |
| Weight (approx.) | 7.5 kg |
| Power Supply | 120V/60Hz or 230V/50Hz (check voltage plate) |
| Power Consumption | Approx. 85 W |
| Stitch Patterns | 19 built-in patterns including straight, zigzag, buttonhole, blind hem, stretch, decorative |
| Stitch Length | Adjustable (0-4 mm) |
| Zigzag Width | Adjustable (0-5 mm) |
| Needle Position | Adjustable (left, center, right) |
| Buttonhole Type | 4-step automatic buttonhole with corded option |
| Feed Dog | Drop feed for darning and free embroidery |
| Presser Foot Pressure | Adjustable (3 settings) |
| Max. Sewing Speed | Approx. 800 stitches per minute (controlled by foot pedal) |
| Free Arm | Yes, detachable extension table |
| Lighting | Built-in sewing light (replaceable bulb) |
| Accessories Included | Zigzag foot, buttonhole foot, zipper foot, overcasting foot, darning foot, blind hem guide, quilting guide, cloth guide, bobbins, screwdrivers, oiler |
| Maintenance | Regular cleaning of feed dog and hook race; monthly oiling |
| Safety | Switch off or unplug when not in use; use correct voltage |
| Warranty | Manufacturer warranty (details in manual) |
Frequently Asked Questions - W1122 White
User questions about W1122 White
0 question about this device. Answer the ones you know or ask your own.
Ask a new question about this device
Download the instructions for your Sewing machine in PDF format for free! Find your manual W1122 - White and take your electronic device back in hand. On this page are published all the documents necessary for the use of your device. W1122 by White.
USER MANUAL W1122 White
natural_image
Line drawing of a sewing machine with no visible text or symbolsWHITE
MODEL1122
HINE
/ the Serial No.
2.
f arm.
of arm.
: reference.
CONTENTS
-
NAMES OF PARTS
-
ACCESSORIES
-
BEFORE SEWING
Detaching Extension Table....5 Connecting Foot Controller and Power Cord....
Changing Needle
Changing Foot 9
Bobbin Winding....12
Inserting Bobbin
Adjusting Lower Tension
Drop Feed Lever
Threading Upper Thread
Twin Needle Threading
Decorative Tucks or Designs....15
Drawing Up Lower Thread....16
Foot Pressure
Fabric, Thread and Needle Table....
Pattern Setting
- STRAIGHT SEWING....19
Pattern Selection Dial....19
Stitch Length Dial....19
Double Presser Foot Lifter 20
Cloth Guide....21
Adjusting Thread Tension 21
Applications of Straight Stitch 22
- ZIGZAG SEWING
Zigzag Width Control 23
Needle Position Control
Thread Tension for Zigzag Stitch 23
- MAKING BUTTONHOLES
Determine Length....
Determine Width....24
Cutting Buttonholes 26
Corded Buttonholes 26
-
SEWING ON BUTTONS
-
OVERCASTING
-
OVERLOCKING
Application of Ultra Stretch
Application of Rick-Rack
Application of Decorative Fun Patterns
- BLIND HEM STITCH 35
Elastic Blind Hem Stitch 34
-
STRETCH SEAM
-
ZIPPER SEWING
-
SHELL STITCHING
-
PIN TUCKING
-
QUILTING....39
-
SCALLOPING
-
MENDING 41
Patching 41
Mending a Rip 42
Darning 42
-
APPLIQUE WORK
-
EMBROIDERY
-
MAINTENANCE
Cleaning 45
Oiling 46
- TROUBLE CHART
Changing Light Bulb
WHITE SEWING MACHINE
Record in space provided below the Serial No.
and Model No. of this appliance
The Serial No. is located Rear of arm.
The Model No. is located Rear of arm.
Serial No.
Model No. 1122
Retain these numbers for future reference.
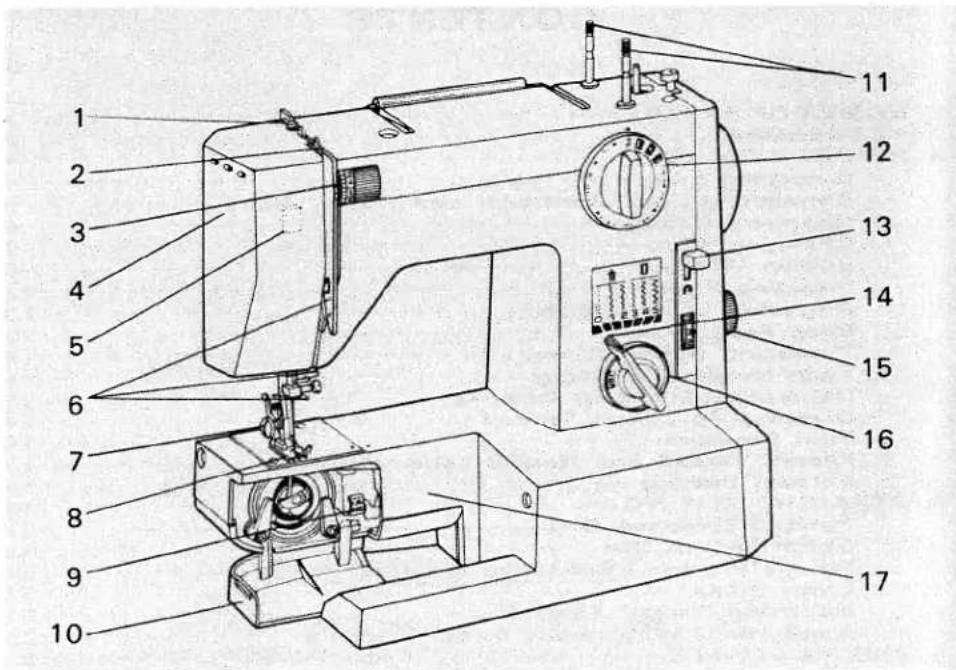
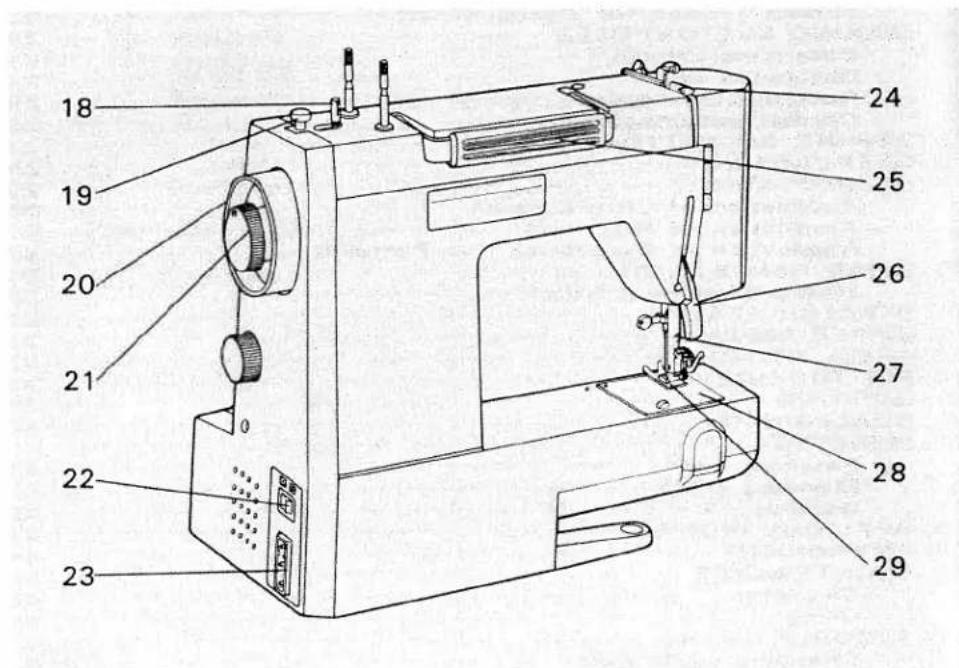
1. NAMES OF PARTS
1 Thread guide for bobbin winding
2 Take-up lever
3 Upper thread tension dial
4 Face cover
5 Foot pressure lever
6 Thread guide for upper threading
7 Presser foot thumb screw
8 Presser foot
9 Drop feed lever
10 Shuttle cover
11 Spool pins (retractable)
12 Pattern selection dial
13 Reverse sewing lever
14 Zigzag width control
15 Stitch length dial
16 Needle position control
17 Free arm
18 Bobbin winding spindle
19 Bobbin winding stop
20 Handwheel
21 Stop motion knob
22 Power supply switch
23 Socket
24 Thread guide for upper threading
25 Handle
26 Presser foot lifter
27 Thread cutter
28 Needle plate
29 Feed dog
2. ACCESSORIES
Zigzag foot(on machine)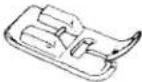 | Buttonhole cutter | ||
Buttonhole foot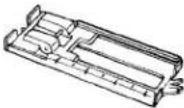 | Bobbins(3 pcs.)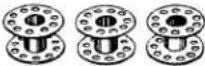 | ||
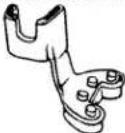 | Button sewingfoot |  Denim needle #16 (1 pc.) Denim needle #16 (1 pc.) Ordinary needles #14 (2 pcs.) Ordinary needles #14 (2 pcs.) Ball point needle (1 pc.) Ball point needle (1 pc.) Twin needle (1 pc.) Twin needle (1 pc.) | |
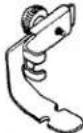 | Zipper foot | ||
Overcasting foot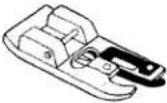 | Screw drivers (small)(large) (small)(large) | ||
^ilting guide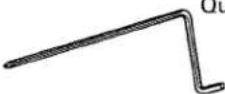 | Oiler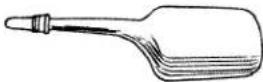 | ||
Darning foot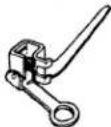 | 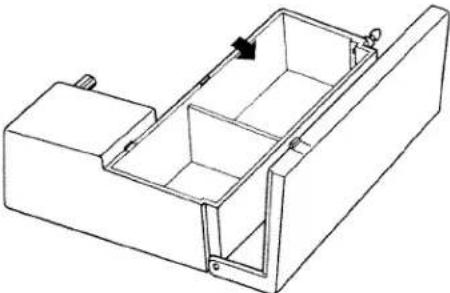 Accessories are stored in built-incompartment at front of extension table. Accessories are stored in built-incompartment at front of extension table. | ||
Blind hem guide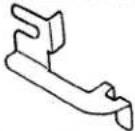 | |||
Cloth guide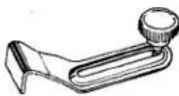 | |||
natural_image
Line drawing of a sewing machine needle stitching a rectangular block (no text or symbols)3. BEFORE SEWING
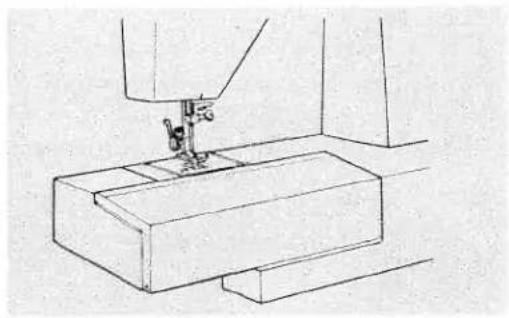
Machine is stored in flat-bed style which makes your work easier in ordinary sewing.
natural_image
Technical line drawing of a mechanical assembly with no visible text or symbolsDetaching Extension Table
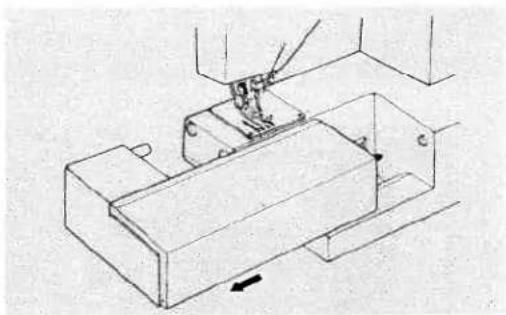
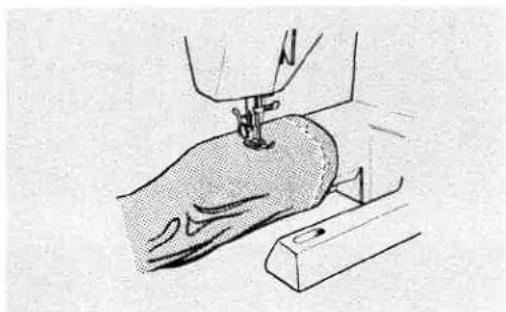
Slide it off and the machine is used as a free-arm model.
natural_image
Illustration of a sewing machine needle stitching fabric (no text or symbols visible)Free-arm is convenient to sew or embroider; trousers, sleeves, cuffs of T-shirts, blouses, etc.
Do vice-versa of above steps to attach extension table.
natural_image
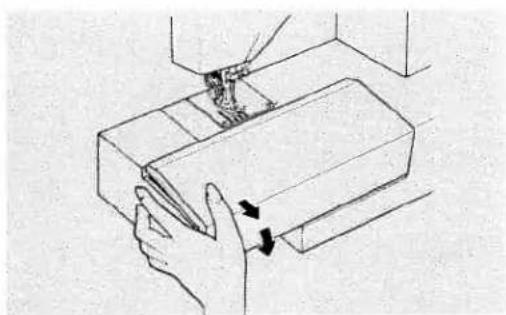
Illustration of a hand holding a rectangular object with arrows indicating movement or force (no text or symbols present)To open lid of accessory box, push it open, as illustrated.
Connecting Foot Controller and Power Cord
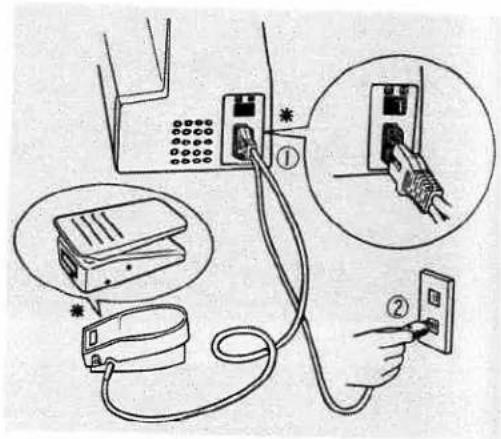
Connect foot controller and power cord ① ②.
Before plugging in your machine, be sure that voltage is same as that of your machine. (written on a plate at back of machine)
*Specifications vary from country to country.
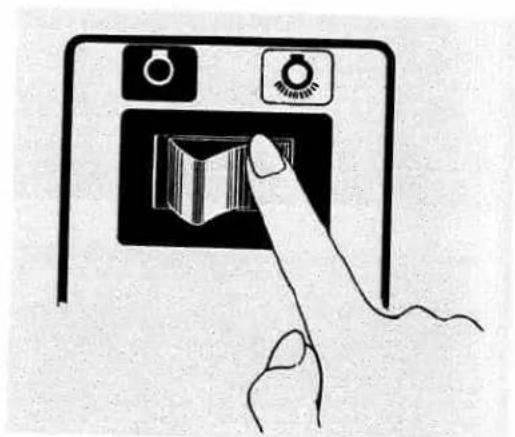
Switch on power to put on machine and turn on sewing light.
Always switch off or unplug machine when not in use.
The more you press foot controller, the faster the machine runs.
natural_image
Hand inserting a device into a control panel (no text or symbols visible)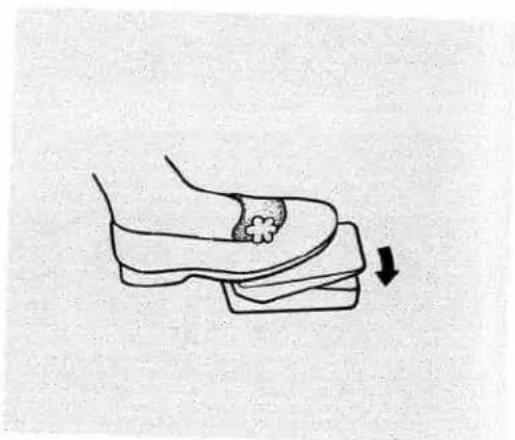
natural_image
Illustration of a hand pressing down on a small object with a flower, showing a downward arrow (no text or symbols)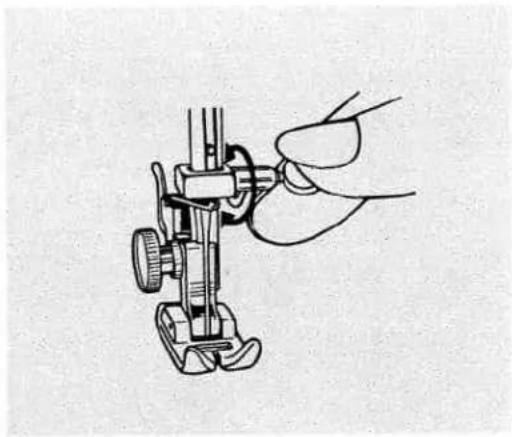
natural_image
Hand operating a sewing machine tool (no text or symbols visible)Changing Needle
Set needle in the highest position by turning handwheel towards you.
Loosen needle clamp screw and take out needle.
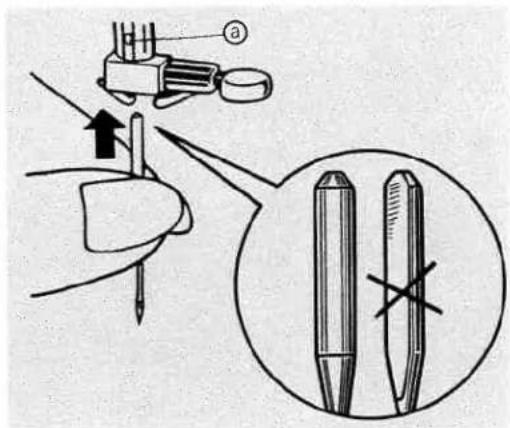
With flat face away from you, insert a new needle into groove of needle bar.
Push needle until it reaches stopper ⓐ and tighten needle clamp screw firmly.
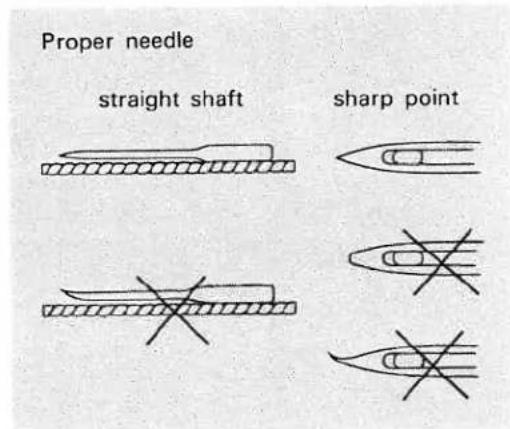
Always use a straight needle with a sharp point.
Using defective or worn needles not only causes stitch skipping, breakage of needles or snapping of thread; it also can damage hook and needle plate.
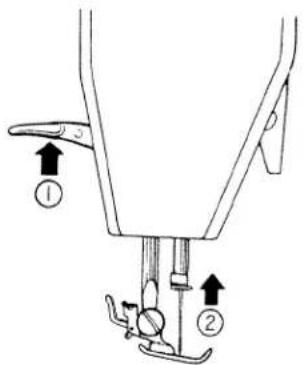
Changing Foot
Raise presser foot lifter ①.
Set needle in the highest position by turning handwheel towards you ②.
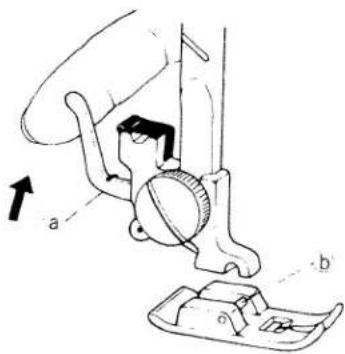
Snap-on Presser Foot:
Push the lever ⓐ in the arrow direction so that the presser foot will come off.
Position a new foot with the pin ⑥ right under the groove of the holder.
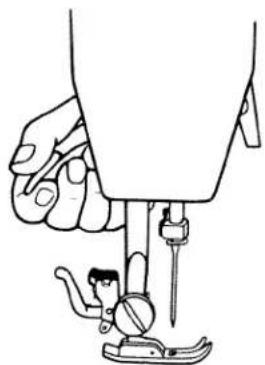
Lower the presser foot lifter so that the foot will be automatically snapped on.
natural_image
Line drawing of a hand using a sewing machine to adjust the base (no text or symbols)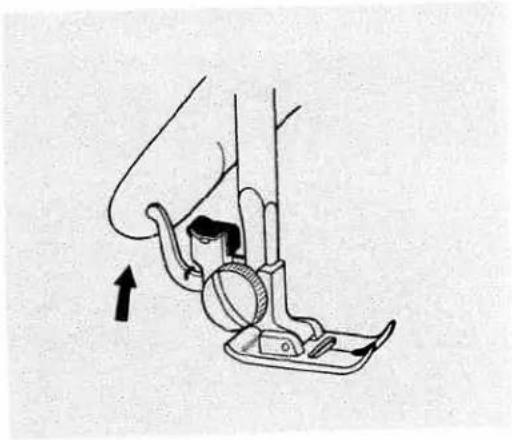
natural_image
Diagram of a foot pedal mechanism with an arrow indicating direction (no text or symbols present)When you fail to catch the foot, push the lever in the arrow direction slightly.
natural_image
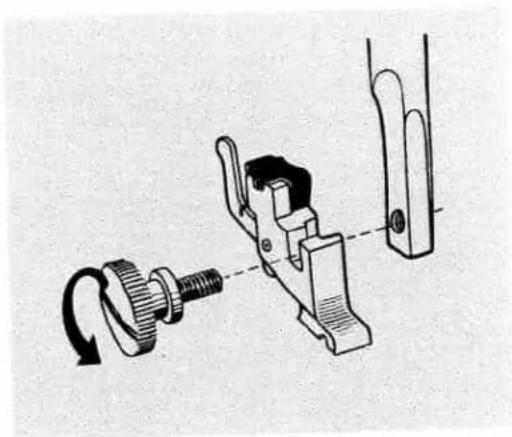
Mechanical assembly diagram showing a threaded fastener and clamping mechanism (no text or symbols)Screw-snap Presser Foot: Remove foot holder by loosening screw with screwdriver.
natural_image
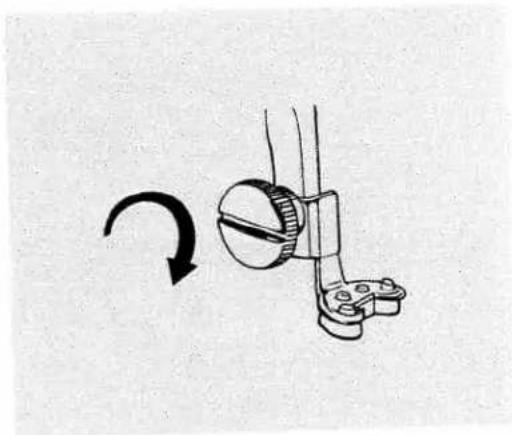
Diagram showing a mechanical component with a rotating arrow indicating rotation (no text or symbols present)Replace screw-snap type presser foot and tighten screw.
Bobbin Winding
Set needle in the highest position by turning handwheel towards you.
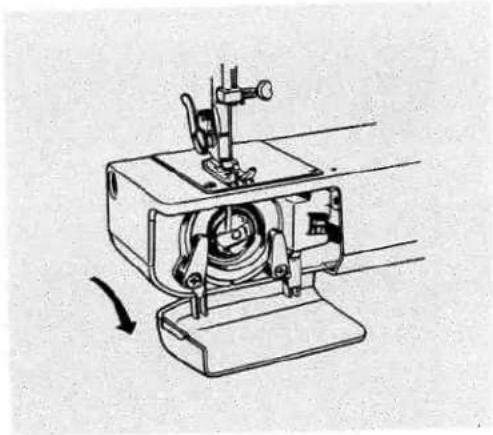
Open shuttle cover.
natural_image
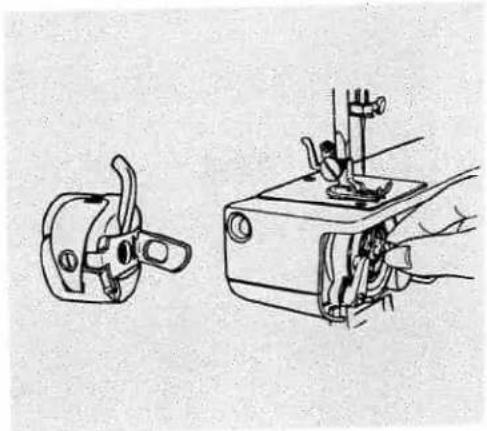
Technical line drawing of a sewing machine with a rotating base and adjustment knob (no text or symbols)Open latch of bobbin case and take it out.
natural_image
Technical line drawing of two mechanical components: a clamp-like device and a sewing machine (no text or symbols present)Close latch of bobbin case and bobbin comes out easily.
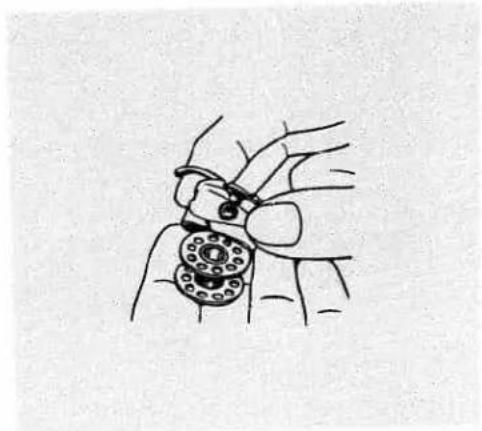
natural_image
Hand holding a mechanical component with a circular base and ring (no text or symbols visible)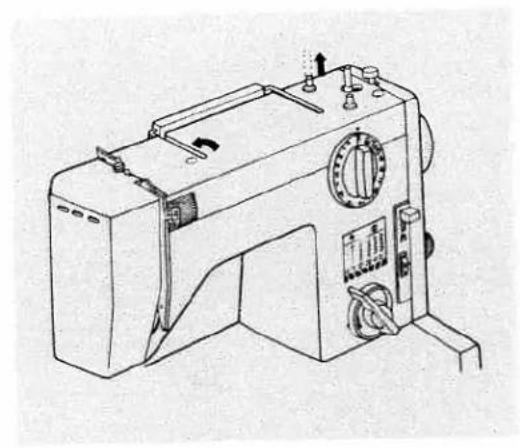
natural_image
Line drawing of a sewing machine with control panel and rotary knob (no text or symbols)Push back to fold handle. Pull out spool pin.
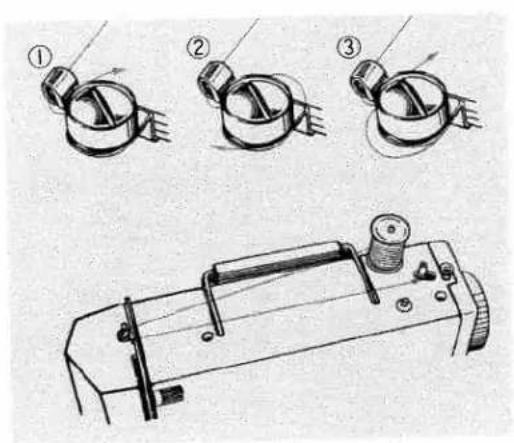
Put a spool on spool pin. Draw thread from spool pin through thread guide and pretension device, following numbers ① ② and ③.
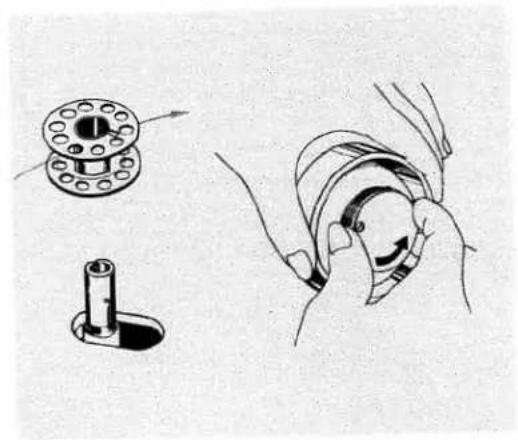
natural_image
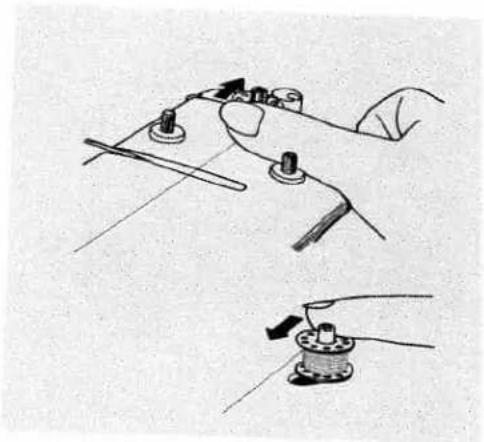
Illustration of mechanical components including a flange, a cylindrical shaft, and a rotating knob (no text or symbols)Wind thread clockwise around bobbin several times. Push bobbin on to spindle.
Holding handwheel with your left hand disengage handwheel by unscrewing stop motion knob.
Push bobbin to right and press down foot controller.
Machine stops automatically when winding is full.
Push bobbin to left.
natural_image
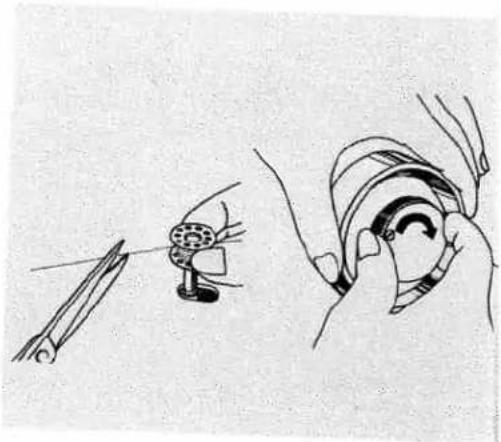
Illustration of two hand positions on a mechanical device, one holding a pin and the other a base with a knob (no text or symbols)Take off bobbin from spindle and cut thread.
Retighten stop motion knob.
natural_image
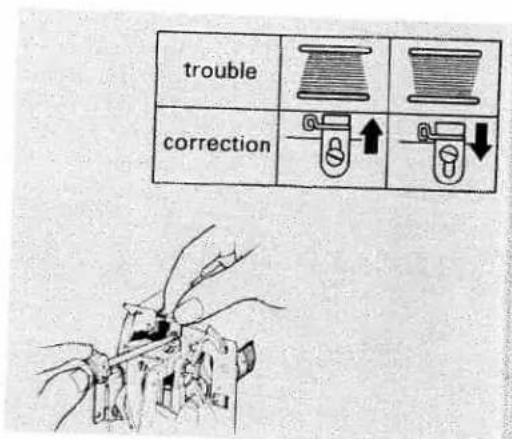
Illustration of a hand holding a small object with tweezers and a magnifying glass, no text or symbols presentIf bobbin is wound unevenly as shown, open face cover and loosen set-screw of the guide for bobbin winding, by using screw driver and adjust height.
natural_image
Diagram of a mechanical clamp or spring assembly with hands and a directional arrow (no text or labels)Inserting Bobbin
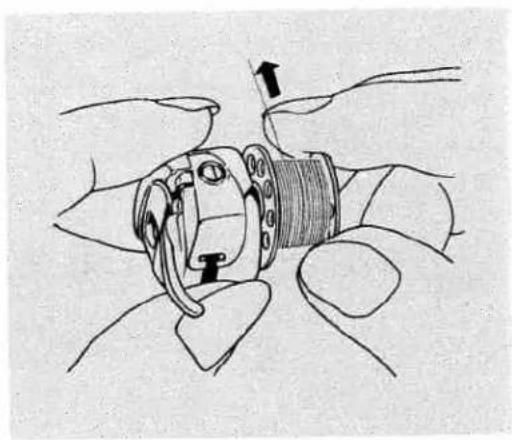
Place bobbin in its case with thread running in direction of arrow.
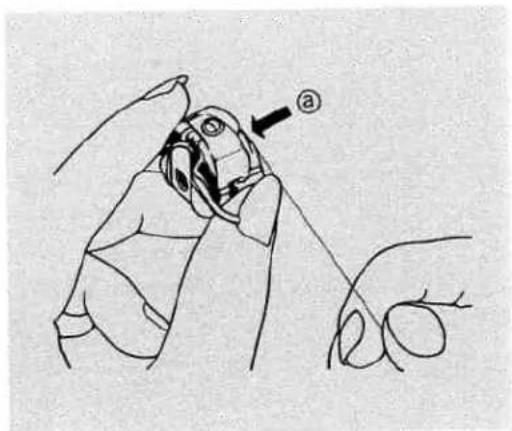
Guide thread into slot ⓐ of bobbin case.
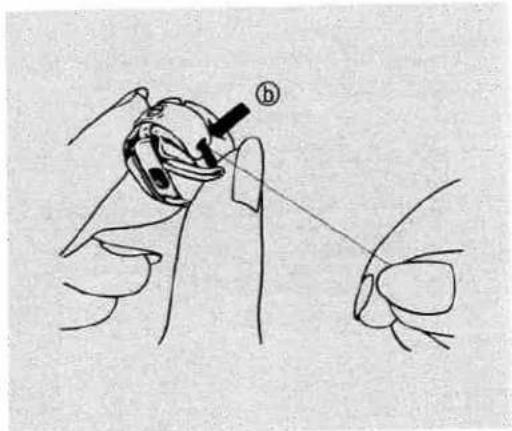
Pulling thread to left, bring it under tension spring then to delivery eye ⑥.
Adjusting Lower Tension
To test bobbin tension, hang and shake bobbin case as shown.
At proper tension bobbin case will gradually drop a small amount.
To adjust tension, turn adjusting screw with small screwdriver.
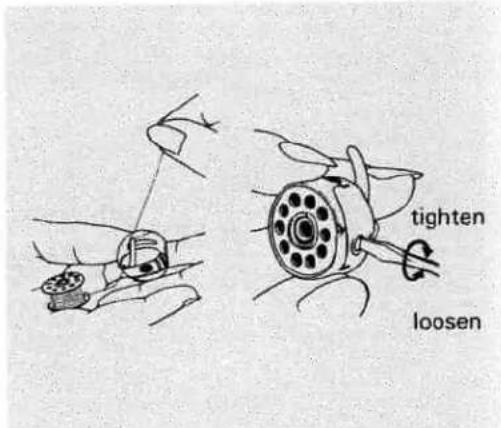
Raise needle in the highest position.
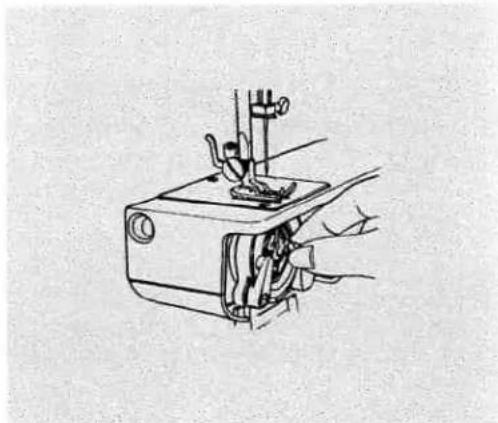
Leave end of thread of about 10 cm (4") from bobbin case.
Take hold of latch and push bobbin case into hook.
Release latch when bobbin case is fully inserted.
natural_image
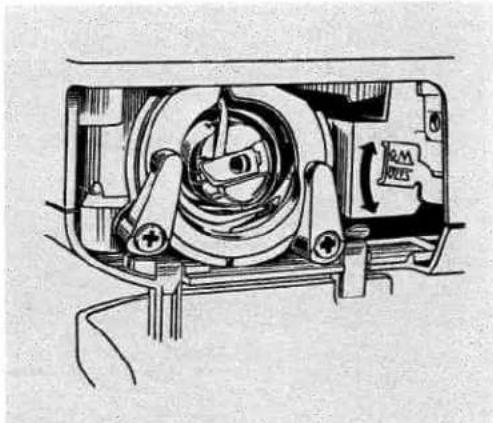
Line drawing of a sewing machine with hands operating it (no text or symbols)Drop Feed Lever
The lever is on right side of hook.
To lower feed dog, move lever down to ▲ position.
This position is for button sewing, darning and embroidery.
For normal sewing, move lever up to ▲▲ position.
natural_image
Technical line drawing of a mechanical assembly with no visible text or symbols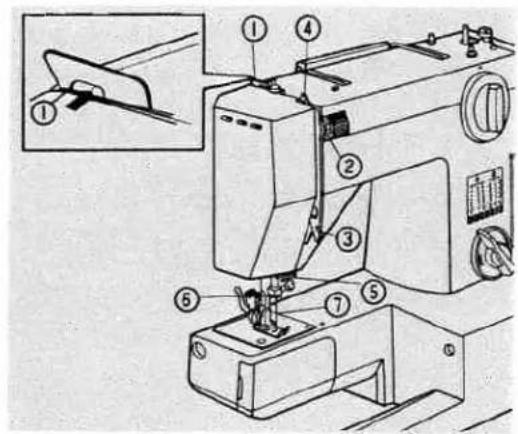
Threading Upper Thread
Raise presser foot lifter.
Raise take-up lever to the highest position by turning handwheel towards you.
Thread following numbers ①-⑦.
Pass thread through guide ①.
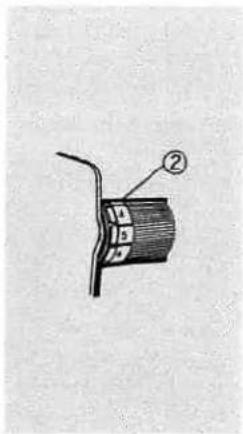
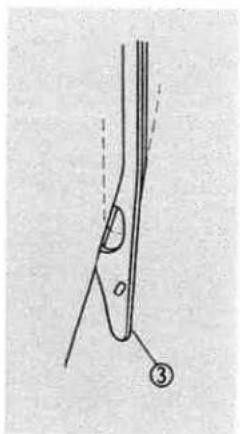
Lead thread either side of tension disc ②.
Hook it to guide ③ from down to upwards.
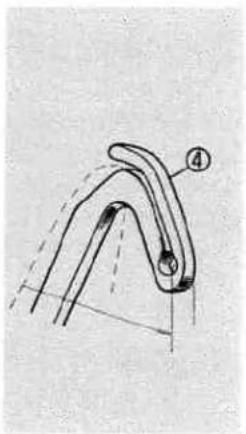
natural_image
Technical line drawing of a mechanical component with dashed lines indicating hidden edges (no text or symbols)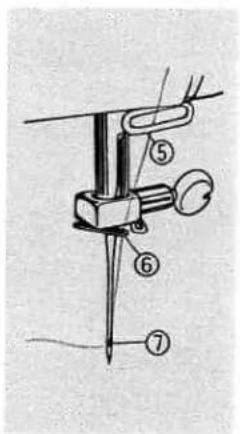
Thread take-up lever ④.
Pass thread to guide ⑤ from right to left, and guide ⑥ (left one) then needle eye ⑦.
Leave end of thread of about 15 cm (6'').
Twin Needle Threading
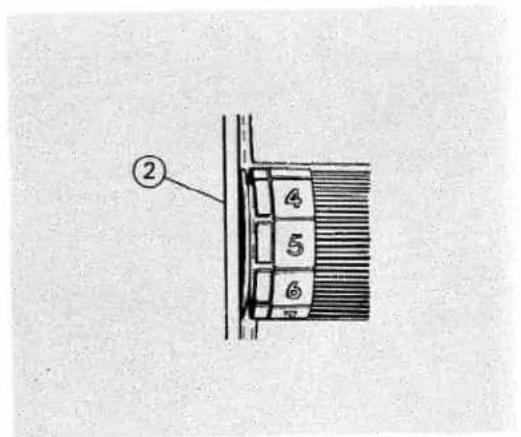
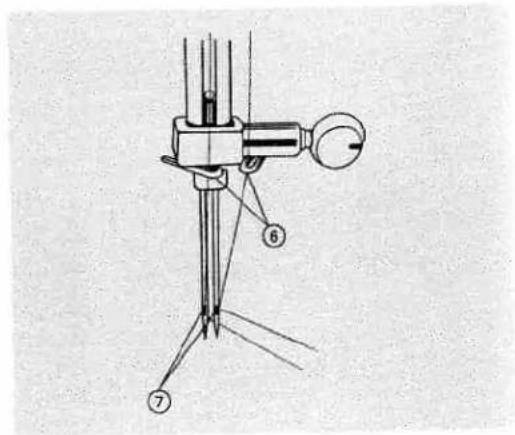
Thread in the same way as normal threading, except at points ②, ⑥ and ⑦.
At point ②, pass threads separately to right and left of tension disc.
At guide ⑥, pass one of threads to right guide and the other at left guide.
At point ⑦, thread from right guide should be lead to right needle eye, and from left guide to left needle eye.
Leave ends of threads of about 15 cm (6'').
Decorative Tucks or Designs
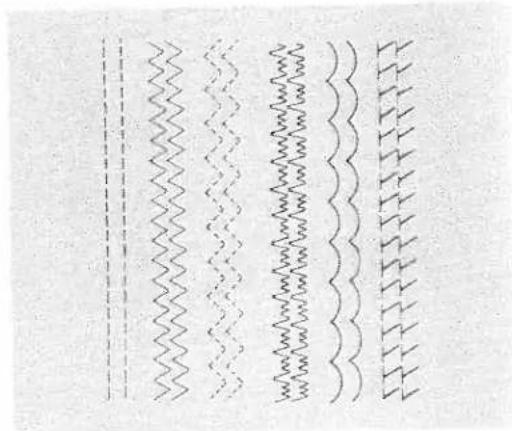
Any stitch can be used with the twin needle for decorative effects. Most attractive are the multiple stitch zigzag and blind hem stitch for fancy tucks. The satin stitch or tapered zigzag designs in two colors are effective for creative trims.
Caution: Remember to use no more than 2.5 zigzag width and needle position control at ●. for twin needle sewing.
natural_image
Pure electrical circuit lines without any symbols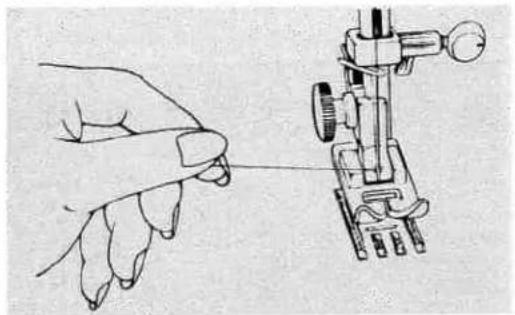
natural_image
Illustration of a hand holding a small object with a tool, next to a mechanical device (no text or symbols visible)Drawing Up Lower Thread
Hold end of upper thread with left hand.
Turn handwheel slowly towards you until needle moves down and up again.
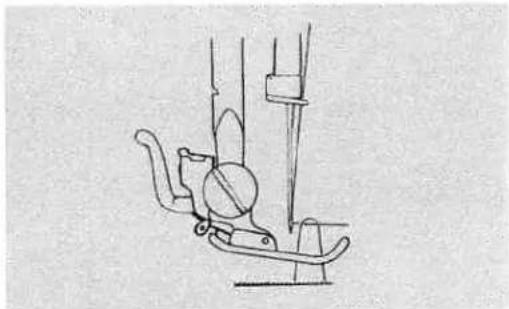
natural_image
Line drawing of a mechanical device with no visible text or symbolsPull upper thread slowly and lower thread will be brought up in a loop.
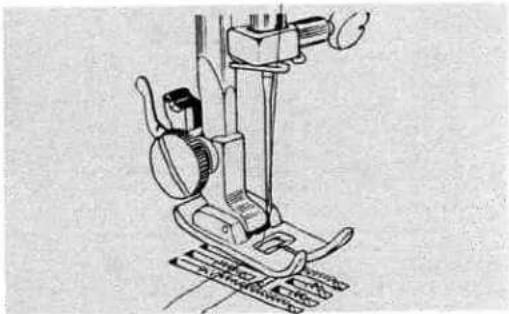
natural_image
Technical line drawing of a sewing machine (no text or symbols visible)Pull out both threads to about 15 cm (6") and place them together under presser foot on left.
natural_image
Hand holding a mechanical component with a pull-up arrow indicating rotation (no text or symbols)Foot Pressure
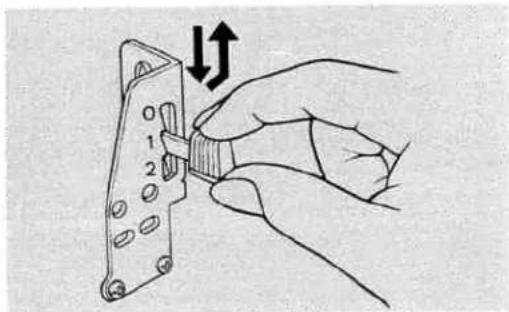
Adjust foot pressure with the lever inside the face cover.
O: for darning, etc.
1: for very elastic materials, thick fabrics, etc.
2: for normal sewing.
Fabric, Thread and Needle Table
| FABRIC | THREAD | NEEDLE | REMARKS | ||||
| European Cotton | Mercerized Cotton | Cotton Covered Polyester, Silk, Nylon | European 705 | U.S.Size 15x1 | Point Style | ||
| VERY SHEER; Lace, Voile, Chiffon, Net | 70 | 60 | Silk Nylon | 65-70 | 9 | Regular | Loosen upper tension one or two points |
| SHEER; Blouse Crepe, Lawn, Organdy, Taffeta | 50-70 | 60 | Silk Nylon | 65-70 | 9 | " | |
| LIGHT-WEIGHT; Crepe, Wool, Brocade, Velvet | 30 | 50 | Silk | 75-80 | 11 | " | |
| MEDIUM; Wool, Silk, Linen, Velvetten, Pique, Faille, Terrycloth | 30 | 50 | Silk | 80-90 | 11-14 | " | |
| HEAVY; Denim, Duck, Sailcloth | 30 | Heavy Duty | C.C.Poly. | 100 | 16 | " | |
| EXTRA HEAVY; Upholstery, Canvas, Awning | 30 | Heavy Duty | C.C.Poly. | 120 | 19 | " | |
| |KNITS| | |||||||
| LIGHT-WEIGHT; Tricot Power net | 50-70 | 60 | Silk Nylon | 70 | 9 | Light Ball | |
| MEDIUM-WEIGHT; Jersey, Double Knit, Power Net | 30 | 50 | Silk Nylon C.C.Poly. | 70-80 | 9-10 | Light to Medium Ball | |
| HEAVY-WEIGHT; Double knit, Power Net | 30 | 50 | Silk Nylon C.C.Poly. | 80-90 | 11-14 | Medium to Heavy Ball | |
| FAKE-FURS, VELOURS | 30 | Heavy Duty | C.C.Poly. | 90-100 | 14-16 | Ball or Sharp | |
| |LEATHER| | |||||||
| VINYLS FILMS | 30 | 50 | C.C.Poly. | 90 | 14 | Wedge | |
| LIGHT-TO-MEDIUM-WEIGHT | 30 | 50 | C.C.Poly. | 90-100 | 14-16 | Wedge | |
| HEAVY LEATHER | 30 | Heavy Duty | C.C.Poly. | 100-110 | 16-18 | Wedge | |
| |DECORATIVE TOUCHES| | |||||||
| TOP STITCHING | Silk twist | 100-110 | 16-18 | Regular | |||
| MACHINE EMBROIDERY | Size 50-70 | 65-80 | 9-11 | Regular | |||
Pattern Setting
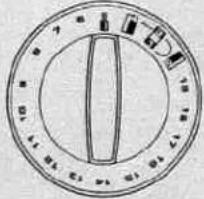 PATTERN SELECTOR PATTERN SELECTOR |  TWINNEEDLE TWINNEEDLE | PATTERNNAME | COLORCODE | ||
| 1-4 |  | BUTTONHOLE | ORANGE | ||
| 5 | 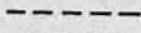 | STRAIGHT | WHITE | ||
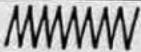 | ZIGZAG | WHITE | |||
| 6 | 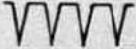 | BLIND HEM | WHITE | ||
| 7 | 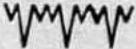 | STRETCHBLIND HEM | WHITE | ||
| 8 | 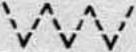 | MULTIPLEZIG ZAG | WHITE | ||
| 9 | 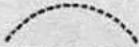 | SCALLOP | WHITE | ||
| 10 | 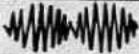 | PEARLDECORATIVE | WHITE | ||
| 11 | 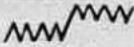 | CHECKER | WHITE | ||
| 12 |  | STRAIGHTSTRETCH | GREEN | ||
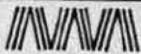 | RICK RACK | GREEN | |||
| 13 |  | DECORATIVE | GREEN | ||
| 14 | 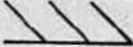 | ULTRASTRETCH | GREEN | ||
| 15 | 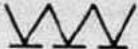 | OVERLOCK | GREEN | ||
| 16 | 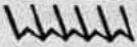 | OVERLOCK | GREEN | ||
| 17 | 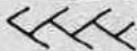 | BRIAR | GREEN | ||
| 18 | 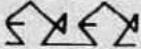 | FISH | GREEN | ||
| 19 | 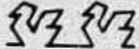 | SWAN | GREEN | ||
4. STRAIGHT SEWING
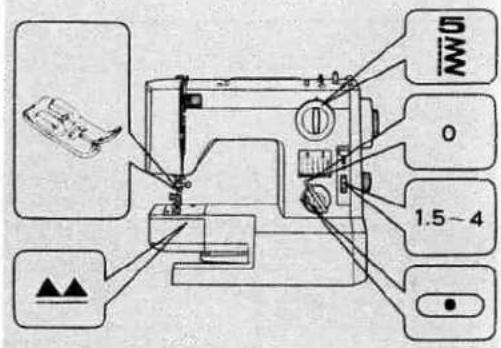
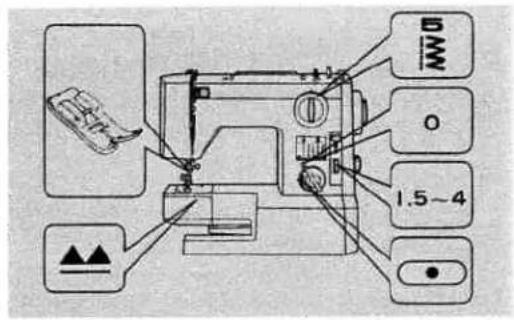
Set machine as shown.
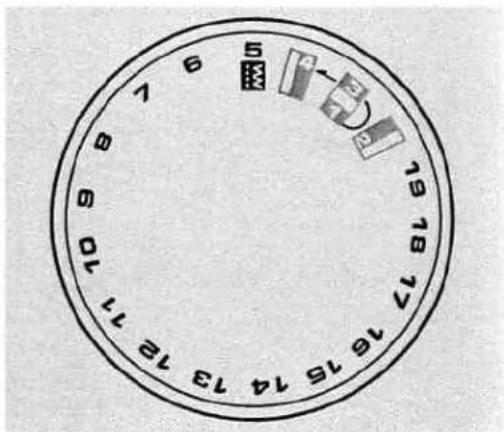
Pattern Selection Dial
Turn dial to choose pattern. Dial can be turned either to right or to left.
* Always make sure needle is in the highest position when operating dial.
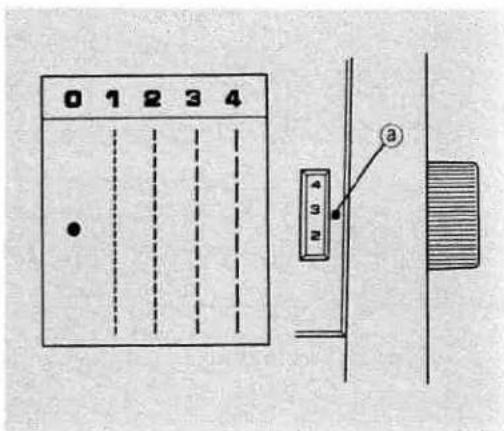
Stitch Length Dial
Set dial at indicating point ⓐ according to stitch size required.
For a longer stitch, turn dial downwards. For a shorter stitch, turn it upwards.
For normal sewing it is set between 2 and 3.
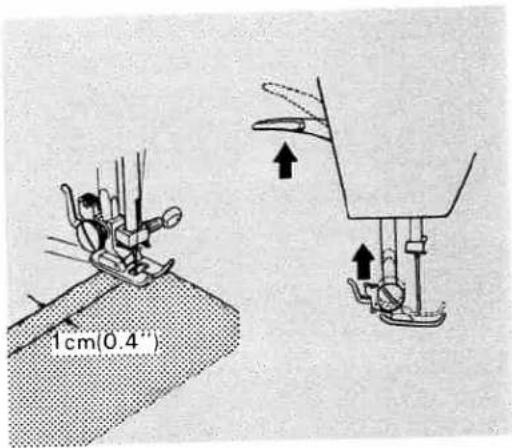
Place fabric under foot about 1 cm (0.4") inside the edge. Lower presser foot lifter.
Double Presser Foot Lifter
In order to obtain wider gap when using very thick materials, firmly push presser foot lifter up as far as it will go.
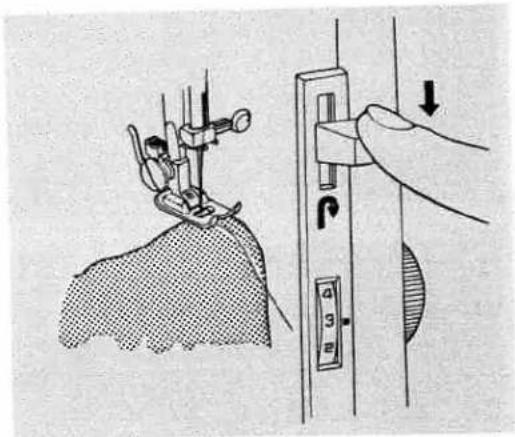
To reinforce seam, sew backwards to the edge of fabric by pushing down reverse sewing lever.
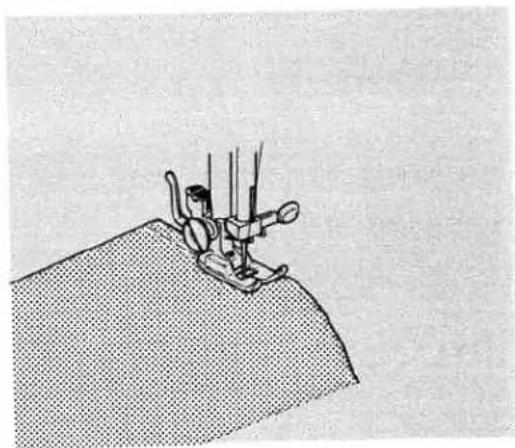
natural_image
Illustration of a sewing machine needle stitching fabric (no text or symbols)Release lever and commence forward sewing guiding fabric by hand as it is fed. Never pull material.
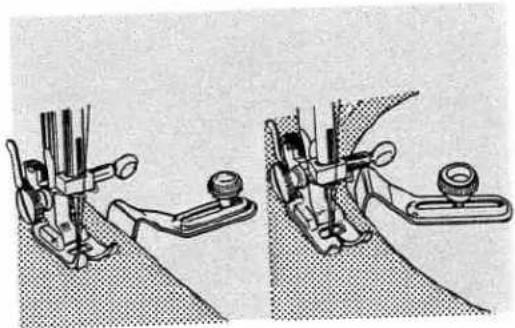
Cloth Guide
Use cloth guide when sewing a long seam of regular distance from edge of material.
Set guide in hole on arm, at right of needle plate, and adjust distance.
Run machine with edge of fabric touching guide.
Position cloth guide at an angle to sew a curved seam.
Sew reverse stitches for reinforcement at end of seam.
Draw fabric to left when sewing is finished.
natural_image
Technical illustration of two sewing machine stitching techniques (no text or symbols)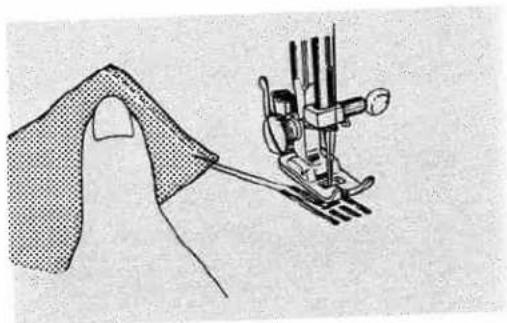
natural_image
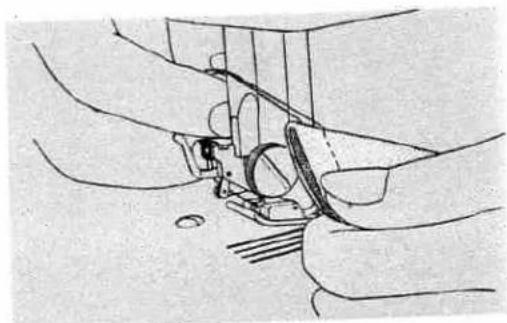
Illustration of a sewing machine needle stitching fabric, showing the blade and foot (no text or symbols)Cut threads with thread cutter behind presser bar.
natural_image
Line drawing of a sewing machine needle stitching fabric (no text or symbols)Adjusting Thread Tension
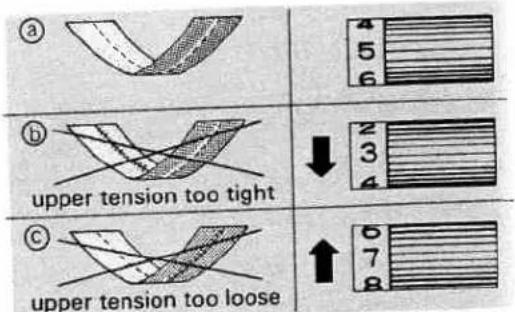
Test stitch performance on a scrap of material you are going to use.
With correct tension (a), upper and lower threads tension is equal and strong enough to lock both threads in center.
If upper tension is too tight (loose), upper (lower) thread lies straight along upper (lower) surface of fabric (b). Correct by turning tension dial.
natural_image
Diagram of a folded garment or fabric piece with a shaded triangular section (no text or symbols)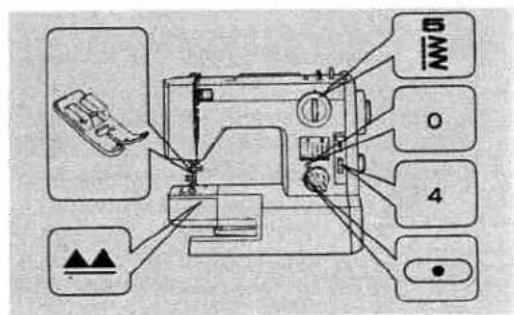
natural_image
Pure geometric line drawing of a zigzag edge with dashed fill (no text or symbols)Applications of Straight Stitch
A. Seams
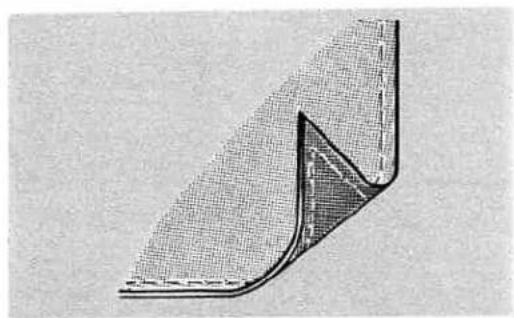
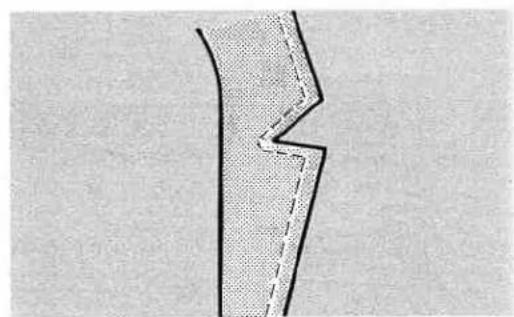
The normal stitch length for most fabrics is 3, but the length chosen should depend on the fabric and area of usage. Usually, heavier fabrics require longer stitches, and lighter weight fabrics require shorter stitches. For curved seams and bias cut areas use a shorter stitch length to add strength and elasticity to the seam.
B. Basting/Topstitching
Sewing a seam with a longer stitch is useful for temporary seams prior to fitting. Basting stitches also may be used when gathering in fullness. Topstitching can be done very effectively with the long straight stitch. For a bolder stitch, two threads of the same type can be threaded through one needle (size 14 or 16). A heavier thread such as buttonhole twist may be used for topstitching, but be sure to use a larger needle (size 16 or 18). Basting instructions in glossary.
5. ZIGZAG SEWING
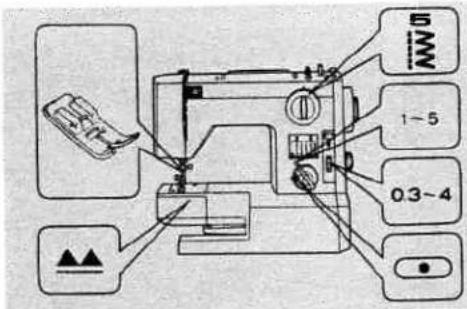
Set machine as shown.
To prevent seam ends unravelling, set machine for straight stitch and sew in reverse at beginning and ending of seam.
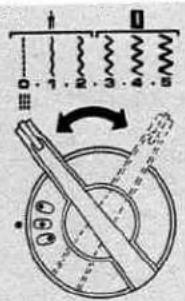
Zigzag Width Control
Set control at required number. Larger the number, wider the stitch.
Set it at 0 for straight sewing.
Make sure needle is in upper position when you set control.
Needle Position Control
Needle position can be changed by turning needle position control.
When selecting position, make sure needle is in upper position to avoid tearing material or bending needle.
| Position | Straight stitch | Zigzag stitch(width 2.5) | ||
| Left position:button sewing,etc. | ||||
| Middle position:straight stitch,buttonholes,etc. | ||||
| Right position:overlock,etc. | ||||
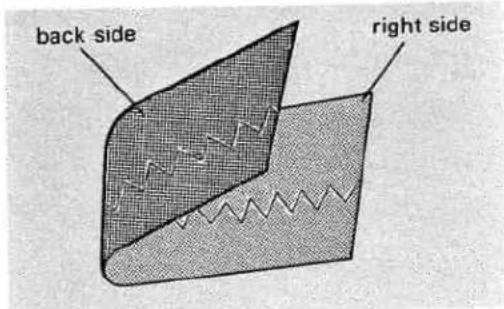
Thread Tension for Zigzag Stitch
Better-looking zigzag stitching requires less upper tension than straight stitching.
Loosen upper tension slightly.
6.MAKING BUTTONHOLES
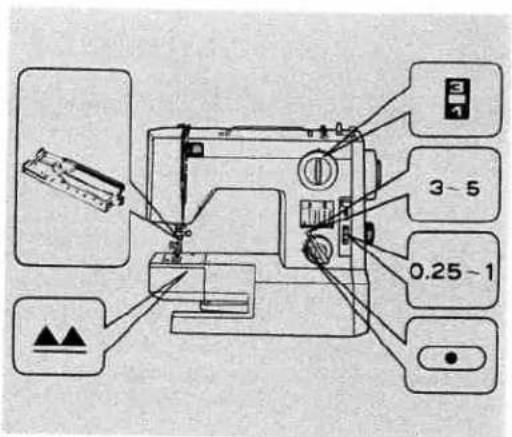
Set machine as shown.
Determine Length
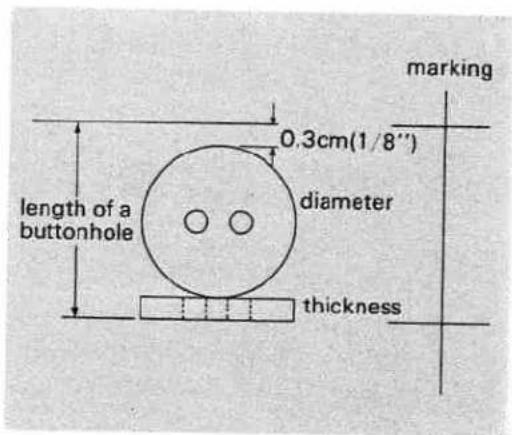
Measure diameter and thickness of button and add 0.3cm (1/8") for bar tacks.
Mark buttonhole size on material.
Determine Width
Determine width according to diameter of button, its thickness, and kind of material.
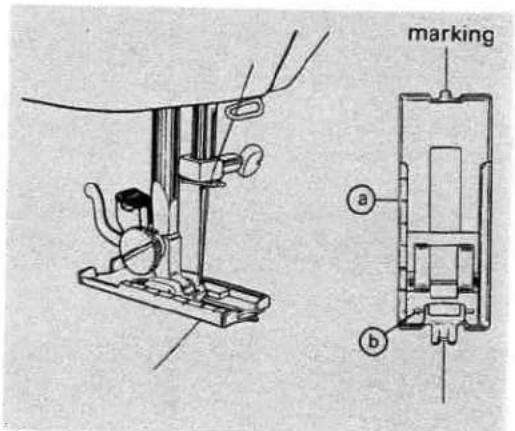
Attach buttonhole foot.
Completely push back sliding part
a of buttonhole foot.
Place material under foot so that marking of buttonhole passes through center of foot and arrow
⑥ of foot indicates beginning line of marking.
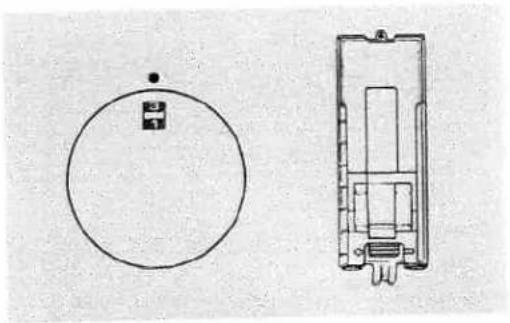
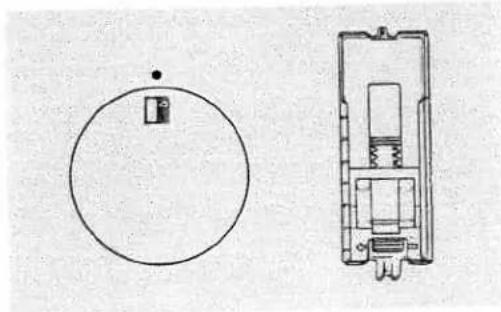
Bar tacking: Set pattern selection dial to 1 ( ) and sew 5-6 stitches.
natural_image
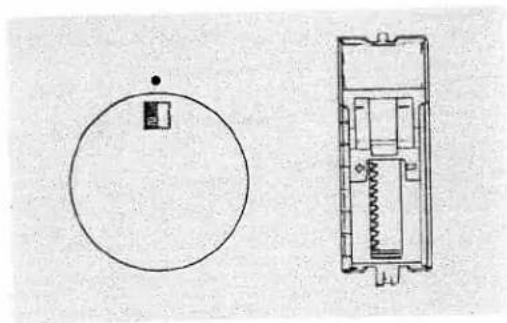
Technical line drawing of a circular component and its internal structure (no text or symbols)Left side: Change pattern to 2 (☐). Sew left side from front to back until it reaches end line.
Remember the point where arrow shows so that it is not necessary to mark end lines for all buttonholes.
natural_image
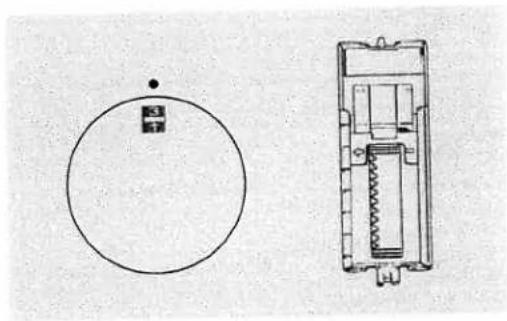
Technical line drawing of a circular component and its internal mechanical assembly (no text or symbols)Bar tacking: Change pattern to 3 (☐) and sew 5-6 stitches.
natural_image
Technical line drawing of a circular component and its internal structure (no text or symbols)Right side: Change pattern to 4 (☐) and sew right side until it catches first bar tack.
Quick finish: To prevent unstitching, set zigzag width at 0 and proceed for a few stitches.
natural_image
Technical line drawing showing a circular component with a small inset and its cross-sectional view (no text or symbols)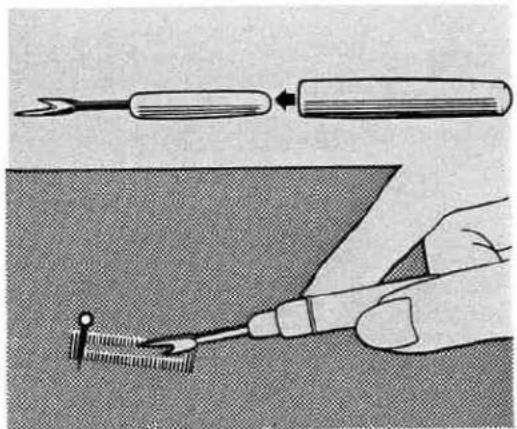
natural_image
Illustration of a hand using a tool to draw or mark a small object, with no visible text or symbols.Cutting Buttonholes
Stick a needle through bar tacks to prevent over-cutting.
Cut buttonhole along center with buttonhole cutter.
natural_image
Pure technical line drawing of a mechanical component without any text, numbers, or symbolsCorded Buttonholes
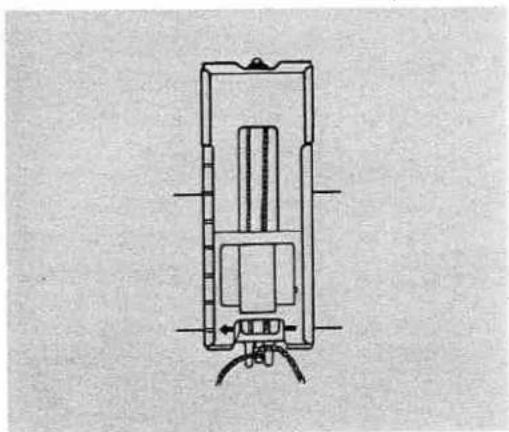
For stretch fabrics such as knits, a corded buttonhole is effective to keep finished buttonhole in shape.
Hook filler cord on top spur and lead ends of cord under foot, pull taut, and hook them to bottom notches as shown.
Proceed with stitching as for regular buttonholes.
natural_image
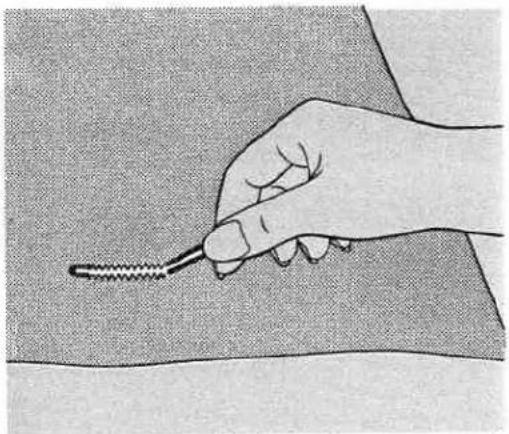
Hand holding a pen tip with a small object inside, against a textured background (no text or symbols)When buttonhole is completed, pull filler cord ends so that loop on the other end disappears into buttonhole stitching.
Thread ends of cord to reverse side and tie, or cut both ends of cord.
7. SEWING ON BUTTONS
Set machine as shown.
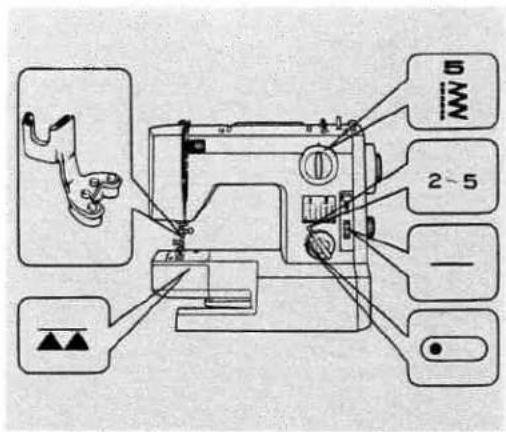
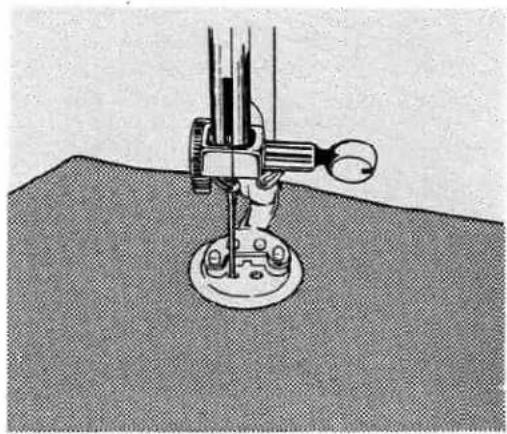
Position a button and material under foot. When needle comes to left side of stitch, lower foot. Raise needle and adjust zigzag width so that needle comes to right hole of button.
Run machine at medium speed and sew 5-6 zigzag stitches.
natural_image
Mechanical sewing machine needle stitching a textured surface (no text or symbols visible)Stop machine when needle is in upper position.
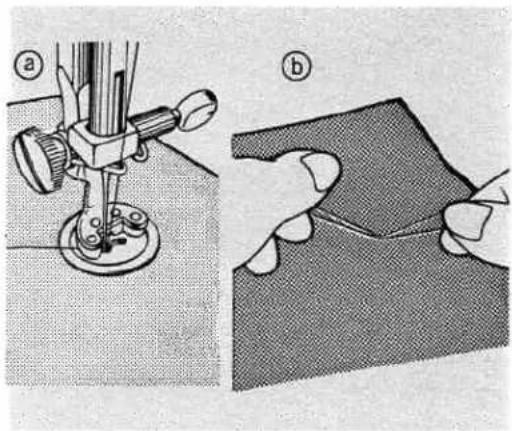
① Set zigzag width control to 0 and sew 3-4 stitches to prevent unstitching.
OR
⑥ Draw out work and cut off threads.
Draw thread ends through to wrong side and tie a knot.
natural_image
Two-step diagram showing a sewing machine and fabric being sewn into a piece (no text or symbols present)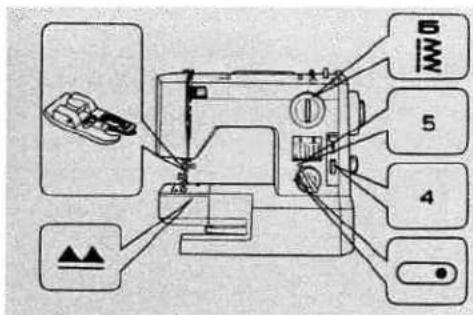
8. OVERCASTING
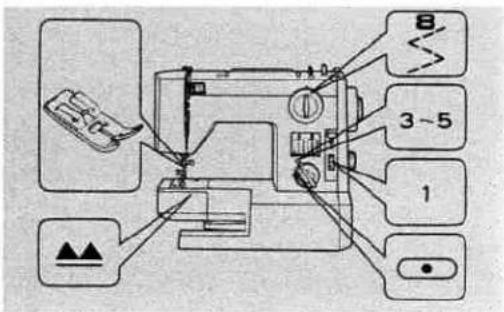
For light weight material:
Set machine as shown.
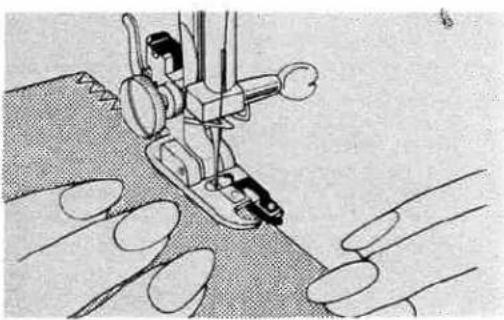
Overcasting prevents edge of fabric from fraying and produces neat finish.
natural_image
Illustration of a sewing machine needle stitching on fabric, with no visible text or symbolsSew carefully, guiding right edge of fabric along cloth guide of foot.
For thick and elastic material:
Set machine as shown.
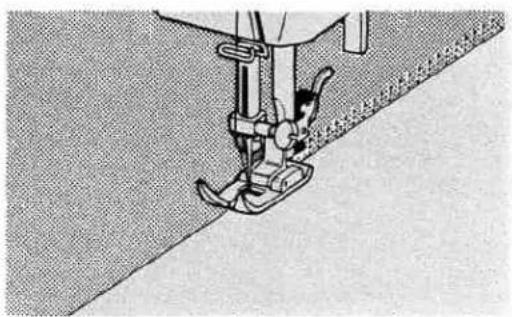
Use ball point needle to get better stitch performance.
natural_image
Illustration of a sewing machine needle stitching fabric (no text or symbols visible)Sew carefully so that all stitches on right side are flush with edge of fabric.
9. OVERLOCKING
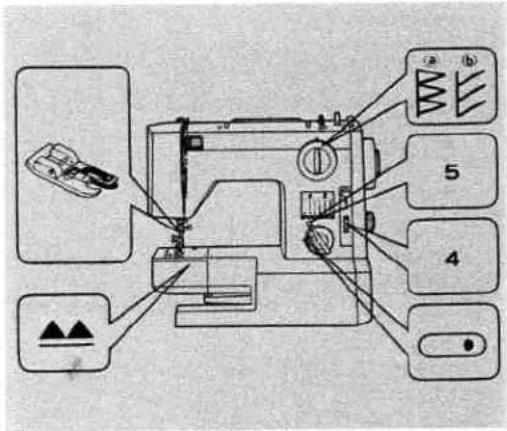
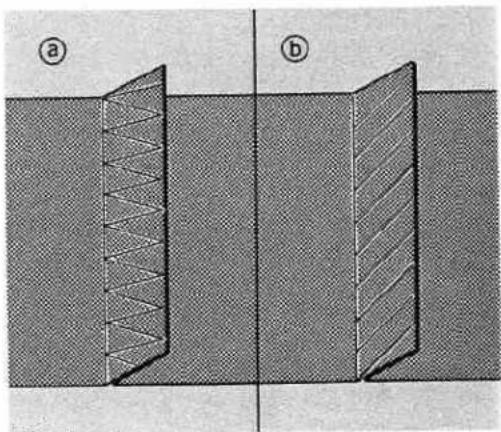
Overlocking stitches make it possible to sew and overcast seams at the same time.
Set machine as shown.
① For medium, thin material
⑥ For medium, thick material
Put two pieces of cloth together with right sides facing and sew.
To prevent edges from fraying, sew so that right side stitches drop outside the edge of material.
In some cases overlocking stitches can be used for overcasting.
natural_image
Diagram showing two cross-sectional views (a and b) of a layered material or structure with hatched patterns, no text or symbols present.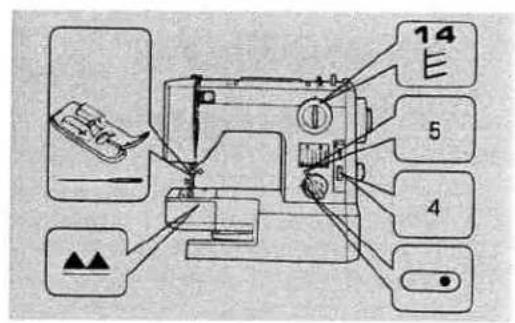
natural_image
Diagram showing two mechanical fasteners or fasteners inserted into a textured surface, with no visible text or symbols.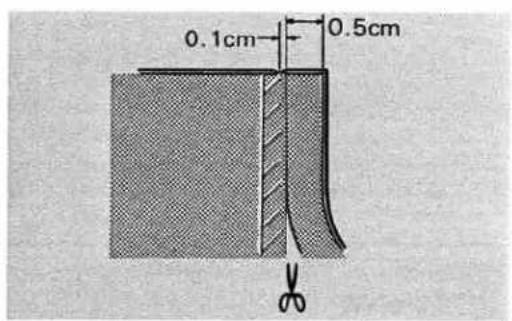
natural_image
Geometric diagram of a curved shaded region with grid lines, no text or symbols presentApplication of Ultra Stretch Stitch

A. Seaming
On most knits, a 3/16 inch finished seam, such as stitch and overcast or the overlock stitch, is more desirable than a 5/8 inch opened seam allowance. These stitches can create a neater, more professional finish, eliminate bulky seams prevent curling, permit the garment to "give" under stress, and at the same time they cut down on the amount of work involved in making a garment. If ever in doubt as to which of the two stitches to use, test both on the particular fabric in question and choose according to their performance.
The stitch and overcast stitch is excellent for stretch fabrics such as sweater knits, bathing suit knits, and cotton knits. It has the greatest strength and elasticity of all.
For patterns with 3/16 inch seam allowances: Feed the fabric such that the needle goes over the raw edge of the fabric when it swings to the right.
For patterns with 5/8 inch seam allowances: Feed the raw edge of the fabric along the etched guide line "1/2", then trim away the excess fabric close to the stitching.
B. Procedure:
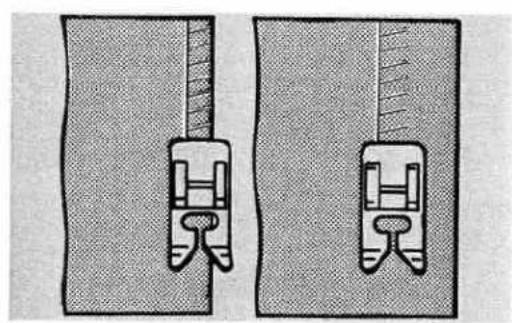
• Overlock stitching is used for seaming and finishing the cut edge of knit fabrics, all in one operation.
- This overlock stitch is especially good for stretch fabrics such as double knit and jersey and will give a firm, neat edge finish.
Application of Rick-Rack
111111
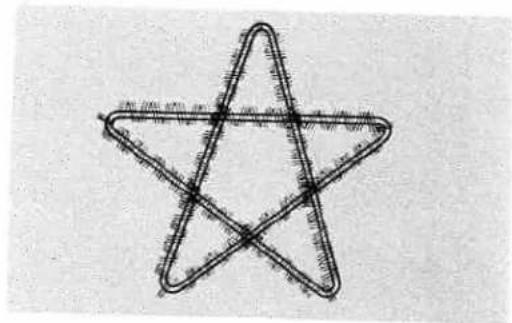
A. Topstitching/Rick-Rack
A decorative topstitch can be produced with the rick-rack stitch. Stitch around the structural lines of the garment for a special effect. Topstitch braid or a decorative inset to add an additional creative flair.
natural_image
Hand-drawn five-pointed star outline with intersecting diagonals (no text or symbols)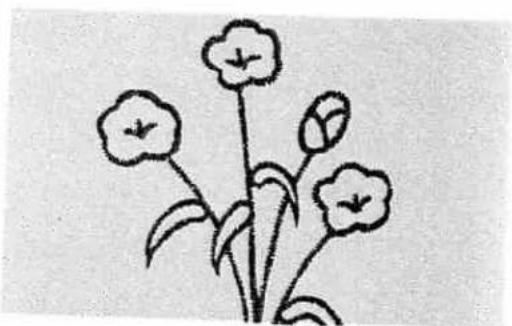
natural_image
Simple line drawing of a flowering plant with three blooms and leaves (no text or symbols)B. Tapering/Rick-Rack
The rick-rack stitch may be tapered to form creative stems and petals of flowers, embroidered pictures and wall hangings. As in tapering the zigzag, slowly turn the stitch width lever from 0 to 5 and back to 0. A group of these tapered rick-rack stitch will form a bouquet-like effect.
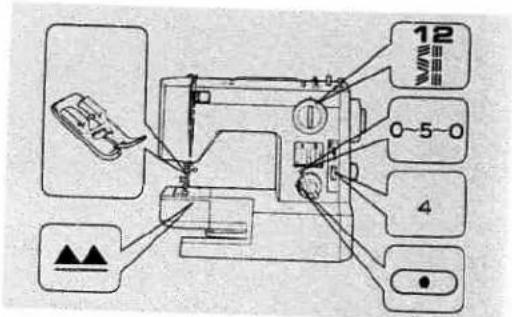
C. Procedure:
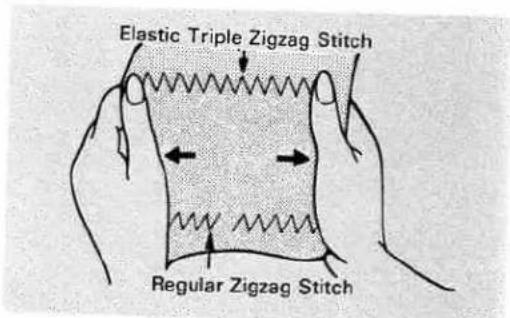
•The elastic rick-rack stitch is a zigzag line of stitching that is desired so that seams may be pressed open.
- Apply this stitch to areas of stress on both wovens and knits.
- Use narrow width of zigzag as a heavy duty triple stitch for seams.
- Use medium and wide widths of zigzag for overcasting edges of seams, facings and hems of heavier weight fabrics such as terrycloth, and for attaching elastic. Use also for decorative stitching.
•Guide your fabric from the front. Do not pull or push as it will cause poor stitching.
natural_image
Abstract geometric pattern with zigzag lines and a shaded corner (no text or symbols)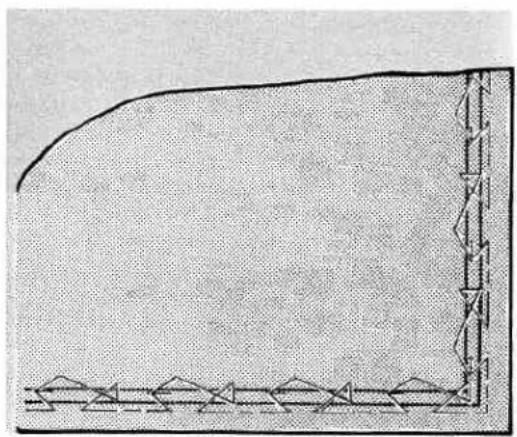
natural_image
Diagram showing a curved boundary with triangular supports and a vertical line, no text or symbols present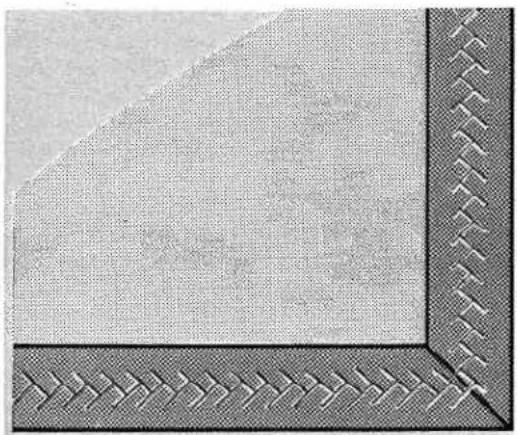
natural_image
Close-up of a textured fabric corner with diagonal seam pattern (no text or symbols)Application of Decorative Fun Patterns

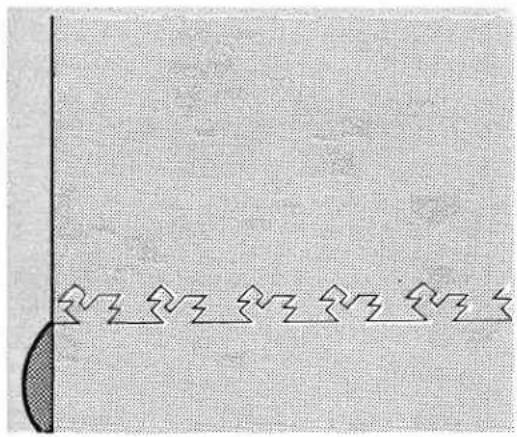
A. Fun stitches-Swan-Fish-Briar
The reverse stitch patterns produce swan, fish, briar designs for use on household linens and children clothes. These reverse stitch pattern can be used to sew in hems as the scallop stitch. The reverse stitch patterns can also be used for topstitching bindings and ribbons for decorative effect. This is done in the same manner that lace is applied with the zigzag stitch. The straight stitched edge of the reverse stitch patterns on the left should be sewn on the left edge of the binding or ribbon. This decorative effect can be used on towels and placemats for a pleasant appearance. The reverse stitch patterns can also be corded for stronger decorative edges on placemats and tablecloths. Simply place four strands of pearl cotton, embroidery floss or yarn under the presser foot. A transparent foot will help guide the cord evenly while sewing the reverse stitch patterns. The reverse stitch patterns can be sewn with two threads through one needle for a more effective decorative stitch. Simply thread two sewing threads through the upper threading system. A larger needle should be used to accommodate the two threads. Use this decorative technique for enhancing tablecloths, placemats, napkins, and curtains.
NOTE: Narrow patterns may be made by setting zigzag width to 4-3-2.
10. BLIND HEM STITCH
Set machine as shown.
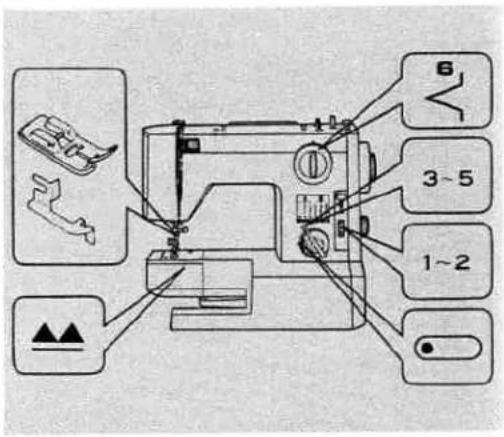
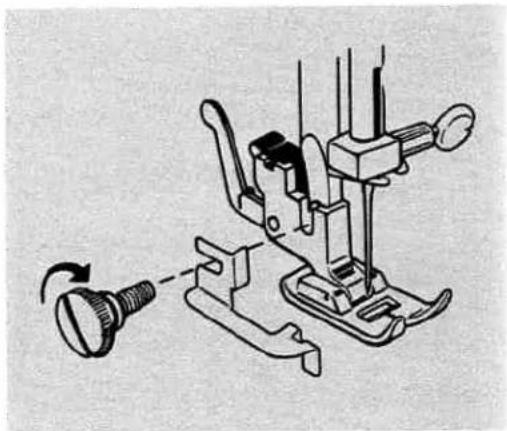
Loosen presser foot thumb screw and attach blind hem guide.
Tighten screw.
natural_image
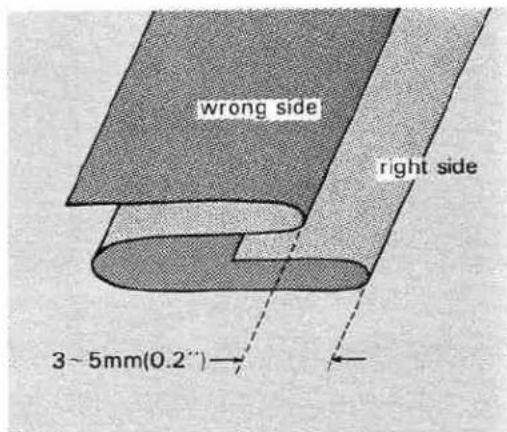
Mechanical assembly diagram showing a tool interacting with a component, no text or symbols presentFold material as shown and place it under foot.
For a neater finish, it is preferable to baste or iron hem beforehand.
natural_image
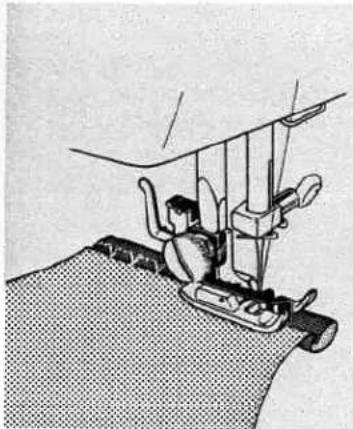
Line drawing of a sewing machine needle stitching fabric (no text or symbols)Sew carefully, guiding fold against guide so that straight stitches are made on hem edge, and slanting stitches pierce only one or two threads of fold.
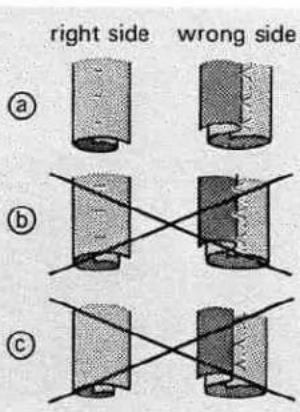
a Correct seam.
(b) Needle is catching edge of fold too much.
© Needle is not catching edge of fold at all.
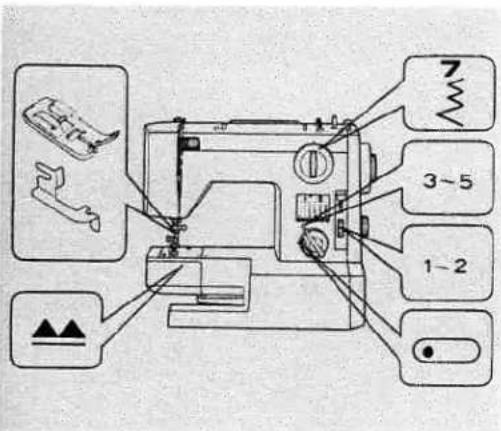
Elastic Blind Hem Stitch
For elastic materials, set machine as shown and sew in the same way as for normal blind hem stitch.
11. STRETCH SEAMS
A ball-point needle is essential. Paper may be laid under knits for smoother feeding.
① Medium-weight fabrics double knit, jersey.
Apply elastic triple stitch.
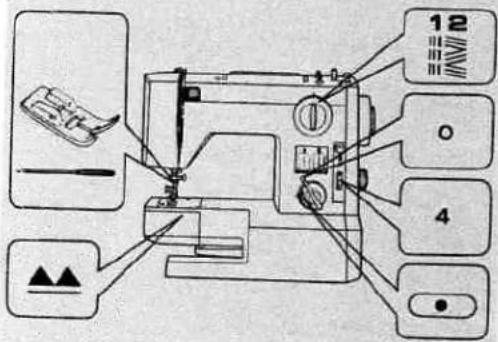
⑥ Light-weight fabrics Apply small zigzag. Reduce upper and lower thread tension.
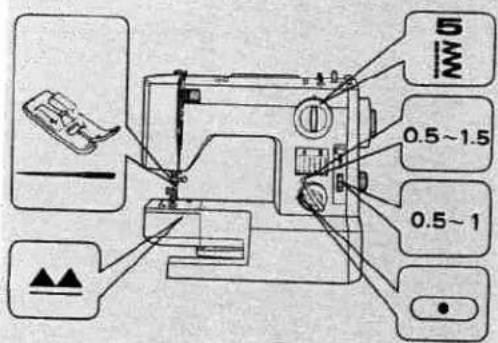
© For Very elastic fabrics spandex (power net)
Use lapped or abutted seam. Apply multiple zigzag.
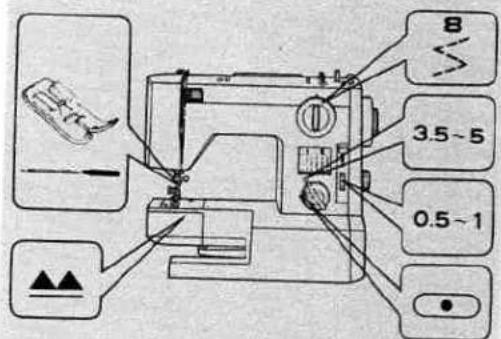
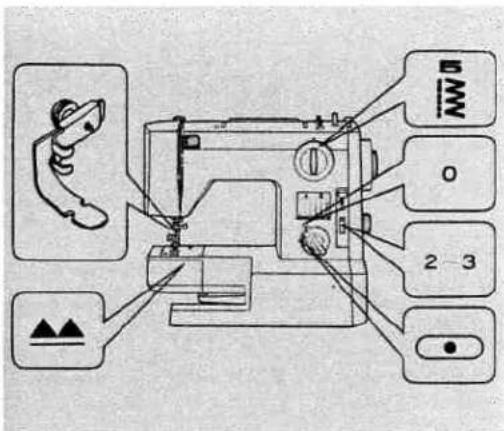
12. ZIPPER SEWING
Set machine as shown.
By using special zipper foot with sliding adjuster, zipper sewing can be easily done without turning fabric.
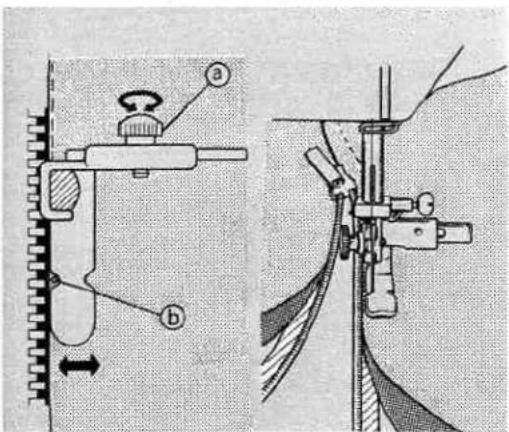
Loosen screw ⓐ and set foot so that needle comes into position ⓑ. Tighten screw.
Sew right side of zipper guiding fabric carefully so that right side teeth of zipper are parallel with left edge of foot.
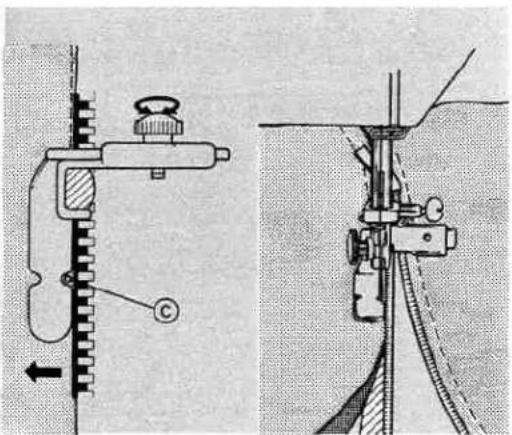
natural_image
Technical diagram showing mechanical assembly with tool and component views (no text or labels)Re-set foot so that needle comes into position ©.
Sew left side of zipper in the same way.
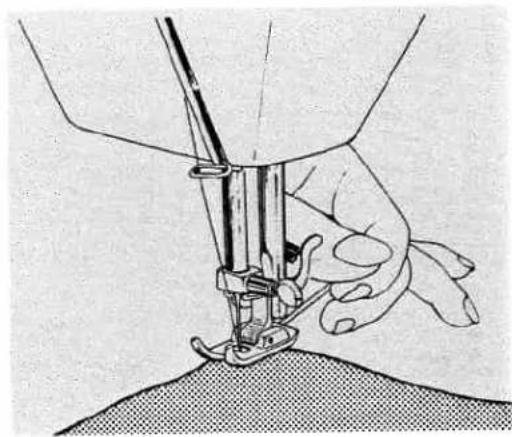
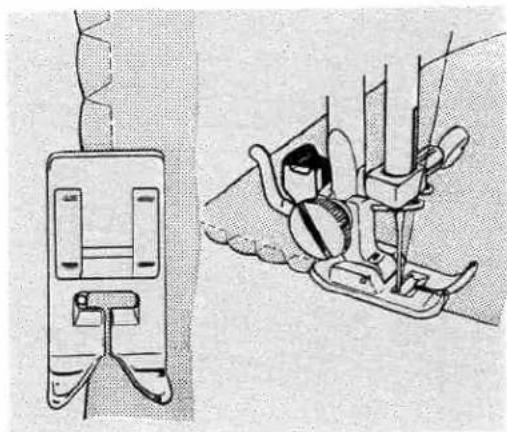
13. SHELL STITCHING
Silk, nylon organdy or similar sheer fabrics are suitable.
Set machine as shown.
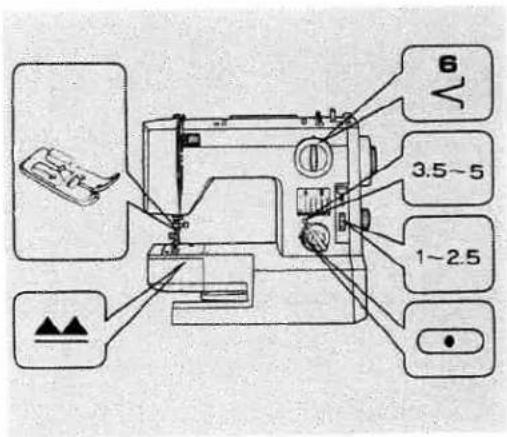
Fold edge of material. With folded edge to left, place it under presser foot.
Pull thread ends towards back when starting sewing.
natural_image
Illustration of a hand operating a sewing machine needle over fabric (no text or symbols visible)Make sure needle misses raw edge of fold when it moves side ways.
natural_image
Technical line drawing of a sewing machine with front and side views (no text or symbols)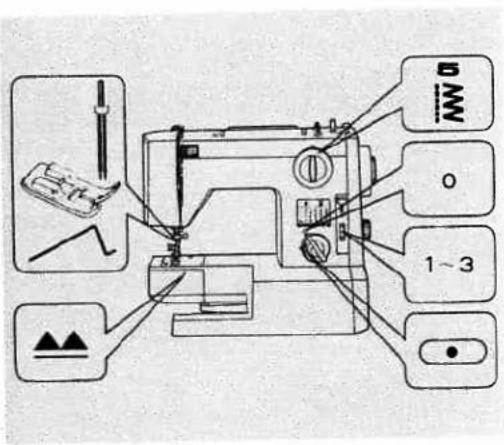
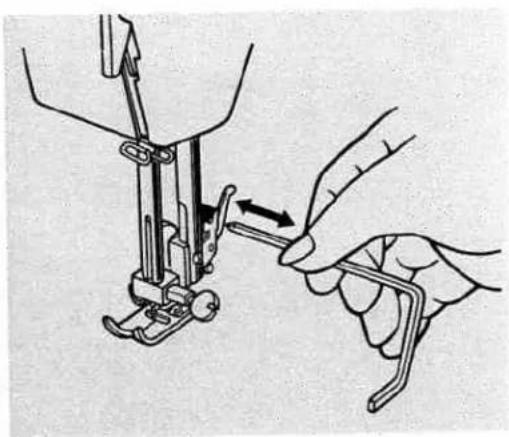
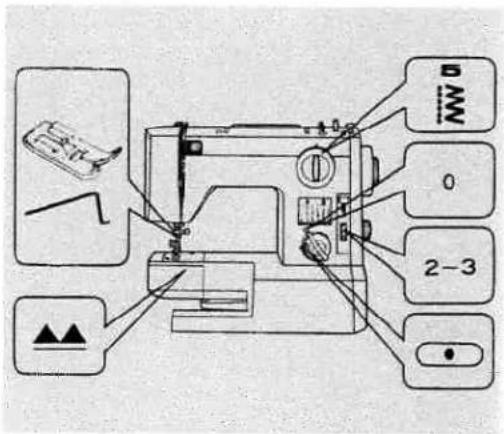
14. PIN TUCKING
Set machine as shown.
For better appearance, use sheer material and tighten lower thread a little.
For twin needle threading see p. 15.
natural_image
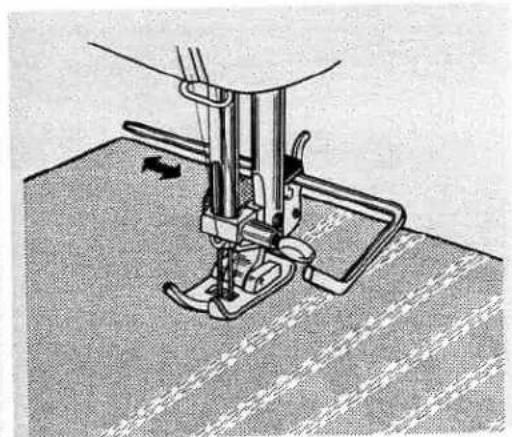
Illustration of a hand using a sewing machine to adjust a piece of hair (no text or symbols present)Insert the quilting guide under the spring plate on the holder.
natural_image
Illustration of a sewing machine needle stitching fabric (no text or symbols)Mark first line with pencil or tailor's chalk, and sew.
From second line, just sew, following seam of first line using guide.
Interval between seams can be adjusted by moving guide in direction of arrow.
15. QUILTING
Set machine as shown.
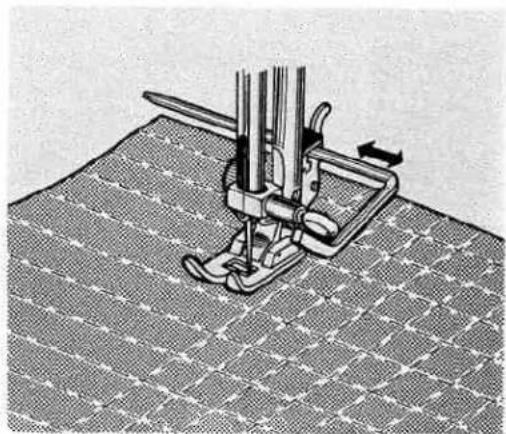
Baste layers of material to prevent them from slipping out as you sew.
Attach quilting guide and sew in the same way as pin tucking.
natural_image
Mechanical sewing machine on a textured fabric mat (no text or symbols visible)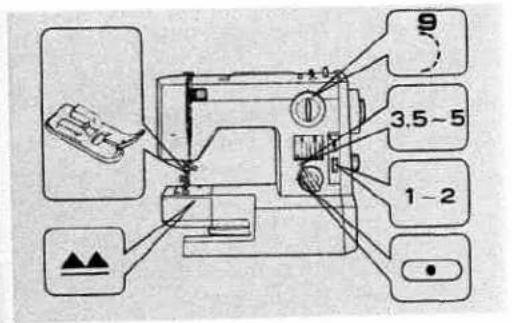
16. SCALLOPING
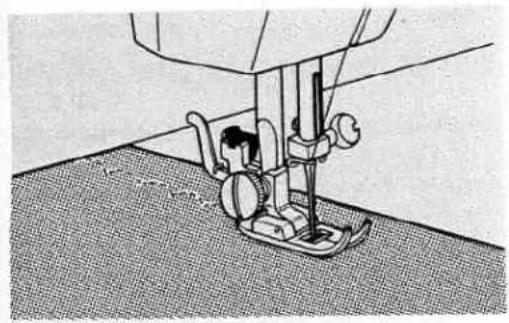
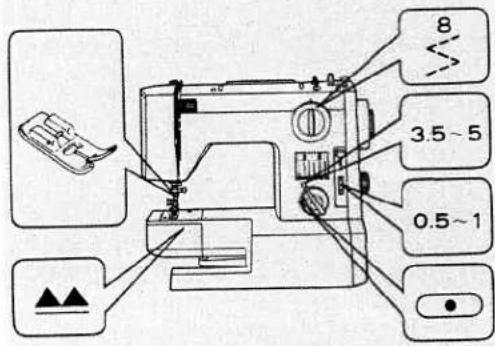
Set machine as shown.
natural_image
Line drawing of a sewing machine needle stitching fabric (no text or symbols)Put two pieces of cloth together with right sides facing, and sew.
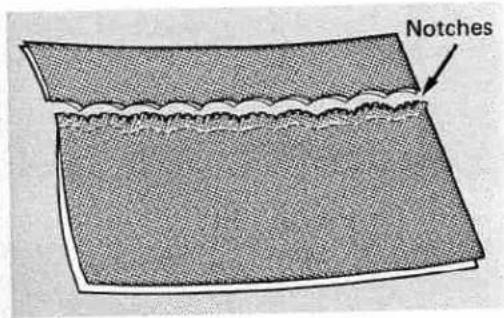
Trim edge 0.3 cm (1/8") away from stitching.
Make notches on seam edge at evenly spaced intervals.
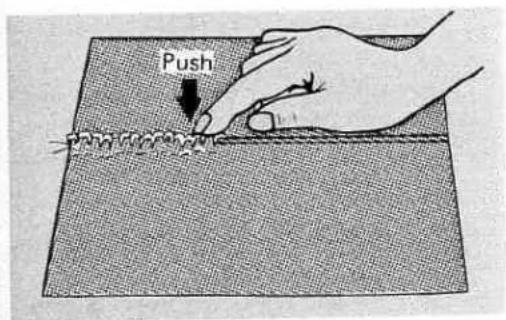
Turn two pieces to right sides out. Bring stitching line to very edge by pushing seam edge gently with your fingers, and press.
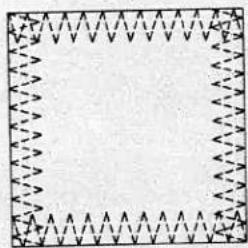
17. MENDING
Patching
Set machine as shown.
Place the patch over the worn part.
Sew along the edge of the patch on the right side. Trim away the worn part close to the seam on back side.
natural_image
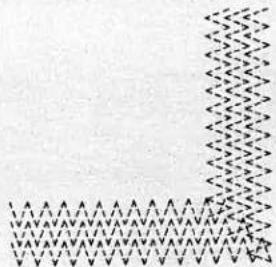
Decorative border with arrow-like patterns and a central blank space (no text or symbols)Mending a Rip
Set machine in the same way as for patching.
Sew the edges of tear together first.
Then sew two more seams on either side.
A piece of gauze can be placed underneath to reinforce the rip.
natural_image
Abstract geometric pattern with repeating arrow-like shapes on a textured background (no text or symbols)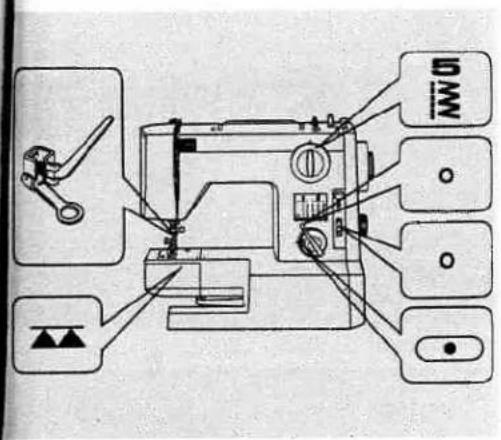
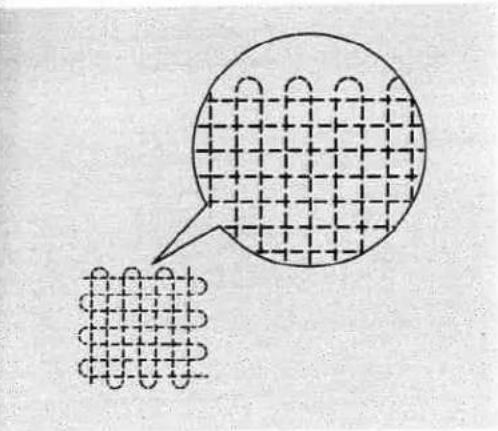
Darning
Set machine as shown.
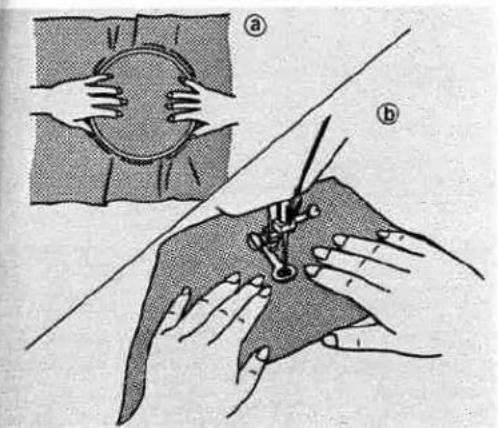
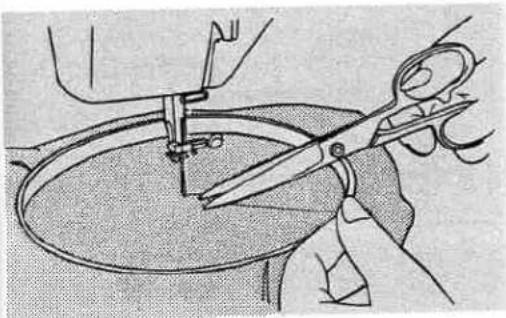
Stretch fabric over the hoop ① or sew with free arm ② according to the part you are going to darn.
natural_image
Diagram showing a grid pattern inside a circle and a wavy line pattern below (no text or symbols)Sew over the worn-out part with closely spaced, stiches guiding material back and forth by hand.
By making turning points blunt, the darned part becomes softer and more flexible.
18. APPLIQUE WORK
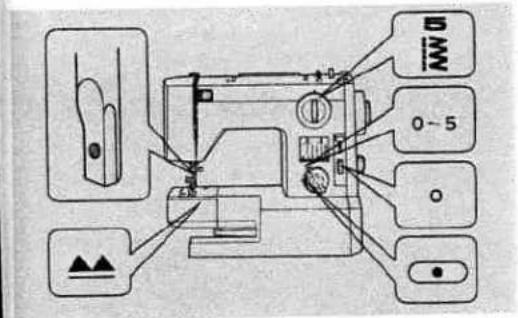
Set machine as shown.
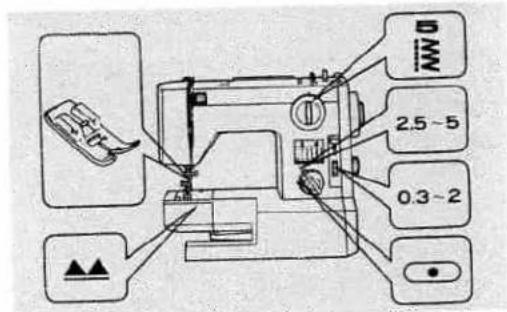
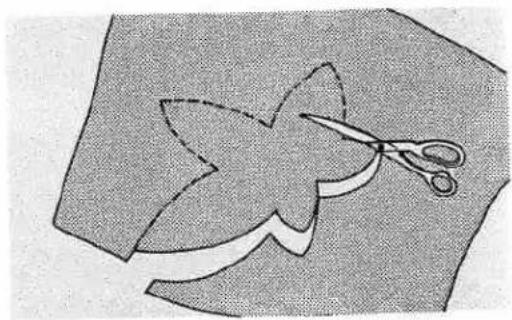
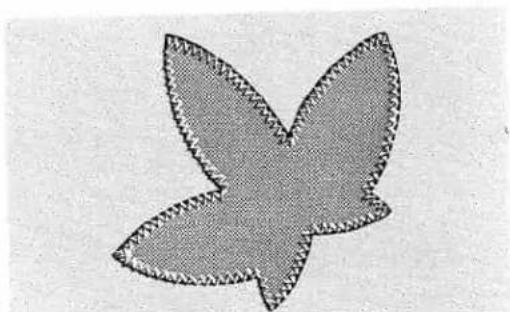
Draw design on material to be used as an applique and cut it out. Place cut-out on base material and baste it.
natural_image
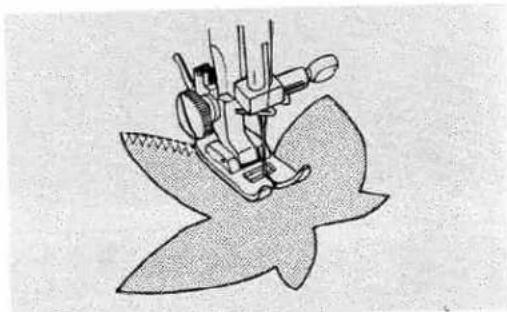
Simple line drawing of a star-shaped cutout with scissors, no text or symbols presentSew around outline with zigzag stitch adjusting stitch length and width according to shape and size of cut-out and type of base material.
natural_image
Illustration of a person operating a sewing machine on a large spool (no text or symbols)To change direction at corners, or to sew very small circles, stop machine, positioning needle just away from edge of cut-out, lift presser foot and turn material. Lower presser foot and continue sewing.
natural_image
Abstract geometric shape resembling a stylized flower or butterfly, composed of shaded petals (no text or symbols)Sew a few stitches at end with zigzag width at 0. This is to prevent unstitching.
| Needle | Thread |
| No. 9 | 120~100 |
| No. 11 | 100~80 |
| No. 14 | 60~50 |
natural_image
Illustration of a hand using scissors to cut a circular object, no text or symbols present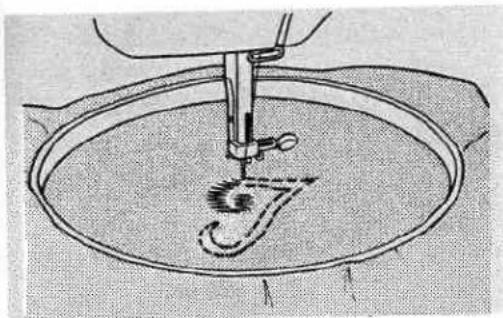
natural_image
Line drawing of a sewing machine needle stitching a circular base (no text or symbols)19. EMBROIDERY
Set machine as shown.
Remove foot, and holder screw.
To avoid lower thread being pulled up, reduce upper thread tension.
For good embroidery, it is important to use correct needles and thread.
Use thin embroidery silk for upper thread and a thinner silk of same kind and color for lower thread.
Trace your design on material and center it in embroidery hoop. Make sure material is taut.
Pull out lower thread by turning handwheel towards you while holding upper thread lightly.
Lower presser foot lifter.
Hold both threads and start sewing along outline of design with satin stitch.
Continue sewing guiding hoop by hand.
To finish filling, sew several stitches with zigzag width at 0.
Lay typewriting paper underneath when embroidering sheer fabric.
20. MAINTENANCE
Your machine requires regular cleaning and oiling for satisfactory sewing performance.
A machine which is used for a few hours a day needs to be cleaned and oiled once a month.
Cleaning
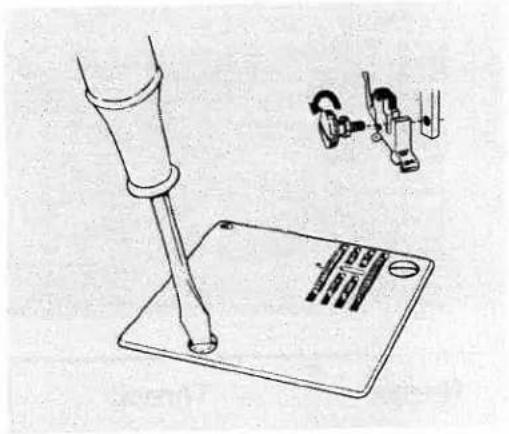
Remove foot and needle. Remove needle plate.
Brush off all dust and lint on feed dog with cleaning brush.
Turn latches outwards.
natural_image
Technical illustration of a mechanical assembly with a tool and a base plate, showing no text or symbols.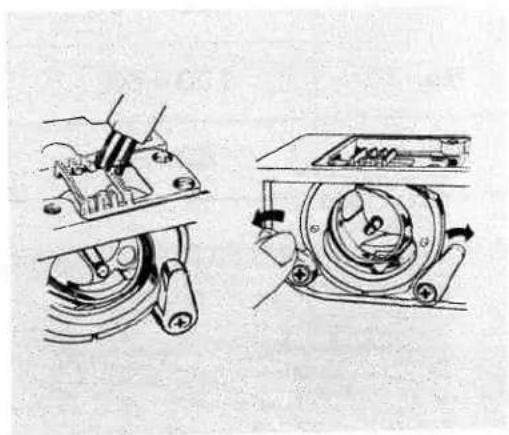
natural_image
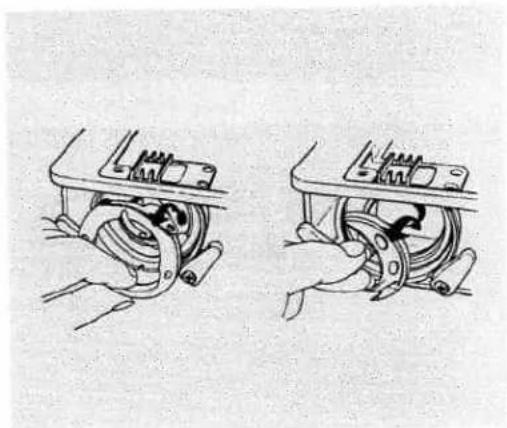
Technical line drawings of mechanical components, showing assembly and disassembly views (no text or symbols)Remove hook race cover. Remove hook. Clean hook race with a cleaning brush and a soft cloth.
natural_image
Two mechanical diagrams showing a hand operating a motor or switch mechanism, with no visible text or symbols.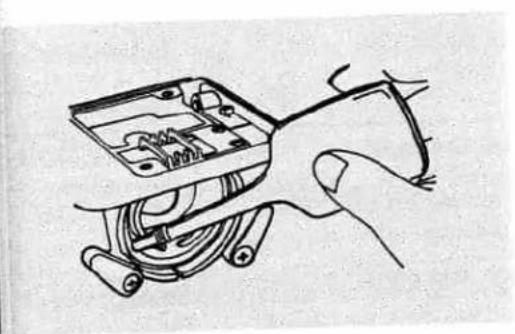
natural_image
Hand holding a small electronic device with wires and components (no visible text or symbols)Oiling
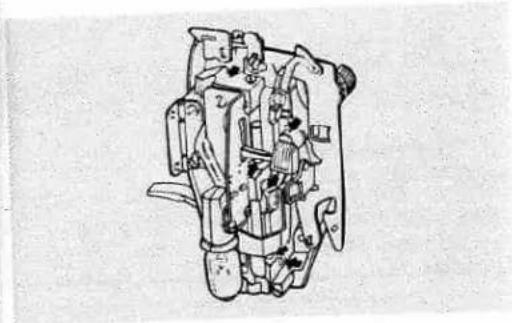
Use oil manufactured specially for sewing machine use. Other oils will eventually cause mechanism to jam.
Apply one drop of oil to part of hook where friction occurs.
natural_image
Technical line drawing of a mechanical device with internal components (no visible text or symbols)Open face cover and apply oil in the same way.
Be careful not to apply too much oil or it may stain your material and cause some sewing difficulty.
After oiling, run machine for 1-2 minutes to allow oil to penetrate to every part.
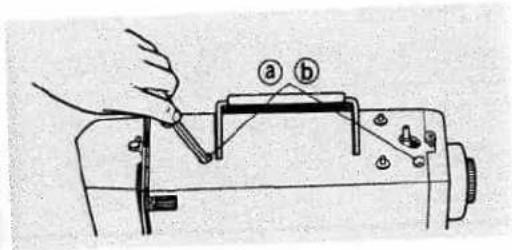
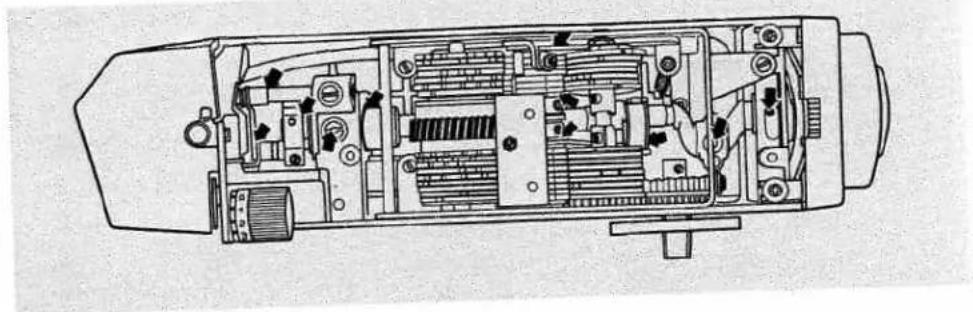
Remove top cover by loosening screws ① and ② with large screwdriver.
Apply one drop of oil to lubricating points indicated by arrows.
natural_image
Technical line drawing of a mechanical device interior showing internal components and housing (no text or labels)- TROUBLE CHART
| PROBLEM | PROBABLE CAUSE | CORRECTION |
| Breaking lower thread | Thread not wound evenly on the bobbin or not drawn up correctlyLower thread tension too tightLint stuck in the bobbin case and inside the tension spring | P.11, P.16P.13Remove lint and fluff with a cleaning brush |
| Skipping stitches | Needle not fully insertedNeedle bentSize or type of needle and thread not suitable for the materialIncorrect upper threadingToo much oil on the hook | P. 6P. 6P.17P.14P.46 |
| Irregular stitches | Incorrect size of needle for the materialUpper thread tension too looseIncorrect lower tension | P.17P.21P.13 |
| The material not fed correctly | Pattern selection dial not set correctlyIncorrect feed dog heightLint stuck on the feed dog | P.18P.13P.45 |
- WHITE
- MODEL1122
- HINE
- CONTENTS
- WHITE SEWING MACHINE
- NAMES OF PARTS
- ACCESSORIES
- BEFORE SEWING
- Detaching Extension Table
- Connecting Foot Controller and Power Cord
- Changing Needle
- Changing Foot
- Snap-on Presser Foot:
- Bobbin Winding
- Inserting Bobbin
- Adjusting Lower Tension
- Drop Feed Lever
- Threading Upper Thread
- Twin Needle Threading
- Decorative Tucks or Designs
- Drawing Up Lower Thread
- Foot Pressure
- STRAIGHT SEWING
- Pattern Selection Dial
- Stitch Length Dial
- Double Presser Foot Lifter
- Cloth Guide
- Adjusting Thread Tension
- Applications of Straight Stitch
- Seams
- Basting/Topstitching
- ZIGZAG SEWING
- Zigzag Width Control
- Needle Position Control
- Thread Tension for Zigzag Stitch
- 6.MAKING BUTTONHOLES
- Determine Length
- Determine Width
- Cutting Buttonholes
- Corded Buttonholes
- SEWING ON BUTTONS
- OR
- OVERCASTING
- OVERLOCKING
- Application of Ultra Stretch Stitch
- Seaming
- Procedure:
- Application of Rick-Rack
- Topstitching/Rick-Rack
- Tapering/Rick-Rack
- Procedure:
- Application of Decorative Fun Patterns
- Fun stitches-Swan-Fish-Briar
- BLIND HEM STITCH
- Elastic Blind Hem Stitch
- STRETCH SEAMS
- ZIPPER SEWING
- SHELL STITCHING
- PIN TUCKING
- QUILTING
- SCALLOPING
- MENDING
- Patching
- Mending a Rip
- Darning
- APPLIQUE WORK
- EMBROIDERY
- MAINTENANCE
- Cleaning
- Oiling
Brand : White
Model : W1122
Category : Sewing machine