W979 - Sewing machine White - Free user manual and instructions
Find the device manual for free W979 White in PDF.


| Product Type | Sewing Machine |
| Brand | White |
| Model | W979 |
| Number of Stitches | 35+ built-in stitches including decorative and stretch stitches |
| Buttonhole Type | Automatic one-step buttonhole (also 5-step and corded option) |
| Needle Positioning | Electronic needle up/down switch (model 979 only) |
| Sewing Speed Control | Adjustable speed control with foot pedal (electronic model 979) |
| Free Arm Capability | Yes, removable extension table converts to free-arm |
| Feed Dog Control | Raise/lower for darning and freehand embroidery |
| Presser Foot Pressure Regulator | Adjustable (4 settings: 1-4, default 3) |
| Stitch Width Control | Adjustable (models 979, 972 only) |
| Super (Stretch) Pattern Group Selector | Push button to select orange/green patterns (model 979 only) |
| Accessories Included | Zipper foot, buttonhole foot, blind stitch foot, screwdrivers, brush, oiler, bobbins, needles, spool pin cap, buttonhole opener |
| Optional Accessories | Straight stitch foot, overcasting foot, satin stitch foot, rolled hemmer, roller foot, button sewing foot, twin needle |
| Light Bulb | 15 watts, replaceable |
| Power Source | Electric, polarized plug (USA model), foot control connection |
| Safety Features | Polarized plug, automatic shutoff if jammed (electronic model), instruction to unplug before servicing |
| Maintenance | Clean feed dogs and shuttle area, oil shuttle race, replace bulb (15W max) |
| User Manual | 44 pages, available in multiple languages |
Frequently Asked Questions - W979 White
User questions about W979 White
0 question about this device. Answer the ones you know or ask your own.
Ask a new question about this device
Download the instructions for your Sewing machine in PDF format for free! Find your manual W979 - White and take your electronic device back in hand. On this page are published all the documents necessary for the use of your device. W979 by White.
USER MANUAL W979 White
natural_image
Line drawing of a sewing machine with no text or symbolsSetting up your machine 7-8
Foot control, Power/light switch.
Needle up/down switch.
Sewing speed control, Spool pin, Presser foot lever
Ninding bobbin
Threading the bobbin thread 10
Veedle, thread and fabric chart 11
Threading top thread 12-13
Picking up bobbin thread 14
Adjusting top thread tension 15
Changing presser feet, Feed dog control 16
Stitch selector and indicator 17
Stitch length/super (stretch) stitch control
Super(stretch) pattern group selector
Reverse stitch lever, Pressure regulator
Stitch width control, Converting to free-arm sewing
Machine setting chart 23-26
Straight stitch Starting to sew. Removing fabric
Starting to sew, Removing fabric, Turning a square cutter
Turning a square corner,
Inserting zippers and piping, Darning
Zigzag stitch 26
Overcasting, Satin stitch
Blind stitch 21
Three-step zigzag. Double-action stitch
Lingerie stitch
Faggoting 30
Stretch stitch 30 - 34
Triple straight stitch, Ric-rac stitch, Overlock stitch,
Slant overedge stitch, Smocking stitch, Feather stitch,
Elastic overlock stitch. Surf stitch. Fishbone stitch
Wish-bone stitch. Stretch overlock stitch. Double overlock stitch.
Stretch patching stitch. Herringbone stitch
Decorative embroidery designs 35
Tips on design stitching
Buttonhole making 36-37
Automatic one-step buttonhole, Adjusting stitch balance.
5-step buttonhole. Corded buttonholes.
Optional accessories 38 - 40
Straight stitch foot. Overcasting foot, Satin stitch foot,
Rolled hemmer. Roller foot. Button sewing foot
Twin needle sewing
Threading twin needle.
Turning a corner with a twin needle
Caring for your machine 41-42
Cleaning the feed dogs and shuttle area,
Changing light bulb
Check chart for performance problems 42-43
Repacking the machine 43
CONTENIDO
"IMPORTANT SAFETY INSTRUCTIONS"
"When using an electrical appliance, basic safety precautions should always be followed, including the following."
"Read all instructions before using this sewing machine."
"DANGER — To reduce the risk of electric shock:"
- "This sewing machine should never be left unattended when plugged in. Always unplug this sewing machine from the electric outlet immediately after using and before cleaning."
- "Always unplug before replacing light bulb. Replace bulb with same type rated 15 watts."
"WARNING - To reduce the risk of burns, fire, electric shock, or injury to persons:"
- "Do not allow to be used as a toy. Close attention is necessary when this sewing machine is used by or near children."
- "Use this sewing machine only for its intended use as described in this manual. Use only attachments recommended by the manufacturer as contained in this manual."
- "Never operate this sewing machine if it has a damaged cord or plug, if it is not working properly, if it has been dropped or damaged, or dropped into water. Return the sewing machine to the nearest authorized dealer or service center for examination, repair, electrical or mechanical adjustment."
- "Never operate the sewing machine with any air openings blocked. Keep ventilation openings of the sewing machine and foot control free from the accumulation of lint, dust, and loose cloth."
- "Never drop or insert any object into any opening."
- "Do not use outdoors."
- "Do not operate where aerosol (spray) products are being used or where oxygen is being administered."
- "To disconnect, turn switch to the off ("0") position, then remove plug from outlet."
- "Do not unplug by pulling on cord. To unplug, grasp the plug, not the cord."
- "Keep fingers away from all moving parts. Special care is required around the sewing machine needle."
- "Never sew with a damaged needle plate as this can cause needle to break."
- "Do not use bent needles."
- "Do not pull or push fabric while stitching. It may deflect the needle causing it to break."
- "Switch the sewing machine off ("0") when making any adjustments in the needle area, such as threading needle, changing needle, threading bobbin, or changing presser foot, etc."
- "Always unplug sewing machine from the electrical outlet when removing covers, lubricating, or when making any other user servicing adjustments mentioned in the instruction manual."
"CAUTION - Moving parts-To reduce risk of injury, switch off before servicing. Close cover before operating machine."
"SAVE THESE INSTRUCTIONS"
"This product is for household use, or equivalent."
FOOT CONTROL (USA only)
ELECTRONIC MODEL
Use Matsushita Electric, Model 4C-337B with sewing machine model 979.
ELECTRIC MODEL
Use Matsushita Electric, Model 4C-316B with sewing machine model 970 and 972.
POLARIZED PLUGS CAUTION
This appliance has a polarized plug (one blade wider than the other). To reduce the risk of electric shock, this plug is intended to fit in a polarized outlet only one way. If the plug does not fit fully in the outlet, reverse the plug, if it still does not fit, contact a qualified electrician to install the proper outlet. Do not modify the plug in any way.
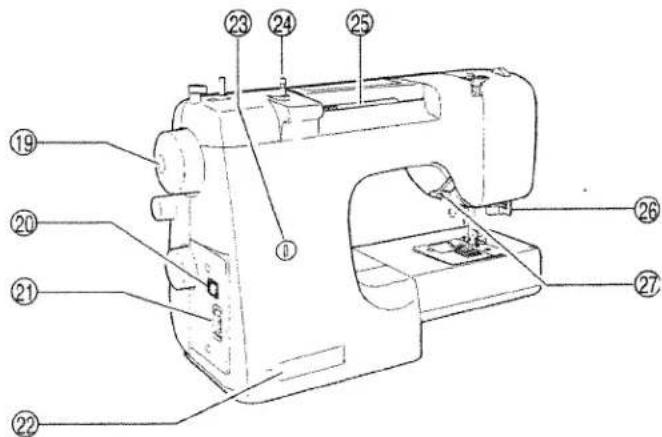
IACHINE IDENTIFICATION
- Bobbin winder tension disc
- Pressure regulator
- Thread take-up
- Thread tension control
- Face cover
*6. Needle up/down switch - Thread cutter
- Extension table
- Feed dog control
- Reverse stitch lever
- Stitch width control
- Bobbin winder shaft
- Bobbin winder stop
- Stitch indicator
- Stitch length control
- Stitch selector
- Super pattern group selector
- Sewing speed control
- Hand wheel
- Power/light switch
- Plug socket
- Identification plate
- Buttonhole stitch adjuster
- Retractable spool pin
- Horizontal spool pin
- Buttonhole lever
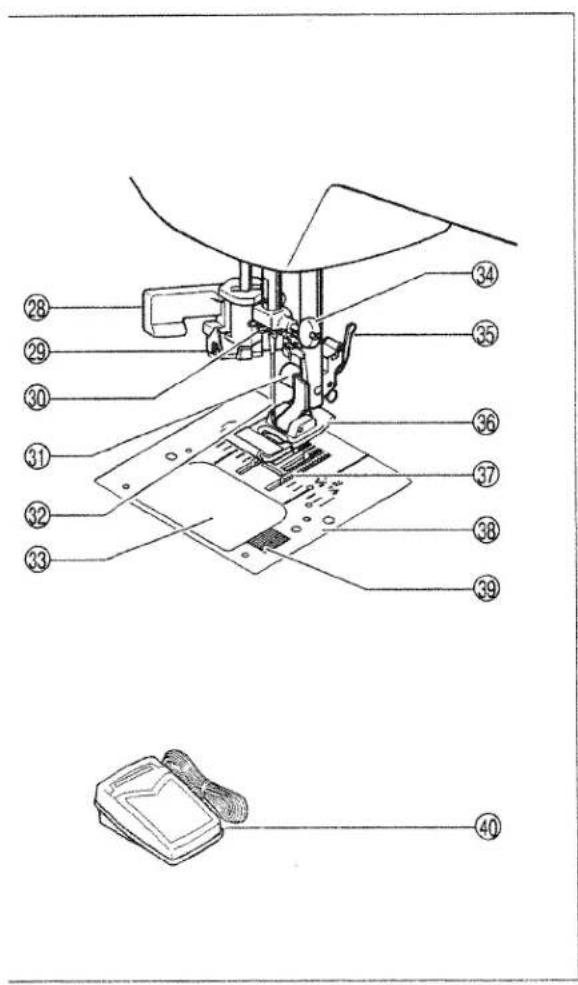
- Presser foot lever
- Automatic needle threader
- Thread guide
- Thread guide
- Presser foot screw
- Needle
- Bobbin cover plate
- Needle clamp screw
- Foot release lever
- Presser foot
- Feed dogs
- Needle plate
- Bobbin cover release button
- Foot control
* Model 979 only
** Model 979, 972 only
IDENTIFICATION DE LA MAQUINA
ACCESSORIES
- Needles
- Bobbins
- Spool pin cap
- Buttonhole opener
- Screwdriver (large)
- Screwdriver (small)
- Brush
- Oiler
-
Zipper foot
-
Buttonhole foot for automatic system (Model 979, 972 only) Buttonhole foot for 5-step system (Model 970 only)
-
Blind stitch foot
ACCESORIOS
natural_image
Technical line drawing of a device's internal components and assembly (no text or symbols)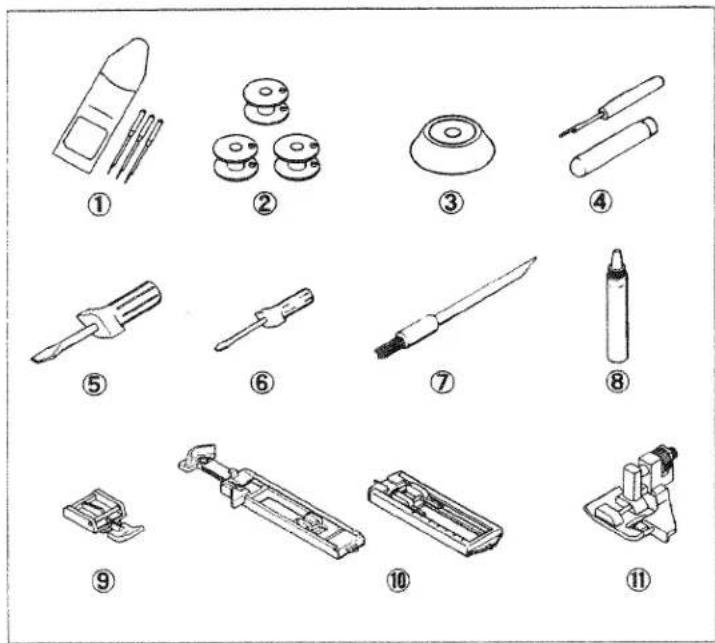
SETTING UP YOUR MACHINE
Be sure to wipe off any surplus oil from needle plate area before using your machine the first time.
FOOT CONTROL
Connect the plug of the foot control into the machine socket (1) and your wall outlet (2) as illustrated.
SAFETY FEATURE OF ELECTRONIC MODEL
If the machine is jammed, it will stop with three beep sounds. After the cause of jamming is removed, step on the foot control and it will run in normal condition.
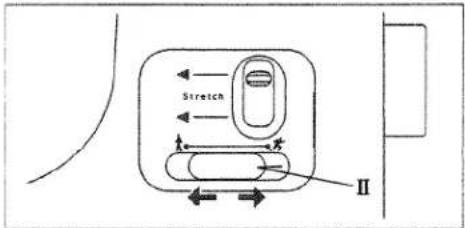
POWER/LIGHT SWITCH
Your machine will not operate until the power/light switch is turned on. The same switch controls both the power and the light.
When servicing the machine, or changing needles or lamps, etc., machine must be disconnected from the main power supply.
Illustration I : Foot control
II: Power/light switch
INTERRUPTOR CORRIENTE/LUZ
(Electronic model 979 only)
Your machine is electronically controlled so that the needle will always rise to the 'up' position whenever you stop sewing.
If you wish to lower the needle, press the switch and a beep sound will be heard and the needle will move to the 'down' position. Push it again or activate the foot control and the needle will move back to the 'up' position.
SEWING SPEED CONTROL
(Electronic model 979 only)
The sewing speed is achieved by using the sewing speed control in conjunction with the foot control. The sewing speed control is moved horizontally to determine the zone of speed required.
Illustration I: Needle up/down switch
II: Sewing speed control
SPOOL PINS
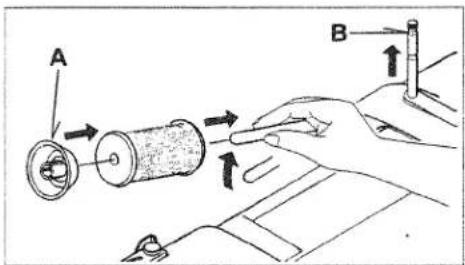
Place a spool of thread on the spool pin. Secure it with the spool cap (A) leaving a gap between the spool cap and the reel of thread to allow the reel to rotate freely.
Pull up the spool pin (B). This is used for bobbin winding when the machine is already threaded.
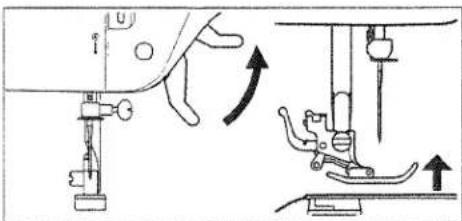
PRESSER FOOT LEVER
There are three positions for your presser foot.
- Lower the presser foot to sew.
- Raise the lifter to the middle position to insert or remove fabric.
- Lift it to its highest position to change the presser foot or to remove thick fabric.
INTERRUPTOR AGUJA ARRIBA / ABAJO
WINDING BOBBIN
- Pass thread from spool through thread guides as shown.
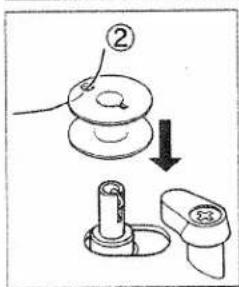
- Pull end of thread through hole in bobbin as shown.
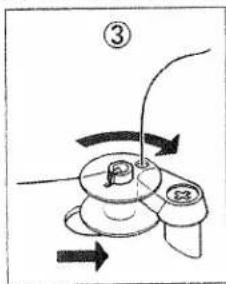
- Push bobbin winder shaft to far left position, if it is not already there. Place bobbin onto shaft with end of thread coming from top of bobbin. Push bobbin winder shaft to right until it clicks. Hold onto end of thread.
- Depress foot control to wind bobbin. The thread that is held will snap. Bobbin will cease turning when completely filled. Push shaft to left to remove bobbin.
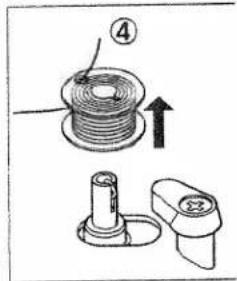
THREADING THE BOBBIN THREAD
- Raise the needle to its highest position by rotating the hand wheel towards you.
- Remove the bobbin cover plate by pushing the release button to the right while pushing the left corner of plate.
- Insert the bobbin making sure the bobbin rotates counter-clockwise.
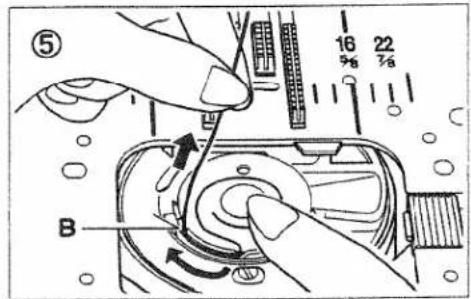
- Pull thread through the slot (A) and then to the left.
- With a finger held gently on top of the bobbin, pull thread through the slot (B) until you hear a clicking sound, and then leave about 6" (15 cm) of thread.
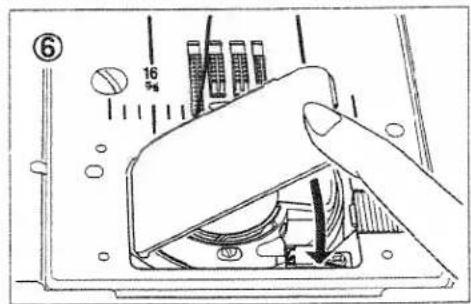
- Replace the bobbin cover plate onto the needle plate.
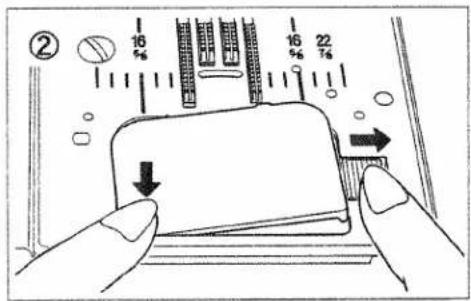
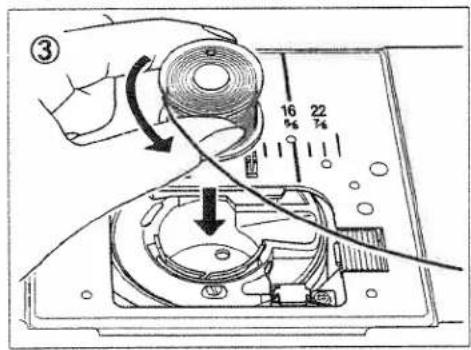
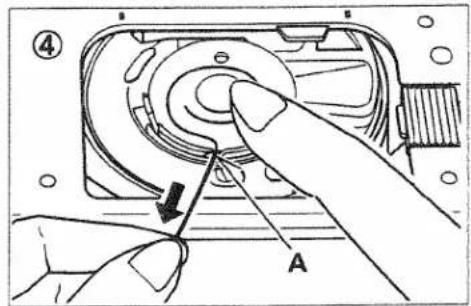
NEEDLE, THREAD AND FABRIC CHART
Use the standard needles. The size of your needle should match the size of the thread and both should match the fabric.
For normal sewing, the same size and type of thread should be used in the bobbin as on the upper part of the machine. Never use a bent or blunt needle.
For successful sewing of stretch fabrics use stretch stitch needles.
| Thread Size | Needle Size | Fabric |
| Cotton 60 - 100SyntheticMachine embroidery | stretch stitch needle | All stretch fabrics. |
| CottonSyntheticSilk AMachine embroidery | 70or80 | Sheer cottons, silk synthetics, fine laces, baliste, dimity. |
| Cotton 60 - 80Mercerized 50 - 60Synthetic | 80or90 | Medium weight cottons, medium weight synthetics, poplin, seersucker, gingham, velvet, light weight woolens, linen. |
| Cotton 30 - 60Mercerized heavy duty | 100 | Heavy weight cottons, medium to heavy weight woolens, denim. |
Changing the needle
- Raise the needle bar to its highest position by turning the hand wheel toward you.
- Loosen the needle clamp screw by turning it toward you.
- Remove the needle by pulling it downward.
- Insert the new needle into the needle clamp with the flat side away from you.
- Push the needle up as far as it can go.
- Tighten the needle clamp screw firmly with the screw driver.
Illustration 1 : Flat side
II: Needle
III: Pin
IV: Flat side away from you.
TABLA DE HILO, AGUJA Y MATERIAL
For successful sewing of stretch fabrics use stretch stitch needles with blue shank.
. Raise the presser foot lever.
. Raise the needle to its highest position by rotating the hand wheel towards you.
. Thread the machine in the following order as illustrated.
SUPERIOR
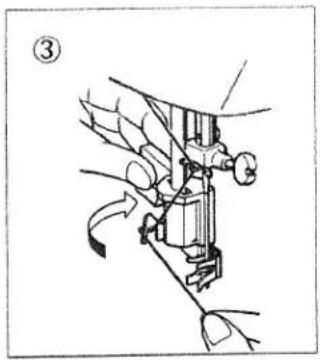
USING AUTOMATIC NEEDLE THREADER (Model 979, 972 only)
Raise the needle to its highest position by rotating the hand wheel towards you.
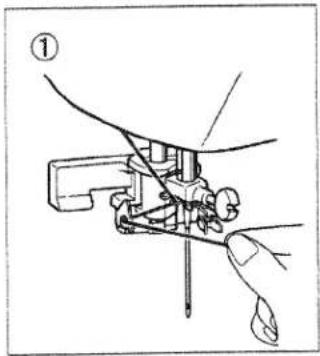
- Hook thread under thread guide as illustrated.
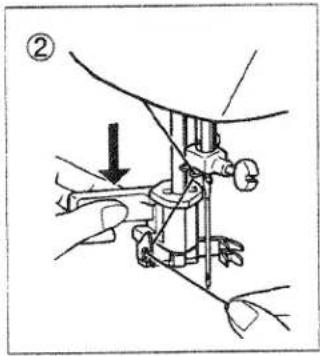
- Pull down lever while holding the end of thread.
- Turn the lever as far as it will go.
- Guide thread into hooked end and pull it upward.
- Return the lever and needle will be threaded automatically.
- Release the lever and pull thread away from you.
NOTE: For smooth threading it is recommended to set the machine at straight stitching (center position) when using needle threader.
natural_image
Mechanical assembly diagram showing hands operating a device with a lever and adjustment arrow (no text or symbols)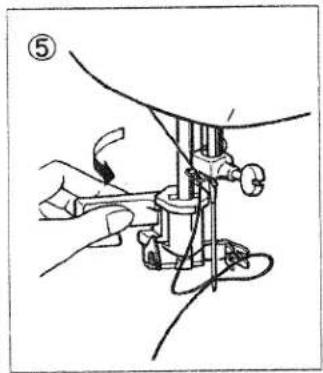
natural_image
Line drawing of a sewing machine needle and handle assembly (no text or symbols)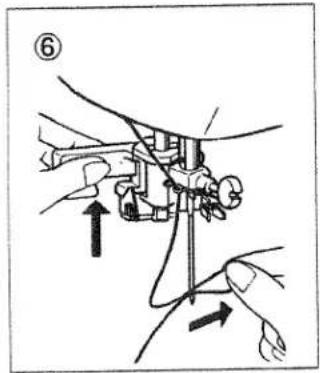
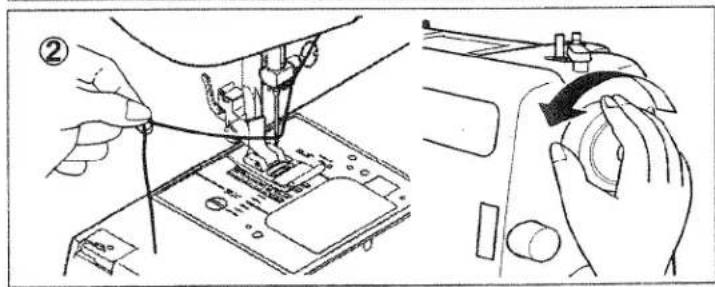
PICKING UP BOBBIN THREAD
- Raise the presser foot lever.
- Holding needle thread loosely with your left hand, turn hand wheel towards you one revolution with your right hand until the needle comes to its highest position.
- Lightly pull up the top thread, and pick up bobbin thread, which will appear through the needle plate slot.
- Pull both top and bobbin threads together towards back of machine under the presser foot, leaving about 6" (15 cm) tail.
RECOGIDA DEL HILO DE LA CANILLA
natural_image
Technical illustration showing hands operating a sewing machine with a close-up view of the mechanism (no text or symbols present)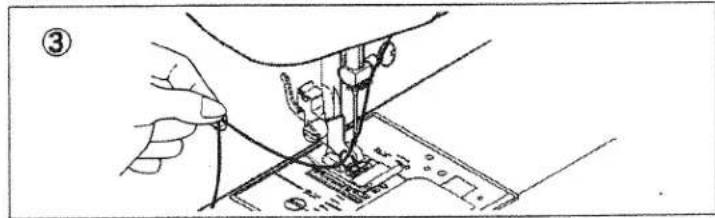
natural_image
Line drawing of a sewing machine needle stitching fabric (no text or symbols)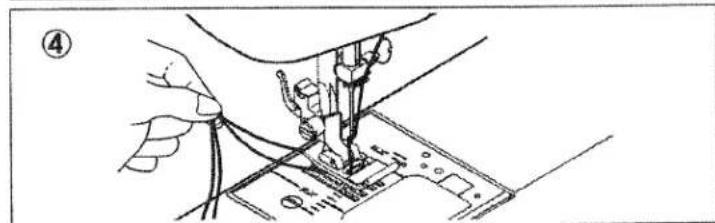
natural_image
Line drawing of hands using a sewing machine to install or repair electronic components (no text or symbols visible)ADJUSTING TOP THREAD TENSION
STRAIGHT STITCHING
The quality of your stitching is largely determined by the balanced tension of both top and bobbin threads. The tension is well balanced when these two threads 'lock' in the middle of layers of fabric you are sewing.
Set the tension control at the "AUTO" position or 3 for normal sewing.
If, when you start to sew, you find that the stitching is irregular, you will need to adjust the tension control. Make any adjustments with presser foot 'down'.
ZIGZAG STITCHING
The top thread may appear on the bottom depending on the thread, fabric, type of stitch and sewing speed, but the bobbin thread should never appear on the top of the fabric.
Illustration I: STRAIGHT STITCHING
1: Under side
2: Top side
3: Well balanced
4: Decrease tension
5: Increase tension
6: Top stitch too tight
7: Top stitch too loose
II: ZIGZAG STITCHING
BOBBIN TENSION
The bobbin tension has been correctly set at the factory, so you do not need to adjust it.
AJUSTE DE LA TENSION DEL HILO SUPERIOR
COSTURA RECTA
natural_image
Illustration of a layered electronic device with wavy internal structure and a labeled section II (no text or symbols on the device itself)CHANGING PRESSER FEET
Be sure needle is in the up position. Raise presser foot lever.
- Raise foot release lever to remove the foot. (Fig.1)
- Place the desired foot on the needle plate aligning needle holes. (Fig.1)
- Lower the presser foot lever so that the ankle snaps on the foot. (Fig. 2)
Illustration 1: Foot release lever
II:Ankle
CAMBIO DEL PIE PRENSATELAS
The feed dogs control the movement of the fabric that is being sewn. They should be raised for all general sewing purposes and lowered for daming, freehand embroidery and monogramming so that you, and not the feed dogs, are moving the fabric.
CONTROL DE DIENTES
STITCH SELECTOR AND INDICATOR
-
To select a stitch, be sure needle is out of fabric at its highest position.
-
Then turn the selector until the required stitch is indicated by the red symbol on the indicator panel.
Illustration I: Stitch indicator
II: Stitch selector
SELECTOR E INDICADOR DE PUNTADAS
Stitch length can be selected easily according to thickness and type of fabric. Super (stretch) stitch patterns can be selected by turning the same dial to mark where fine adjustment can be made.
CONTROL LARGO DE PUNTADA Y PUNTADA SUPER (ELASTICA)
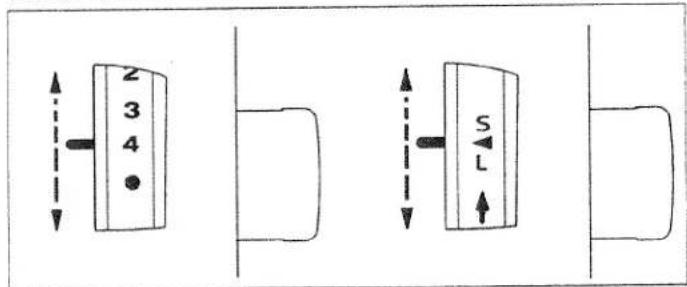
SUPER(STRETCH) PATTERN GROUP SELECTOR (Model 979 only)
To select orange patterns, push down the selector. Push it up for green patterns.
It is recommended to begin, or end seams with several stitches in reverse for reinforcement. As long as you are pressing down this lever while sewing, the machine will continue to feed the fabric backwards.
ELECTRONIC MODEL
When depressing the lever, a beep sound will be heard and the machine will sew slowly in reverse. When it is released, a beep sound will be heard again.
PRESSURE REGULATOR
This control regulates the pressure of the presser foot on to the feed-dogs. Insufficient pressure may cause poor feeding of the fabric, skipped stitches, or difficulty in guiding the fabric. Too much pressure may result in feed-dogs or presser foot marks appearing on the fabric.
For most fabrics set the control at 3. For thicker ones increase it to 4 and for finer ones decrease to a lower number.
natural_image
Technical diagram showing a door handle, water level, and fluid flow path (no text or symbols)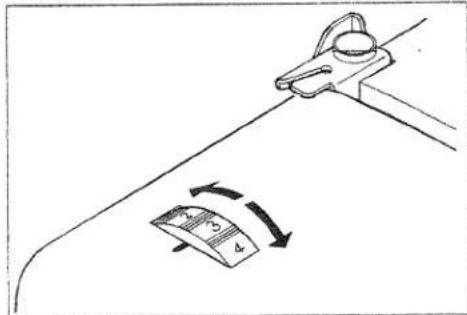
STITCH WIDTH CONTROL
(Model 979, 972 only)
The width of all the stitches produced on this machine can be made narrower or wider by adjusting the stitch width control.
SELECTOR ANCHO PUNTADA
CONVERTING TO FREE-ARM SEWING
Your machine can be used either as a flat-bed, or as a free-arm model.
With the extension table in position, it provides a large working surface as a standard flat-bed model.
By removing the extension table (just pull it off to the left as shown), the machine converts into a free-arm model.
CONVERSION PARA LA COSTURA CON BRAZO
natural_image
Pure mechanical diagram showing a spring-mass system with no text, numbers, or symbols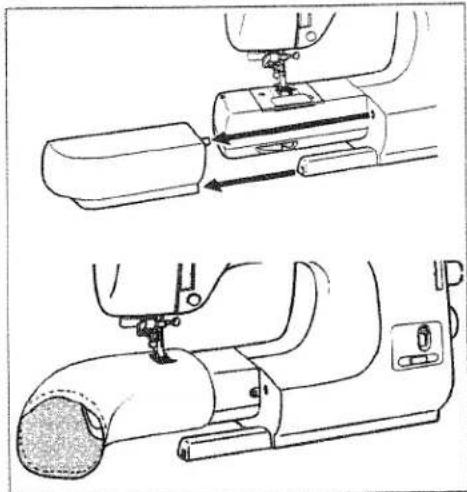
natural_image
Technical line drawings of two sewing machine components (no text or symbols)IACHINE SETTING CHART (1) / ESQUEMA DE AJUSTE DE LA MAQUINA (1)
| ENGLISH | ESPAÑOL | ||
| 1 | BUTTONHOLE | OJALES | |
| 2 | STRAIGHT (Center position) | RECTA (al centro) | |
| 3 | STRAIGHT (Left position) | RECTA (a la izquierda) | |
| 4 | ZIGZAG | ZIG-ZAG | |
| 5 | BLIND | INVISIBLE | |
| 6 | THREE-STEP ZIGZAG | ZIG ZAG TRES PUNTADAS | |
| 7 | FOUR-POINT LINGERIE | LENCERIA CUATRO PUNTOS | |
| 8 | STRETCH BLIND | INVISIBLE SUPER ELASTICO | |
| 9 | DECORATIVE SCALLOP | DECORATIVAS FESTON | |
| 10 | DECORATIVE DOMINO | DECORATIVAS DOMINO | |
| 11 | DECORATIVE DIAMOND | DECORATIVAS DIAMANTE | |
| 12 | DECORATIVE ARROWHEAD | DECORATIVAS PUNTA DE FLECHA | |
| 13 | DOUBLE ACTION | DOBLE ACCION | |
| 14 | LINGERIE | LENCERIA | |
| 15 | FAGGOTING | FAGOTING | |
| 16 | TRIPLE STRAIGHT (Center position) | PUNTADA TRIPLE (al centro) | |
| 17 | TRIPLE STRAIGHT (Left position) | PUNTADA TRIPLE (a la izquierda) | |
| 18 | RIC-RAC | ZIG-ZAG | |
| 19 | RIGHT OVERLOCK | OVERLOCK DERECHA | |
| 20 | SMOCKING | NIDO DE ABEJA | |
| ENGLISH | ESPAÑOL | ||
| 21 | LEFT OVERLOCK | OVERLOCK IZQUIERDA | |
| 22 | ELASTIC OVERLOCK | OVERLOCK ELASTICO | |
| 23 | SUPER DECORATIVE | SUPER DECORATIVAS | |
| 24 | SUPER DECORATIVE | SUPER DECORATIVAS | |
| 25 | SUPER DECORATIVE | SUPER DECORATIVAS | |
| 26 | SUPER DECORATIVE | SUPER DECORATIVAS | |
| 27 | FISHBONE | RASPA | |
| 28 | STRETCH OVERLOCK | OVERLOCK ELASTICO | |
| 29 | STRETCH PATCHING | PARCHEADO ELASTICO | |
| 30 | SLANT OVEREDGE (Right) | SOBREHILADO INCLINADO (derecha) | |
| 31 | FEATHER | PLUMA | |
| 32 | SLANT OVEREDGE (Left) | SOBREHILADO INCLINADO (izquierda) | |
| 33 | SURF | SURF | |
| 34 | SUPER DECORATIVE | SUPER DECORATIVAS | |
| 35 | SUPER DECORATIVE | SUPER DECORATIVAS | |
| 36 | SUPER DECORATIVE | SUPER DECORATIVAS | |
| 37 | SUPER DECORATIVE | SUPER DECORATIVAS | |
| 38 | WISH-BONE | PUNTO DE BRUJA | |
| 39 | DOUBLE OVERLOCK | OVERLOCK DOBLE | |
| 40 | HERRINGBONE | ESPIGA | |
MACHINE SETTING CHART (2)
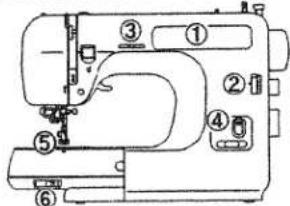
① INDICATOR
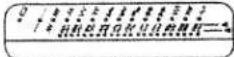
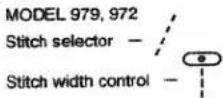
② STITCH LENGTH CONTROL


③STITCH WIDTH CONTROL
Model 979, 972 only
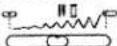
④ SUPER PATTERN GROUP
SELECTOR
Model 979 only

⑤ PRESSER FOOT
B. Blind stitch foot
A. Zigzag foot


D. Zipper foot
C. Buttonhole foot
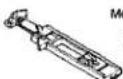
odel 970 only

⑥ FEED DOG CONTROL
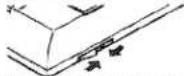
1) INDICADOR
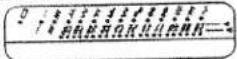
② CONTROL

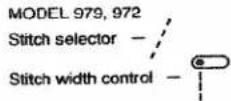
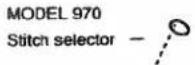
① Straight stitch at center needle position with following settings;
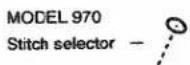
② Straight stitch at left needle position with following settings;
PUNTADA RECTA
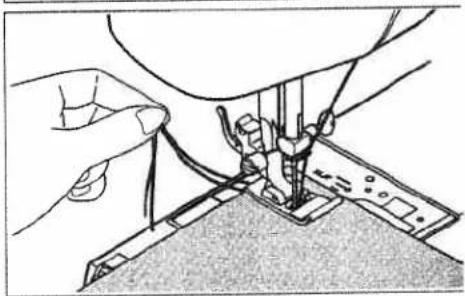
Before placing the material on the machine, see that the ends of the threads have been drawn about 6" (15 cm) to the rear of the machine. Hold on the threads during the sewing of the first 3 or 4 stitches of the seam.
Fasten each seam by back tacking at the beginning and end of the seam.
natural_image
Line drawing of a sewing machine needle stitching fabric (no text or symbols)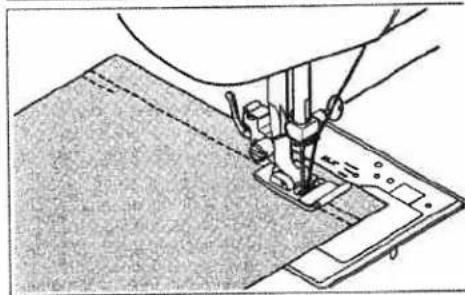
natural_image
Line drawing of a sewing machine needle stitching fabric (no text or symbols)REMOVING FABRIC
first turn the handwheel towards you until the needle is at its highest position, then raise the presser foot, draw materials to the rear and cut off excess thread with the thread cutter located on the left end of working surface or on the presser air.
SACANDO EL TEJIDO
'o turn a square corner 5/8" (1.6 cm) from the fabric edge, top stitching with the needle tip piercing the fabric, when eaching the cornering guide as shown. Raise the presser oot, turn fabric.
View stitching line will align with 5/8" (1.6 cm) seam guide on side of needle plate. Lower the presser foot and begin stitching in new direction.
Illustration I : Cornering guide
GIRO EN ESQUINAS EN ANGULO RECTO
natural_image
Line drawing of a sewing machine needle stitching fabric (no text or symbols)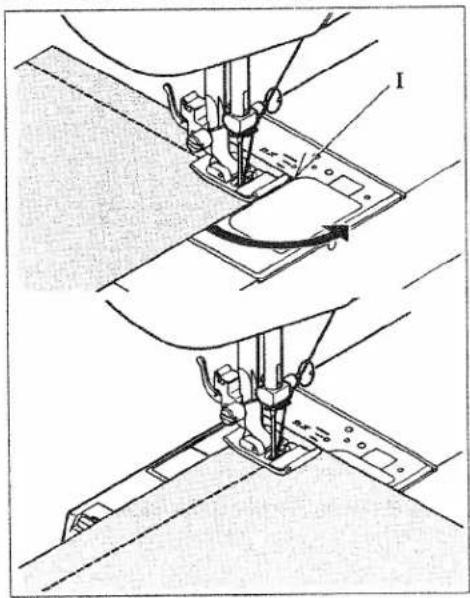
natural_image
Technical line drawing of a sewing machine needle and base, showing mechanical components without any text or symbolsINSERTING ZIPPERS AND PIPING
SETTING
Use zipper foot which allows you to sew to the right or left of the zipper or close to the cord.
Illustration I : Needle to left of foot II : Needle to right of foot
INSERTING ZIPPERS
To sew down the right side, attach left side of zipper foot to presser foot holder so that the needle passes through the opening on the left side of the foot.
To sew down the left side, attach right side of foot to foot holder.
PIPING
To pipe soft furnishings, cover cord with a bias strip of fabric and pin or tack it to the main piece of fabric.
Attach right side of zipper foot to foot holder so that needle passes through the opening on the right side of the foot.
natural_image
Two line drawings of a sewing machine in different angles (I and II), showing mechanical components without any text or symbols.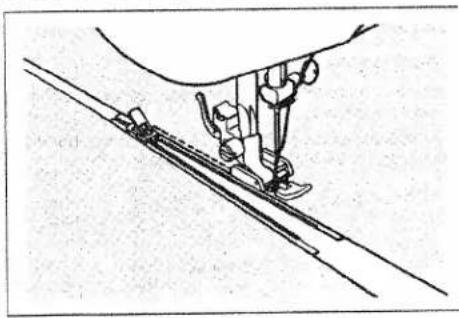
natural_image
Line drawing of a sewing machine needle stitching a fabric (no text or symbols)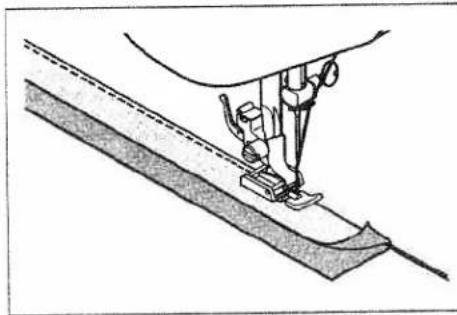
natural_image
Line drawing of a sewing machine needle stitching fabric (no text or symbols)WARNING
ower feed dogs and remove presser foot.
tretch fabric in an embroidery hoop with the hole at center.
holding the needle thread, take one stitch and pick up bobbin
bread through the fabric. Lower presser bar and start sewing
t a slow to medium speed, moving the fabric back and forth
with a steady rhythm. Turn fabric and sew another layer of
titching over the first layer of stitching.
ZIGZAG STITCH
OVERCASTING
This is one of the more frequently used zigzag stitches for garment construction.
Place material under the presser foot so that the right swing of the needle sews along right edge of fabric.
SATIN STITCH
This is a closely spaced attractive stitch used for appliqué, bar-tacking, etc. Slightly loosen top thread tension for satin stitching.
Use a backing of stabilizer or interfacing for sheer materials to avoid puckering.
ZURCIDO
natural_image
Illustration of a medical procedure showing needle insertion into a patient's mouth (no text or symbols)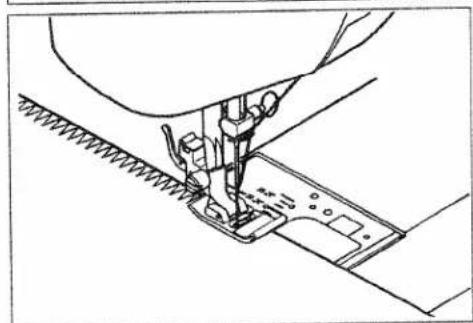
natural_image
Line drawing of a sewing machine needle stitching fabric (no text or symbols)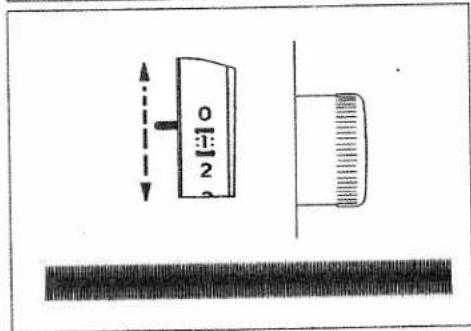
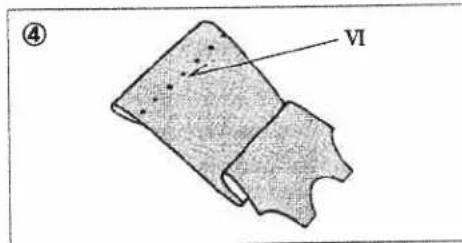
BLIND STITCH
WWW - Regular blind stitch for normal fabrics
- Elastic blind stitch for soft, stretchable fabrics
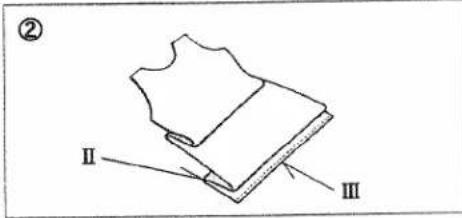
- First neaten the edge. For lightweights turn up and baste about 3/8" (1 cm). For heavyweights overcast.
- Fold garment away from hem leaving about 1/4" (0.6 cm) of hem edge extending.
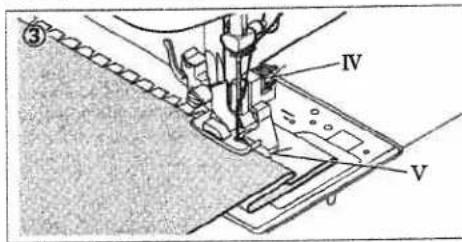
- Place garment under blind stitch foot with the fold of the garment against guide and adjust it by turning screw so that the zigzag just catches the fold.
- Press both sides of the finished hem. The right side of the garment will show only the blind stitches.
Illustration I: Inside of dress
II : Final hem length
Ⅲ: Neatened raw edge
IV: Adjustment screw
V: Guide
VI: Right side of finished hem
PUNTADA INVISIBLE
THREE-STEP ZIGZAG

This is a strong stitch because it makes three short stitches where the normal zig-zag makes only one.
For this reason it is highly recommended for overcasting all types of fabrics.
It is also ideal for mending tears, patching, sewing towelling, patch-work and attaching flat elastic.
ZIG-ZAG DE TRES PUNTADAS

Double-action stitch is ideal for producing flat overlapped seams on almost any type of fabric and a bolder effect will result from sewing with contrasting thread.
PUNTADA DE ACCION DOBLE

natural_image
Technical illustration of a sewing machine needle stitching fabric strips (no text or symbols)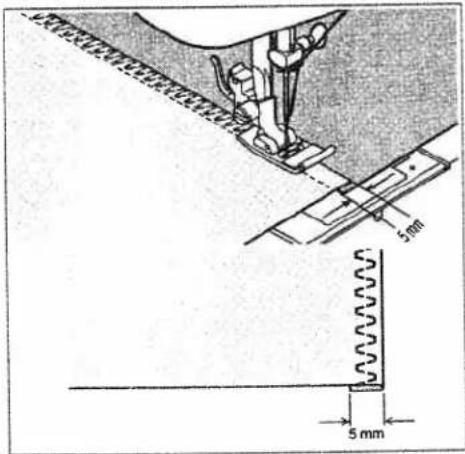
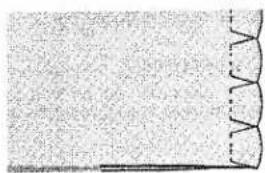
LINGERIE STITCH
Lingerie stitch is for seaming and overcasting sheer, soft fabrics in one operation. It also produces a delicate shell hem on lingerie and other fine garments.
SEAM AND OVERCAST IN ONE
Place the right sides of the fabric together and position under the presser foot so that the zig-zag part of the stitch sews just over the raw edge.
Illustration
1: Regular lingerie stitch
II: Four-point lingerie stitch
SHELL HEM
Turn under the raw edge and press. Place the fabric right side up so that the zig-zag part of the stitch sews just over the folded edge, pulling the fabric in to form a shell hem. Trim away excess fabric close to the stitching line.
Regular shell stitch

Regular shell stitch produces a tiny shell hem on lingerie and other fine garments.
Four-point shell stitch

If bigger size of shell pattern is desired, use four-point shell stitch.
PUNTADA DE LENCERIA
natural_image
Close-up of a textured surface with a vertical black spring on the right side (no text or symbols)I
natural_image
Abstract textured pattern with curved black lines on white background (no text or symbols)II
natural_image
Technical line drawing of a sewing machine needle stitching patterned fabric (no text or symbols):AGGOTING

his is a popular decorative stitch (used in sleeves or fronts of blouses and dresses). To attach two separate pieces of fabric together, leave a little space in between. To prepare the fabric:
old under the seam allowances on the cut edges, and press. Baste folded edges to stabilizer with about 1/8" (0.3 m) space between. Stitch over the 1/8" (0.3 cm) allowance, just catching the fabric fold on both sides with needle. Remove bastings and stabilizer; press.
STRETCH STITCHES
Stretch stitches are mainly for use on knit, or stretchable abrics, but can also be used on ordinary materials.
ADJUSTING STRETCH STITCH BALANCE
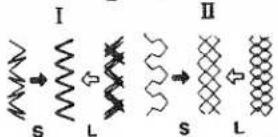
Stitch length/super (stretch) stitch control should be at a mark for most materials. Depending upon the type of fabric used, you may need to adjust this Control to match forward stitches of stretch sewing with reverse motion stitches. If the stitches are too open, turn the Control to S position; if the stitches overlap, turn the Control to L position.
Illustration
I: Ric-Rac Stitch
II: Smocking Stitch
Triple straight stitch is far stronger than ordinary straight stitch because it locks three times-forwards, backwards and forwards.
It is particularly suitable for reinforcing the seams of sportswear in stretch and non-stretch fabrics, and for curved seams which take a lot of strain.
Use this stitch also to top-stitch round lapels, collars and cuffs to give a professional finish to your garments.
RIC-RAC STITCH

Ric-rac is a quick method of finishing a raw edge and providing a decorative top-stitch in one operation. It is ideal for edging neck-bands, armholes, sleeves and hems.
FAGOTING (Diente de rata)

natural_image
Pure diagram of a mechanical or structural assembly with no visible text, numbers, or symbols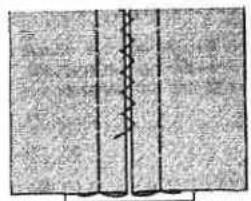
natural_image
Pure diagram of a vertical wire or spring between two textured rectangular panels (no text or symbols)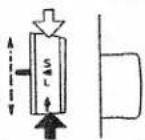
natural_image
Line drawing of a sewing machine needle stitching fabric (no text or symbols)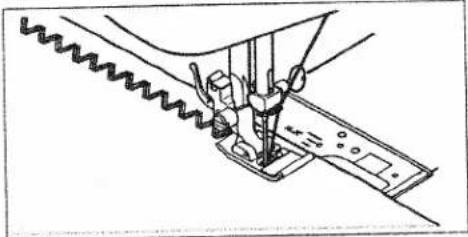
natural_image
Line drawing of a sewing machine needle stitching fabric (no text or symbols)OVERLOCK STITCH
This is the same type stitch used by the garment industry in making sportswear - it forms and finishes the seam in one operation.
It's very effective for use in repairing raw or worn edges of older garments.
SLANT OVEREDGE STITCH ^ 7
Excellent for hemstitching table and bed cover with an elegant touch. Picot-like stitch can also be made on sheer materials. Sew along the raw edge of fabric and trim close to the outside cf the stitching.
SMOCKING STITCH
- Make a straight line of gathers across the fabric that you wish to smock.
- With a narrow strip of fabric directly under the line of gathering, stitch over the gathers. The design will be a series of small diamonds.
PUNTADA OVERLOCK
natural_image
Line drawing of a sewing machine needle stitching fabric (no text or symbols)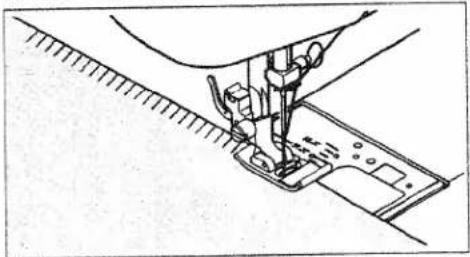
natural_image
Line drawing of a sewing machine needle stitching fabric (no text or symbols)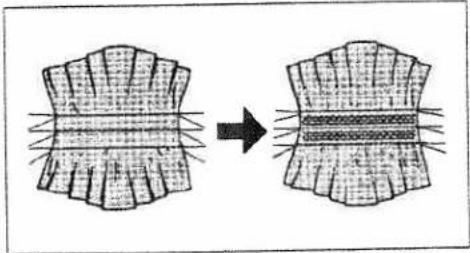
natural_image
Diagram showing two stages of fabric cutting or afficking process, with arrows indicating process direction (no text or symbols)FEATHER STITCH
The pleasing appearance of this stitch enables it to be used for top stitching, or attaching lace or inset panels when making lingerie or girdles.
PUNTADA PLUMA
Use this stitch in preference to regular overlock stitch for overcasting stretch or knit fabrics where strength and flexibility are required.
PUNTADA OVERLOCK ELASTICA
It is an attractive stitch for border design.
PUNTADA SURF
natural_image
Technical line drawing of a mechanical assembly with gears and a base plate (no text or symbols)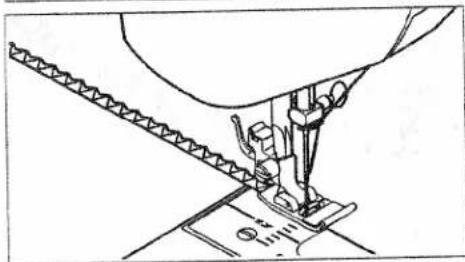
natural_image
Line drawing of a sewing machine needle stitching fabric (no text or symbols)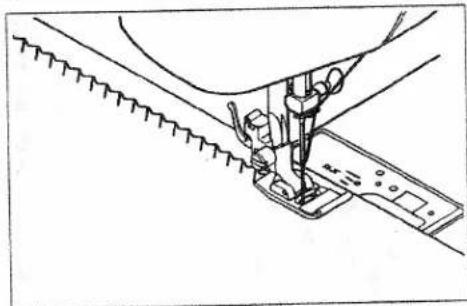
natural_image
Line drawing of a sewing machine needle stitching fabric (no text or symbols)FISHBONE STITCH

Use to create decorative borders and for embroidery.
PUNTADA RASPA

Use to sew and finish elastic fabrics or for decoration of borders.
PUNTO DE BRUJA

Stretch overlock seams and overcasts in one to produce a narrow, supple seam, particularly suited to swimwear, sportswear, T-shirts, babywear in stretch nylon, stretch towelling, jersey and cotton jersey.
PUNTADA OVERLOCK ELASTICA

natural_image
Technical line drawing of a sewing machine needle stitching a fabric (no text or symbols)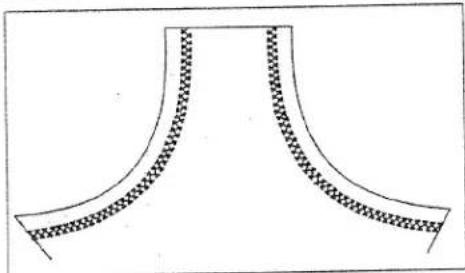
natural_image
Pure geometric diagram of a symmetrical curved structure with checkered pattern, no text or symbols present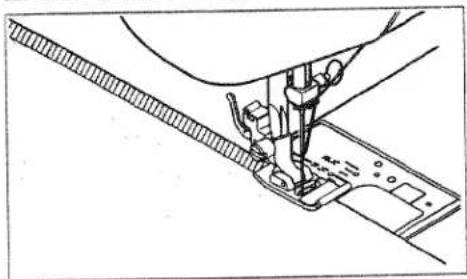
natural_image
Line drawing of a sewing machine needle stitching fabric (no text or symbols)DOUBLE OVERLOCK STITCH

Double overlock has three main uses. It is perfect for attaching flat elastic when making or repairing lingerie; and for overcasting and seam and overcast in one on slightly stretch fabrics and non-stretch ones such as linen, tweed, and medium to heavy-weight cotton.
PUNTADA OVERLOCK DOBLE

STRETCH PATCHING STITCH

Stretch patching stitch, as well as being a decorative stitch, is ideal for patching stretch fabrics such as jersey and knitwear.
PUNTADA ELASTICA DE PARCHES

It is a versatile stitch used for joining fabric pieces and embroidery.
PUNTADA ESPIGA

natural_image
Illustration of a sewing machine needle stitching fabric, with hands operating the seam (no text or symbols)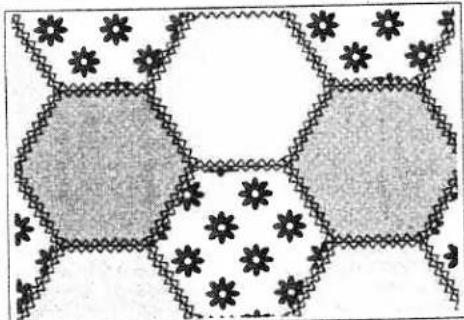
natural_image
Abstract geometric pattern with interlocking shapes and floral motifs (no text or symbols)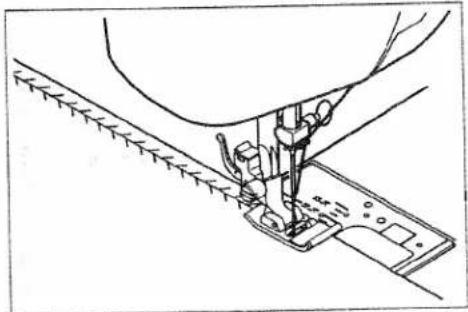
natural_image
Line drawing of a sewing machine needle stitching fabric (no text or symbols)DECORATIVE EMBROIDERY DESIGNS
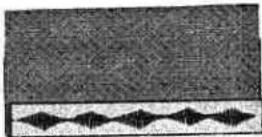
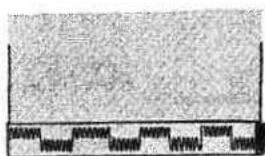
Your Machine will produce a wide range of beautiful decorative embroidery patterns as illustrated on the Stitch indicator panel.
Simply select the design of your choice and proceed to sew, the pattern will be produced automatically. The final effect of each design will depend on stitch length setting.
TIPS ON DESIGN STITCHING
- Always make a practice design on a scrap of the fabric you plan to use.
- Start with a full bobbin and plenty of thread on the spool to avoid running out of thread in the middle of your design.
- Reduce the top thread tension slightly.
- On a very soft fabric you may want to use a stabilizer backing or organdy that can be cut away afterwards.
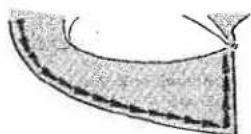
Illustration I : Scallop pattern on collar
Ⅱ : Diamond on narrow hem
III: Domino on bias tape
IV: Arrowhead on lapel
natural_image
Abstract pattern of wavy and zigzag lines with arrowheads, no text or symbols present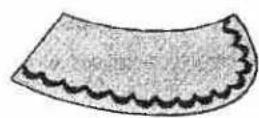
I
II
Ⅲ
IV
BUTTONHOLE MAKING
AUTOMATIC ONE-STEP BUTTONHOLE
(Model 979, 972 only)
- Carefully mark the position of buttonhole on your garment.
- Slide open the button carrier and insert the button.
- Attach the buttonhole foot.
- Place the garment under the foot so that the needle pierces the fabric at the beginning of buttonhole.
- Lower the buttonhole lever and the presser foot lever.
- Push the buttonhole lever away from you.
- Start machine to complete entire buttonhole.
NOTE: When buttonholes are completed, be sure to raise the buttonhole lever as far as it can go.
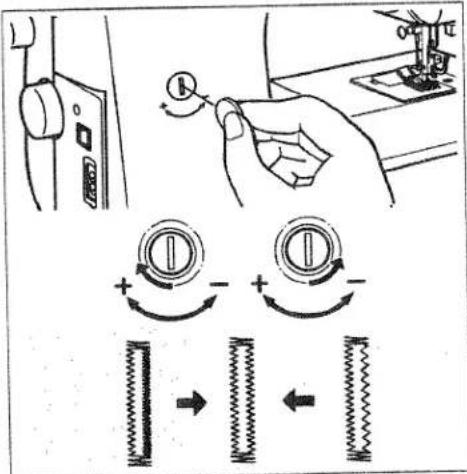
ADJUSTING STITCH BALANCE
Stitch length differences in forward and reverse stitches of the buttonhole are equalized with the buttonhole stitch adjuster.
If the reverse stitches are too close together, turn the adjuster slightly clockwise using a coin as illustrated; if they are too far apart, turn counter-clockwise.
CONFECCION DE OJALES
OJALES AUTOMATICOS
-STEP BUTTONHOLE (Model 970 only)
Bartack 4 or 5 stitches. Stop sewing at the left stitch and raise needle to its highest position.
Stitch forward to the end of buttonhole mark. Stop sewing at the left stitch and raise needle.
Bartack 4 or 5 stitches. Stop sewing at the right stitch and raise needle.
Straight stitch backward until needle reaches beginning of buttonhole.
Stitch forward to the end of buttonhole mark to complete buttonhole.
CORDED BUTTONHOLES
Hook filler cord (crochet thread or buttonhole twist) under the spur/hook at back of foot and pull both ends of the cord forward under the foot in grooves. Sew buttonhole with Zigzag stitches covering the cord.
When completed, release the cord from foot, pull ends of cord forward and snip off extra length.
Illustration I : Spur/hook II : Model 970 only
OJALES CON CORDON
OPTIONAL ACCESSORIES
Optional Accessories described in this section are not supplied with this machine as standard equipment, but can be obtained from the dealer who supplied your machine or by contacting us directly.
STRAIGHT STITCH FOOT
Use this foot when close control is needed according to the type of fabric or stitching procedure.
OVERCASTING FOOT
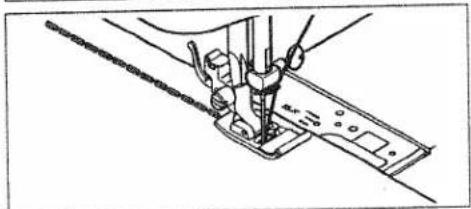
This foot is used to guide fabric when overcasting. Place your fabric under the foot with its edge against the edge guide and start to sew.
Illustration 1: Edge guide
SATIN STITCH FOOT
Satin stitch foot is grooved to permit dense stitching to pass under it easily.
Closely spaced zig-zag stitches are called satin stitches. This is an attractive stitch used for appliqueing, bar tacking.
Slightly loosen top thread tension for satin stitching. Use a backing of stabilizer or interfacing for the sheer materials to avoid puckering.
natural_image
Line drawing of a sewing machine needle stitching fabric (no text or symbols)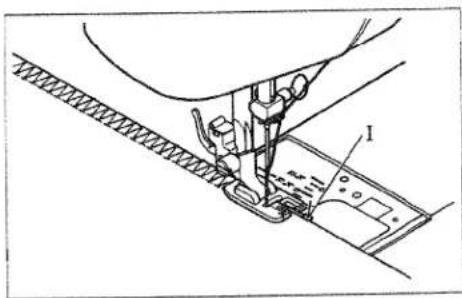
natural_image
Technical line drawing of a sewing machine needle stitching a textured fabric (no text or symbols)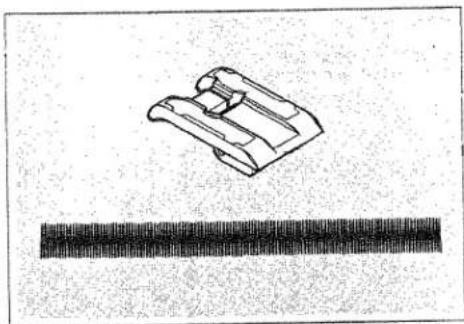
natural_image
Simple line drawing of a mechanical component above a textured horizontal bar (no text or symbols)ROLLED HEMMER
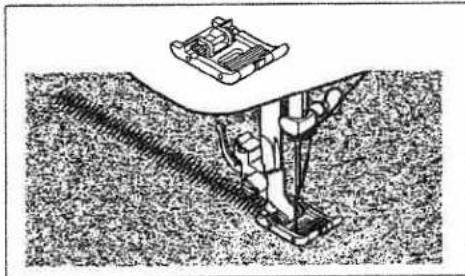
Snap on the rolled hemmer and sew, guiding the fabric into the scroll of the foot.
Rolled hemming is performed with zigzag stitch, narrow hemming with straight stitch.
Illustration I: Scroll
DOBRADILLO RODILLO
When sewing leather, suede, plastic and velvet, fit the roller foot to aid the smooth flow of fabric. However, especially when sewing softer leather and suede, better results may be achieved by using the normal zigzag foot.
BUTTON SEWING FOOT
Snap on button sewing foot and lower feed dogs. Fix the button in place on the fabric with clear adhesive tape. Align two holes of button with the slot of presser foot, and lower the foot to hold the button securely.
Adjust stitch width to the holes of buttons, and take 5 or 6 stitches. Finish sewing with extra 2" (5 cm) of thread remaining. Draw the threads to reverse side of the fabric and tie. When sewing a flat button, place a needle or a pin between the holes of button as shown.
natural_image
Technical illustration of a mechanical device with a base mount and textured surface (no text or symbols)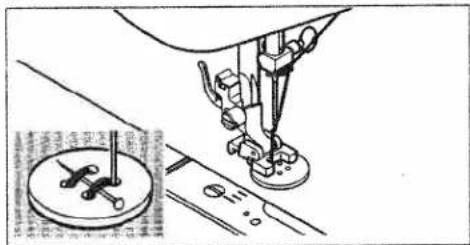
TWIN NEEDLE (Model 979, 972 only)
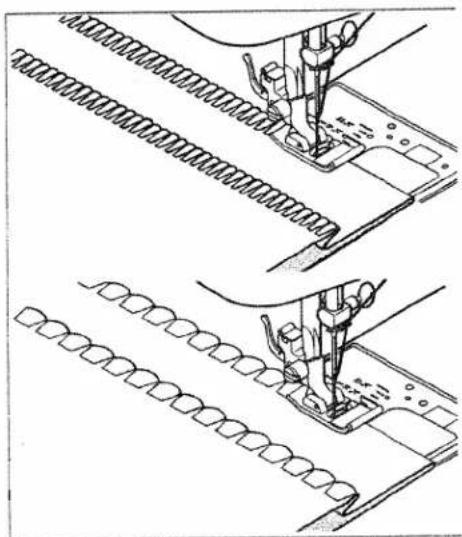
A twin-needle produces two rows of parallel stitches for pin tucks, double top stitching and decorative sewing.
When using twin-needles, the stitch width should never be set above twin needle mark, regardless of the stitch you have selected. Doing so will result in broken needles and possible damage to your machine.
THREADING THE TWIN NEEDLE
- Place a spool on each spool pin. Thread the two threads as one except double thread guides are provided. Draw one thread through each of these and through each needle front to back.
- Pick up bobbin thread as for single needle sewing. Pull the three threads together under the presser foot to the back of the machine, leaving about 6" (15 cm)clear.
NOTE: Needle threader cannot be used to thread the twin needle.
TURNING A CORNER WITH A TWIN NEEDLE
- Use hand wheel to stop stitching with the left-hand needle (the longer of the two) just piercing the fabric. Raise presser foot, turn the fabric by 45° and lower the foot.
- Take one stitch, leaving the left-hand needle piercing the fabric. Raise presser foot, turn fabric by further 45°, lower the foot, and continue sewing.
natural_image
Technical line drawing of a mechanical device with no visible text or symbols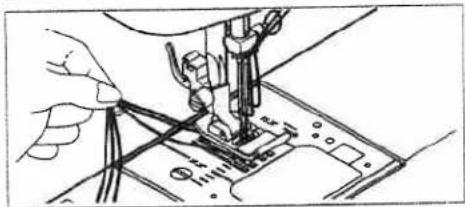
natural_image
Illustration of a sewing machine needle stitching fabric (no text or symbols visible)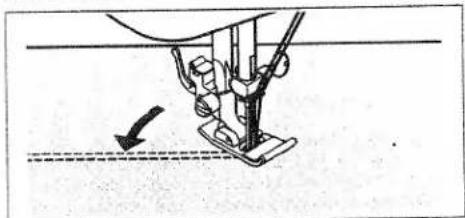
natural_image
Diagram of a sewing machine needle stitching fabric, showing measurement and angle (no text or symbols)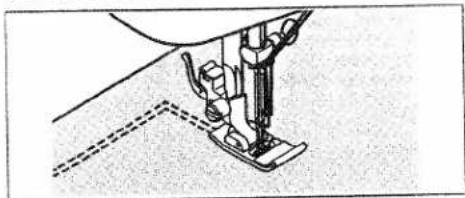
natural_image
Line drawing of a sewing machine needle stitching fabric (no text or symbols)CARING FOR YOUR MACHINE
To ensure the best possible operation of your machine, it is necessary to keep the essential parts clean at all times.
Always disconnect the machine from power supply by removing the plug from the socket-outlet
Cleaning the feed dogs and shuttle area
-
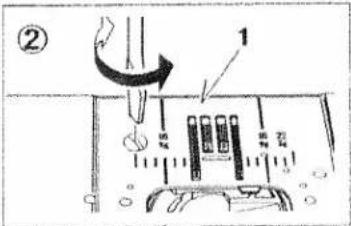
Raise the needle to its highest position.
-
Remove the needle plate (1).
-
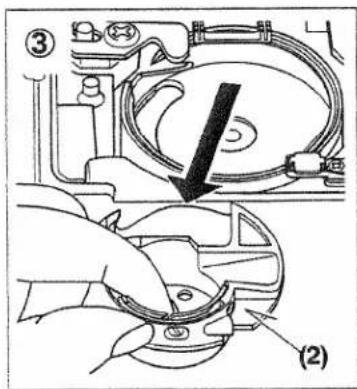
Remove the bobbin case (2).
-
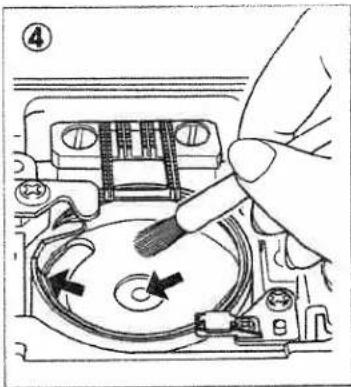
Clean the feed dogs and shuttle area with the lint brush.
NOTE : Put a drop of sewing machine oil on the shuttle race as indicated by the arrows.
- Replace the bobbin case with the projection (3) positioned against the spring (4). Replace the needle plate.
GUIDE SU MAQUINA
natural_image
Hand inserting a screw into a CD-ROM drive (no text or symbols visible)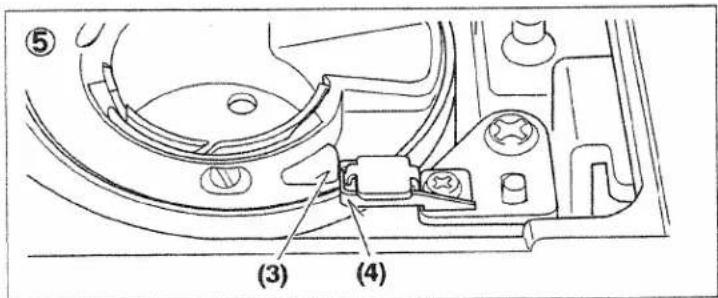
Changing light bulb
Remove the face cover, Unscrew the bulb and firmly screw in a new bulb. Replace the face cover.
Disconnect from main power supply before changing a bulb. Do not use a bulb of more than 15 watts.
CHECK CHART FOR PERFORMANCE PROBLEMS
GENERAL PROBLEMS
Machine does not sew.
*Foot control is not connected. - See page 7
*Power switch is turned off. - Turn on the switch.
Machine jams/knocks.
*Thread is caught in shuttle. - Clean shuttle (see page 41)
*Needle is damaged. - Replace needle (see page 11).
Fabric does not move.
*Presser foot is not lowered - Lower presser foot
*Stitch length is set at 0. - Set it at 1 to 4
STITCHING PROBLEMS
Machine skips stitches.
*Needle is not all the way up into needle clamp. - See page 11.
*Needle is bent or blunt. - Replace needle (see page 11)
*Machine is not threaded correctly. – See page 12
*Thread is caught in shuttle. - Clean shuttle (see page 41).
*Fabric is a certain knit or synthetic. - Use stretch stitch needle
(see page 11).
Stitches are irregular
*Needle size is not correct for thread and fabric. – See page 11.
*Machine is not threaded correctly. – See page 12.
*Top thread tension is too loose. - See page 15.
*Fabric is being pulled or pushed against machine feeding action.
- Guide it gently
*Bobbin has not been wound evenly. – Rewind bobbin.
Needle breaks.
*Fabric is being pulled or pushed against machine feeding action
- Guide it gently
*Needle size is not correct for thread and fabric. - See page 11
*Needle is not all the way up into the needle clamp (see page 11).
THREAD PROBLEMS
Thread bunches.
*Top and bobbin threads are not drawn back under presser foo
before starting seam
- Draw both threads back under presser foot about 4 inches (10
cm) and hold until a few stitches are formed.
Needle thread breaks.
*Machine is not threaded correctly. – See page 12.
*Top thread tension is too tight. - See page 15.
*Needle is bent. - Replace needle (see page 11).
*Needle size is not correct for thread and fabric. - See page 11
Bobbin thread breaks.
*Bobbin case is not threaded correctly. - See page 10.
*Lint accumulates in bobbin case or shuttle. - Remove lint (see
page 41)
Fabric puckers.
*Top thread tension is too tight. - Adjust thread tension (see page)
15
*Stitch length is too long for sheer or soft fabric. - Shorten stitch
length
REPACKING THE MACHINE
Save the packing material for future use. It may become necessary to transport the machine. Improper packing may result in damage during transit. When repacking the machine, follow the instructions illustrated.
VOLVER A EMBALAR LA MAQUINA
natural_image
Technical line drawing of a mechanical assembly with open and closed boxes (no text or symbols)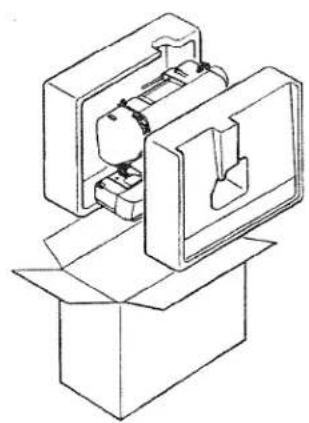
natural_image
Technical line drawing of an open box with internal components (no text or symbols)- CONTENIDO
- "IMPORTANT SAFETY INSTRUCTIONS"
- "DANGER — To reduce the risk of electric shock:"
- "WARNING - To reduce the risk of burns, fire, electric shock, or injury to persons:"
- "CAUTION - Moving parts-To reduce risk of injury, switch off before servicing. Close cover before operating machine."
- "SAVE THESE INSTRUCTIONS"
- FOOT CONTROL (USA only)
- ELECTRONIC MODEL
- ELECTRIC MODEL
- POLARIZED PLUGS CAUTION
- IACHINE IDENTIFICATION
- IDENTIFICATION DE LA MAQUINA
- ACCESSORIES
- ACCESORIOS
- SETTING UP YOUR MACHINE
- FOOT CONTROL
- SAFETY FEATURE OF ELECTRONIC MODEL
- POWER/LIGHT SWITCH
- INTERRUPTOR CORRIENTE/LUZ
- (Electronic model 979 only)
- SEWING SPEED CONTROL
- SPOOL PINS
- PRESSER FOOT LEVER
- INTERRUPTOR AGUJA ARRIBA / ABAJO
- WINDING BOBBIN
- THREADING THE BOBBIN THREAD
- NEEDLE, THREAD AND FABRIC CHART
- Changing the needle
- TABLA DE HILO, AGUJA Y MATERIAL
- SUPERIOR
- USING AUTOMATIC NEEDLE THREADER (Model 979, 972 only)
- PICKING UP BOBBIN THREAD
- RECOGIDA DEL HILO DE LA CANILLA
- ADJUSTING TOP THREAD TENSION
- STRAIGHT STITCHING
- ZIGZAG STITCHING
- BOBBIN TENSION
- AJUSTE DE LA TENSION DEL HILO SUPERIOR
- COSTURA RECTA
- CHANGING PRESSER FEET
- CAMBIO DEL PIE PRENSATELAS
- CONTROL DE DIENTES
- STITCH SELECTOR AND INDICATOR
- SELECTOR E INDICADOR DE PUNTADAS
- CONTROL LARGO DE PUNTADA Y PUNTADA SUPER (ELASTICA)
- SUPER(STRETCH) PATTERN GROUP SELECTOR (Model 979 only)
- PRESSURE REGULATOR
- STITCH WIDTH CONTROL
- SELECTOR ANCHO PUNTADA
- CONVERTING TO FREE-ARM SEWING
- CONVERSION PARA LA COSTURA CON BRAZO
- PUNTADA RECTA
- REMOVING FABRIC
- SACANDO EL TEJIDO
- GIRO EN ESQUINAS EN ANGULO RECTO
- INSERTING ZIPPERS AND PIPING
- SETTING
- INSERTING ZIPPERS
- PIPING
- WARNING
- ZIGZAG STITCH
- OVERCASTING
- SATIN STITCH
- ZURCIDO
- BLIND STITCH
- PUNTADA INVISIBLE
- THREE-STEP ZIGZAG
- ZIG-ZAG DE TRES PUNTADAS
- PUNTADA DE ACCION DOBLE
- LINGERIE STITCH
- SEAM AND OVERCAST IN ONE
- SHELL HEM
- PUNTADA DE LENCERIA
- :AGGOTING
- STRETCH STITCHES
- ADJUSTING STRETCH STITCH BALANCE
- RIC-RAC STITCH
- FAGOTING (Diente de rata)
- OVERLOCK STITCH
- SLANT OVEREDGE STITCH ^ 7
- SMOCKING STITCH
- PUNTADA OVERLOCK
- FEATHER STITCH
- PUNTADA PLUMA
- PUNTADA OVERLOCK ELASTICA
- PUNTADA SURF
- DOUBLE OVERLOCK STITCH
- PUNTADA OVERLOCK DOBLE
- STRETCH PATCHING STITCH
- PUNTADA ELASTICA DE PARCHES
- PUNTADA ESPIGA
- DECORATIVE EMBROIDERY DESIGNS
- TIPS ON DESIGN STITCHING
- BUTTONHOLE MAKING
- AUTOMATIC ONE-STEP BUTTONHOLE
- ADJUSTING STITCH BALANCE
- CONFECCION DE OJALES
- OJALES AUTOMATICOS
- -STEP BUTTONHOLE (Model 970 only)
- CORDED BUTTONHOLES
- OJALES CON CORDON
- OPTIONAL ACCESSORIES
- STRAIGHT STITCH FOOT
- OVERCASTING FOOT
- SATIN STITCH FOOT
- ROLLED HEMMER
- DOBRADILLO RODILLO
- BUTTON SEWING FOOT
- TWIN NEEDLE (Model 979, 972 only)
- THREADING THE TWIN NEEDLE
- TURNING A CORNER WITH A TWIN NEEDLE
- CARING FOR YOUR MACHINE
- Cleaning the feed dogs and shuttle area
- GUIDE SU MAQUINA
- Changing light bulb
- CHECK CHART FOR PERFORMANCE PROBLEMS
- GENERAL PROBLEMS
- STITCHING PROBLEMS
- THREAD PROBLEMS
- REPACKING THE MACHINE
- VOLVER A EMBALAR LA MAQUINA
Brand : White
Model : W979
Category : Sewing machine